Miui Installation Guide
Milind | Pl2 ツ
(aka the "haha MIUI is such a garbage ROM you have to use a special snowflake installation" method for installation via vanced manager)
Table of contents
- Guide for disabling MIUI optimization
- Non-root installation guide
- Root installation guide
- Download links
- Vanced support links
- Other links
Guide for disabling MIUI optimization
- If you're on Official MIUI 12.5 Enhanced OR newer MIUI made by Xiaomi.EU then you don't have to do this. However, if you are still not able to install and facing the same MIUI optimization error issue, you can follow this guide normally.
- For any MIUI user not on the said version/variants, Installing vanced microG, Vanced, or YouTube Music Vanced via vanced manager or Split Apk Installer (SAI) requires you to disable MIUI optimization first. Otherwise, you will be unable to install any app and will receive a similar error like below: ⬇️


Or when updating from old vanced version to new, this error will come;

⬇️ Instruction manual: ⬇️
STEP 1. Open system settings.
STEP 2. Tap on the About phone(as shown in the picture below).

STEP 3. Now tap on the MIUI version until it shows "you are now a developer". That is, it unlocked developer options.

STEP 4. Go back to the settings main menu and navigate to the "additional settings" (as shown in the picture below).

STEP 5. Now, you can see the "developer options" and tap on them.

STEP 6. Scroll down to the bottom and there you will find the "MIUI optimizations".

STEP 7. Allow a warning and disable it.
STEP 8. Now you can proceed to use Vanced manager[OPTION A] or Split Apk Installer(SAI) [OPTION B] whatever you prefer for vanced installation.
- Certain MIUI global variants have hidden MIUI optimization settings in developer options due to an update. To restore MIUI optimization, repeatedly tap "Reset to default values" until it appears. {Video tutorial} ⬅️
- If the said setting is greyed out for you, Go to device Settings > Additional Settings > Languages & input, then Autofill service & set it to Google. Now you can go back to Developer options and the Auto-fill section will be enabled.
- If you still can't tap on "reset to default values", make sure you are not using "battery saver" if you are please turn off battery saver mode then reboot the device (mandatory) and it will work.
- If you're on Official MIUI 12.5 Enhanced OR newer or if you are a Xiaomi EU user, you need to make sure you are on 20.2.20 or later then you don't have to disable MIUI Optimization. However, if you are facing an MIUI optimization issue, read the next point.
- For EU ROM users who are on a version lower than the version described above or still facing optimization issues even on 20.2.20+ builds, since the MIUI optimization feature is not available for you, you have 2 ways:
Either use the adb command "setprop persist.sys.miui_optimization false" via a PC to disable MIUI Optimization so you can go and use Vanced Manager/SAI or use option C or D below.
NON-Root Installation
There are four methods available for you to install Vanced applications. They are listed below:
- Using Vanced Manager [Follow OPTION A]
- Using Split APK Installer(Normal mode) [Follow OPTION B]
- Using Split APK Installer(Shizuku mode) [Follow OPTION C]
- Using PC with adb installation (in simple terms, users who can't able to use manager and SAI due to compatibility issues/downloading issues/etc) [Follow OPTION D]
OPTION A: Using Vanced Manager
- This method requires you to disable "MIUI optimization" first without which you CAN NOT install vanced applications via vanced manager. (This can delete all permissions for apps, proceed at your own risk)
- Download Vanced manager from our official Vanced site.
- Tap on the blue arrow from the bottom right
- Begin with installing Vanced microG first then Vanced (or Youtube music vanced) whatever you were planning to install.
- Enjoy
{The link for a guide to disable MIUI optimization is here}
After installing Vanced, you can choose to enable "MIUI optimization" back again or keep it as it is.


OPTION B: Using Split Apk Installer(SAI) normal mode
- This method also requires you to disable "MIUI optimization" first without which you CAN NOT install vanced applications via SAI. (Disabling optimization can delete all permissions for apps, proceed at your own risk)
- Install vanced microG latest available using Vanced Manager or using manual links provided here.
- Open SAI and check that the "
signed APK" option is disabled in SAI settings. - Proceed with the installation of Vanced using the files you need.
- Enjoy Vanced
{The link for a guide to disable MIUI optimization is here}
{Download links for both apps can be found here}
OPTION C: Shizuku method (Needs pc with adb installed)
- Install Shizuku from here following all instructions carefully.
- Enable Shizuku Mode from "installer" in Split Apk Installer(SAI) settings.
- First, install vanced microG using a manual APK file or using vanced manager.
- Download the vanced files using the MediaFire v15 link and install using SAI.
- Enjoy!
{Download links for both apps can be found here}
OPTION D: ADB installation (Needs pc with adb installed)
- Download the necessary Vanced files using the download links below.
- If you have downloaded it as a ZIP file, you have to extract them.
- Place all such files in one folder.
- Run this command while connected to your phone: "
adb install-multiple black.apk split_config.arm64_v8a.apk split_config.en.apk". - Install Vanced microG manually on your phone.
{Download links for both apps can be found here}
NOTES:
- If you want to install a language other than English, download the required APK file for it and change the command in the end. (for example
split_config.de.apk) - If you want to install Dark instead of Black, replace
black.apkwithdark.apkin the command.
Root Installation
For installation of vanced (or YouTube Music Vanced) root variant, you get 2 ways:
- Non-manual installation using the Vanced manager or SAI app
- Manual installation by following old school or epic root method
A) NON-MANUAL INSTALLATION:
There are 2 methods available, choose any you find comfortable.
- Using Vanced manager
- Using Split Apk Installer
IF USING VANCED MANAGER
NOTE: With the new manager from v1.3.1, you don't need to disable apk signature verification anymore.
- Deactivate MIUI OPTIMIZATION in Developer Options (Disabling optimization can delete permissions for your apps, proceed at your own risk). See the guide on how to disable MIUI optimization using this link.
- Download and install Vanced Manager using this link.
- Grant root permission by tapping on the magisk/root icon from the middle to use root installer mode.
- Begin installing Vanced (or Music Vanced)
- Profit!


IF USING SPLIT APK INSTALLER
Some IMPORTANT information to read first:
- ⚠️⚠️⚠️Unfortunately, the same method won't work after version 15.43.32. Hence, it is advised to use the vanced manager or follow the epic root method under manual installation.⚠️⚠️⚠️
- To install Vanced using Split Apk Installer(SAI) app, it's mandatory to disable "APK signature verification". It will not work without it since starting v15 Google has switched to a new signature scheme. You can use Xposed with CorePatcher or Lucky Patcher(Yellow smiley face app) to disable it.
- Some ROMs include a feature to spoof signature and a lot of users mistake it as apk signature verification. It's not the same thing and it won't help you.
Let's jump to the process for installing Vanced:
- First, disable the APK Signature Verification. THIS IS A COMPULSORY STEP SO DON'T EVER THINK TO SKIP it. Instructions for both the Xposed and Lucky patcher methods can be found after this process.
- After disabling signature verification, download and install the Split Apk Installer app.
- Download the necessary files for Vanced root variant.
- Open Split Apk Installer and configure it with "
Root mode" and make sure "Sign APK is turned OFF". - Locate the files using the picker and begin the installation.
- Enjoy!
{Download links for both apps can be found here}
➼ INSTRUCTIONS for Lucky Patcher:
- Go to magisk manager settings and turn on "
core only mode" and reboot. (If you are on magisk canary, then you can skip this step but we don't guarantee it will patch. if it did, 👍) - Install the yellow smiley face app(LP) and give it all the permissions.
- Click on toolbox -> Patch to android -> disable ".apk signature verification" only. This option would be the 2nd one. [Dont select any other options & untick Dalvik cache]
- It will reboot automatically. If it looks stuck, don't panic, let Yellowman do changes and it will reboot.
- Come back to the yellow app and check. It should now say 'patched' below the .apk signature verification option and say either 1/2 or 2/2 on the first patch.
- Now install "Vanced" as you would using SAI.
WARNINGS:
- If you don’t want to/can’t install Xposed, then you can use Lucky patcher to install vanced.
- If you want to uninstall the Yellowface/Smiley face app after installing vanced, better revert the patches you applied first(tick first red colour option of core.jar from the same dialog and hit apply) then uninstall yellow man.
➼ INSTRUCTIONS for Xposed + CorePatcher:
- Install "Riru" from Magisk Module Repo in Magisk Manager.
- Install EdXposed Manager's latest available apk from GitHub (link here).
- Download the YAHFA or Sandhook canary zip(choose one from it) from EdXposed Manager and flash in Magisk Manager and reboot. (Download the canary release and make sure you're on the latest Magisk Or you may experience a boot loop).
- Install CorePatcher(核心破解) app (direct link can be found here). Then toggle the module in EdXposed and reboot your device.
- Open the Corepatcher app, configure and enable the "third option" from it to disable "APK signature verification".
NOTES:
- After installing vanced, if you want to remove all these apps and modules, first revert the toggles of the corepatcher you did and uninstall modules and app one by one.
- To fix SafetyNet, enable signature verification back again then uninstall all Xposed modules and apps you installed above. After this, clear Google Play Services data and reboot device.
B) USING MANUAL INSTALLATION:
There are 2 methods available, choose any you find comfortable.
- Follow New Epic Root Method
- Follow Old School Method
INSTRUCTIONS FOR Epic Root Method
- Install the stock official YouTube app of the same version as vanced as app update (like you install a normal app, not a system app).
- Download the vanced files from the links given here and extract the zip to someplace.
- Replace vanced
base.apkinto/data/app/com.google.android.youtube(replace me). Rename "theme".apk to "base.apk". - Run this command via the terminal app in root mode. "
chcon -R u:object_r:system_file:s0 /data/app/com.google.android.youtube(replace me)/base.apk" - Force stop YouTube and Vanced will be installed.
How youtube stock app name looks like(for replaceme in step2)
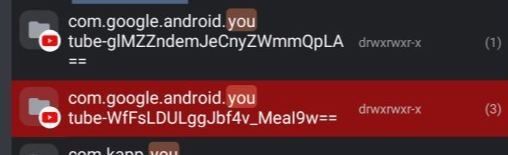
⚠️Some extra info related to New Epic Root Method⚠️
- No LP or Xposed is required.
- Replace (replace me) with the string you see in the folder name from - to ==. Check the image
- For step 3 use any emulator from the play store to run the command(can skip the step if you are on permissive SELinux always).
- You can get a vanced base APK from Mediafire/afh from links down below. Base apk is just a theme APK.
- If the vanced app uninstalls/vanishes after rebooting the device, install the vanced app using the old method. This happens only for a few users and there's no workaround for it yet.
INSTRUCTIONS FOR Old School Method
⚠️⚠️⚠️Unfortunately, the same method won't work after version 15.43.32. Hence, it is advised to use the vanced manager or epic root method.⚠️⚠️⚠️
Since Vanced is in split apk form, it's really hard to integrate it, so you have to follow these steps one by one carefully.
Note: Though we download it for arm32, it'll work on arm64 too without any bugs. You can still Download for arm64 directly.
- Disable APK signature verification first. Use services.jar patch if you don't have access to the ROM source or use any method from above.
- Download the required vanced files for legacy|root from Mediafire/afh links down below and copy all files to
/system/app/YouTube/. - Extract the lib folder from the"
split_config.armeabi_v7a.apk" and copy to/system/app/YouTube/lib/. (rename lib/armeabi-v7a to lib/arm) - Rename
YouTube_*.apk/theme.apkto "base.apk". - Finally, check for all files. You should have the following files in /system/app/YouTube/base.apk, /lib/arm/ with all *.so files, split_config.language.apk for your language. You can remove all other files that aren't required.
- Reboot. If you've done everything, Vanced will be installed as a system app.
{Download links for both apps can be found here}
Download Links
Taken down
⚠️For any issues, read our troubleshooting and FAQ.⚠️
Vanced support links
You can ask for support if you face any difficulties on either of the following platforms:
Other links
For all other vanced help guides and troubleshooting, check below:
- Vanced installation guide for v15 and above
- Vanced troubleshooting
- Vanced FAQ
- Vanced music
- Information regarding TOS, privacy, piracy
Google has officially removed support for any version below v15. Hence, any download links or installation method has been removed and you all are recommended to update to a newer release to enjoy new features.