Actions Types in MenuBuilderBot EN
MegaHubTelegram
The @MenuBuilderBot constructor allows you to configure any button in your bot to perform an almost unlimited number of actions ones it is clicked by the user.
The functionality of the Actions is extensive and flexible in a way of its application, therefore, the description of all the nuances of working with it is a huge and rather tedious document, which, however, you must be familiarized with. If this is the first time you trying to familiarize yourself with it, just read it in its entirety. In the future, to clarify the details, you can refer to its separate parts as a reference. In this document, we will talk in details about the types of Actions.
📜 The translation of this materials into your native language can be automatically done using the Google translator. Follow the link and select the desired language in the title:
https://translate.googleusercontent.com/translate_c?depth=1&sl=en&tl=es&u=https://telegra.ph/Actions-Types-in-MenuBuilderBot-EN-03-01
⬛ Table of Content

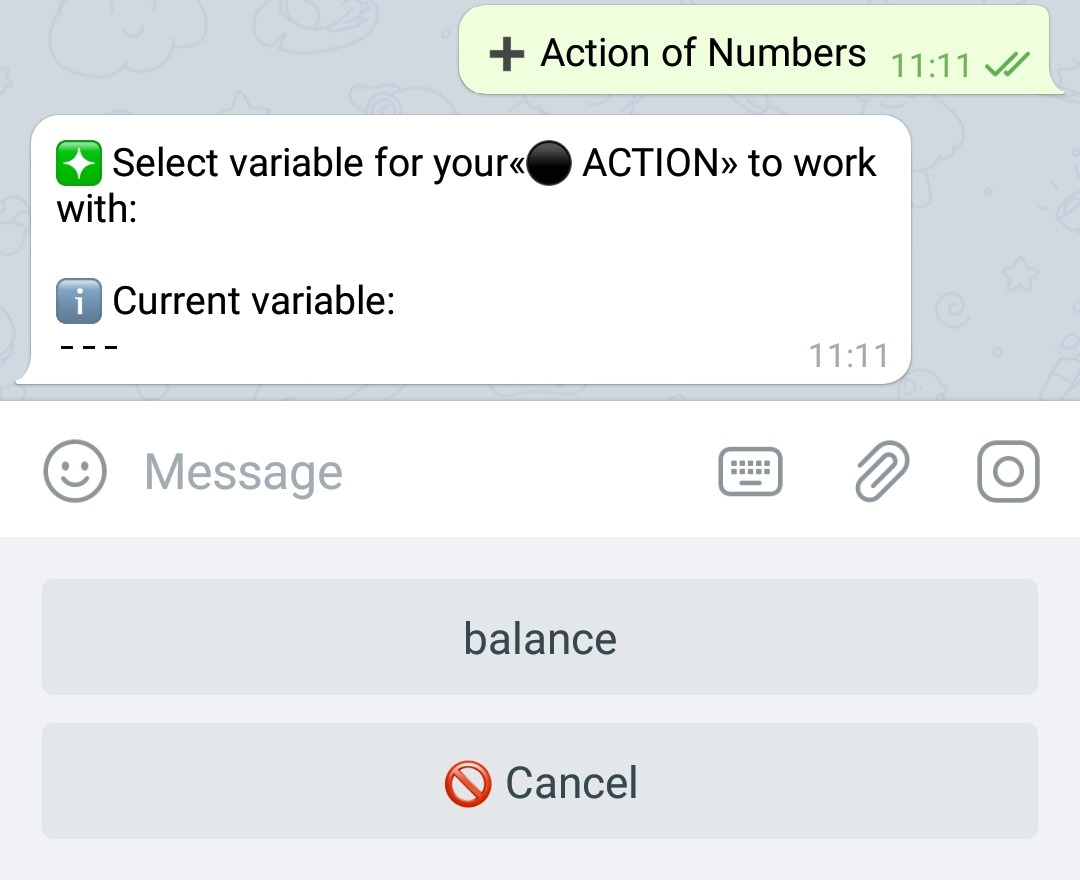
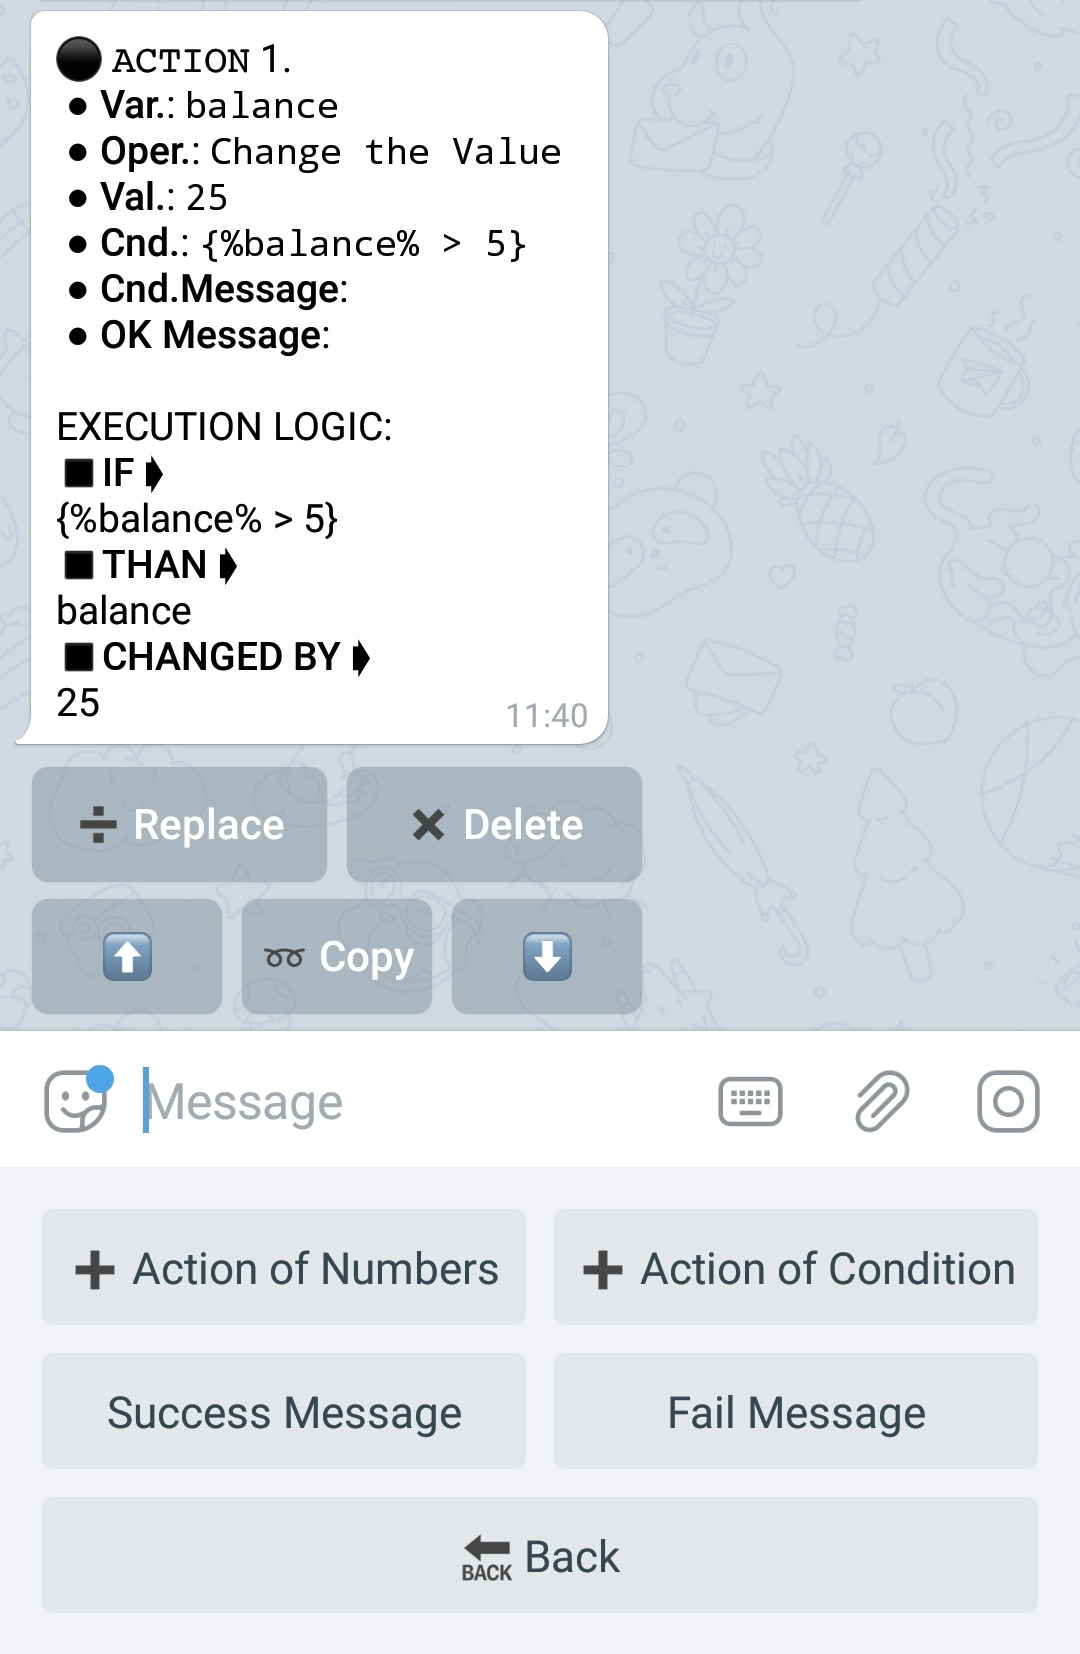
⬛ Action of Numbers
«Action of Numbers» allows you to perform operations with variables. Subtract, add and carry out other mathematical operations. For more complex calculations you can use «Expressions» (for the Guide on «Expressions», see the «Additional Information» section at the end of the document).
As we have already indicated above, Actions are added to buttons and are executed in order (from top to bottom) once the button is pressed.
Choose «Action of Numbers»
Next, specify the variable for your Action to work with.
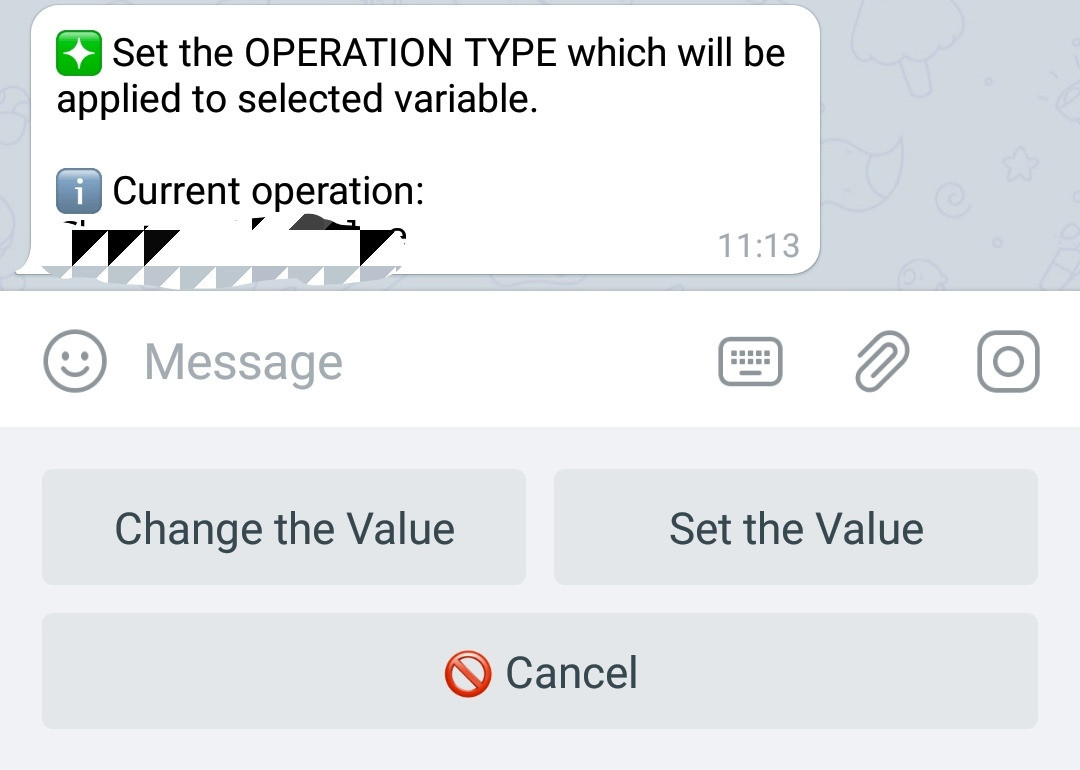
Select one of the Operation Types.
For the convenience of working with data when Action is executed, you will be asked to use one of two types of operations:
1. «Change Value» - in this case, the value you specify will be added (or subtracted with a negative value) to the existing value of the variable.
2. «Set Value» - in this case, the value of the variable will be set equal to the value you have specified for this Action, regardless of the variable original value (the data existed in the variable before, will be erased).
The following data can serve as Action’s specified value:
1. Regular number (Any natural number, as well as decimal or negative)
2. Macros of a variable (the same of another one). The appropriate plug-in must be purchased for the bot in order to use it, see the «Additional Information» section at the bottom of this document.
3. An Expression containing Numbers and/or macros. he appropriate plug-in must be purchased for the bot in order to use it, see the «Additional Information» section at the bottom of this document.
4. Macro or Expression containing Macros and «Time» Functions. The link to the «Time» variable guide will be in the «Additional Information» section at the end of the document.
In this mode Action of Numbers can work with Date and Time variables. Using expressions or functions, necessary values can be assigned to these variables, including it is possible to "add" time to the time that already set in the variable.
For example the expression:
will calculate and set the date 3 months later than the one existing in the tvariable.
Read more about Date and Time variables in the manual.
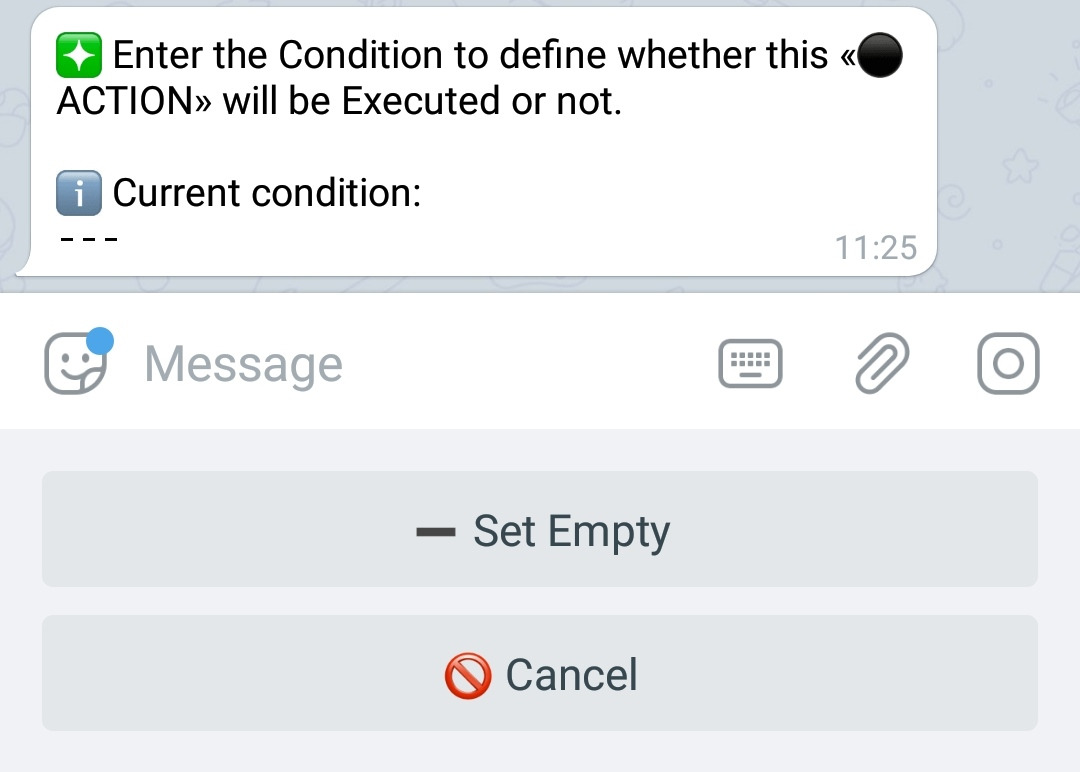
After that (if the «Conditions for Buttons» plugin is purchased in your bot), you will be prompted to enter a condition under which this Action will work. You can also set the appropriate messages in case of failure to fulfill this condition. The «Condition» is always the «Expression». Read more about Expressions in the corresponding manual.
If the individual condition of the Action which introduced here is not fulfilled, this is not an error, just this particular Action will not work. The chain of actions will not be interrupted and will continue its further execution.
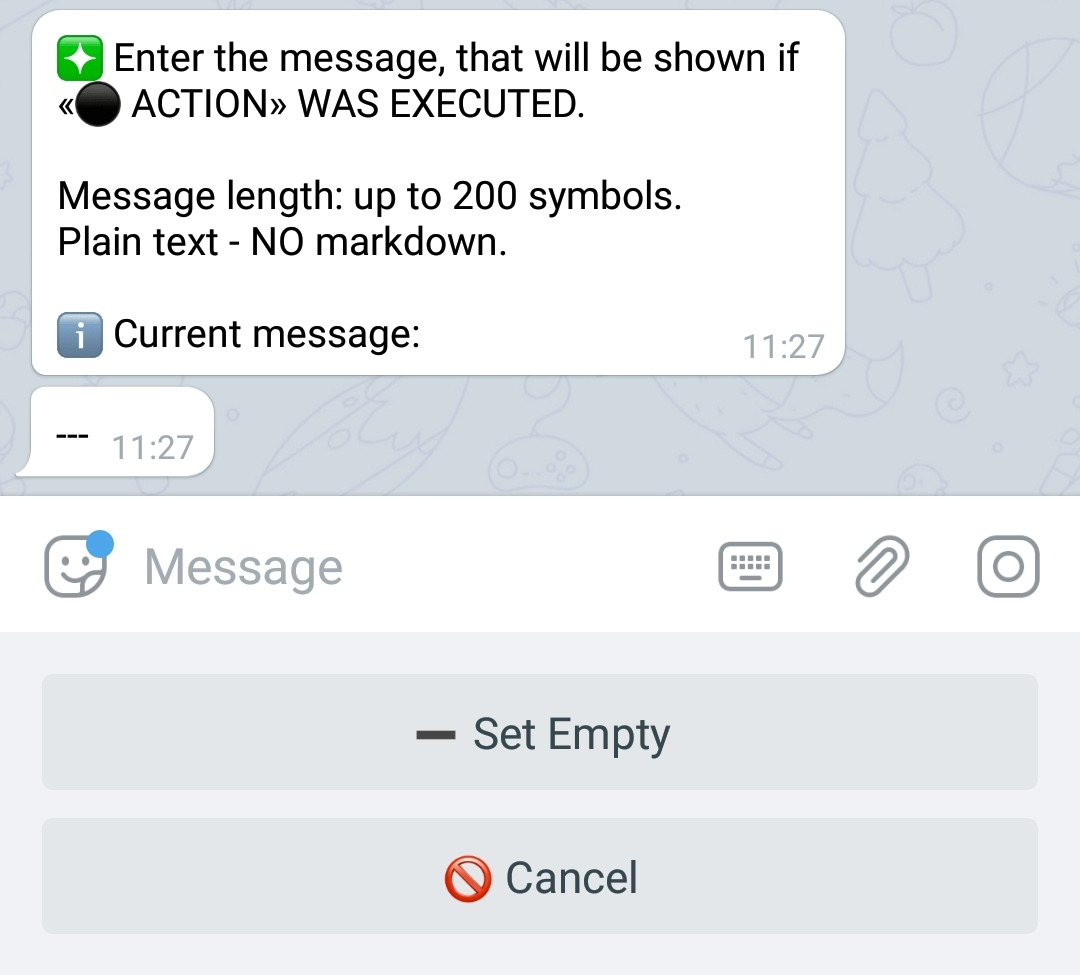
It is not mandatory to enter the Condition itself and its messages, click «Set Empty» if you do not need them in this case.
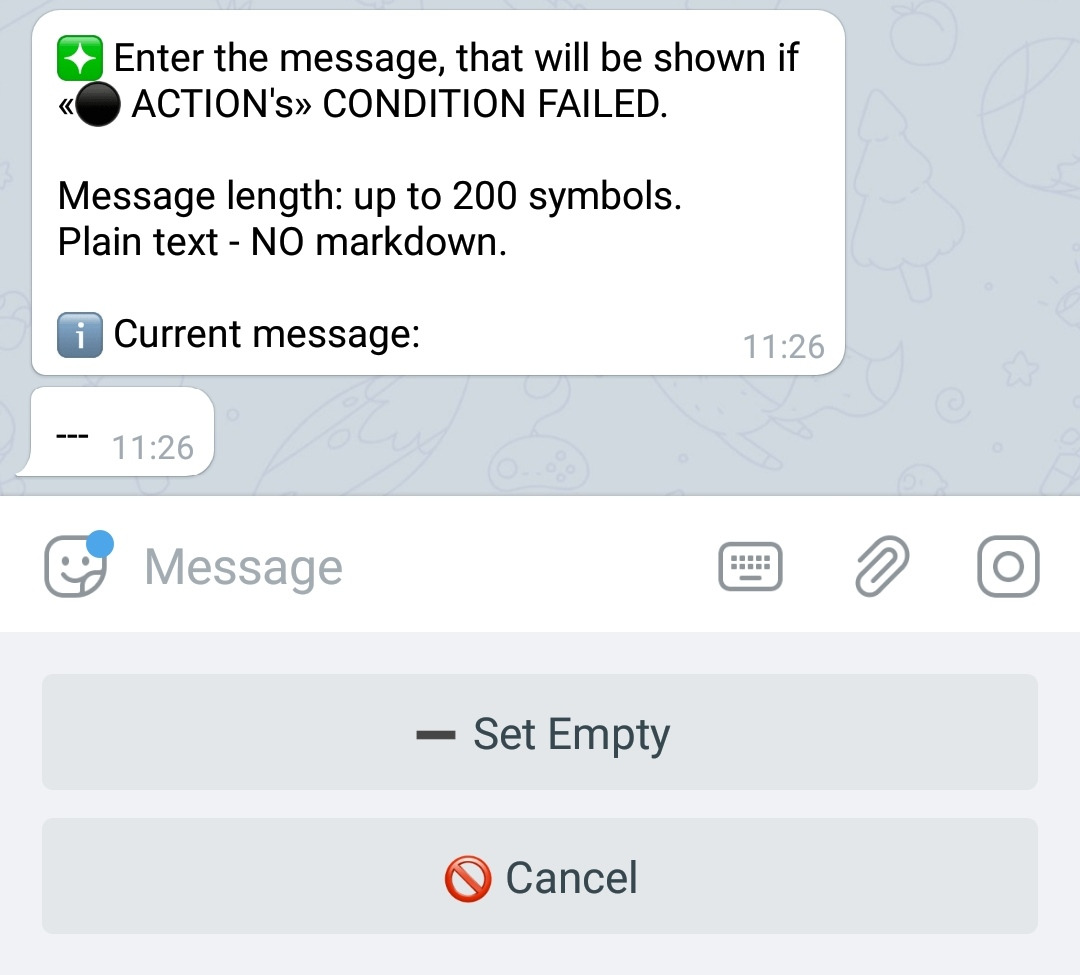
Next, you will be prompted to enter a message in case the Condition is not met. It is not mandatory to enter a message about the success of the execution, click «Set Empty» if you do not need it in this case.
Next, you can enter a message that will be shown to the user in case of the successful execution of the Action.
In this post, special macros are available to show the changes that Action makes to the variable. Especially useful when using random or inconsistent accrual amounts. To do this, use a combined macro:
where "varname" is the name of the variable that has been changed and which amount of change you want to display.
Please note that these macros can also be used in the «Expressions» of the Action itself.
Here is an example (although using expressions is not the topic of this guide).
Let's say you have 2 Actions:
Action 1. balance = {-1 * randi (10, 200)}
Action 2. invest = {1 * %balance_v%}
as a result, the “invest” variable will be added with as much amount, as MUCH the balance has been changed for.
These macros can also be used in GENERAL messages about the success or failure of the entire chain of Actions.
It is not mandatory to enter a message about the success of the execution, click «Set Empty» if you do not need it in this case.
After that, a new Action will be created and its data will appear as a message with inline control buttons in the chat with the bot.
⬛ Action of Conditions
«Action of Conditions», unlike the individual conditions of each Action, allows you to interrupt the further execution of the entire chain of Actions if its condition is not met.
Please note that the place in the chain of Actions where «Action of Conditions» being placed, will define the moment of its possible interruption. All previous Actions will be executed, all subsequent ones will be not.
The creation of this Action is similar to the previous one, you will be asked to add the Condition itself that needs to be checked. The «Condition», as it is in the previous case, is always an «Expression».
Then you need to enter a message that will be displayed if the Action Condition is not fulfilled (Error message). It is not mandatory to enter this message, click «Set Empty» if you do not need it in this case.
Sometimes, when adding a Condition and this Action, difficulties arise in understanding the mechanics of its operation, which does not allow us to clearly predict at what particular moment this Action will trigger. In the "Manual on Conditions" there is a small section that may facilitate understanding, in addition, there you can find out all the nuances of working with the Conditions.
The button in which Actions are added, in the vast majority of cases, will contain its own messages, the information for which this button was actually created for. In this regard, it is necessary to determine the behavior of the button itself in case of non-fulfillment of the condition.
Here you will have two options:
1. You can let the button show its added messages to the user, despite the non-fulfillment of the Condition.
2. Or forbid it to show its messages in case of non-fulfillment of the Condition.

For each of the options, there are many ways to apply.
⬛ Action of Referrals
«Action of Referrals», is designed for accruals to the Referral Parents of the user who pressed the button with this Action.
Accruals (of rewards) are going to the variable specified, in a form of a percentage of the number you have specified (you can also use the variable’s macros if you have purchased the appropriate plug-in, see «Additional Information» at the end of the document). The percentage can be specified for each level of the referral system. One level is available by default. But with the help of extensions, it can be increased to the required size, creating multi-level referral systems.
The creation of this Action is similar to the two previous ones.
You indicate the Variable where the Accrual of reward for each level should go, then the number of accruals itself, the percentage of which should be rewarded along the referral system.
Please note that the number itself, that you have specified as an “accrual starting point” will not be credited (added) to anyone, because it only serves as a reference point for calculations.
The next step will offer you to specify the amount of reward for each level.
The reward is indicated in a column, for each level from a new line. Each number is the amount of percent from the original number you have specified. In order for the distribution of referral rewards to have a natural look, the amount of reward percentage must decrease with each new level. Although in some cases there may be exceptions.
For example:
20
10
5
On top, you can see the setting for a three-level referral system where the rewards are 20%, 10%, and 5% for each level, respectively.
Down, on the picture, there are settings for accruals of 10%, 1%, 0.1%. Note that the "." (period) is used to separate decimal values.
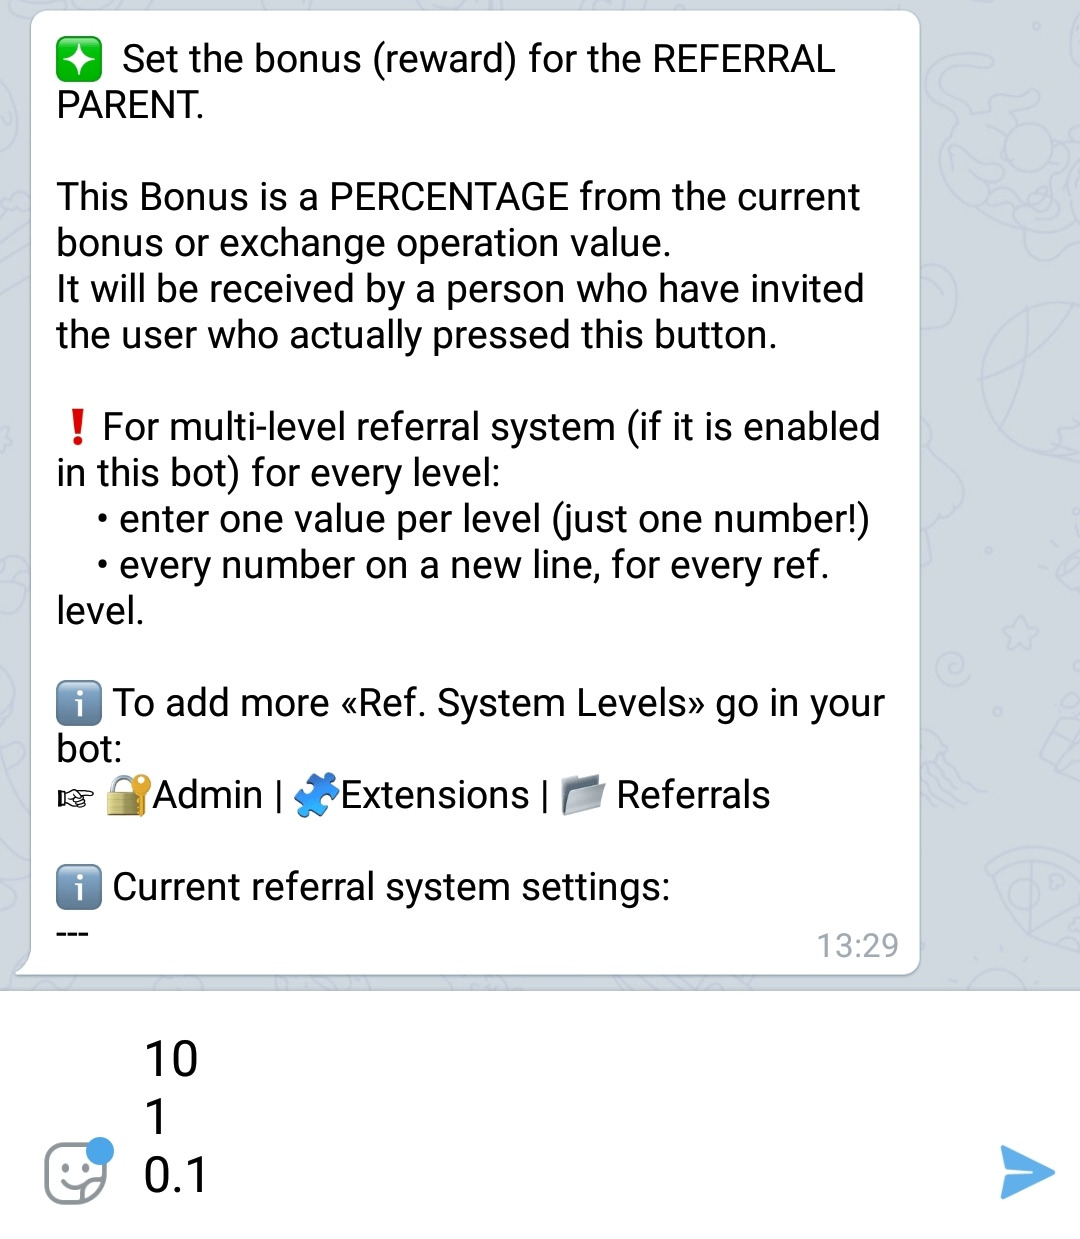
The number of referral levels for which your accrual is indicated (and thus distributed) may be less than the actual number of referral levels in your system. However, the first number will always correspond to the first level, the second number to the second level, and so on.
Please note that the number of “Operations” for such an Action is considered according to the number of actual accrual actions, and therefore it is directly related to the number of referral parents of the user for whom the particular accrual takes place.
If the «Conditions for Buttons» plugin is purchased in your bot, then you will be asked to enter a condition under which this Action will work. You can also set the appropriate messages in case of failure to fulfill this condition. We remind you that the “Condition” is always the “Expression”. Read more about Expressions in the corresponding manual.
If the individual condition of the Action introduced here is not fulfilled, this is not an error, just this particular Action will not be executed. The chain of actions will not be interrupted and will continue to execute further.
It is not necessary to enter the Condition itself and its messages, click «Set Empty» if you do not need them in this case.
⬛ Action of Initialization
«Action of Initialization» allows you to set the initial value of any variable. In this case, the variable must be either new and never used by the user, or empty - cleared to its original state.
INFO: For example, you can use it for Time Variable. The point is that the new Time Variable will always show the current time, which is sometimes leads to unpredictable results in expressions. So, this function is used to set a specific value for this variable – intialize it to prevent it from showing current time. In addition, it can be used for the initial accrual of any amount to the user. When added to a button, this Action will be triggered only once and will make only one charge to a variable - after which, it will no longer work for this user.
1. When creating this Action, first you will be asked to specify a variable, the variable this Action will later "initialize" (that is, change it once).
2. Then, of course, you need to specify the value that will actually be assigned to the variable.
3. After that, you can specify a message that will be shown to the user, proving that this action has worked. It is not necessary to indicate the message, you can leave it blank if you do not want to inform the user or let him know that some data has been changed.
This completes the creation of this action.
The nuances of working with Action of Initialization.
● This Action with works only if the variable that it changes is absolutely empty. That is, it is either just created and, for this reason, has no value in it, or it has been cleared by commands like
/varclearall and /vardel and is empty for this reason (more info regarding these commands you can find in Variables Manual). After clearing the variables with these commands, Action of initialization will work again.
● For the Numeric Variables, zero is also a value and Action will not work. So making Action work by assigning 0 (zero) to a numeric variable will not work.
● This Action works with Numeric, Text and Time variables. Does NOT work with Global.
⬛ Action of Commands
This Action allows you to refer to any button by its command, with all the corresponding consequences. Including transferring the user to the desired menu - if the command of the button itself is configured accordingly. You can read more about working with commands in the guide on commands.
It can be used for non-linear menu navigation. Including, if necessary, create for the users impression of a dynamically changing menu, when the user gets a different result by pressing the same button. This mechanic is described for inline buttons in "LifeHack #4" (see this guide by the link), but now such approach can be used for regular buttons as well.
1. When creating this Action, you must first enter the command that this Action should send. This command belongs to the button whose functionality you want to access using this Action.
INFO: Please note that if you need to transfer the user to the menu of the button you are referring to, then you need to remember that this action is configured within the button itself, when adding a command. For that being said, the button itself determines whether it is necessary to transfer the user there. Action - only accesses this button by its command.
2. After adding a command, you will be prompted to enter a Condition for triggering this Action. This is optional and depends on needs of your specific situation.
3. As in all previous cases, after adding the Condition, you will be prompted to enter a message in case the Condition is not met - an error message.
4. Next, you need to determine whether the command transition will interrupt the further execution of the remaining Actions in the list below. By default, execution will be aborted. If you change this setting and allow execution, then after the transition and completion of all possible actions in the destination button, the bot will return to the execution of the remaining Actions in original button.
4.2. In addition to interrupting the execution of the following Actions, at the same stage, you can tell the bot whether, after completing all the actions associated with the transition by command, bot also has to show the message of the button from which the actual transition was made.
This completes the creation of the "Command Action".
Nuances of working with Action of Commands:
The maximum number of consecutive automatic transitions by command is 5 (five).
⬛ Action of Transactions
This Action allows your users to make changes by increasing or decreasing the values of each other's variables. To be more specific, Action will allow users to make transfers of certain digital assets inside the bot. To make in more simple - transfer money to each other or tokens that are, for example, on their balance. However, money transfers are only a small part of the spectrum of possible ways to use this functionality. When creating a function with the participation of this Action, the user can be given a choice of the amount, or it can be rigidly set.
At the same time, whether funds will be added or taken away will be determined by the admin when setting up this Action. The user can NOT choose the sign (+/-) of the amount that he sends.
INFO: Regardless of what number he specifies for the transaction, the sign will be determined by the admin when composing this Action, and the number sent by the user, positive or negative, will always be turned into positive before being added to (or processed by) the formula specified by the admin.
The user can be given the choice of the addressee, or it can also be rigidly set. Everything will depend on the specific circumstances and objectives.
1. When creating, first of all, you need to specify the variable that the Action data will change. This is a variable on the recipient side, that is, you specify the recipient variable to be changed.
2. After that, the bot will ask you to specify the amount of change.
Depending on your tasks, you can:
● rigidly to set this amount - just by sending required number to the bot.
● specify the macros of a digital variable that will contain the amount and from where this amount should be taken. Moreover, this variable can be both global and individual. In the case of an individual variable, you can create a form in advance and, by entering a variable, allow your user to set the value of this variable himself. Thus, the user can choose the amount to transfer by himself.
● you can make the variable positive or negative - to do this, put a minus sign in front of the sum (or before the macro of a numeric variable). In this case, the amount will be taken away from the addressee.
3. Next, the bot will ask you to specify the user ID whose variable you want to change. This identifier can be specified rigidly - just by sending it to the bot. However, in the vast majority of cases, it is better to set this identifier through a macros of a specific text variable.
INFO: This will allow you to easily change this value yourself and give your user the opportunity, of changing this variable, in order to choose whom he will send his funds to. To do this (as it was in the previous case), a Feedback Form shall be created in advance, where user, by using “variable input”, will set the value of this variable by himself, thus defining the person to send his funds to.
User ID it is user's Telegram ID or his Menu Builder UserCode. Although both are numeric, this variable must be a text variable or, in some special cases, it can be global.
IMPORTANT: We do NOT recommend using numeric variables to store identifiers, because these identifiers can start from zero, and a numeric variable will delete it when saving - which will lead to an error that can be searched for a long time and not found.
4. After that, the bot will ask you to specify the conditions for triggering this Action. Whether or not to specify any, will depend on your situation and particular case.
INFO: This condition is needed, for example, in order to check whether the sender has enough funds on his Balance to make a transfer, in case the amount he sent will need to be deducted from the sender's account later. Accordingly, if the condition is not met, then the Action will not work.
IMPORTANT: As you understand, a separate Action is just a brick in the building of the final function. Therefore, the Action of the Transaction in the queue of Actions can be followed by the Action of Numbers, which will deduct the amount sent from the balance. Use the same approach for deduction that you have set to define the amount for transfer.
IMPORTANT: Please note that if this Action did not work, it will not, in any way, affect the rest of the Actions in the chain - that means, they will continue to be executed as if nothing had happened. For this reason, if the Action of Transaction is followed by the Action of Number that is deducting from the Balance, then the same condition (or the whole Action of Condition, so to stop the whole further execution) must be added for the deducting Action as well, otherwise it will be executed regardless of whether the transfer has occurred or not.
5. After creating the Condition, the bot will prompt you to enter a message that will be shown to the user if this Condition did not work. In other words, an error message. You can use macros and emoji in this message, but you cannot use markdown. This message is optional and can be omitted.
6. Next, the bot will prompt you to enter a message for the user in case of successful operation of this Action. You can use macros and emoji in this message, but you cannot use markdown. This message is optional and can be omitted either.
This completes the creation of the "Action of Transactions".
⬛ Action of Messages
This Action allows you (or your user), by pressing a button, to send a message to a specified addressee. We deliberately do not say "to a group" or "channel", because in fact this Action allows you to send messages to anyone who has a Telegram ID - that is, not only to groups and channels, but also to the bot's users themselves.
1. The bot will ask you to enter the message that you need to be send. Any available Macros, Expressions, and Markdown markup can be used in the message.
IMPORTANT : This message is generated at the moment of sending and therefore, when using Macros of Variables and Expressions, it will contain the data of the sender - regardless of who and where it will be shown.
2. Next, you need to enter the ID of the Chat, Group or User of the bot - the place where you want to send the message. Most often this is a Group or Channel (how to set up a bot to work in a group or channel), but you can send a message to an individual user as well. For this, you need to specify its ID here.
INFO: In this setting, you can use Variable Macros and Expressions - in this way, the addressee can be dynamically substituted, for example, by pre-writing its ID into a dedicated variable - for example, using Action of Numbers or Texts.
3. This Action can also set a Condition under which it will be executed.
4. Next, you can enter a message that will be shown if the Condition is not true.
This completes the creation of the "Action of Messages".
⬛ Action of Texts
This Action allows you to assign values to Text variables by user clicking a button in a bot.
(The functionality of this Action may be expanded in the future)
1. At the first step, you need to specify the Text Variable whose value you want to set. Only the Text Variables that are created in your bot will offered for selection.
2. Next, the bot will ask you to specify a value - that is a text - that will be assigned to the previously selected variable. Maximum text length is 200 characters (as it is for any Text Varioable).
3. This Action can also be set withe the Condition under which it will be executed.
4. Next, you can enter a message that will be shown if the Condition is not true.
This completes the creation of the "Action of Texts".
IMPORTANT: "Action of Texts" consumes 3 "Tokens of Functions" instead of one, unlike other Actions. Working with texts generating more load on the server side.