Unofficial Syncler Setup Guide
inb4after
Preface
I have created this setup guide to help you get Syncler up and running from scratch. It will take you through all the required accounts you need to link and addons you need to install to transform Syncler from a media tracker into an all in one streaming app, to sync them all.
Read the guide in full to understand all the steps you need to undertake and complete them in order to minimise any problems that may occur. If you don’t have any of the prerequisites, look on the subreddit or do a quick Google search to research things like debrid services, Trakt accounts and how they work. It is important to do this before you jump into Syncler and allows you to get a better experience from the app.
I have also created a FAQ and Troubleshooting guide to answer commonly asked questions about the app and to provide fixes for any issues you may run into.
Good luck!
TABLE OF CONTENTS:
4) Installing via Syncler Installer
5) Installation required space notice
Part III - Activating Syncler+
11) Connecting Trakt
Part V - Installing provider packages
15) The provider package manager
Part VI - Searching for sources
18) The search menu
20) Play button
24) Subtitles
25) Casting
26) Default action
27) Auto-select
28) Auto-play next
29) Sorting
30) Filtering
31) Common Errors
Part I - Download
1.
Download Links
Syncler is available to download and install directly from the Google Play store on both Android and Android TV operating systems. Other operating systems such as Fire TV devices can use the Aptoide store.
Links to these can be found below:
Alternatively, you may use the standalone Syncler Installer app to download the latest Syncler APK. Read the next section for more information.
2.
Syncler installer notice
Similar to the app stores, Syncler Installer reduces the .apk size from ~200 MB to ~80 MB because it detects your device type and only downloads what is needed.
You can also easily download and update BETA versions inside the installer.
Syncler installer can be downloaded from the official site or the official filelinked store. Links to these can be found below:
• Official filelinked: 52358658
Note: If you are running Android 10 or Android 11, auto-installation with the installer is not supported yet. Once the download is finished, read the popup message carefully. Navigate to your "Downloads" folder and find "Syncler.apk", which you should then manually install.
3.
Beta versions notice
As of Syncler 1.0-beta10, the android package name of the BETA branch has changed. This will allow users to run the main stable version alongside beta versions without conflicting.
Therefore, you may need to set up Syncler from scratch again if you want to test out the beta versions, as settings from the stable version will not transfer across automatically.
Also there are small visual differences between some versions of Syncler, for example, "Link resolving" has now become "Source resolving" and some buttons and informational text have been updated / removed.
The only functional change is the introduction of a new provider install website which only works for beta versions.
Part II - Installation
4.
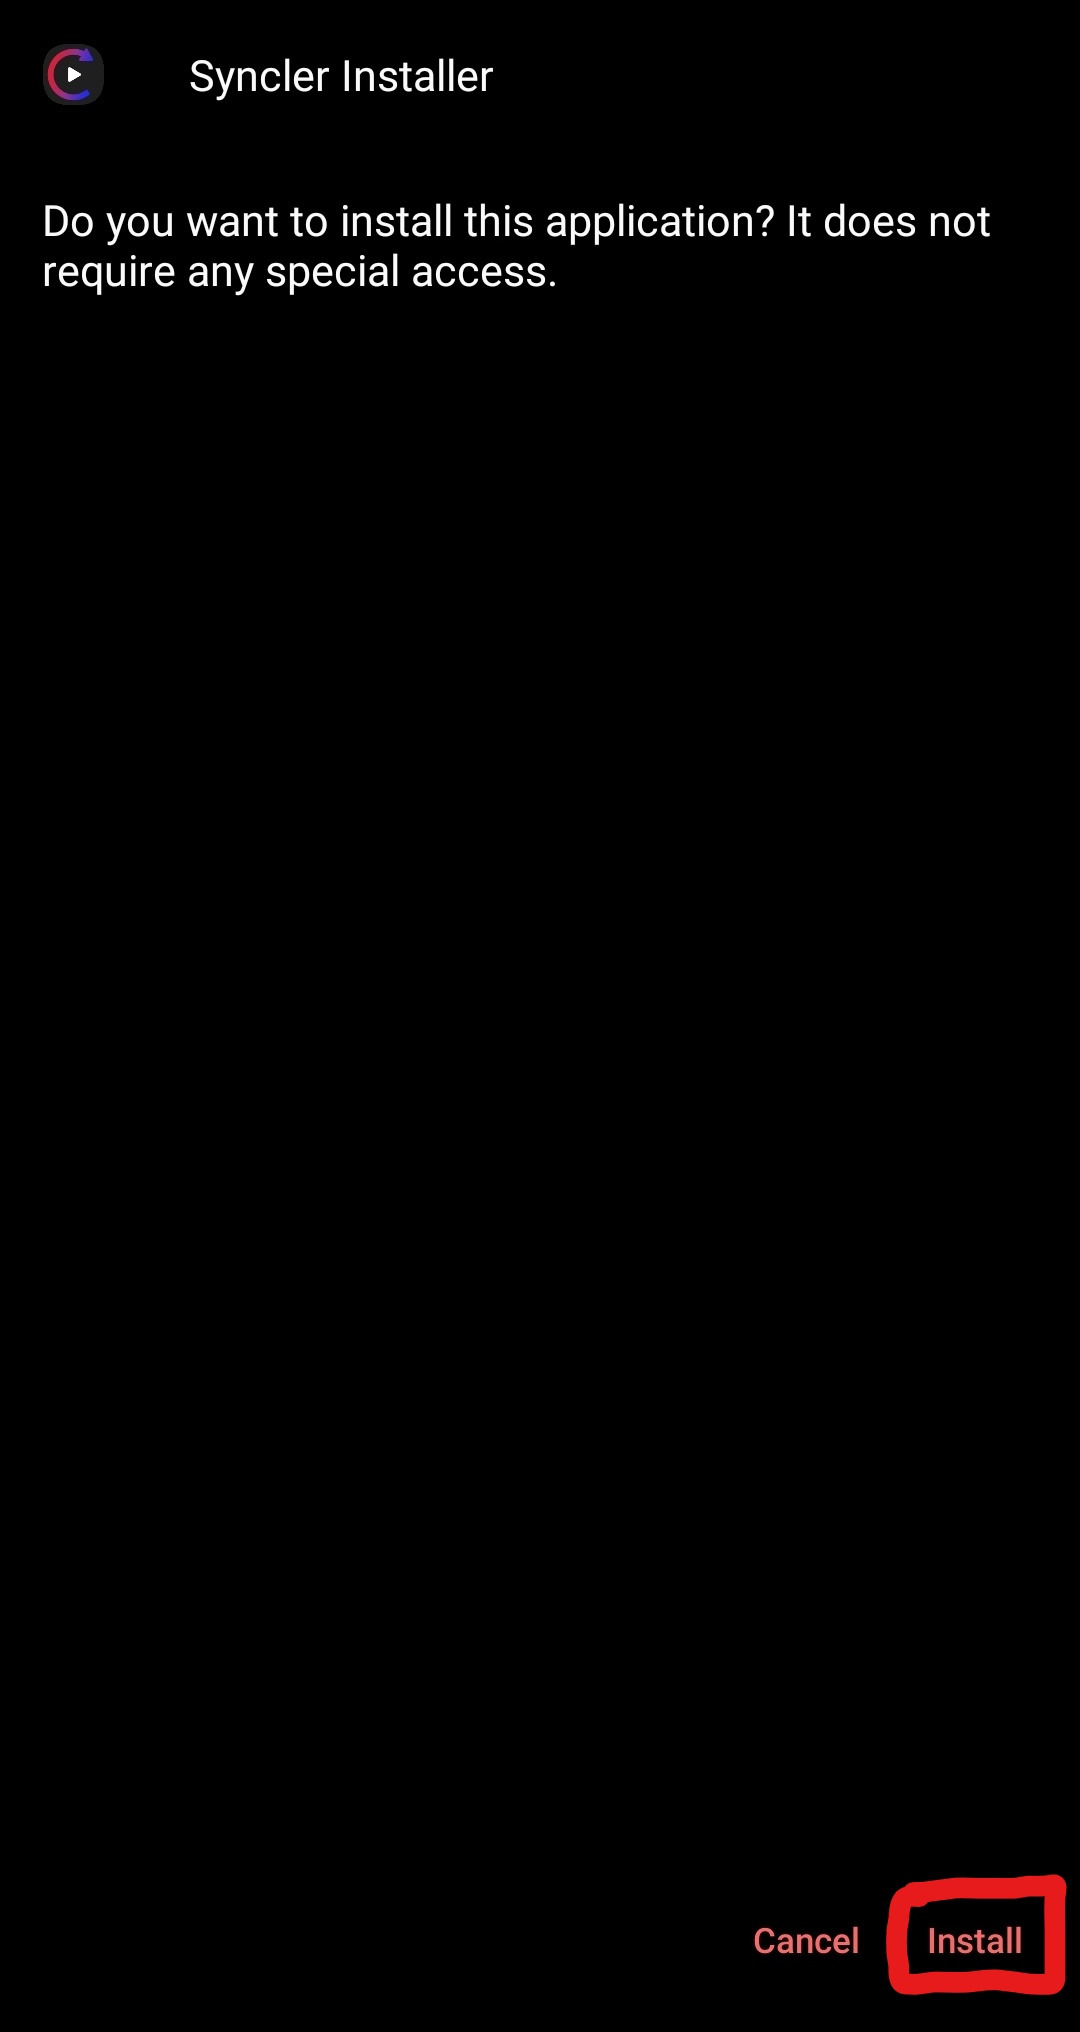
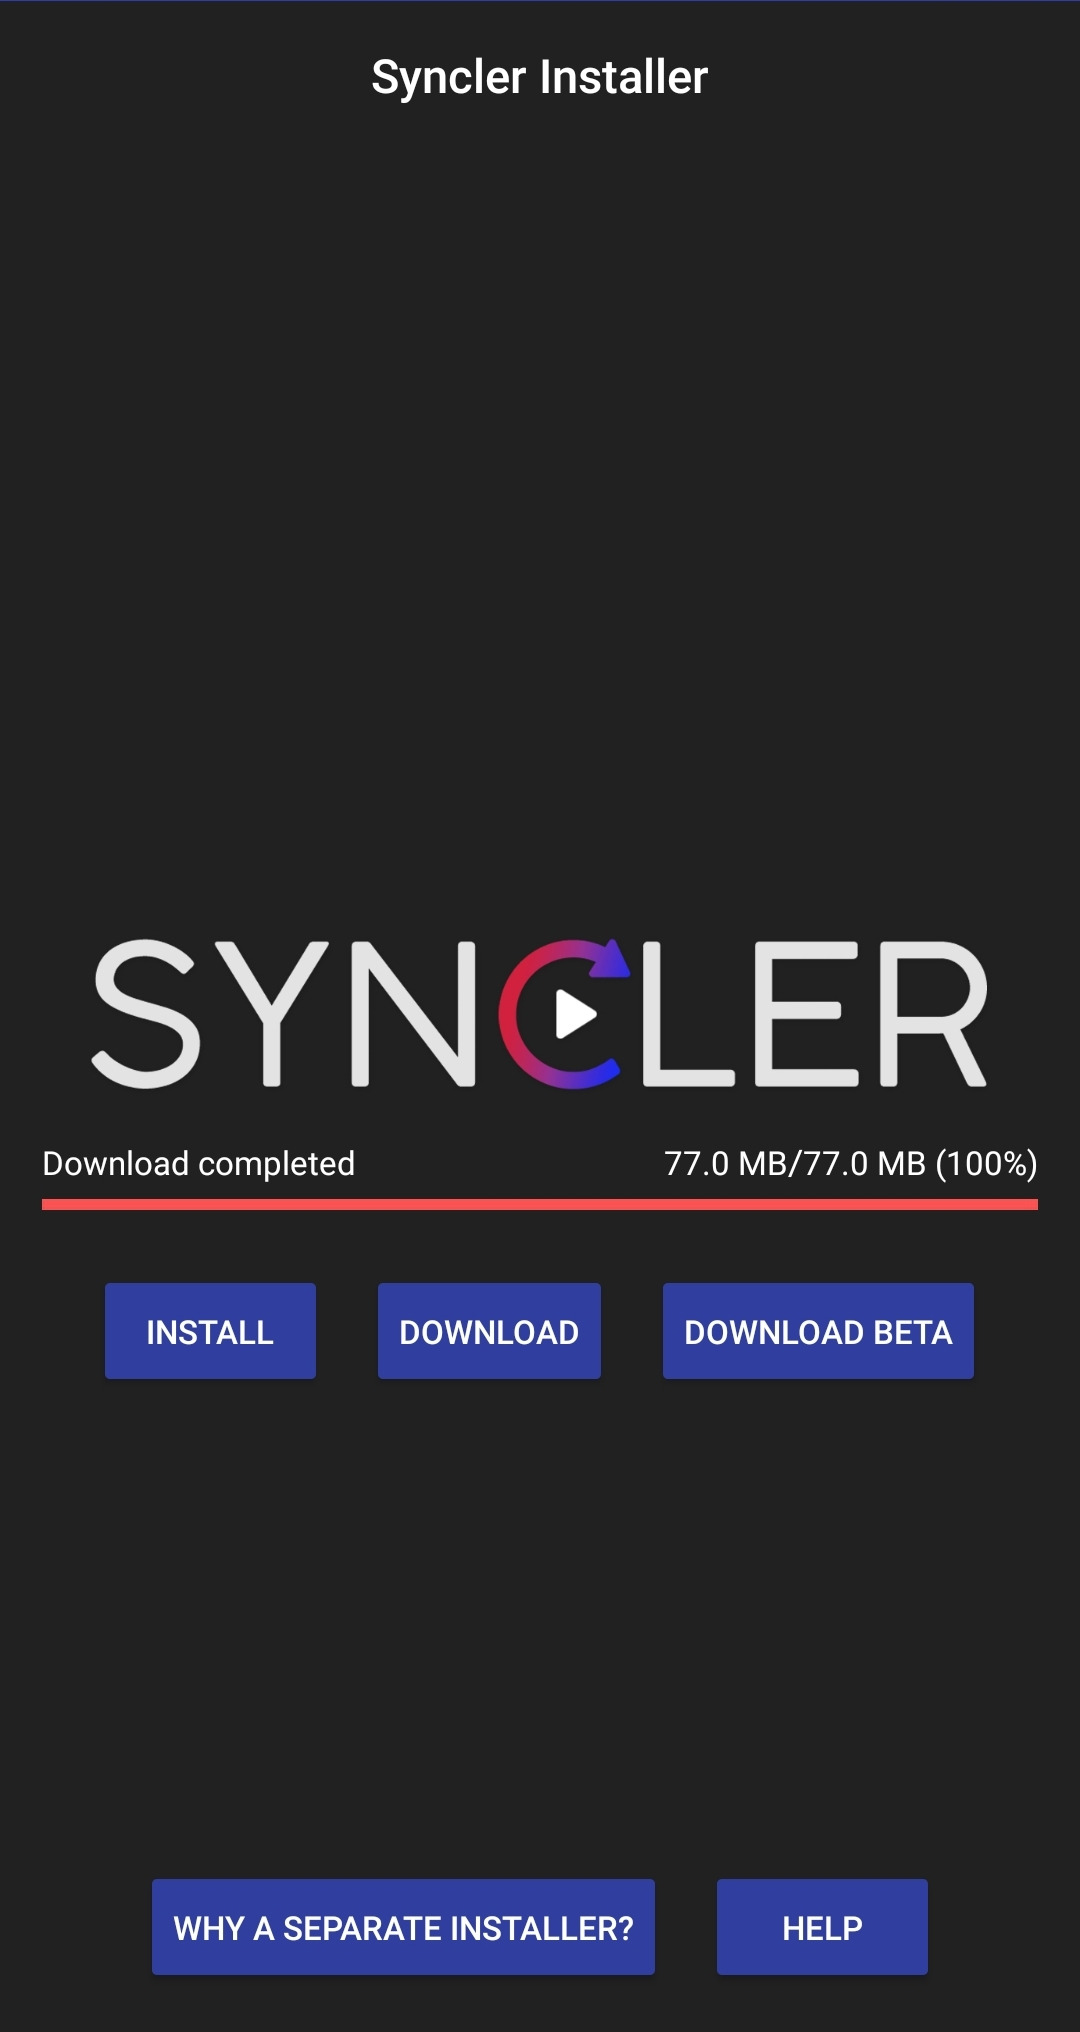
Installing via Syncler Installer
Installing "Syncler Installer" is as simple as installing any other app. You can do this with a file manager / downloader or directly from filelinked itself. Please make sure your file manager / downloader or filelinked app has been granted permission to install unknown apps.
Press Install then "Open".
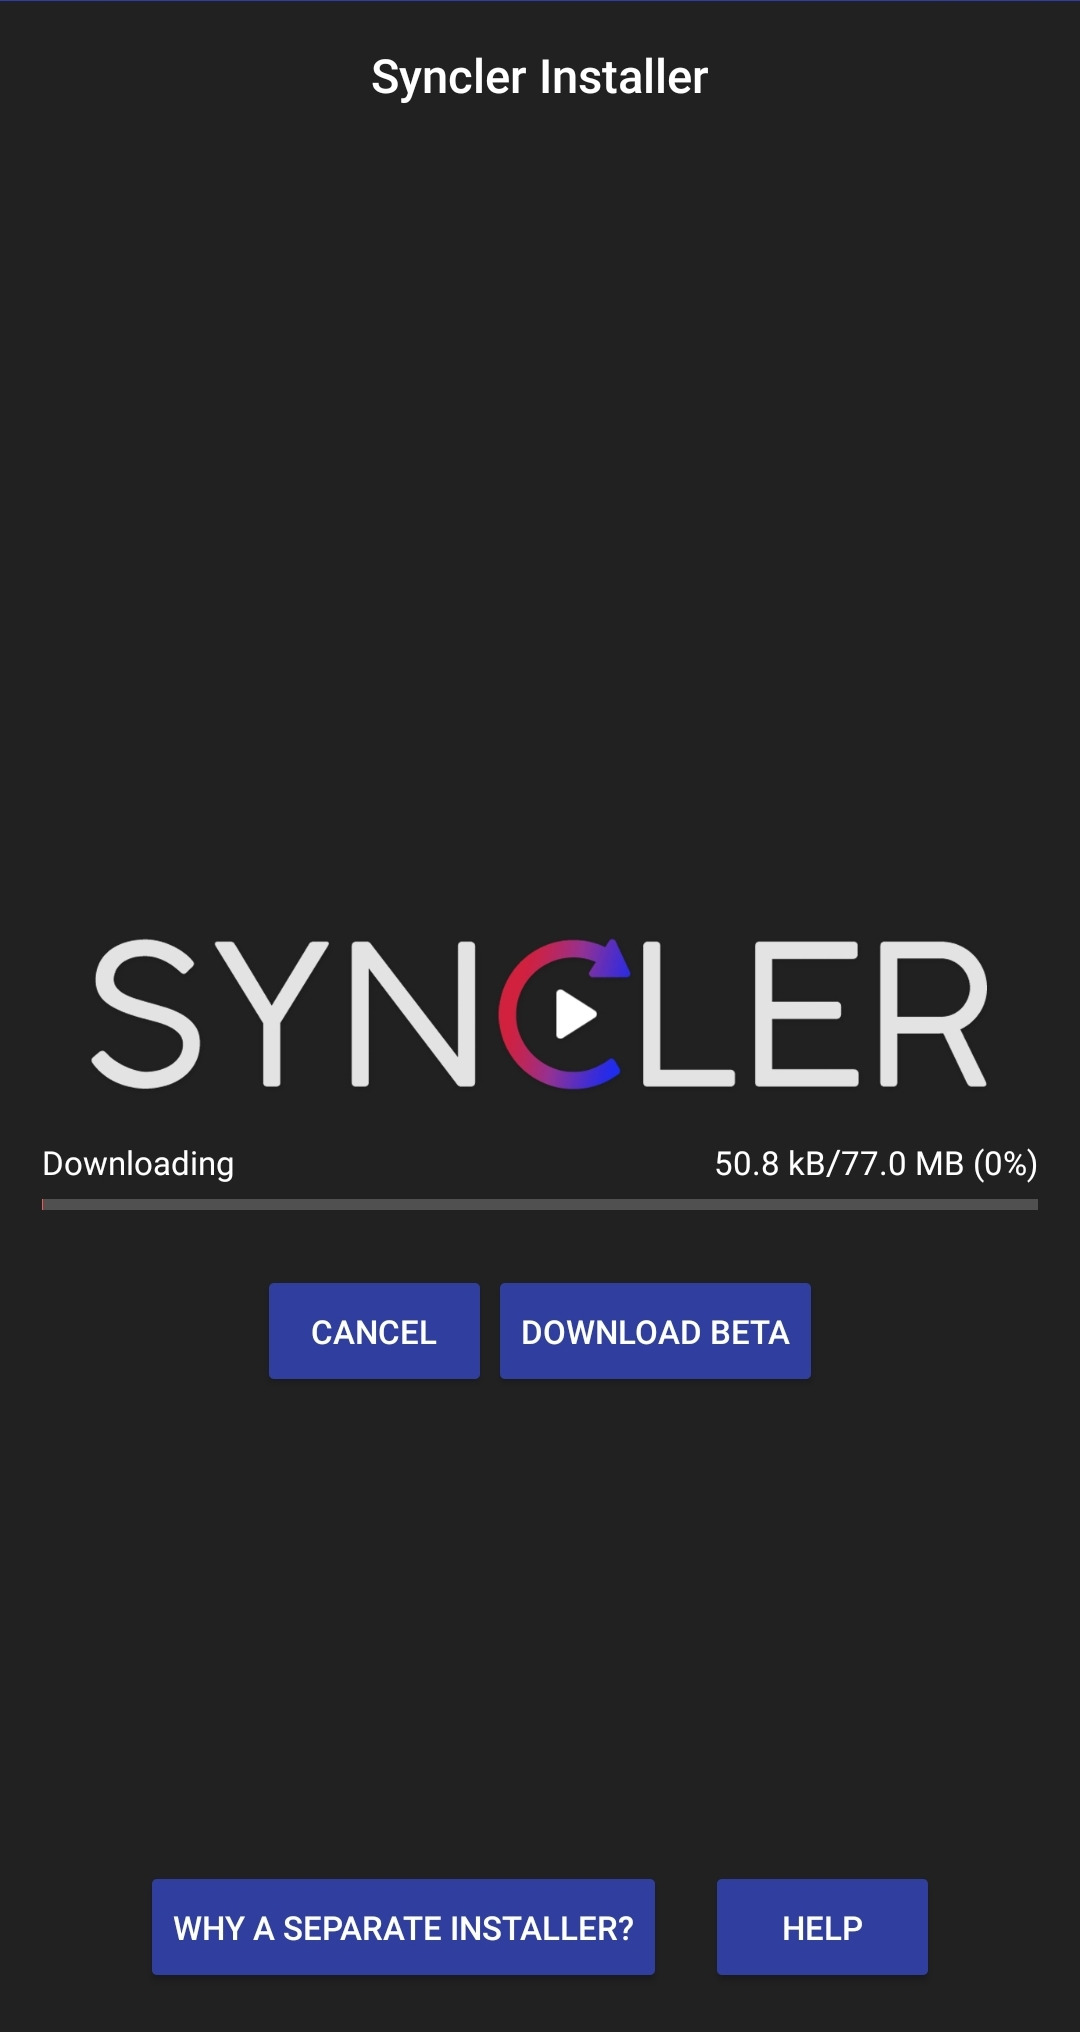
Syncler installer will automatically start downloading the latest stable version of Syncler that is specific to your device.
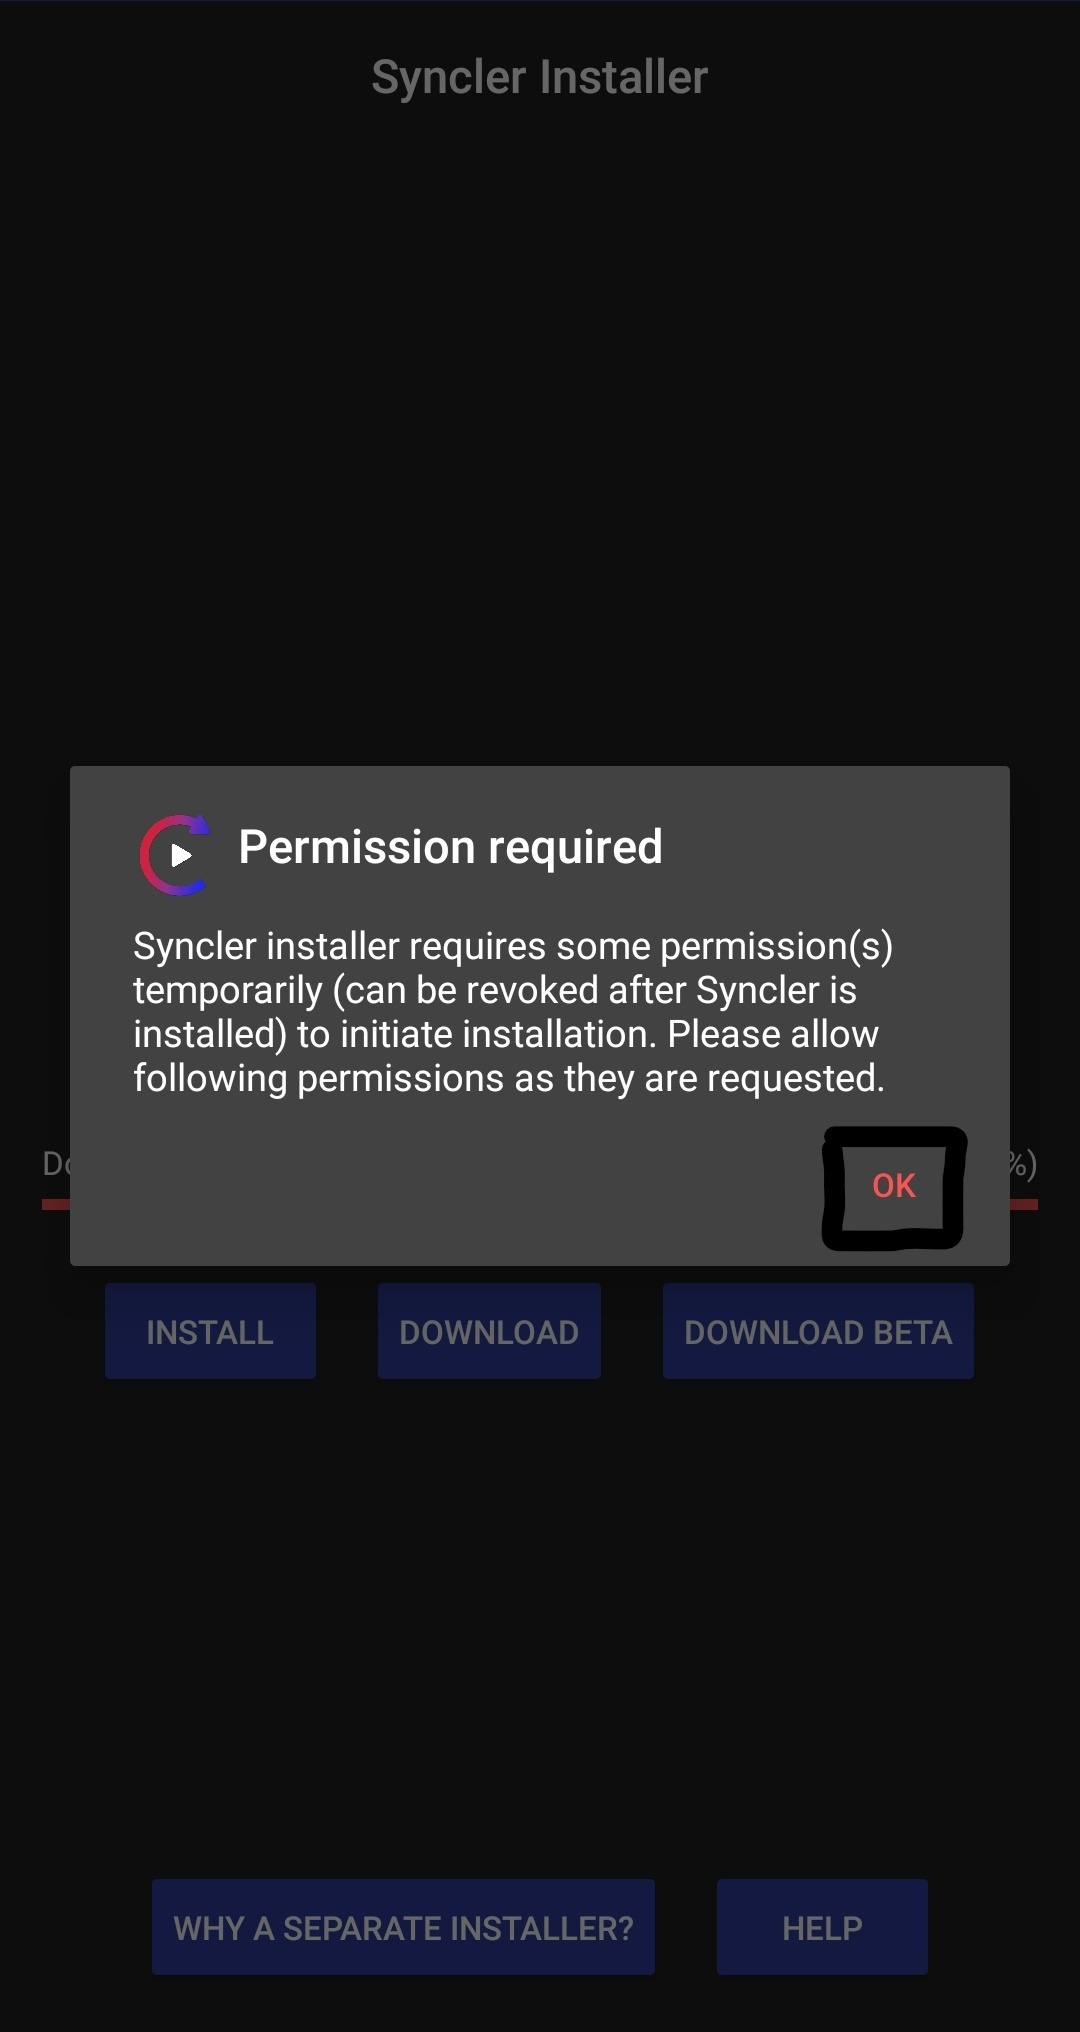
After the download is complete, you will need to grant permissions to Syncler Installer to access your device storage and install unknown apps. Read the popup for more information and press "OK".
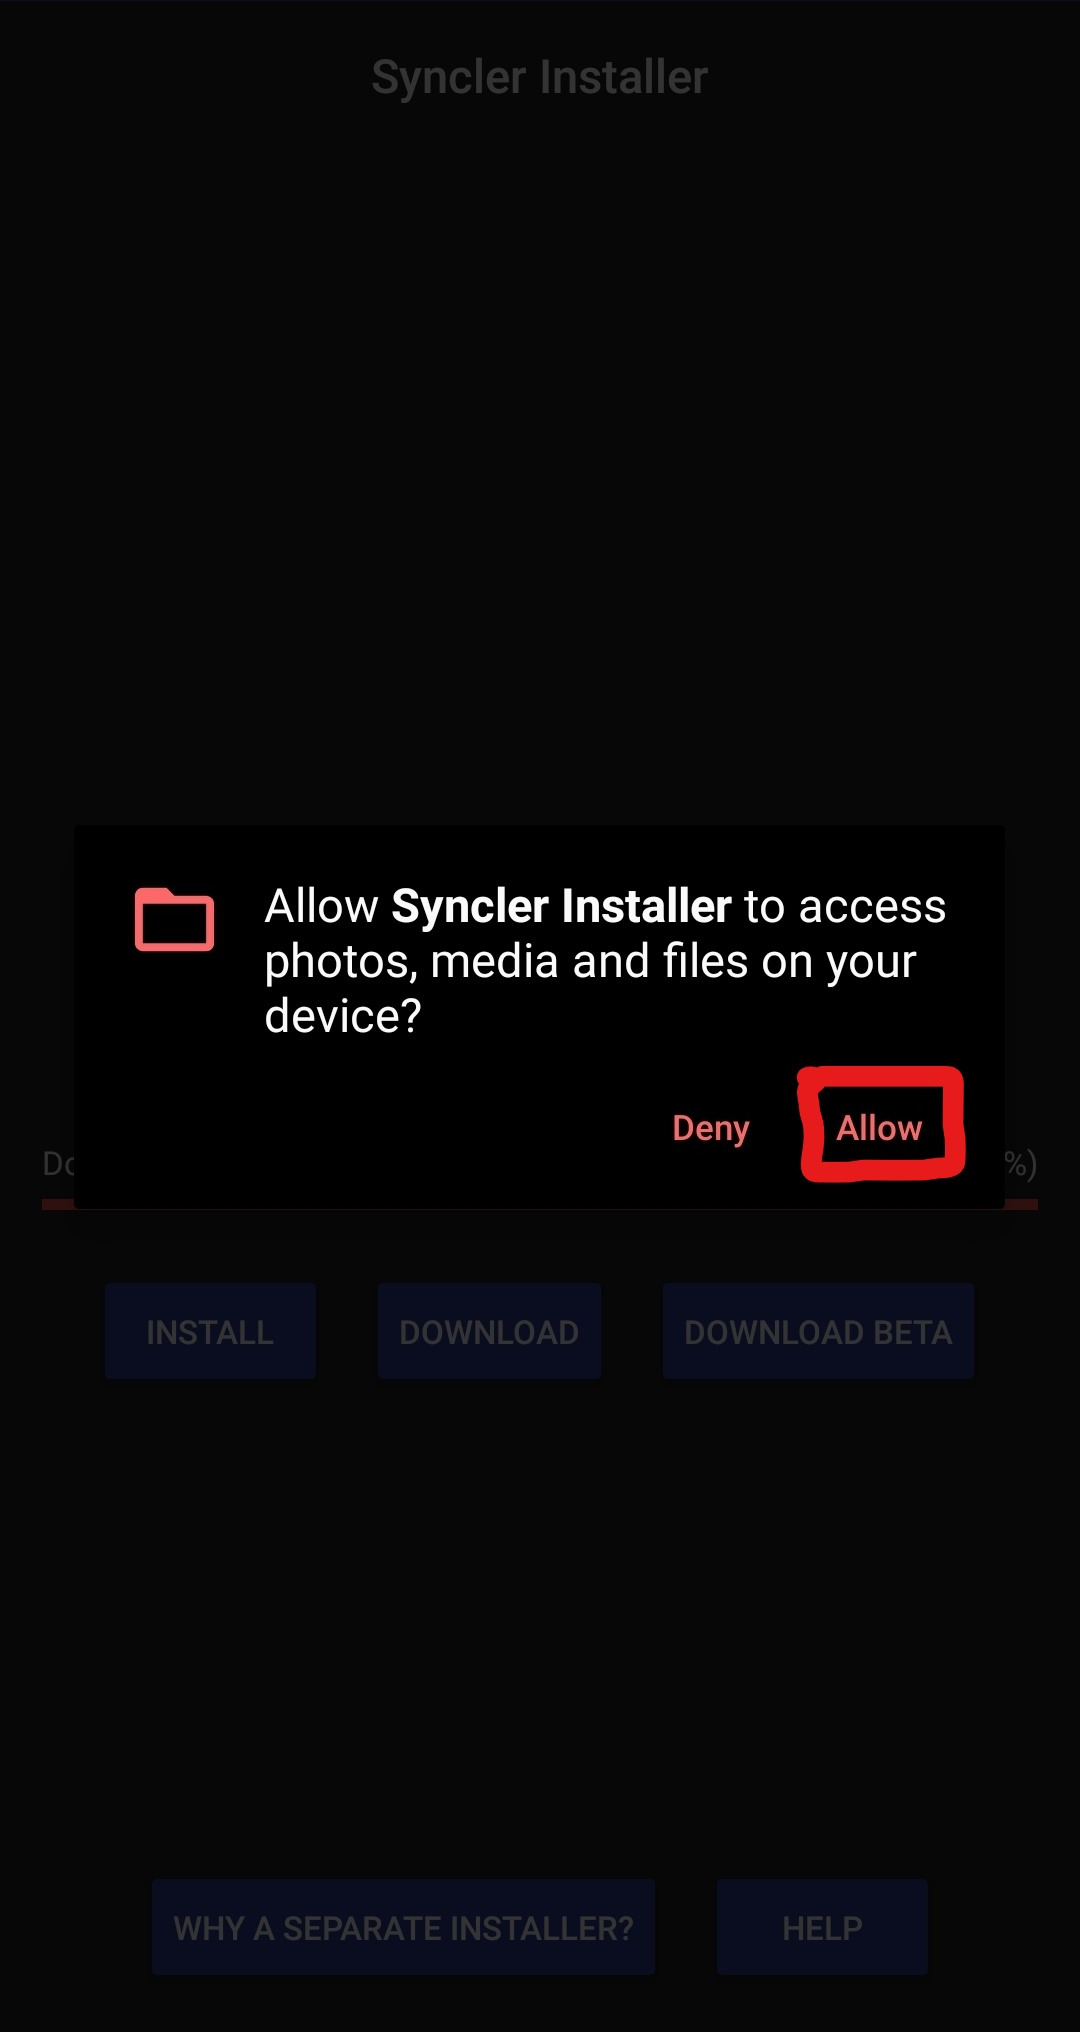
Android system will ask you to enable storage permission. Press "Allow".
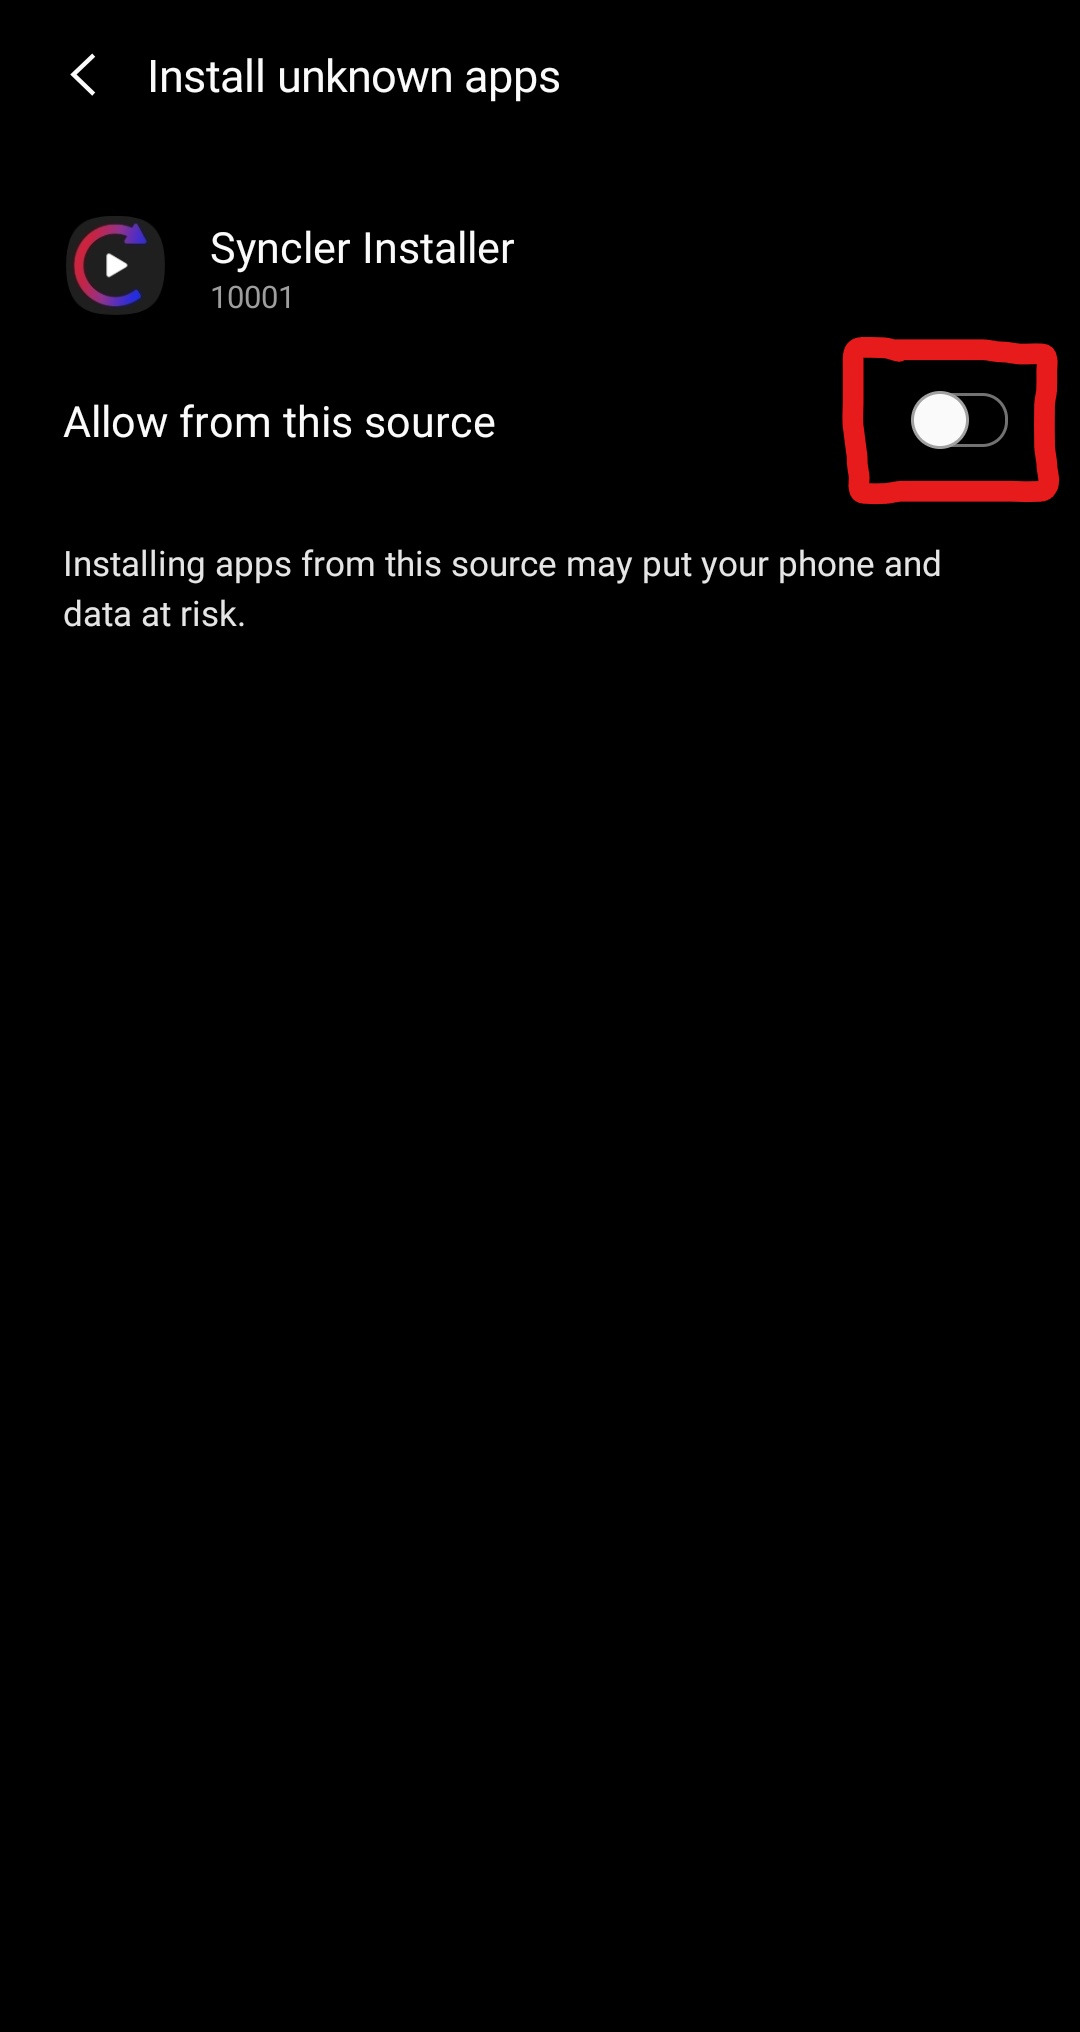
Press the toggle to enable installation of unknown apps via Syncler Installer.
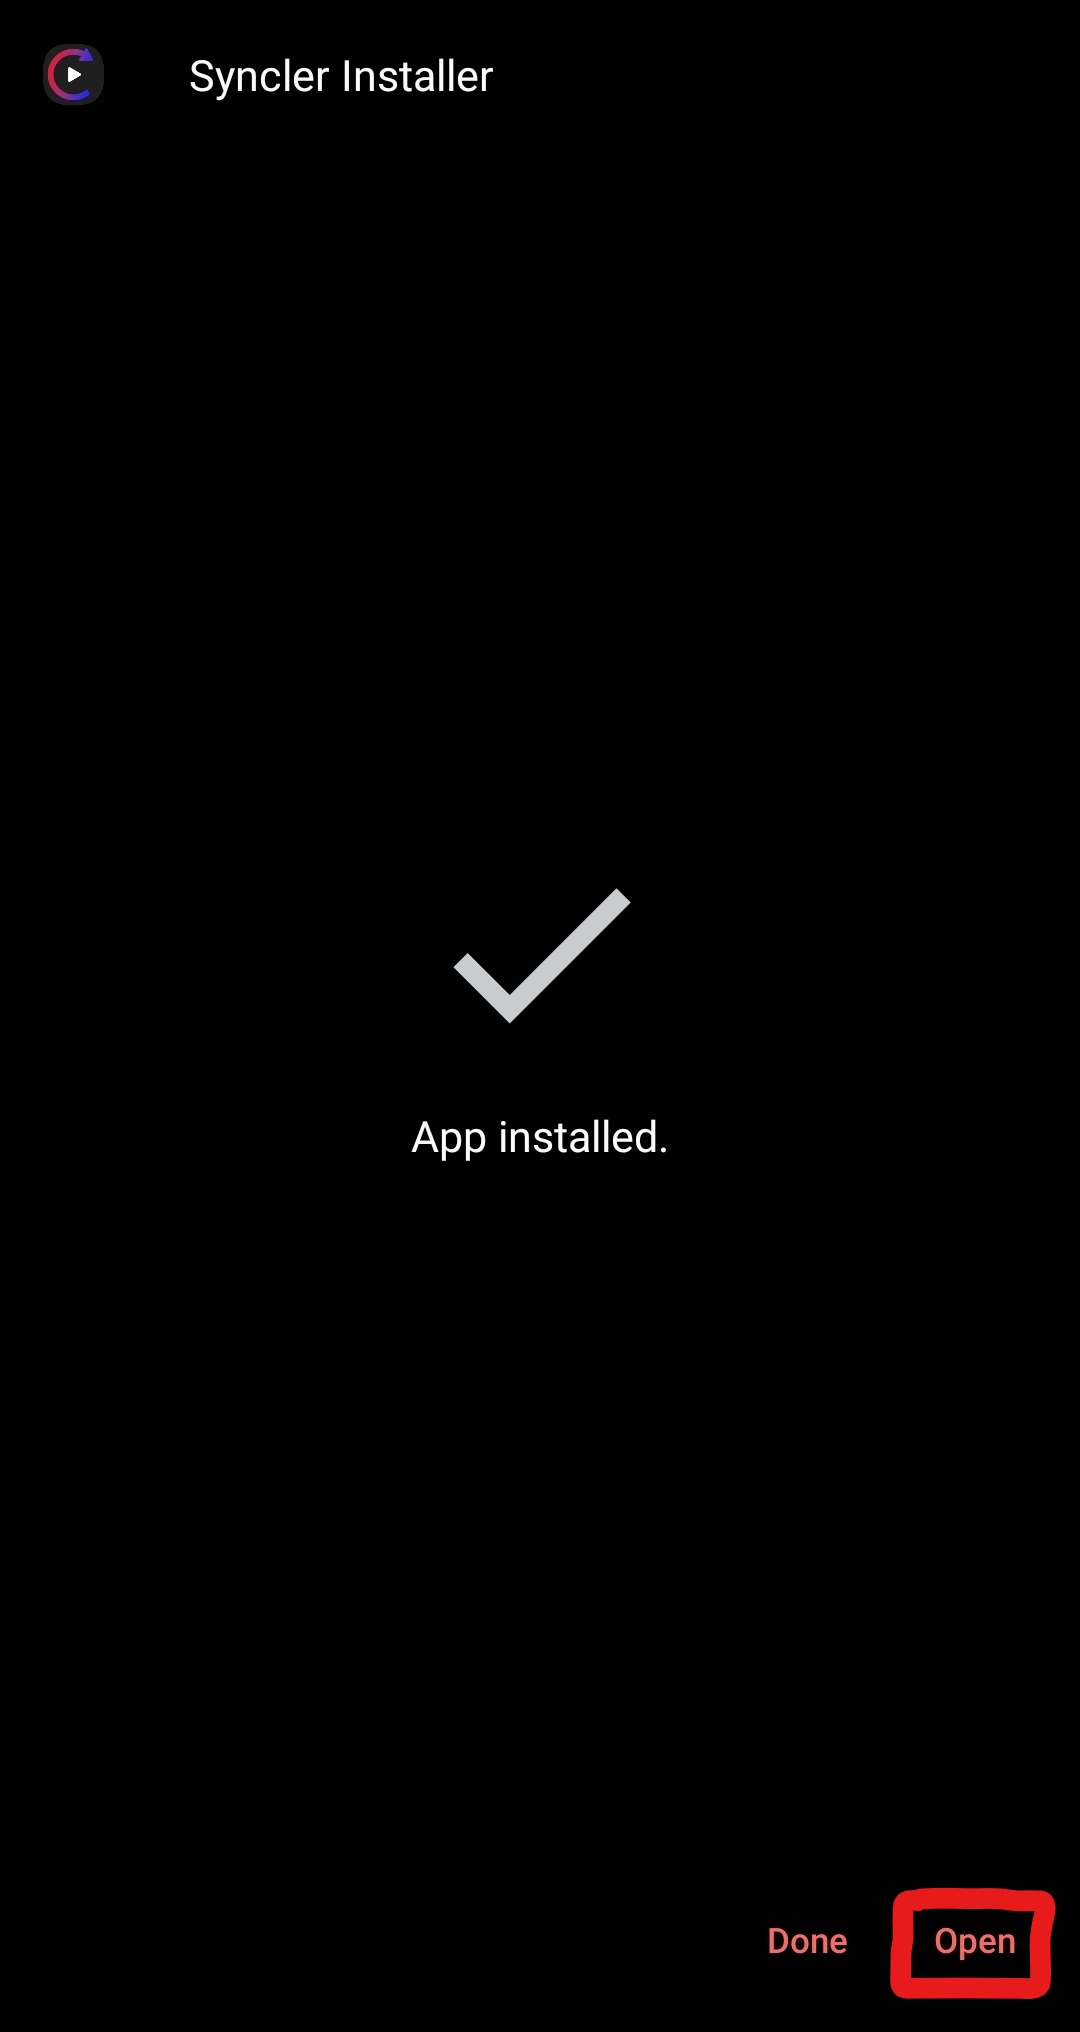
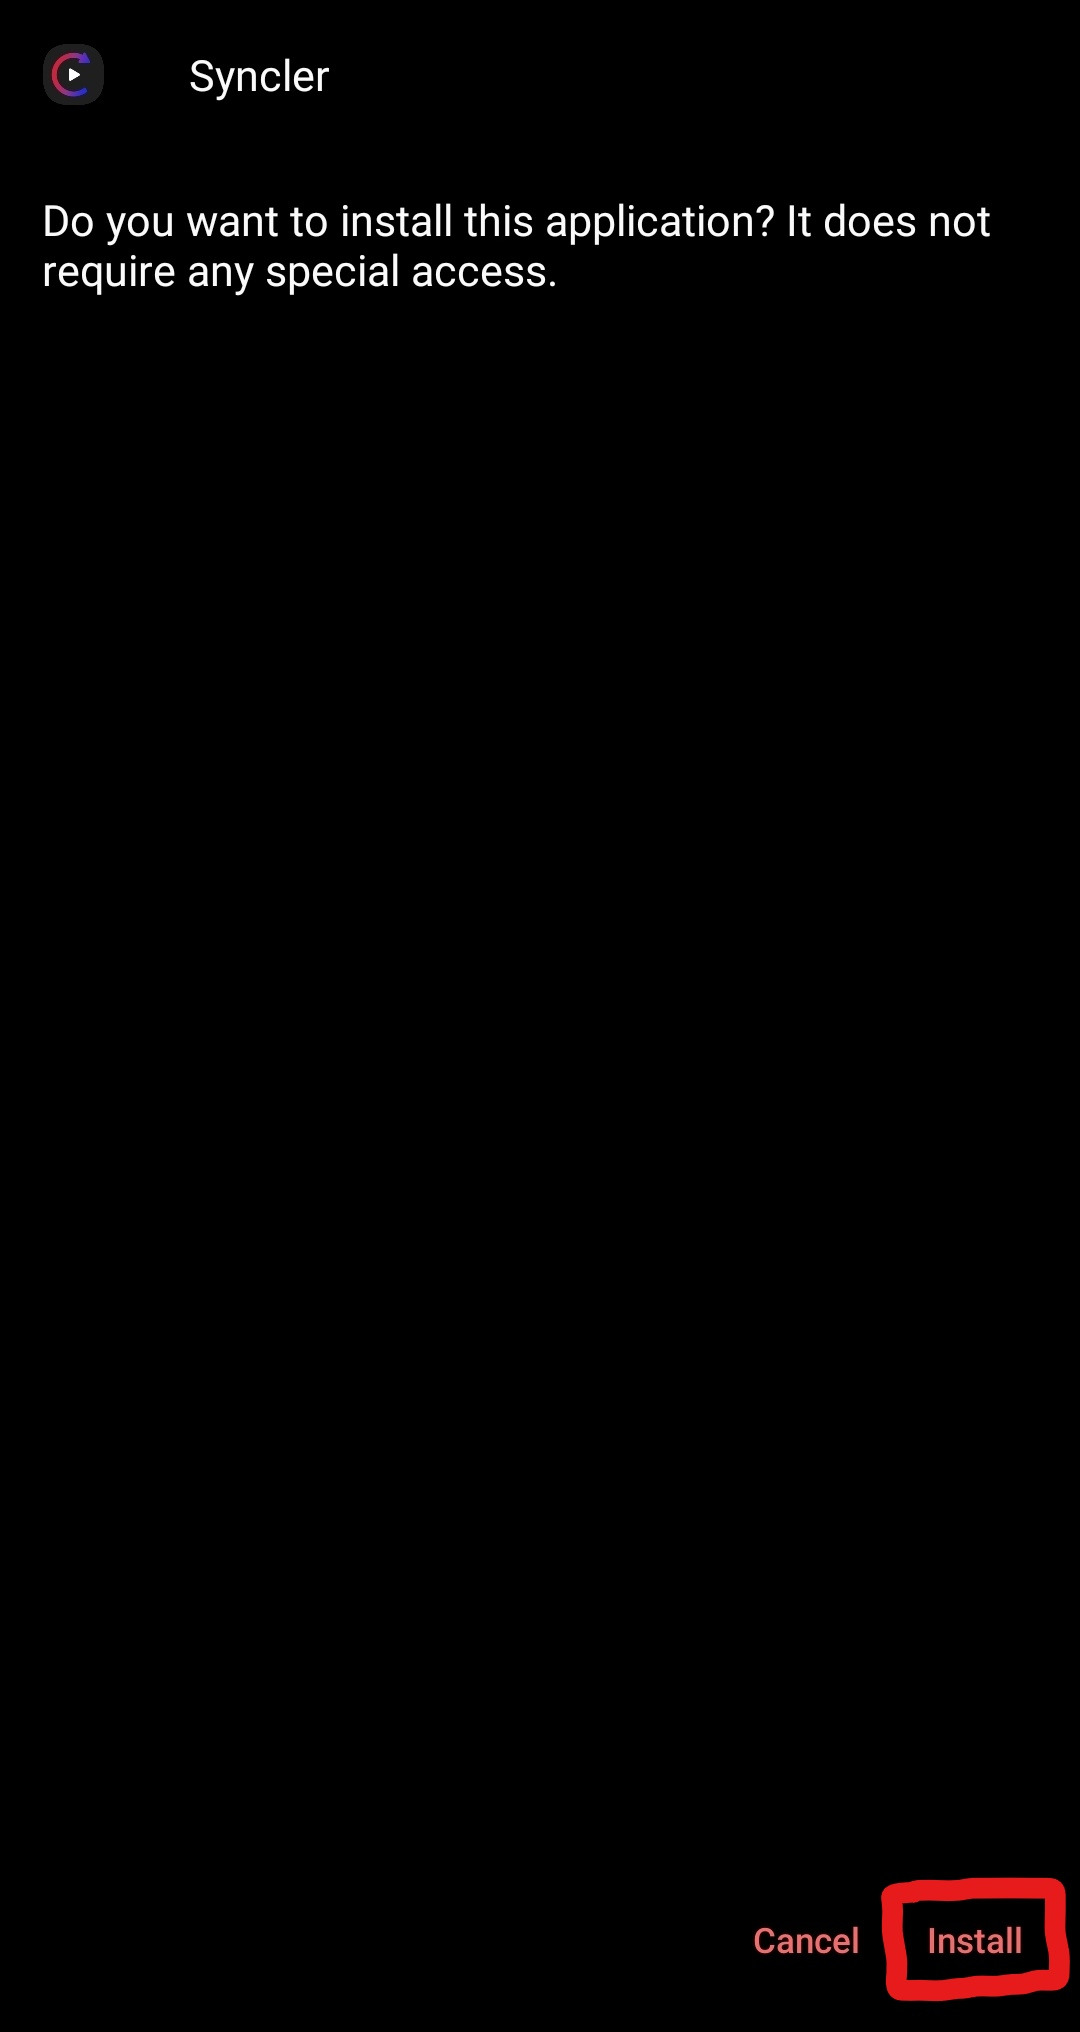
Then go back and the Syncler installation screen will popup. Press "Install" one last time.
Once the process is complete, Syncler is now installed to your device and is ready to launch!

You may now remove Syncler Installer from your device if you wish. It would be beneficial to keep it if you are interested in updating to BETA versions of Syncler.
You can also re-download the latest stable version of Syncler manually, at any time. Press the relevant button to do so.
5.
Installation required space notice
You may run into an “App not installed” error message when trying to install Syncler. This is the result of not having enough free storage space to install the app. Free up around ~250 MB to be safe and try the install again. On some devices you may need even more free space.
6.
First time opening
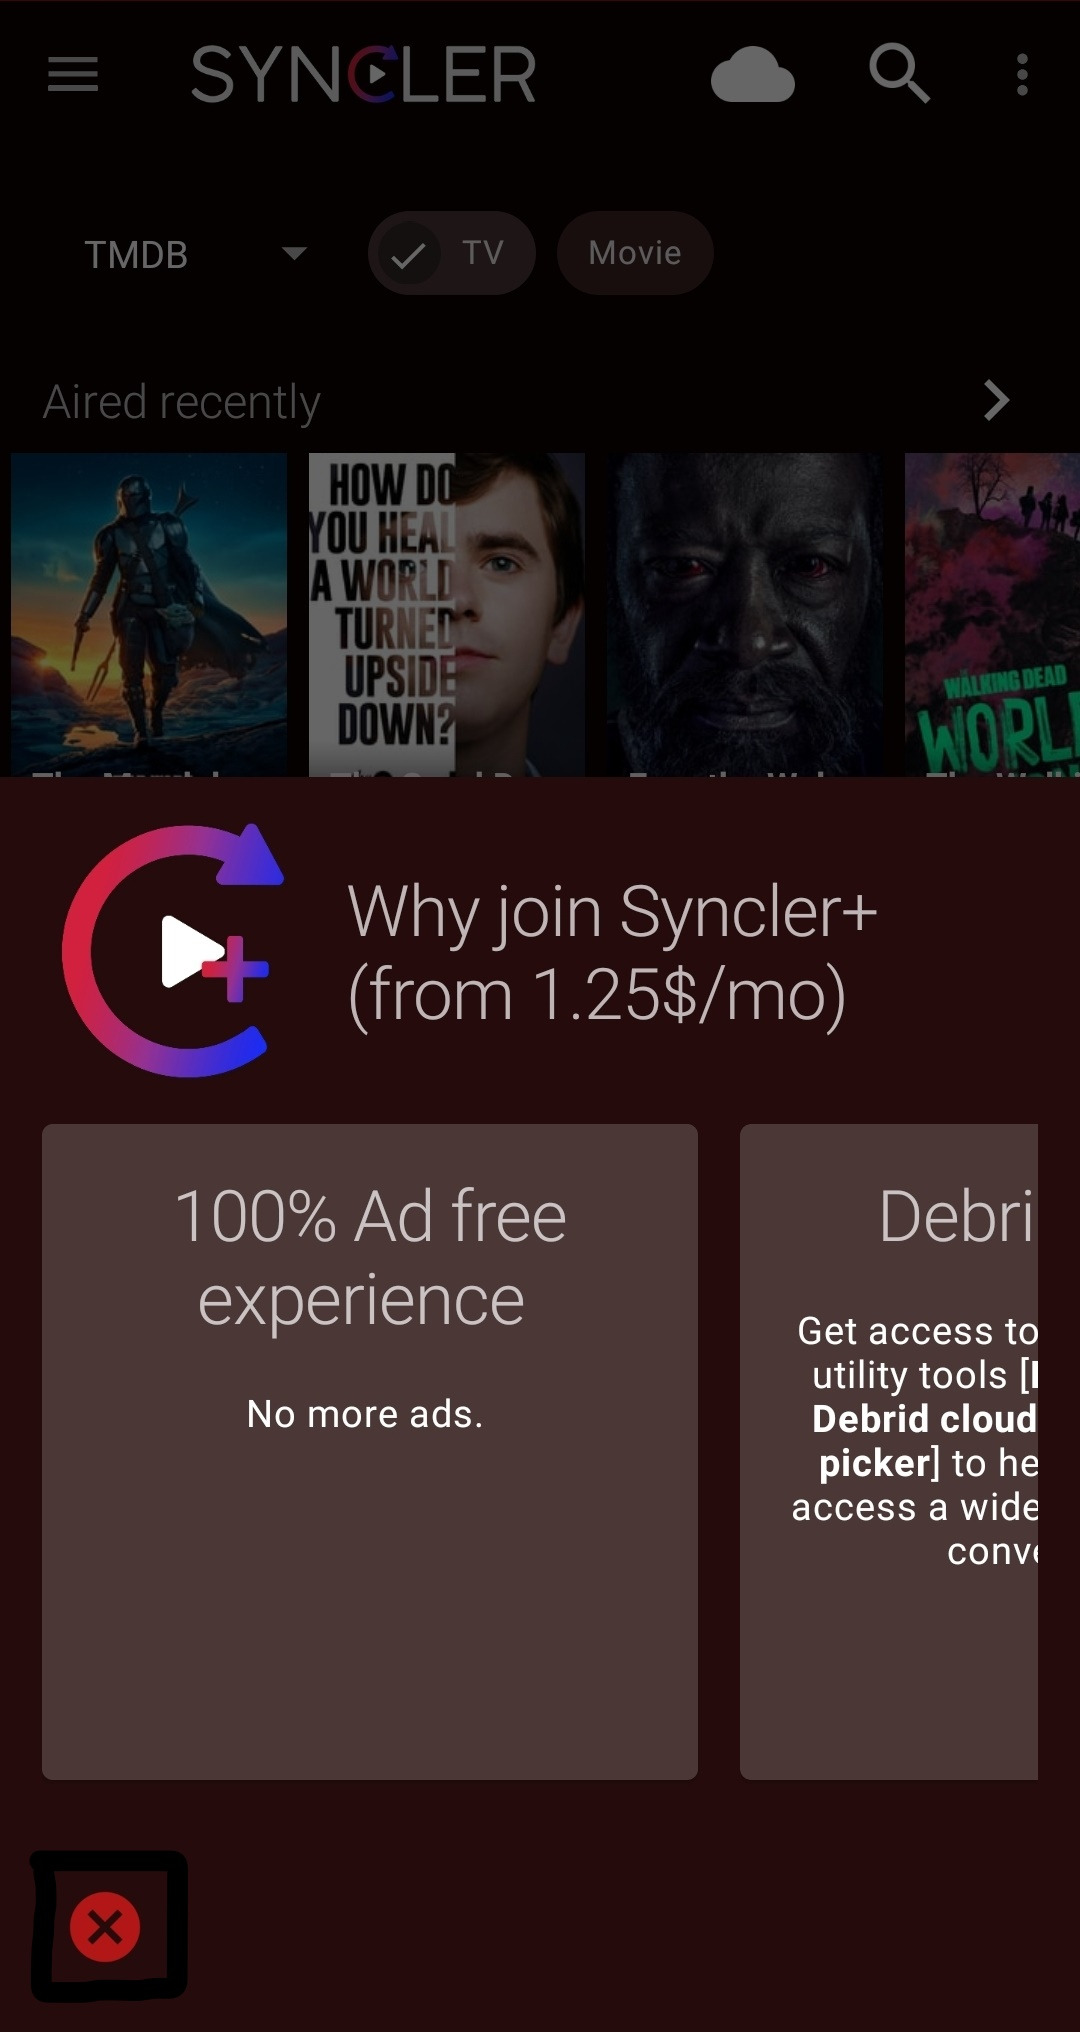
When you first open Syncler, the app will present a notice to subscribe to Syncler+ to deactivate ads and unlock more features. Please close this window as we will activate Syncler+ in the next section, using the side menu.
Part III - Activating Syncler+
7.
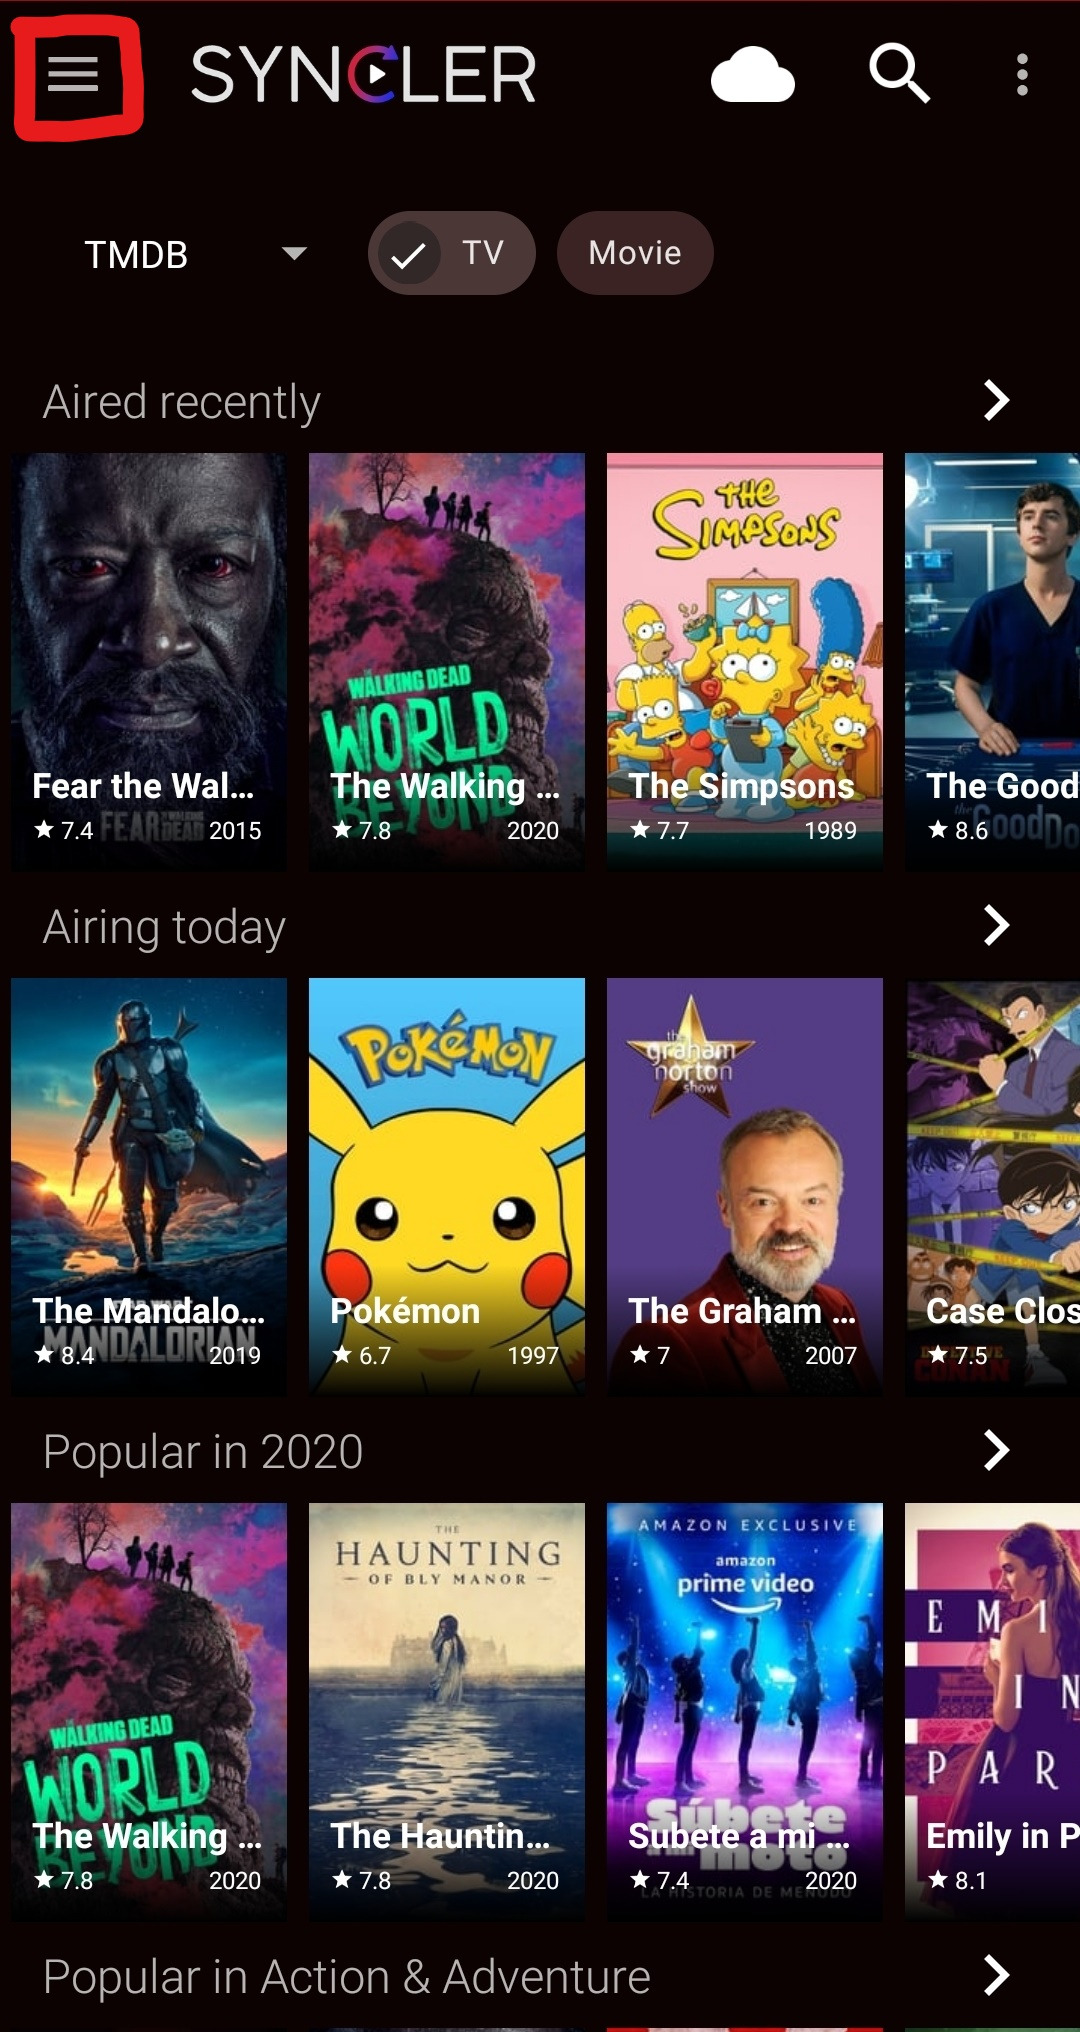
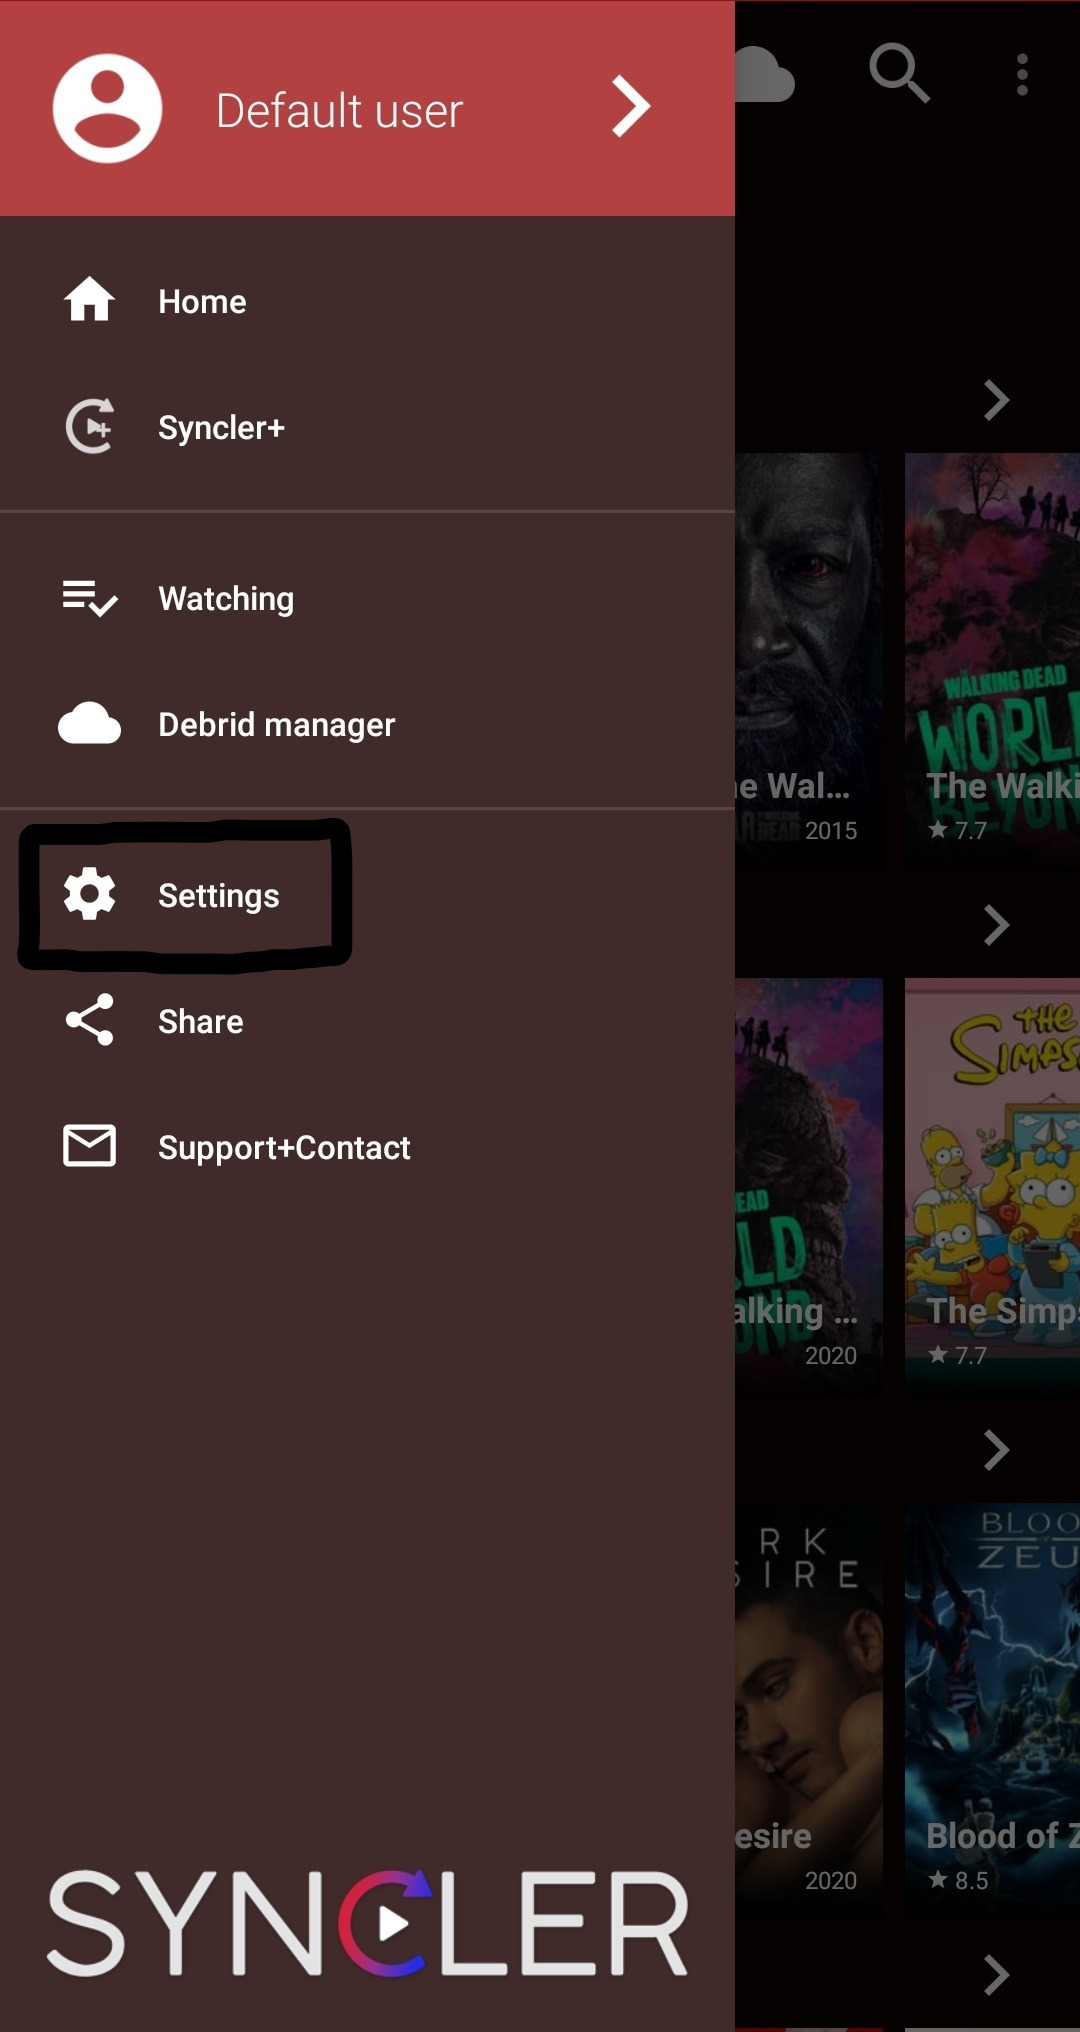
The side menu
You can press left on your remote (if using a TV device) or press the three lines in the top left (if using a mobile device) to access the side menu. From here, you can navigate to the Syncler+ information page, watch history page, debrid manager and Syncler settings.

Press the Syncler+ option to get started with activating premium features.

8.
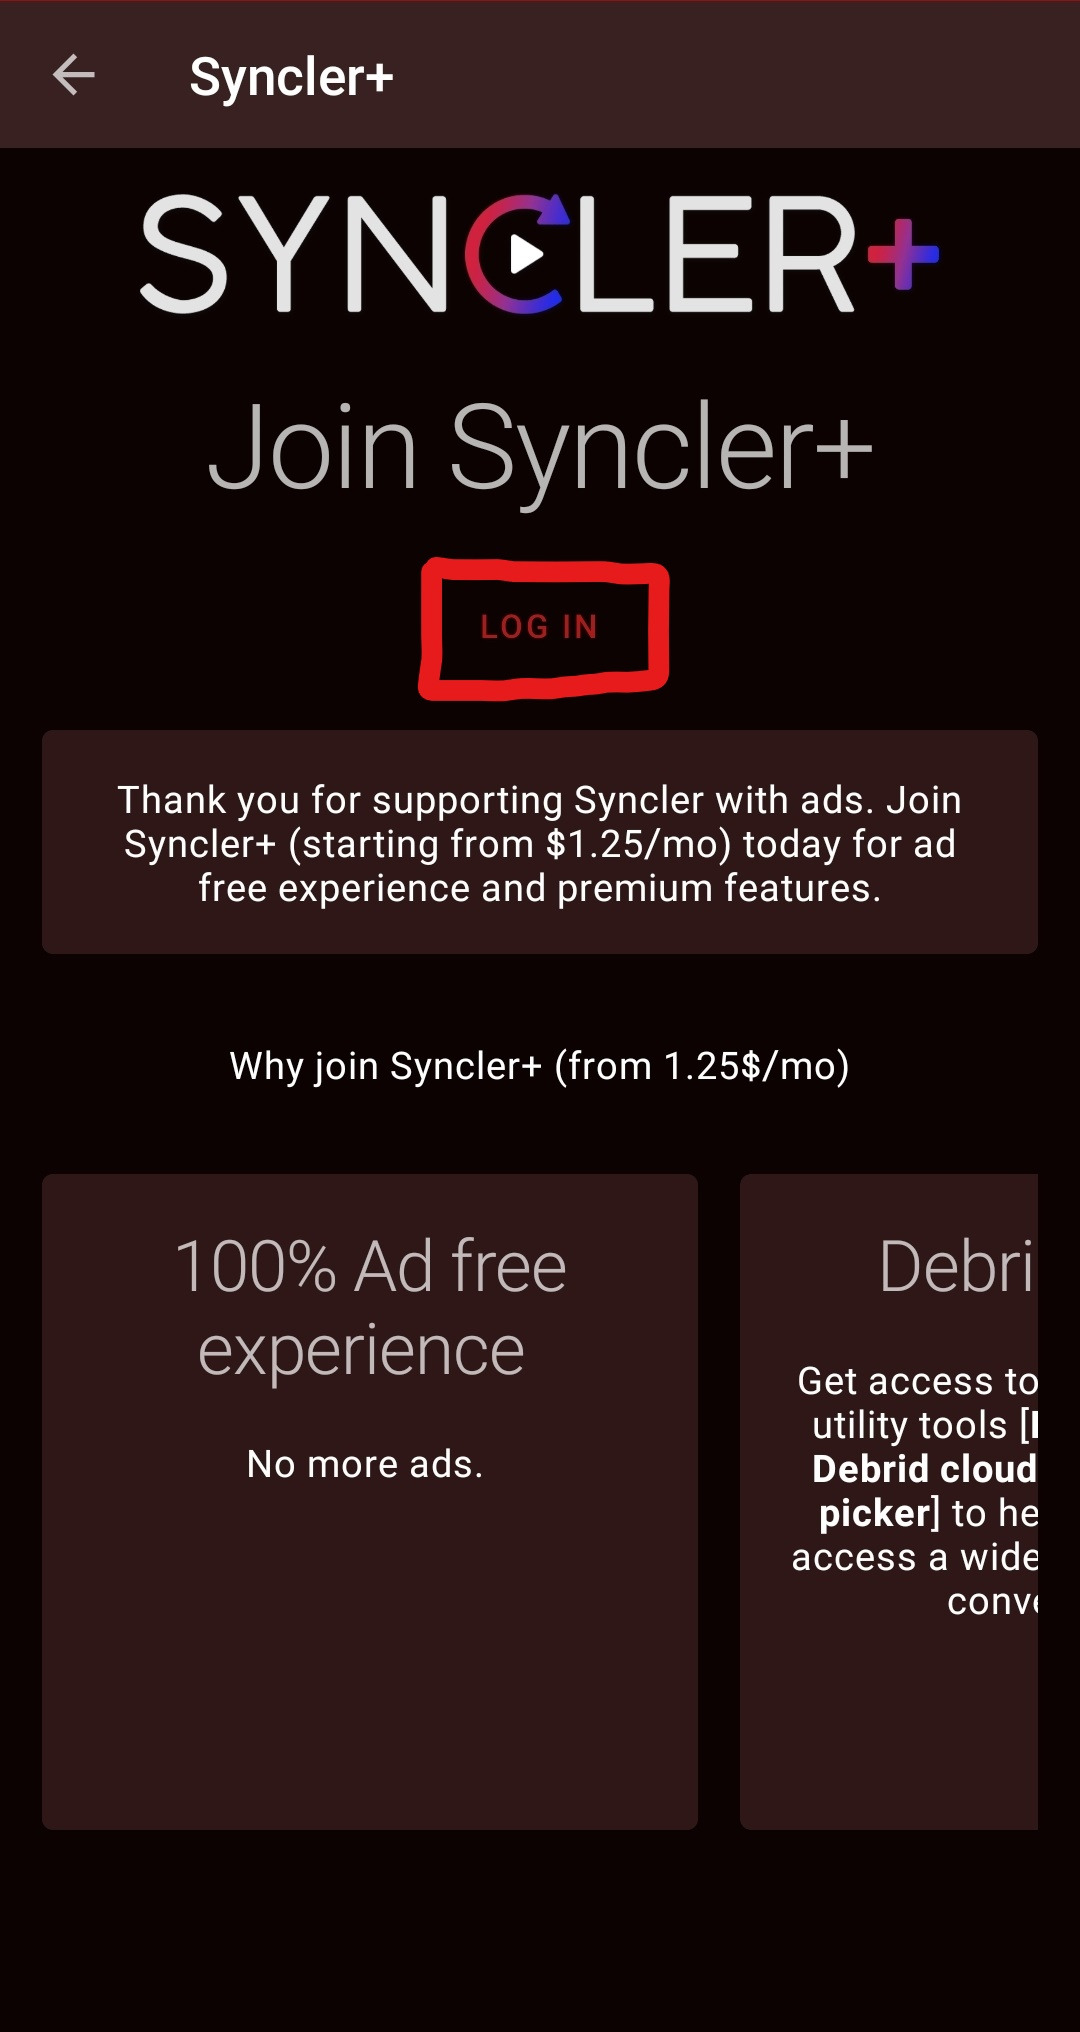
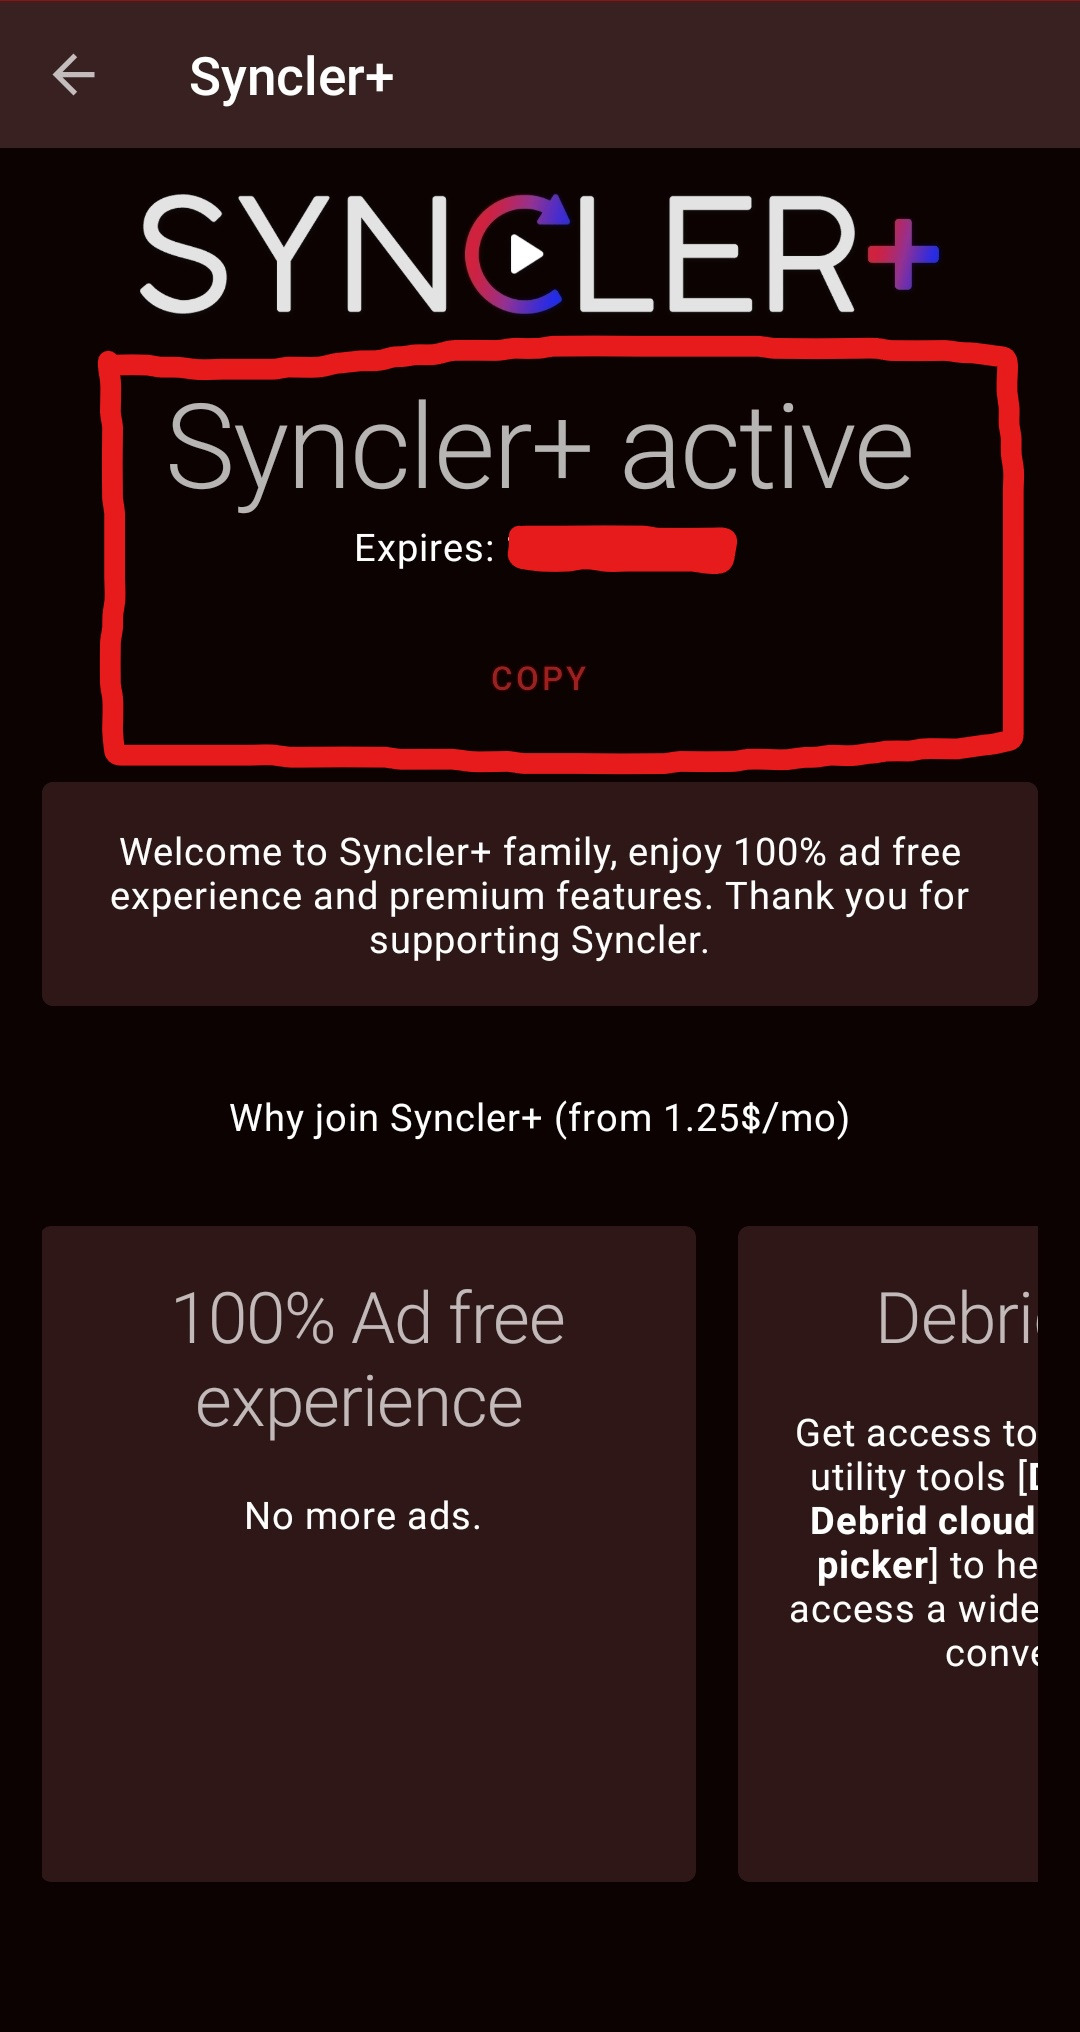
Syncler+ information page
This page breaks down the features of Syncler+ and gives the option to login. This is where you will enter your subscription code.

9.
Entering the code
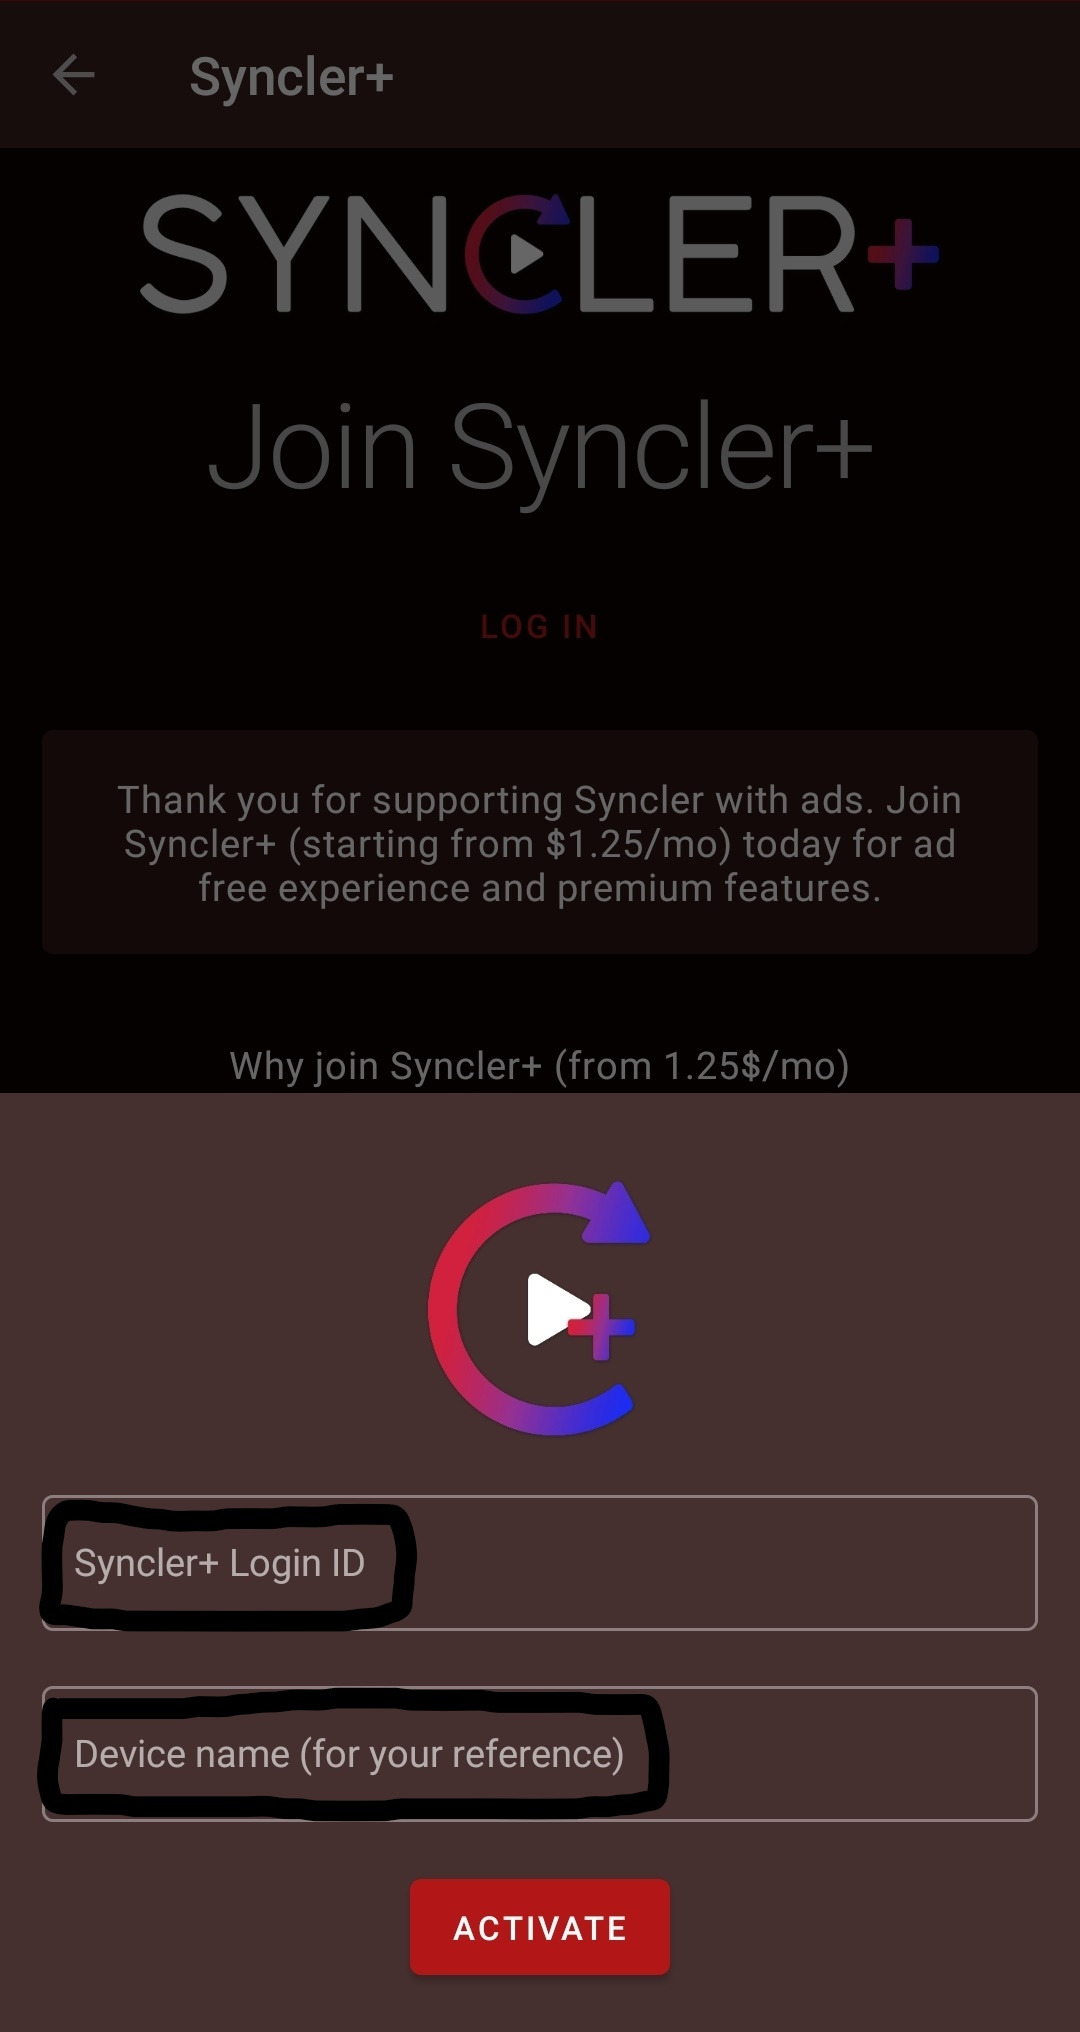
Press "Log in" and type in the product key (Login ID) that you’ve purchased from the website into the popup box.
Press "Activate" and your new Syncler+ membership is now active!
The information page now shows how long you’ve got left on your Syncler+ membership and whether it is currently active.
Part IV - Connecting accounts
10.
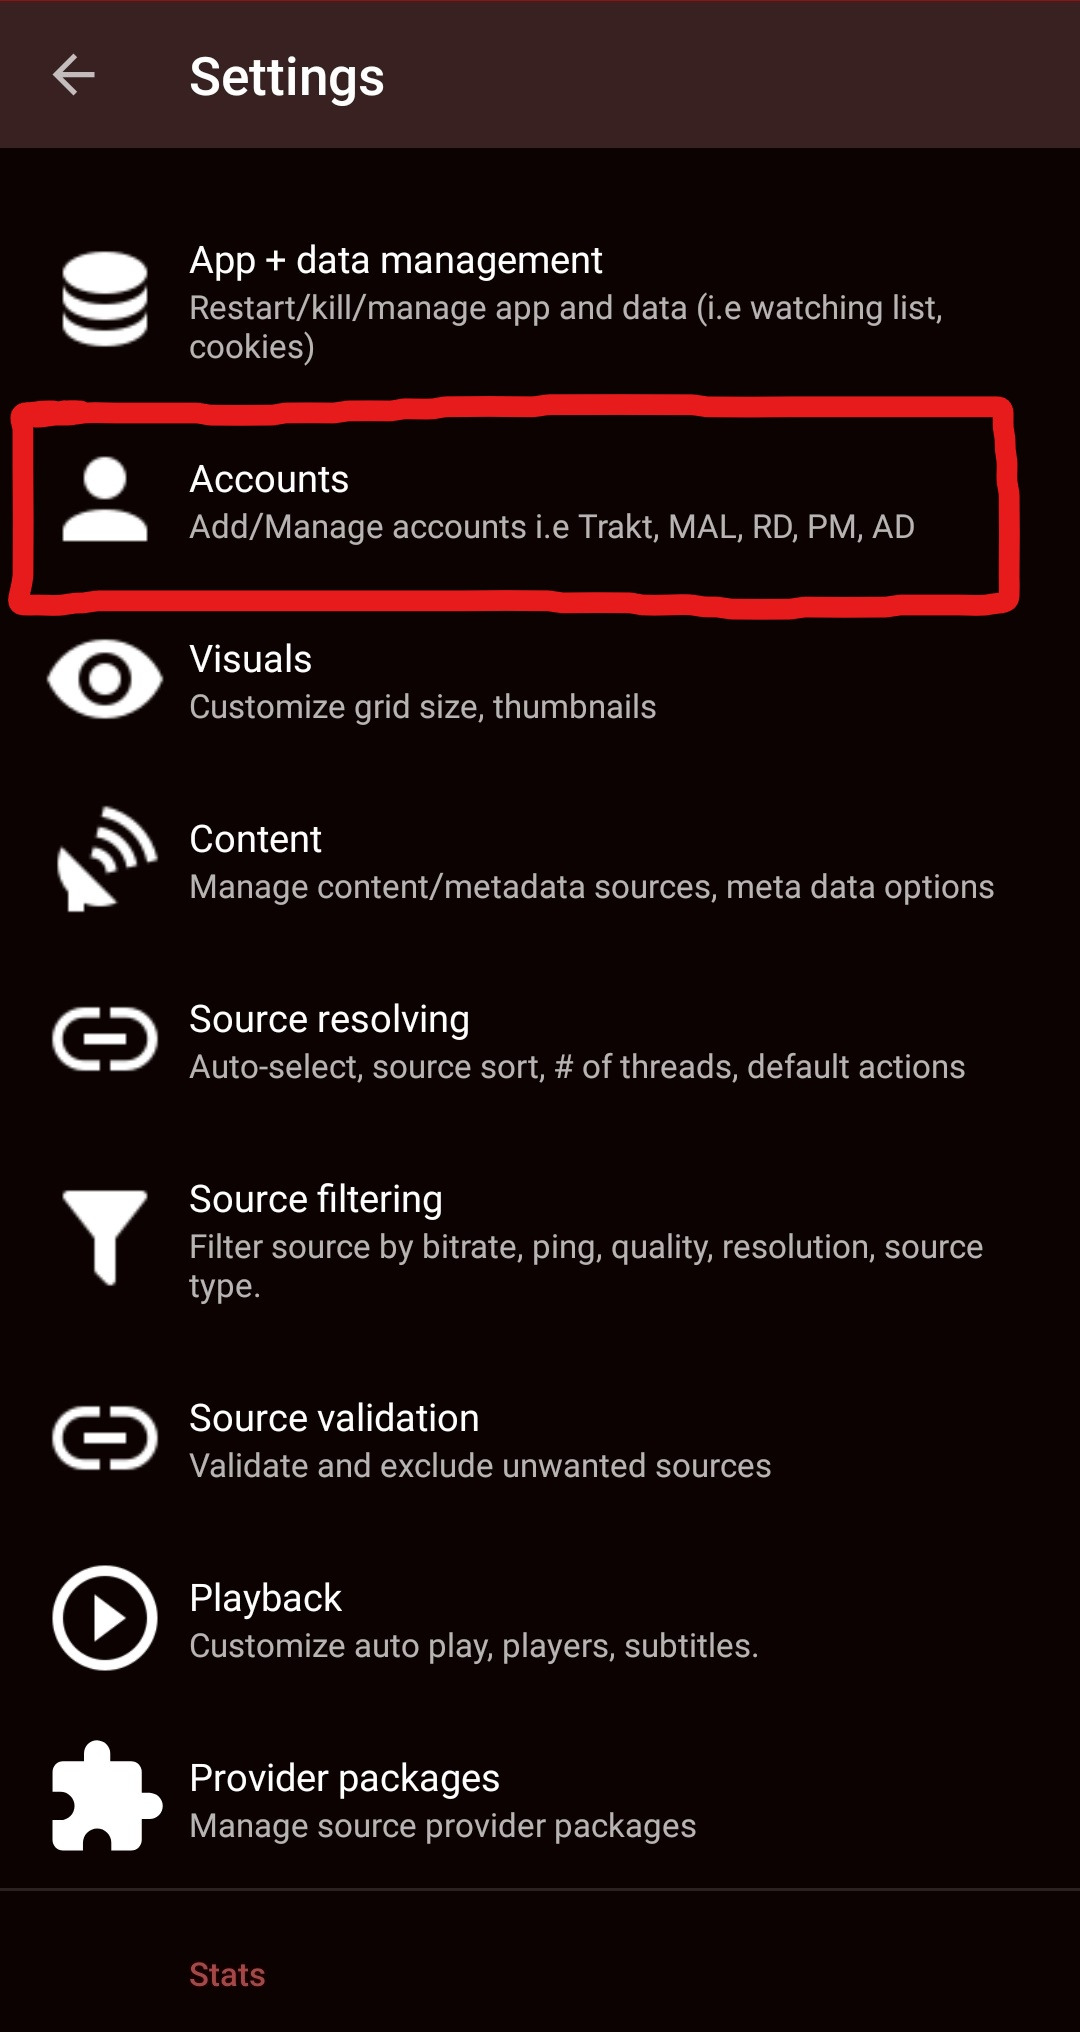
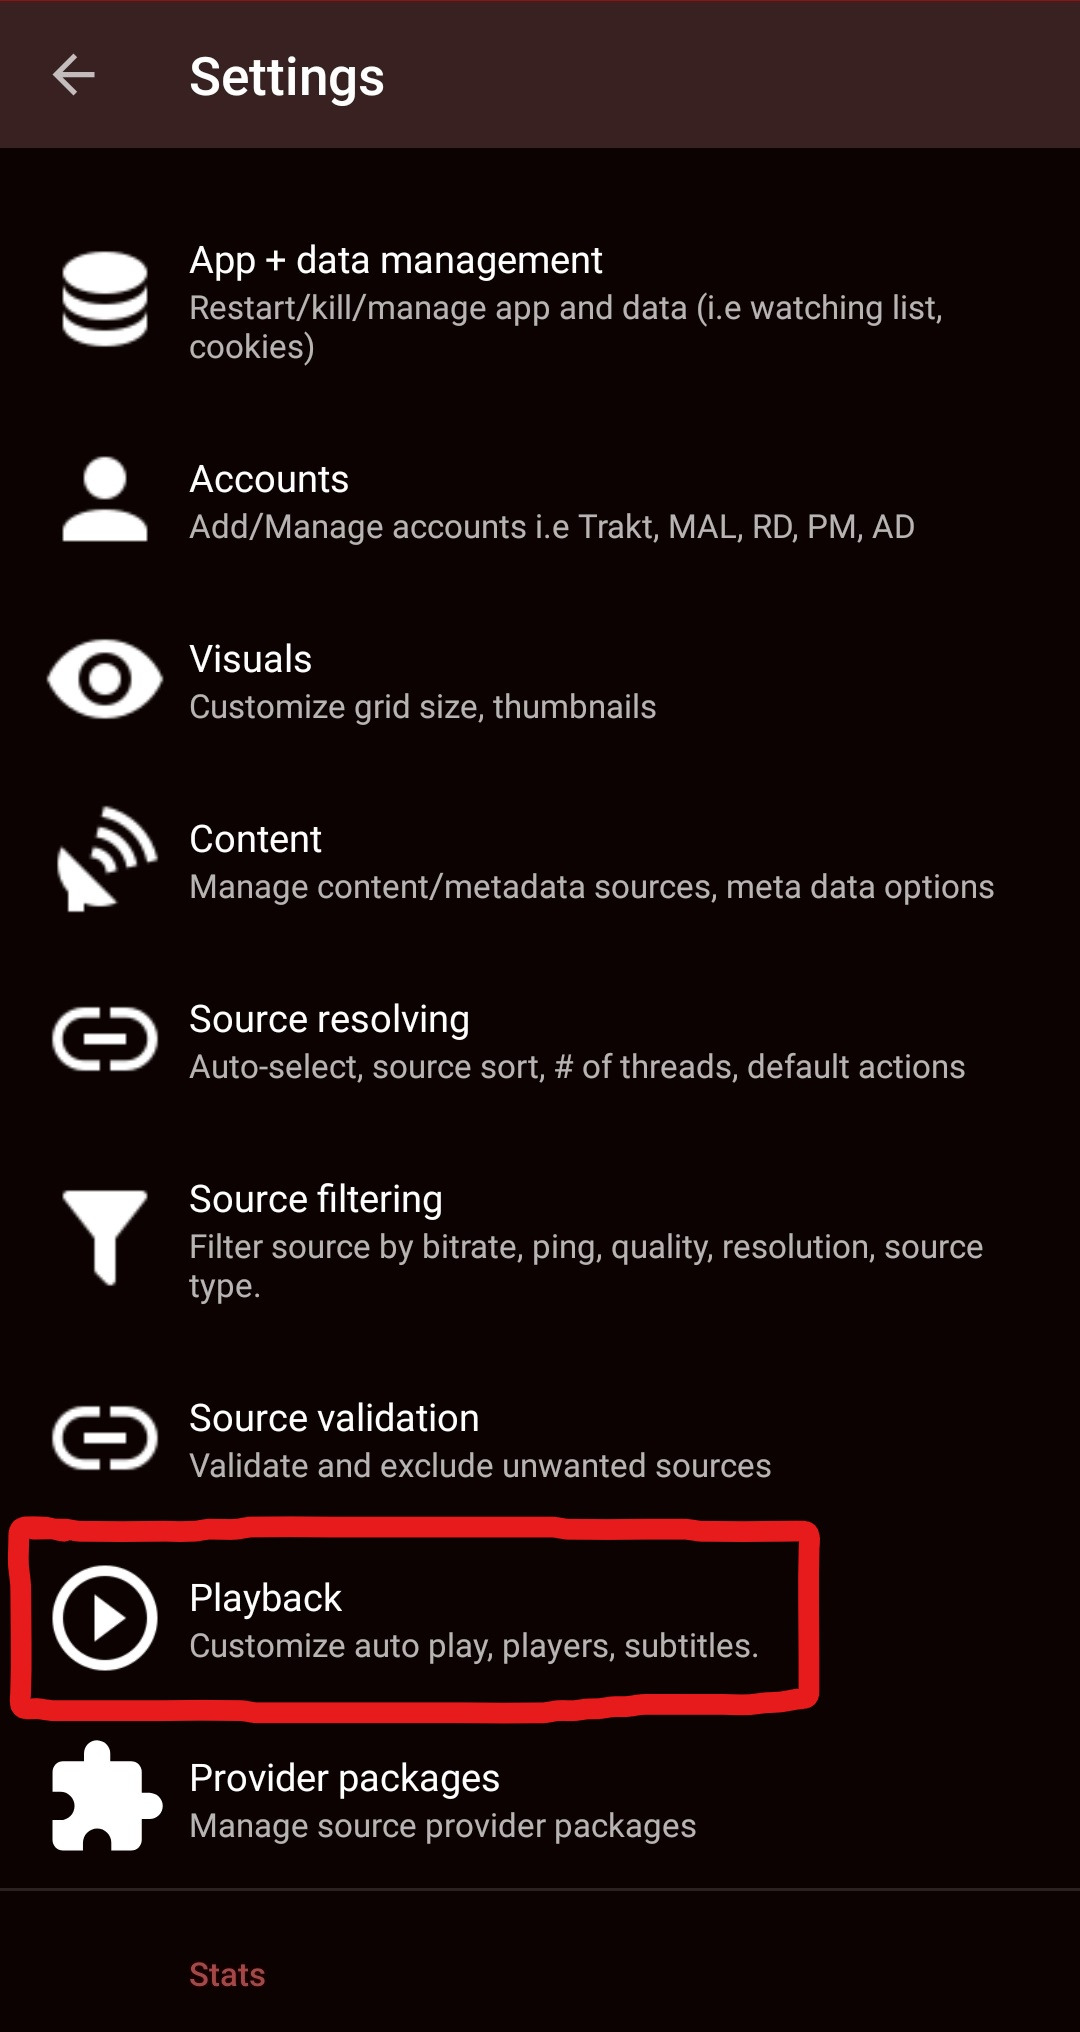
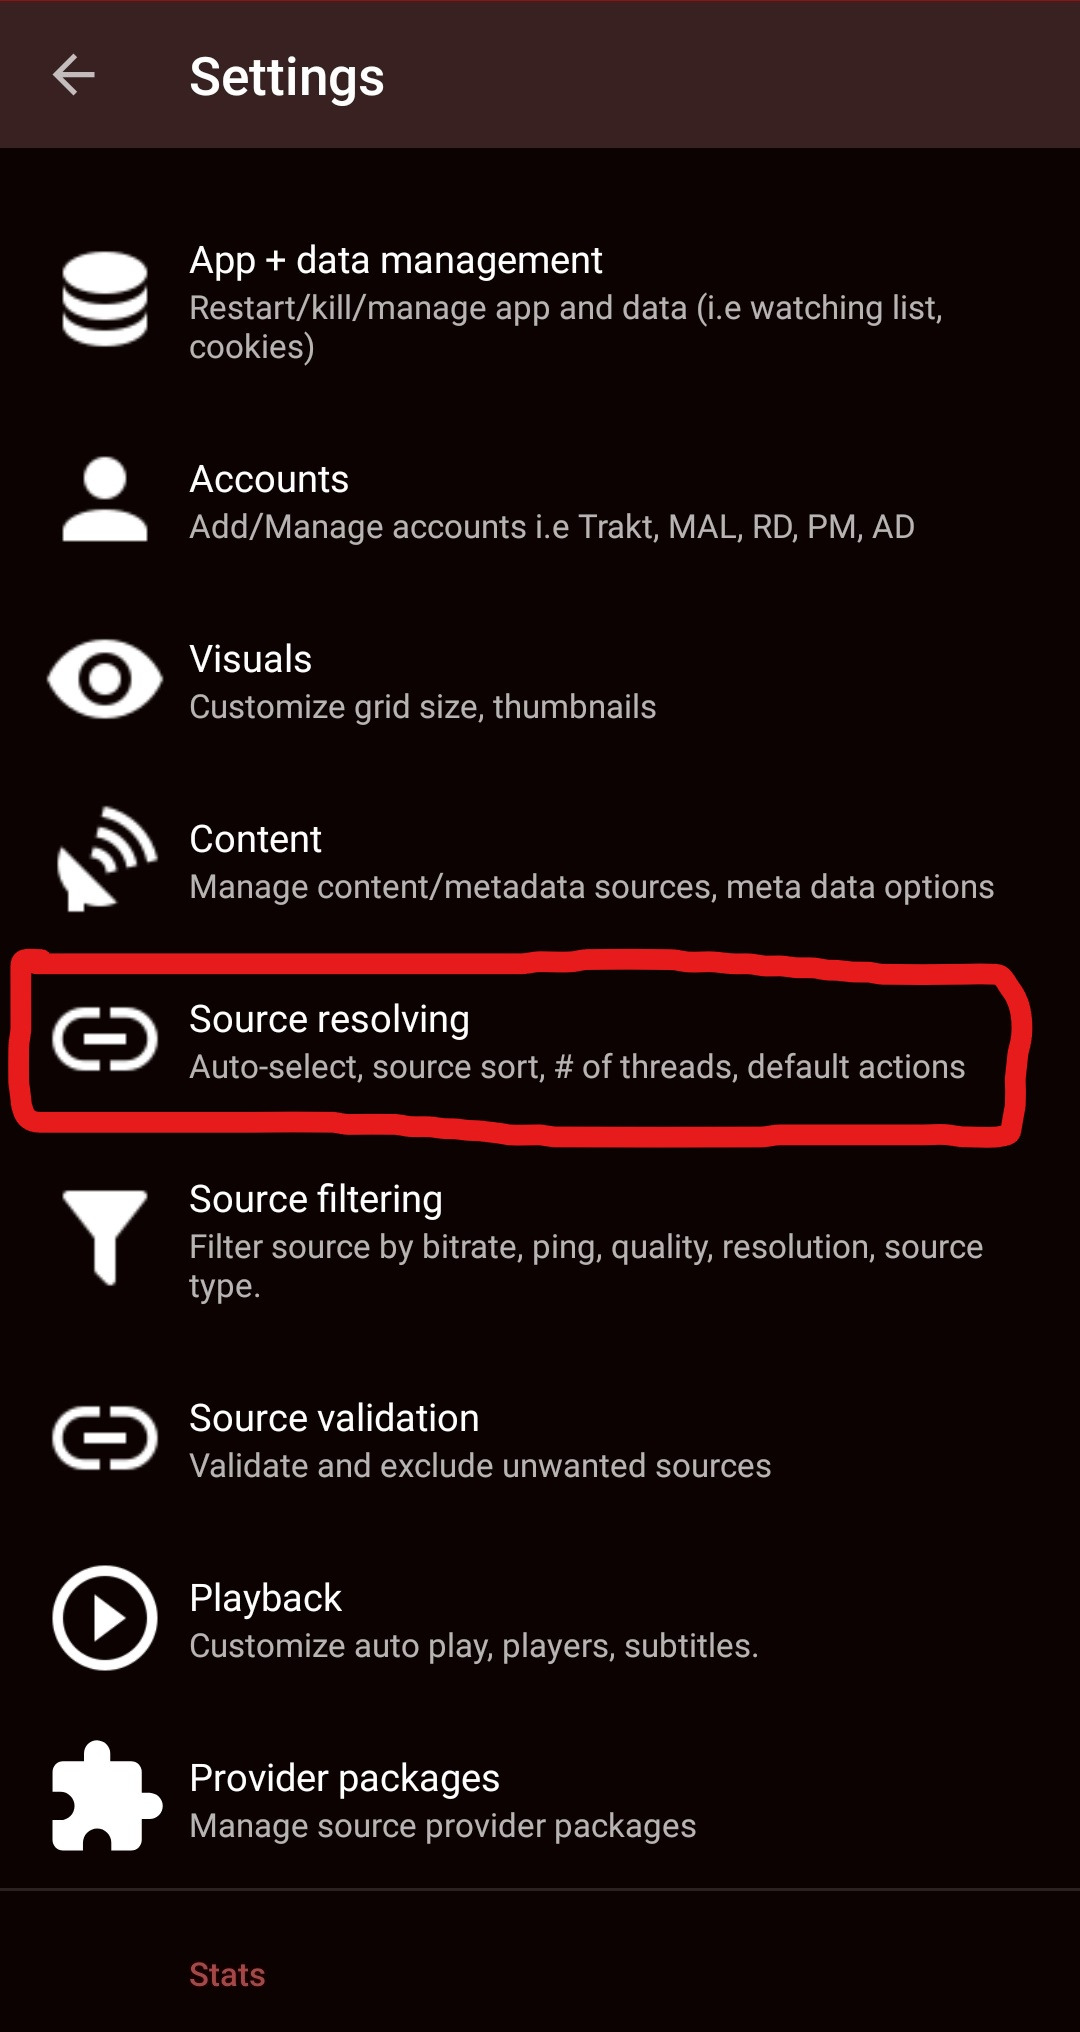
The settings menu
Open the side menu and press the Settings option.

The page now shows every category of setting that you can customize in Syncler. There are also short headings which show the main features inside each category for easy access.
For the next sections we will be inside the “Accounts” category, press this and continue reading.
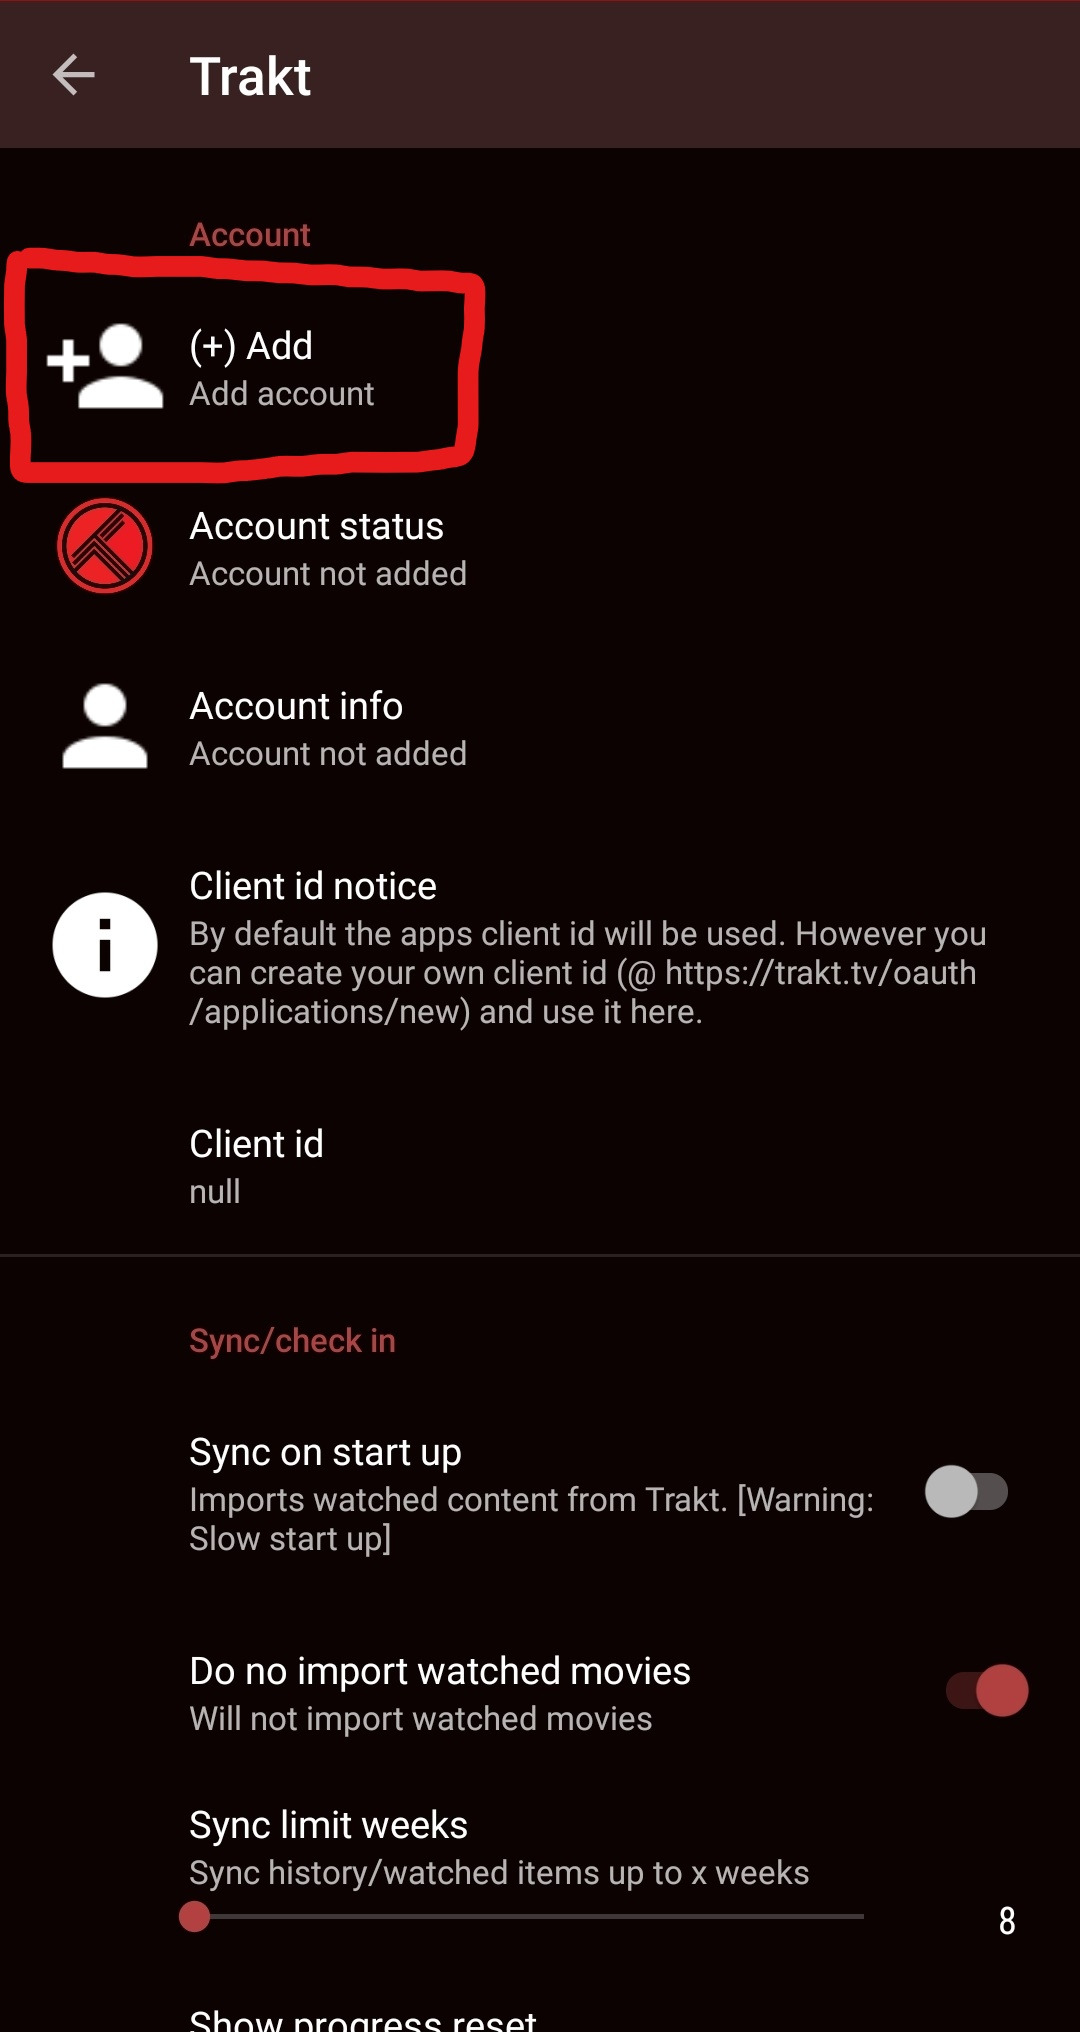
11.
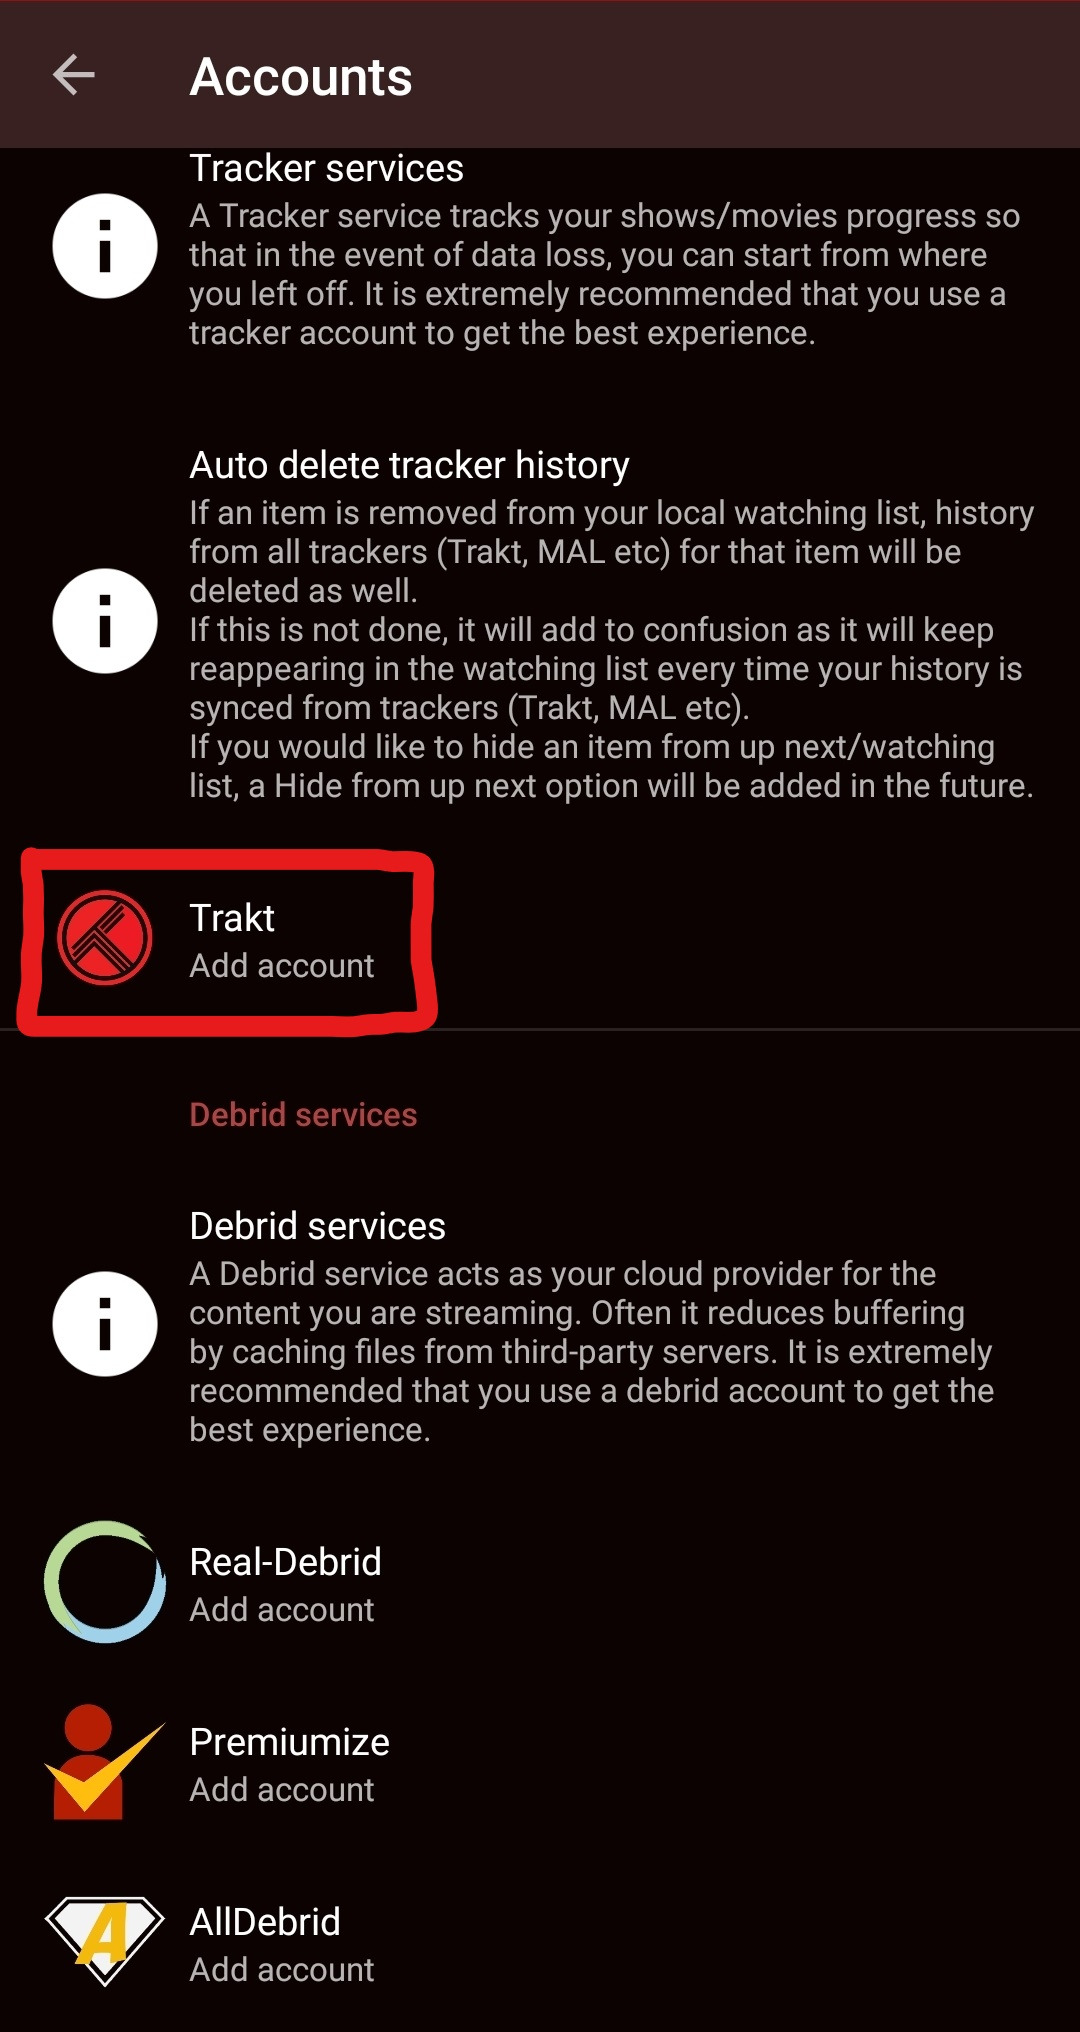
Connecting Trakt
Connecting your Trakt.tv account is optional but highly recommended. If you don’t have one already, you can sign up and use one for free!
Link to the Trakt website can be found here
Once you’ve signed up, make sure your profile is set to public and any lists you’ve liked / created are also public.
Disable your VPN / Adblocker / DNS, you can turn it on again after completing this section.
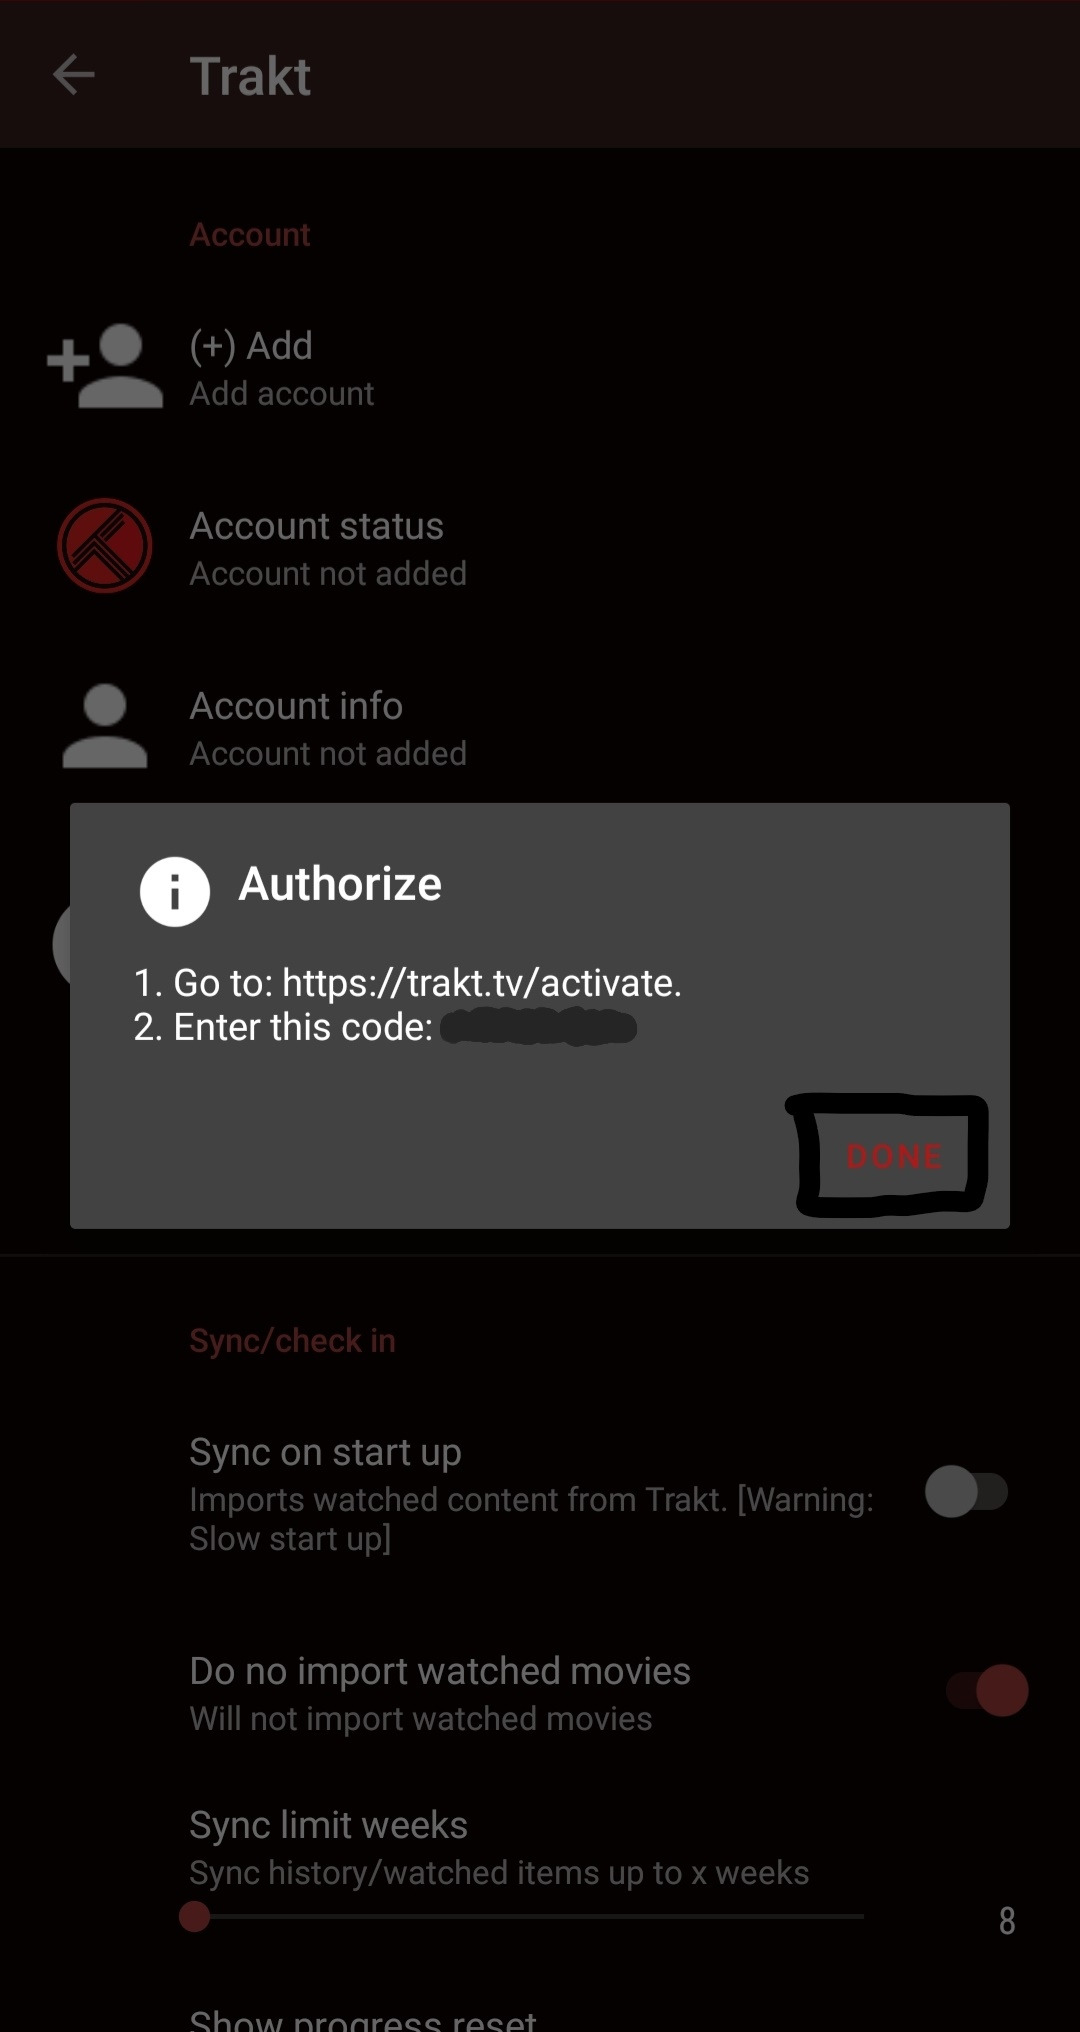
Inside Syncler, press the Trakt option and on the next screen press “Add account”.
A popup should open and direct you to their device activation website, where you enter the code shown on your device.
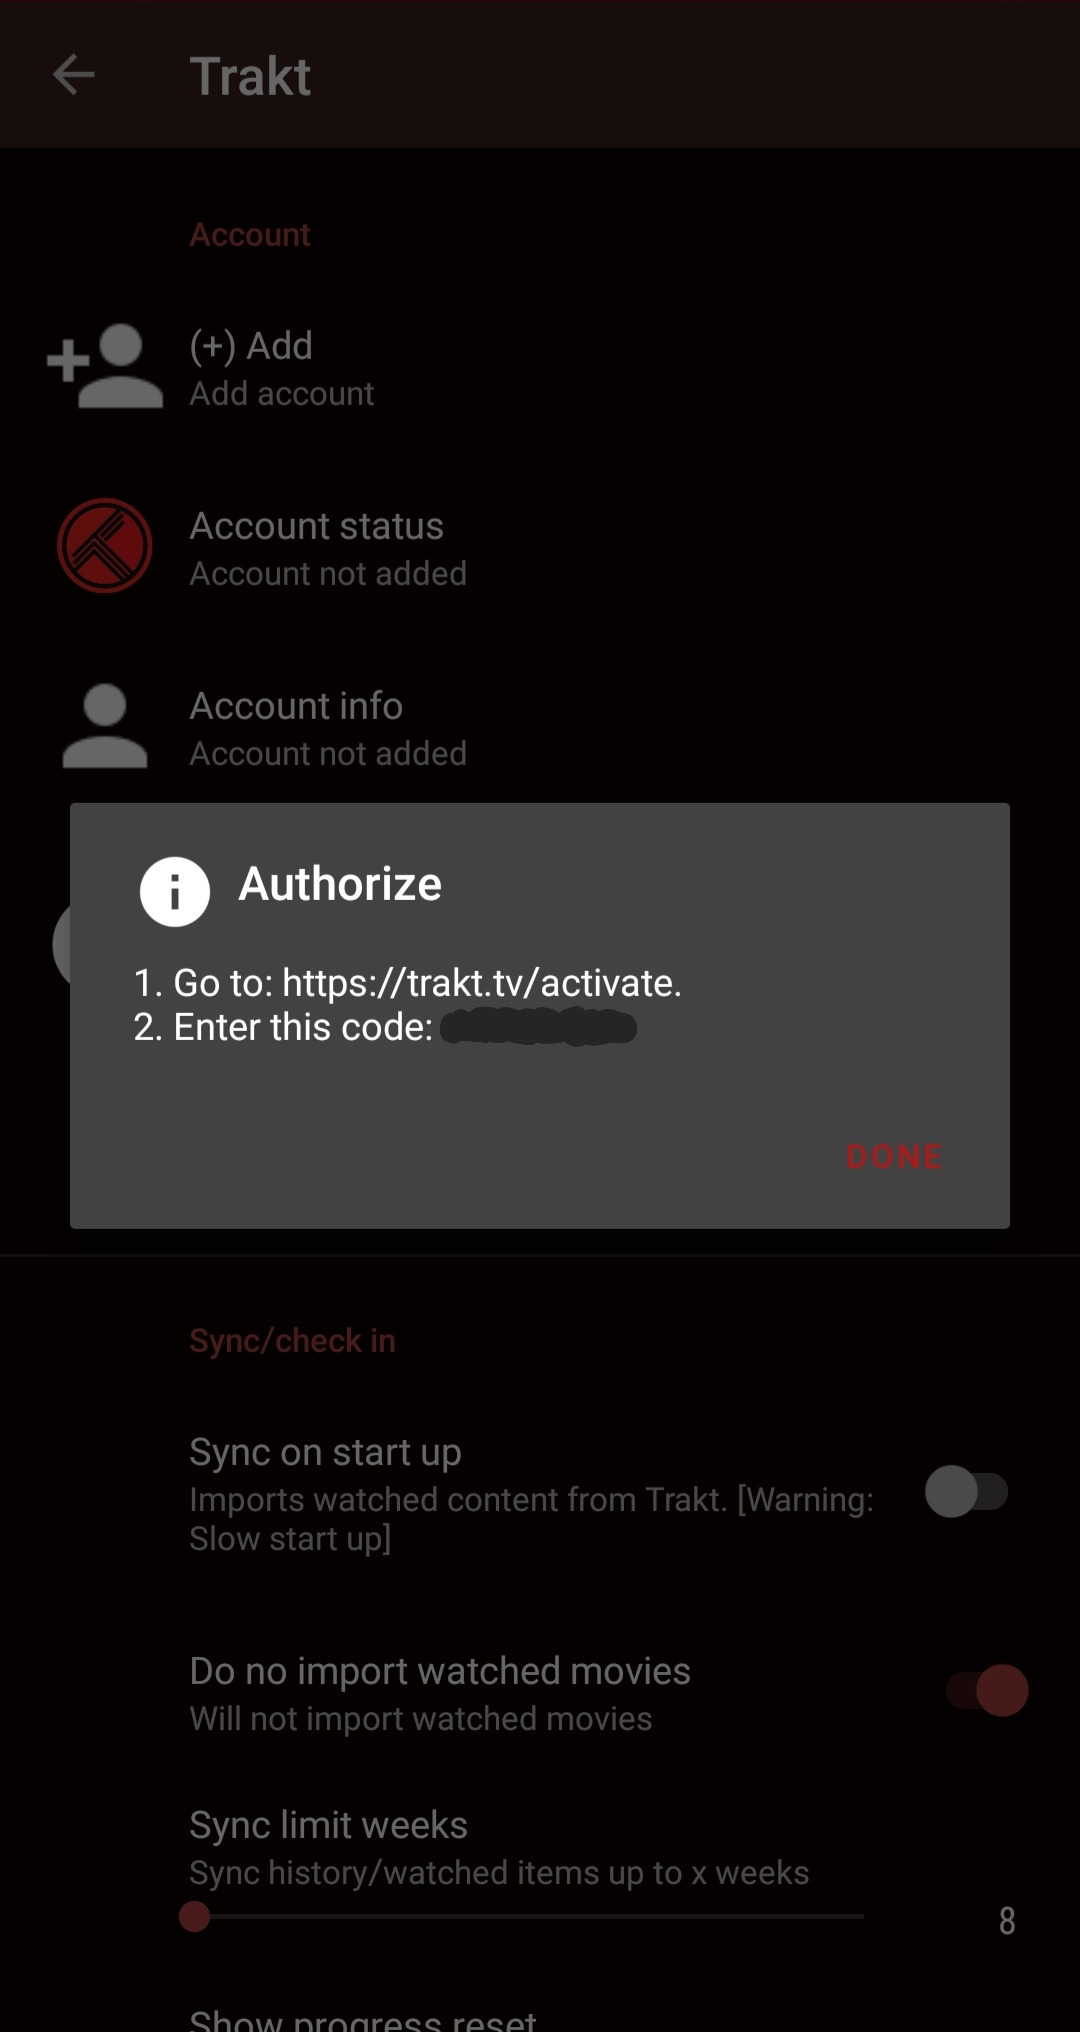
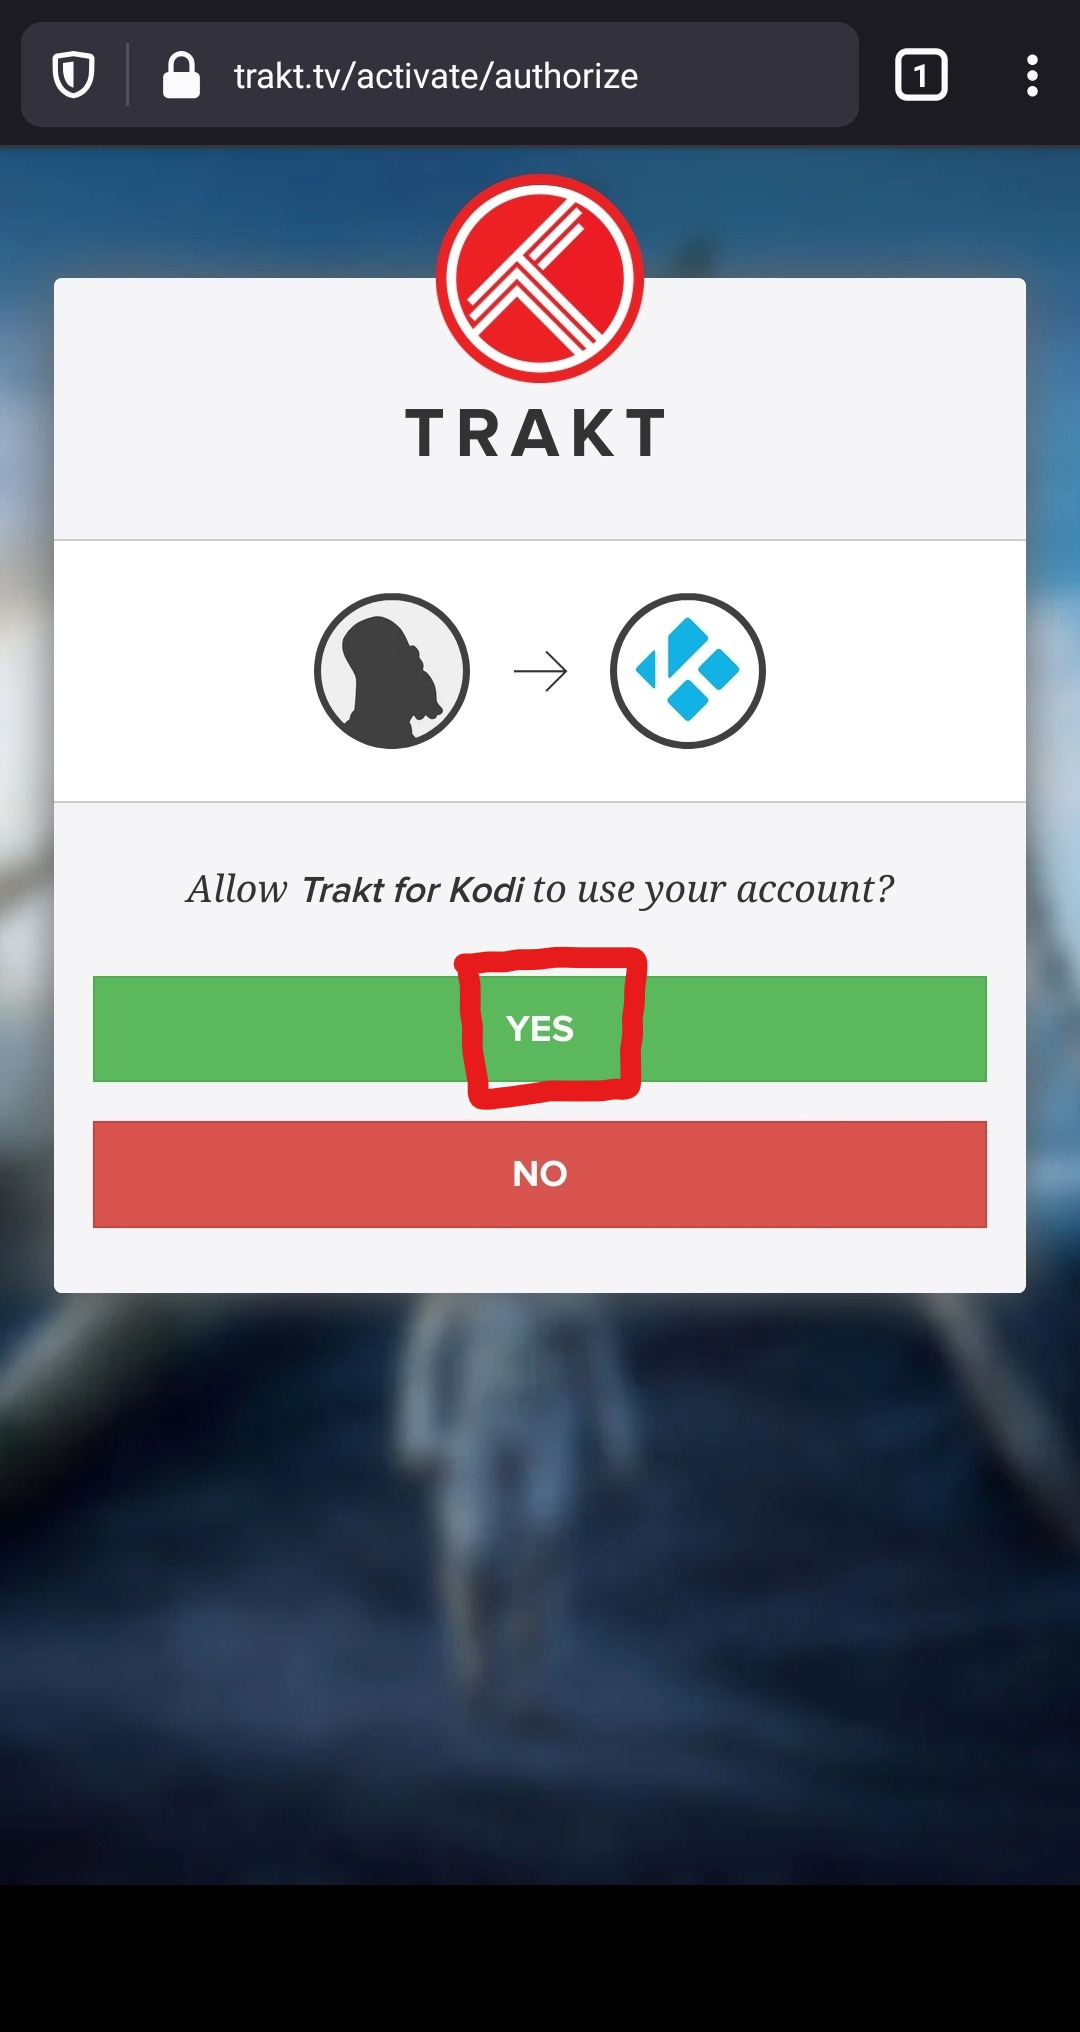
Log in to Trakt on another device, then open the above link and enter the code from Syncler. Trakt will ask your permission to link your account to the device, press "Yes".

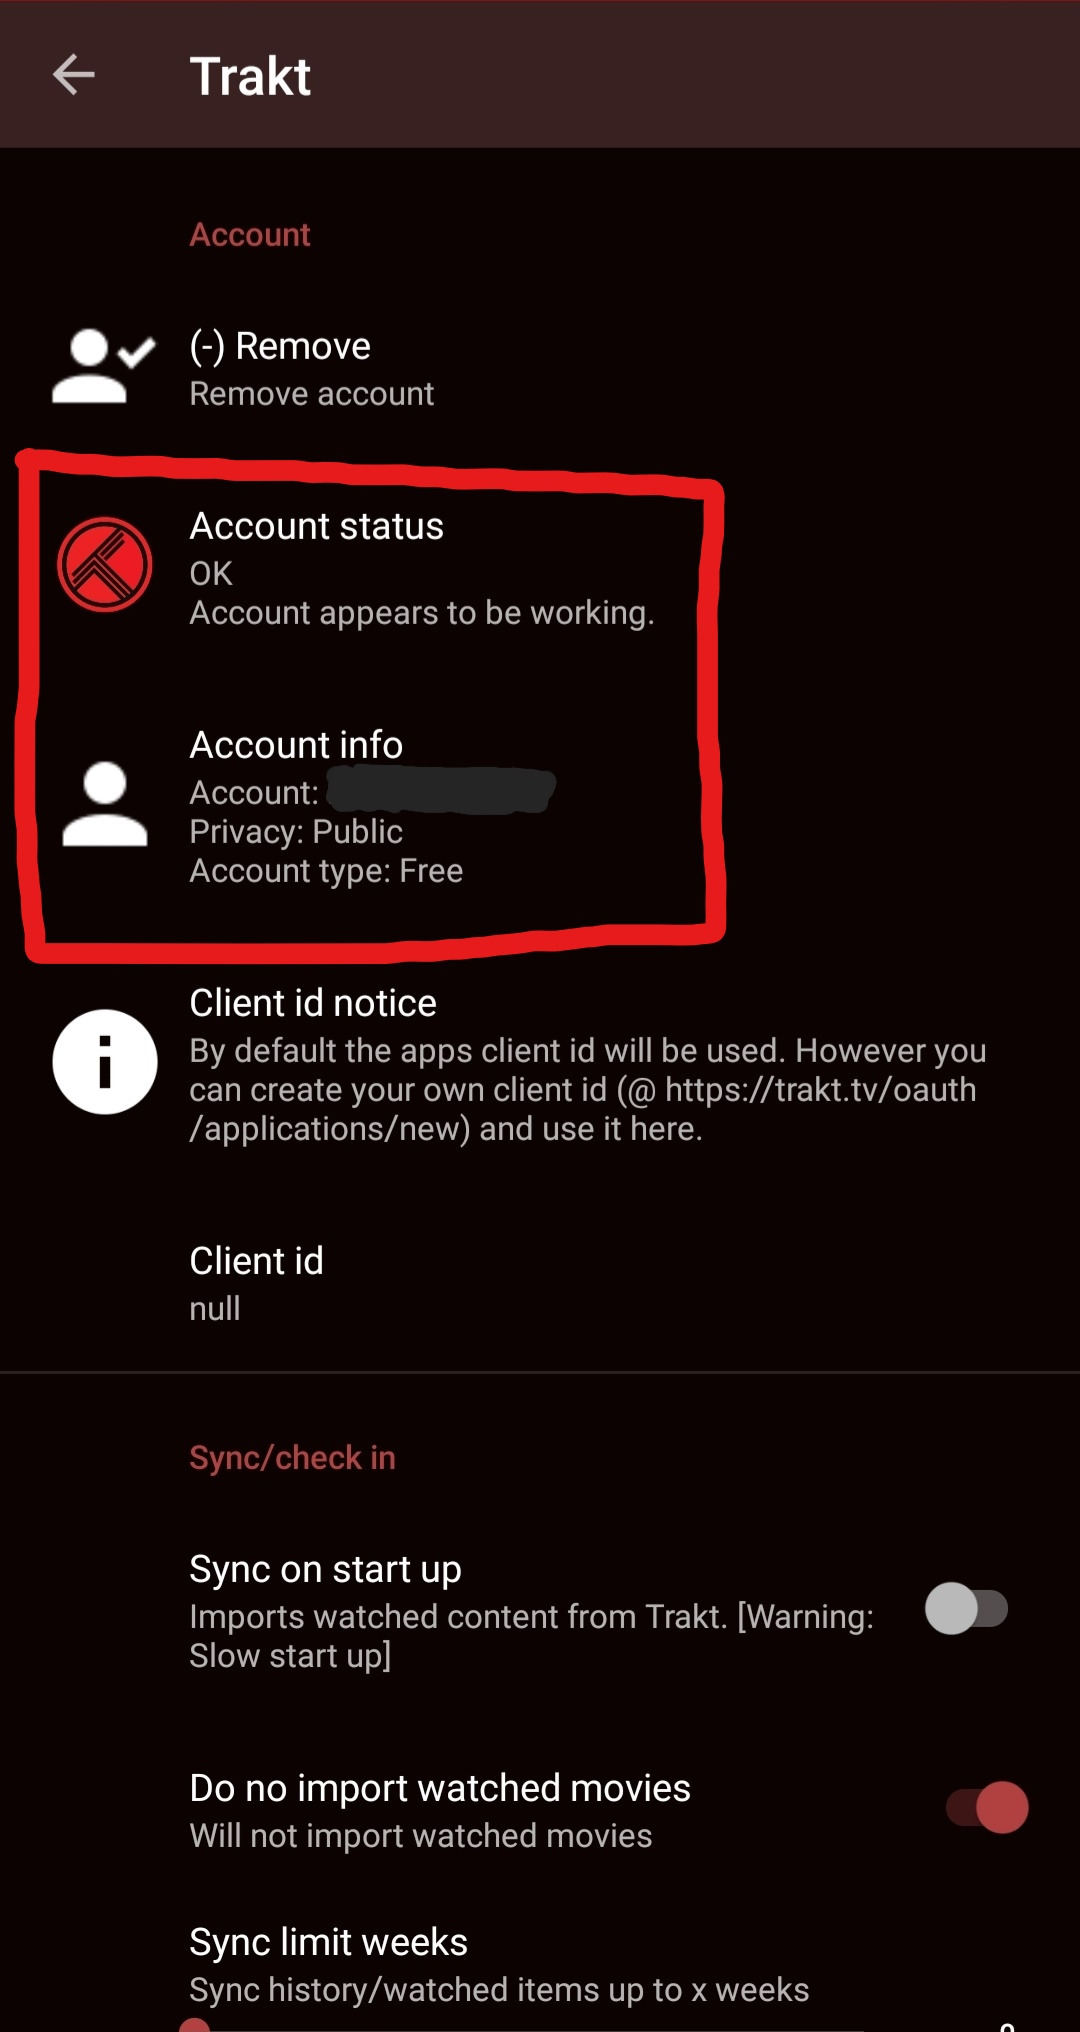
The Trakt website will return if the process was successful and now you can press “Done” on the Syncler popup to finish adding the account.
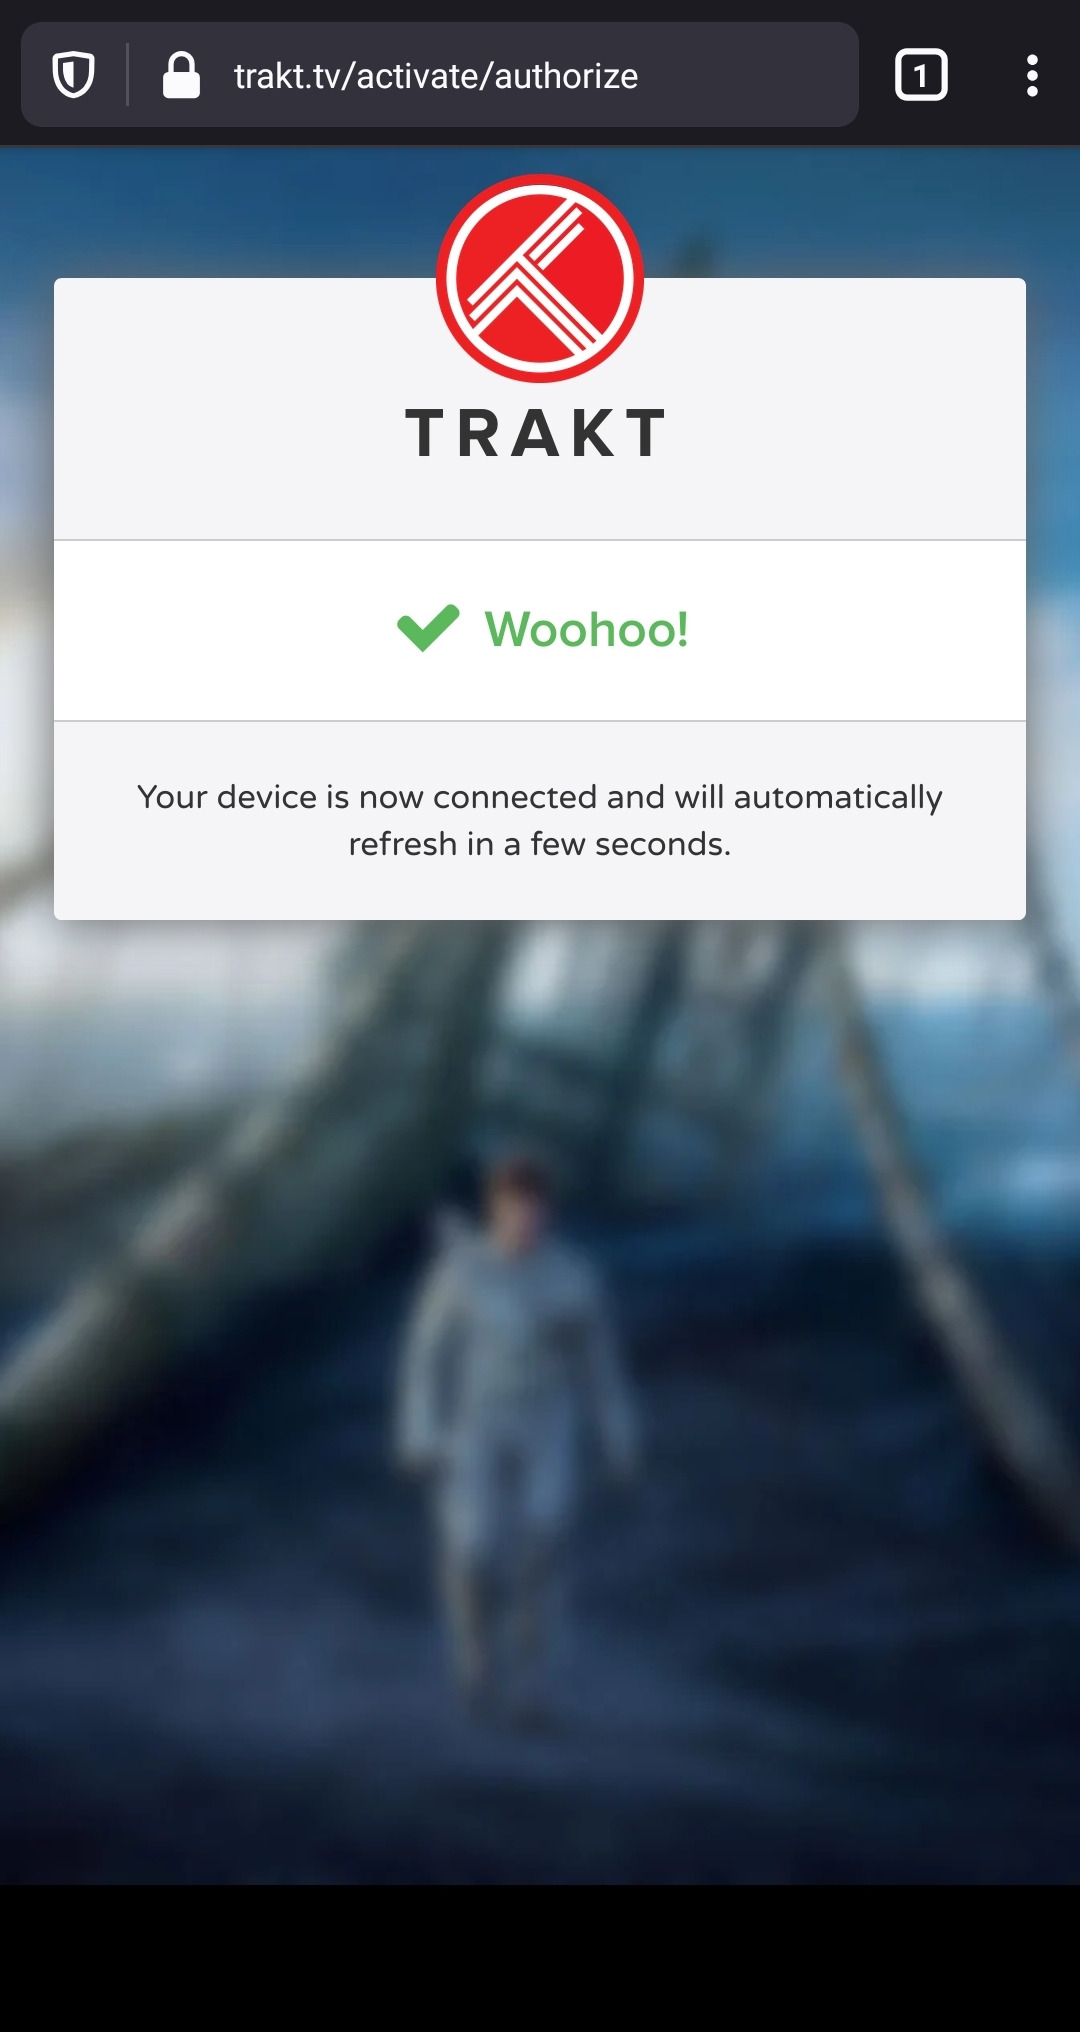
You will see a small refresh as your account status and information populates.
12.
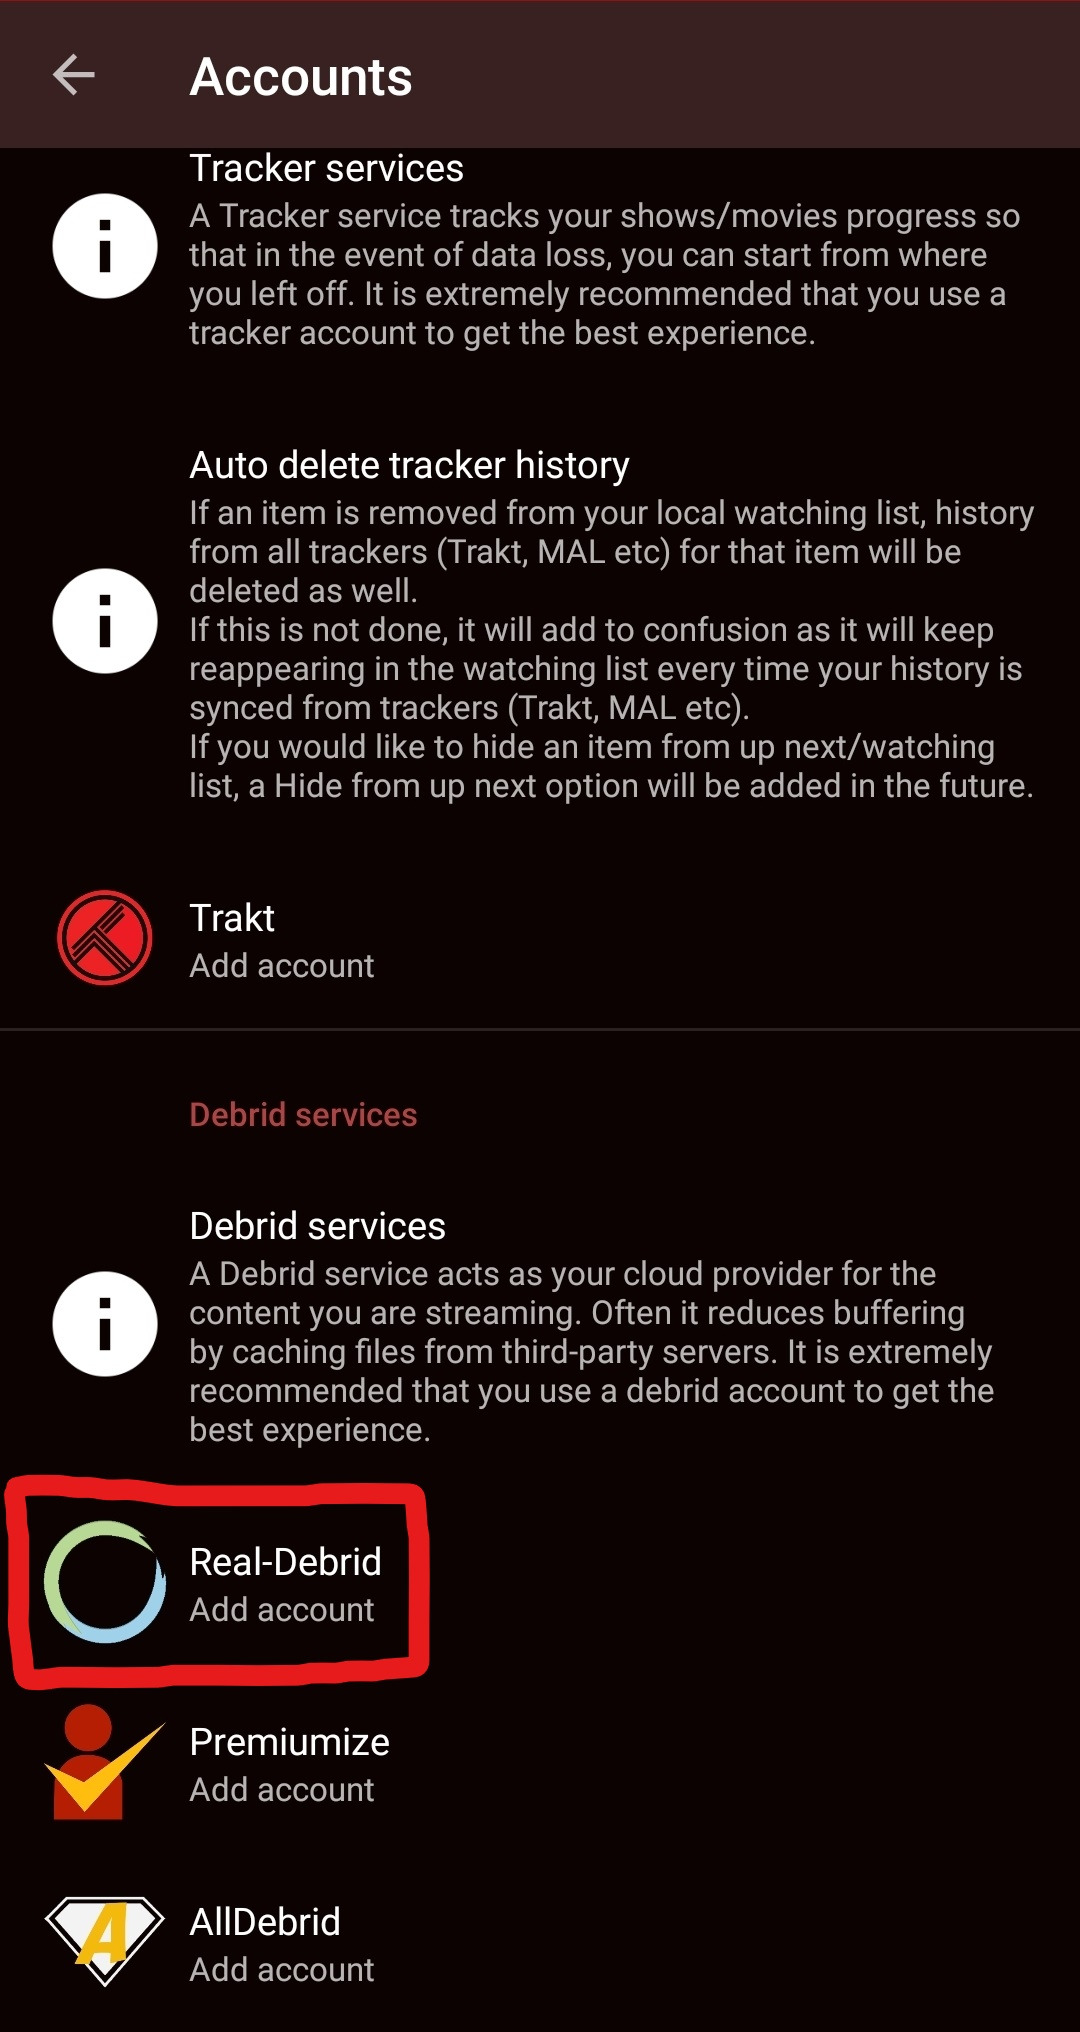
Connecting Real-Debrid
Connecting your Real-Debrid account is optional (only if using a non-debrid provider) but highly recommended. If you don’t have one already, you can sign up and purchase the service on their website!
Link to the Real-Debrid website can be found here
Disable your VPN / Adblocker / DNS, you can turn it on again after completing this section.
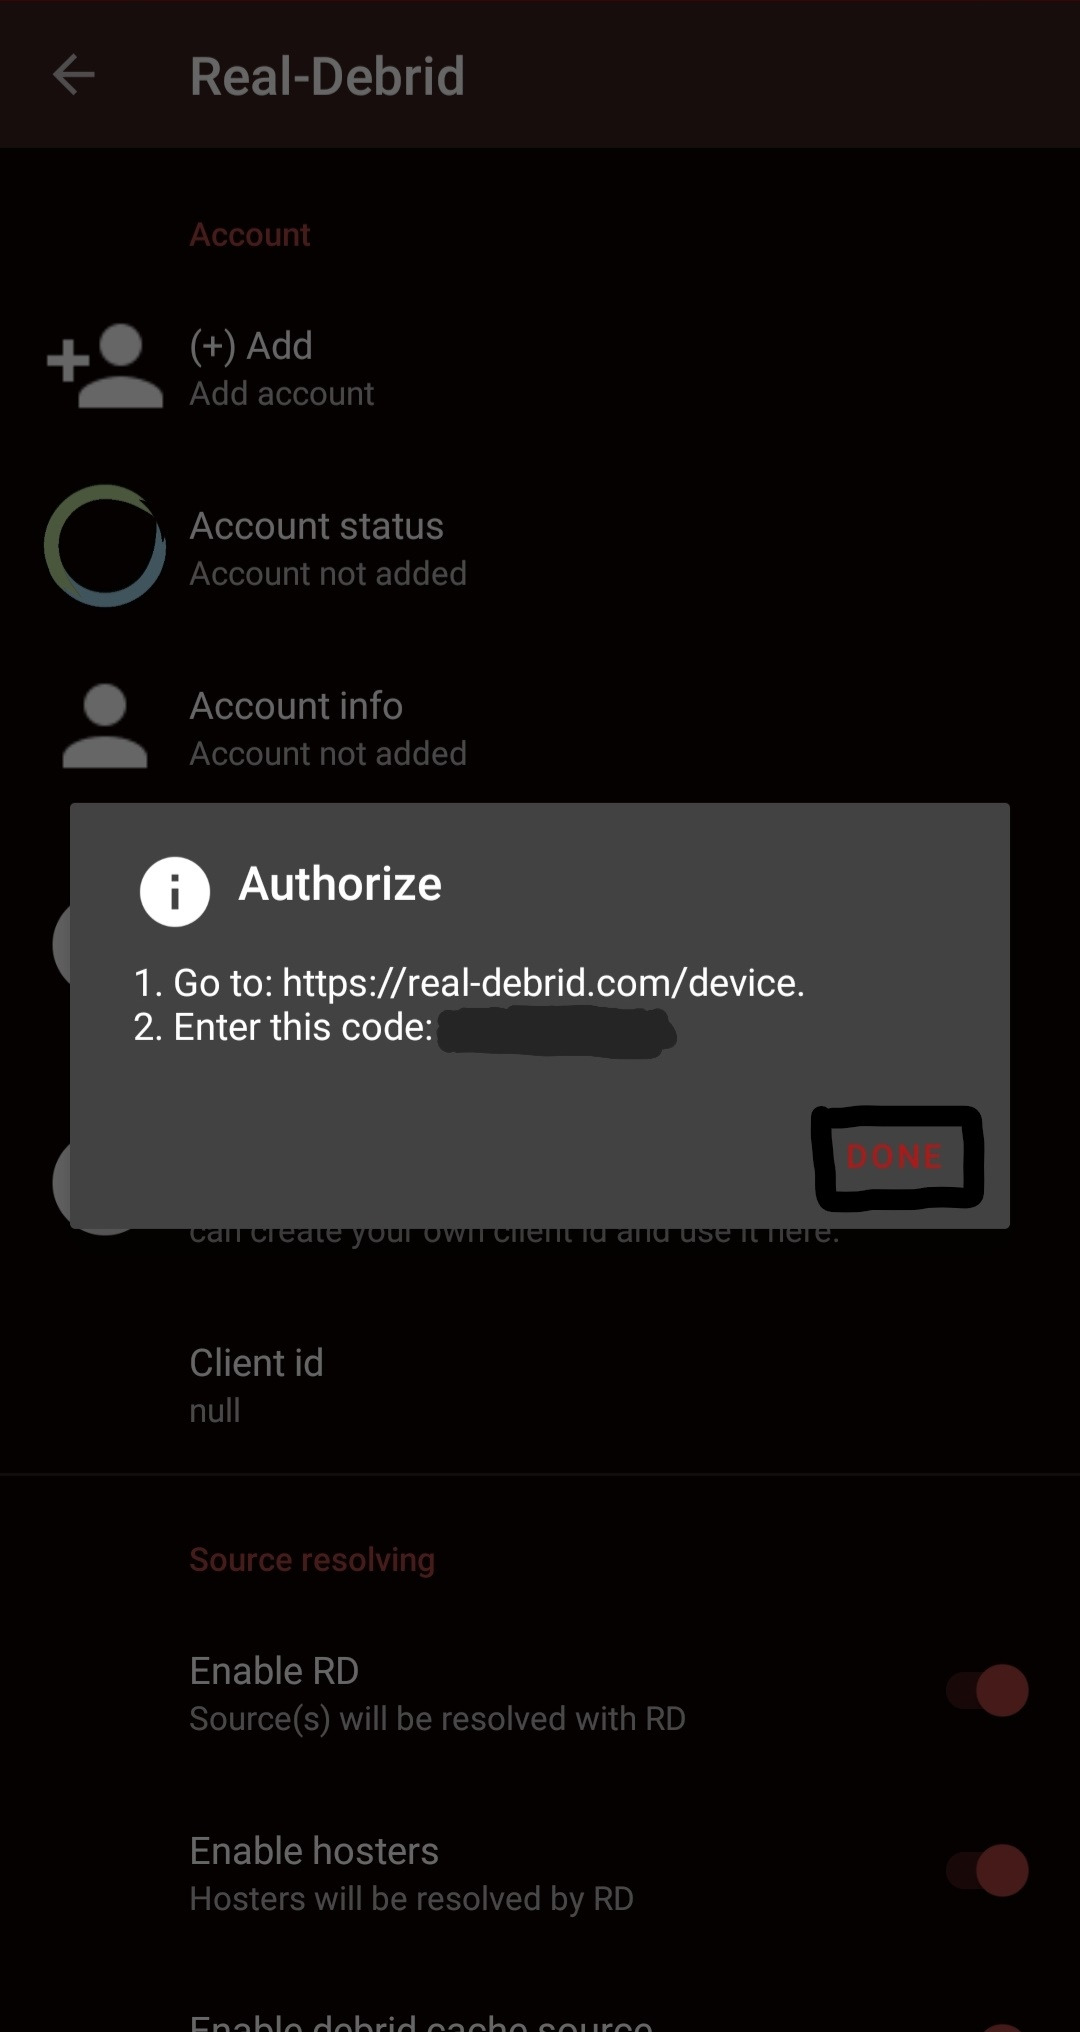
Inside Syncler, press the Real-Debrid option and in the next screen press “Add account”.
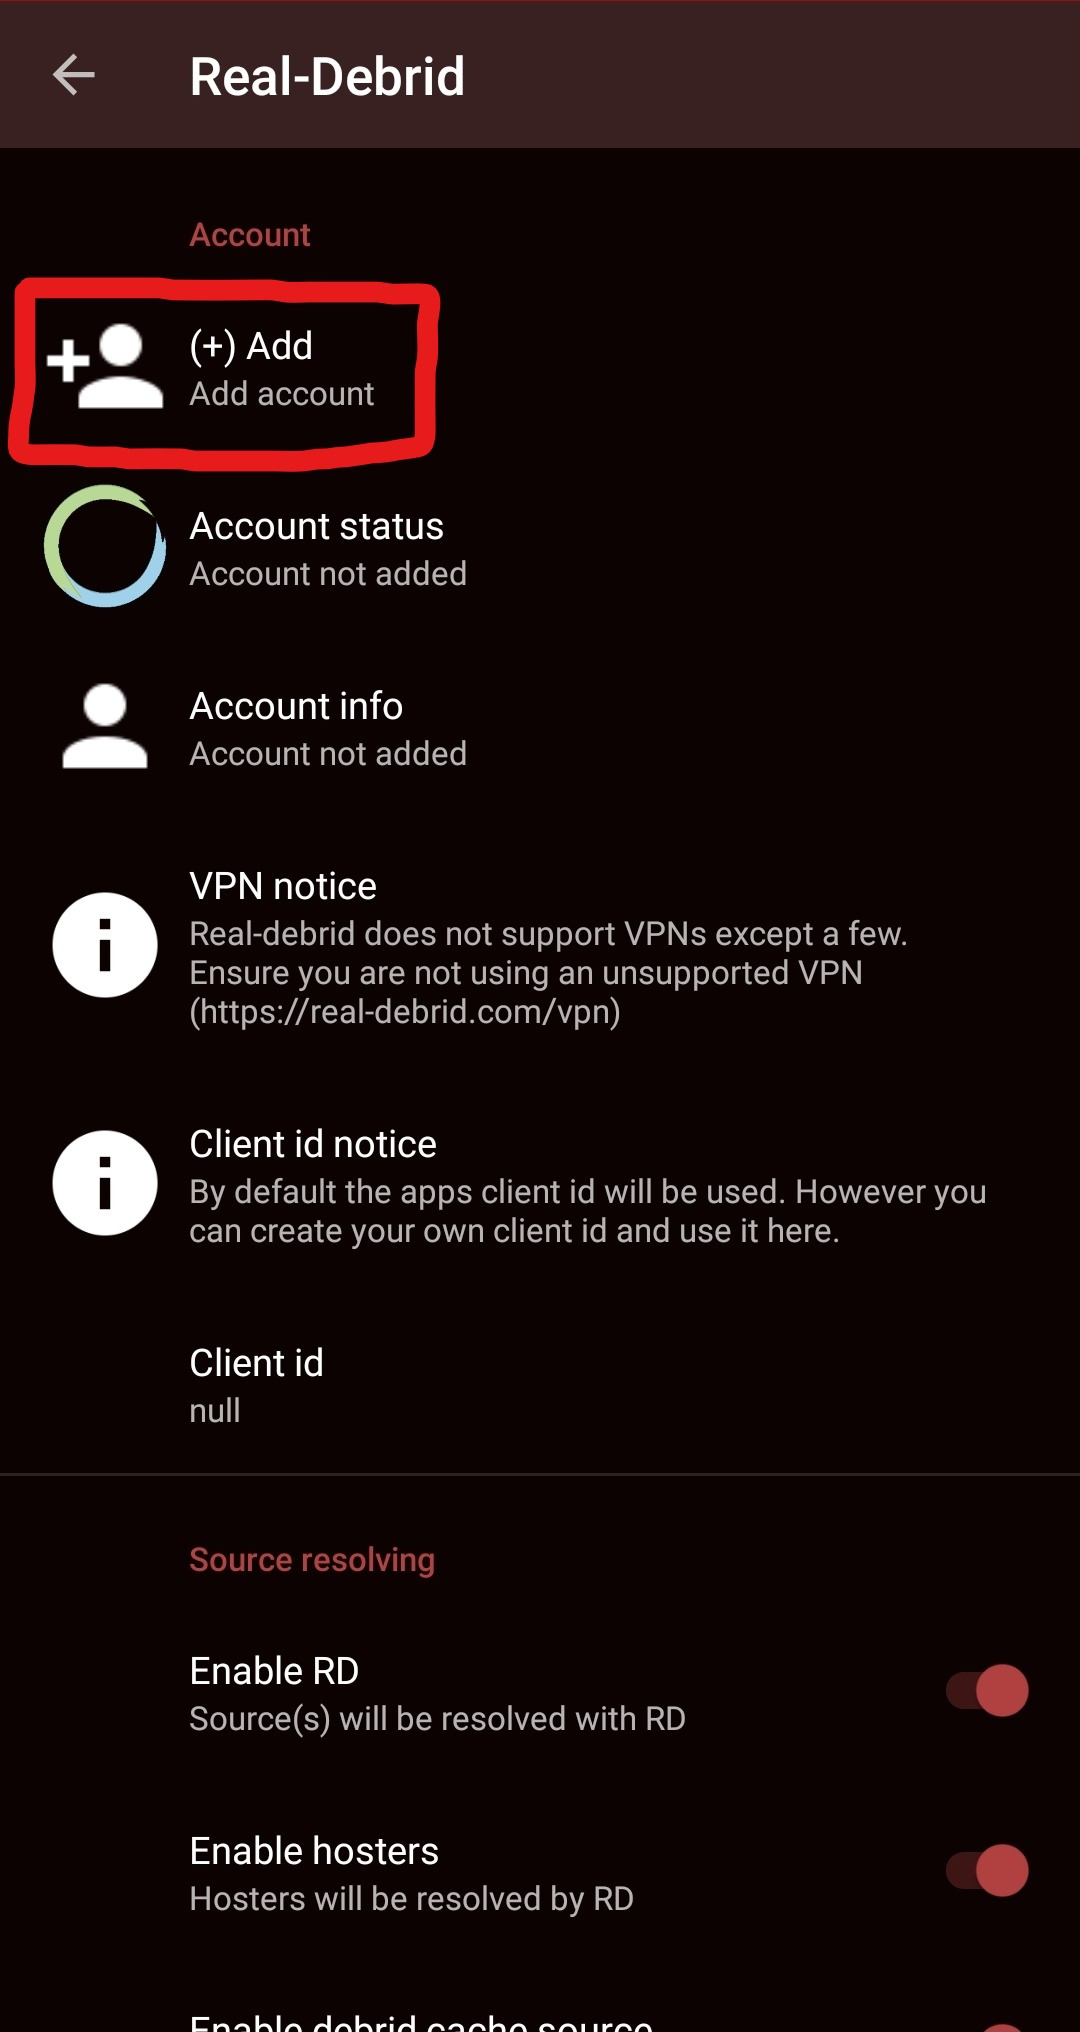
A popup should open and direct you to their device activation website, where you enter the code shown on your device.
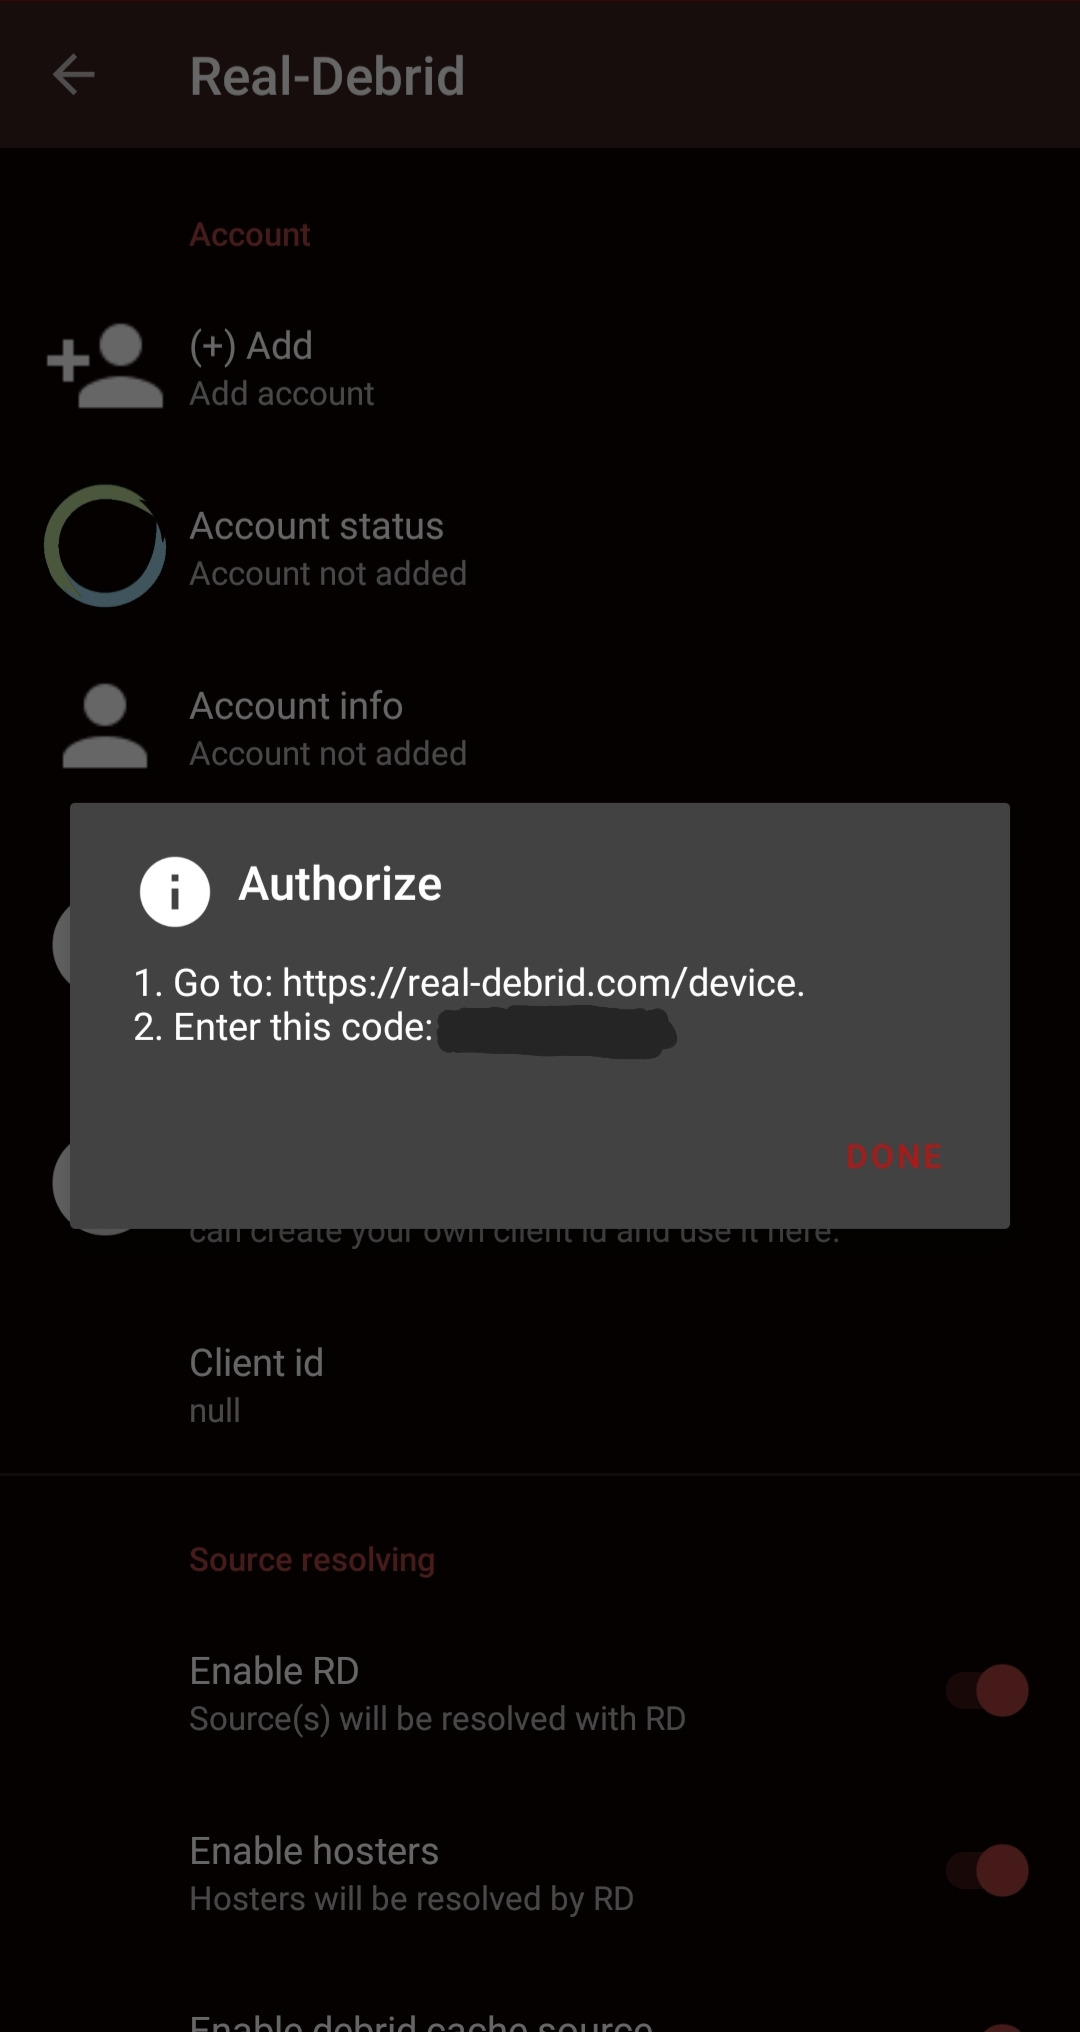
Log in to Real-Debrid on another device, then open the above link and enter the code from Syncler.
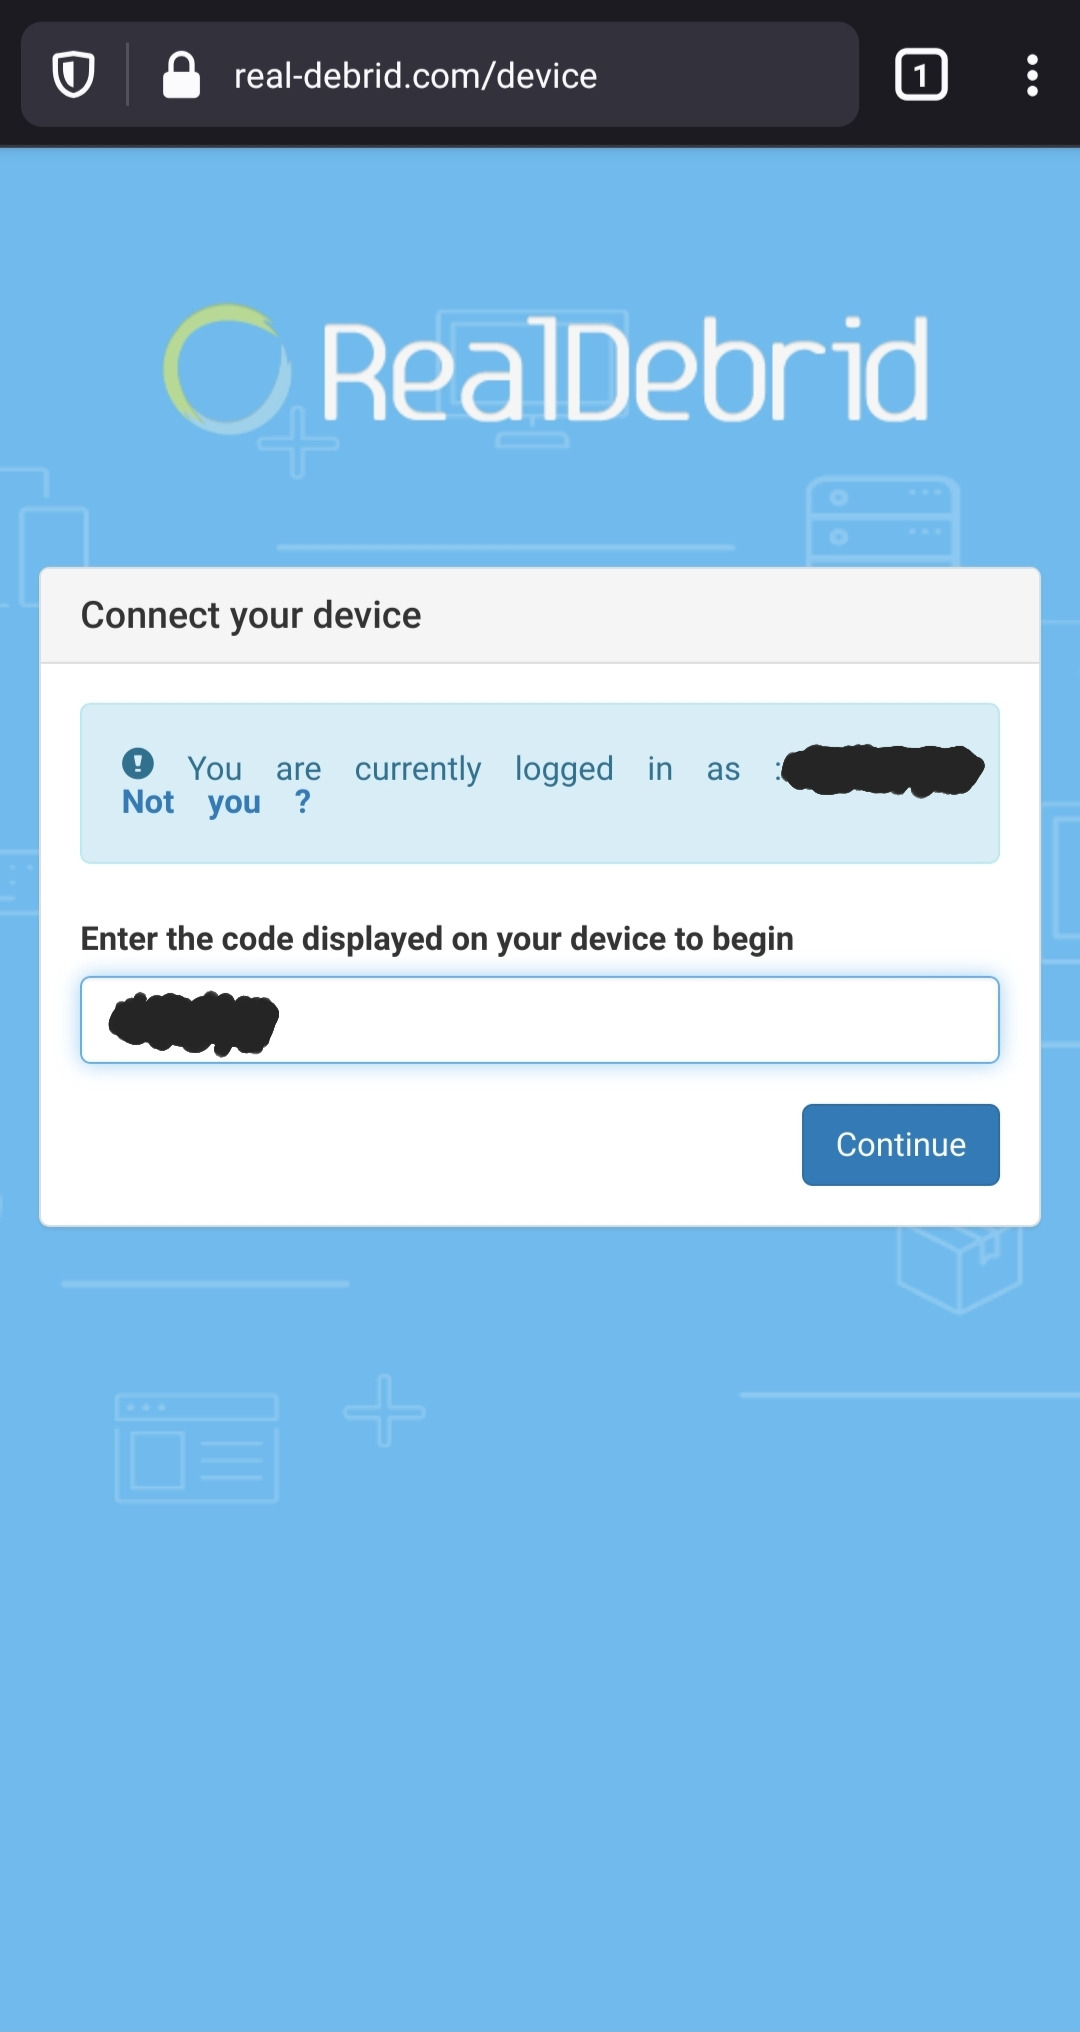
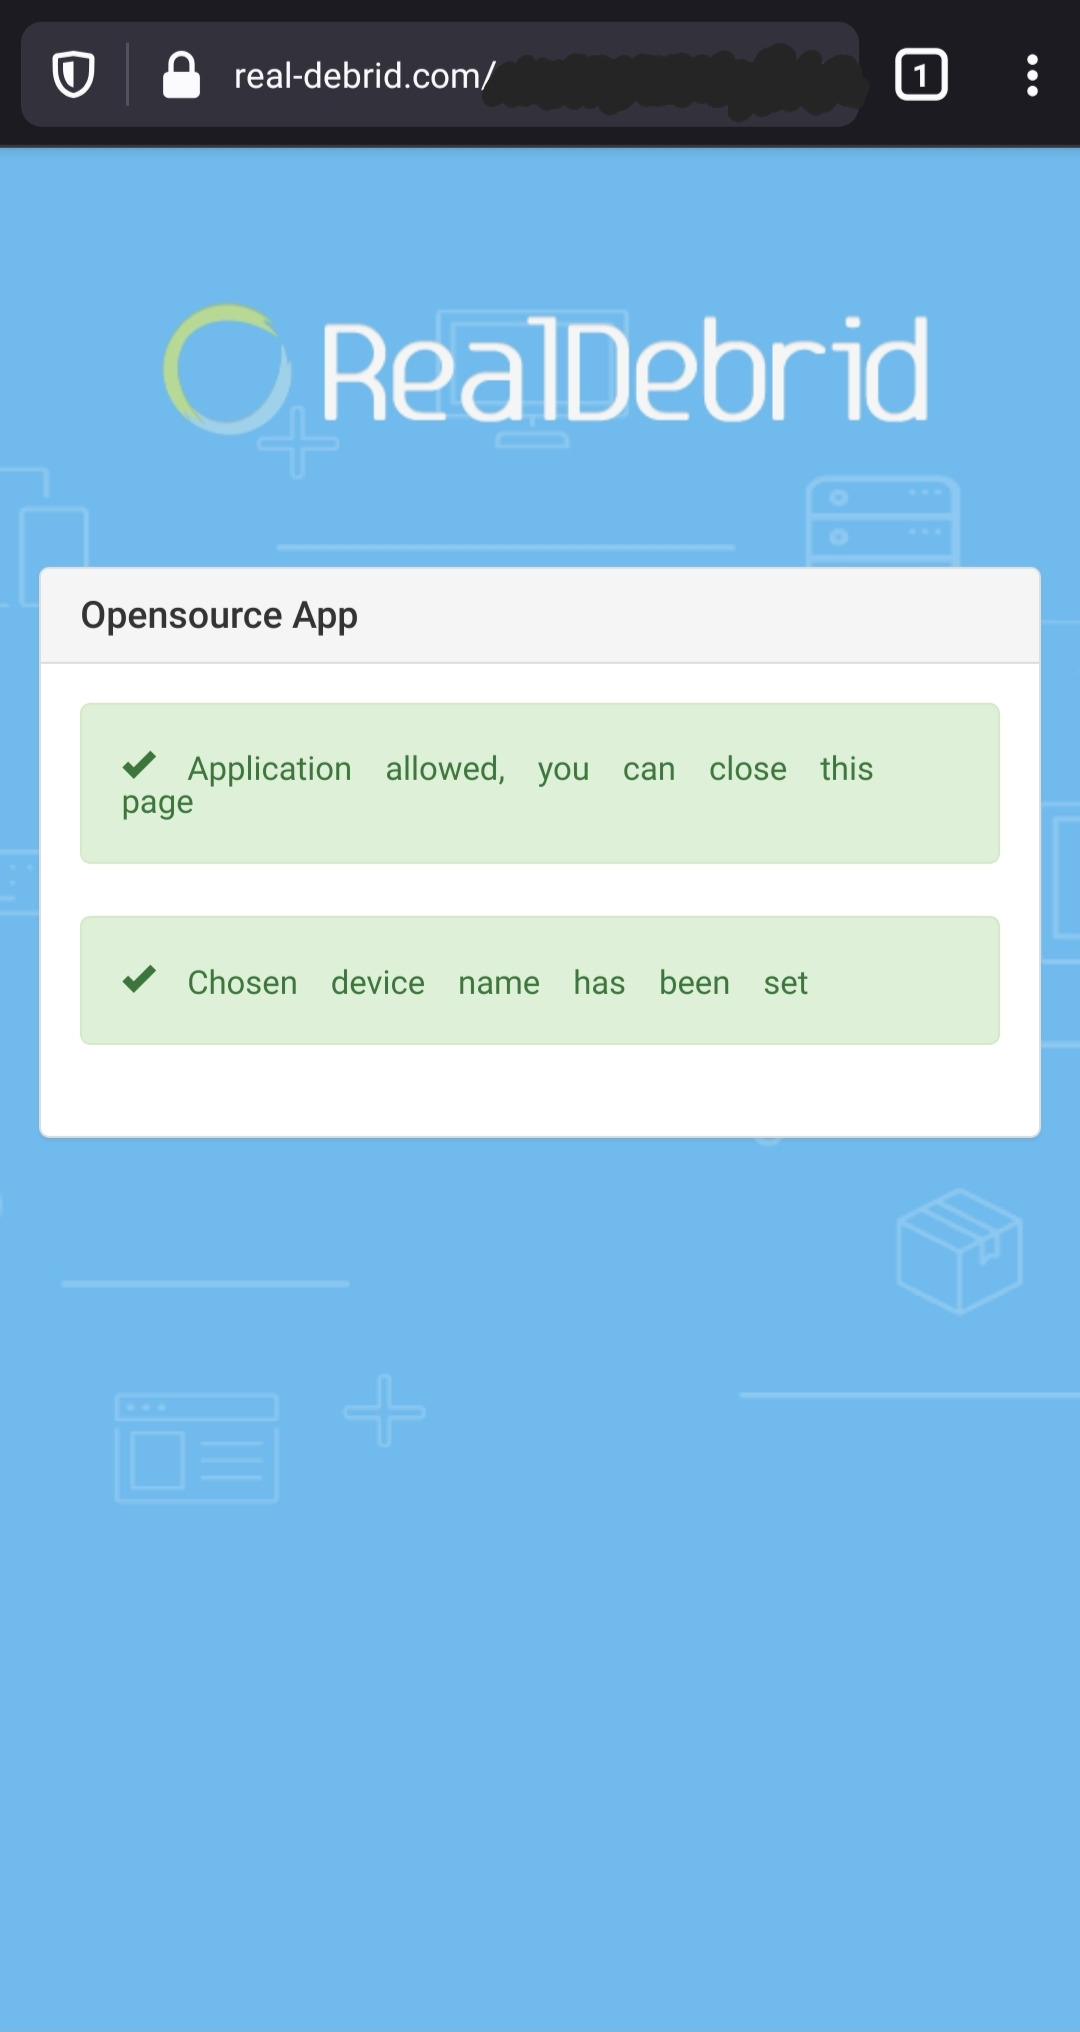
Real-Debrid will also ask you to name your device, this is optional but makes it easier to track which apps and which devices you’ve added your Real-Debrid account to.
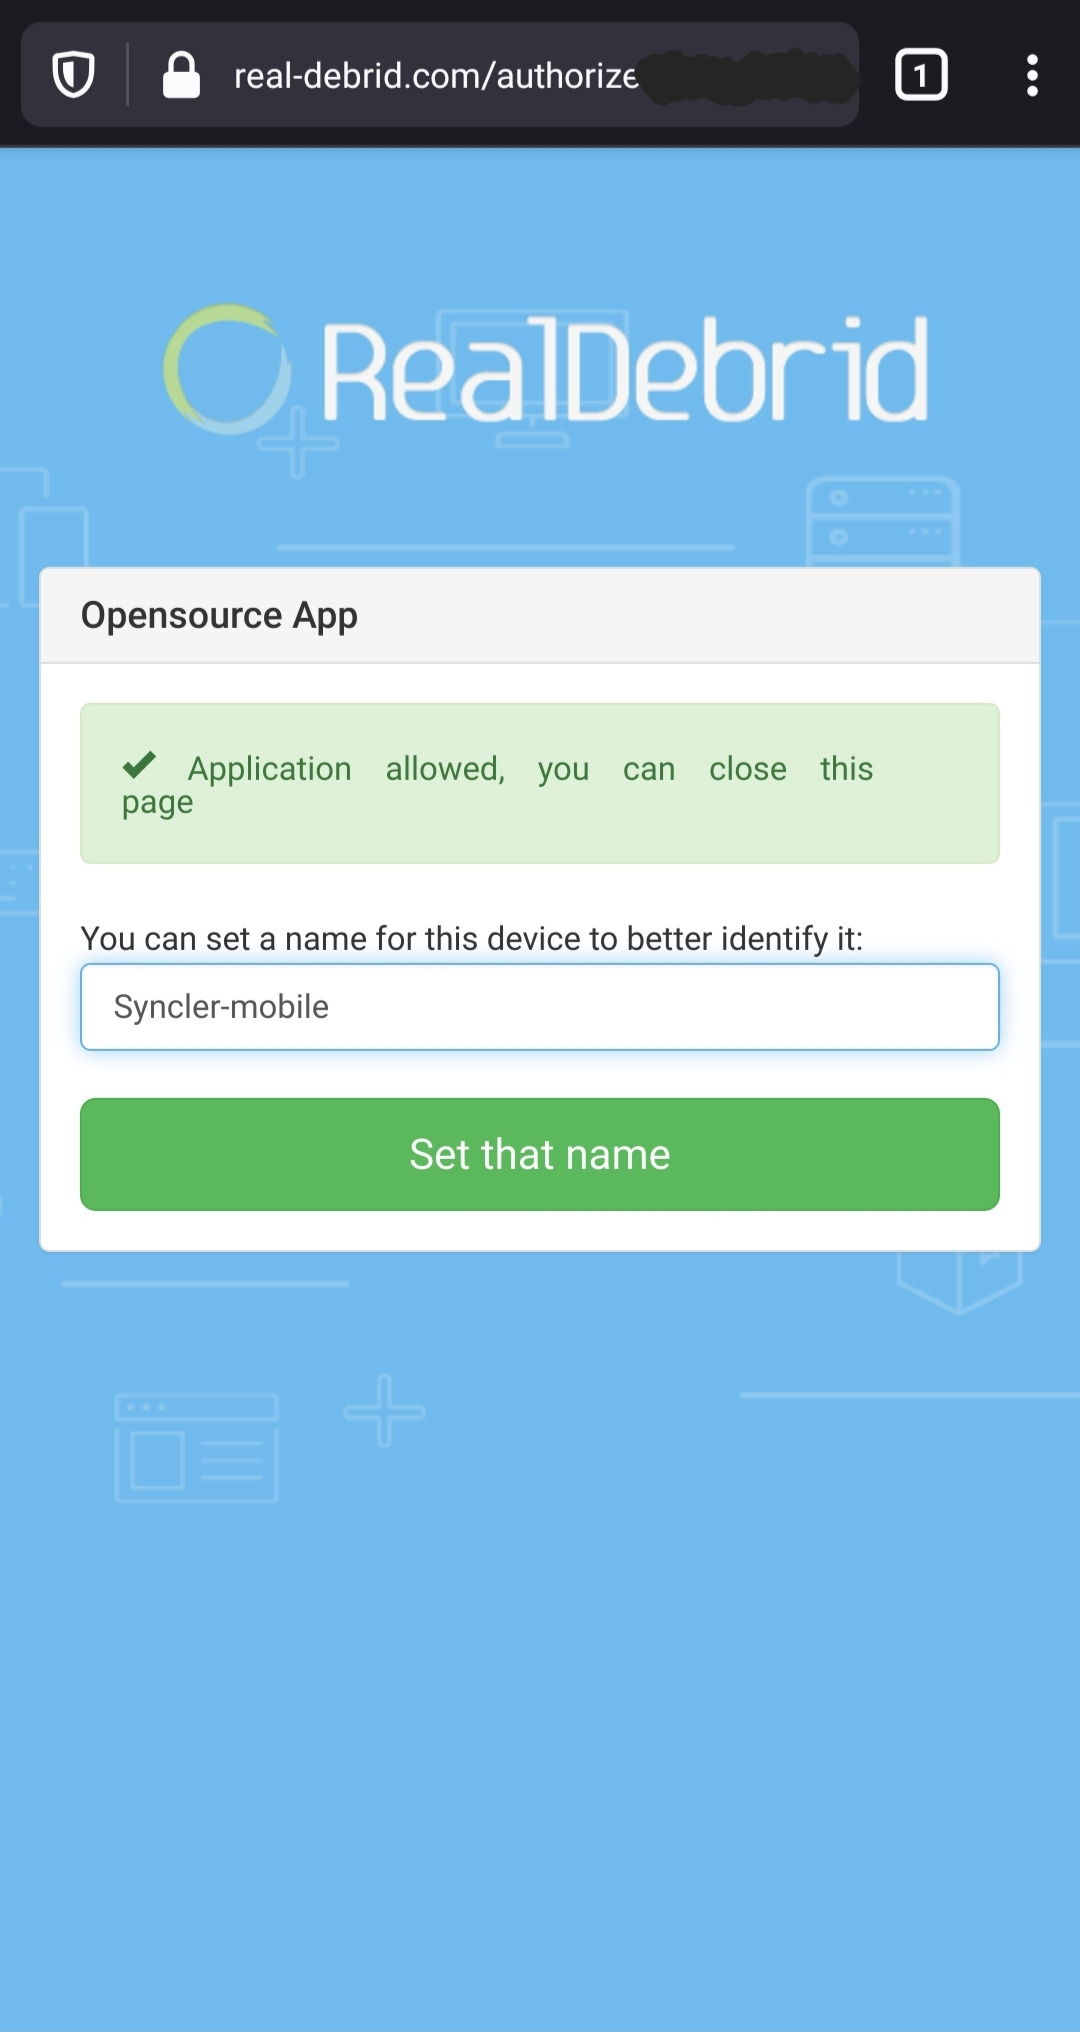
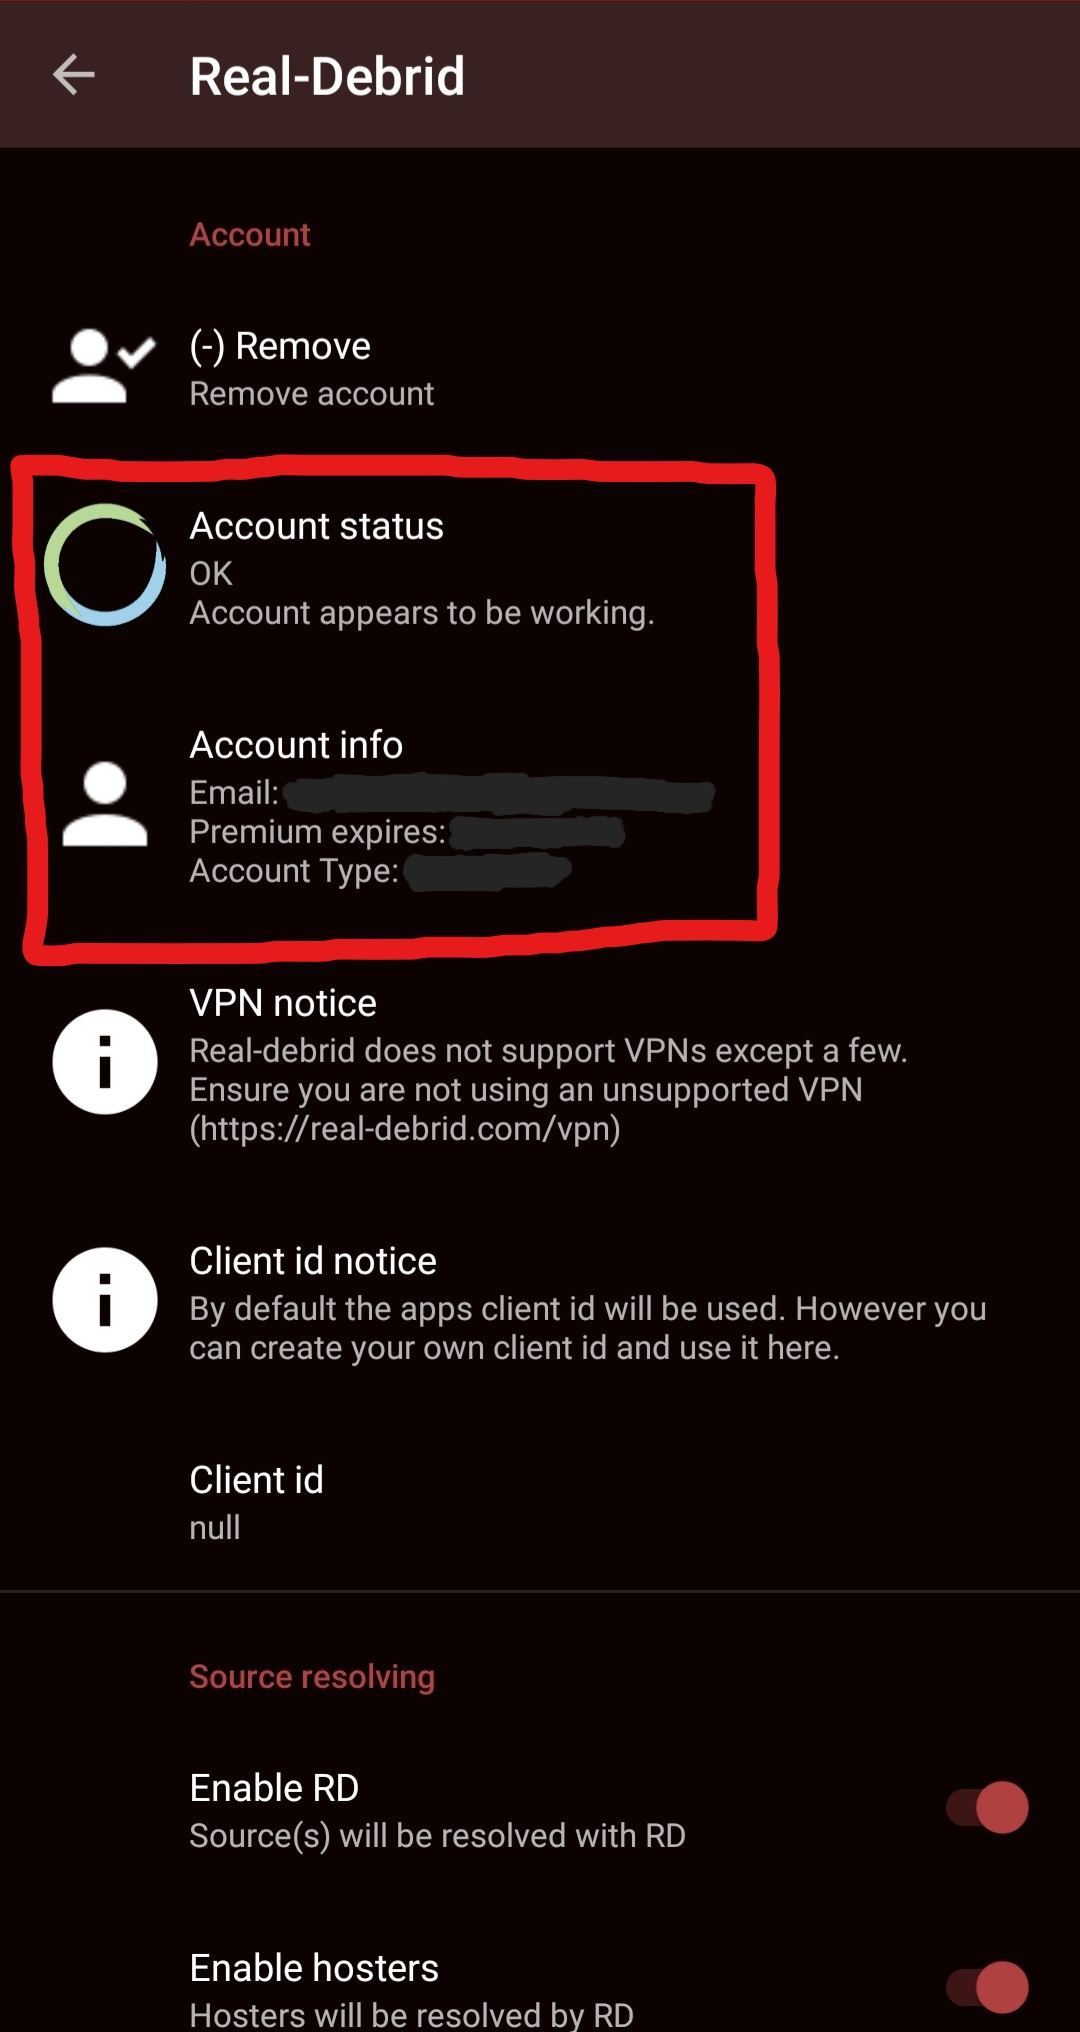
The Real-Debrid website will return if the process was successful and now you can press “Done” on the Syncler popup to finish adding the account.
You will see a small refresh as your account status and information populates.
13.
Connecting Premiumize
Connecting your Premiumize account is optional (only if using a non-debrid provider) but highly recommended. If you don’t have one already, you can sign up and purchase the service on their website!
Link to the Premiumize website can be found here
Disable your VPN / Adblocker / DNS, you can turn it on again after completing this section.
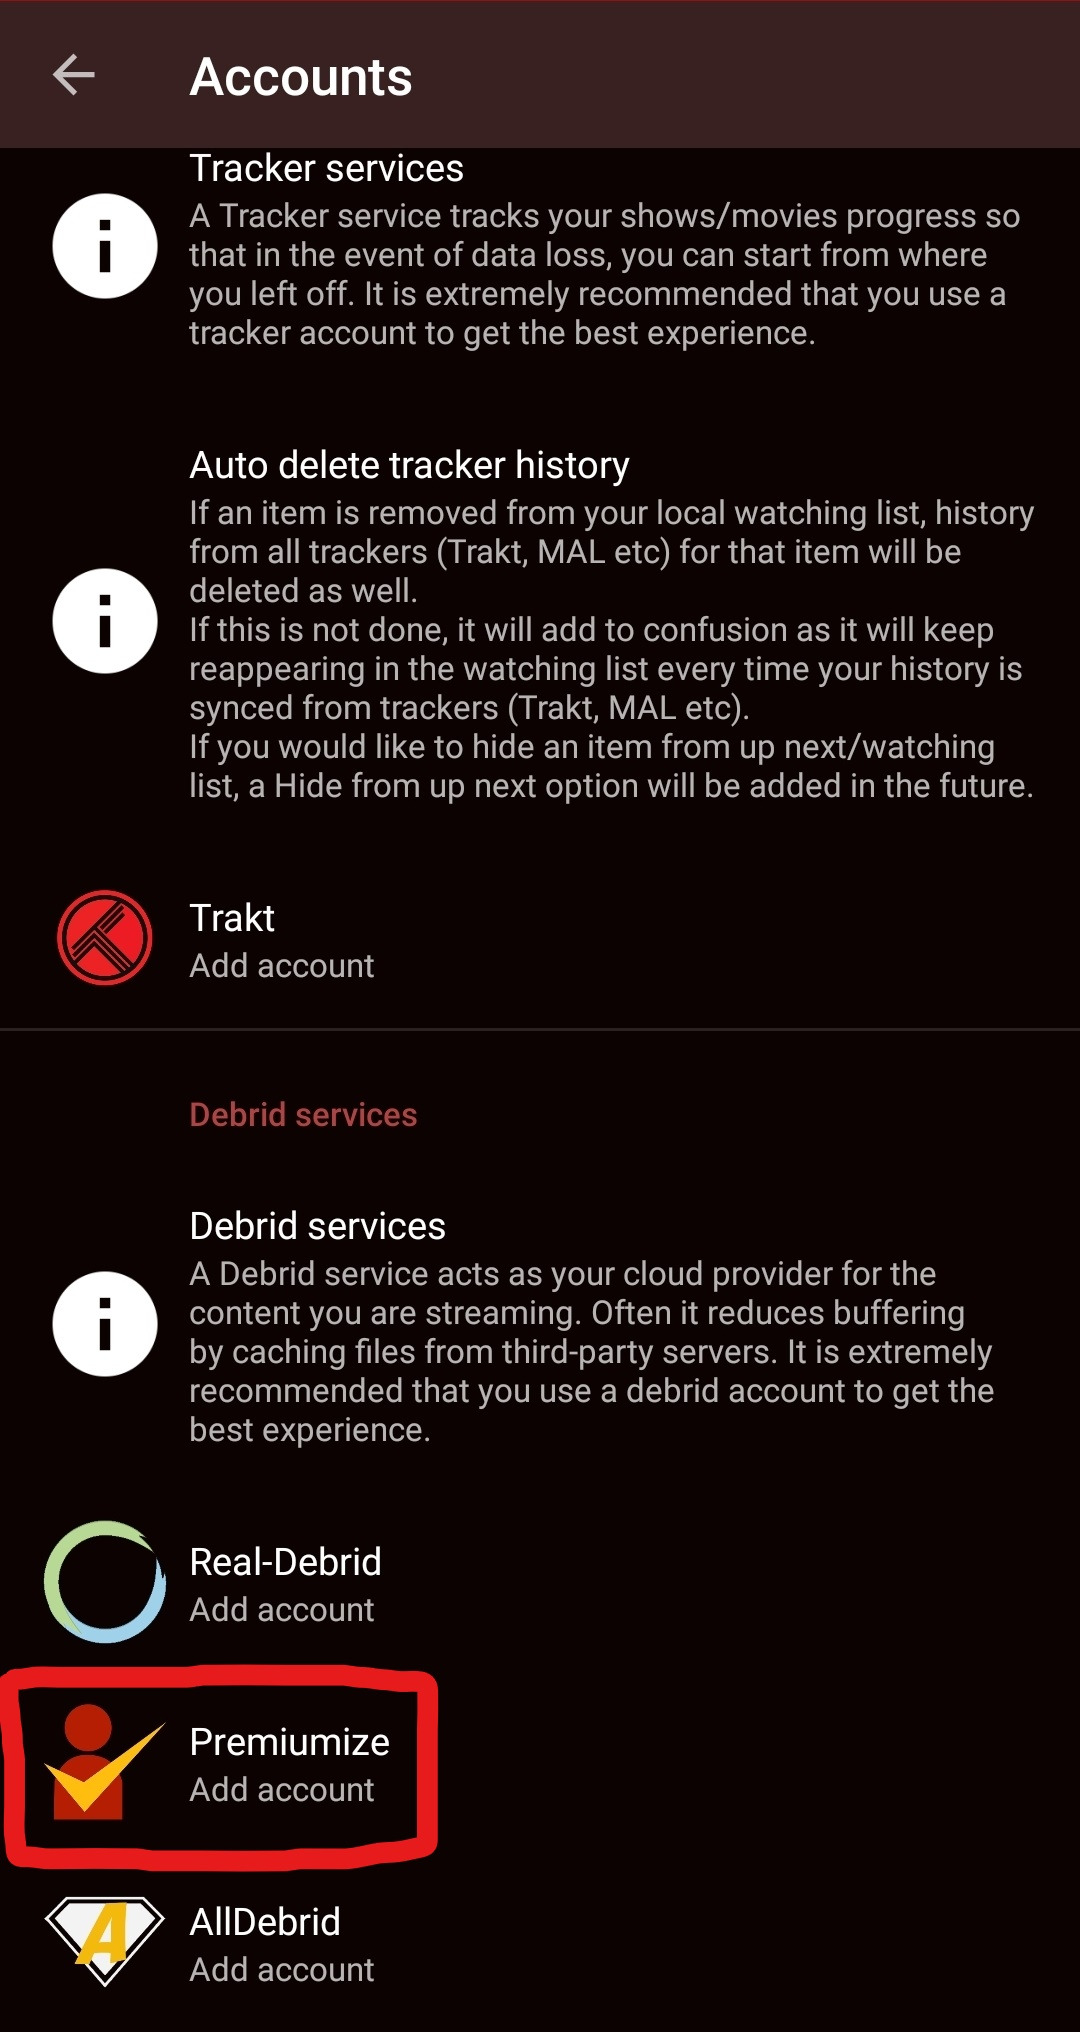
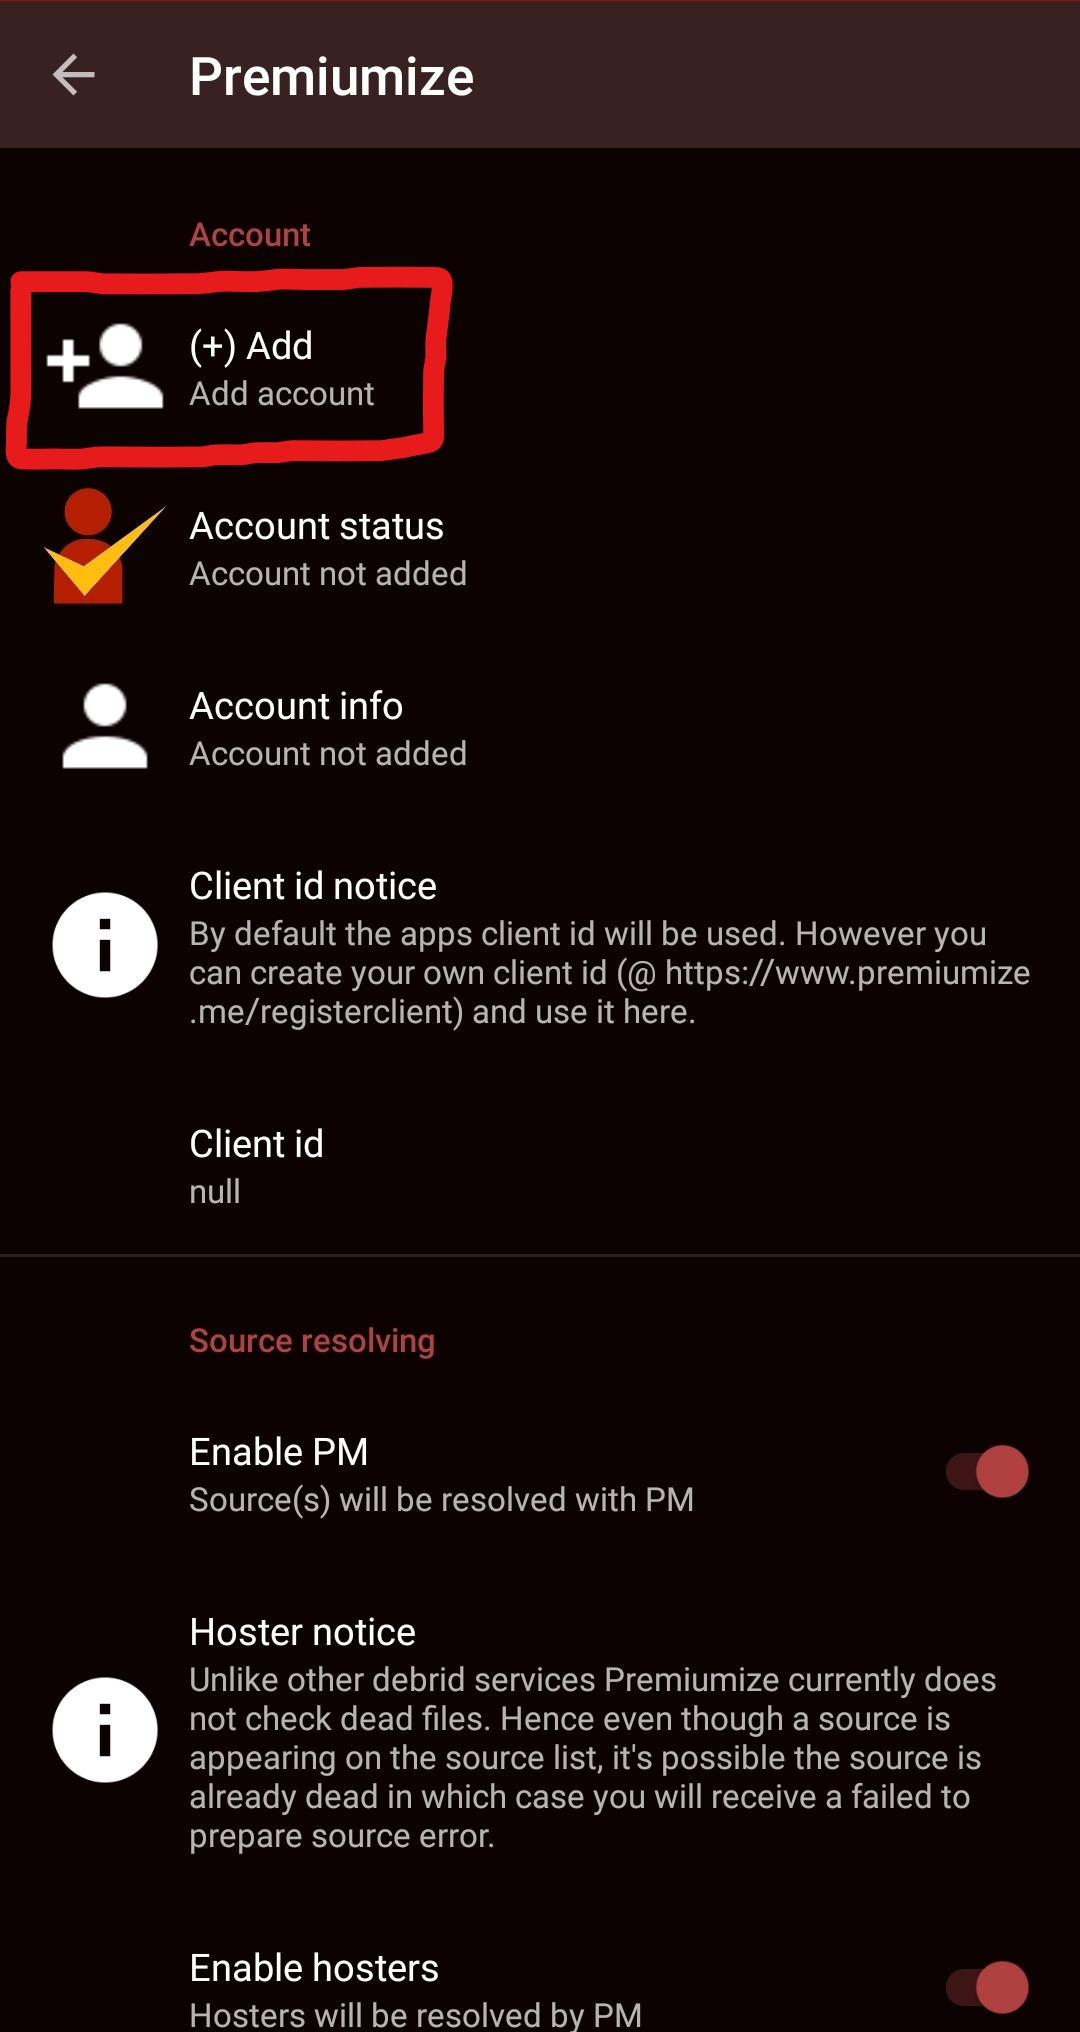
Inside Syncler, press the Premiumize option and in the next screen press “Add account”.
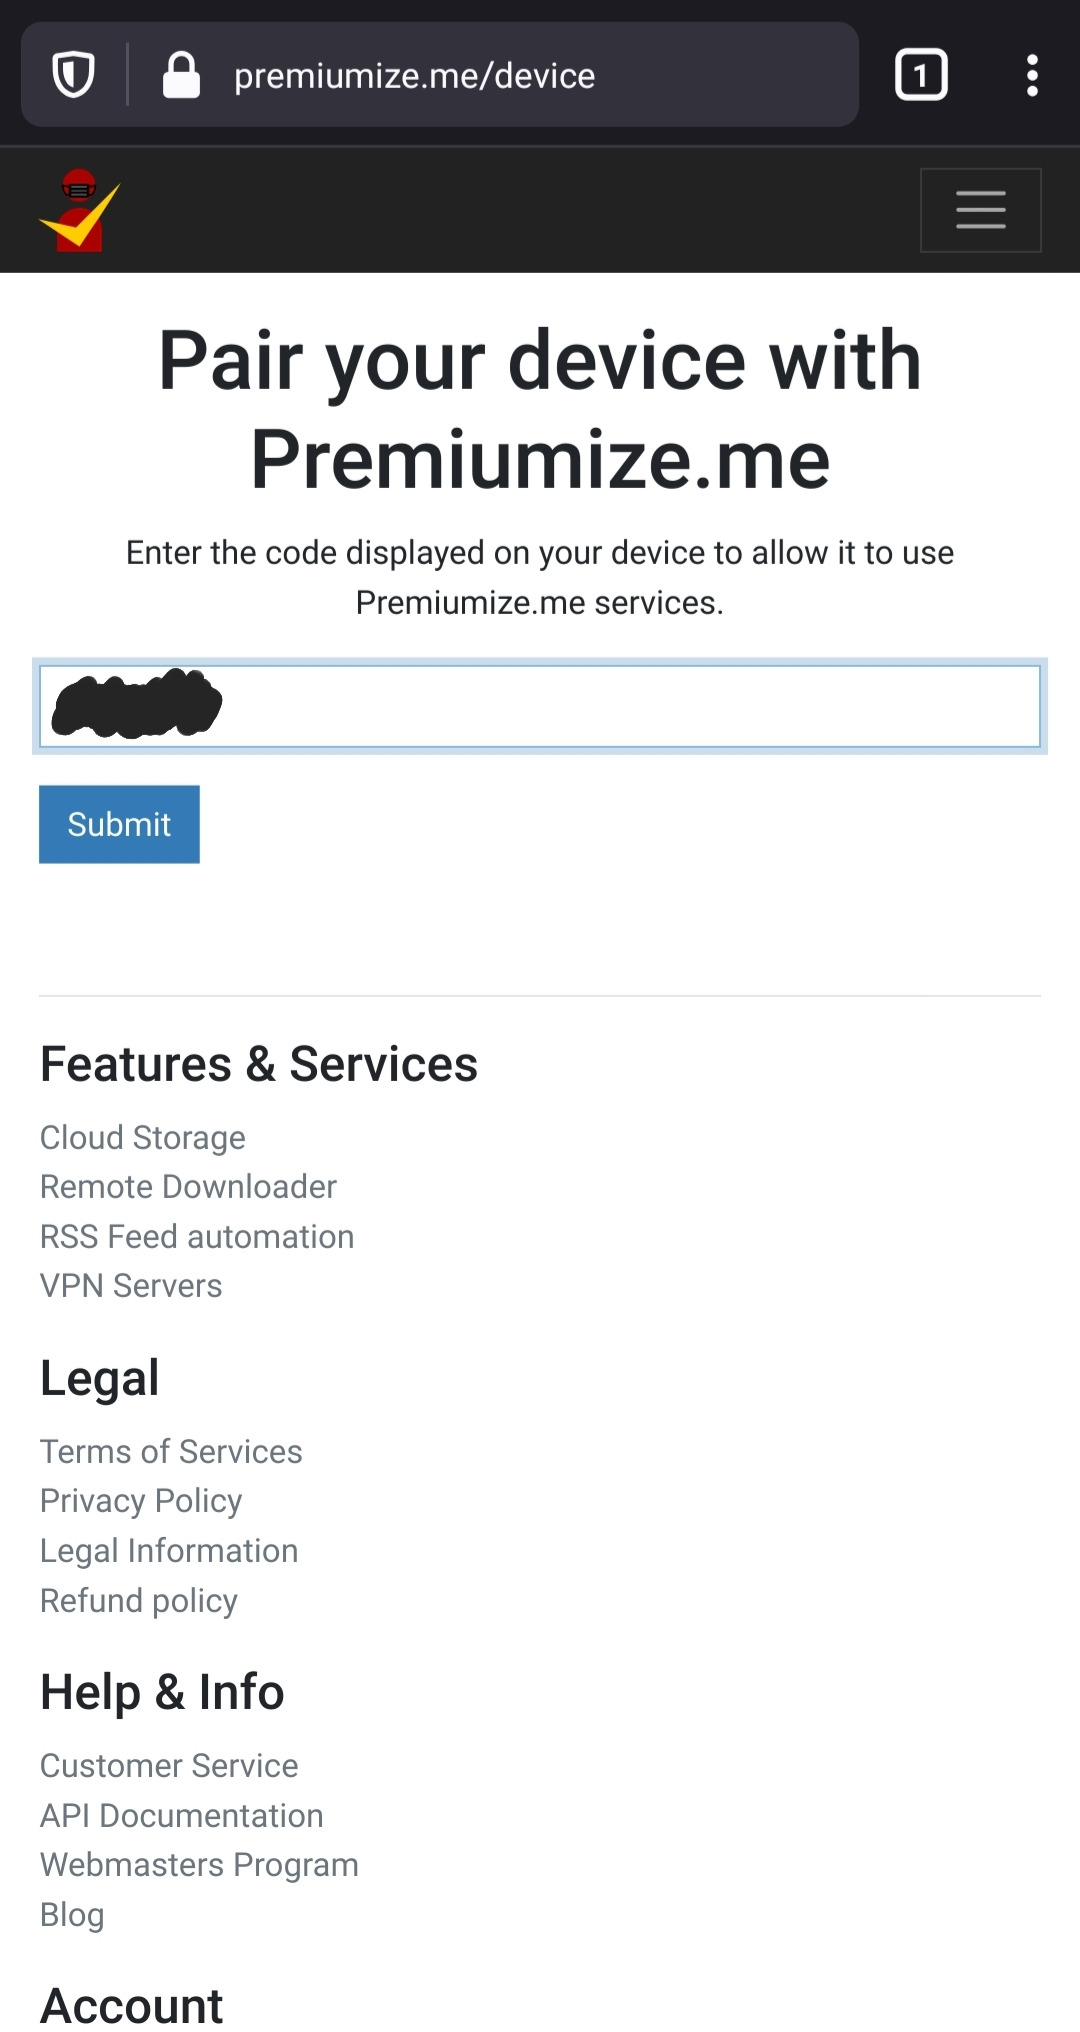
A popup should open and direct you to their device activation website, where you enter the code shown on your device.
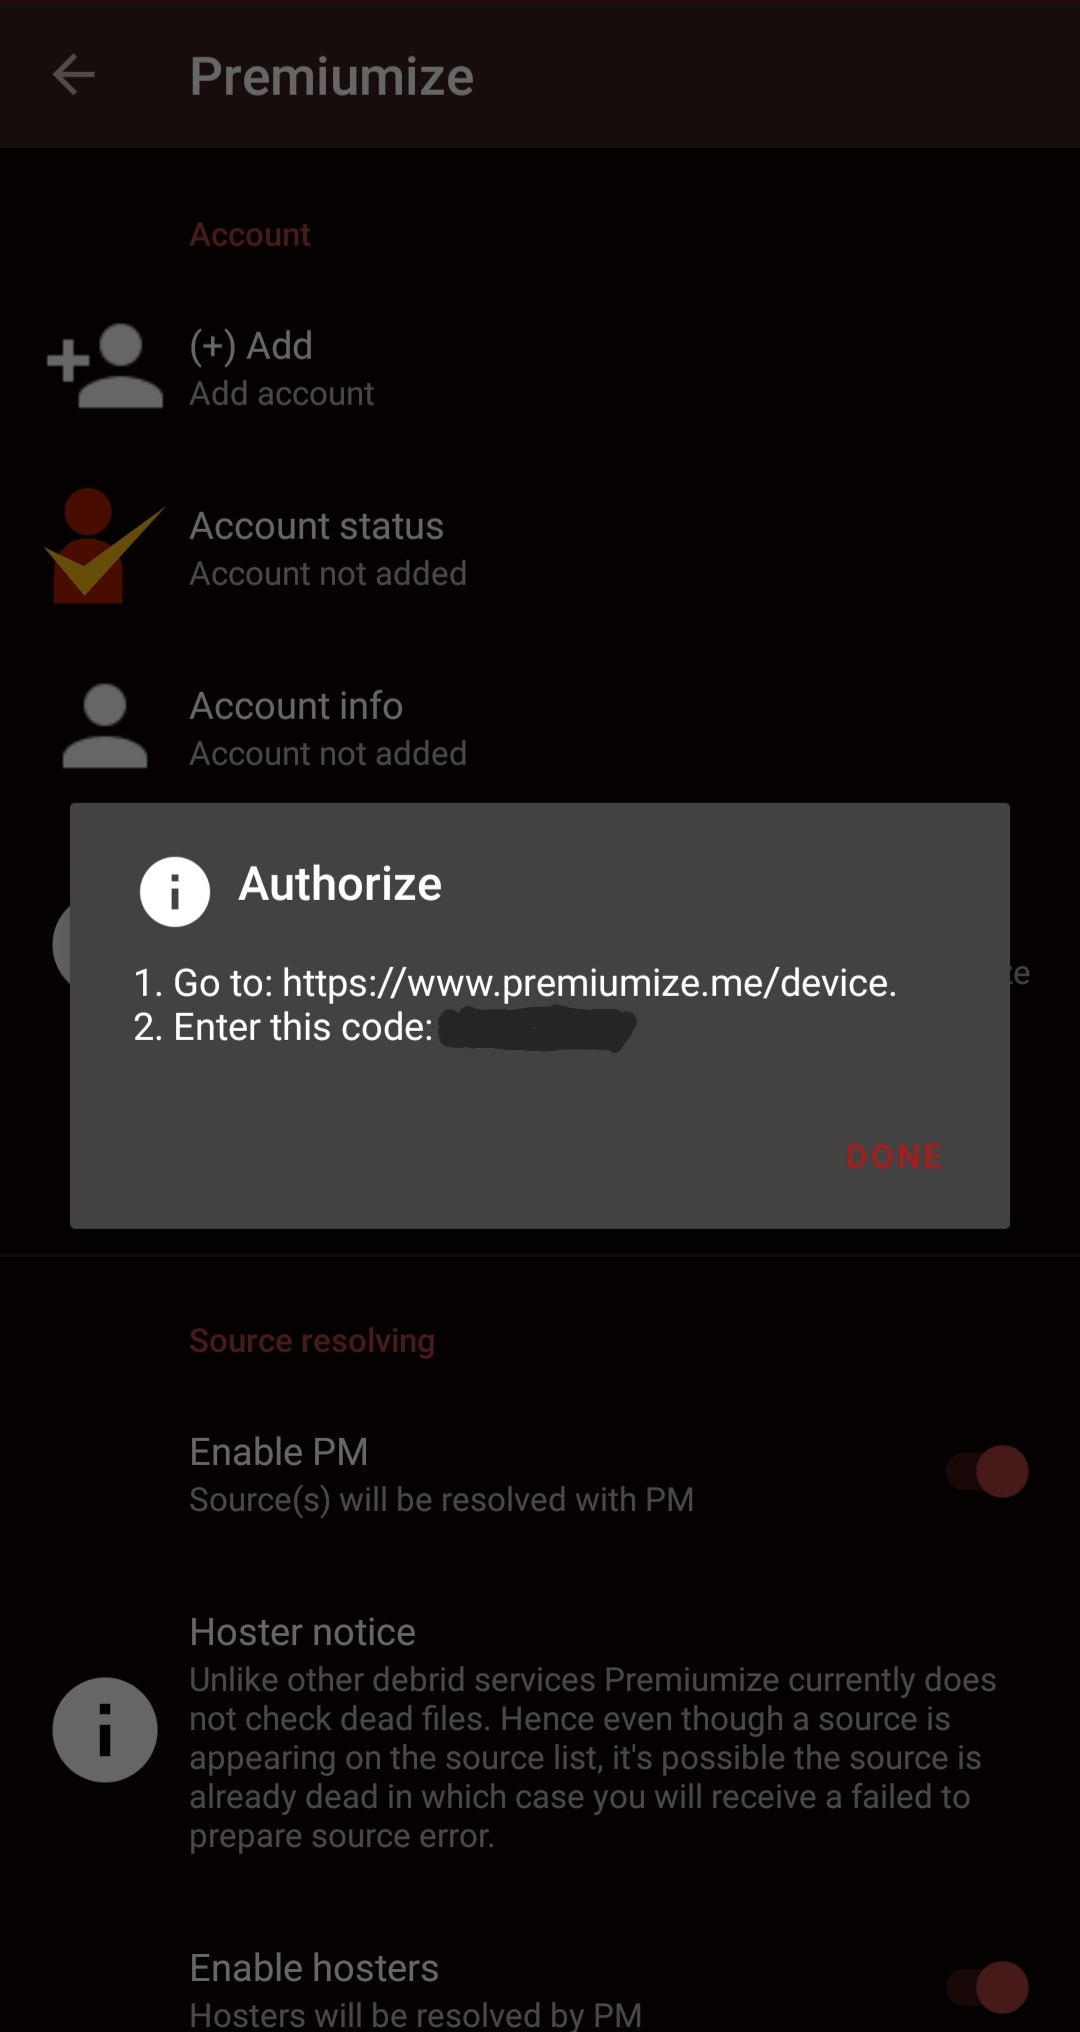
Log in to Premiumize on another device, then open the link and enter the code from Syncler.
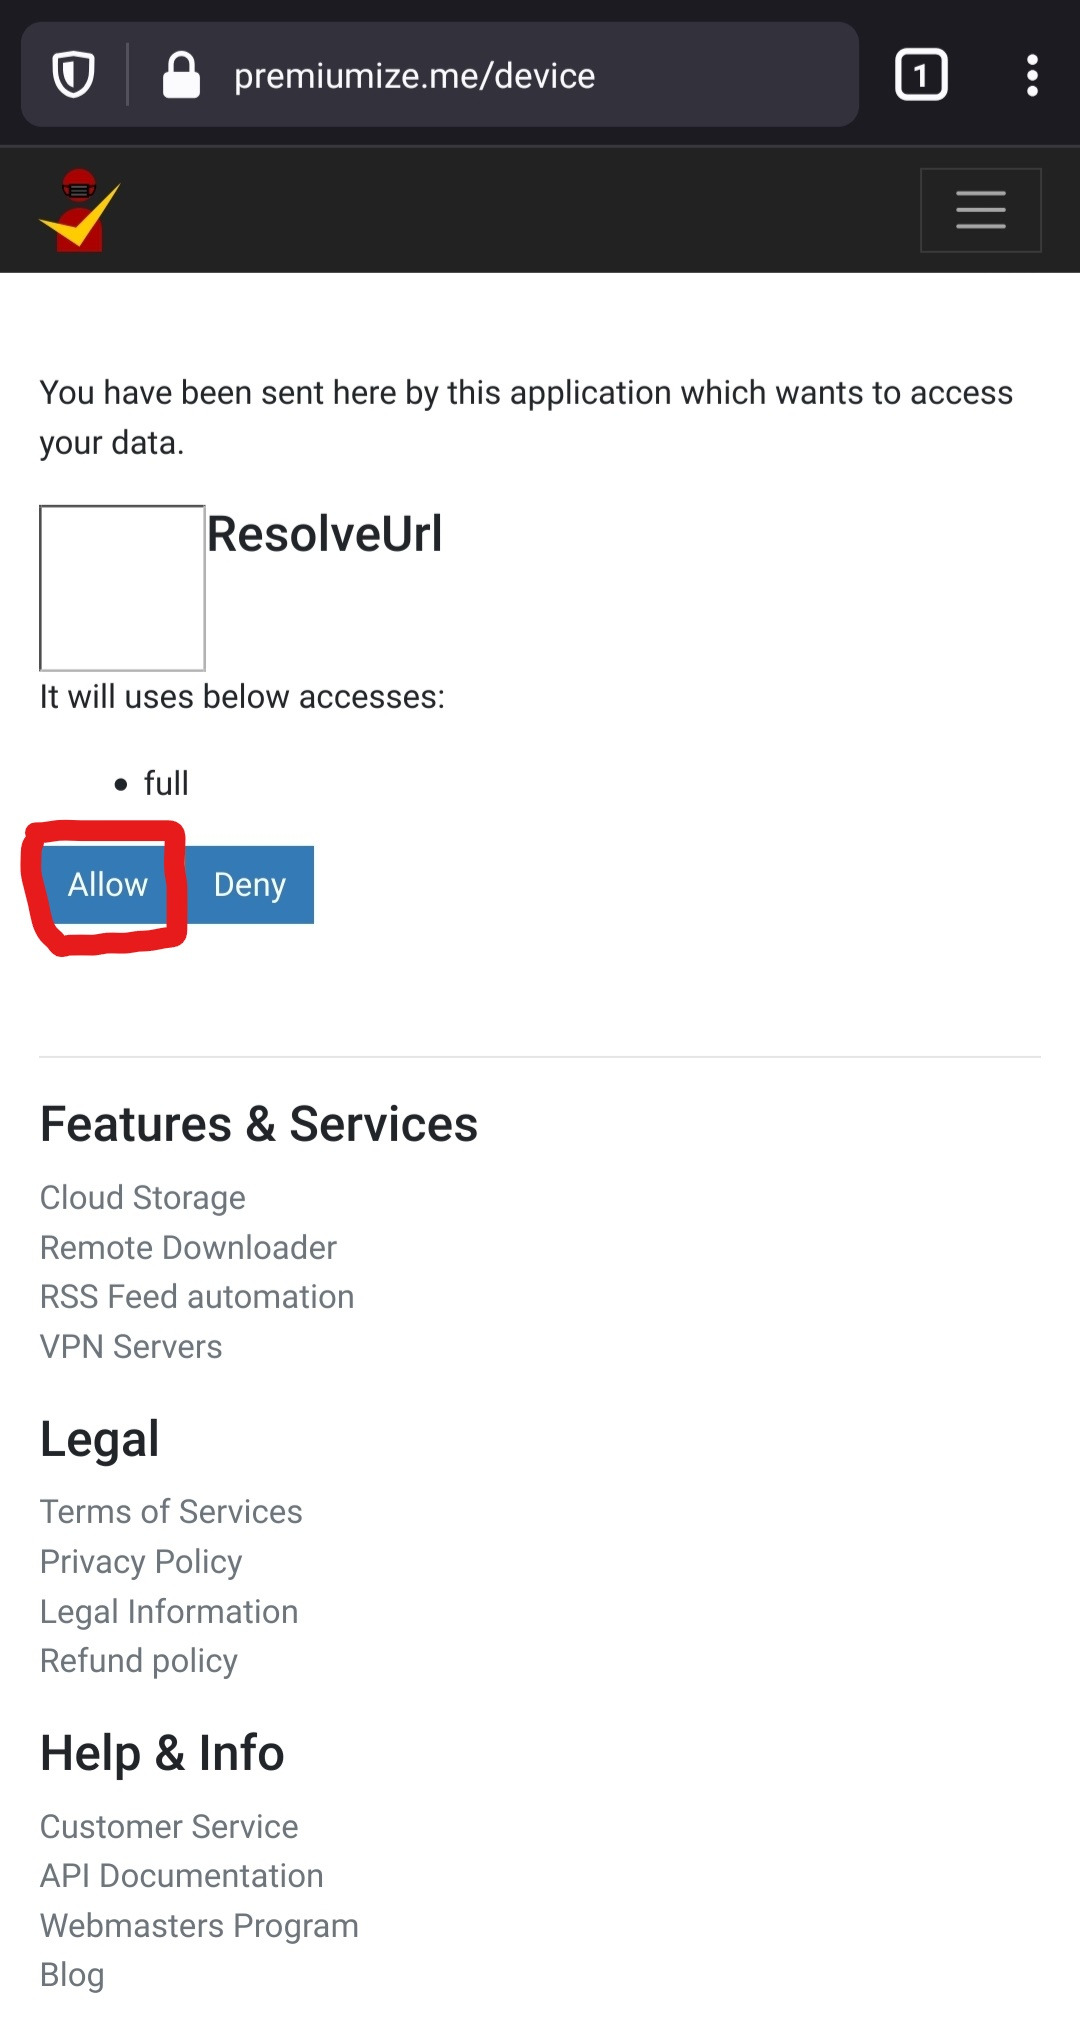
Premiumize will ask your permission to link your account to the device, press "Allow".
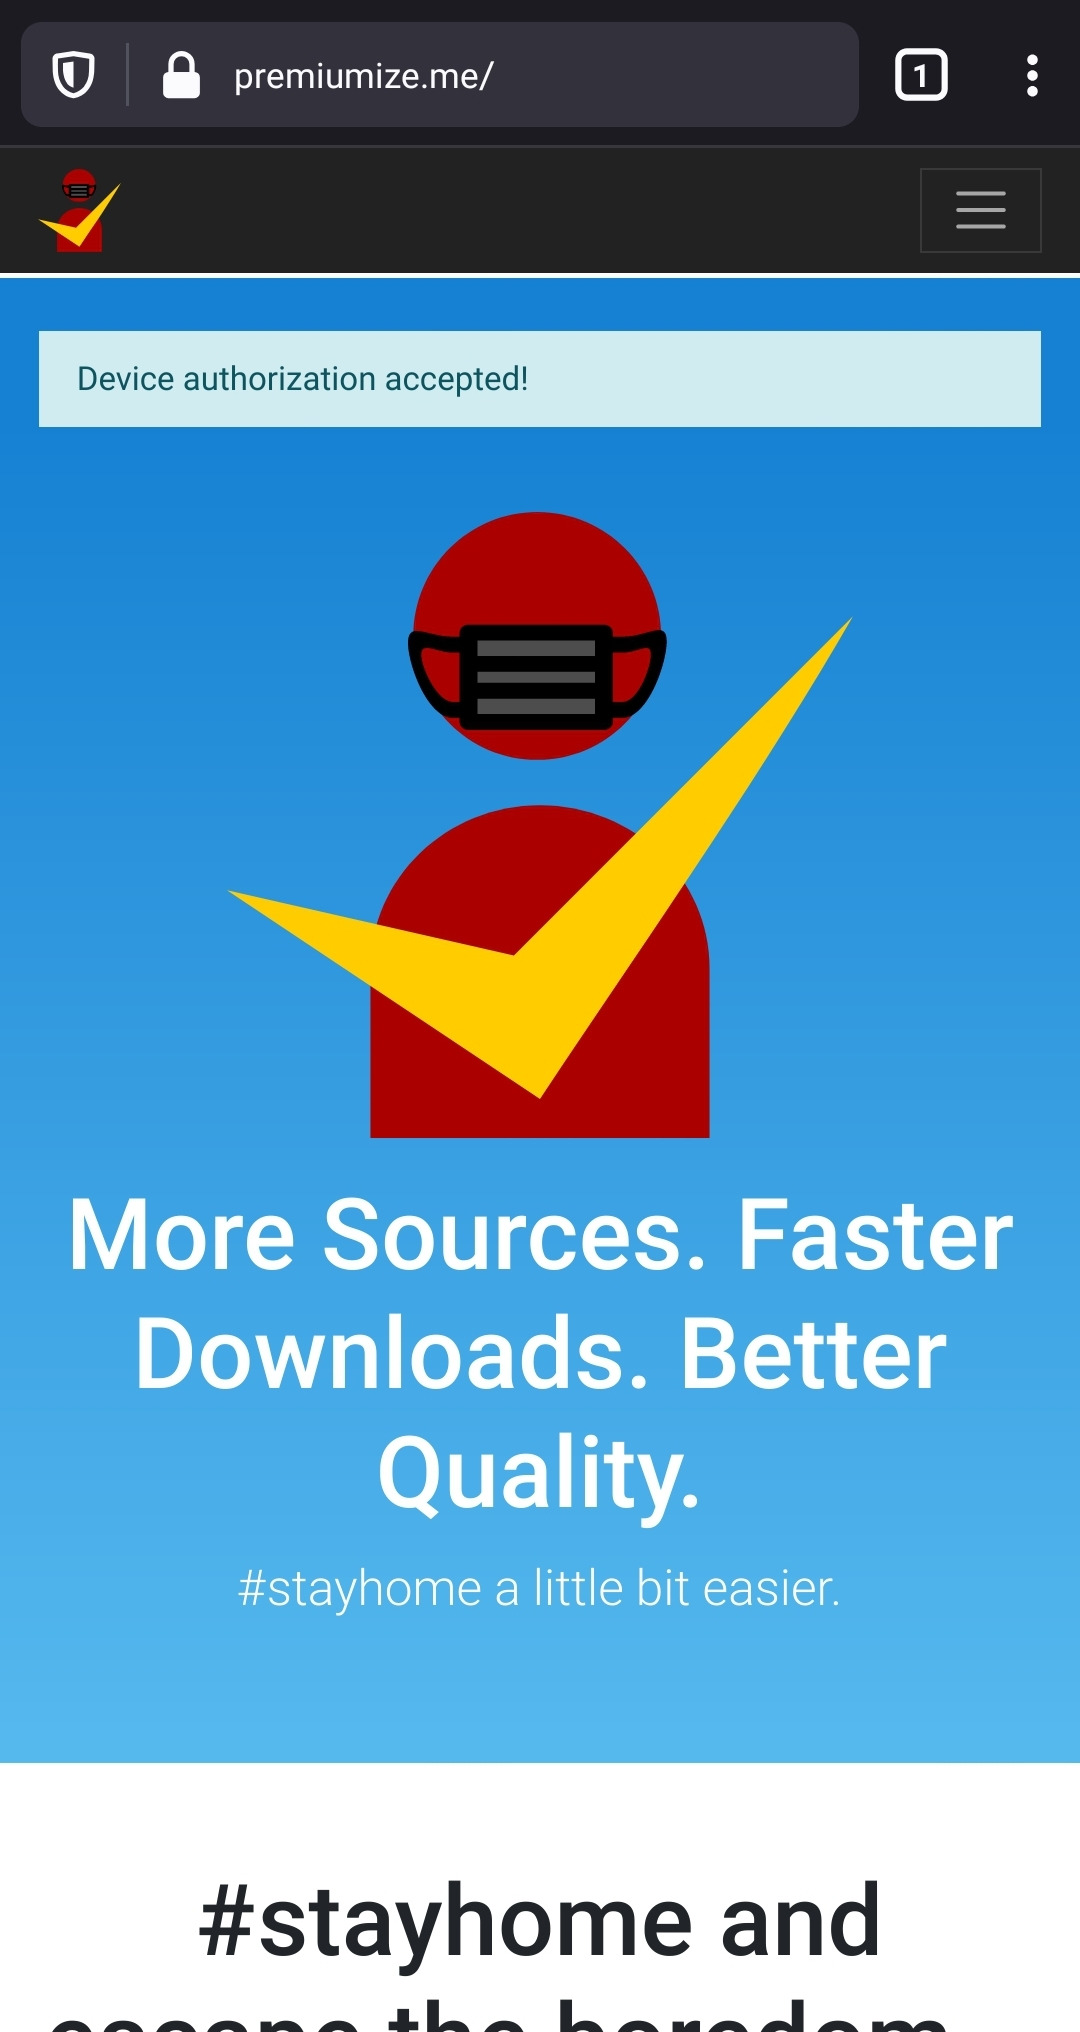
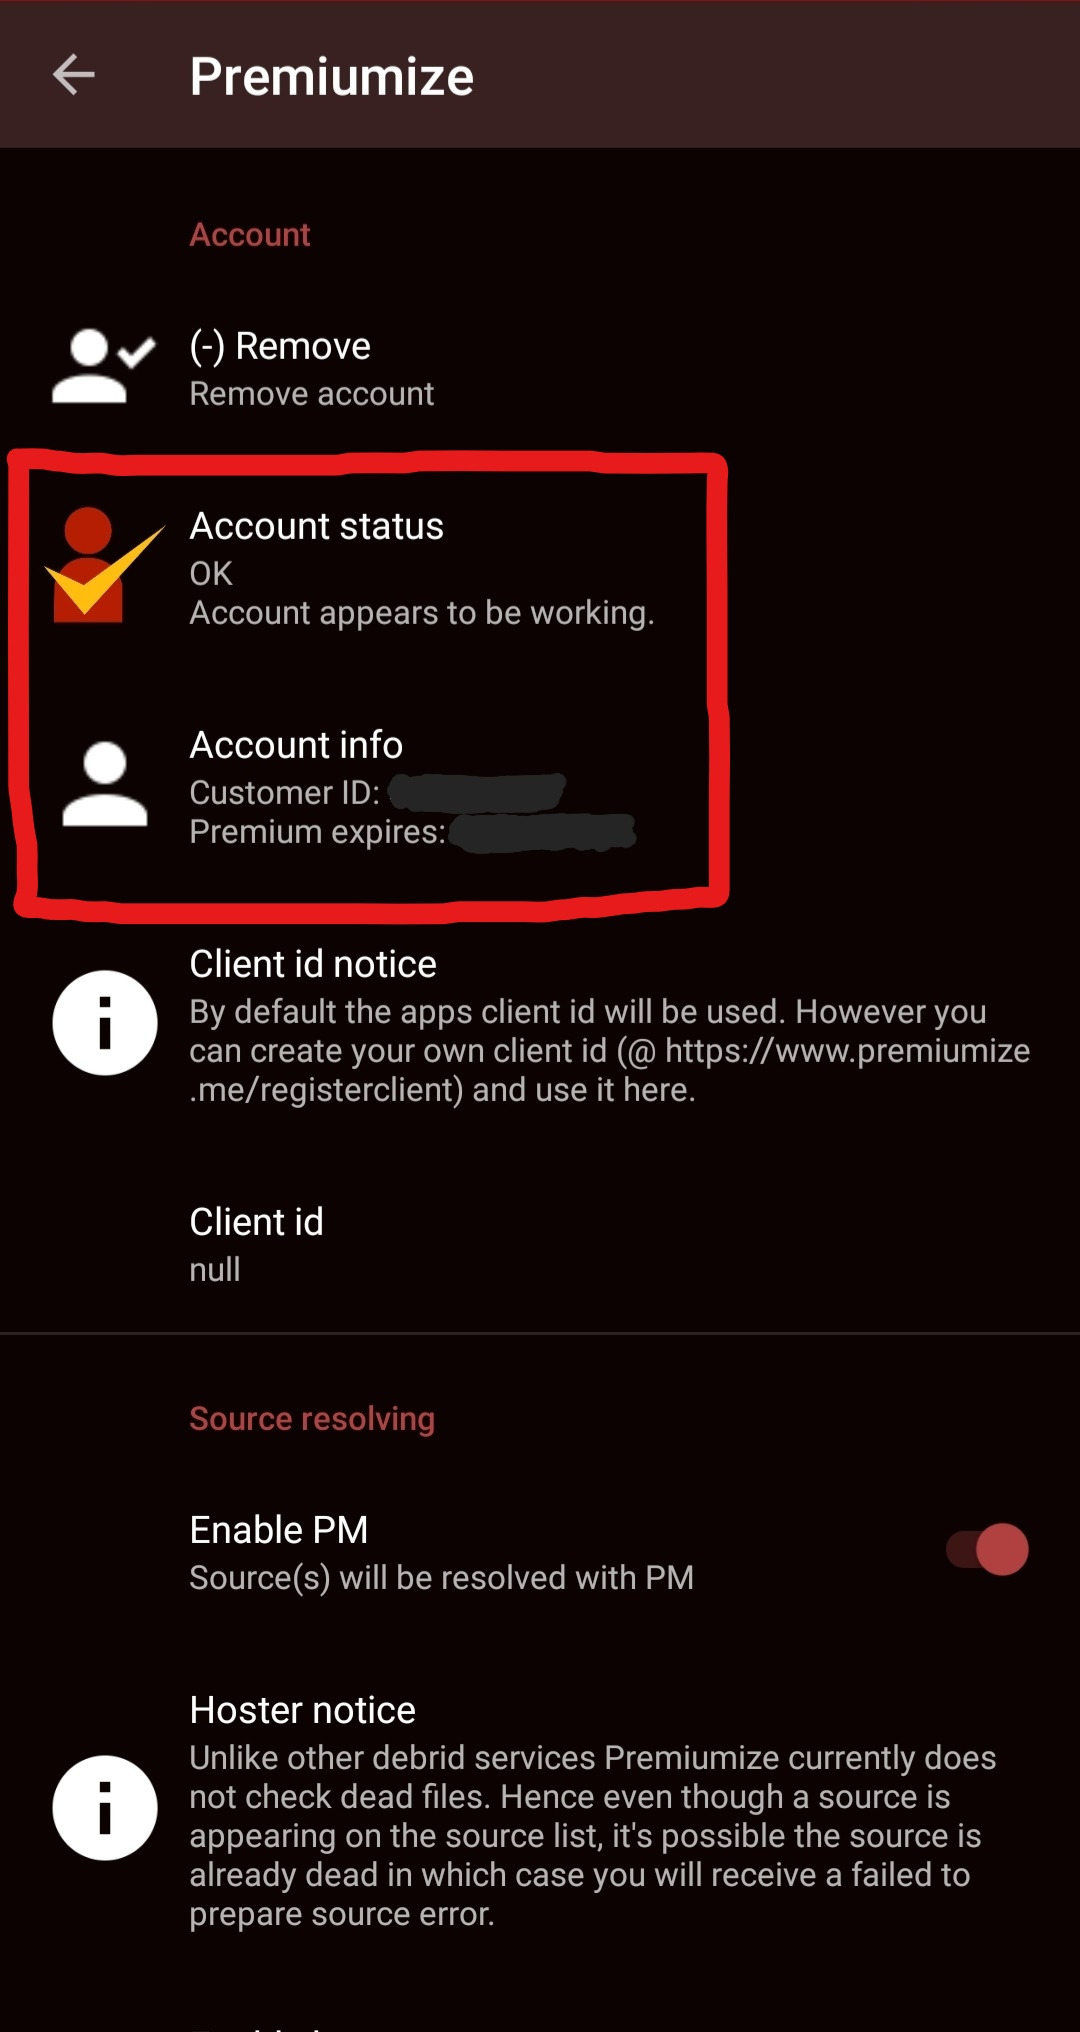
The Premiumize website will return if the process was successful and now you can press “Done” on the Syncler popup to finish adding the account.
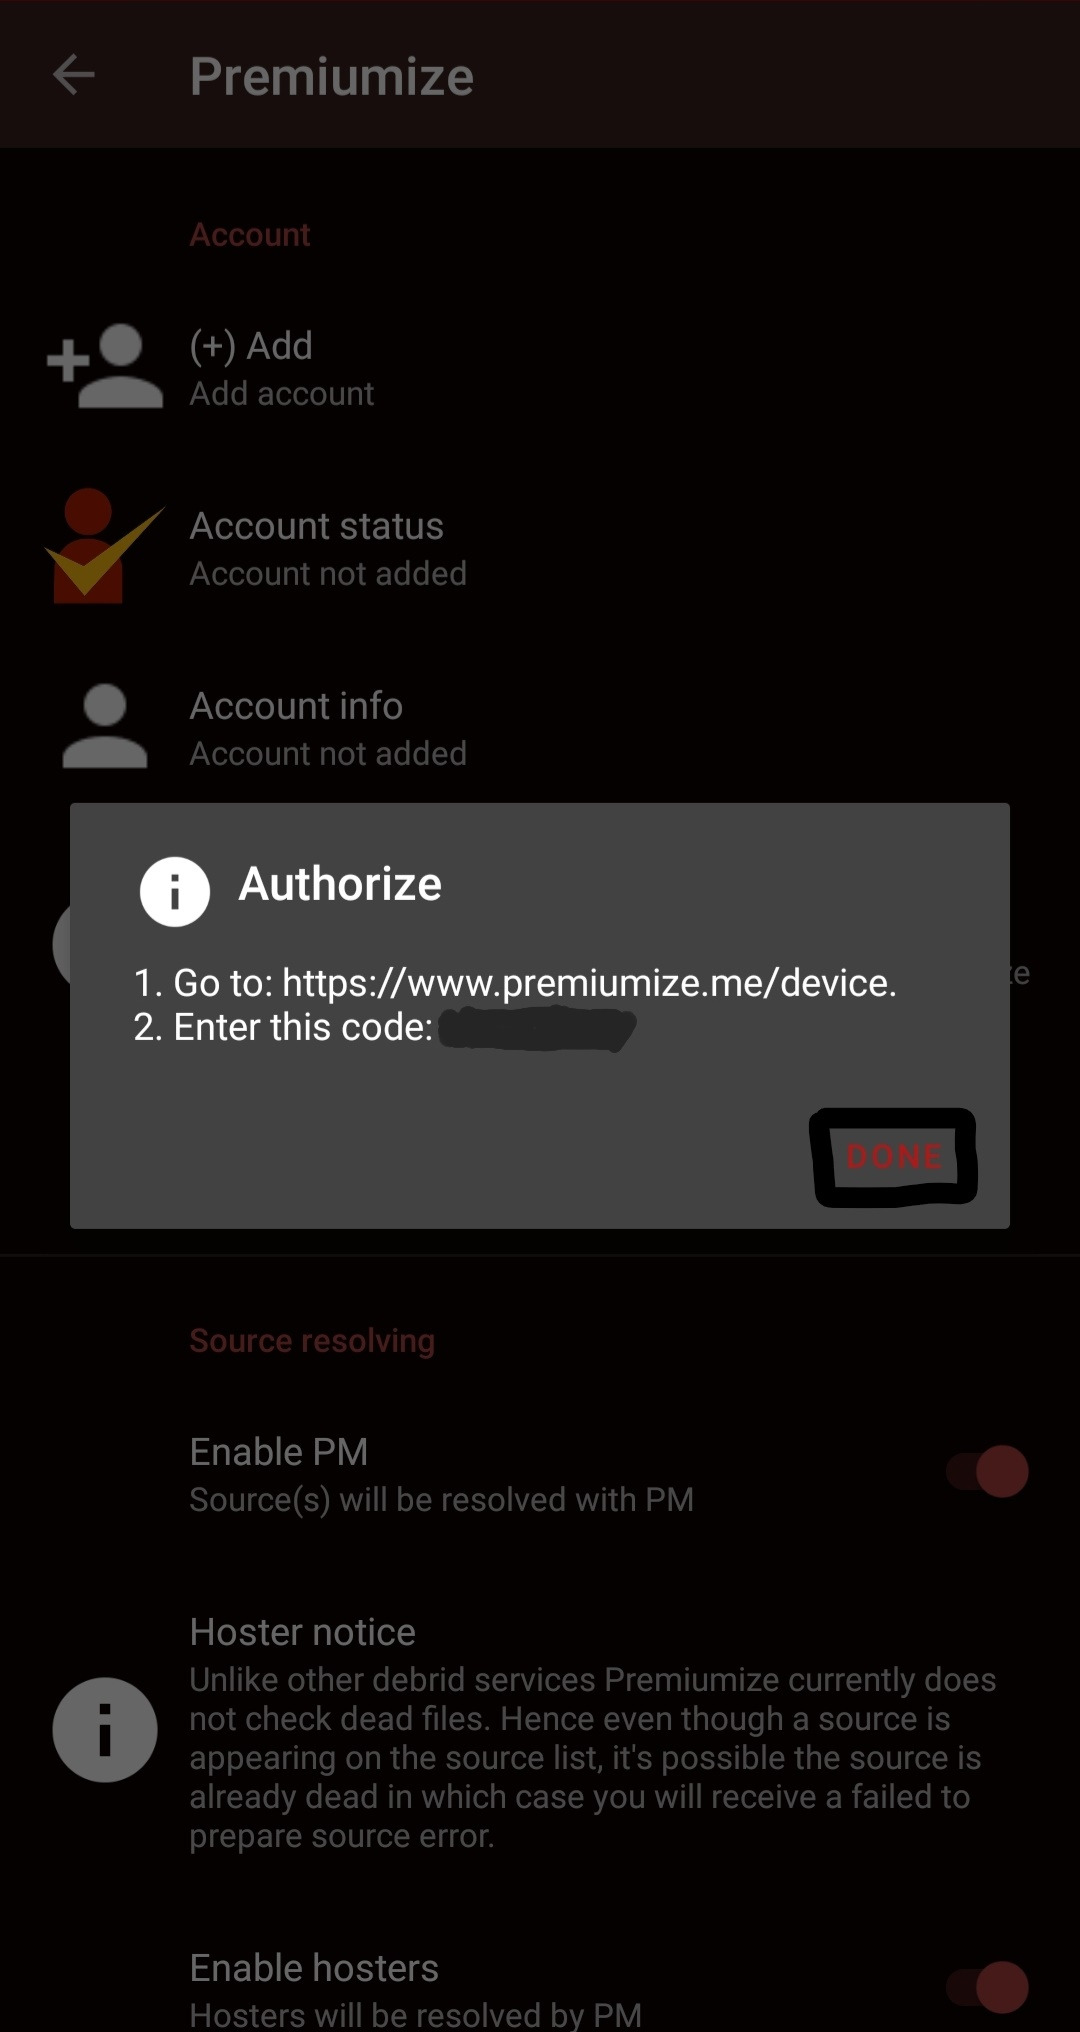
You will see a small refresh as your account status and information populates.
14.
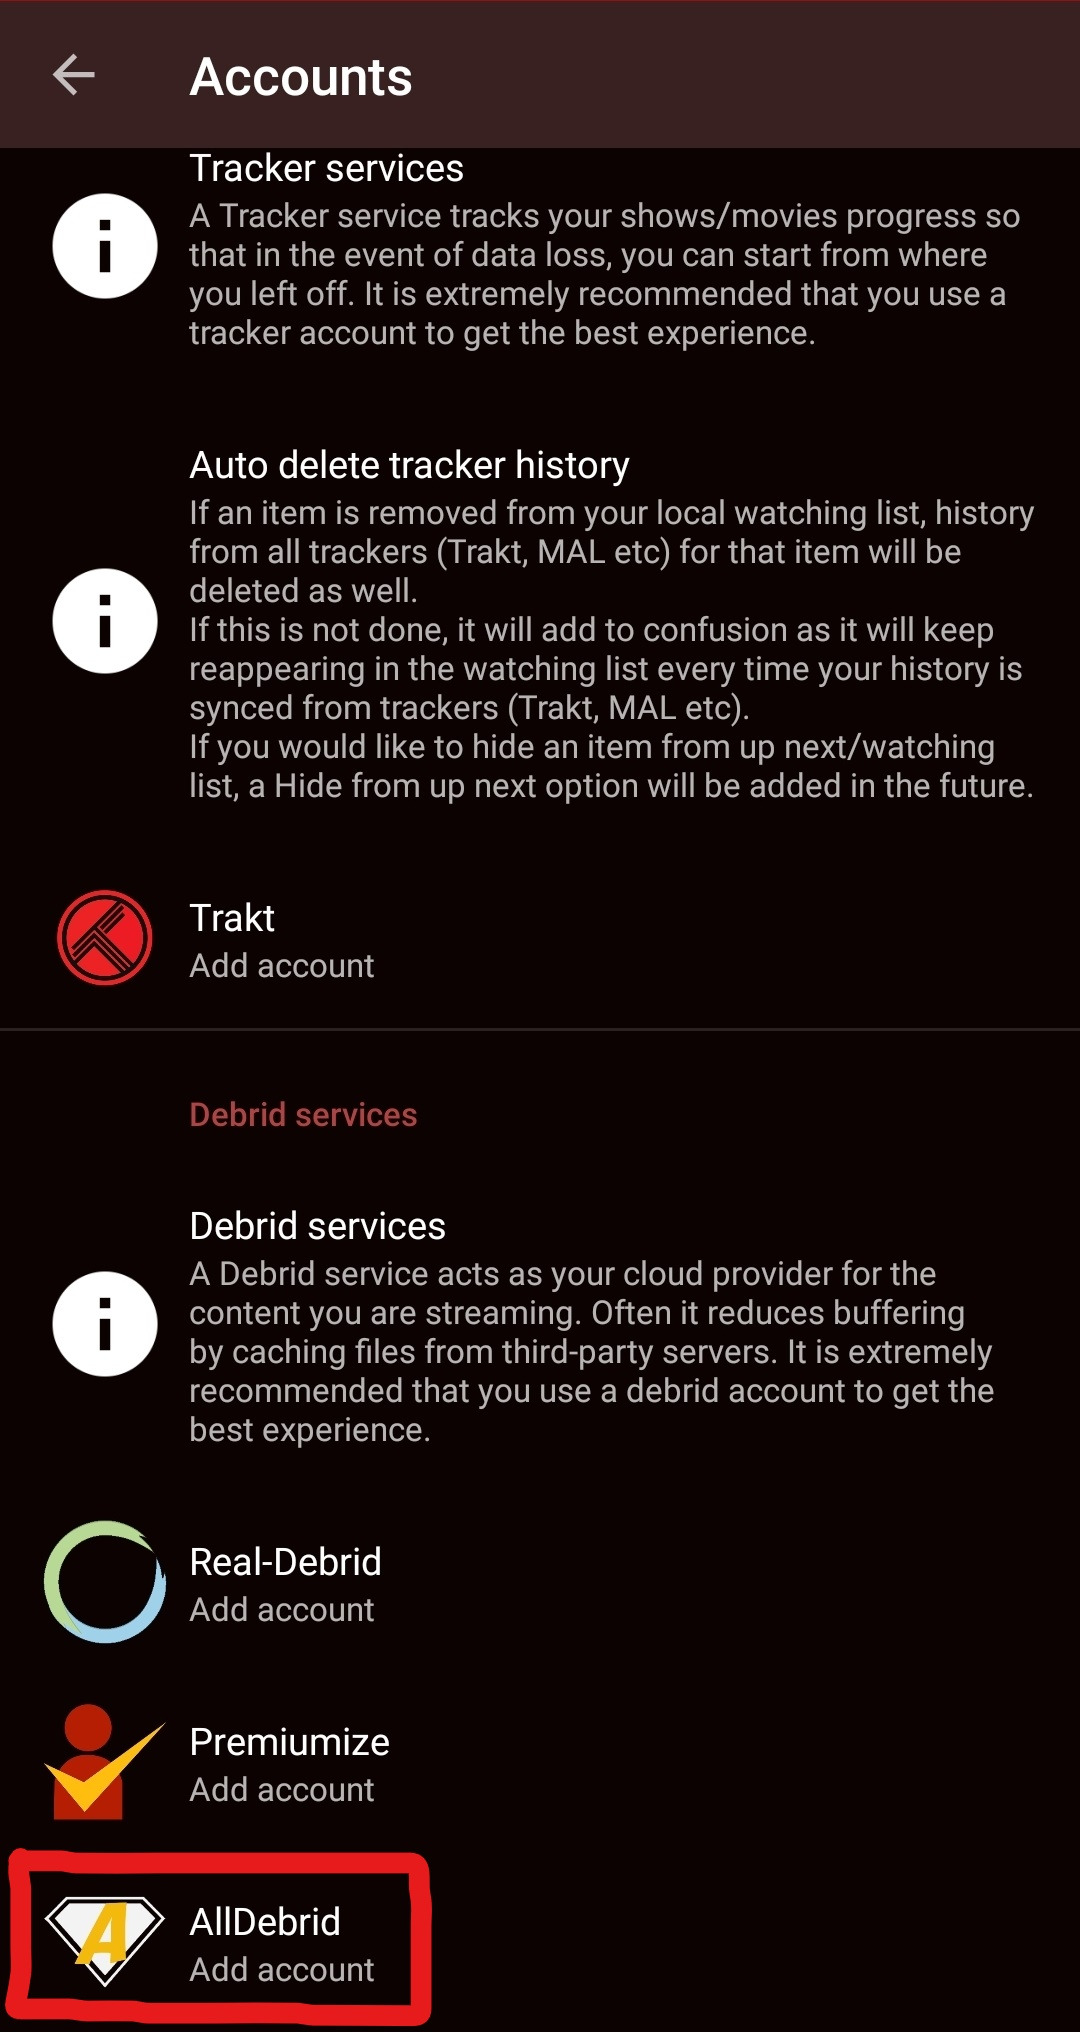
Connecting All-Debrid
Connecting your All-Debrid account is optional (only if using a non-debrid provider) but highly recommended. If you don’t have one already, you can sign up and purchase the service on their website!
Link to the All-Debrid website can be found here
Disable your VPN / Adblocker / DNS, you can turn it on again after completing this section.
Inside Syncler, press the All-Debrid option and in the next screen press “Add account”.
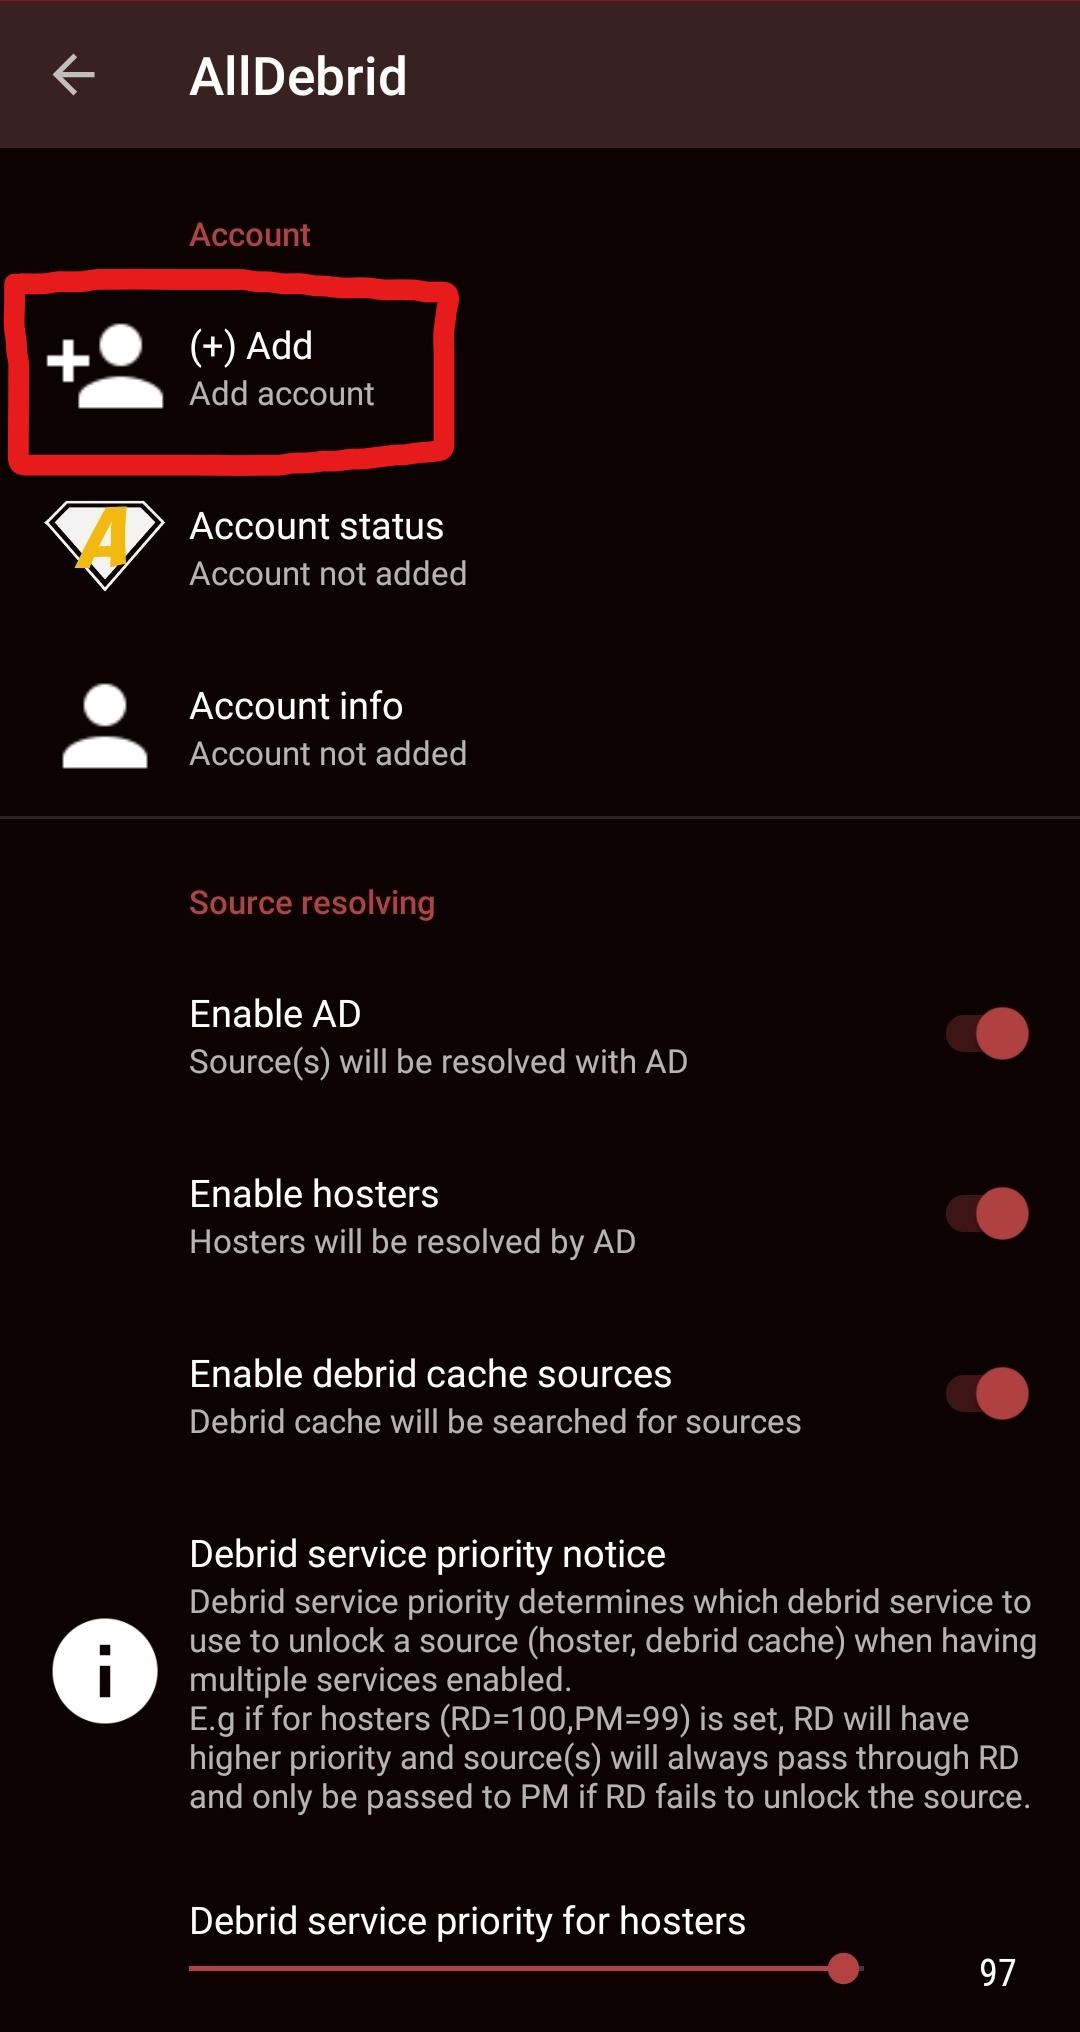
A popup should open and direct you to their device activation website, where you enter the code shown on your device.

Log in to All-Debrid on another device, then open the above link and enter the code from Syncler.
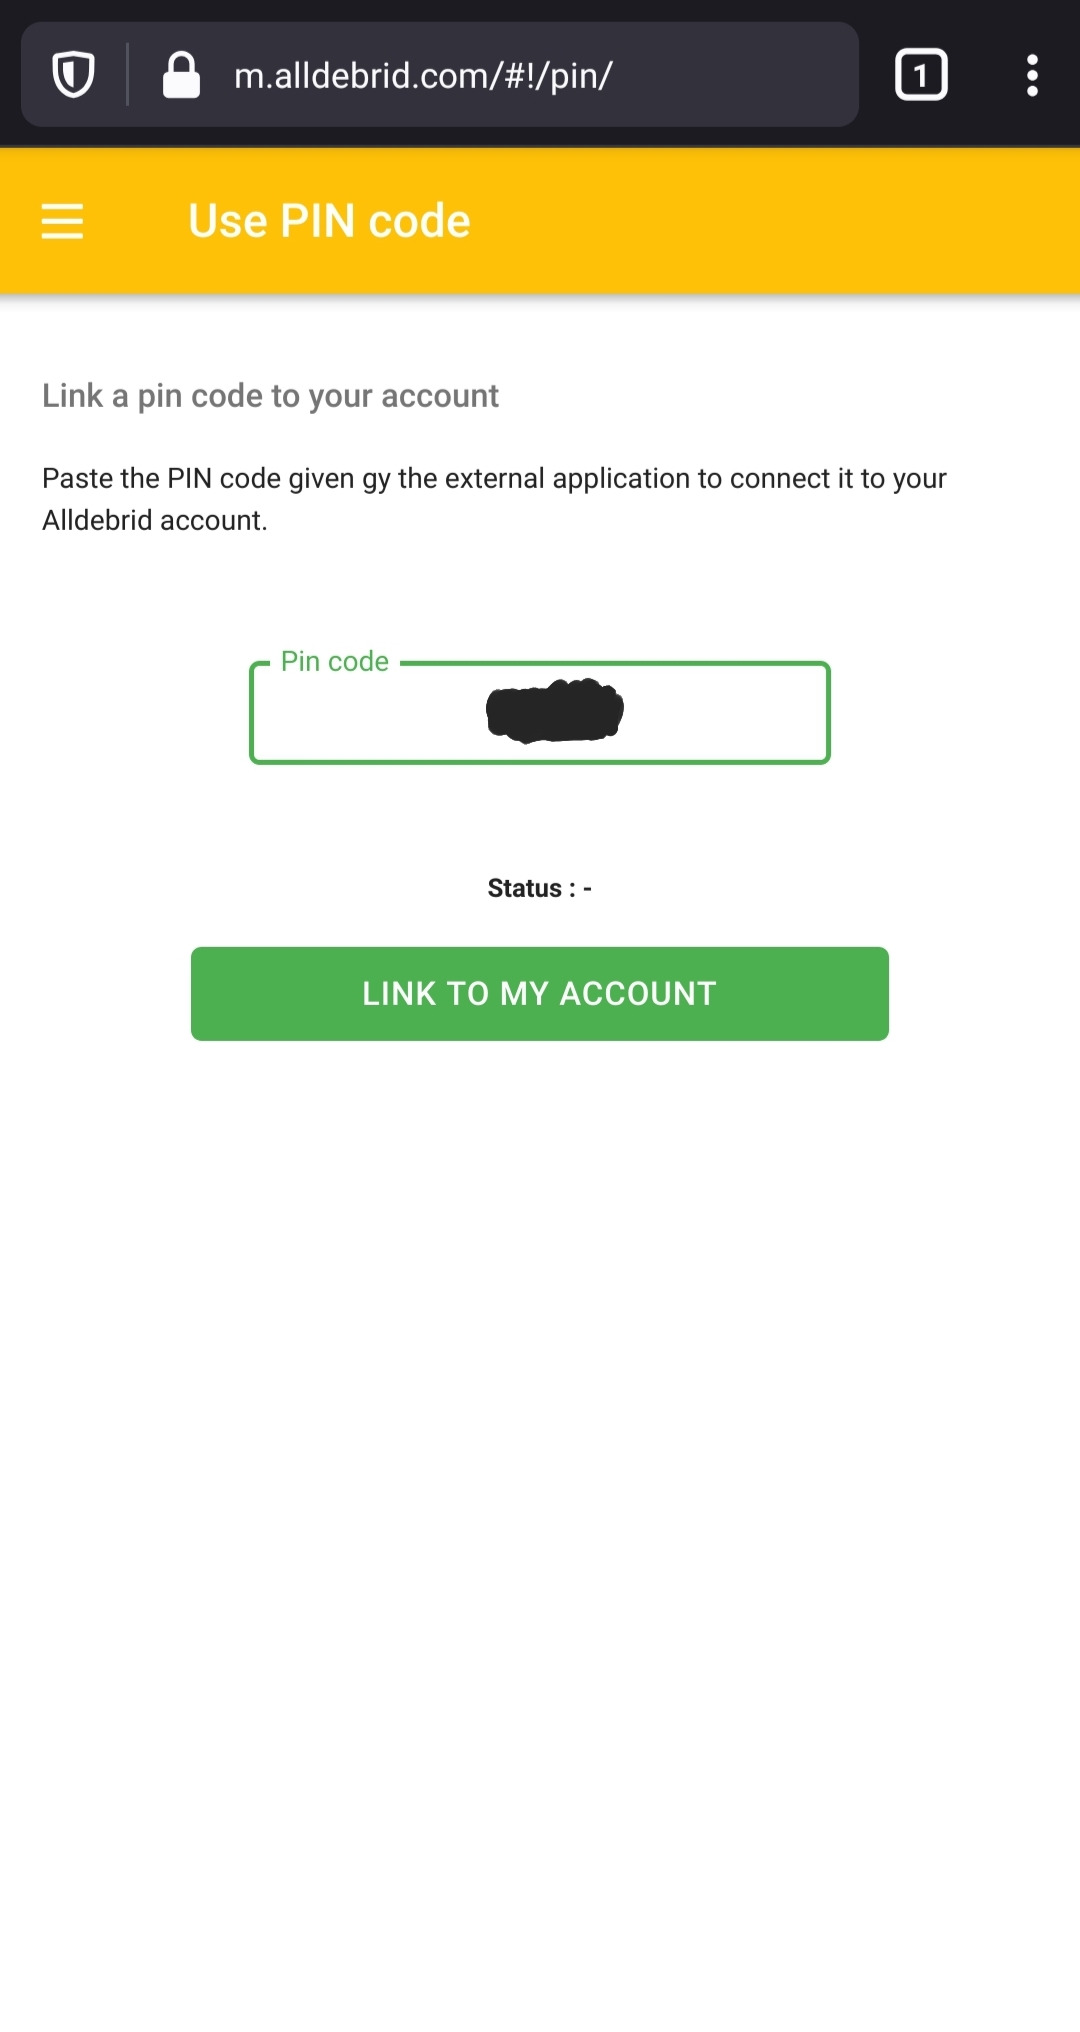
The All-Debrid website will return if the process was successful and now you can press “Done” on the Syncler popup to finish adding the account.
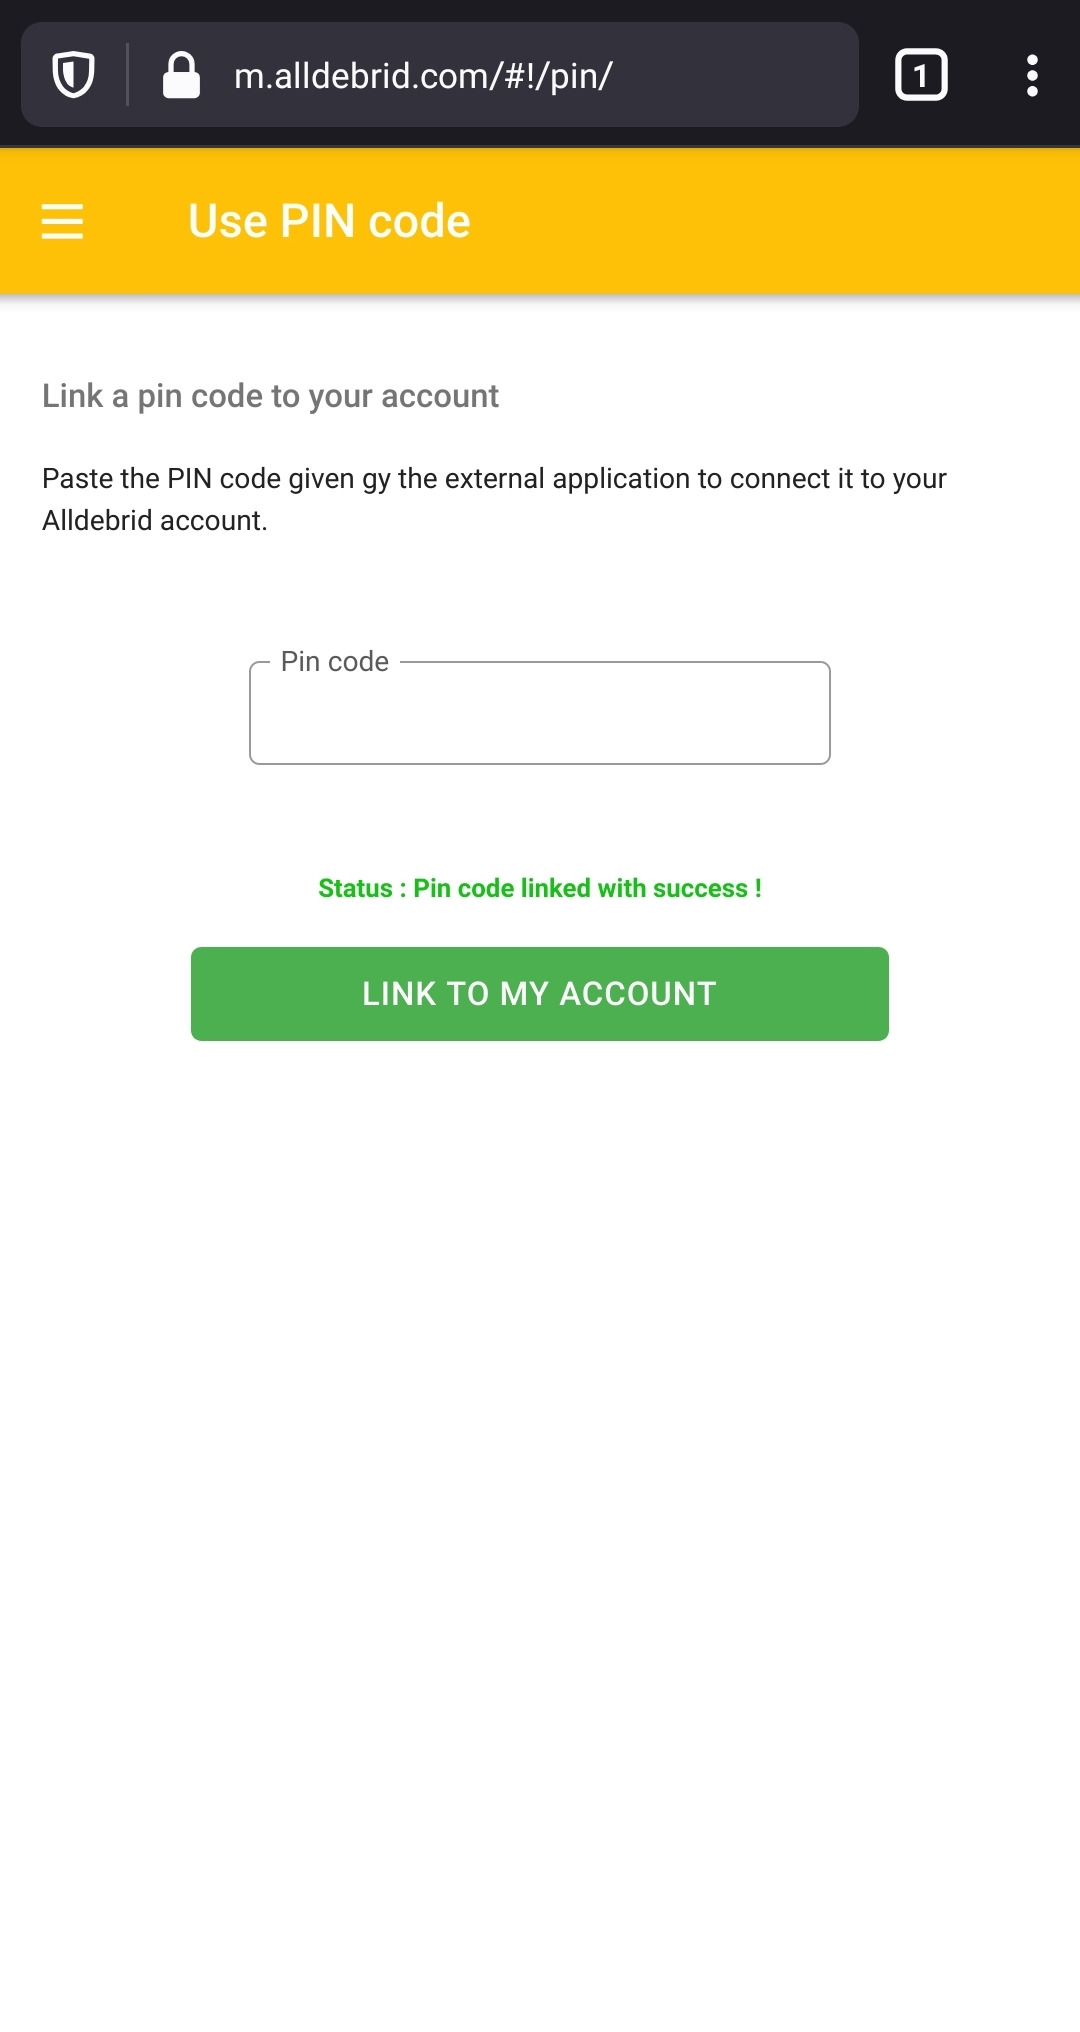

You will see a small refresh as your account status and information populates.

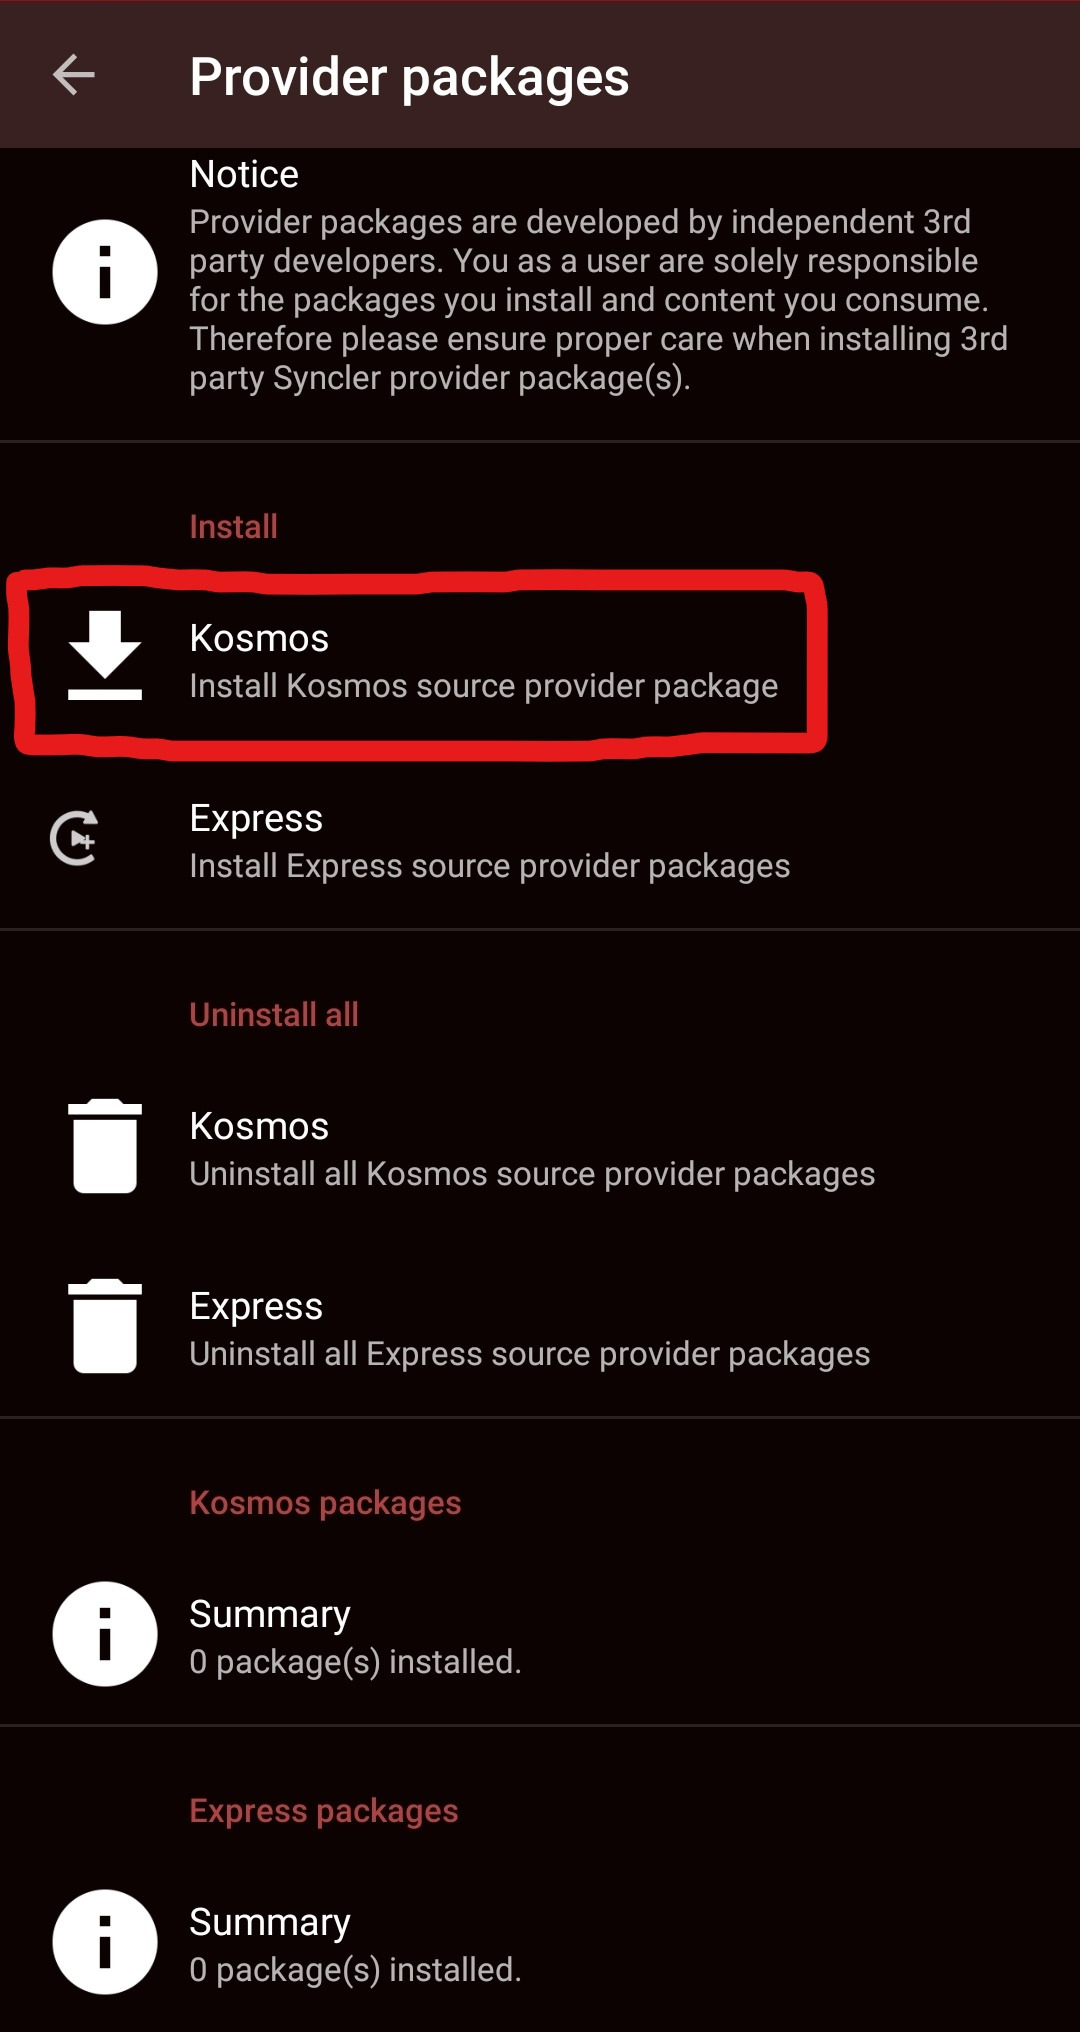
Part V - Installing provider packages
15.
The provider package manager
Open the side menu and press the Settings option.

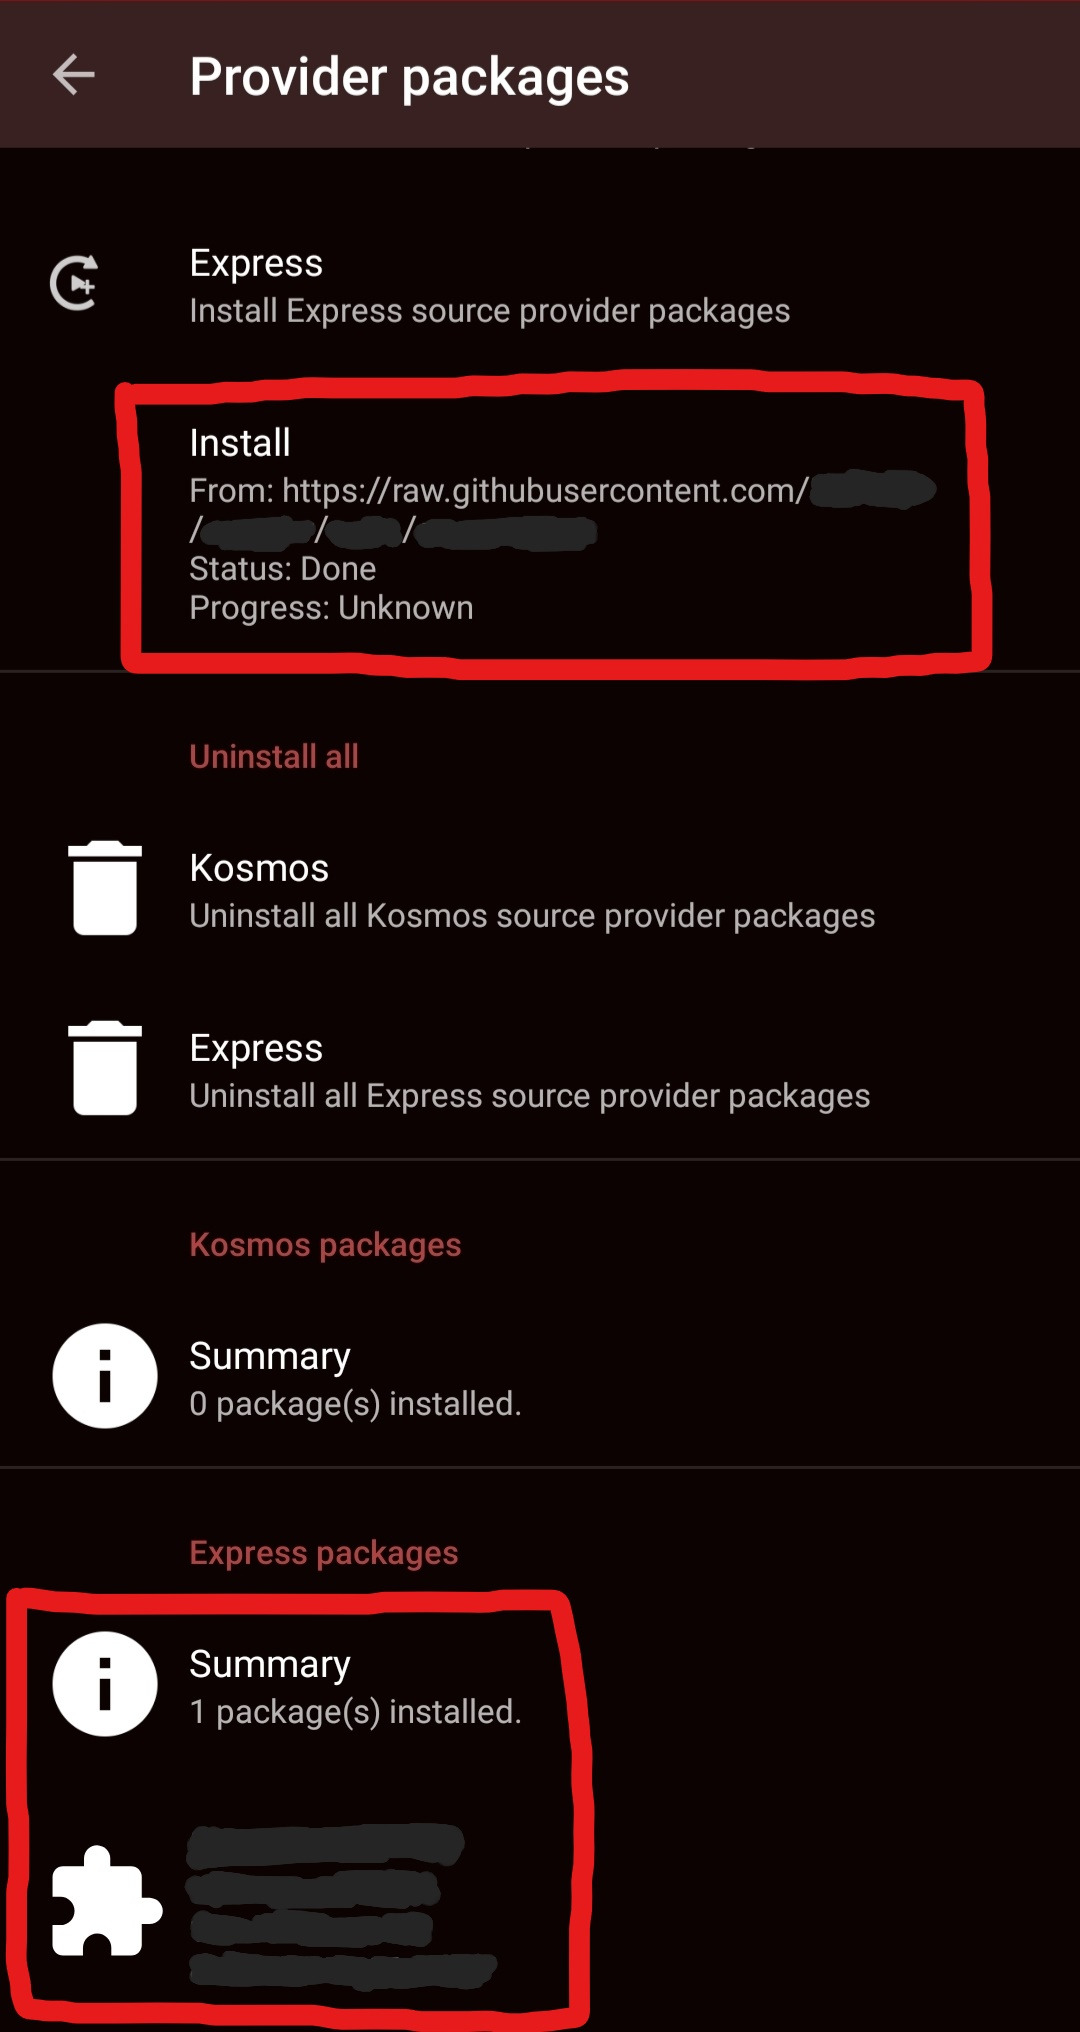
Navigate to the bottom and you will find the "Provider packages" category. The page that opens from this option is where you will manage your providers.
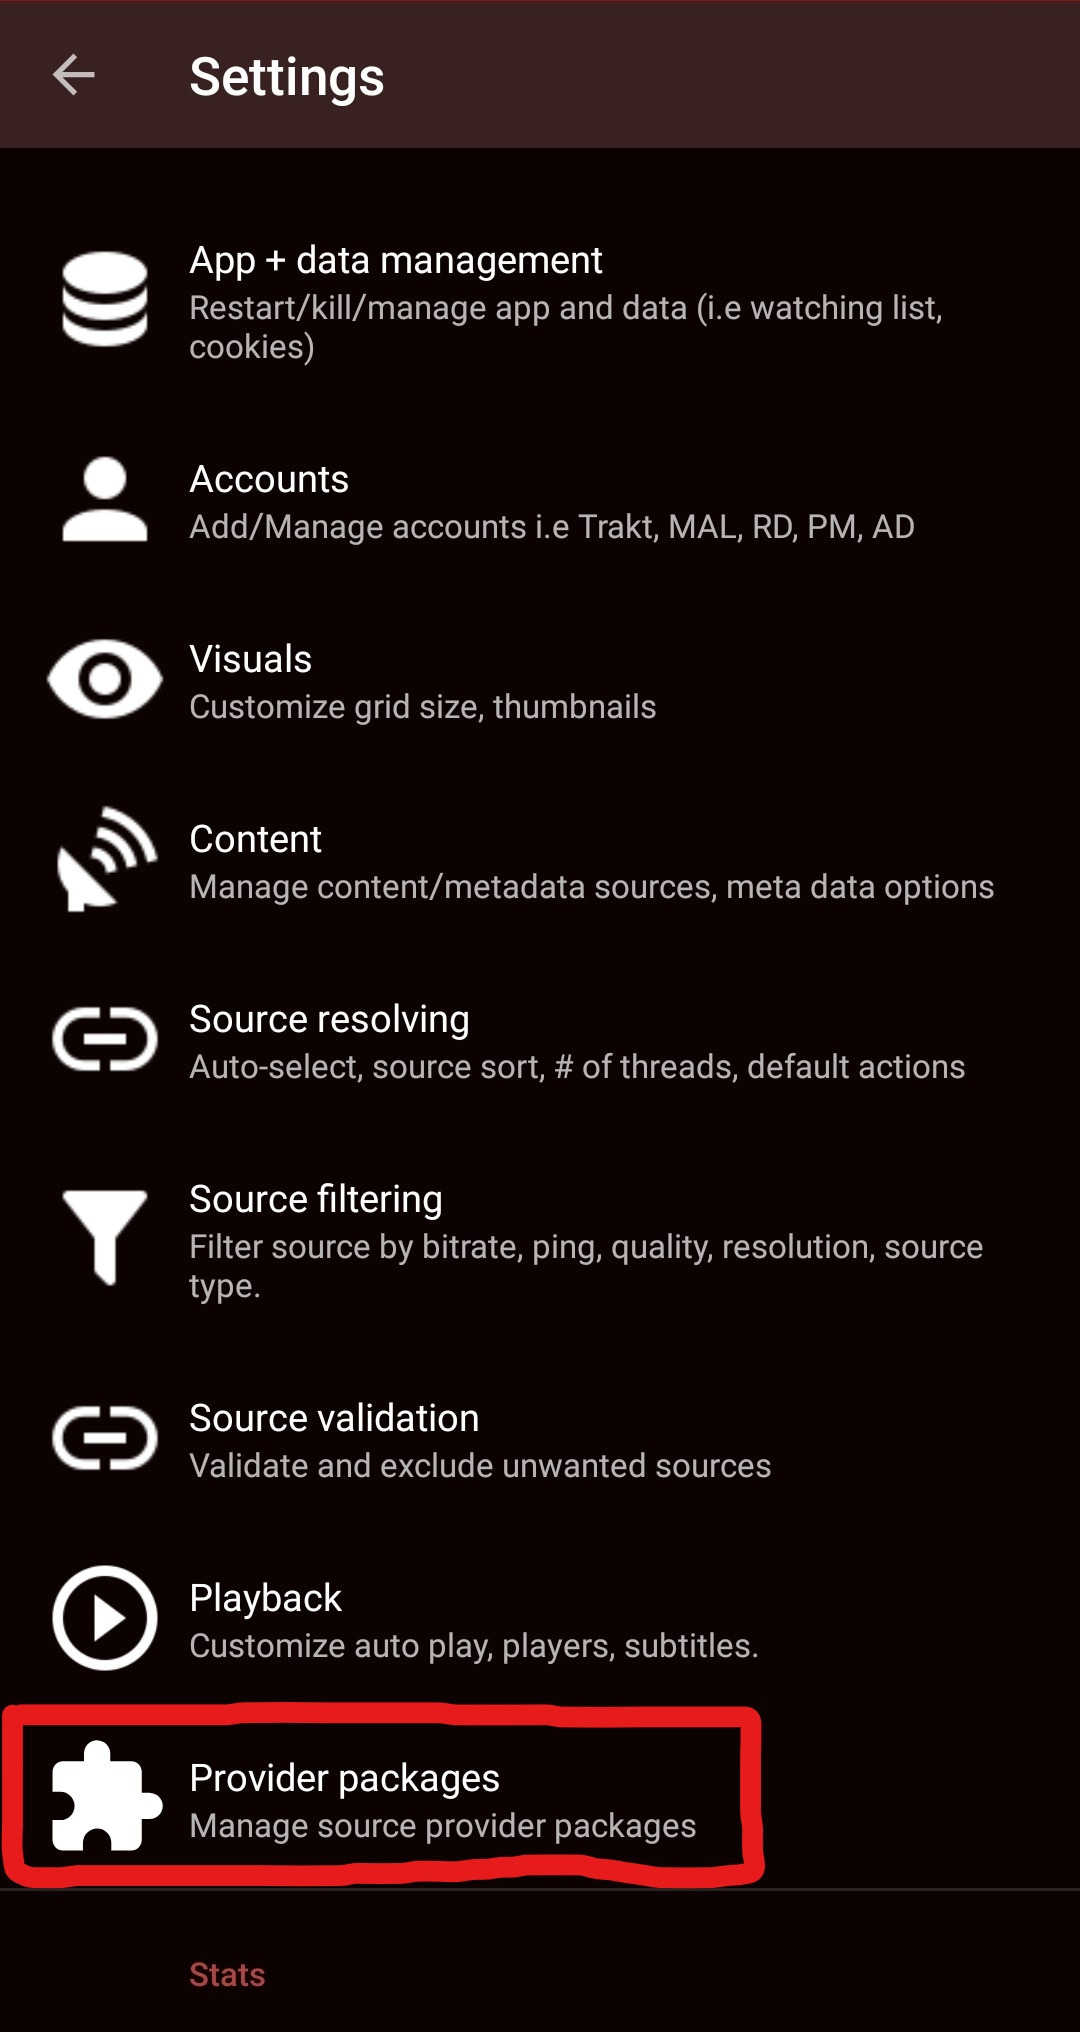

You will be able to install providers specific to each supported framework, either Kosmos or Express, depending on what language the provider is written in. See installation instructions given by the provider developer to understand which option you will use for their package.
Once installed you can manage an individual provider by selecting it. You can also remove all providers of a certain framework (ie. removing all Express providers).
16.
Finding provider(s)
Finding a provider is beyond the scope of this guide as it involves possible legal liability. Hypothetically, you could join discord groups, telegram channels or the new Providers4Syncler subreddit which may or may not be able to help you find a provider package.
The provider package is distributed as a URL, which contains the source code of the provider. Save this URL as you will need it in the next section.
17.
Installing provider(s)
Installation of a provider is similar to connecting an account but with an extra step in the middle. The process is simple to repeat once you have learnt it well.
Disable your VPN / Adblocker / DNS, you can turn it on again after completing this section.
If your provider is an Express package, select the “Install as Express” option.
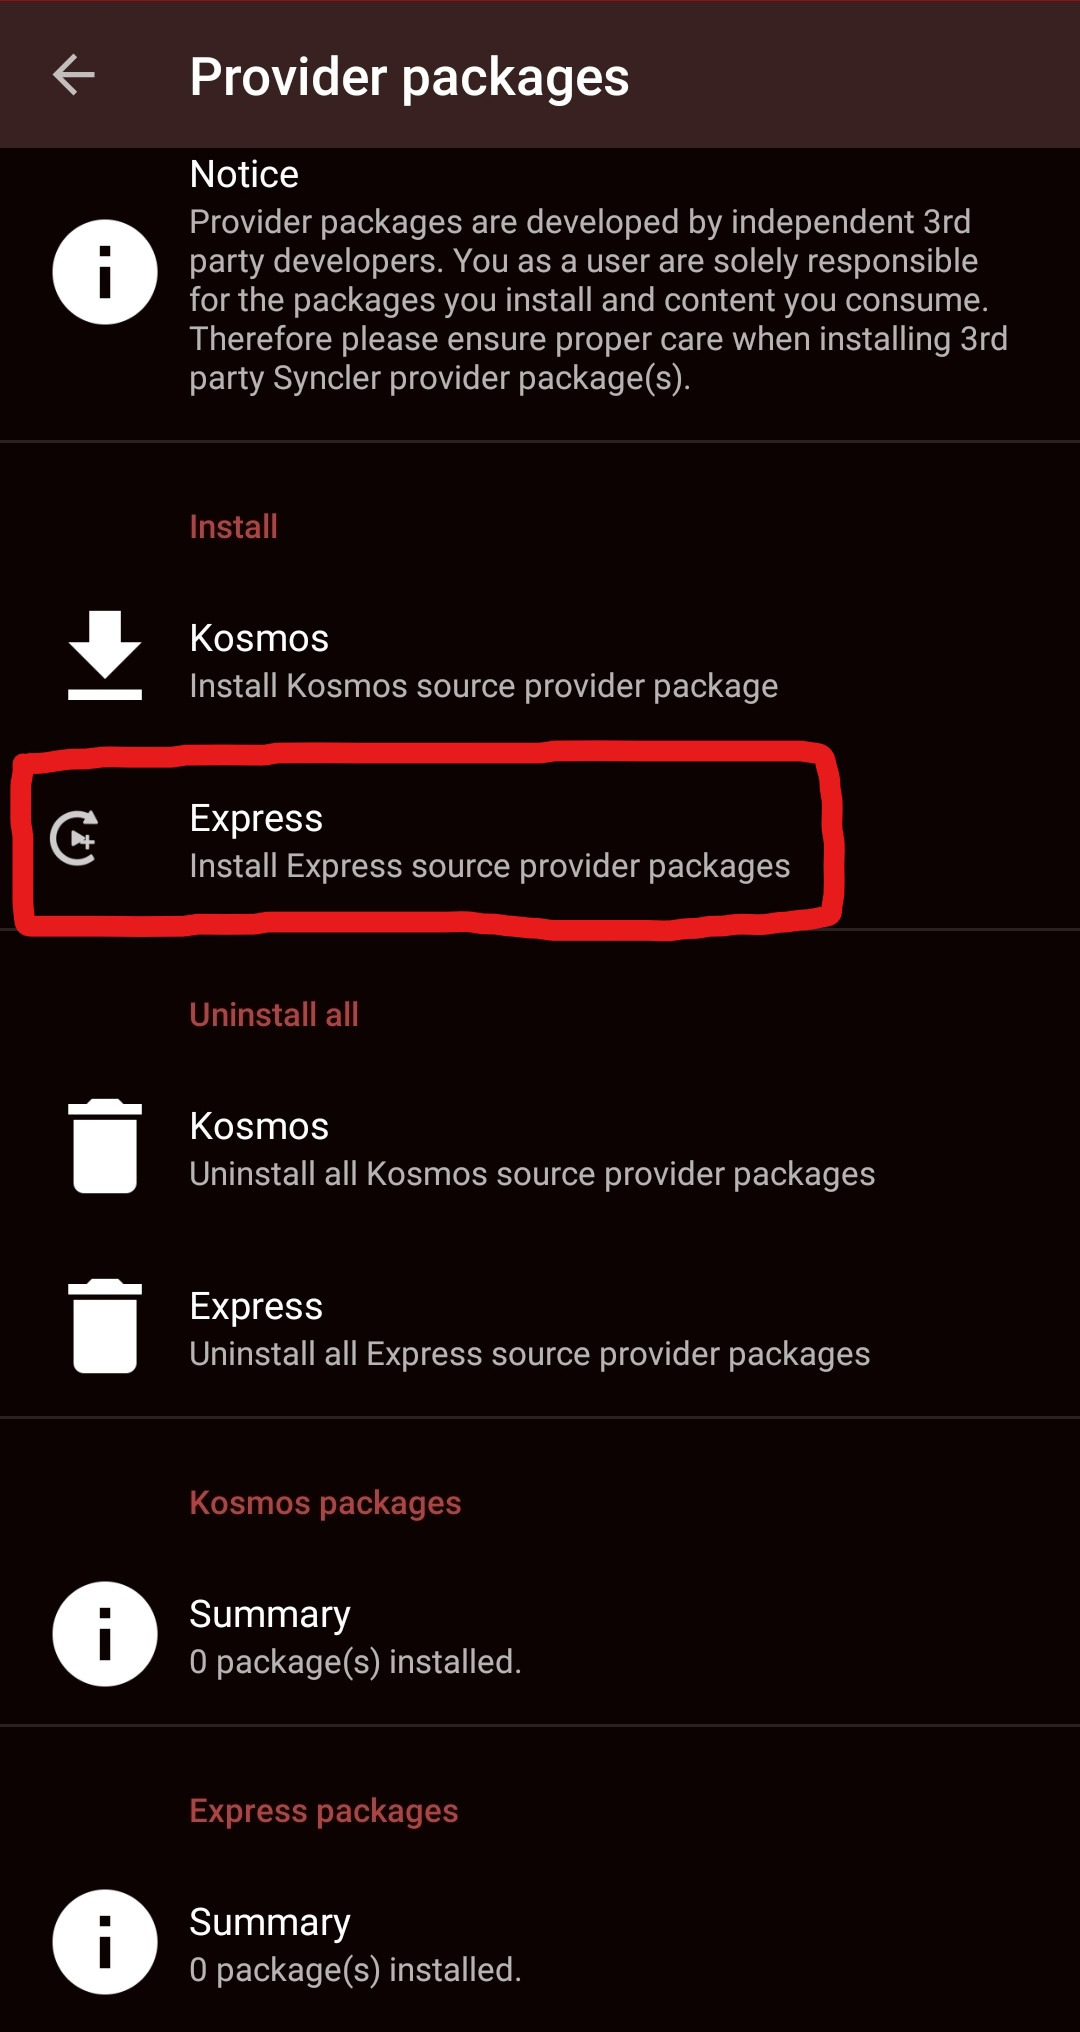
If your provider is a Kosmos package, select the “Install as Kosmos” option.
A popup should open and direct you to the provider installation website.
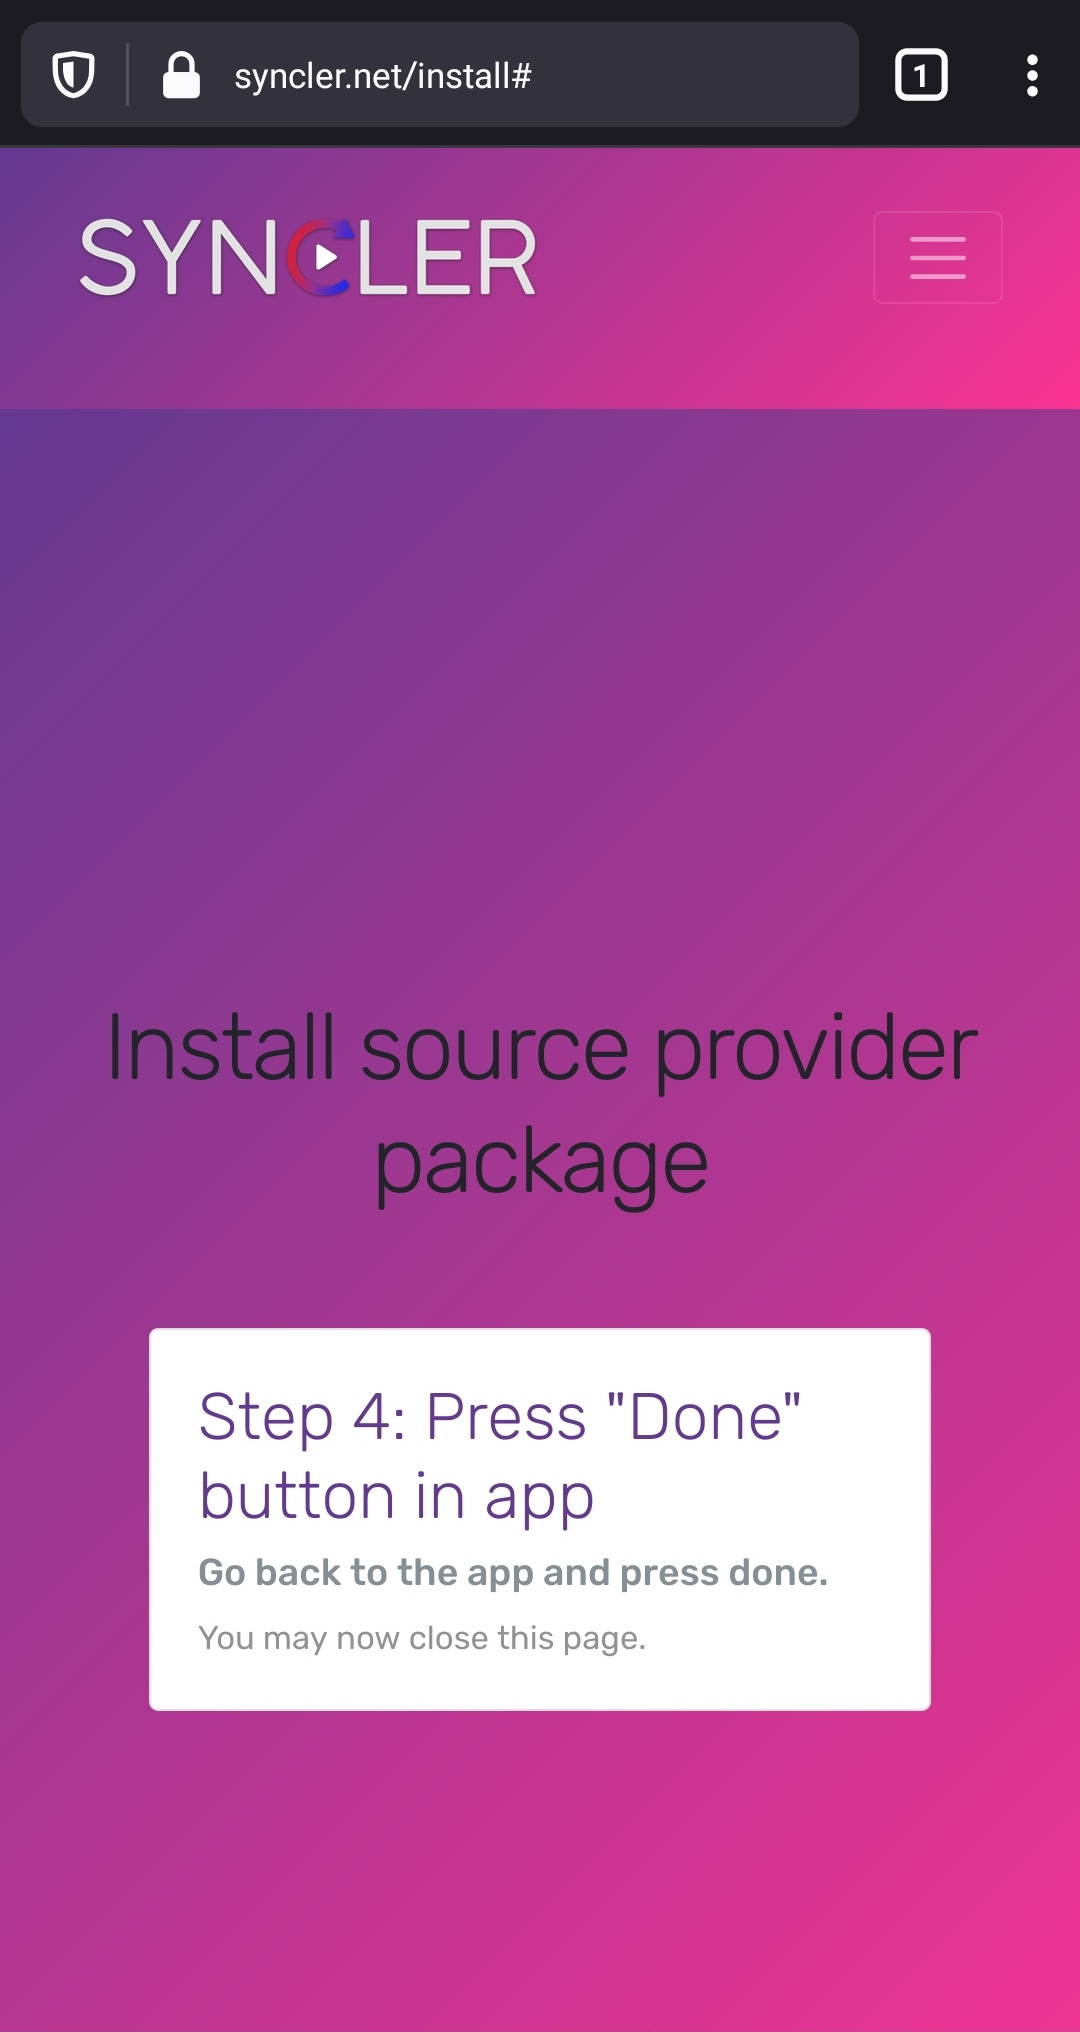
If you're using a stable version of Syncler, go to syncler.net/install
If you're using a beta version of Syncler, go to beta.syncler.net/install
If you're not sure which version you are using, the popup will always tell you the correct site to go to. The rest of the process is exactly the same.
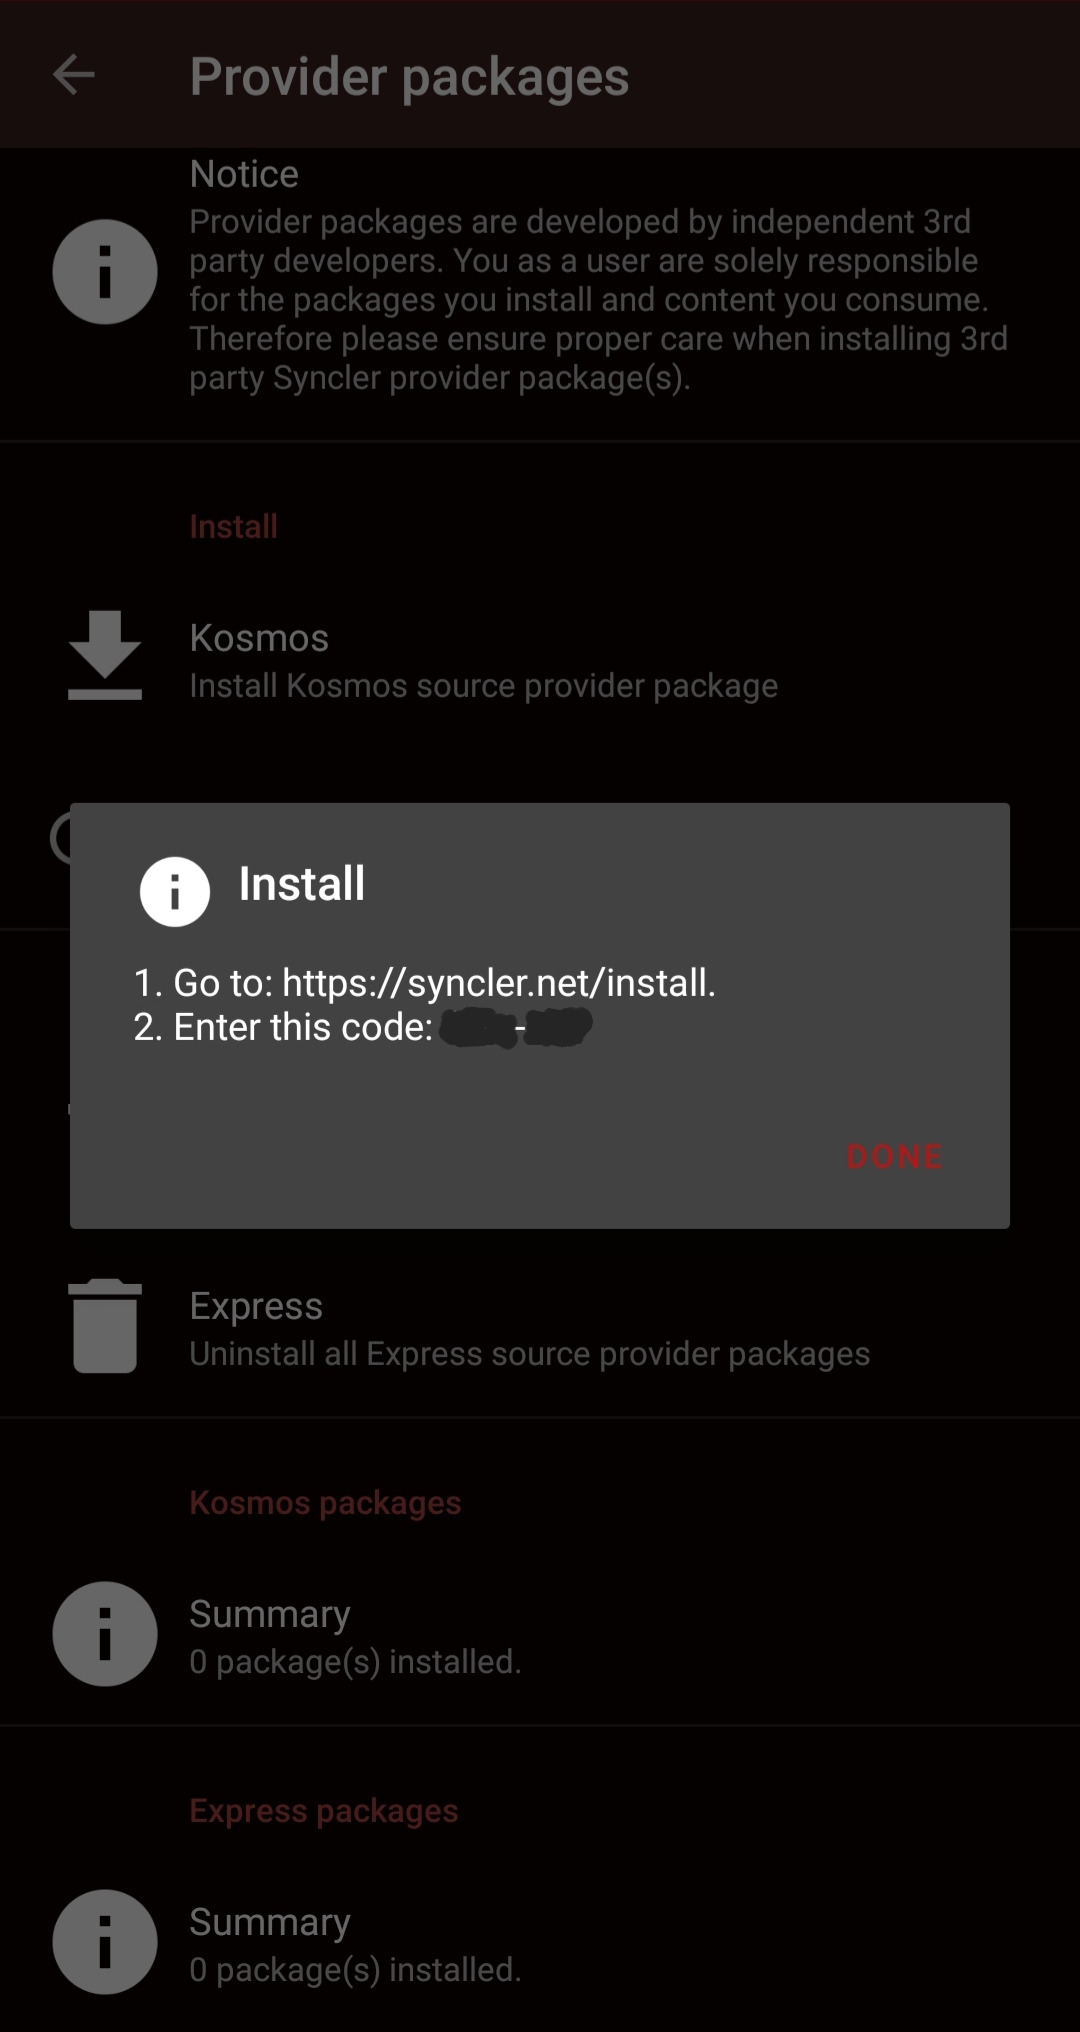
Enter the code shown on your device, then press “Next” on the website.
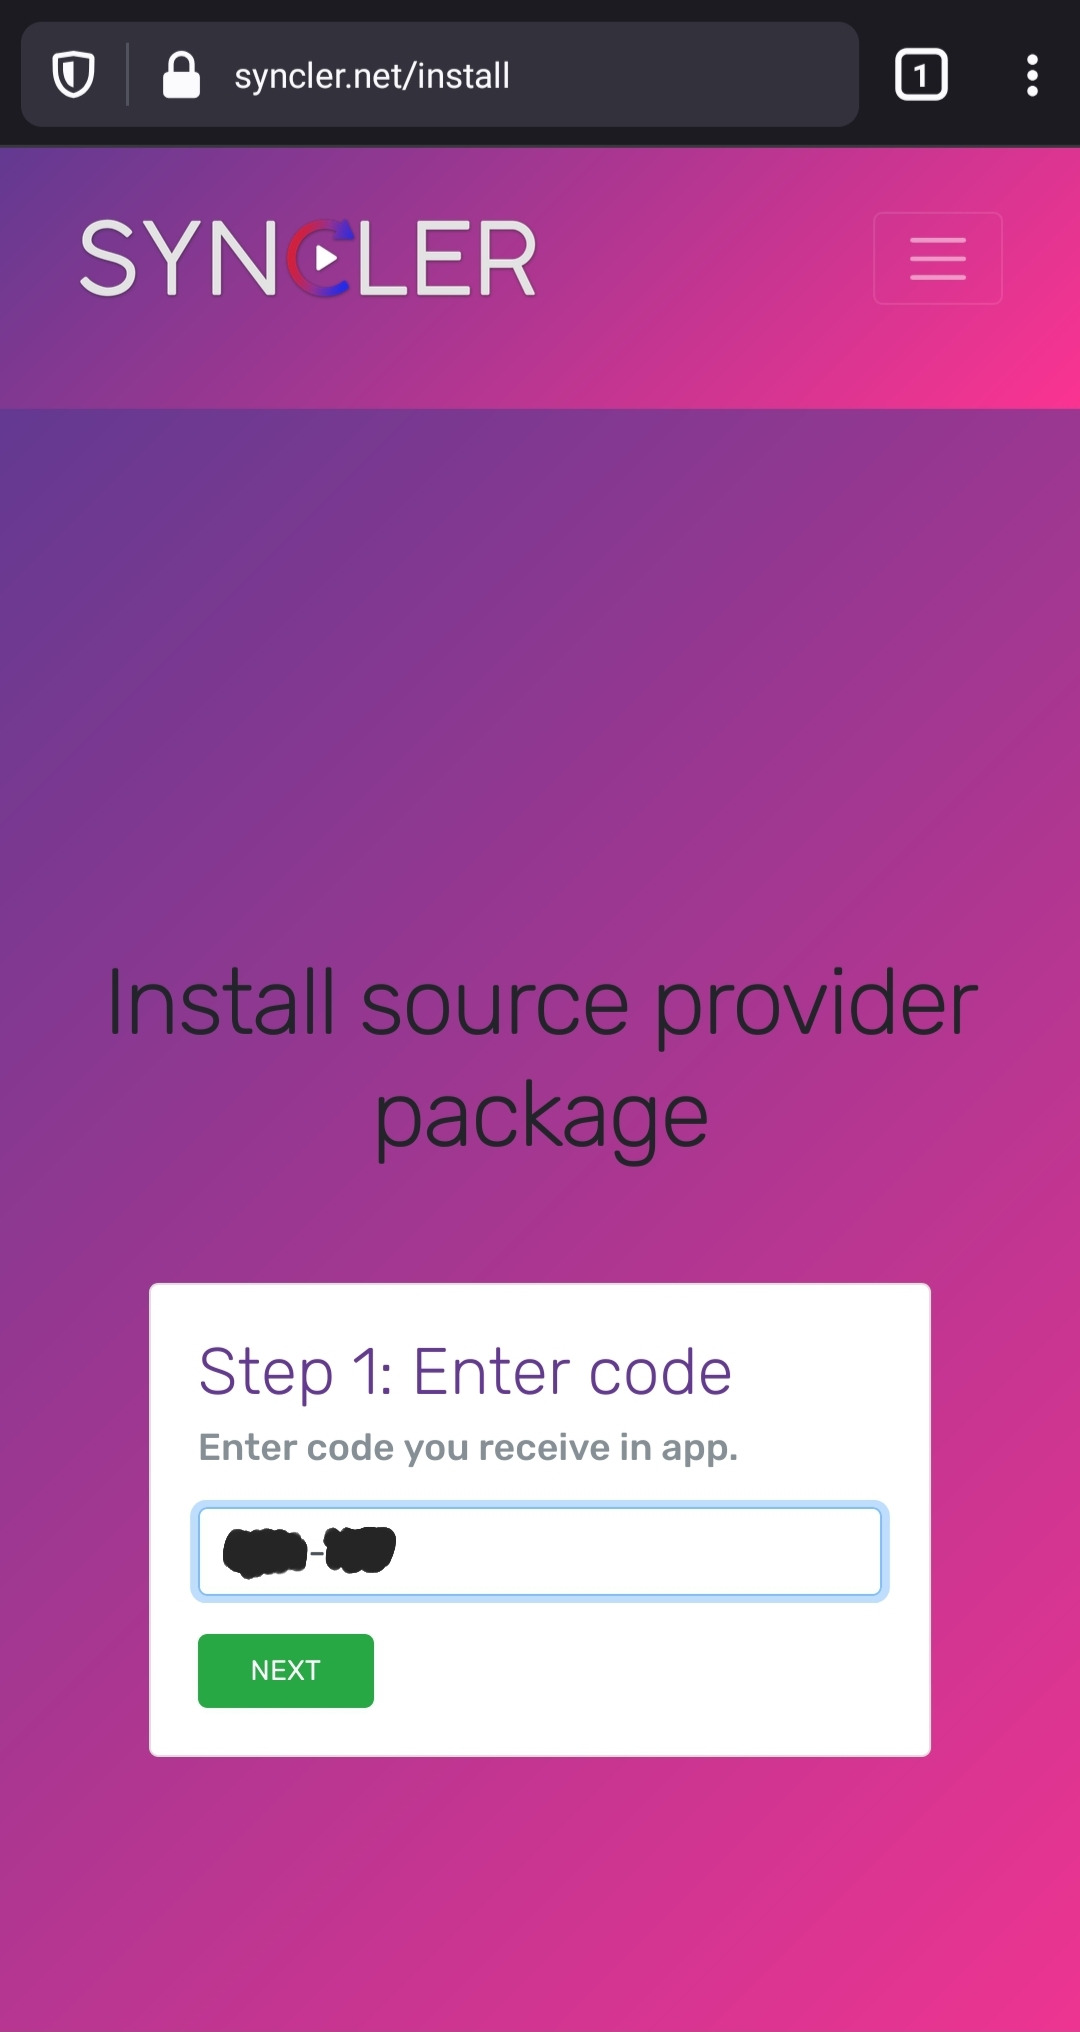
After entering the code correctly, the next page of the website is a text box where you define the provider package. All this step means is you should copy and paste the URL (found in the previous section) which contains the source code of your provider. Make sure there are no spaces / new lines before or after the URL.
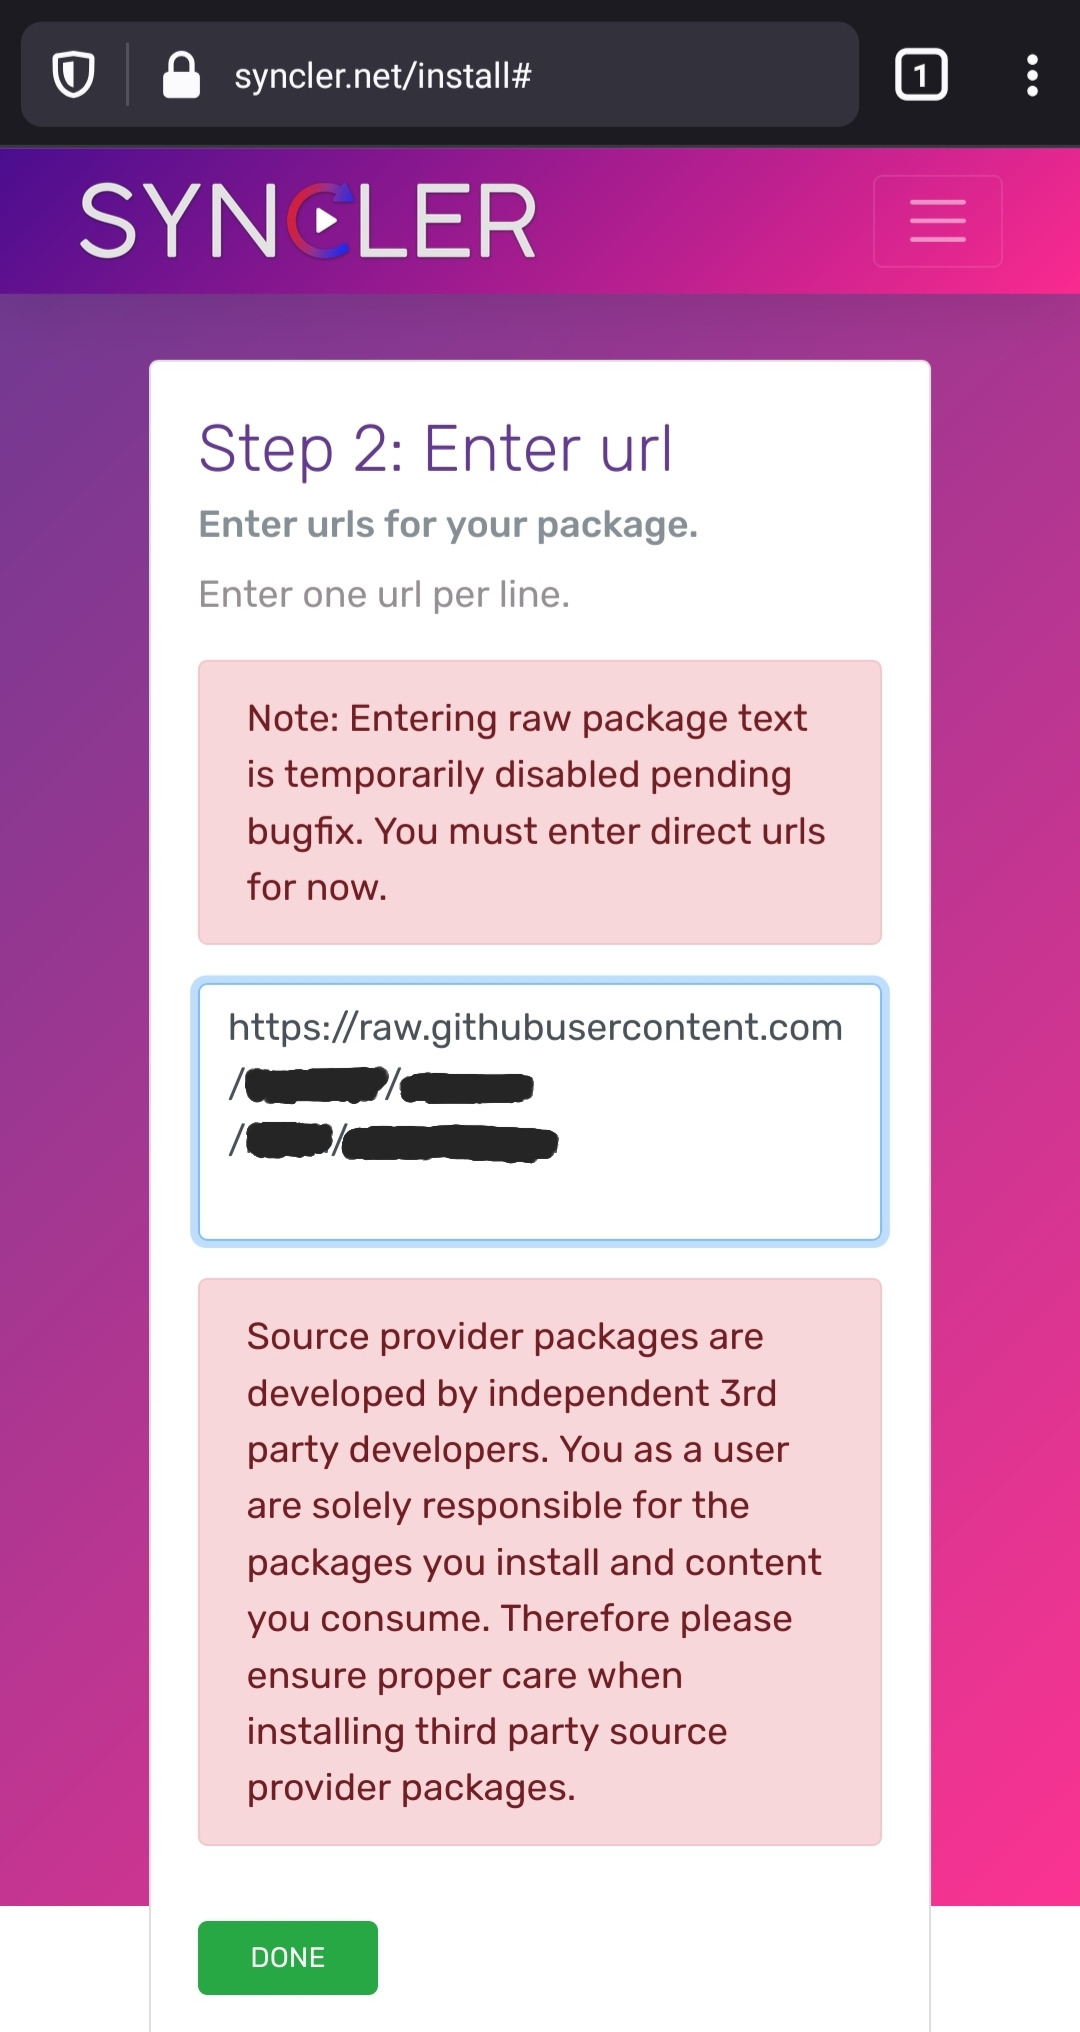
Then press “Done” on the website.
The website will return if the process was successful and now you can press “Done” on the Syncler popup to finish adding the provider.
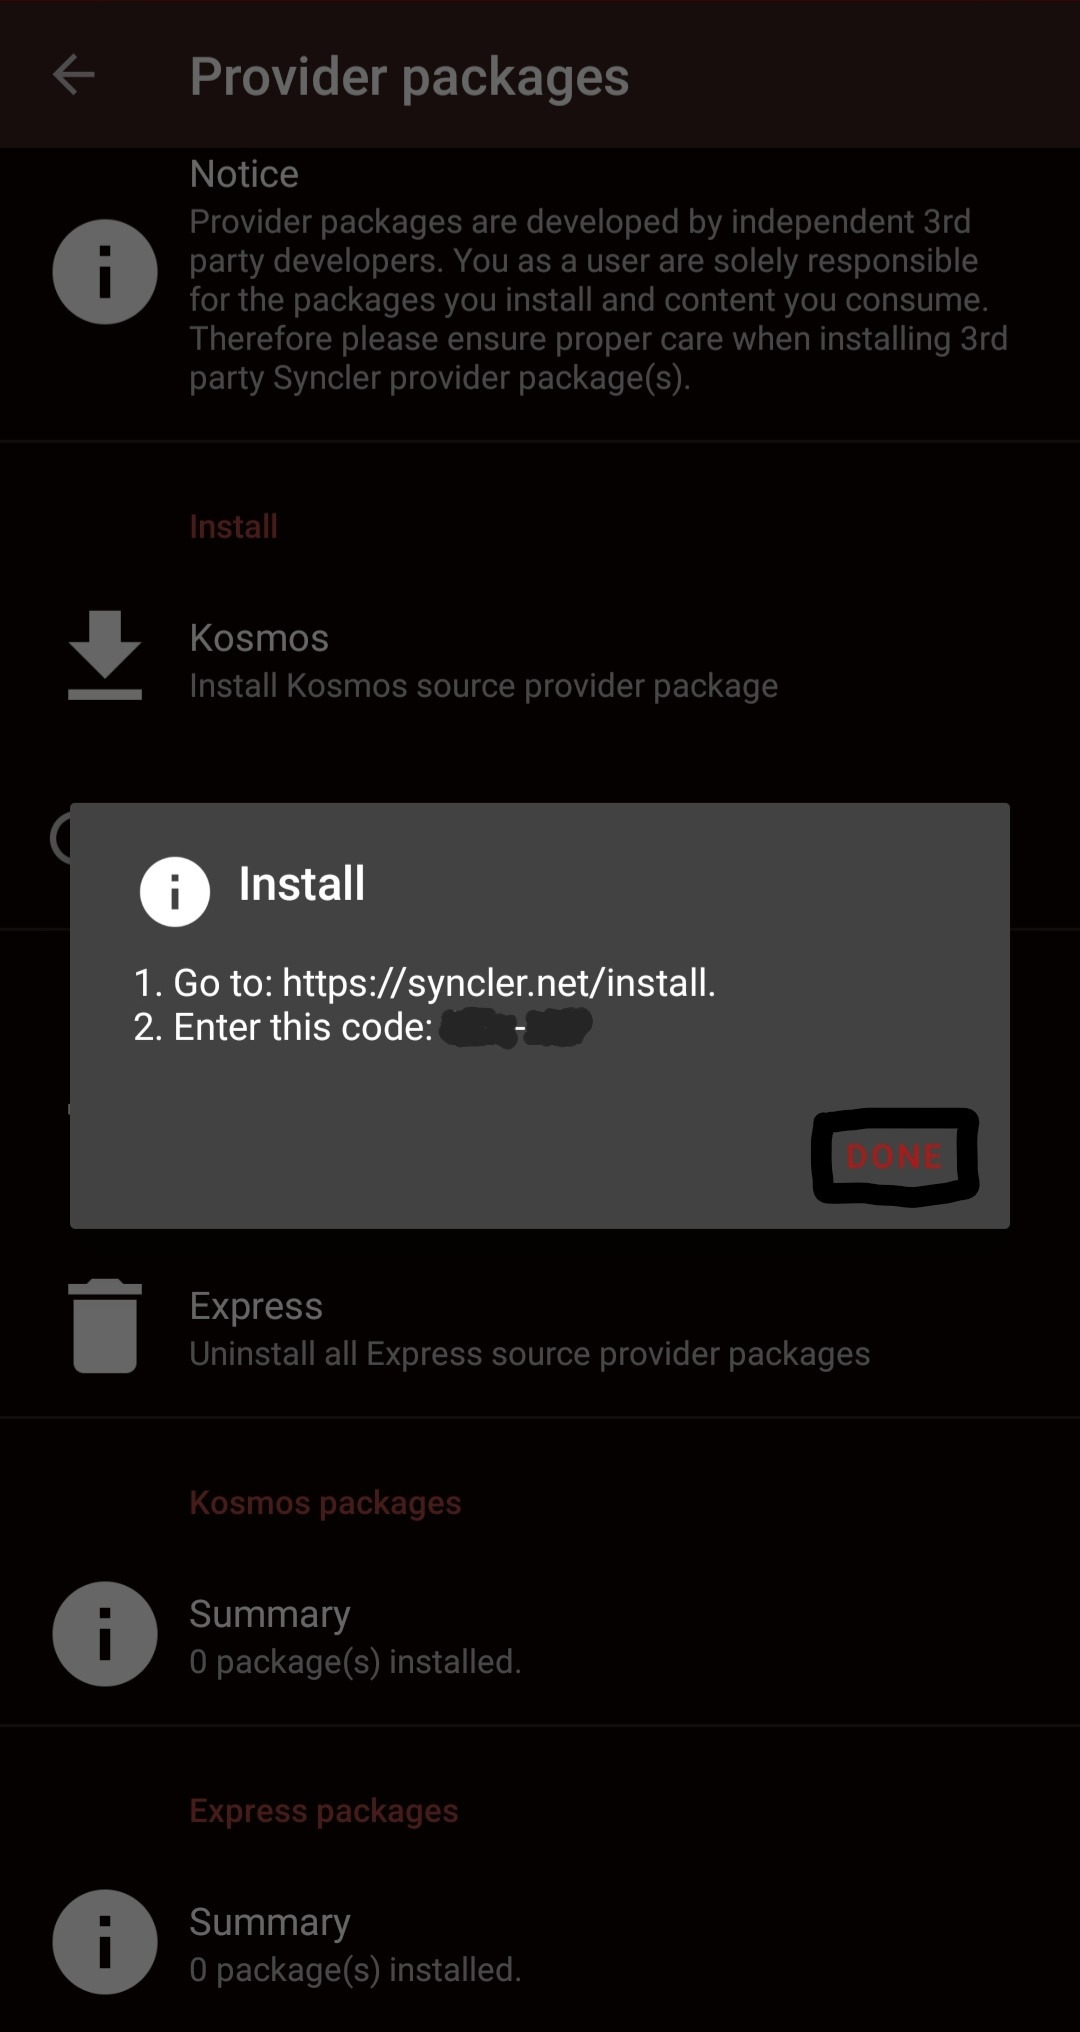
You will see a small table pop up and refresh as the source code is downloaded and installed.
Part VI - Searching for sources
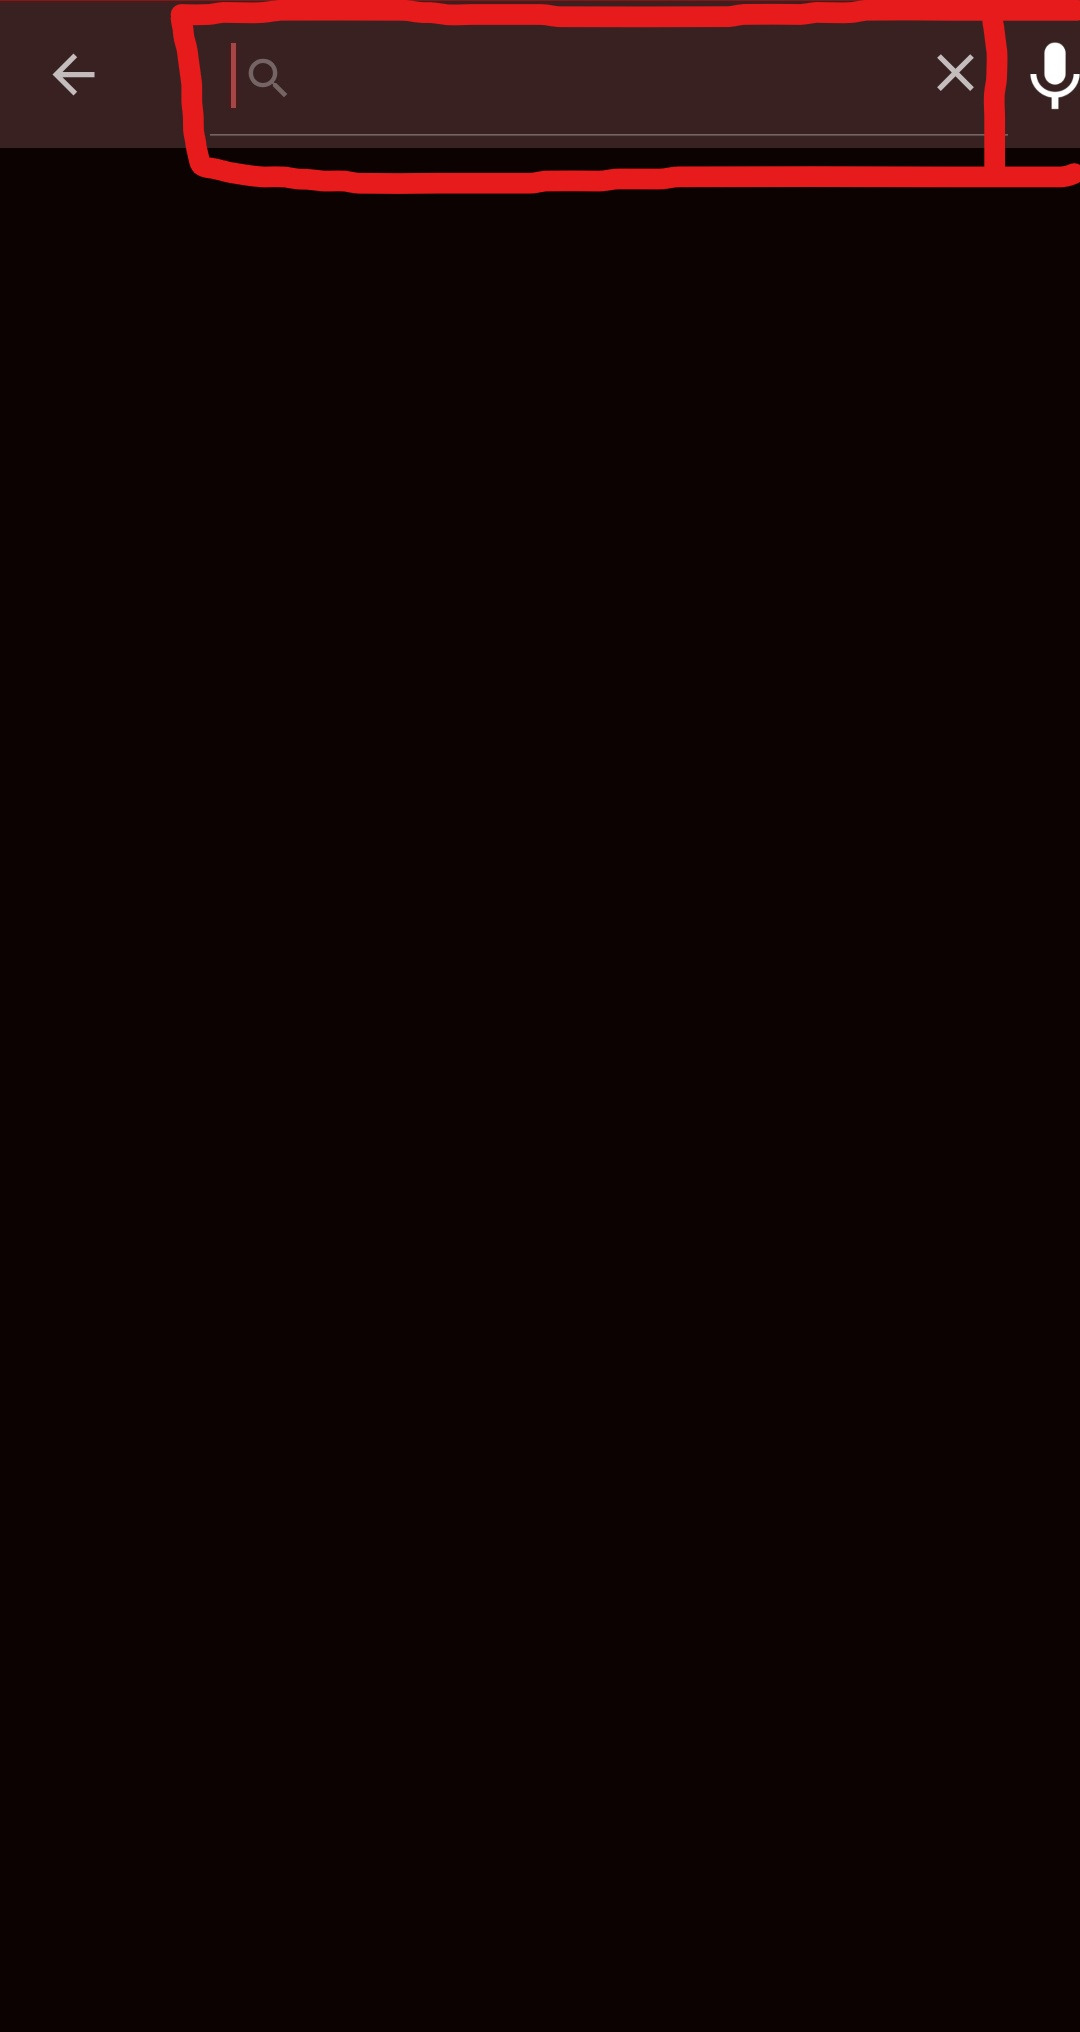
18.
The search menu
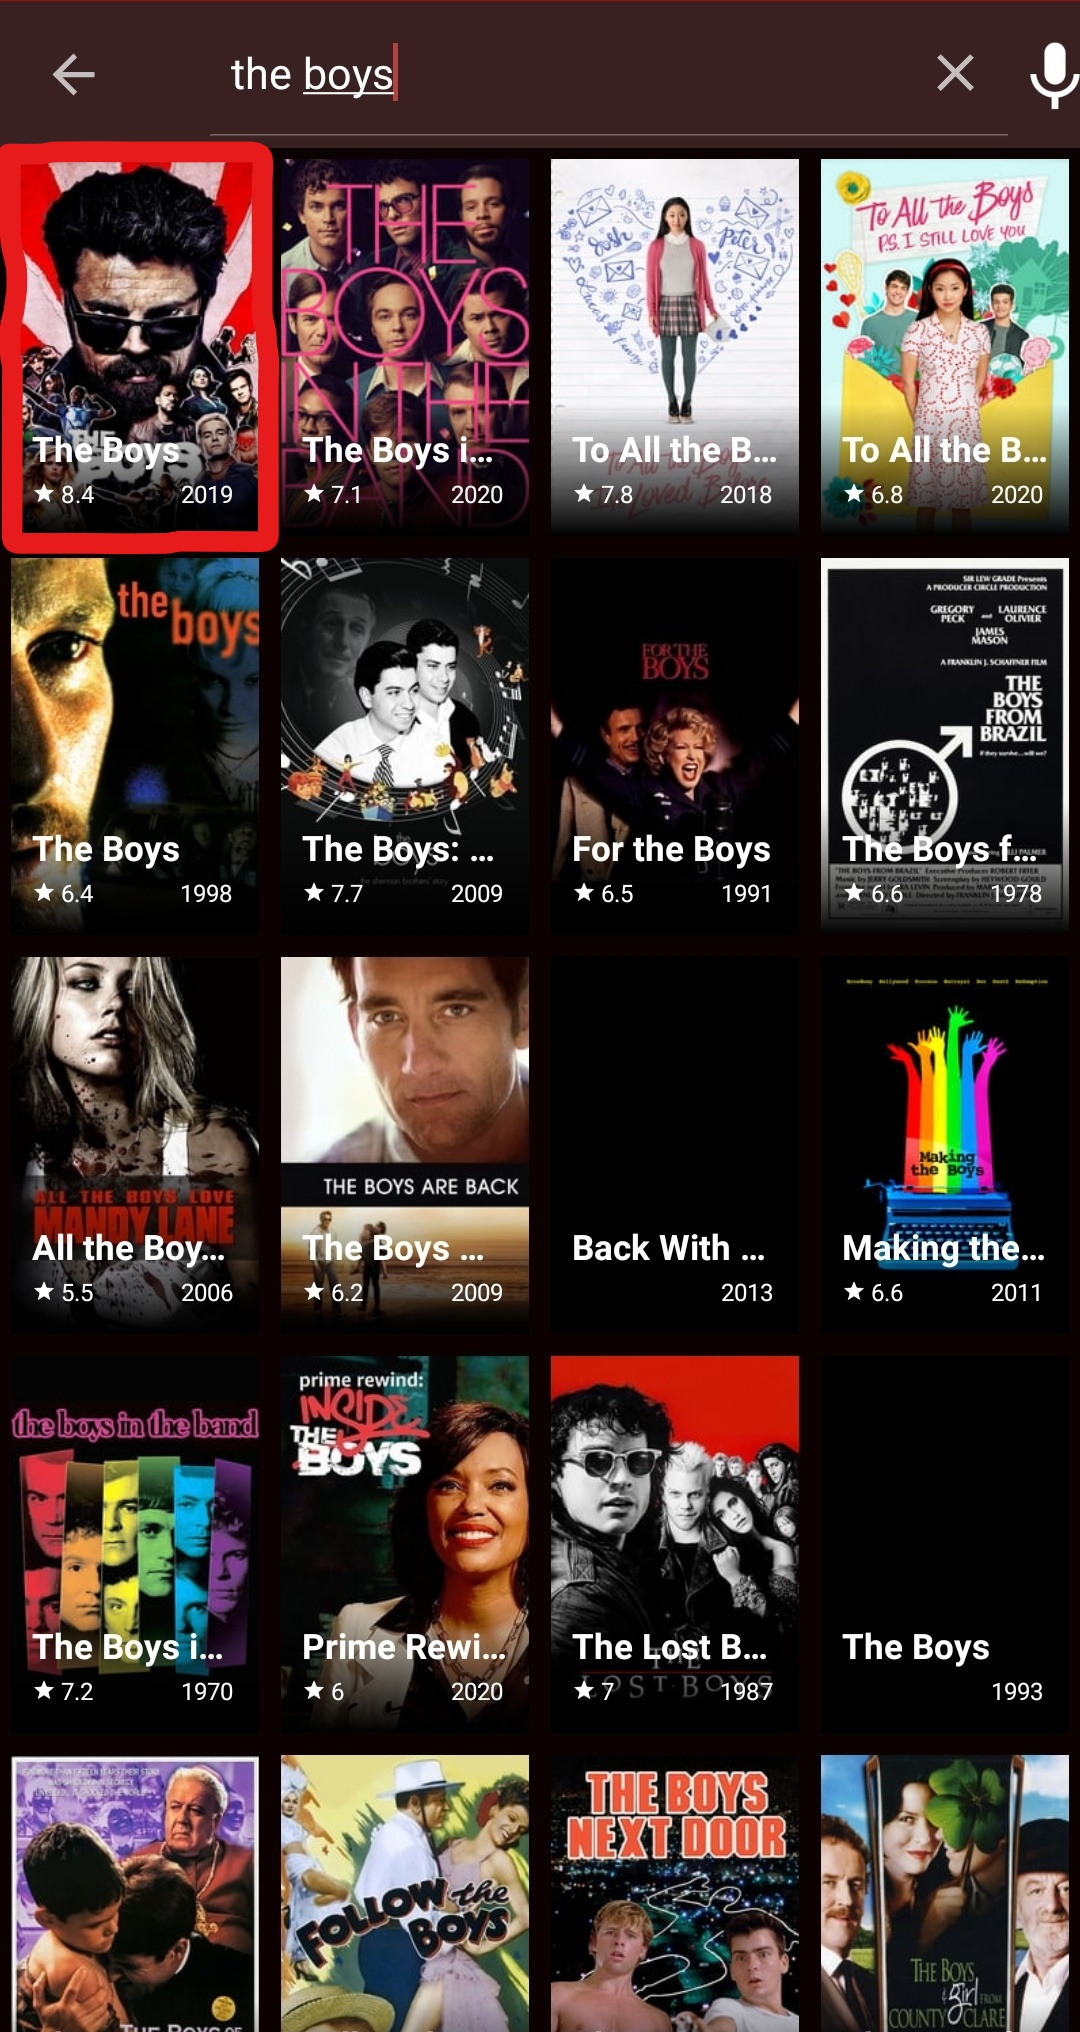
Open the side menu and press the Search option (on a TV device) or press the search icon (on a mobile device).
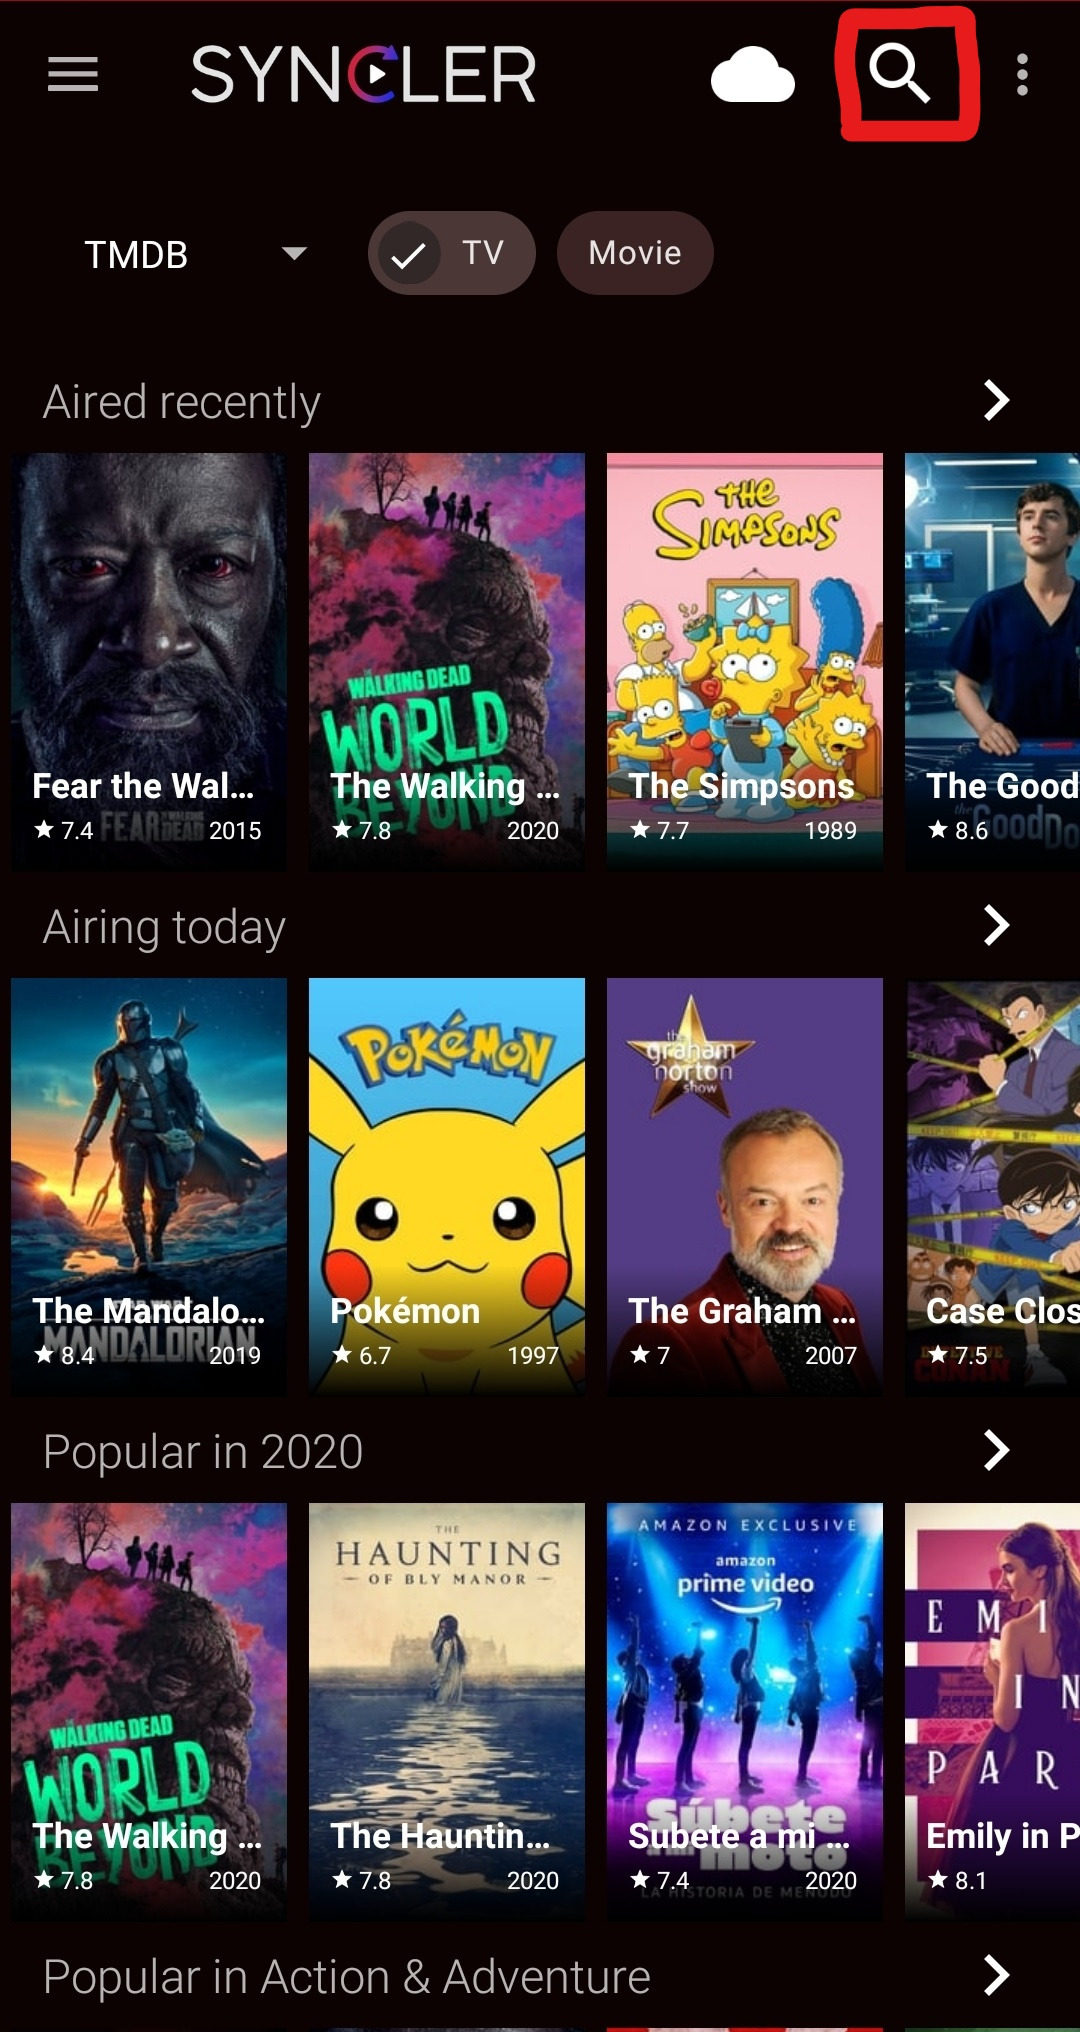
Here you can voice search (Compatible devices only) or type in the TV show / movie you would like to watch.

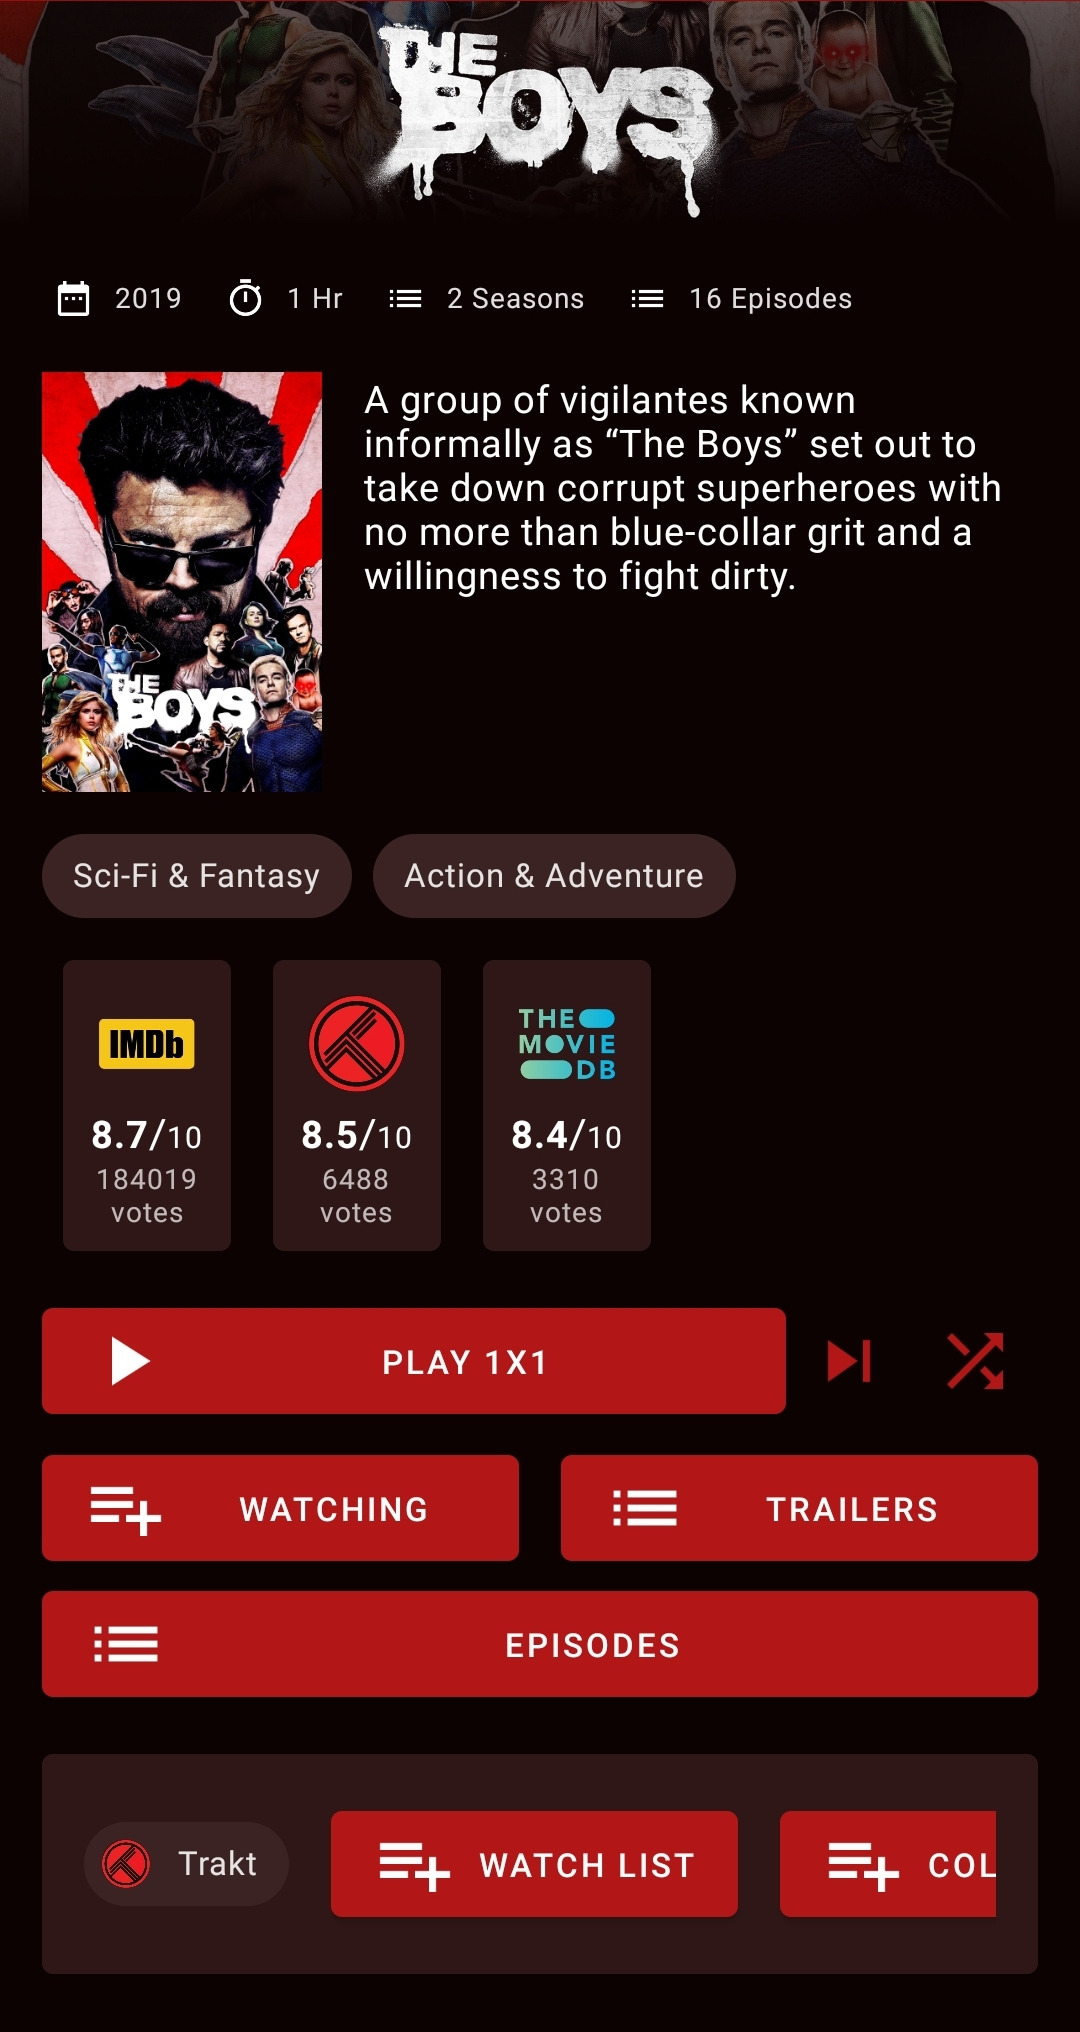
After you find the desired content, press the tile and you will be taken to the page for that specific show / movie.
19.
User interface views
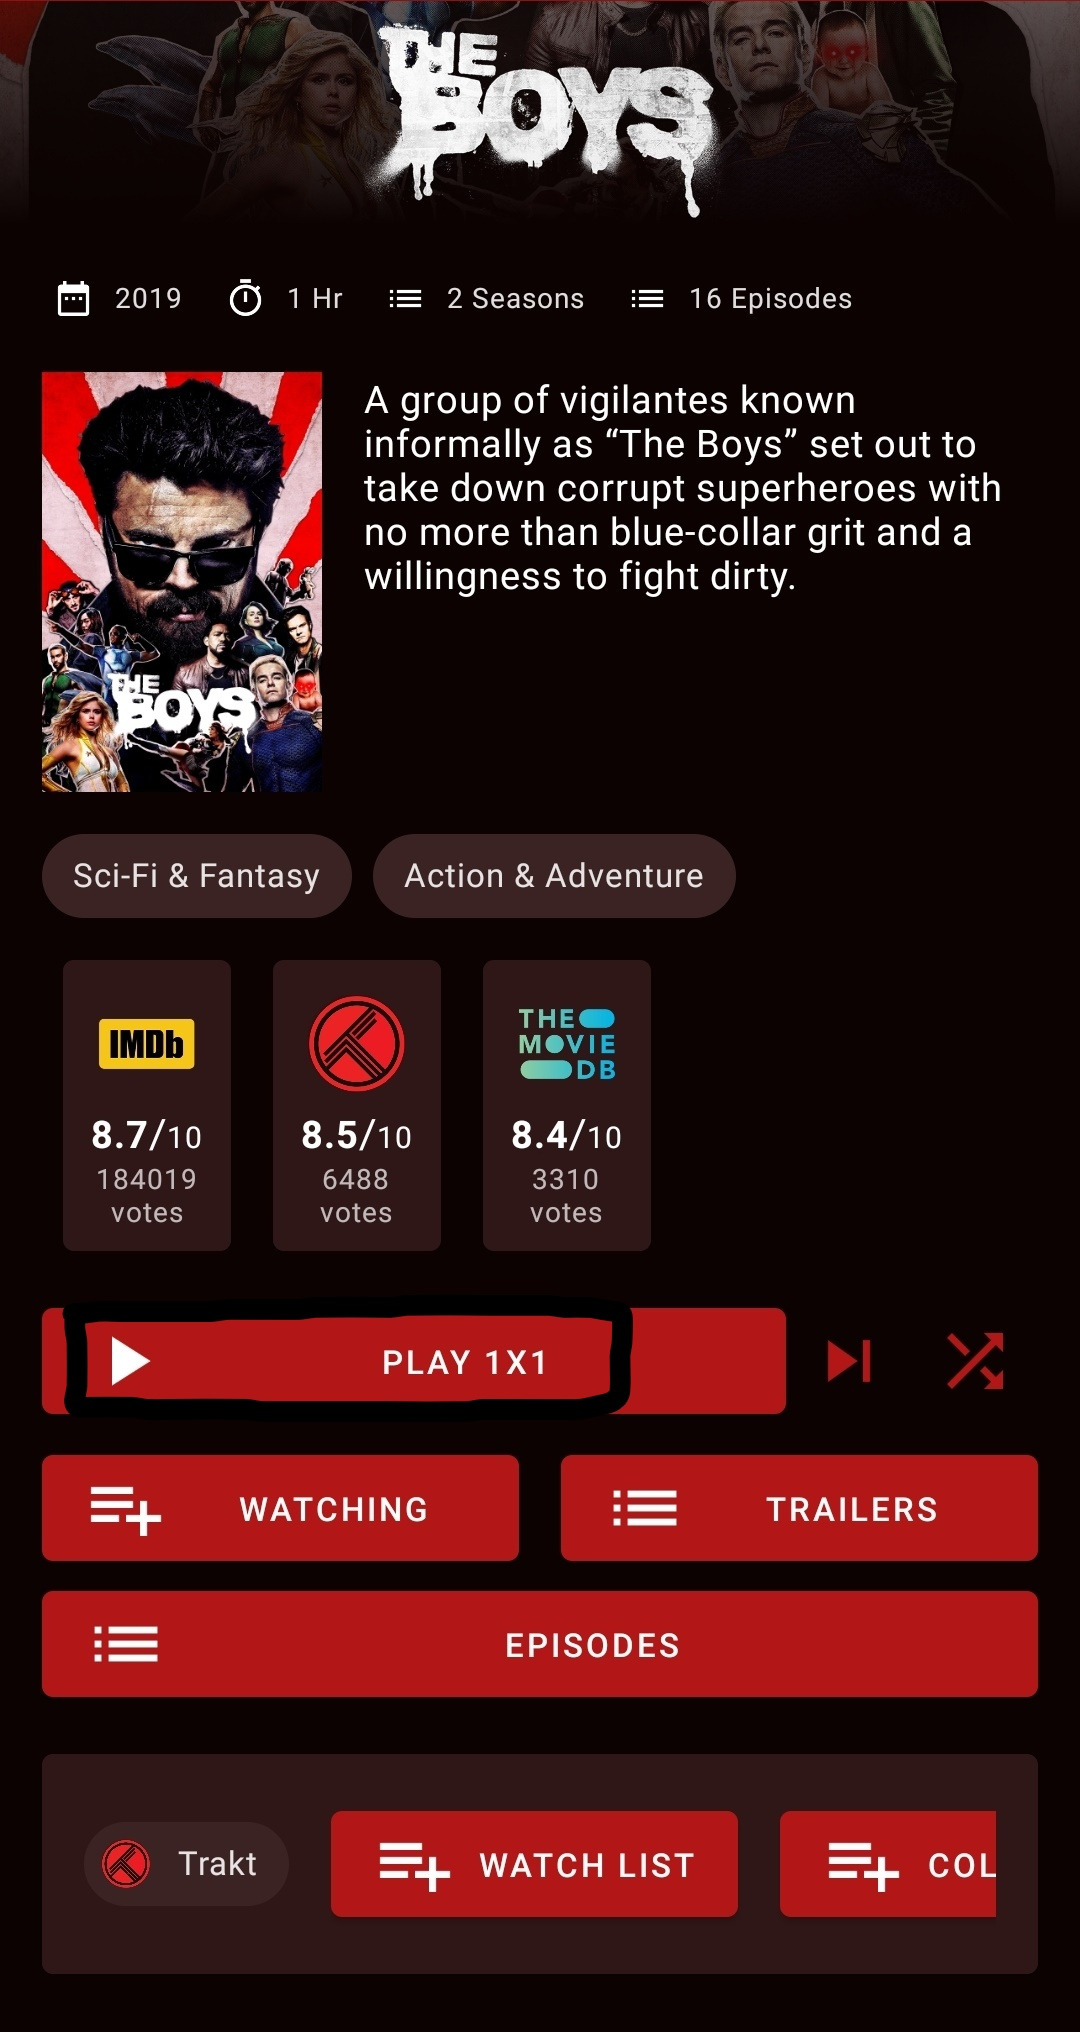
The view for TV shows is a little different to movies. There are Netflix style scrolling lists to pick seasons and episodes, just press the episodes button (on a mobile device).
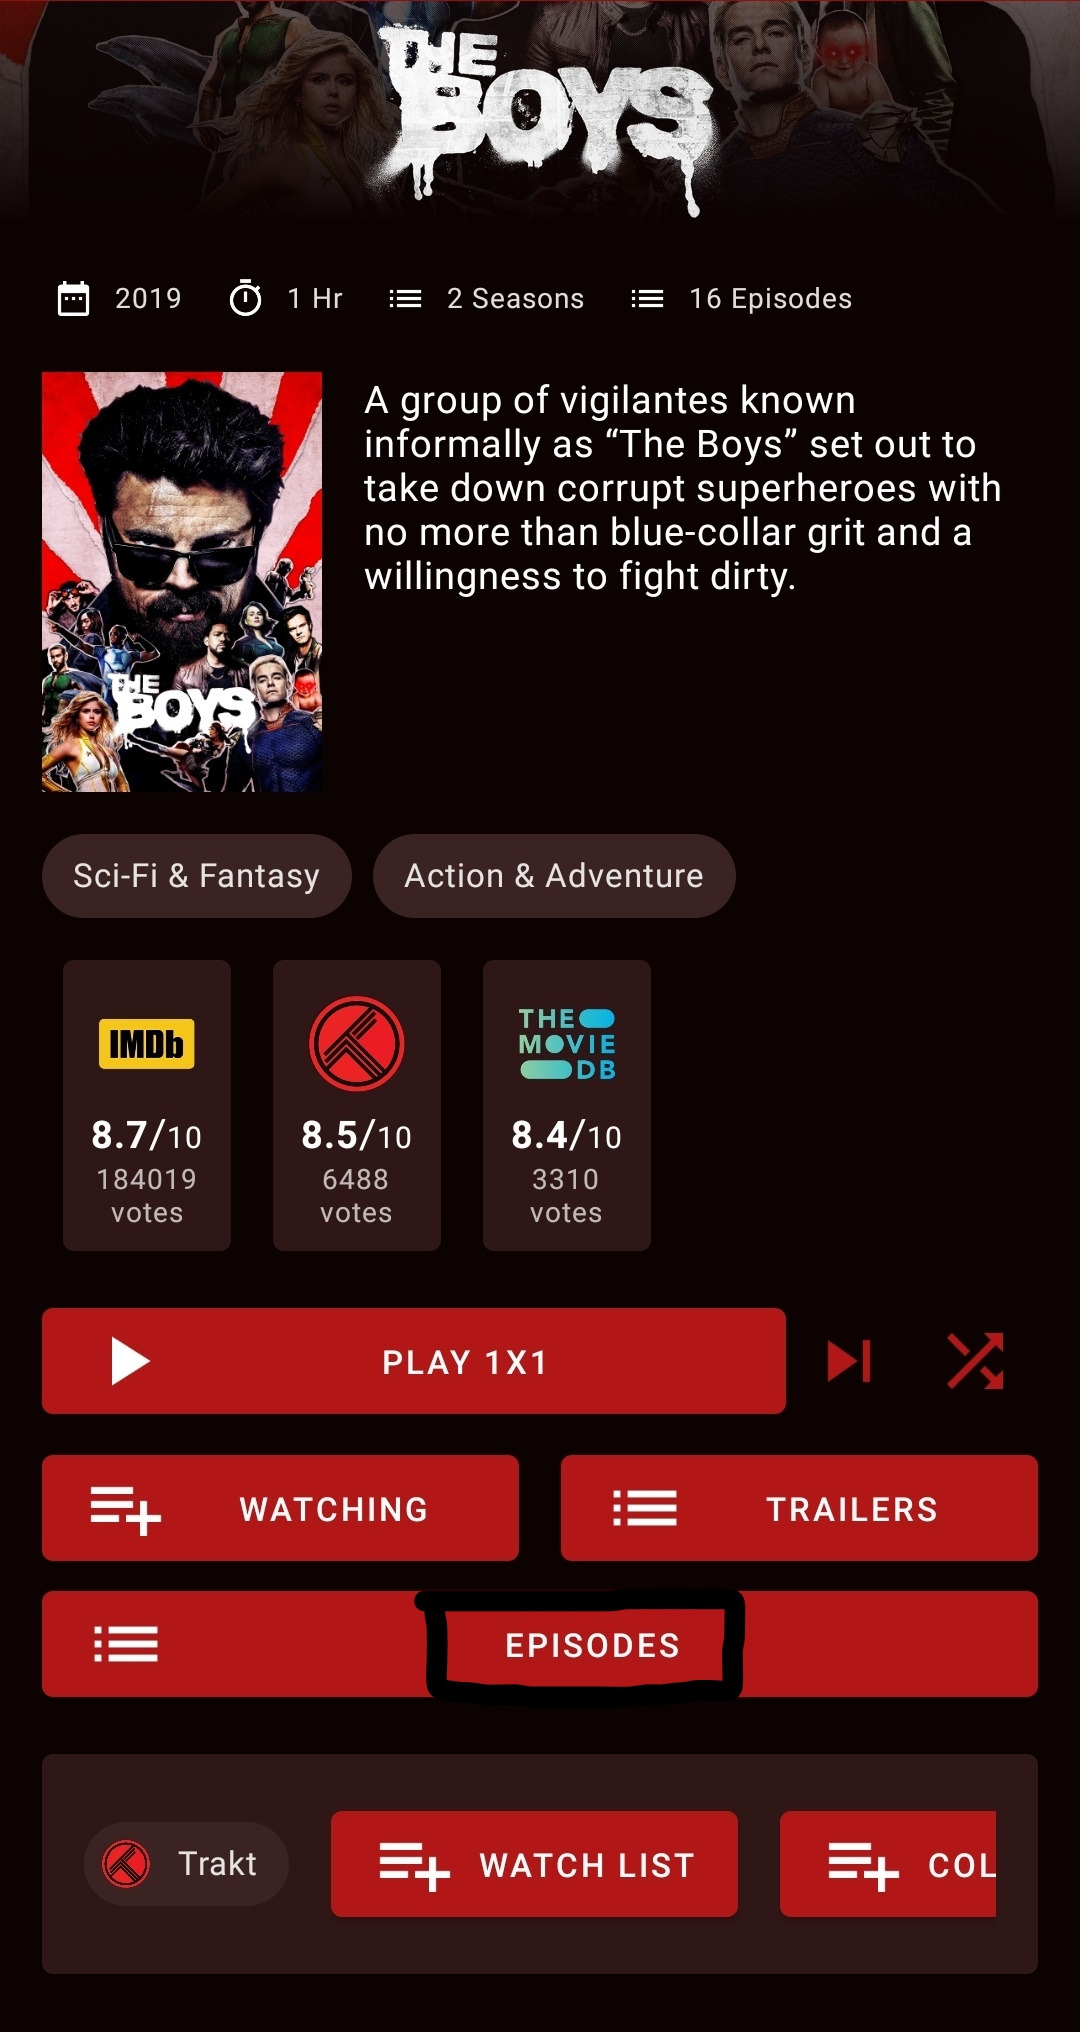
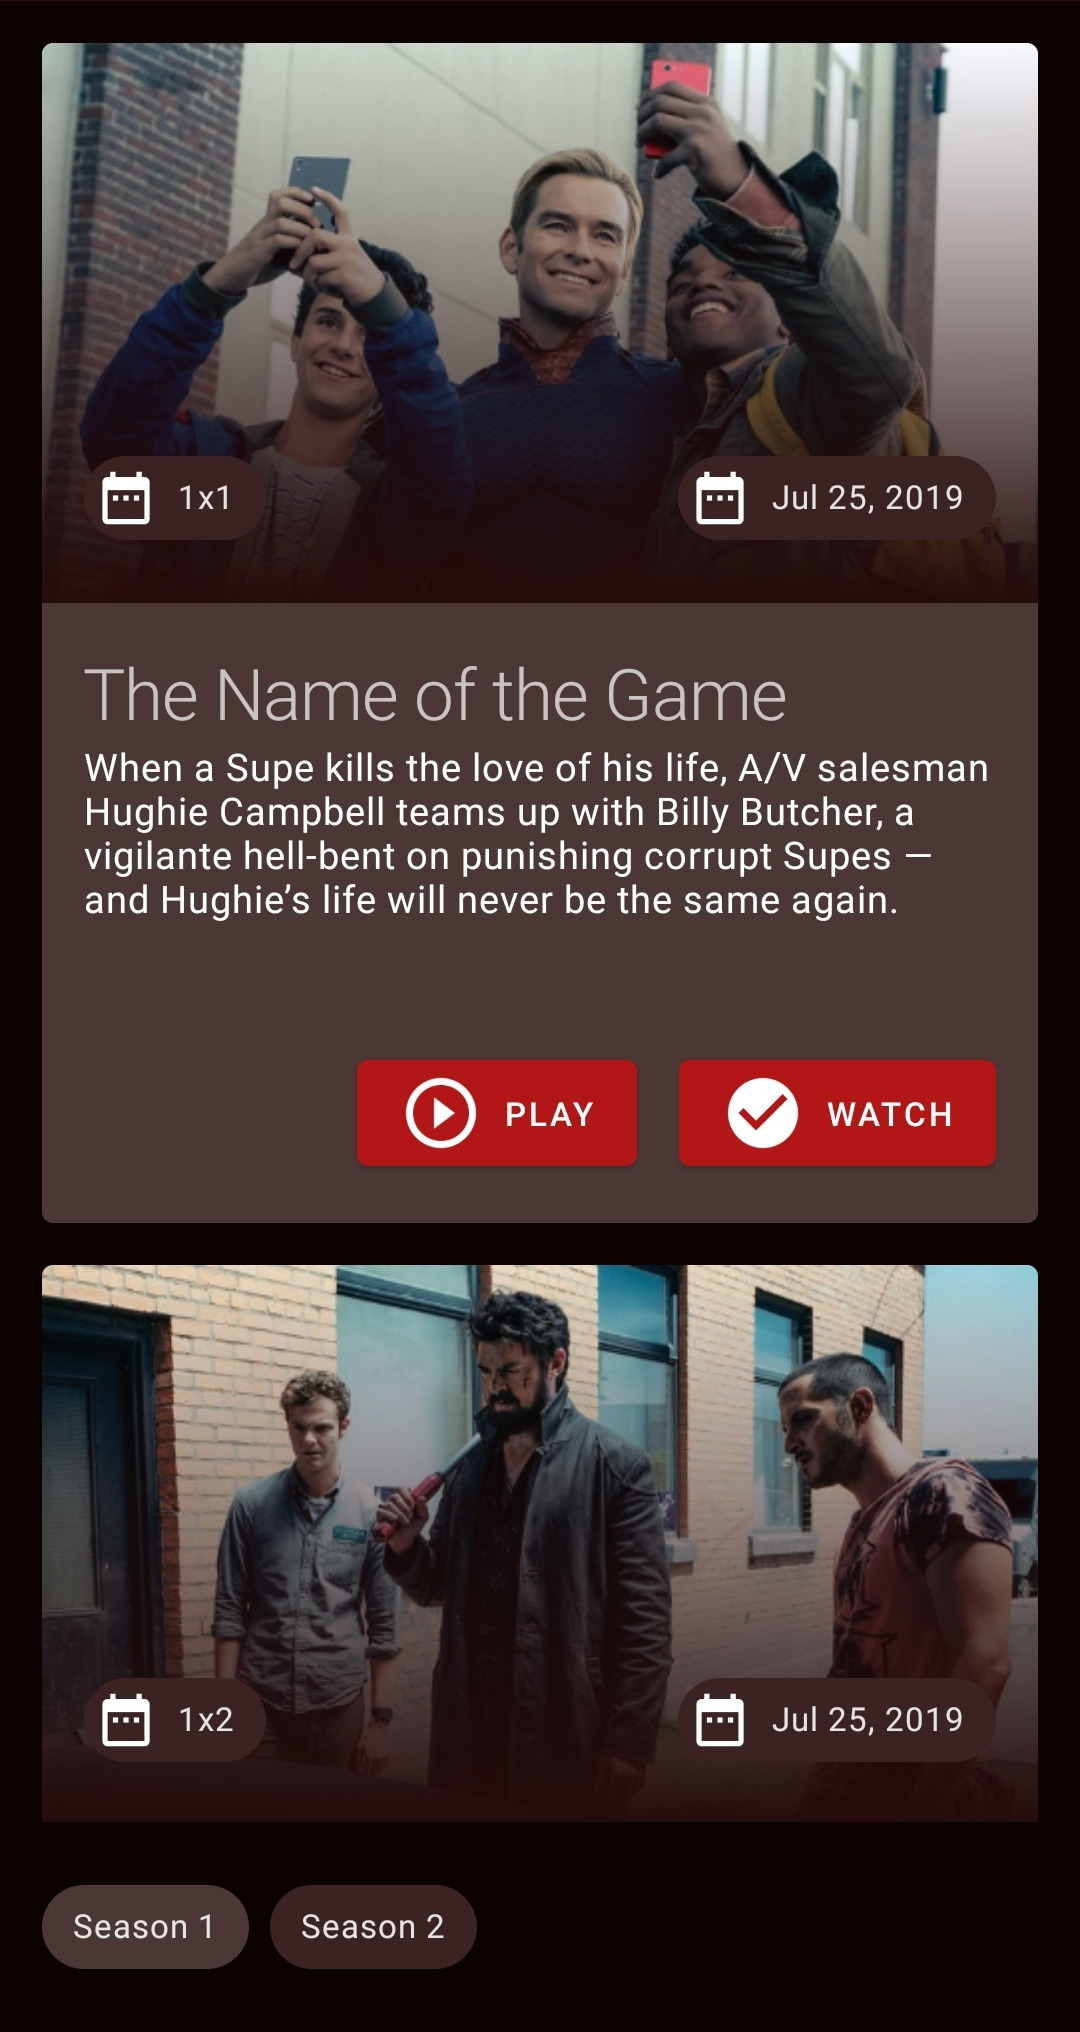
Using the control buttons you can play, mark as watched, view trailers and even shuffle episodes randomly for TV shows. Separate buttons are included for Trakt operations such as adding to watchlist or collection.
20.
Play button
The play button is simple but also dynamic. It can change to resume if you haven’t finished some content and can also change to start over if you’ve finished watching the entire show / movie. This is the button you press to start searching for sources!
21.
Source search screen
After you press the play button, you will be taken to the source search screen and the search will be initiated automatically.
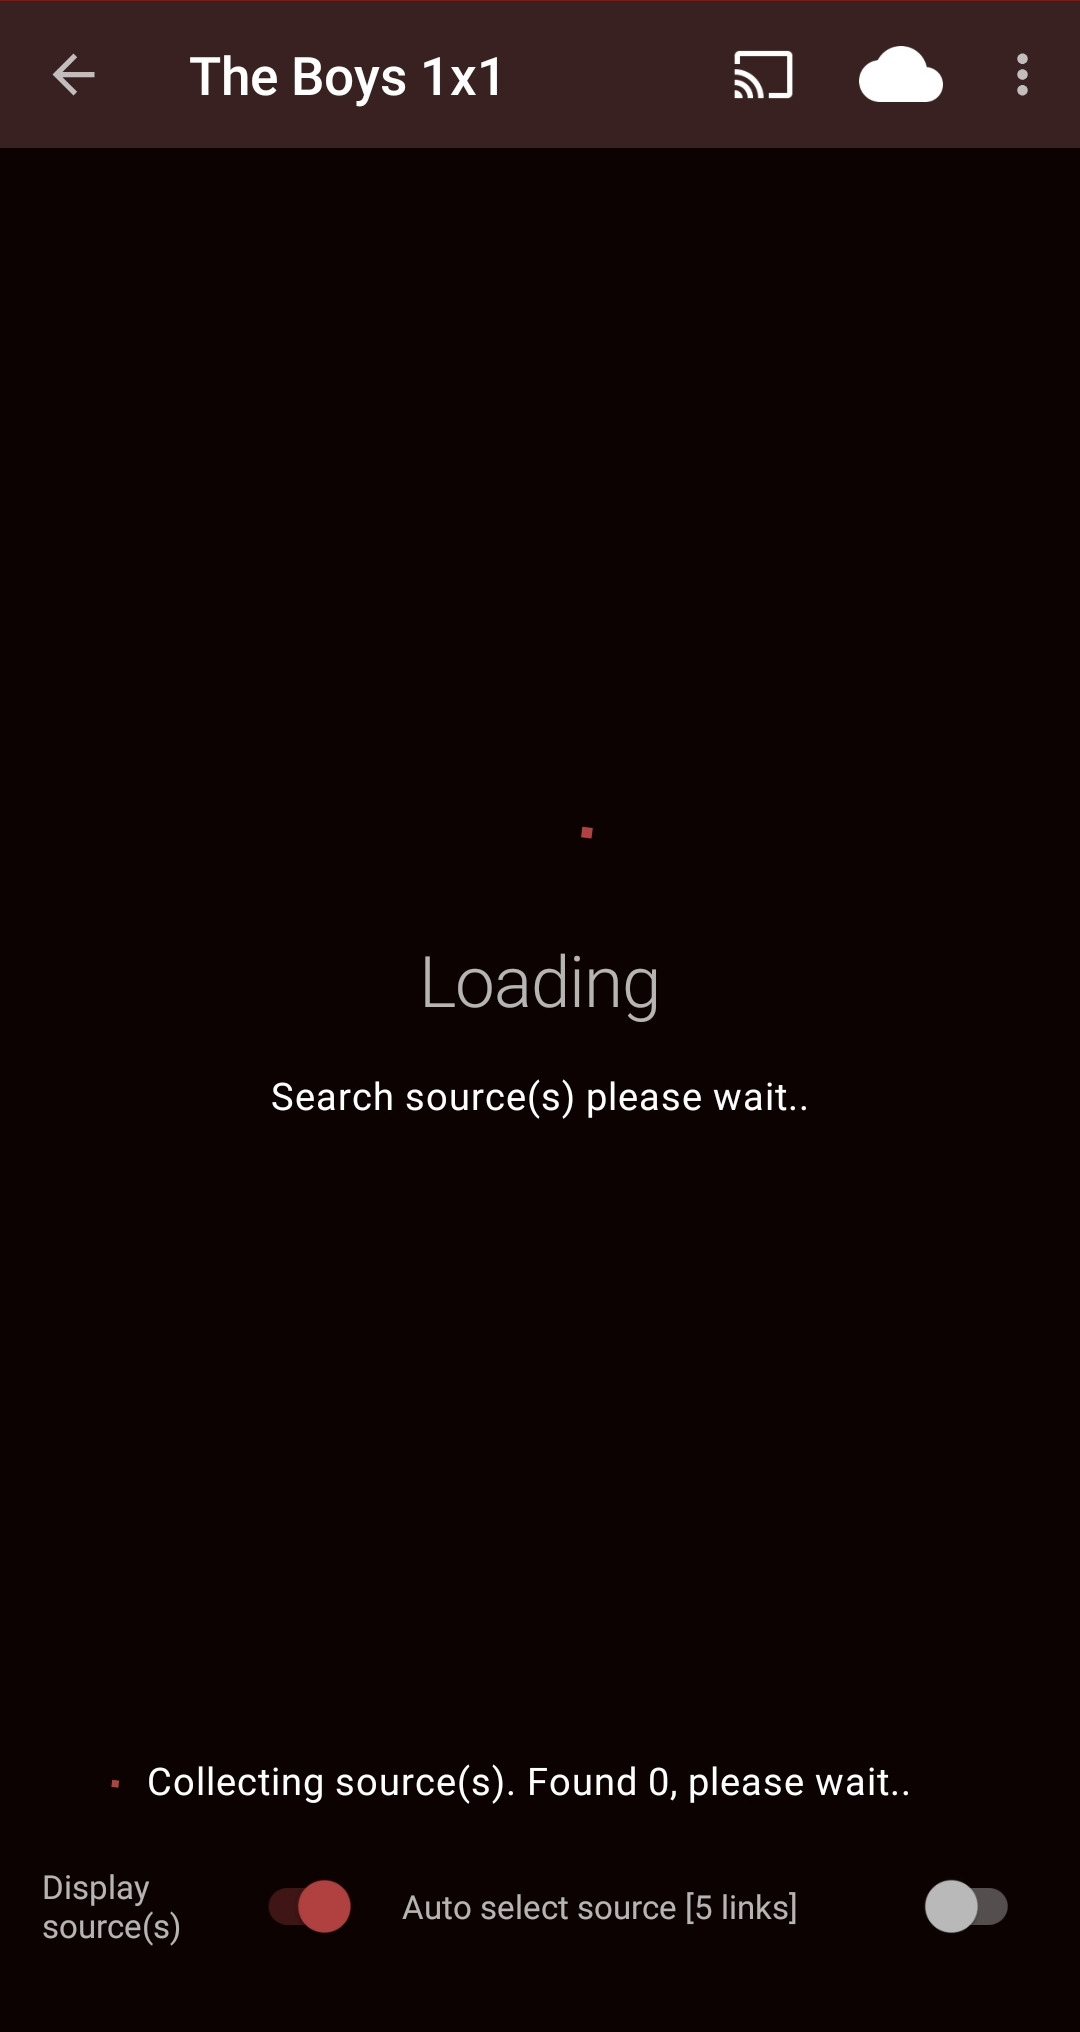
There are buttons for casting, debrid cloud manager, adding magnet to debrid cloud and the standard next episode, previous episode and random (shuffle) controls.
22.
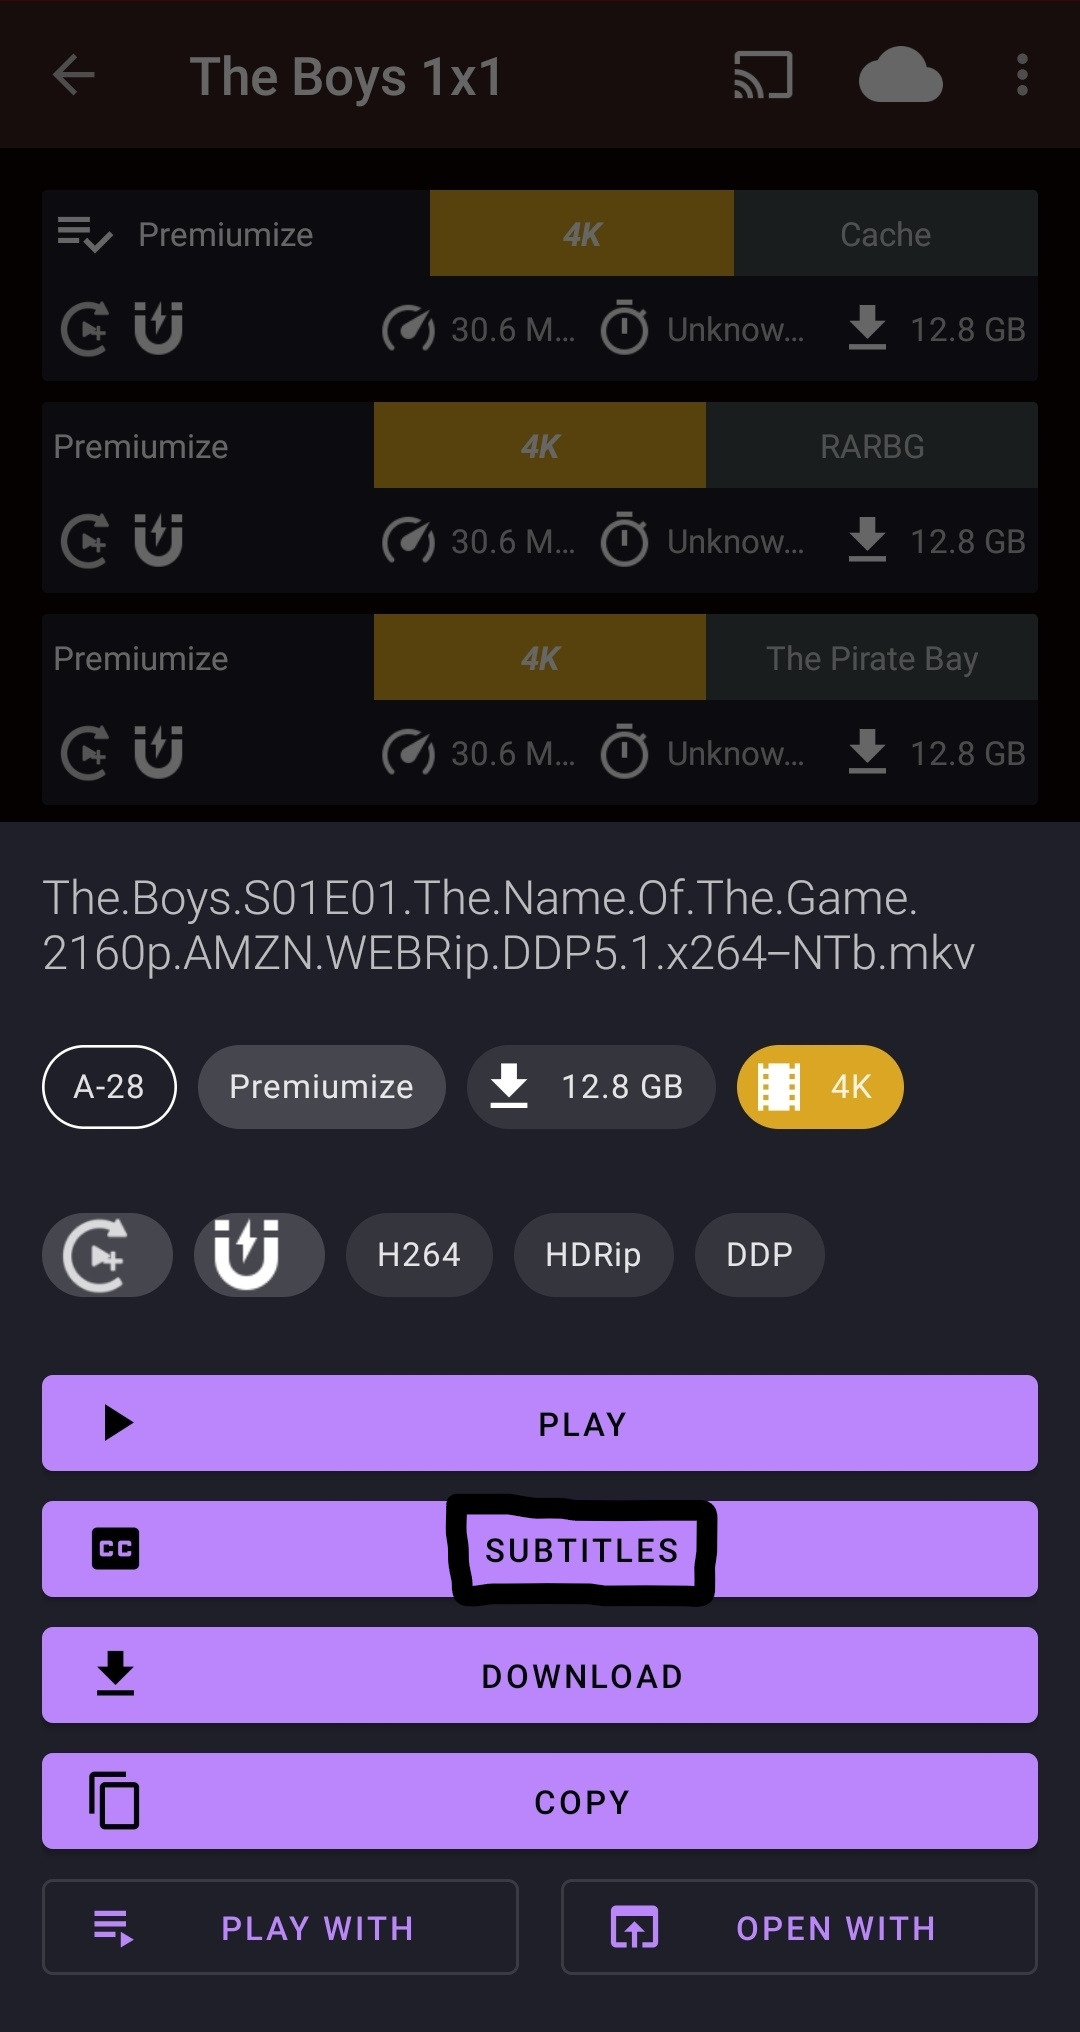
Choosing a source
By default, sources are sorted by file size descending. When choosing a source, take into consideration your network speed and the bitrate of the source you’re trying to watch. This helps to minimise buffering during playback.
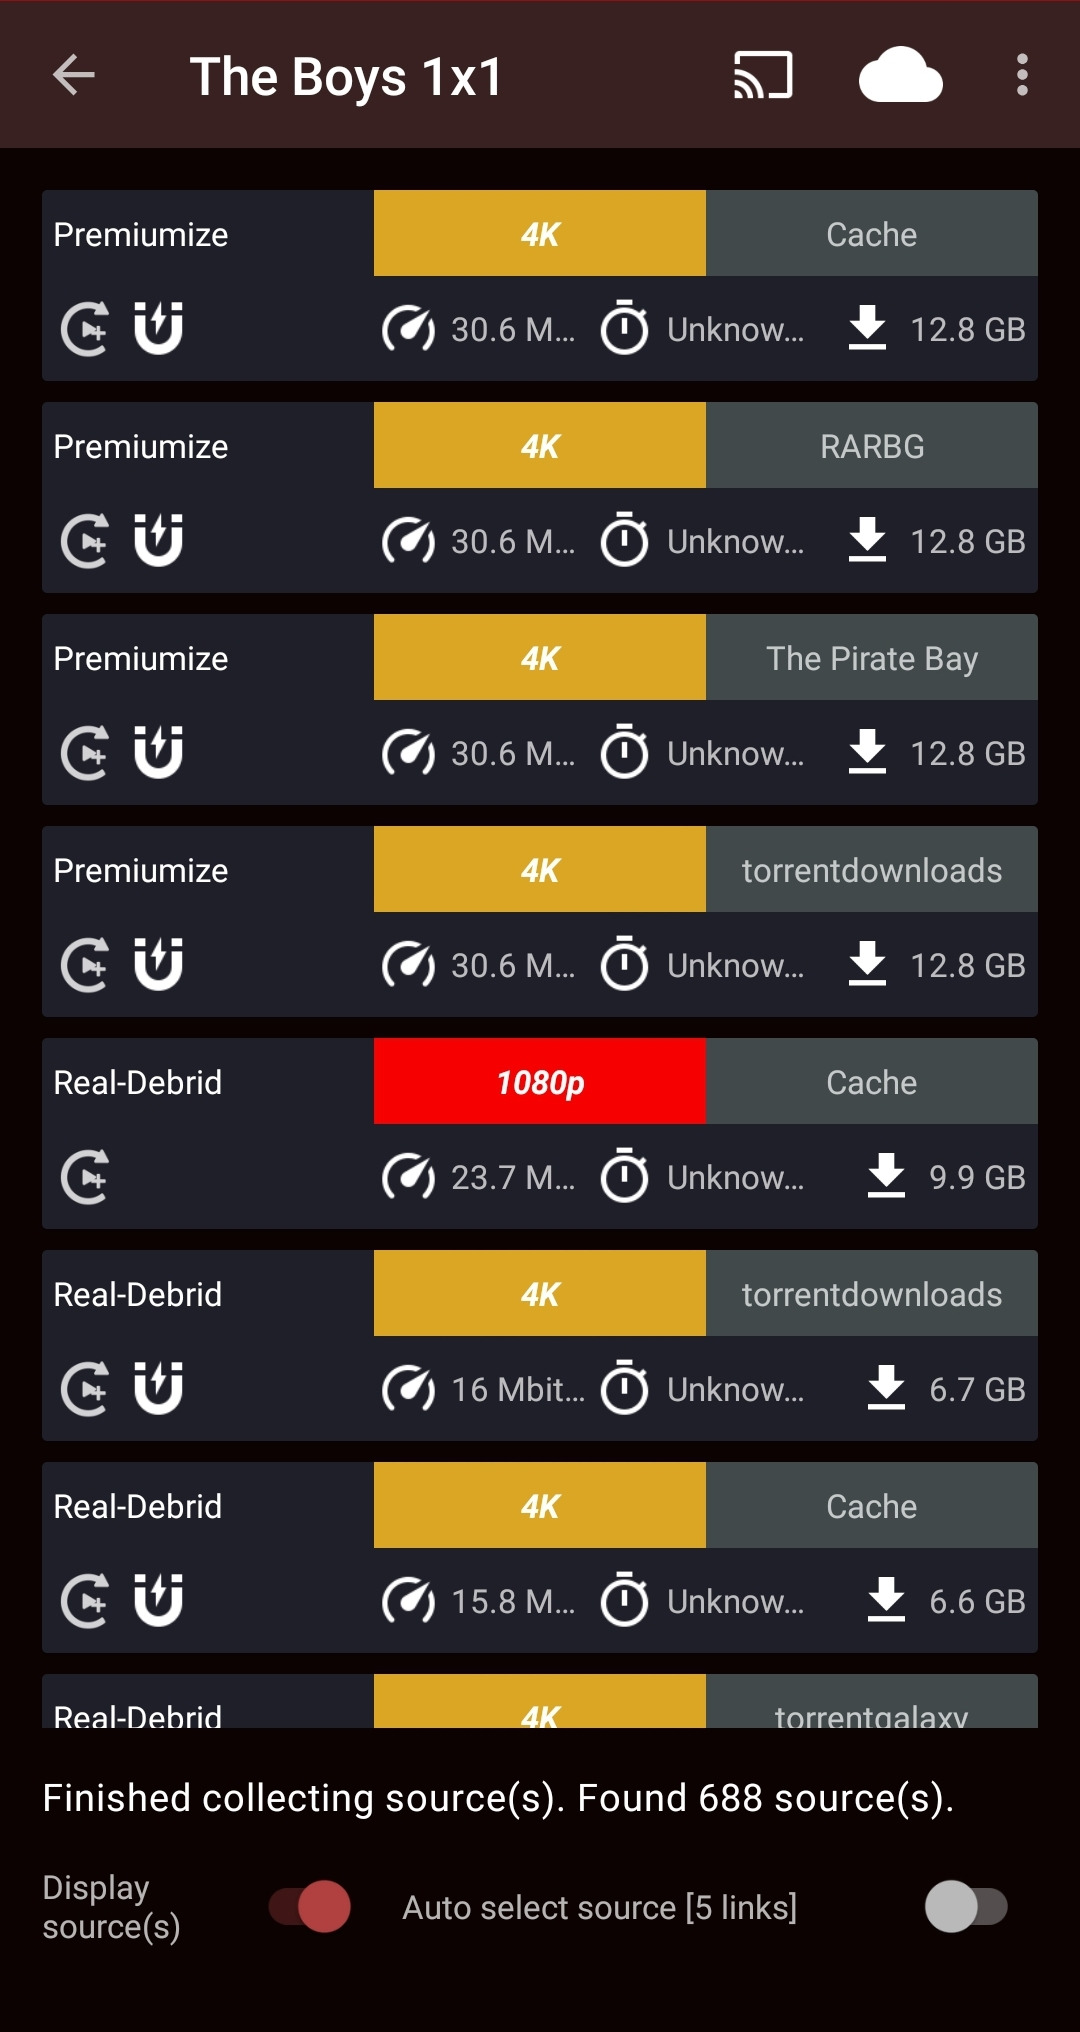
Long pressing on a source will bring up a context menu with more information and options.
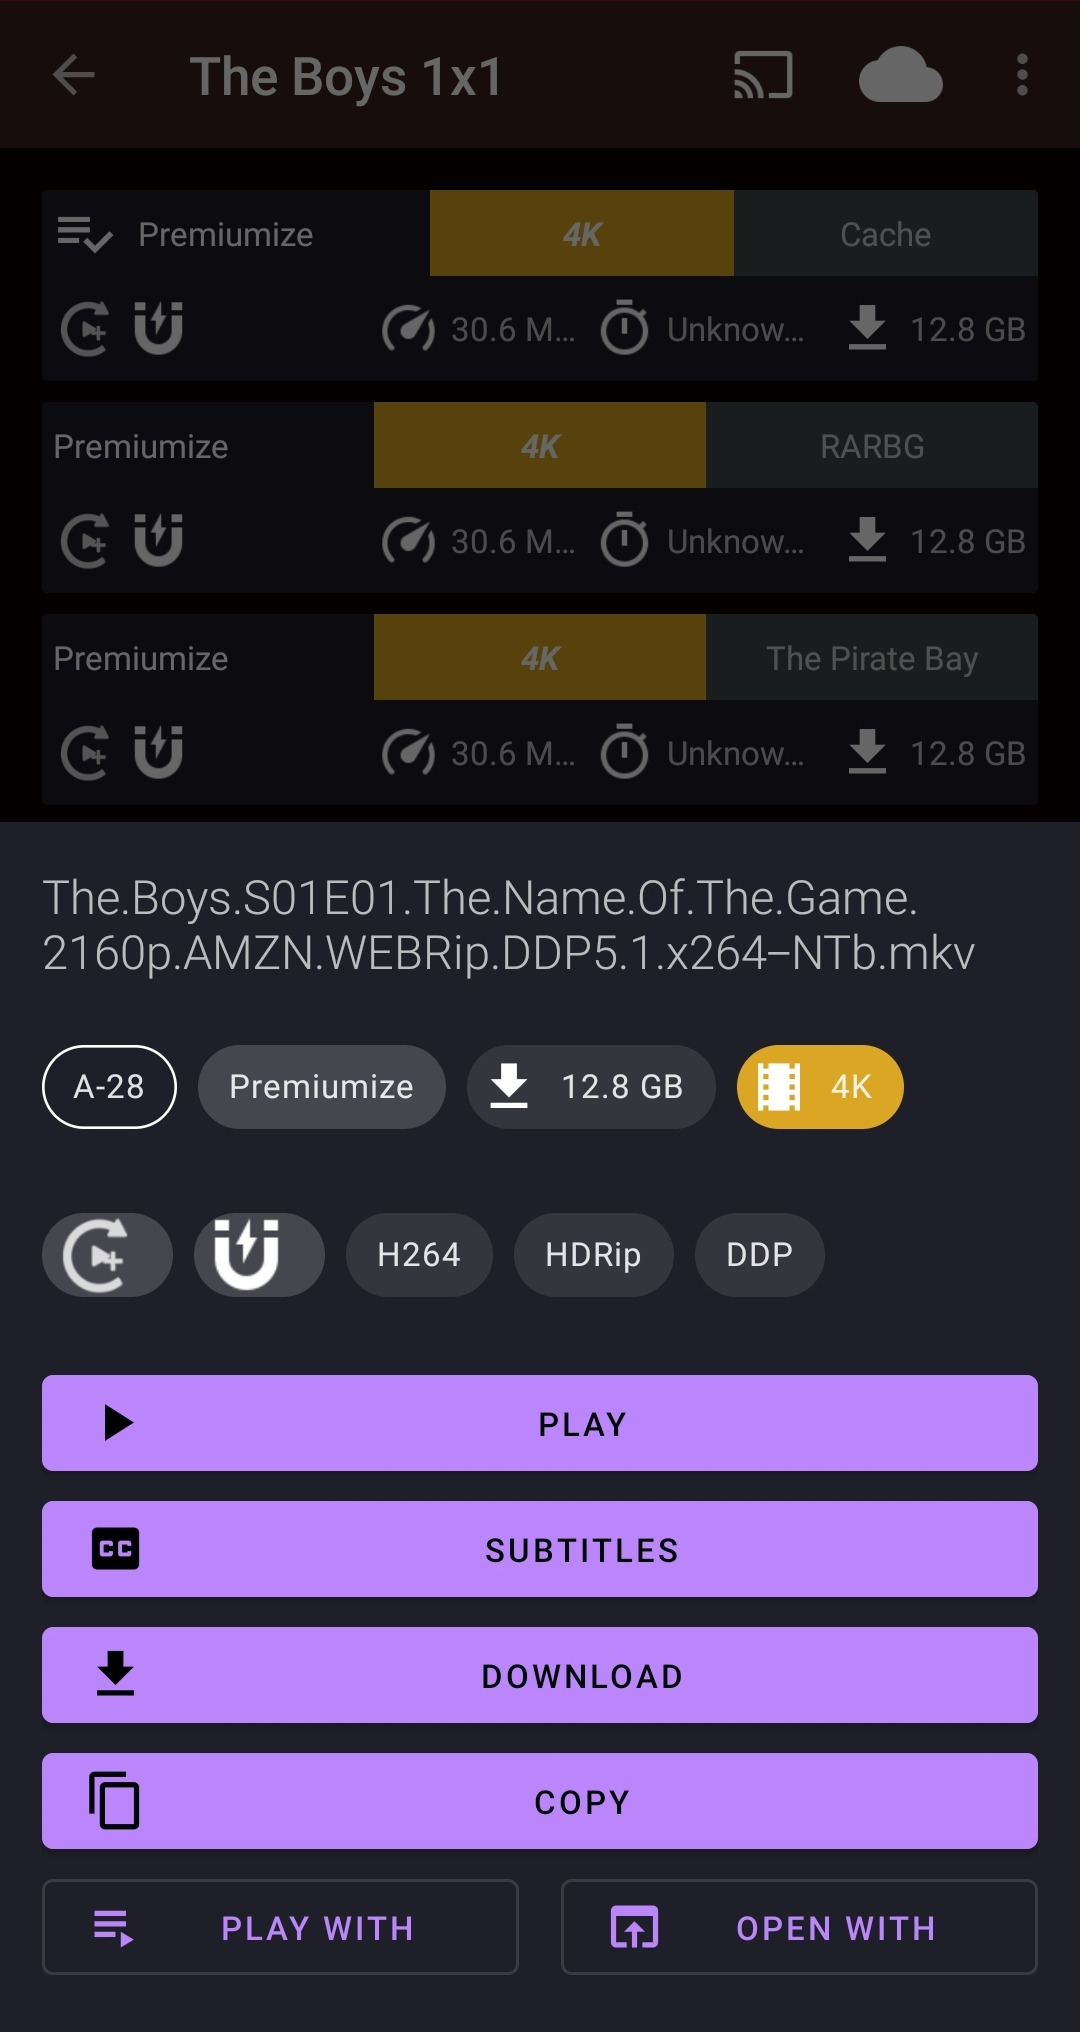
These options include:
• Play (default short press action)
• Play with subtitles (Built in Syncler subtitle search)
• Download
• Copy source URL (to use in an external player)
• Play with (an external player)
• Open with (an external player)
You may also notice the filename, source name, debrid service which resolved the source, file size, resolution, video codecs and other metadata. Syncler makes it much easier to find exactly which source you want to play.
Once you’ve pressed a source, the internal player should begin playback of your content.
Part VII - Further setup
23.
Using an external player
If you would like to use an external player, for whatever reason, you can choose from fully supported players like Kodi, MX Player and VLC.
Open Settings and go to “Playback”.


In here you will see the option “Video player”, which you can press and then choose which player you would like Syncler to open automatically after selecting a source.
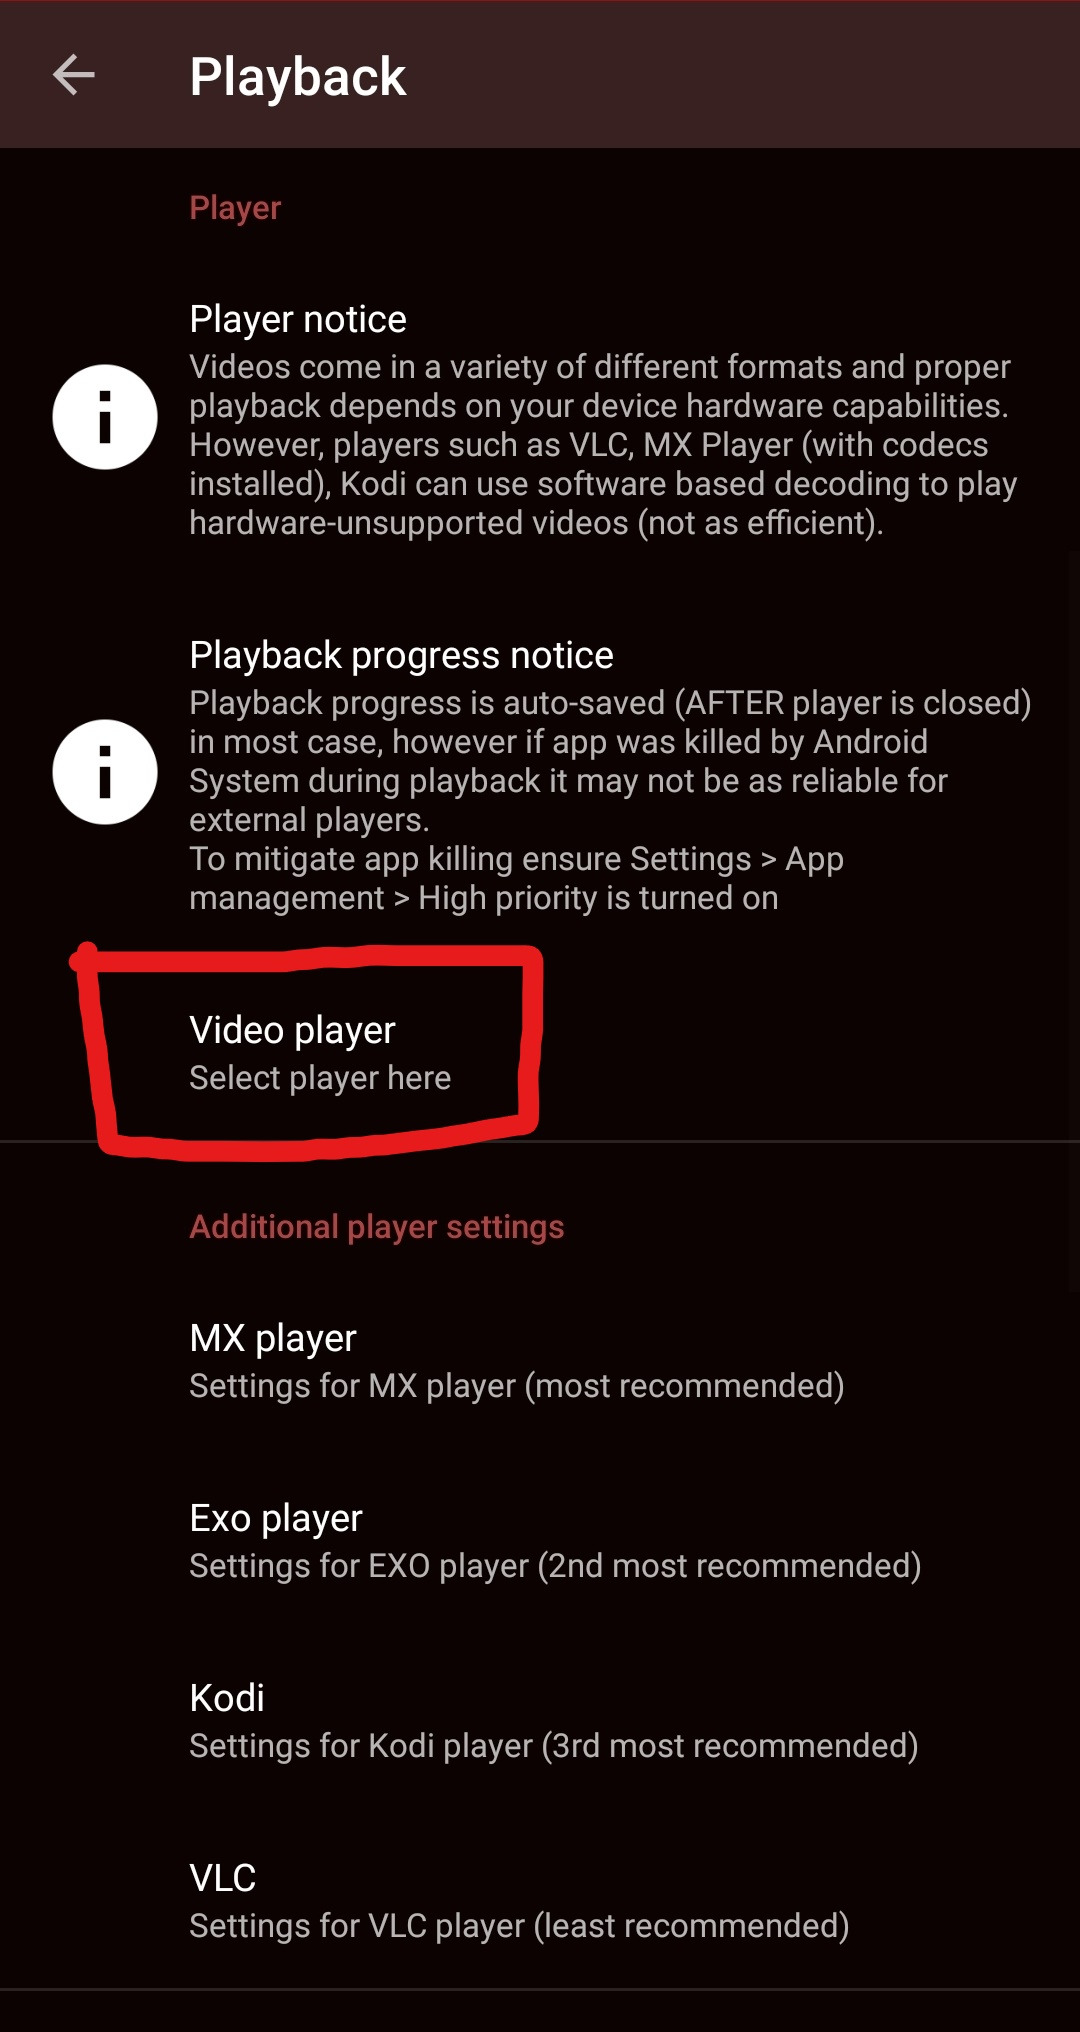
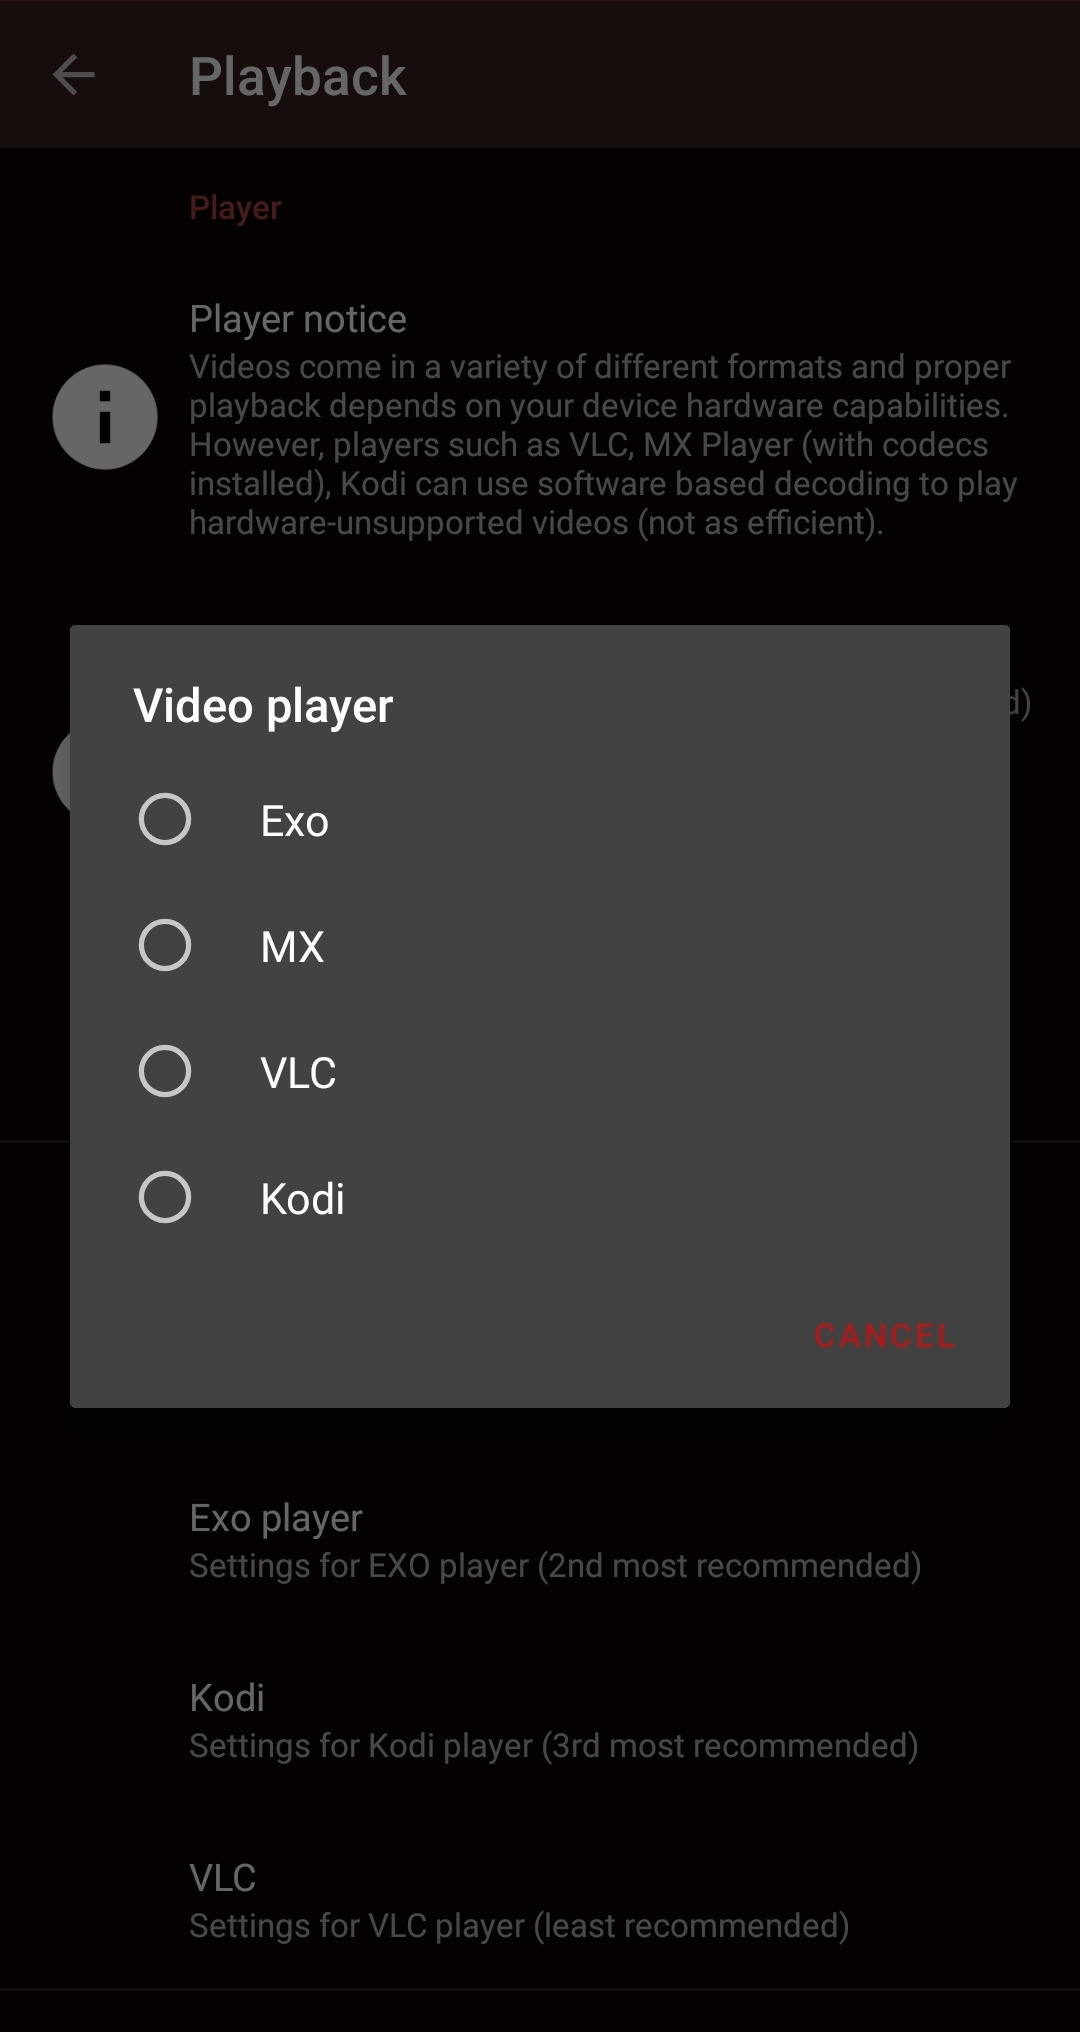
Exo player is recommended as it is the internal player which Syncler is most integrated with, but other players may have certain features not added to the internal player yet.
You can use any other player by long pressing a source and choosing the “Play with” context option.
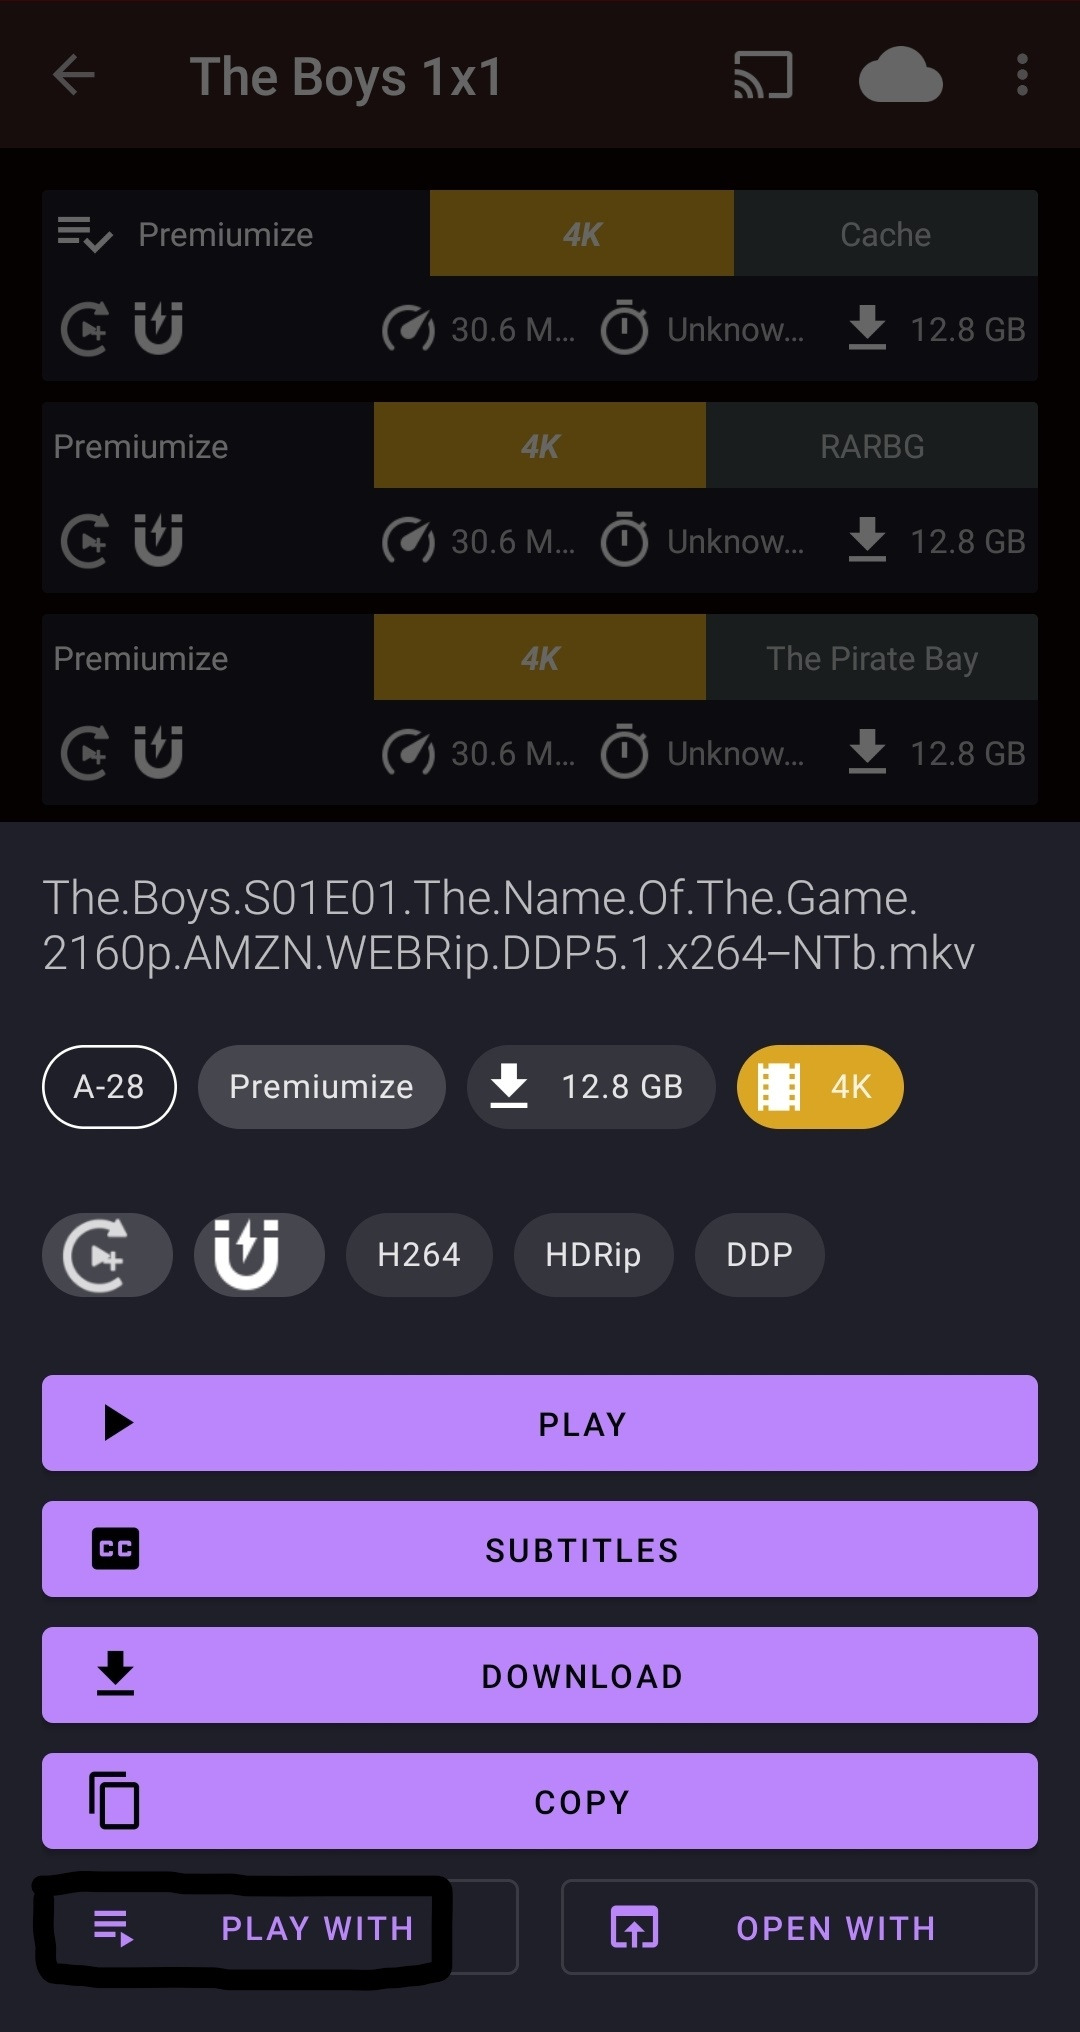
A small menu will open, containing a list of installed players to choose from. You can set the external player to open once or every time.
You can also change the default short press action to “Play with”, see the default action section below. This will open the installed player selector for every source you short press on the source search screen, or if you’ve set something to open always, it will open that app every time!
24.
Subtitles
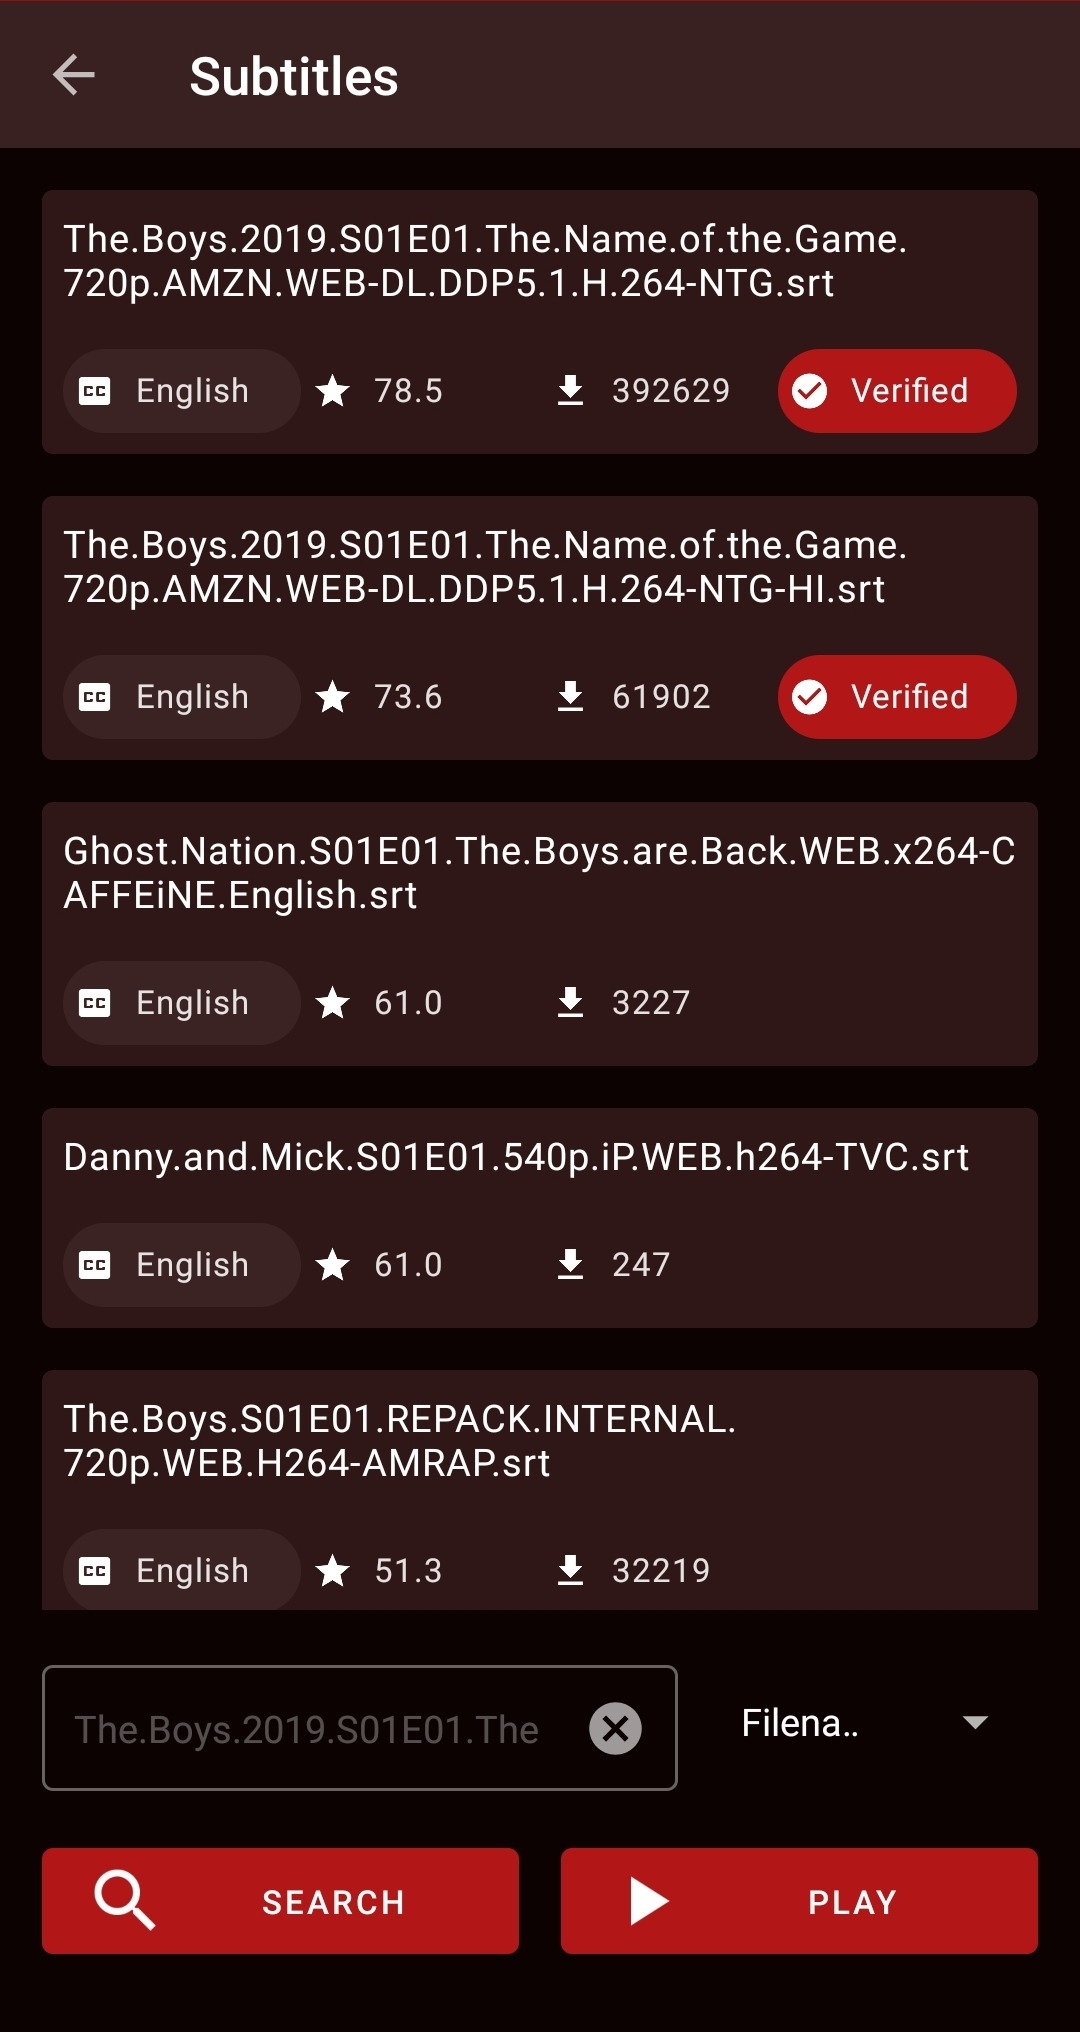
You can search for subtitles by long pressing a source and choosing the “Subtitles” context option.
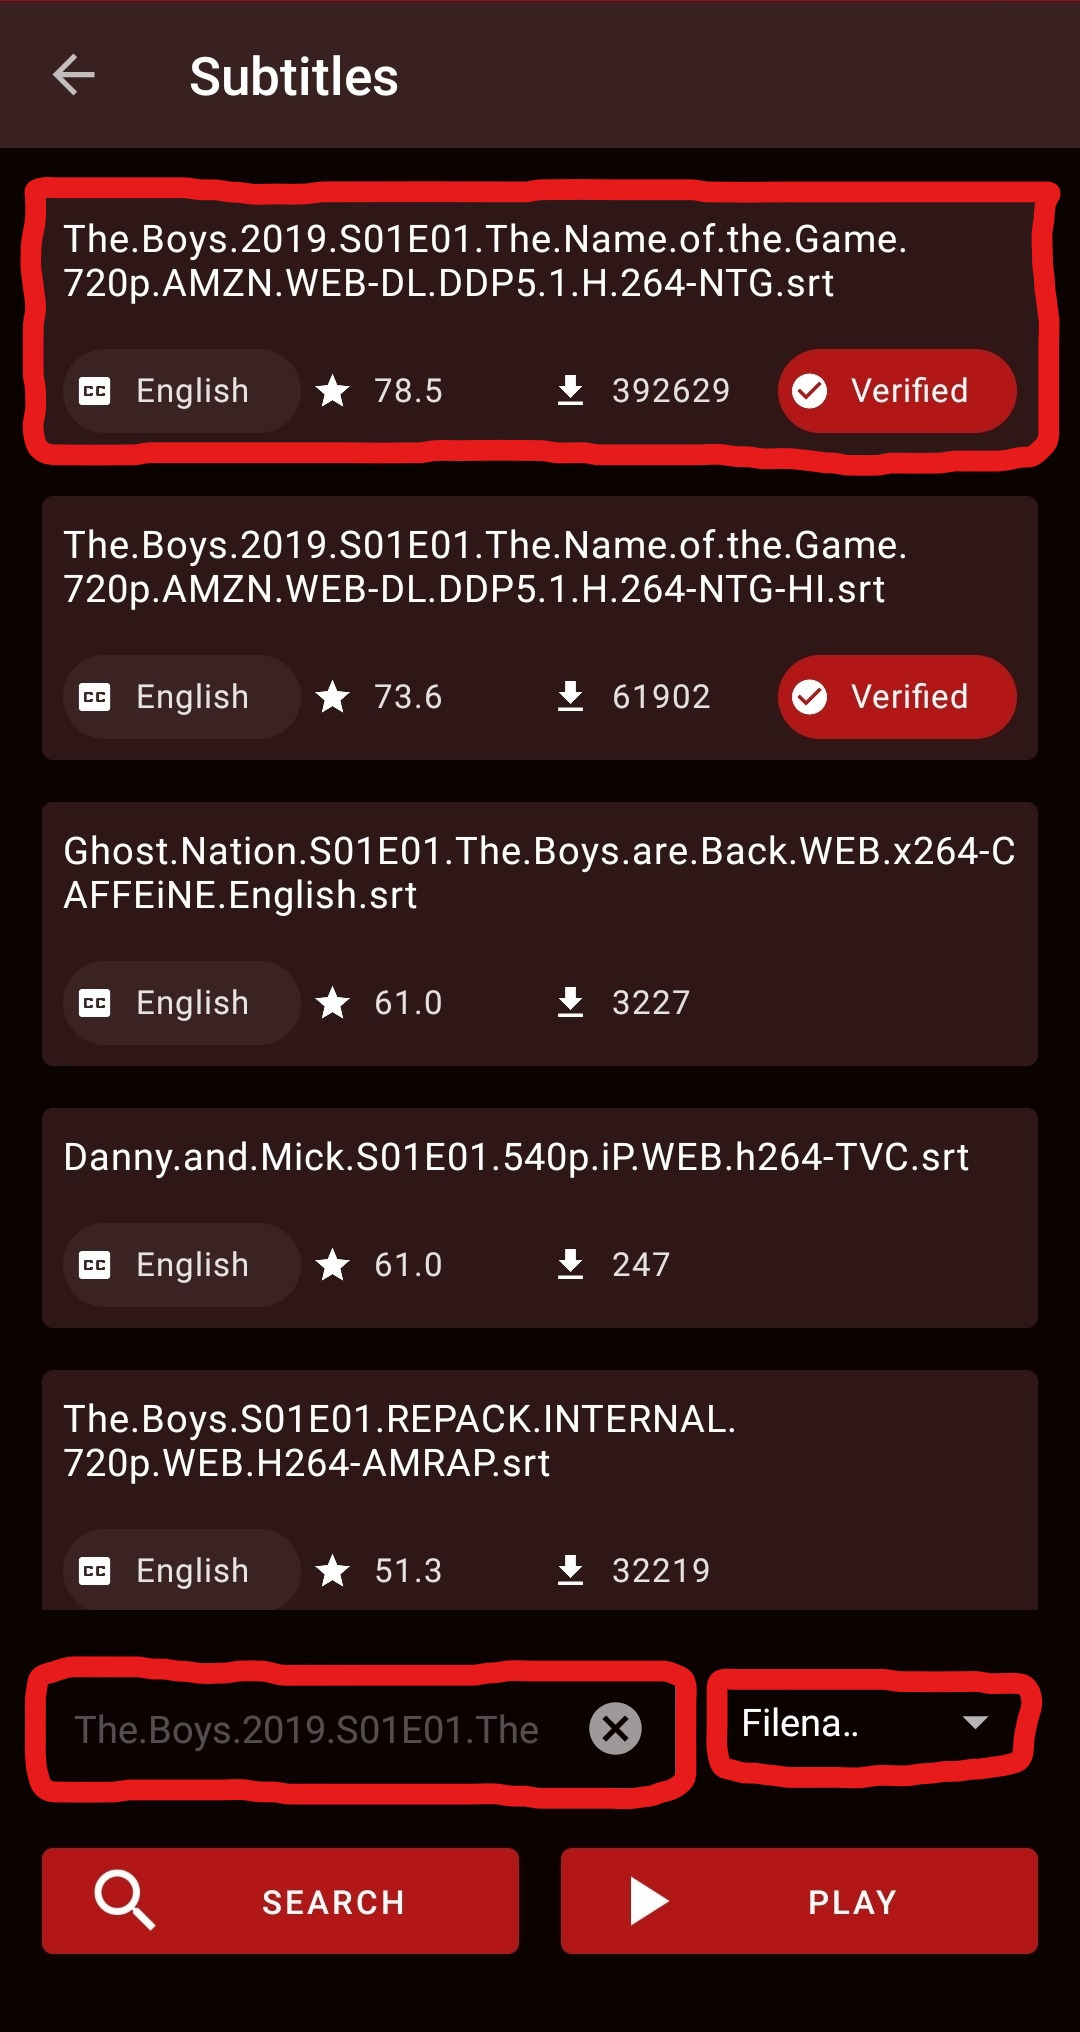
This will open the subtitle search screen which automatically shows subtitles for the content you’re watching by matching the filename.
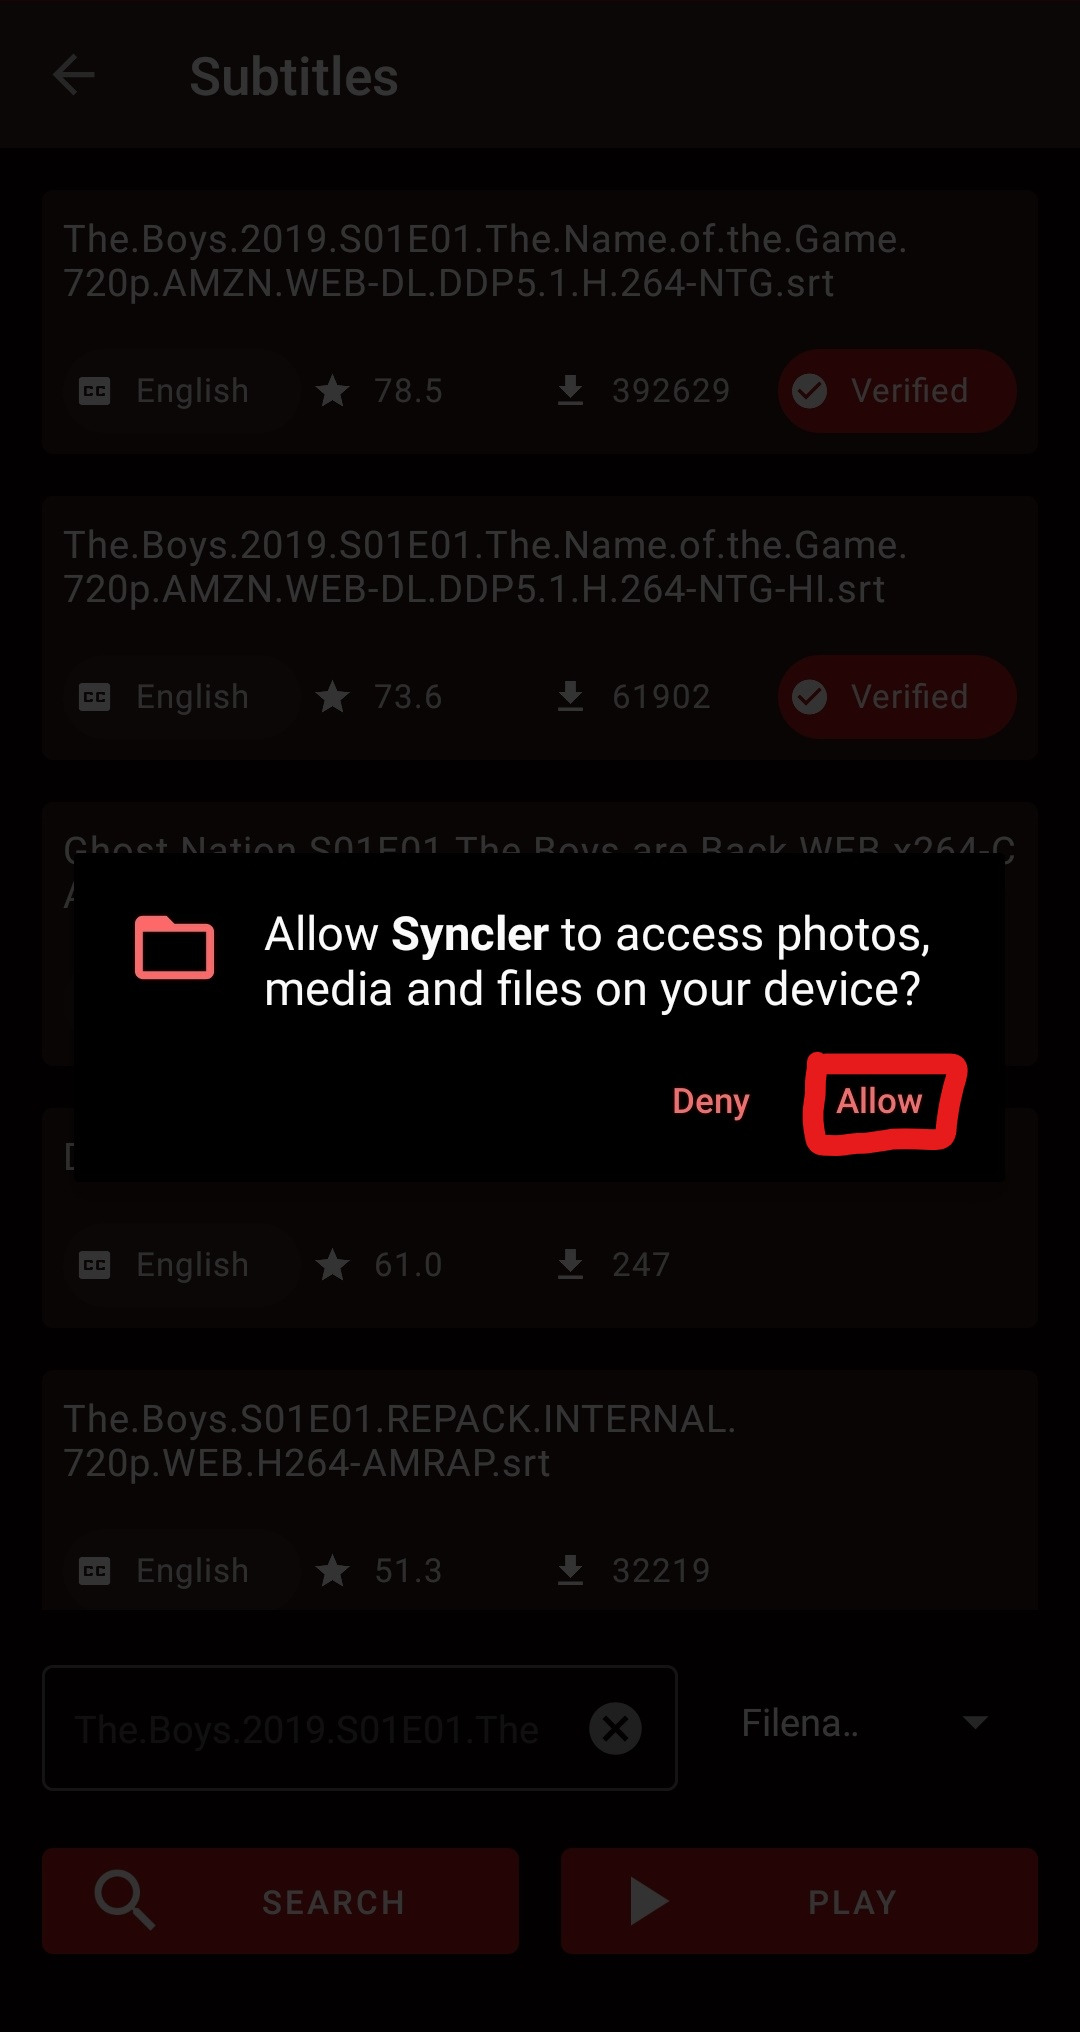
At this point you will be asked to enable storage permissions. Please allow this to avoid issues with subtitles downloading and, in the near future, Syncler auto-updates.
Press on the search box to search by custom text. You can change the search mode between filename, ID (IMDb) or name using the drop down list. To select subtitles just press on the one you want and it will be downloaded and playback will start automatically.
You can also change the default short press action to “Subtitles”, see the default action section below. This will open the subtitle picker for every source you short press on the source search screen.
25.
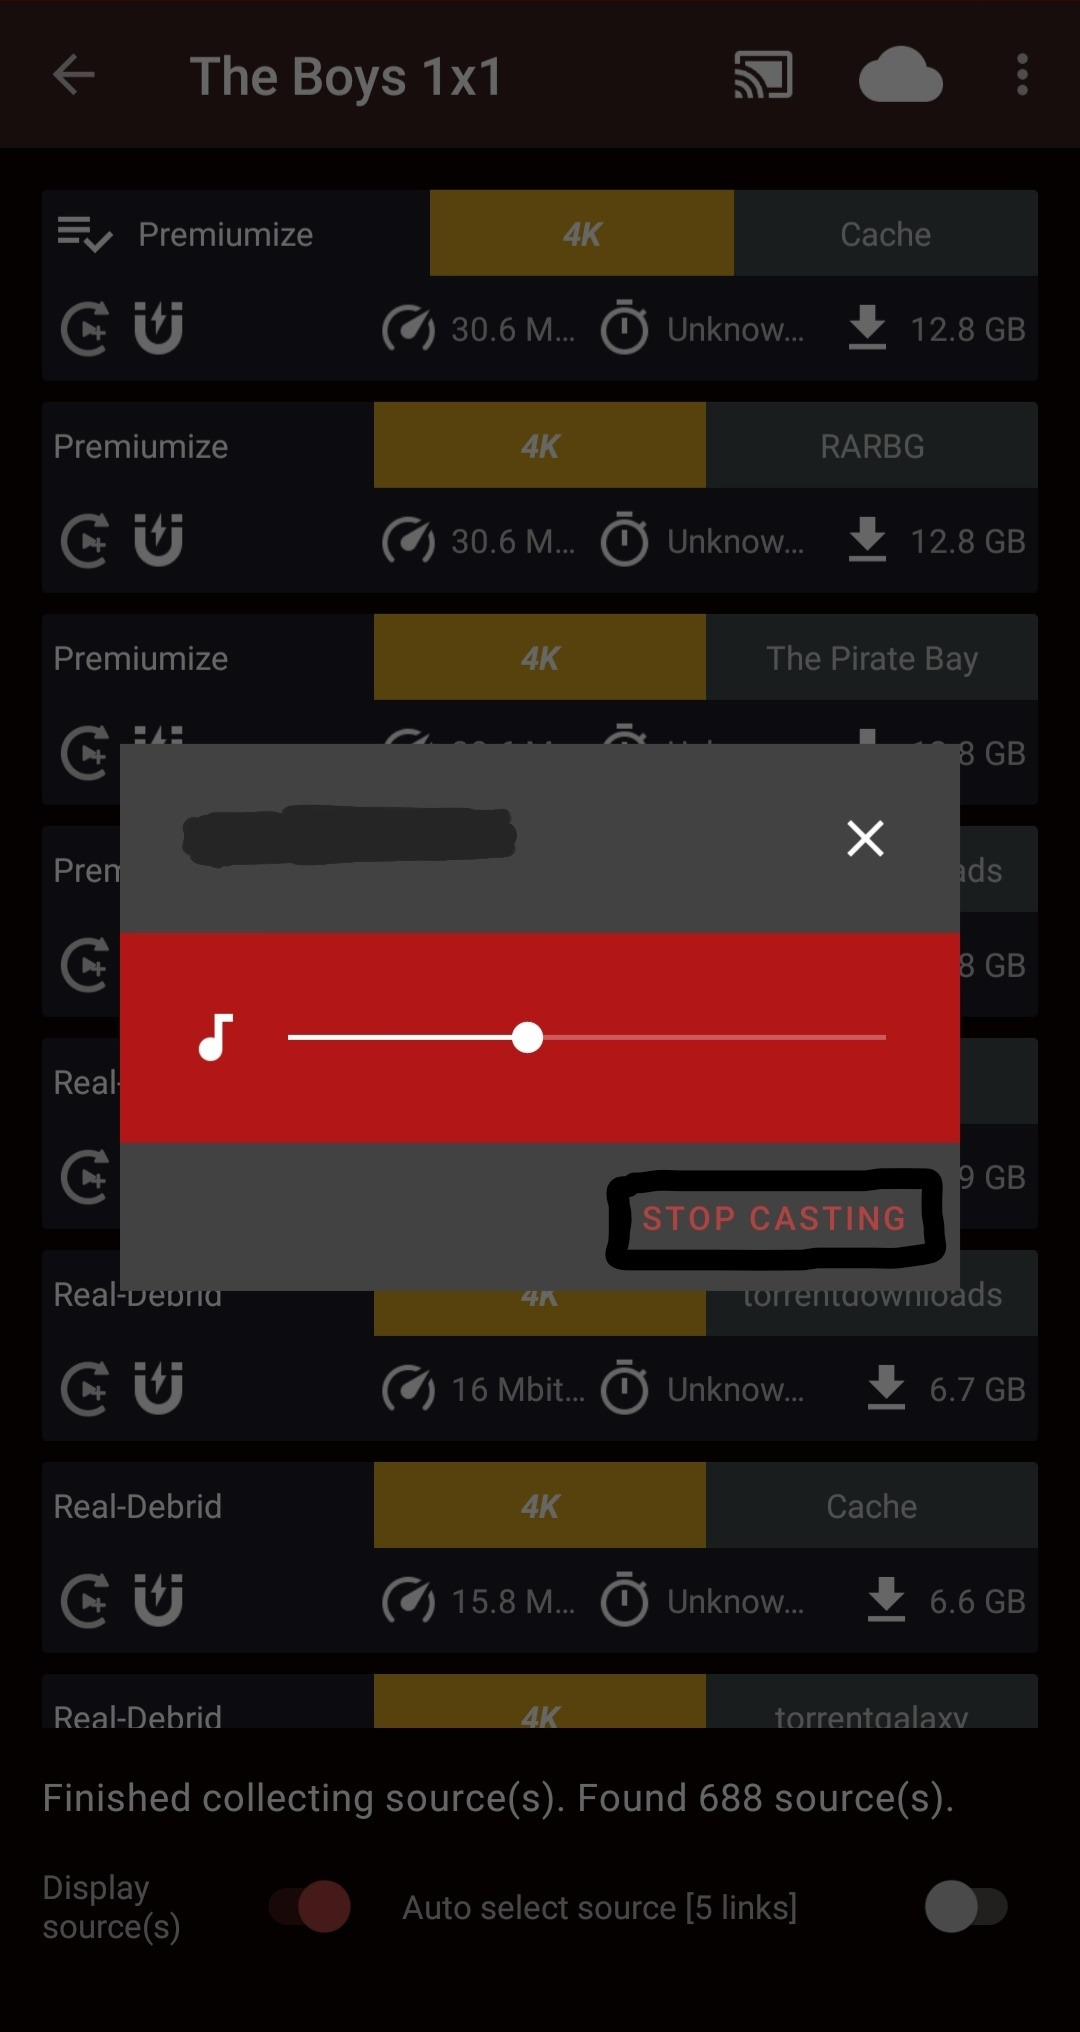
Casting
The easiest way to cast content is to directly connect to the casting device from the source browser screen inside Syncler.
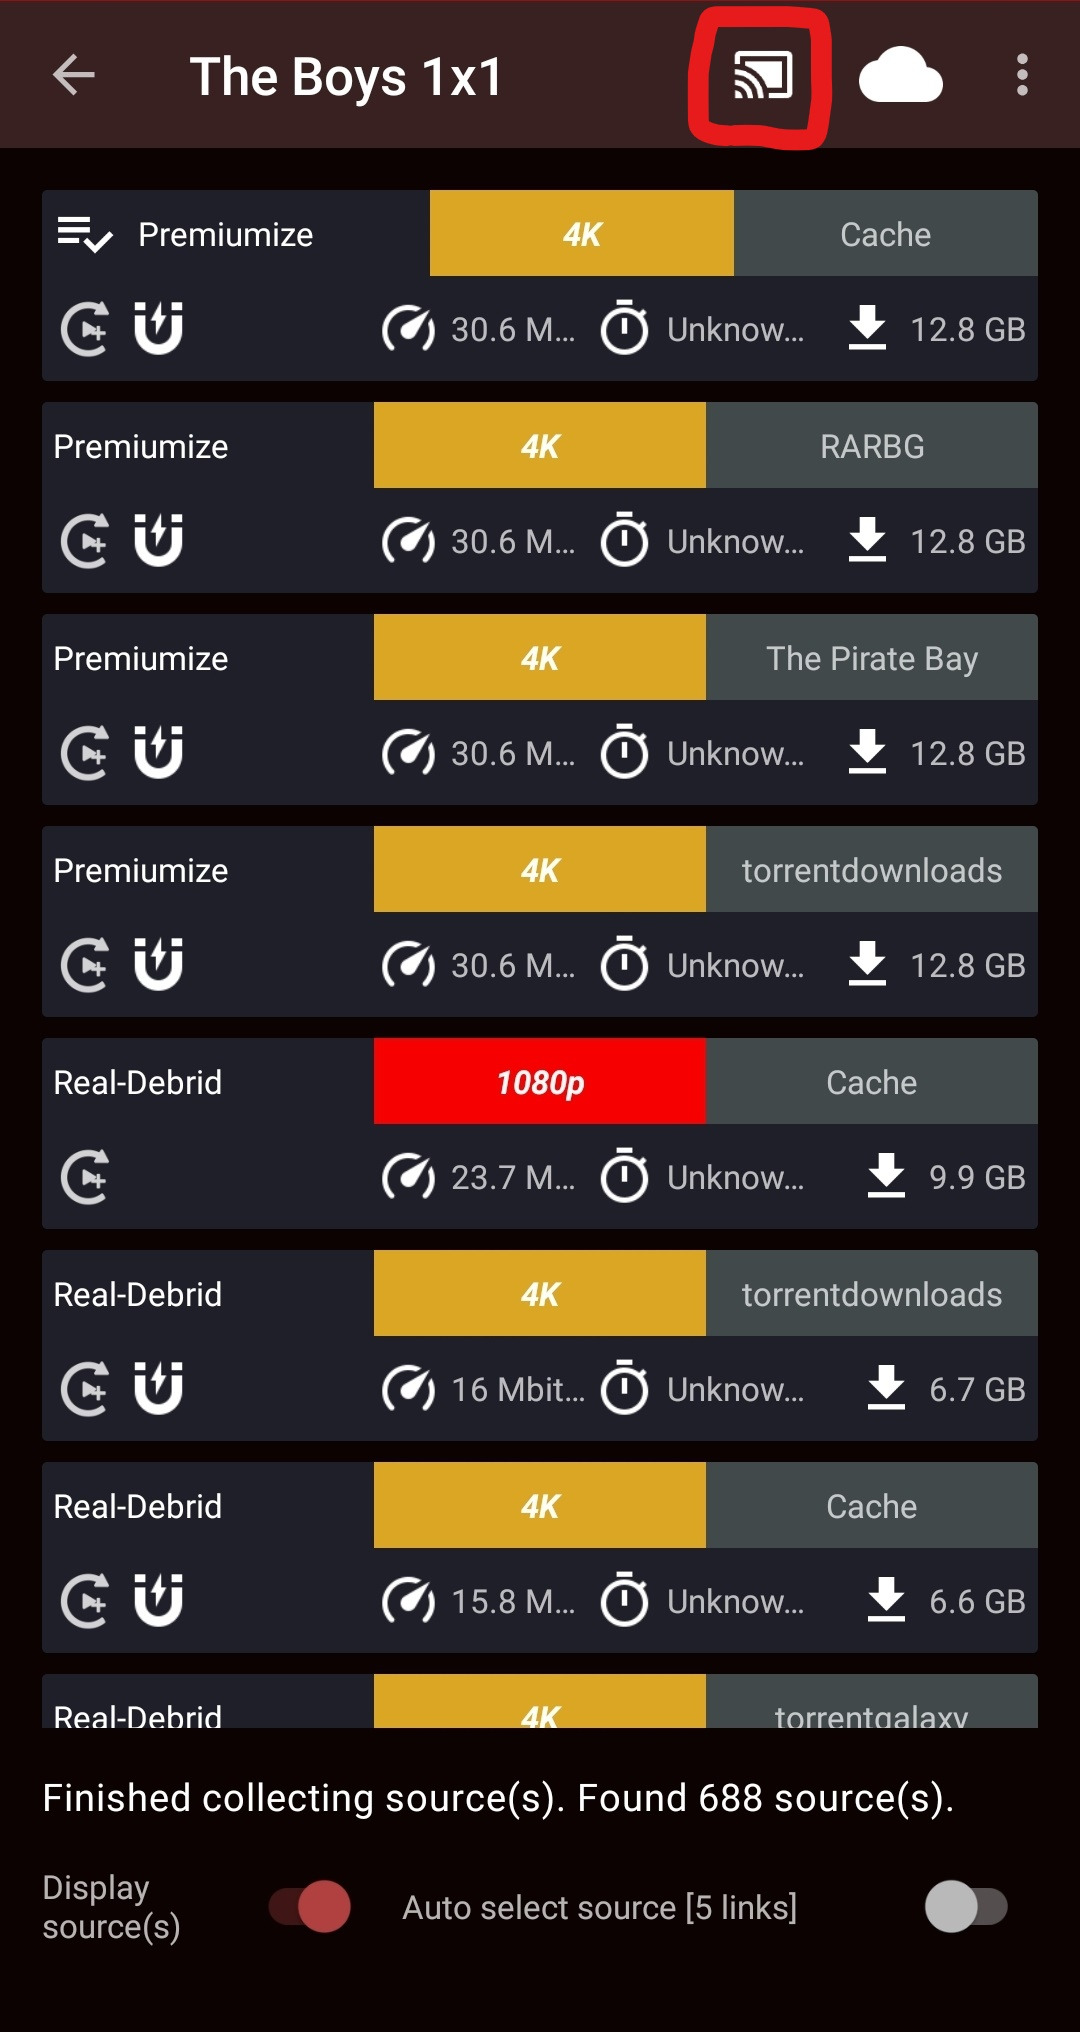
Press the cast logo near the top right and choose the casting device you would like to send the video to.
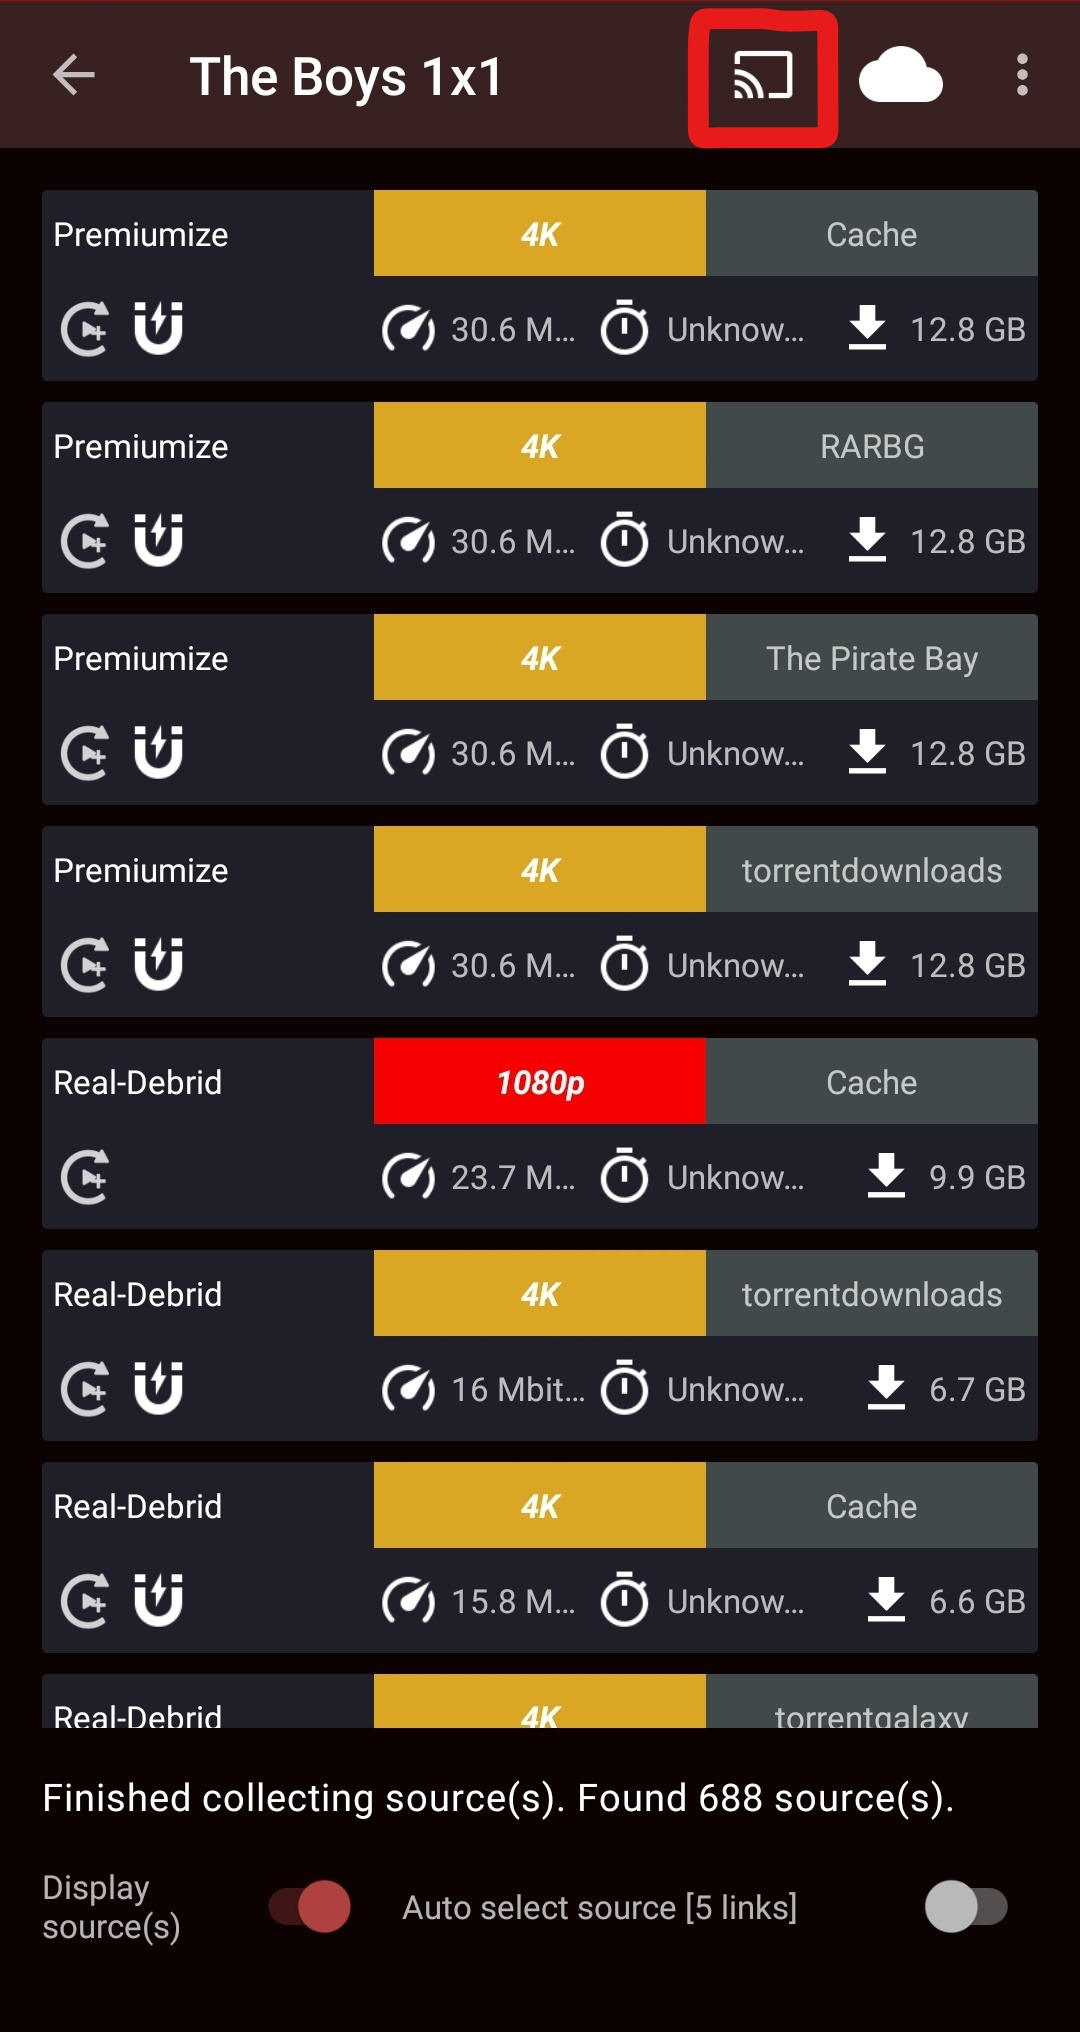
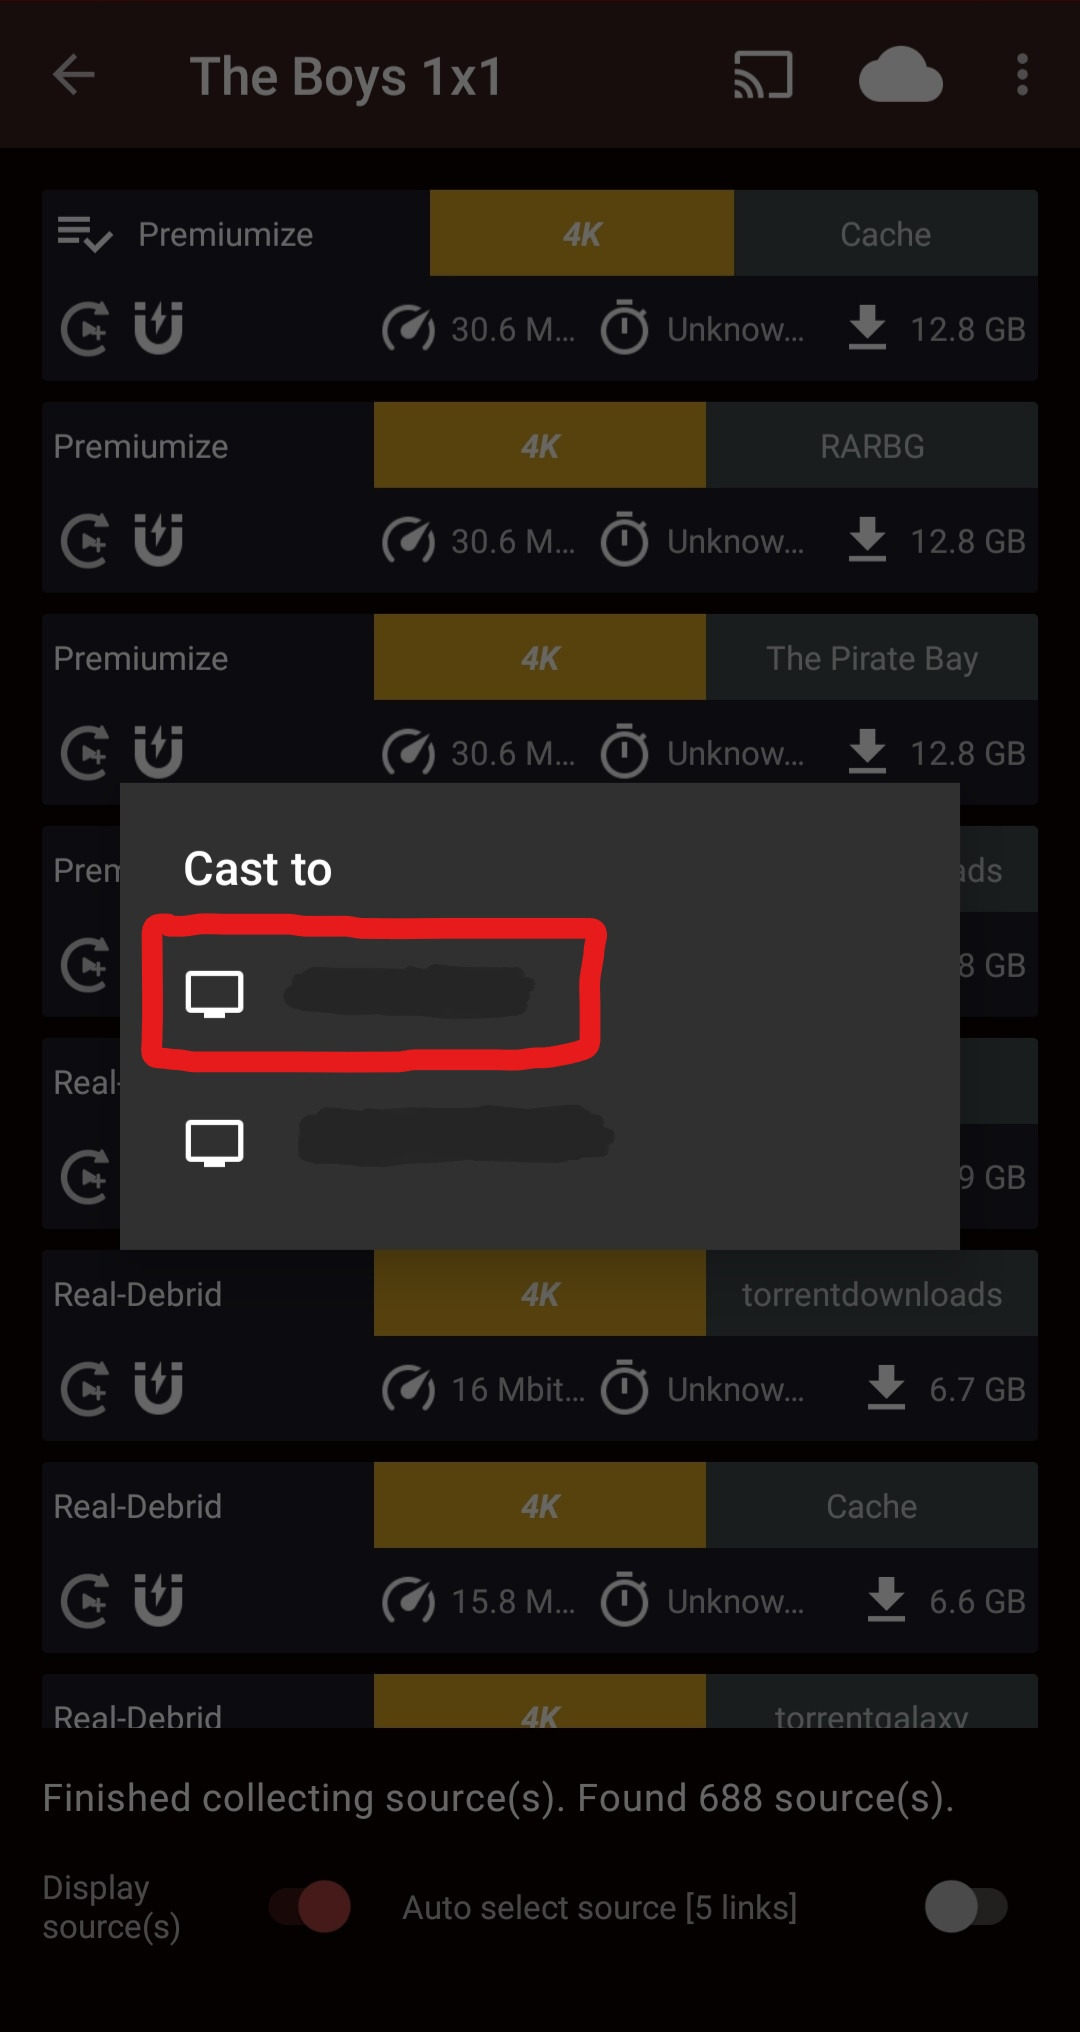
If the connection is successful, the cast icon fills in and a toast message appears near the bottom.
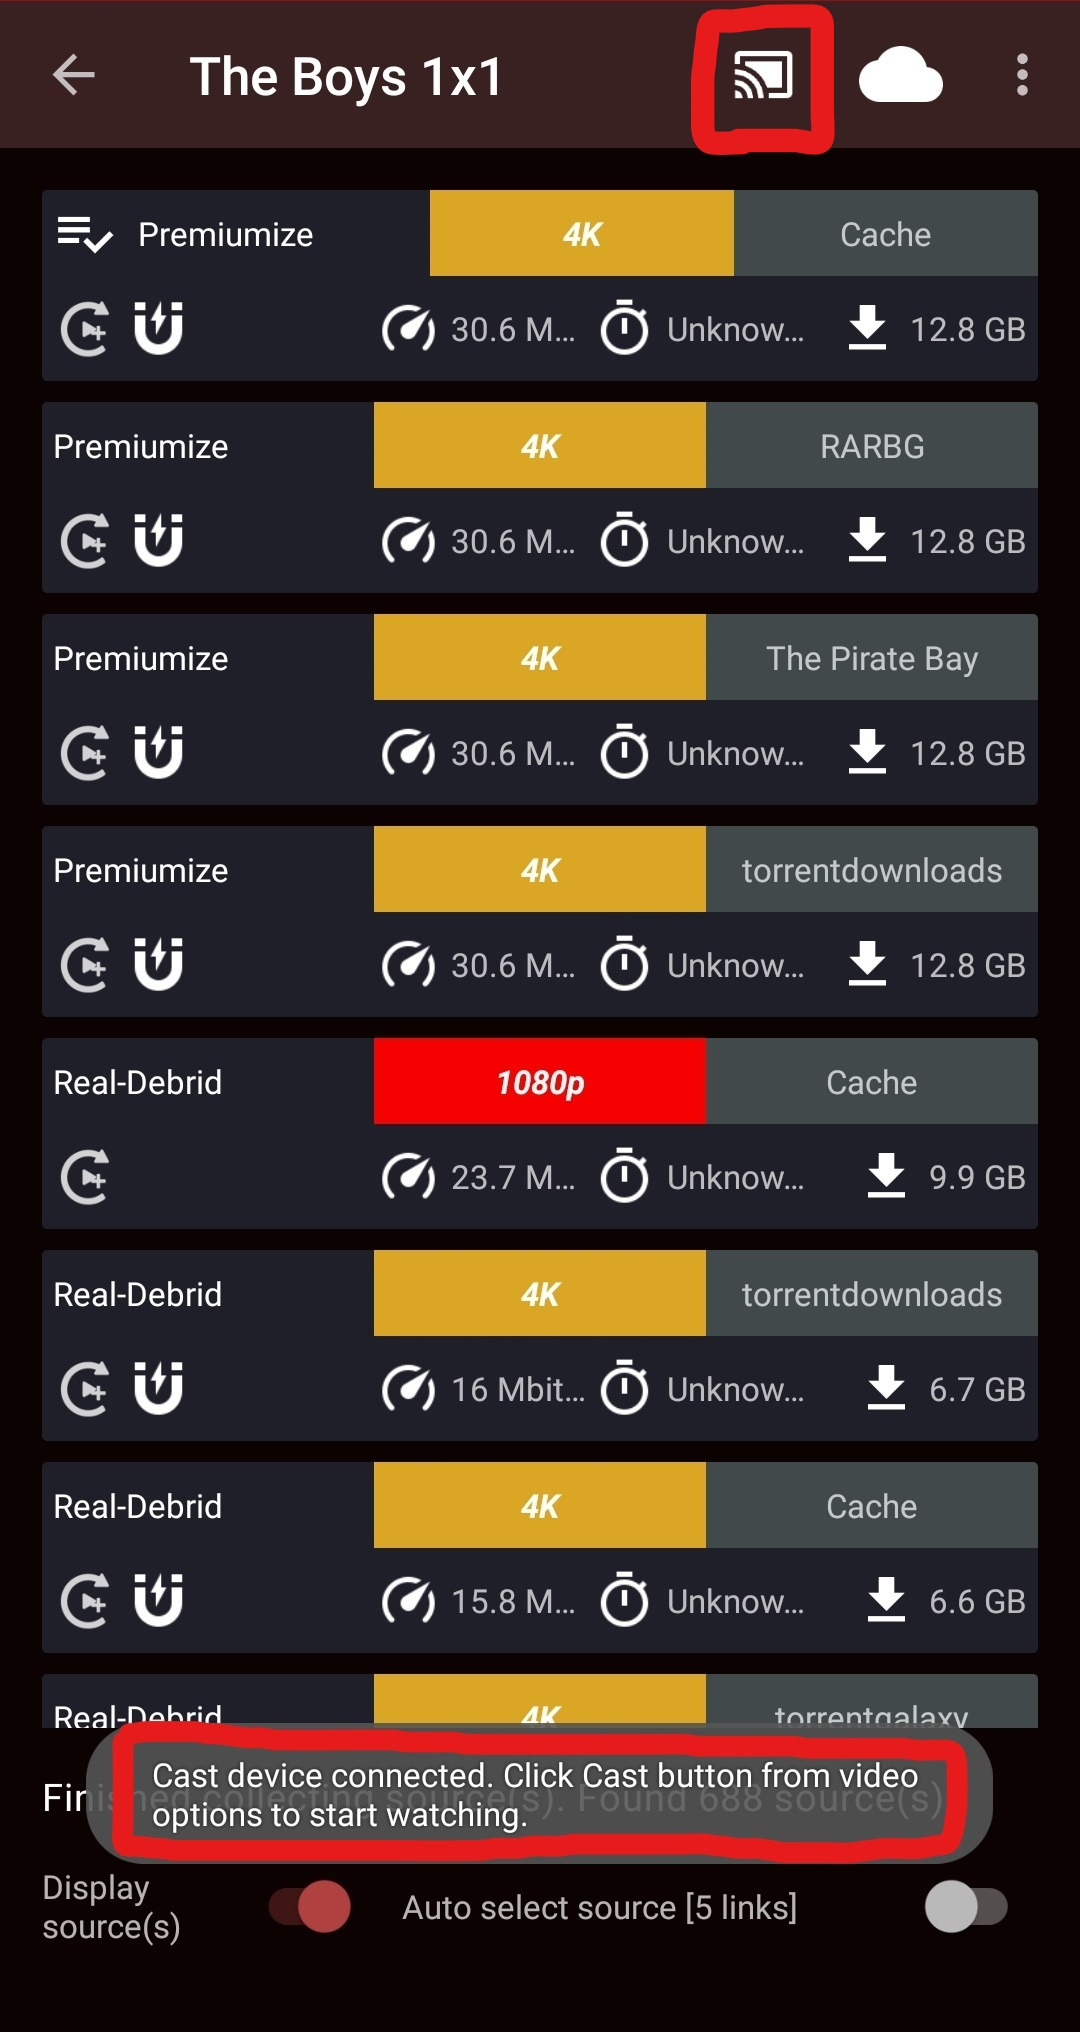
Now you can pick a source as you normally would, or use the long press context menu where the "Cast" option is now available.
After choosing the desired source, Syncler will automatically begin playback on the casting device and you can use the app as a remote to control playback and subtitling.
To stop casting, press the filled in cast icon on the source search screen and press “Stop casting”.
You can also cast using external players like VLC or Web Video Caster using the play / open with features of Syncler.
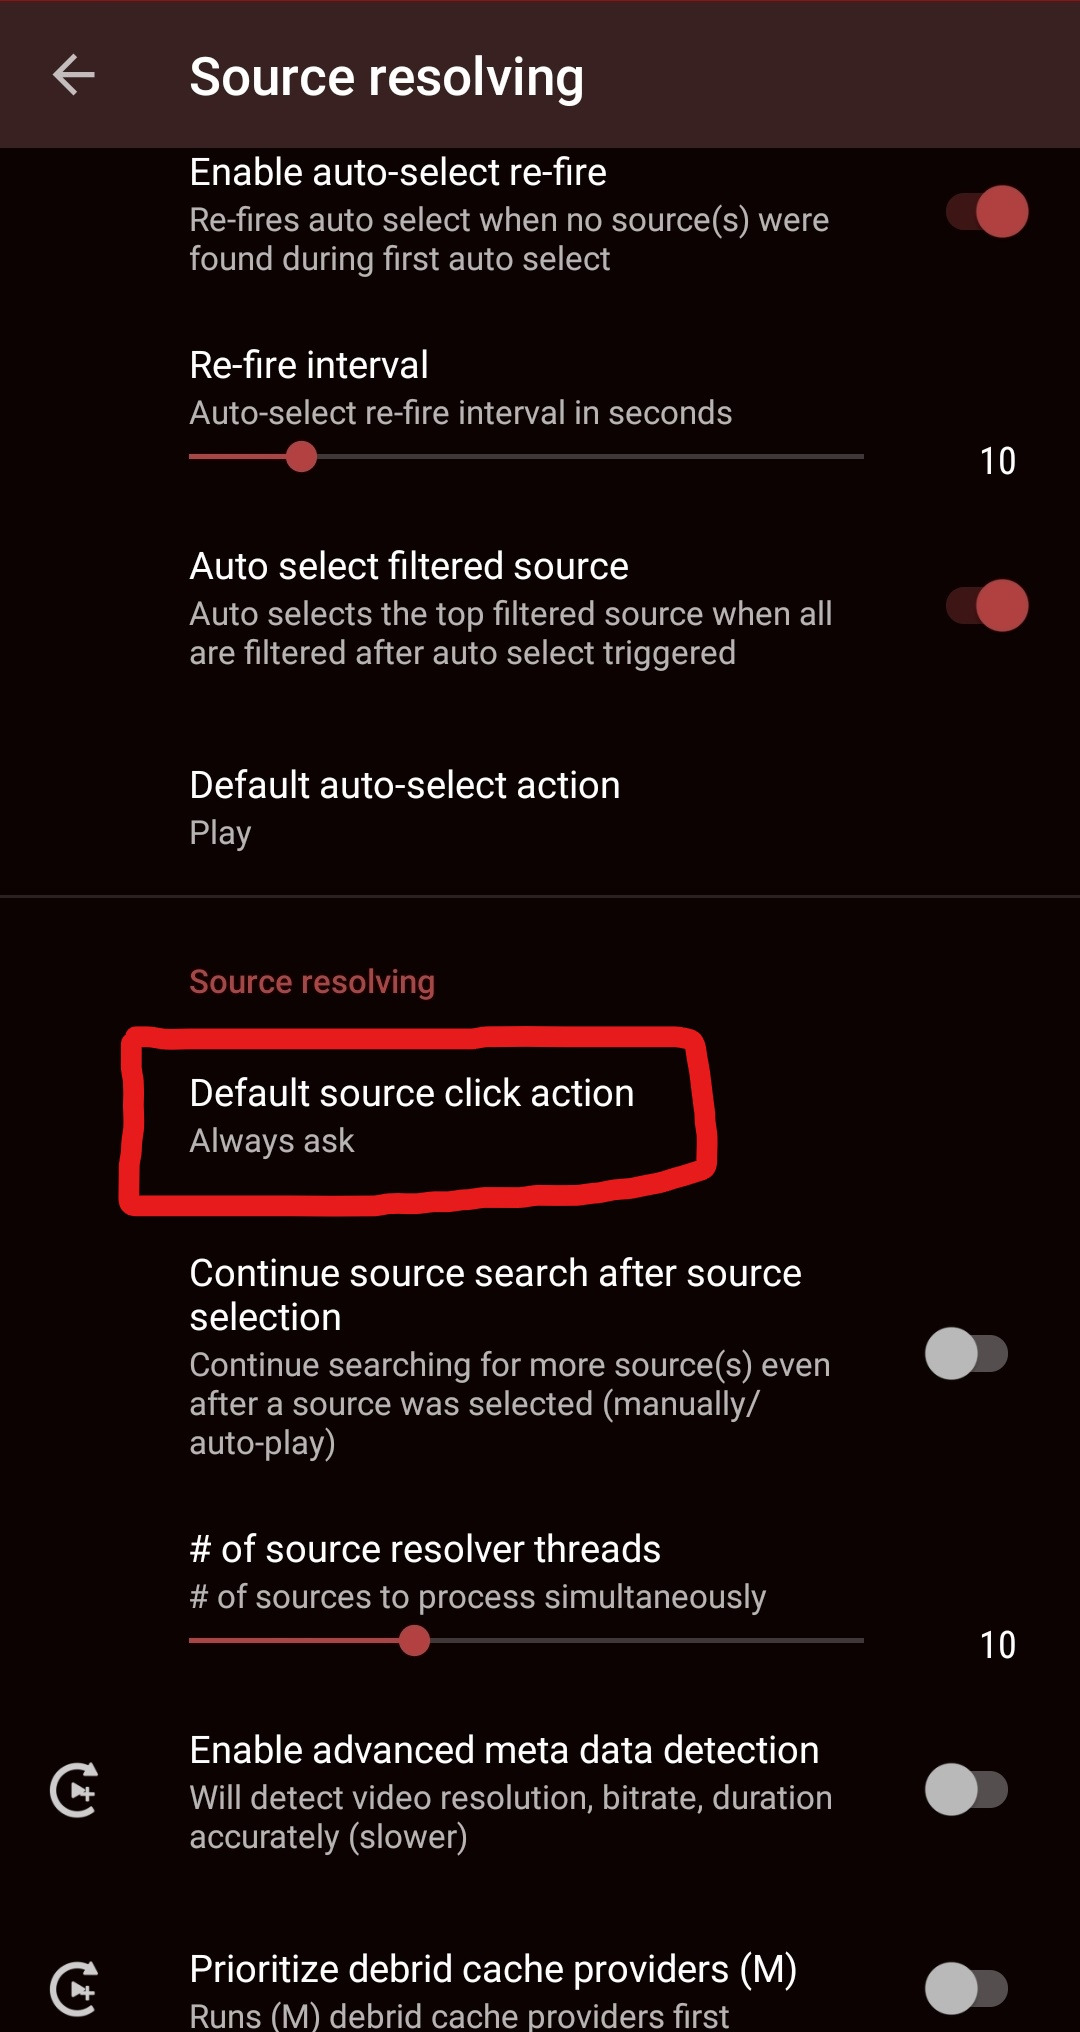
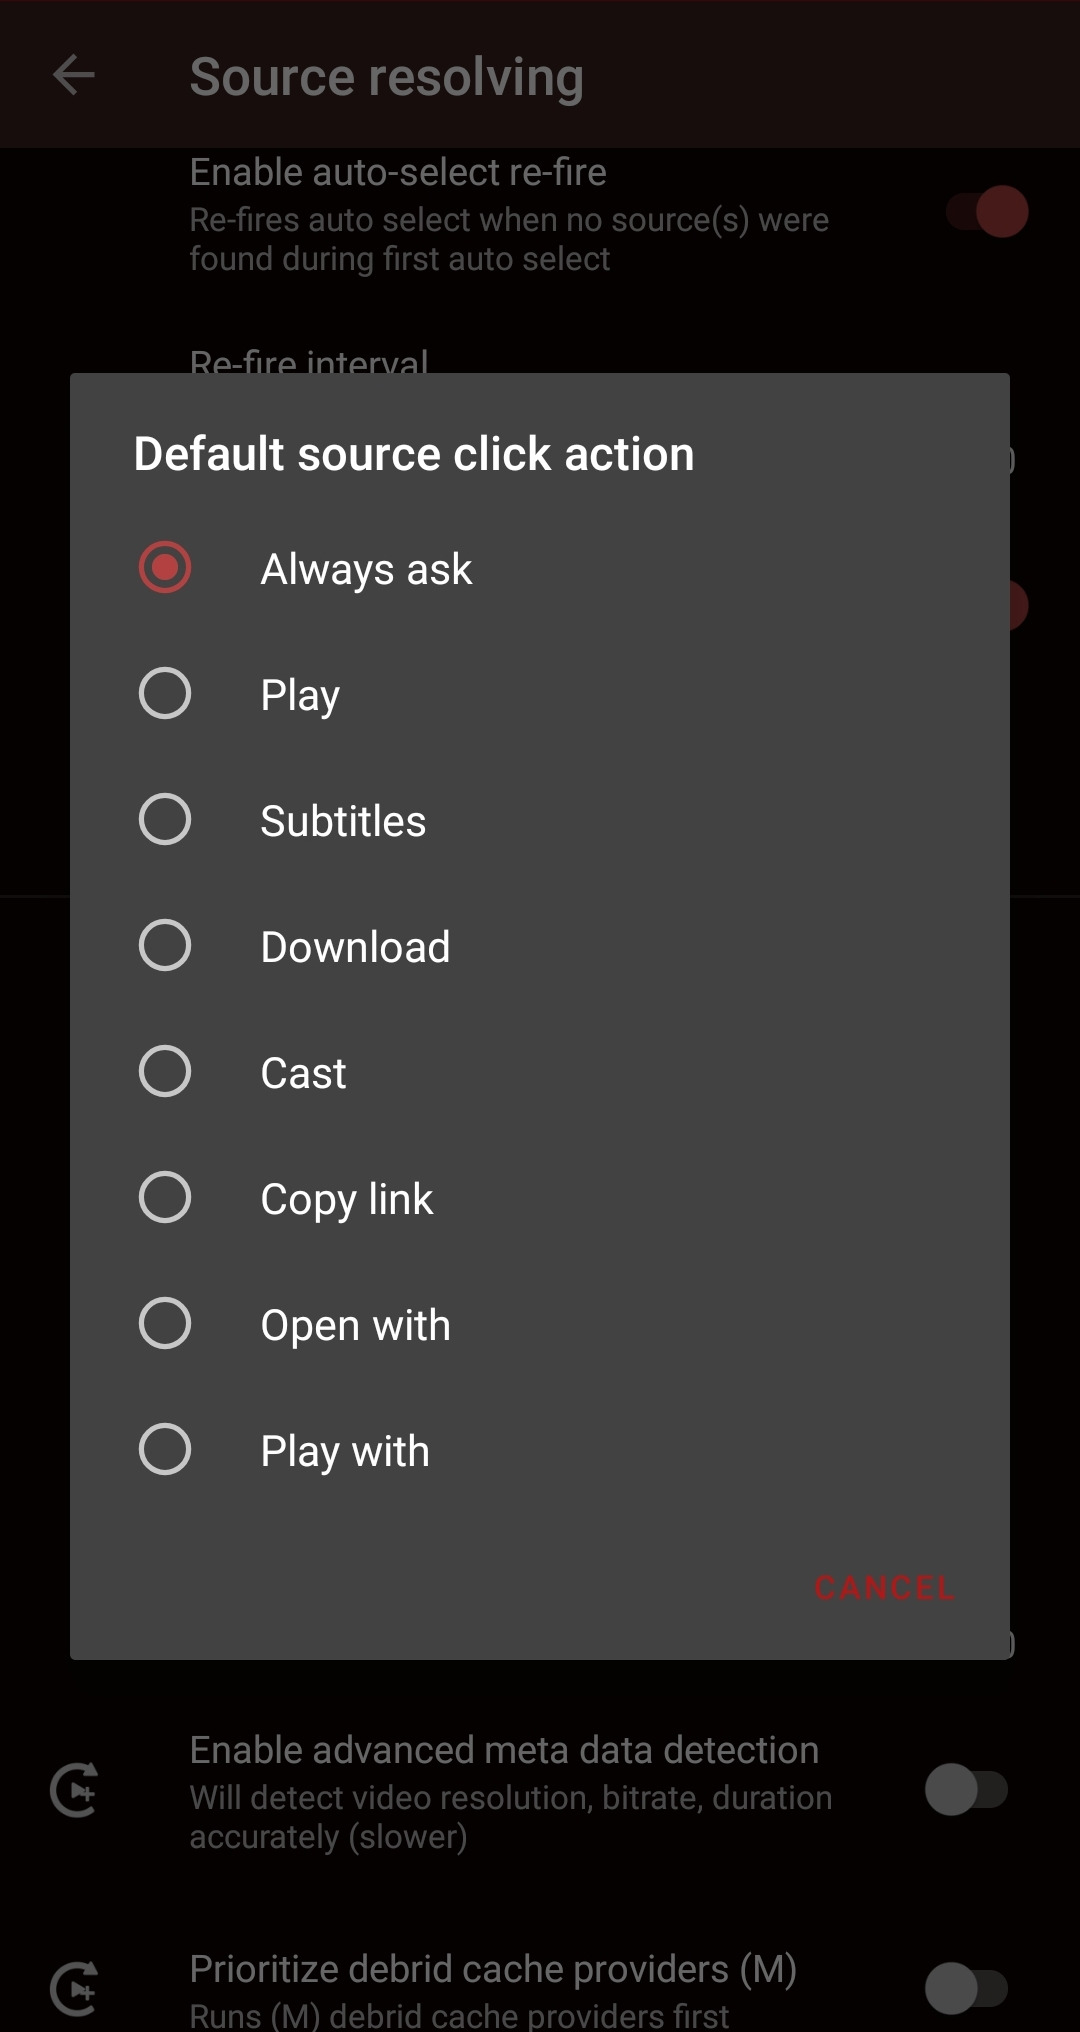
26.
Default action
You can change the default action Syncler does when you are short pressing a source. This saves time when playing with subtitles, downloading, casting and using external players not included in the fully supported list.
Go to Settings then “Source resolving”.

Find and press on the “Default source click action” option. A list will pop up and you should select whichever option suits your needs best.
27.
Auto-select
Auto select is a feature to let Syncler automatically pick a source for you (Auto play) as long as it meets certain conditions, which you can customize.
Open Settings then go to “Source resolving”.


Turn on “Enable auto select”.
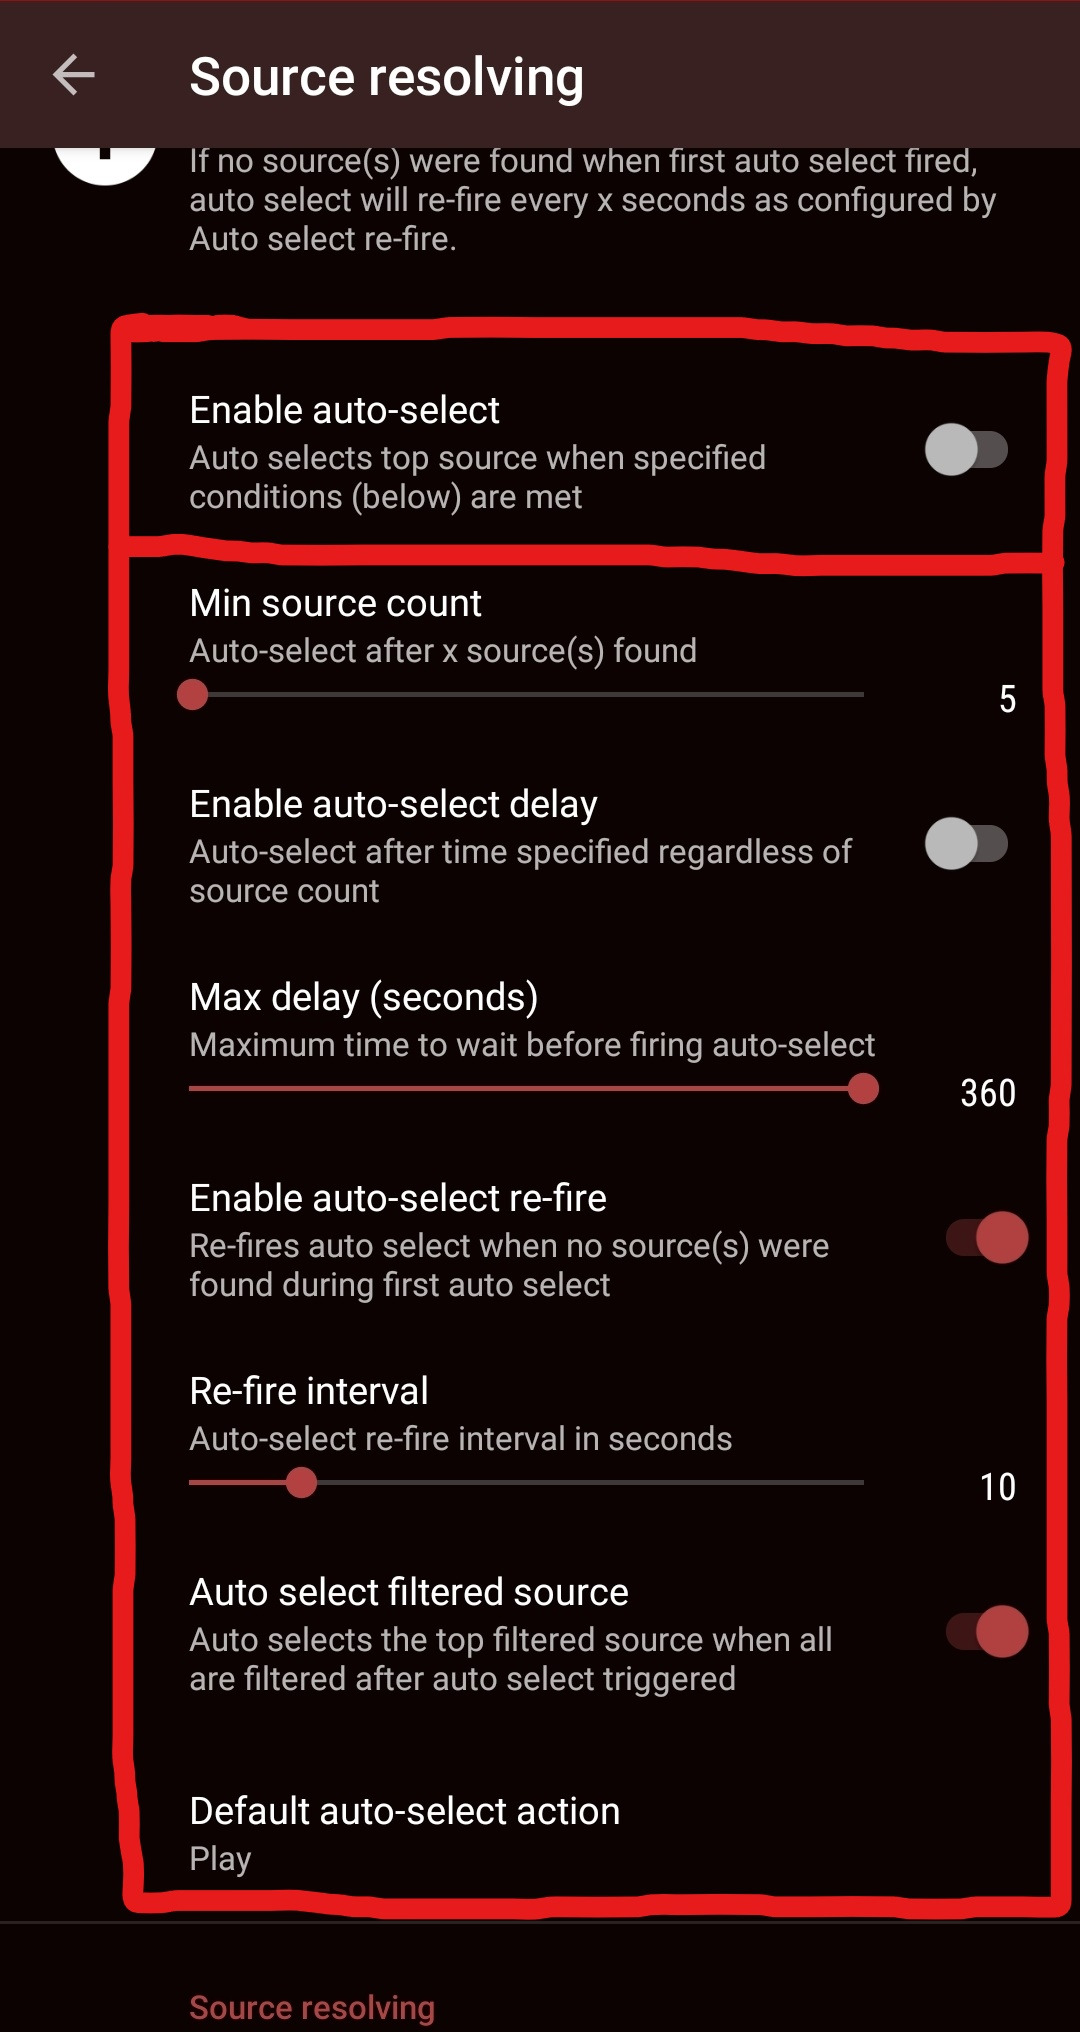
The options below the main toggle can be customized to your liking but auto-select will always choose the top source once the conditions are met.
It would be wise to set up sorting and filtering settings if your network speed or device cannot handle the sources that flow in first. See the relevant sections below for more information.
28.
Auto-play next
Auto next is a feature to trigger source searching for the next episode after the current episode you’re watching ends. This can be useful for binge-watching multiple episodes in a row and can be used in conjunction with auto-select and sorting / filtering settings to make Syncler almost autonomous!
Go to Settings then “Playback”.

Turn on “Auto next”.
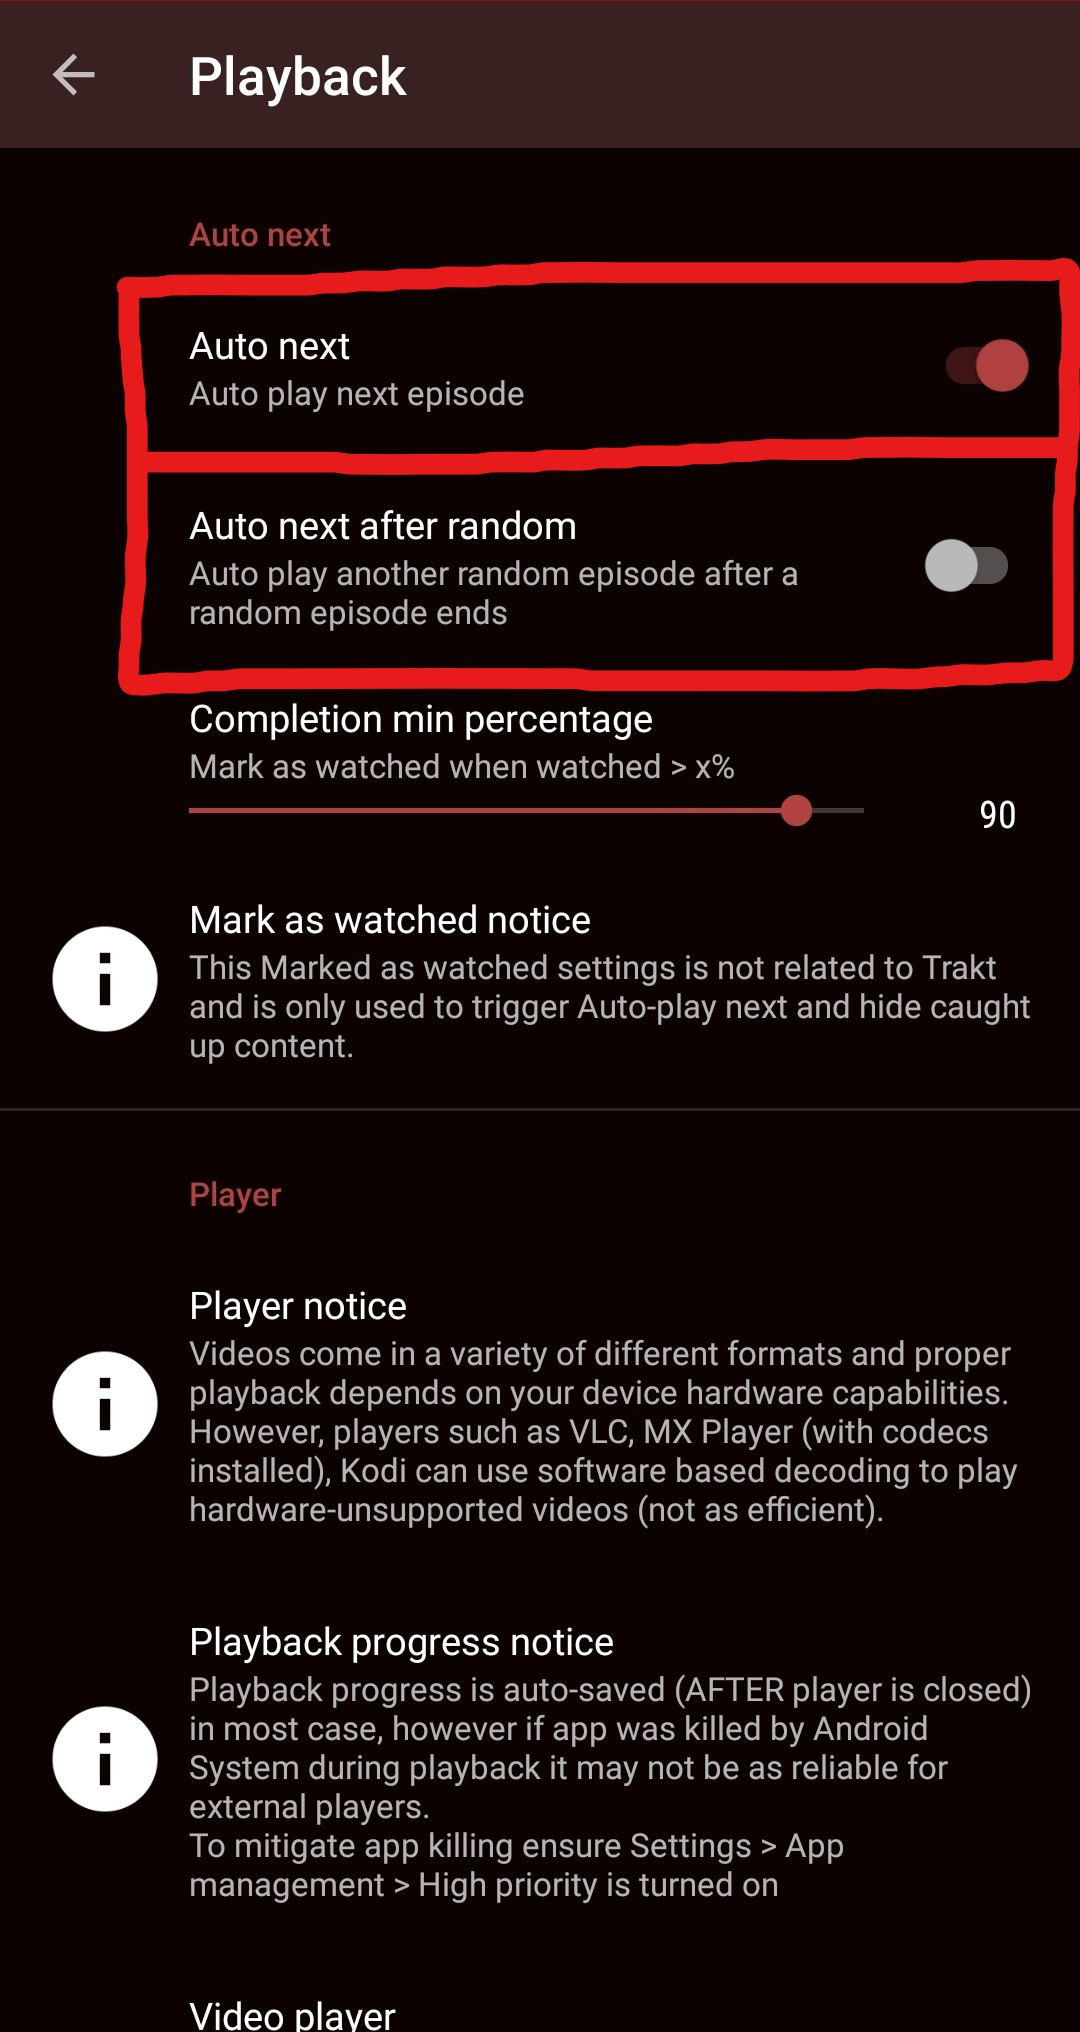
If you want to watch a random episode after the current one, turn on “Auto next after random” instead.
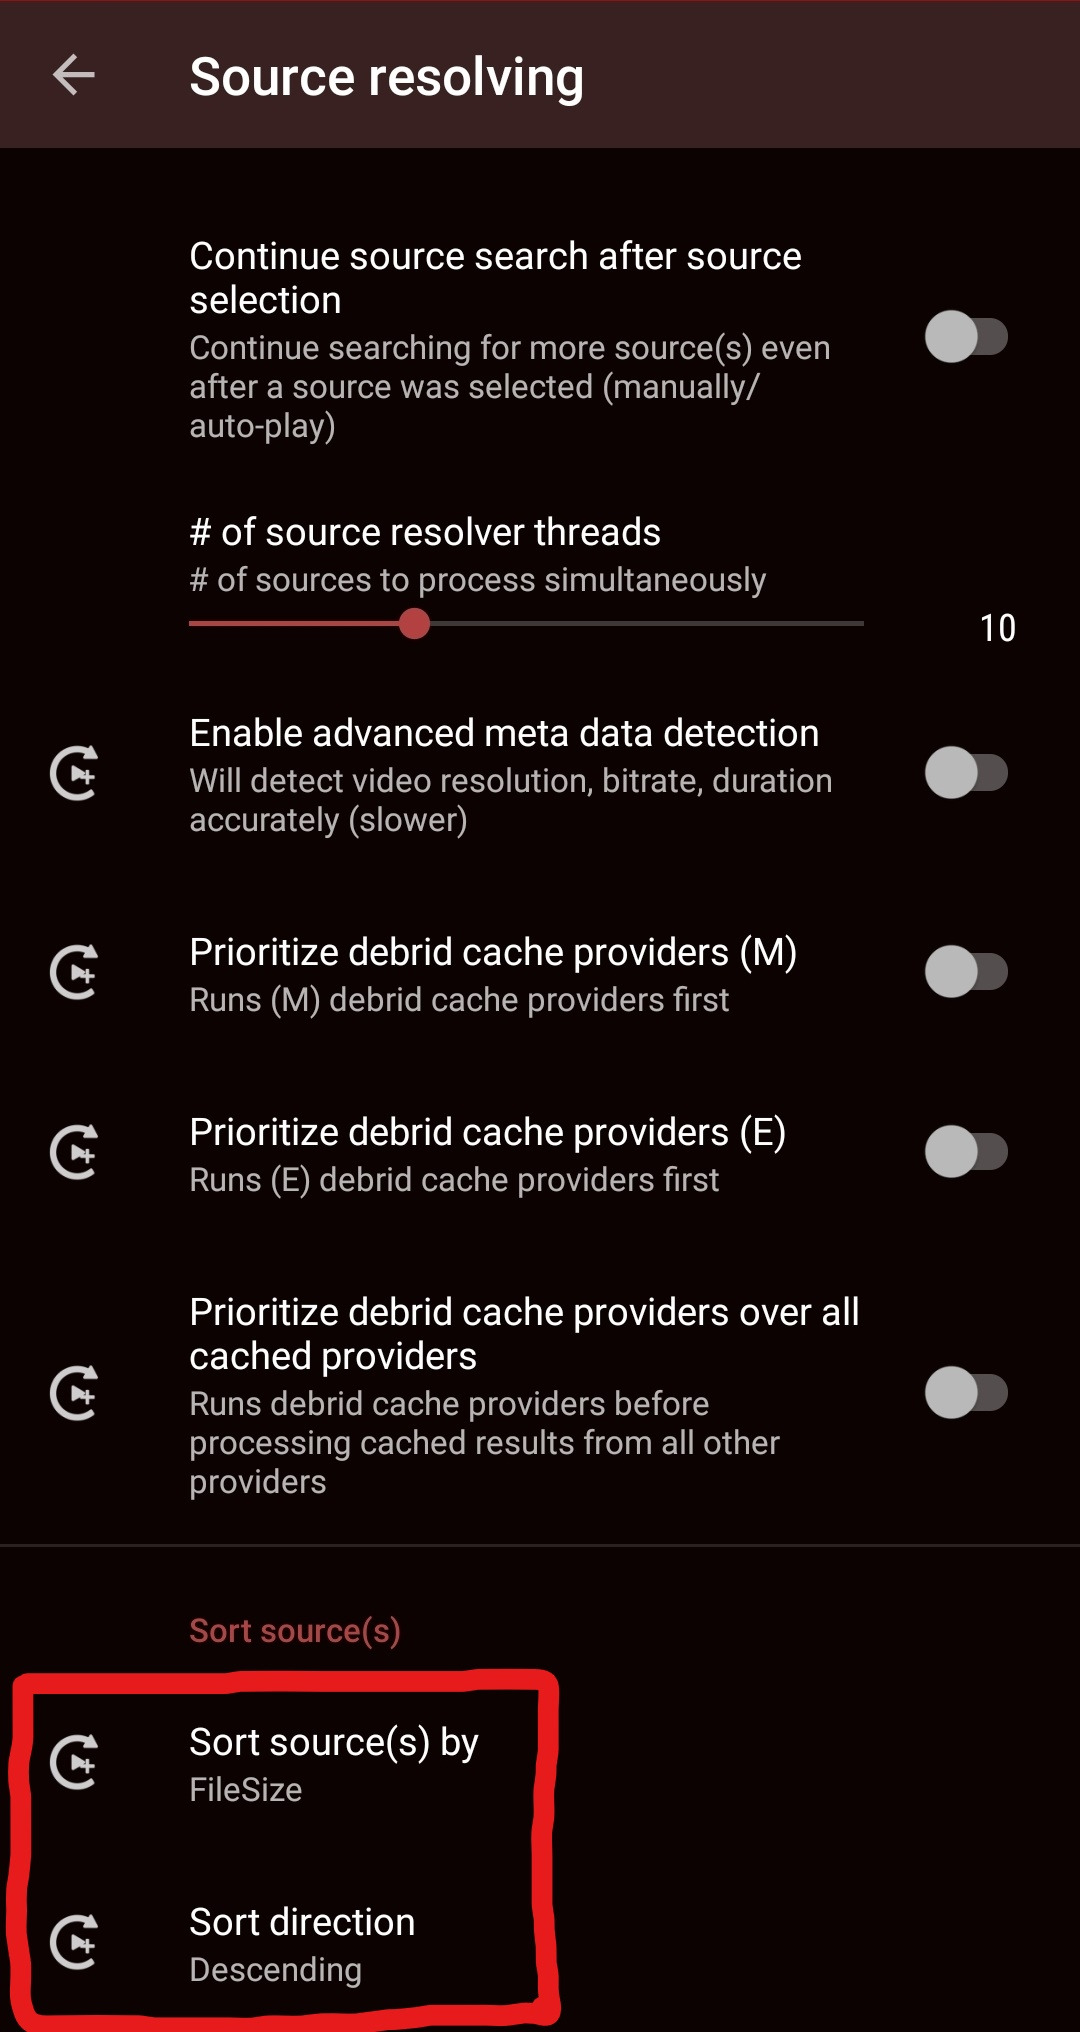
29.
Sorting
Source sorting affects all sources shown on the source search screen and is mainly used in conjunction with auto-select which only selects the top source. You can sort by file size, ping, bitrate or resolution and choose between ascending or descending directions.
Open Settings then “Source resolving”.

You can then press “Sort source(s) by” and “Sort direction” to change the options to your personal preference.
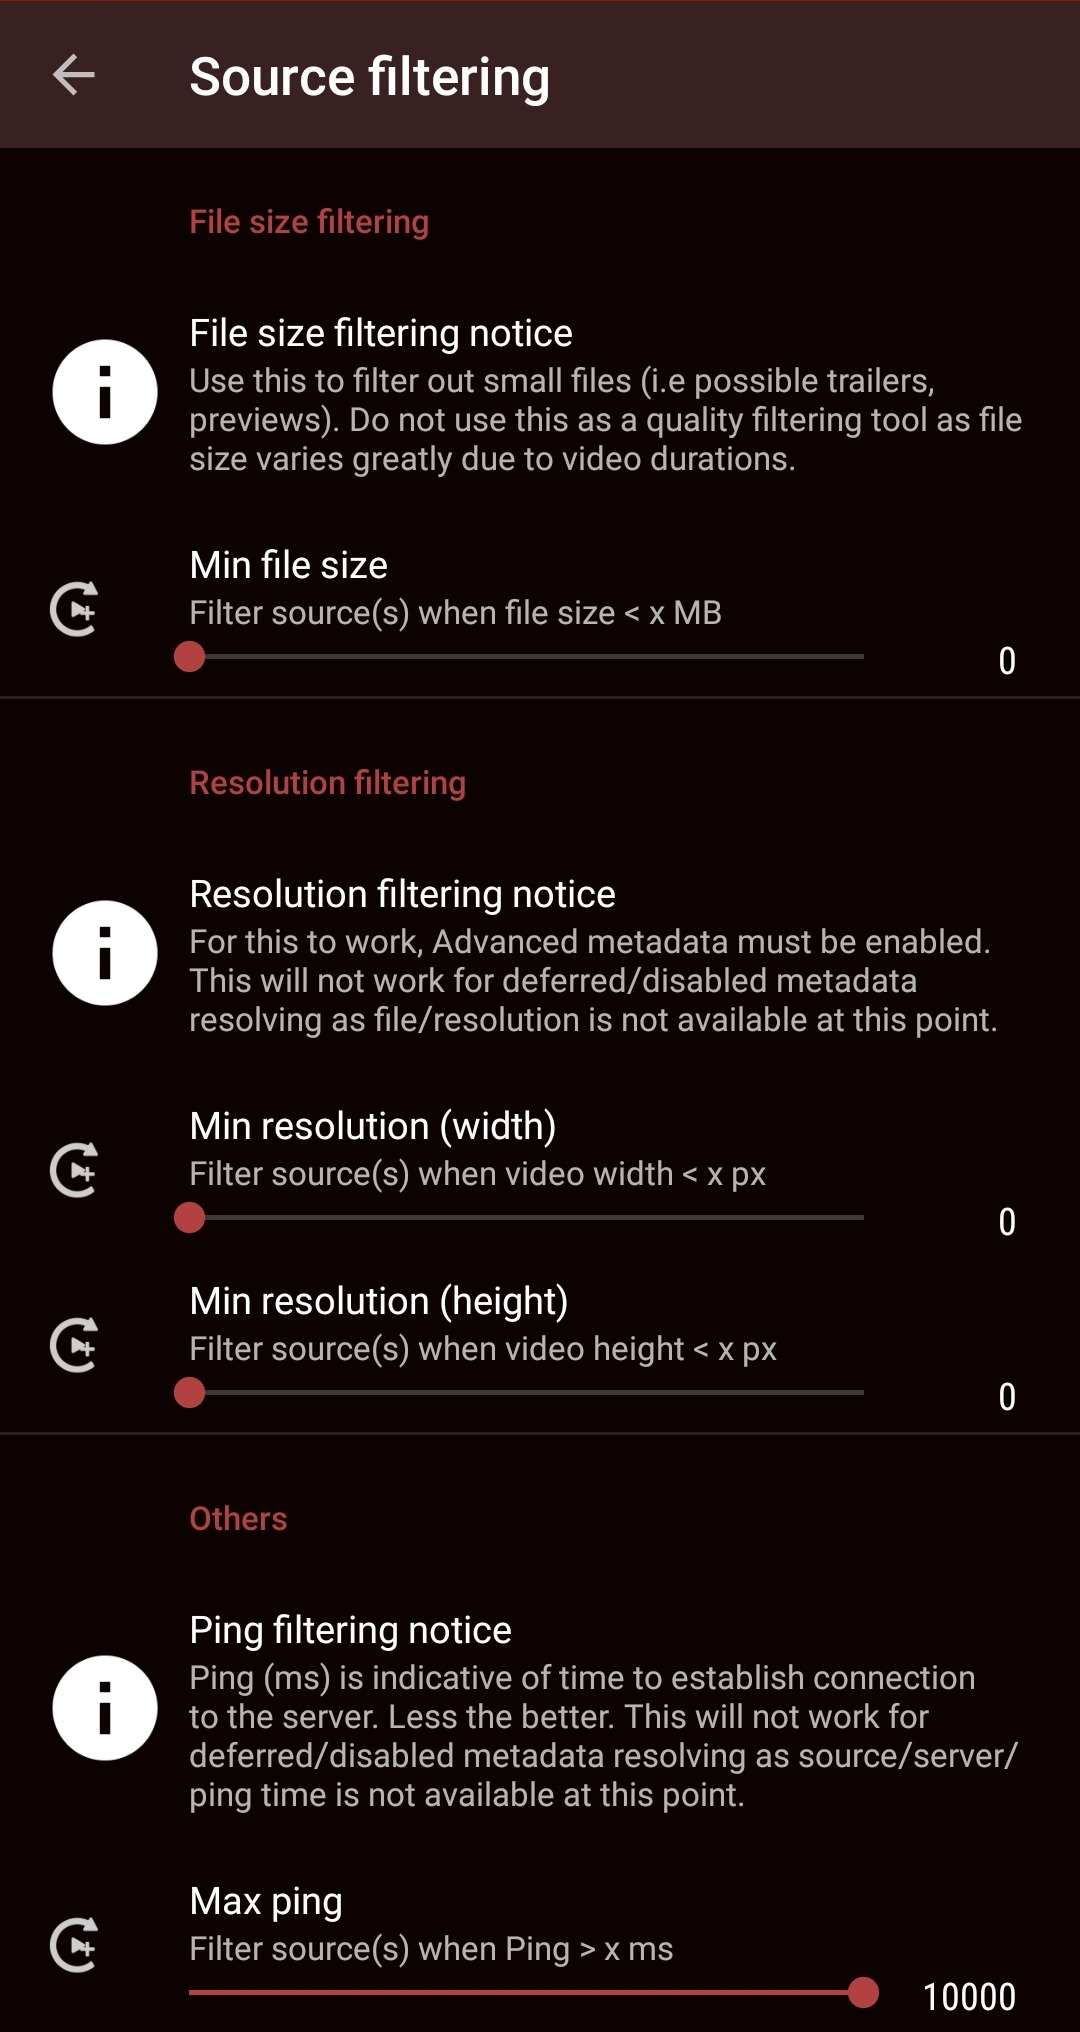
30.
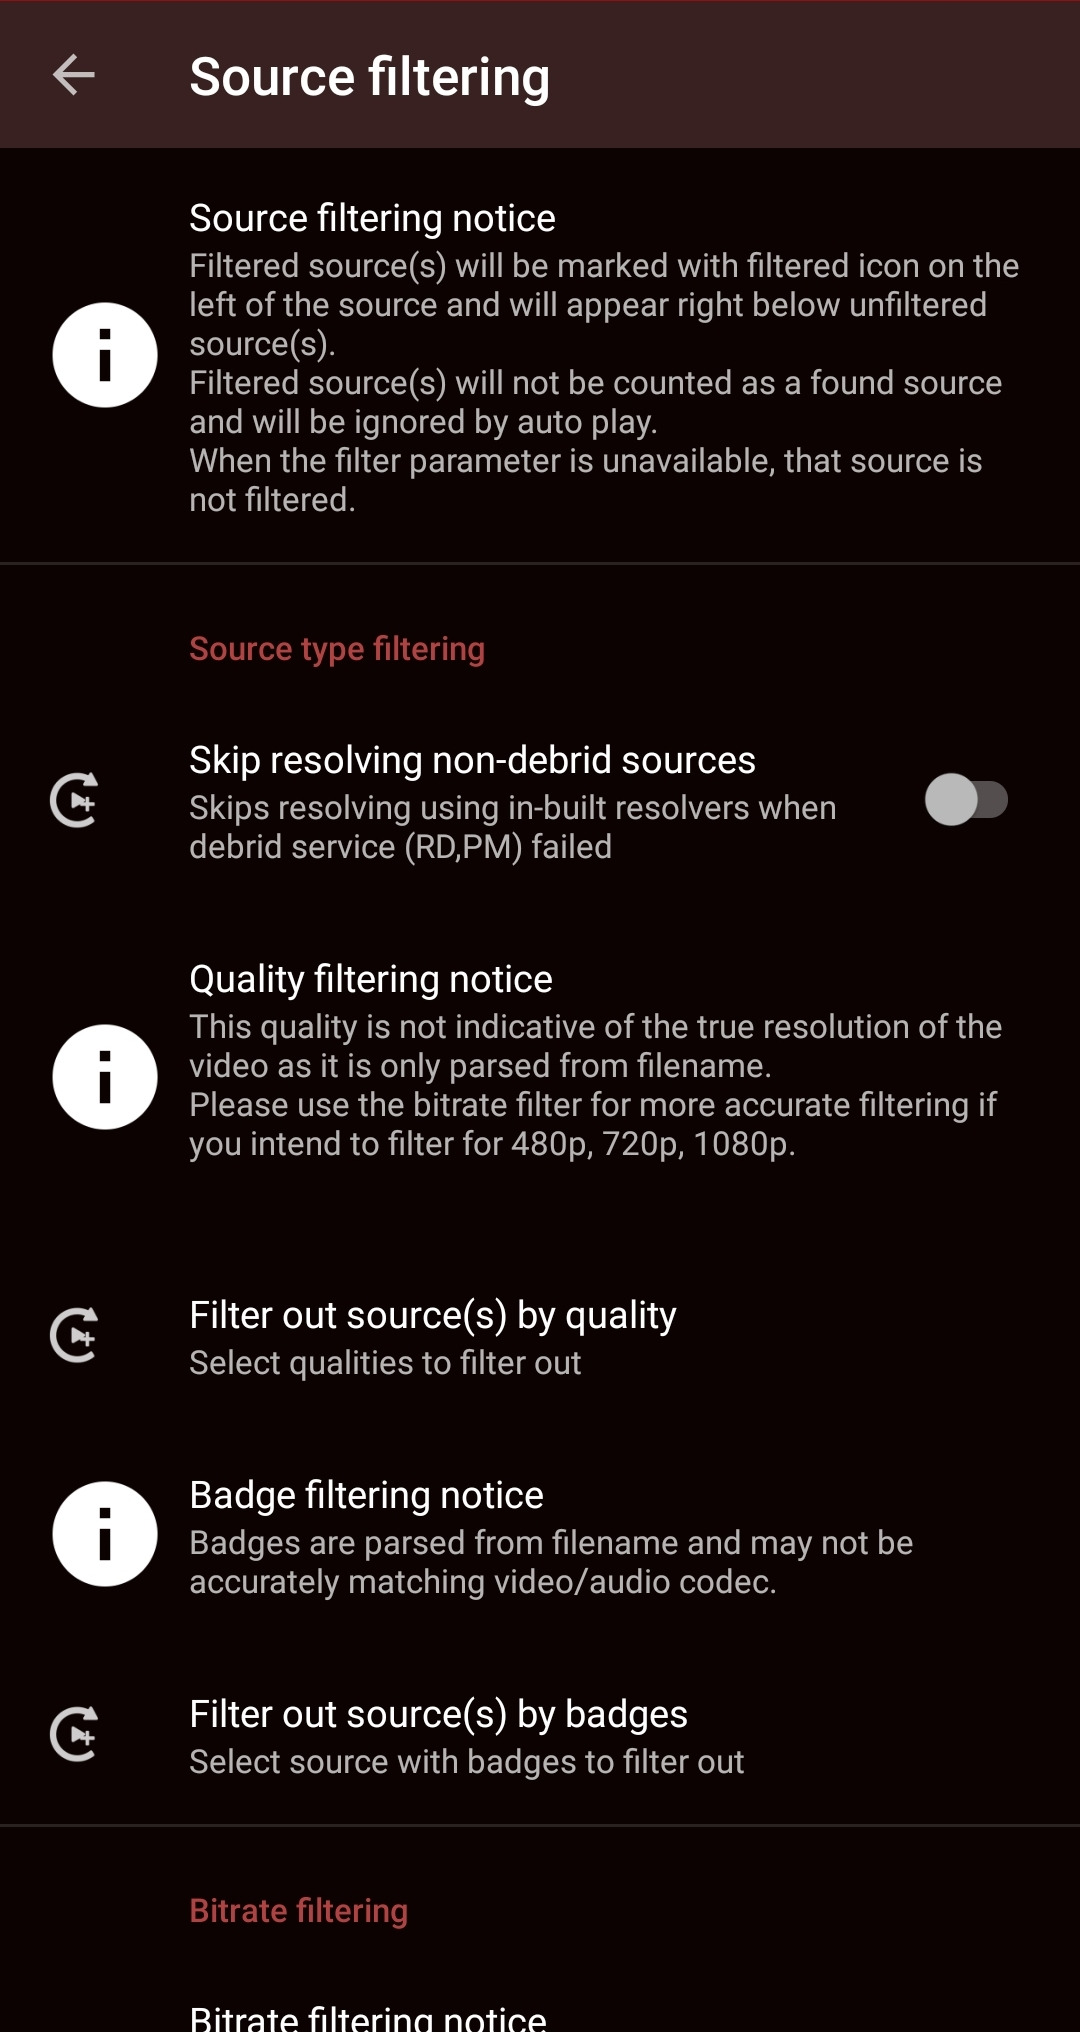
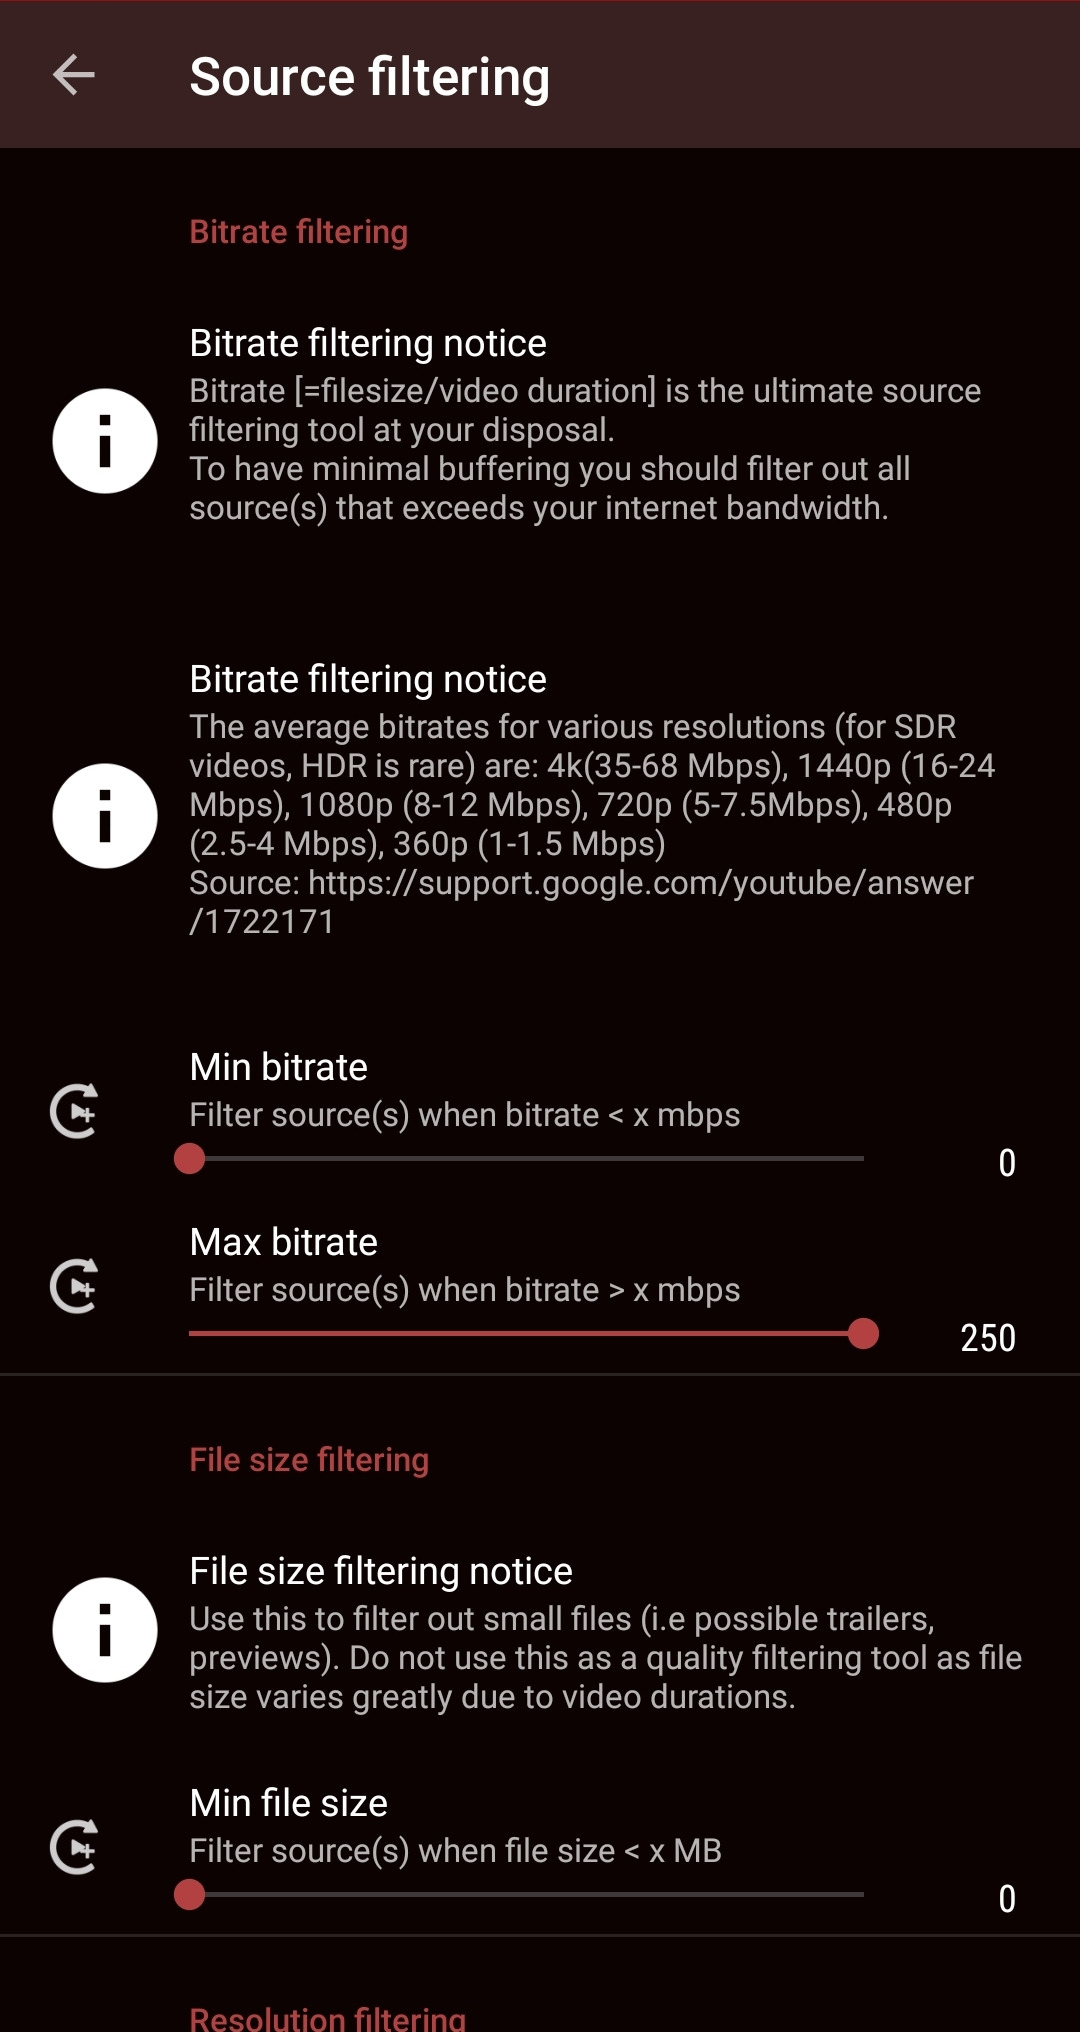
Filtering
Source filtering is equally as important as sorting and it should definitely be considered when using auto-select. This option affects all the sources matching certain conditions and pushes them to the bottom of the source search screen. This effectively disables certain sources from triggering auto-select.
Go to Settings and then “Source filtering”.

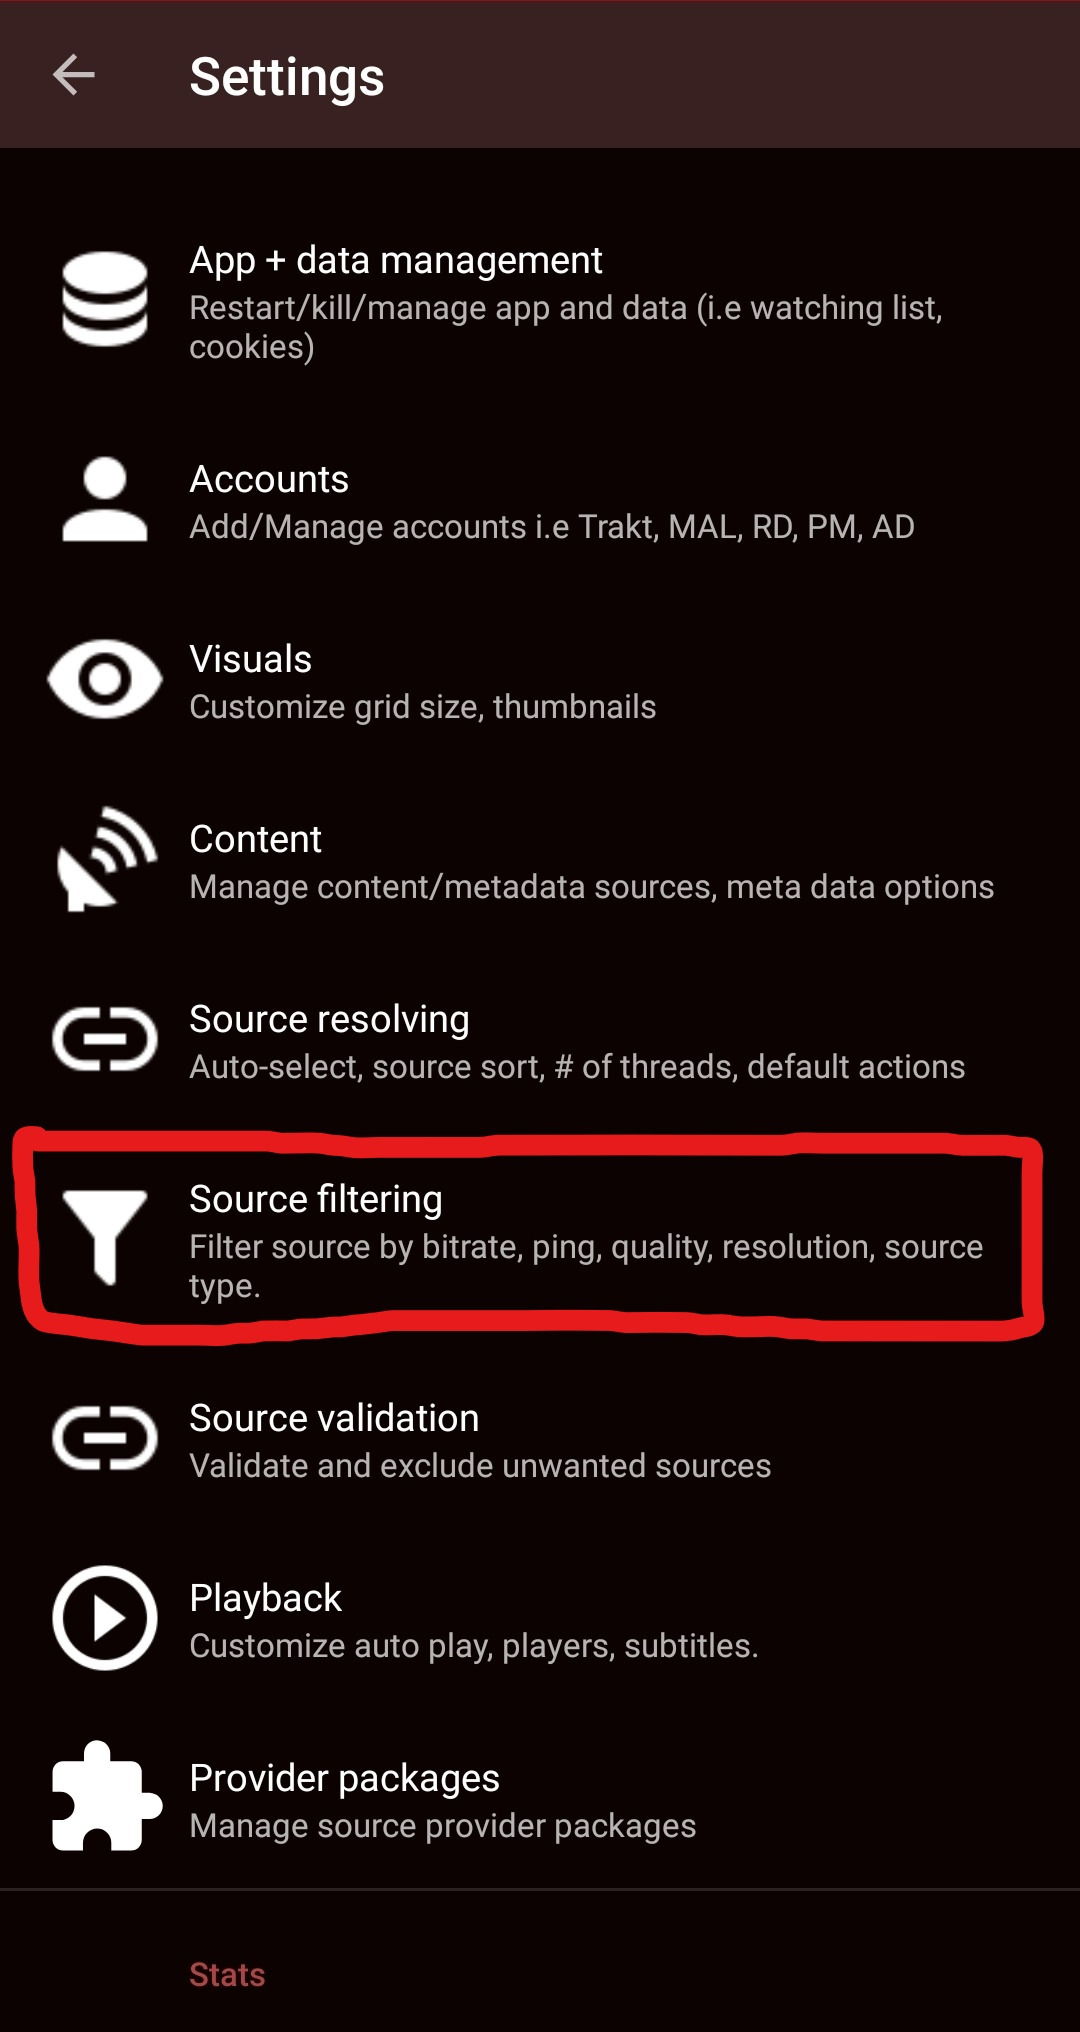
The list of conditions you can customize include:
• Source type - set to include / remove non-debrid (free sources)
• Resolution (Quality) - set to include / remove 4K, 1080P, 720P etc.
• Badges (metadata) - grabbed from filename, not actual metadata so may not be accurate
• Bitrate - set minimum and maximum bitrate
• File size - set minimum file size to remove trailers and previews
• Advanced resolution - set minimum pixel width and height
• Ping time (latency) - set maximum ping
Part VIII - Troubleshooting
31.
Common Errors
I have created a separate article to answer any questions you may have regarding Syncler. The page also includes troubleshooting steps to fix any errors or issues you may receive during setup or normal usage.
The link to the FAQ & Common Errors page can be found here