How to set up bots for working in groups in @MenuBuilderBot

We introduce the very long awaiting functions for @MenuBuilderBot bots: now bots are working in groups and channels!
Русская версия мануала находится здесь.
Groups Tokens
Enabled groups consumes small fee. It was added to avoid bots being placed into thousands of useless groups that nobody needs and long ago forgot about their existence.
For the group fee we add special Group Tokens. Group tokens are purchased for the whole owner account and can be spend in all its bots.
1 group in 1 bot per 1 day consumes One Group Token. Tokens are chared daily: for example, if any group was enabled only for 3 days - it will consume only 3 tokens. No overpay for month or like this.
To get Group Tokens go to:
🔐 Admin
* 🧩 Extensions
* 📂 Channels and Groups
* Group Tokens (TG)
Every group includes the following functions:
* Greeting new users with a greeting message
* 10 triggers
* Antispam
* Basic moderation (will be added later)
Prepare the group
How to add the group
1. Go to group management menu
🔐 Admin
* 🧫 Channels & Groups
* My Groups
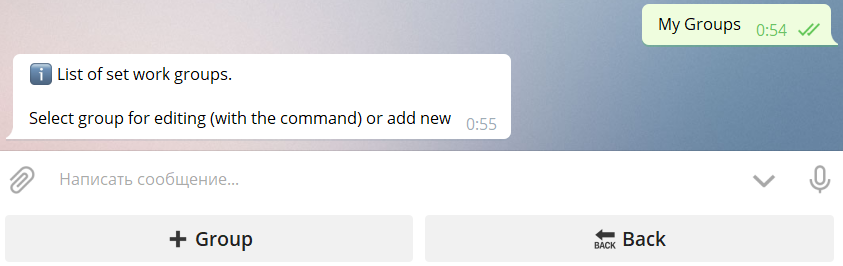
2. Add new group
2.1 Press "+ Group"
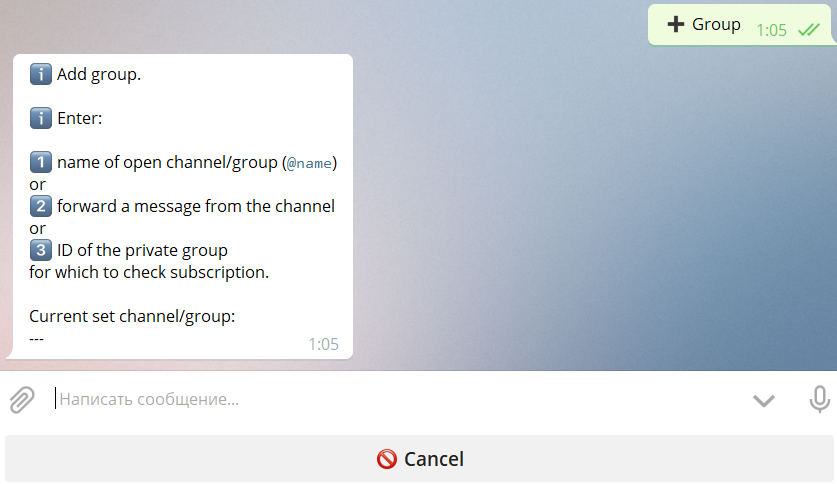
2.2 Send the group requisites (one of the following):
a. name of open channel/group (@name)
b. forward a message from the channel
c. ID of the private group (see below how to get ID)
To get the private group ID use the @RawDataBot. Add it to the group with full rights. As soon as it will be added, it will post a full dump of data:

Get the ID from the section "chat" and use it to add group to the bot. After that remove @RawDataBot from the group.
If everything is successfull, you'll see the added group:
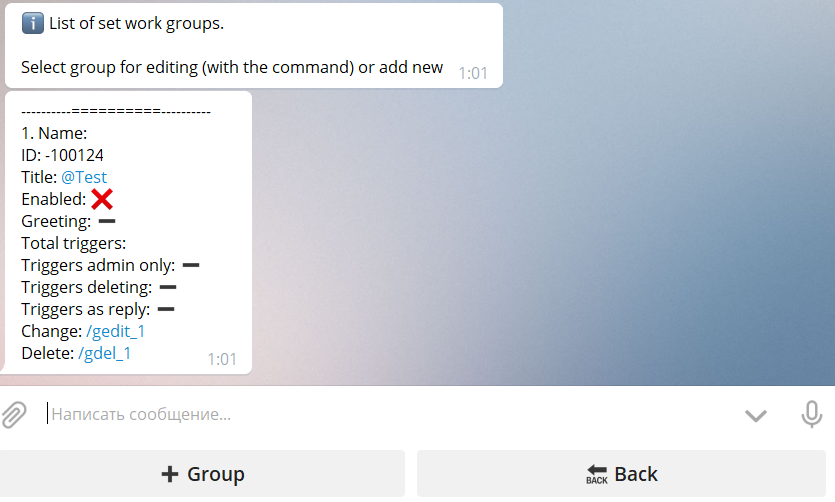
The title of the group will be "Unknown" if the bot yet do not know the group. Later title will be updated automatically.
After that you can add the bot to the group: bot will not leave it.
How to set up the group
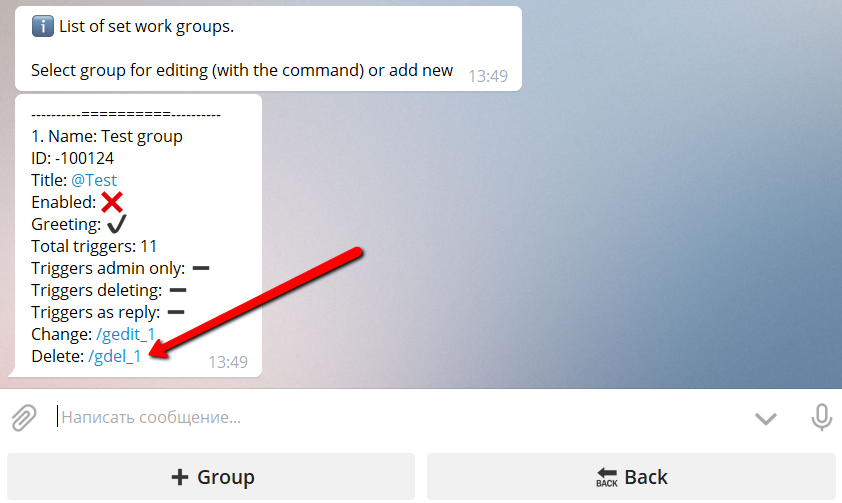
To set up the group find the group in the list of groups and click group edit command:

You'll get the group editing menu:
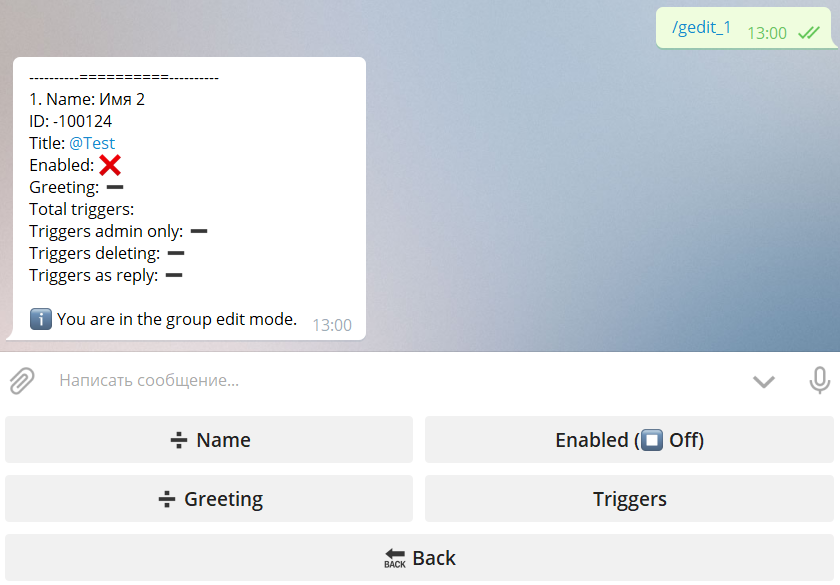
➗ Name - allows to set the comment to the group (optional). This is admin only information and will be visible only to admins. It will be shown in Admin menu when operating the group.
Enabled (▶️On/⏹Off)- activates (▶️On) or deactivates (⏹Off) the group.
When the group is disabled (⏹ Off), bot does not work in the group, but stay in it and all group settings are staying alive. You still can set up group options etc. Only one group can be disabled to avoid storage of lot of unused groups.
Enabling the group immediately charges 1 Group Token for the current day immediately!
➗ Greeting - allows to set the greeting message for new users in group. If the message is set - greeting for new users is enabled. To disable greetings delete the greeting message.
Greeting message can include the macros. %firstname% for all bots. %lastname%, %username%, %userid% for accounts with purchased user macros.
In the greeting message you can now use inline buttons. Buttons of types "URL" and "PopUp" are supported. "Command" buttons will not be shown.
Triggers - allows to set triggers for groups. See the following section for details.
How to delete the group
Go to "My groups". To delete the group find the group in the list of groups and click group delete command:
Triggers for the group
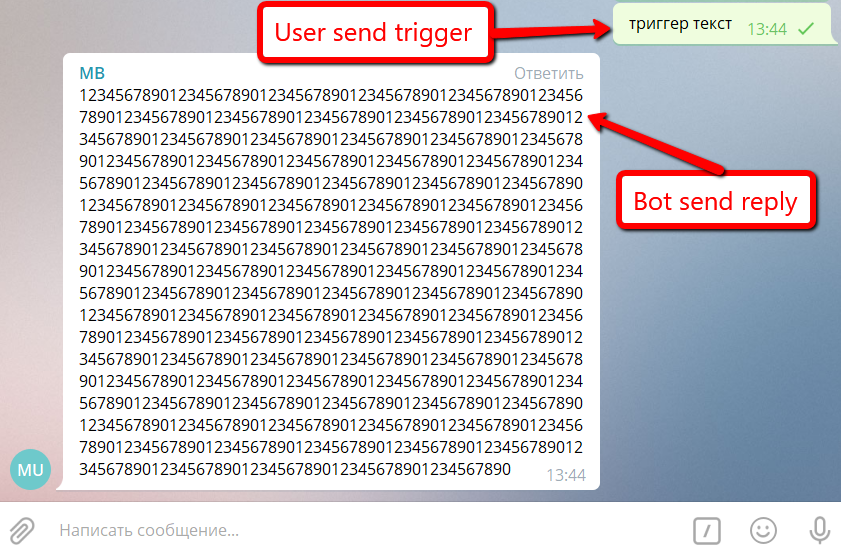
What are triggers
Triggers are special keywords. If the bot see this keyword in the group, he can react on this by sending the predefined message to the group.
To set up triggers click "Triggers" in the group edit menu. Triggers are set for every group individually together with triggers' options.
Triggers' options
Triggers' options are set for all triggers in the group. Setting option for a single trigger is not possible.
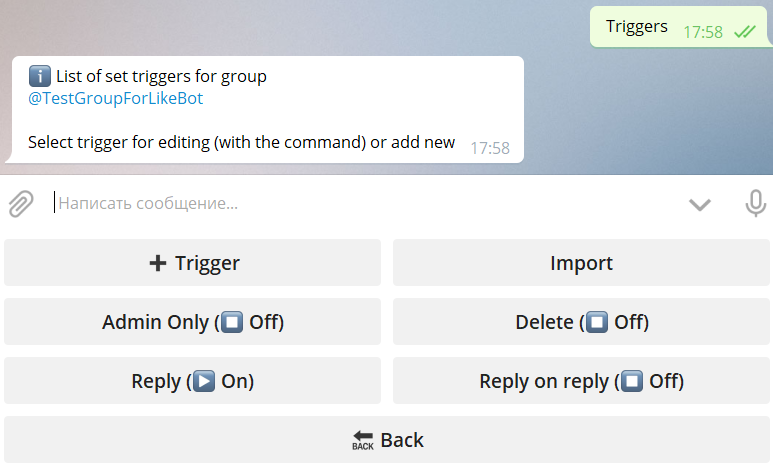
Admin Only (▶️On/⏹Off) - defines, if bot react only on triggers posted by group admin (▶️On) or by any user (⏹Off).
Delete (▶️On/⏹Off) - defines, if the message with the trigger will be deleted after the bot answers (▶️On) or stay in chat (⏹Off).
Reply (▶️On/⏹Off) - defines, if the answer to trigger will be sent as a reply (▶️On) or will be posted as ordinal message (⏹Off). Will be ignored if "Delete" is enabled.
Reply on reply (▶️On/⏹Off) - if the trigger was sent as reply to some message, the bot will also send a reply to that message (▶️On) or post ordinal message (⏹Off).
How to add triggers
Triggers are bind to the bot butons. To define a trigger you should create a button, add a message to that button (or select existing button with existing message) and bind some trigger text with it.
It does not matter if this button is available from menu, locked or hidden: trigger will always work for it. For buttons created specially for triggers it's a good practice to create special submenu (or several submenus), hide the entrance with "Admin only" and inside it create buttons with messages for triggers. We do things like this. :)
To add the trigger:
1. Click "➕ Trigger"
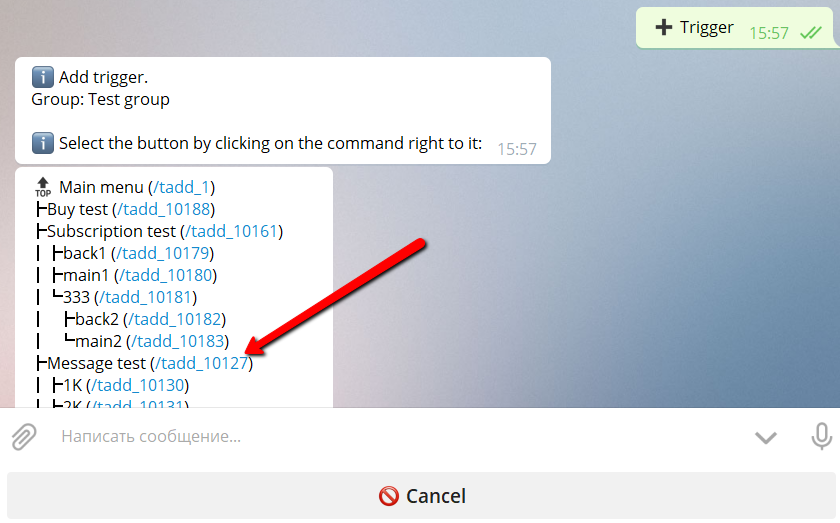
You'll get all your buttons as a menu tree:
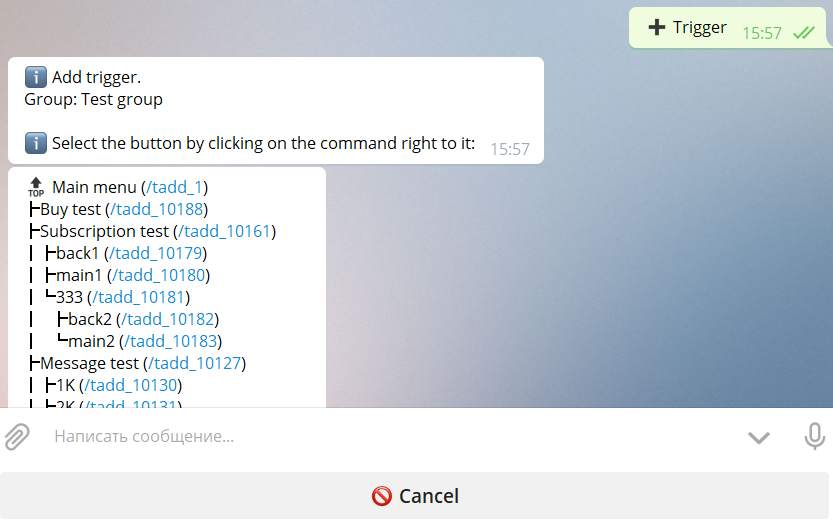
2. Select the button
Select the button you want to bind to trigger using one of the commands in the menu tree:
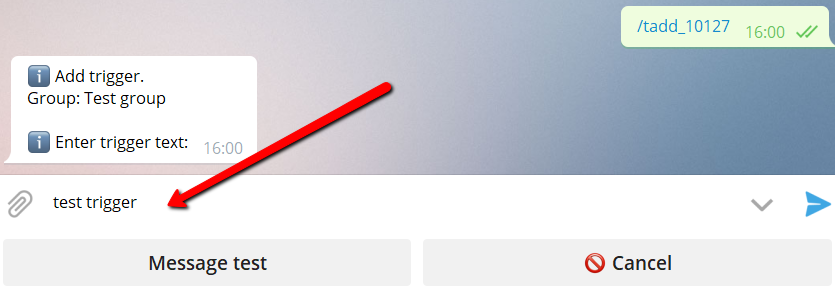
3. Enter trigger text
Enter the text of the trigger (when bot see message with this text he will reply with button message):
If you want a trigger to be the same as the button text you can use the down button:
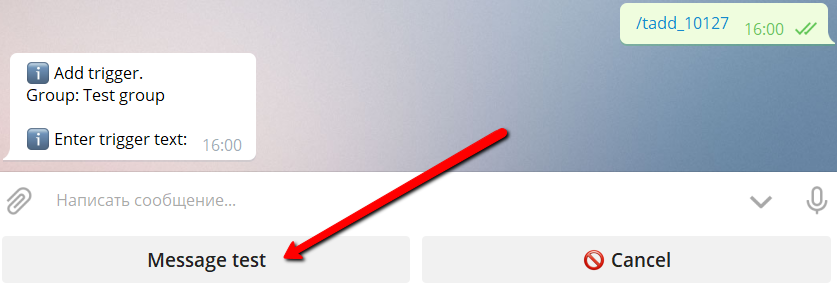
This button will always have the name like the button you selected from the menu.
All triggers are case insensitive: they are always saved in lowcase and will work if they are called in any case for example "Test trigger" or "TeSt TrIgGer".
That's all. Now you set up the trigger with text "test trigger" that will send to this group the message(s) from the button "Message test" of your menu.
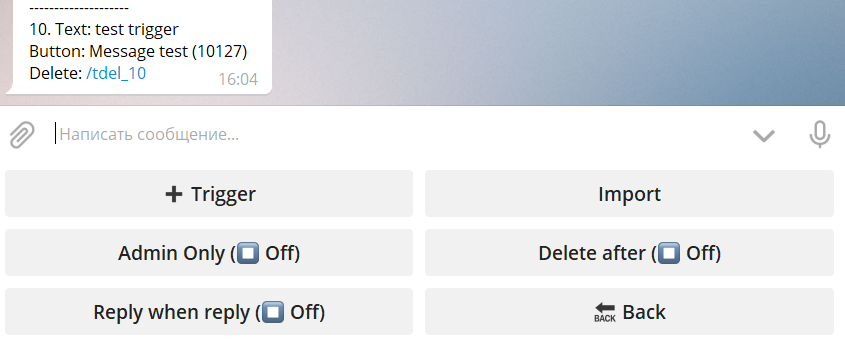
One button can be bind to multiple triggers.
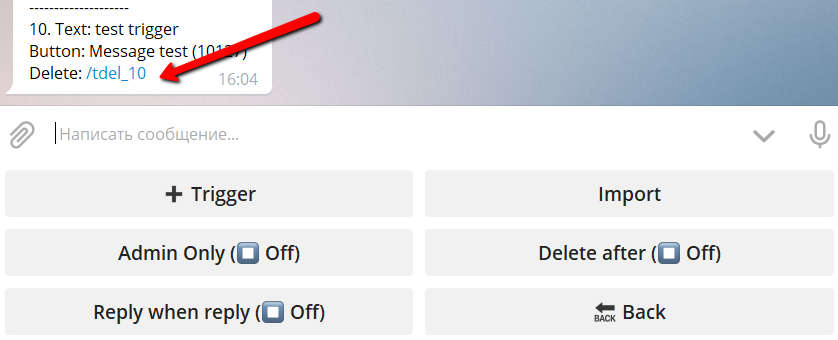
Delete the trigger
To delete the trigger in the trigger list click the trigger delete command:
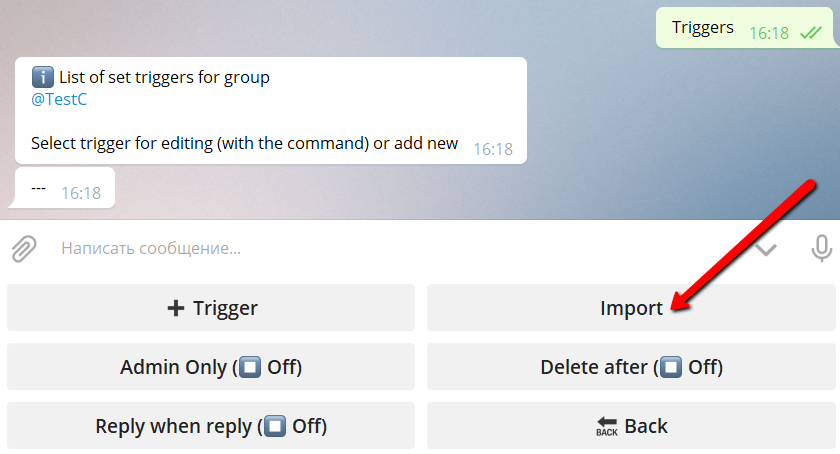
How to import triggers
If you want to use the same set of triggers (subset of triggers) in several groups you can import trigger to the group from another group.
1. Select group
Enter into the edit mode of the group, to which you want to import triggers.
2. Click "Import"
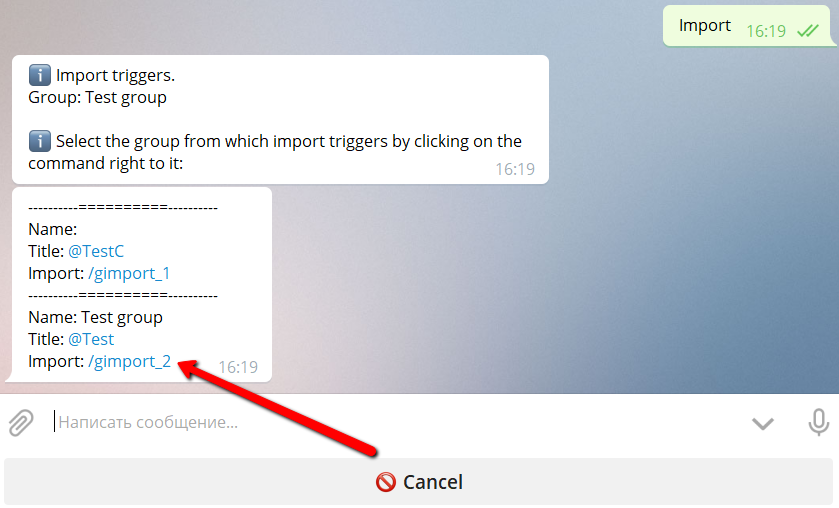
3. Select the group
Select the source group by clicking the group select command:
4. Select triggers to import
Select triggers to import by entering their numbers separated with commas:
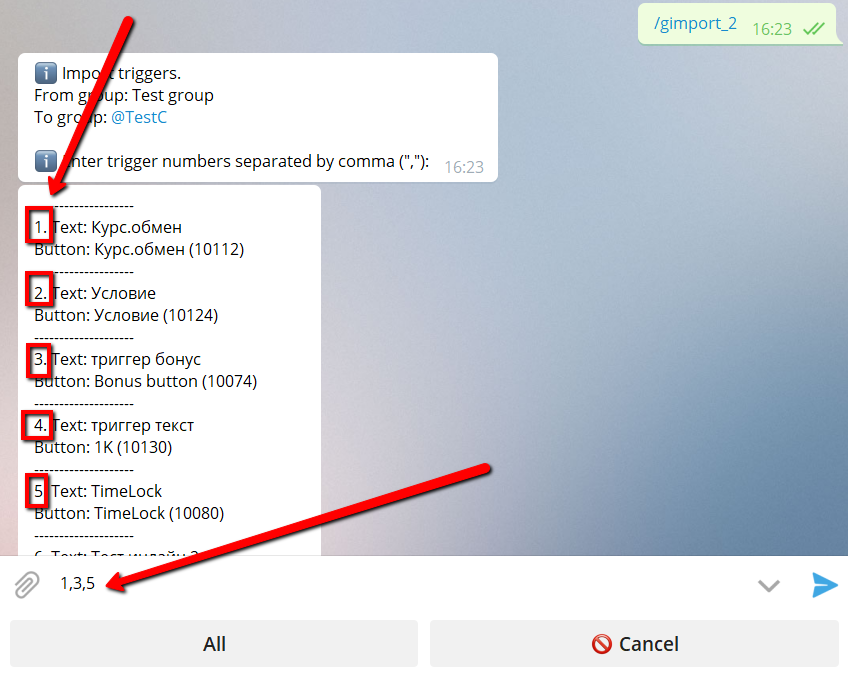
If you want to import all triggers - use button "All".
Now the same triggers exist in a new group.
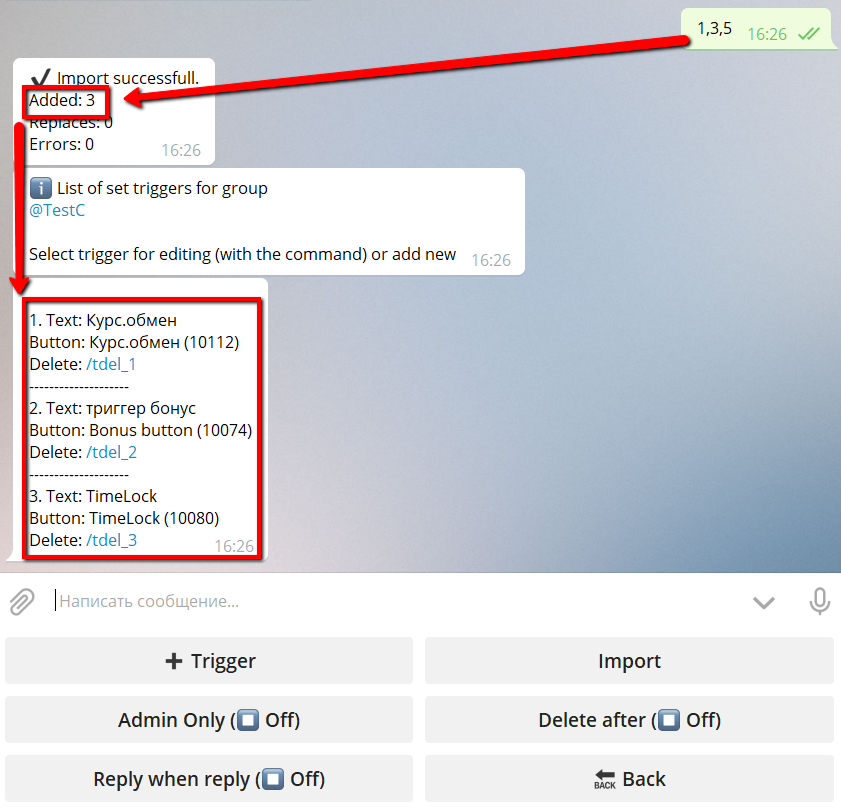
During import triggers with new text will be added. Triggers with the same text will be replaced.
Special trigger features
*️⃣ In the messages that are shown by triggers inline buttons are now also supported. Supported types: URL, PopUp.
*️⃣ "Trigger by presence". If the trigger starts with "!", for example, "!bonus", it will be searched "by presence" and will work on phrases like "how to get bonus". Messages, triggered by "!" triggers will not be deleted independently from the option "Delete".
Special triggers
There are set of special trigger commands for service needs.
*️⃣ t (one letter "t"): will send all available in the group triggers. The message will automatically be deleted after any trigger will be posted.
More special commands will be added later.
How to get more triggers
To get additional triggers go to:
🔐 Admin
* 🧩 Extensions
* 📂 Channels and Groups
* More triggers
Additional triggers belongs to the bot forever and can be added to any group of this bot.
I.e. if you add 10 triggers, you can use 5 of them in group 1 (15 triggers: 10 base + 5 additional), 3 of them in group 2 (13 triggers: 10 base + 3 additional) and 2 of them in group 3 (12 triggers: 10 base + 2 additional).
Once additional triggers are purchased, they will never disappear. If you delete additional trigger from the group or if you delete the whole group - additional triggers become free and can be used again in another group.
Antispam for groups
What is antispam
Antispam is... antispam. 🙂 Your bot can protect your group from spam.
To set up antispam click "Antispam" in the group edit menu. Antispam options are configured for every group individually.
Antispam will never react on group admins' messages! If you want to test antispam - use non-admin account. :)
Antispam options
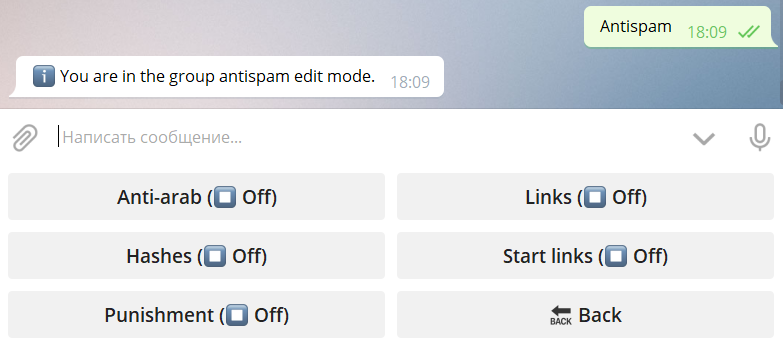
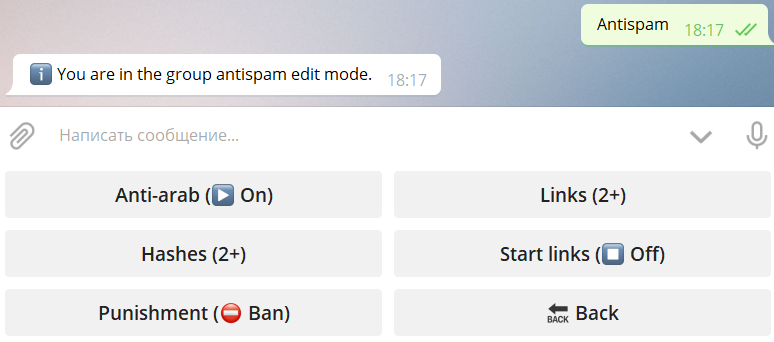
Anti-arab (▶️On/⏹Off) - defines, if the bot will idetify as spam messages with arabic text (▶️On).
Links (⏹Off/1+/2+/3+) - defines, if the bot will identify as spam messages with the given number of links (1+ - one or more links, 2+ - two or more, 3+ - three or more). ⏹Off - any number of links allowed.
Hashes (⏹Off/1+/2+/3+) - defines, if the bot will identify as spam messages with the given number of #hashes (1+ - one or more hashes, 2+ - two or more, 3+ - three or more). ⏹Off - any number of hashes allowed.
Start links (▶️On/⏹Off) - defines, if the bot will idetify as spam messages with bot start links (referral links etc., ▶️On).
Pinishment (⏹Off/⛔️Ban/❌Kick) - defines, what to do with spamers: nothing (just delete messages), Ban (read-only) or Kick (remove from group).
Well protected group will look like this:
We will add more functions for the groups in @MenuBuilderBot bots. Stay tuned.

All @MenuBuilderBot tutorials
https://telegra.ph/All-MenuBuilder-Tutorials-06-29