MIUI Unlocking Bootloader, Flashing Recovery & Rooting Process
Sharifuzzaman ShafiFirst of All, these are my knowledge which was gained through hard reading from XDA Developers Forum, GitHub, reddit, different websites & watching YouTube Videos.
DISCLAIMER:
Here, I will explain all the process of unlocking Bootloader, Flashing Recovery & Rooting Your Xiaomi Phone, though the general idea is the same, so you can read it from TOP TO BOTTOM because you can use this knowledge FOR ANY ANDROID PHONE GENERALLY. Here, I also explained ALL THE PROBLEMS YOU MIGHT FACE WHILE DOING THIS, AND HOW TO GET OUT OF THOSE PROBLEMS, BECAUSE XDA THREADS AND YOUTUBE VIDEOS DOES NOT ANSWER YOUR PROBLEMS IN ONE THREAD OR IN ONE VIDEO, ONLY WHILE DOING IT, WE FIND THAT, DOING THESE WEREN'T SO EASY LIKE YOUTUBE VIDEOS OR XDA THREADS :)
AND PLEASE DO NOT TAKE IT FOR GRANTED, DON'T SHOW YOUR SASSY ATTITUDE TO ME, BECAUSE OF GETTING ALL THESE READYMADE, YOU WILL NEVER KNOW THE SLEEPLESS NIGHTS BEHIND IT AND THE PAIN I ENDURED.
AND OF COURSE, DO THESE ON YOUR OWN RISK, IF SOMETHING HAPPENS TO YOUR DEVICE AND YOU BLAME ME, I WILL LMAO AT YOU.
REQUIREMENTS: 1. PC/LAPTOP 2. PENDRIVE WITH OTG CABLE (FOR PRECAUTION, GO TO STEP 4.3 TO LEARN WHY)
Step Number 01: Backup All Your Data:

YOU HAVE BACKUP ALL YOUR DATA, INCLUDING APP DATA, GALLARY PHOTOS, ALL OF THEM BECUASE UNLOCKING BOOTLOADER WILL RESET EVERYTHING, IT WILL START FROM THE MOMENT WHEN YOU BOUGHT YOUR PHONE FIRST & SWITCHED IT ON.
STEPS:
1. To Backup All Your Data-
a. Go to settings "backup and restore" in additional setting (or in MY DEVICE - BACK UP & RESTORE)
you can use either mobile or computer backup, both are same, after backing up, transfer it to computer.
b. Backup your contact from "contacts" (optional, because "step a" includes this)
c. Then connect your phone with your pc & backup all the necessary files, for example, create a backup of these folders:
i. DCIM
ii. Download
iii. Pictures
iv. MIUI (Gallery, recorder etc.)
e. Shareit, vidmate folder
f. Whatsapp folder (you can also backup it in google, goto SETTINGS - CHATS - CHAT BACKUP)
g. and others as per your necessity
My process is a manual process, so no app is required.
READ IT: in internet, you will find that you can use rooted app to backup these, like TITANIUM, or take a NANDROID BACKUP (SYSTEM AND APPS) USING TWRP RECOVERY, my boy, listen well, you haven't yet unlocked your bootloader, how can you have a rooted device and twrp recovery? (well you can have a rooted device but that also requires unlocked bootloader which will reset everything on your phone)
Step Number 02: Unlock Your Bootloader

STEPS:
1. Enable developer option by clicking on MIUI version 7 times
2. from "Additional setting", go to "developer option". there, do these:
a. enable OEM UNLOCKING
b. in device unlocking, add your MI account. if shows problem or error,
remove your MI account then add it again from device unlocking, (NOT FROM MY DEVICE, ADD ACCOUNT) then, it will take you to main settings, just come back and click add again, it will work in Sha Allah.
c. now in your pc, download MI Flash Unlock from official MI website, HERE (better to install the latest)
d. Unzip it, run it using "batch_unlock", add your mi account
e. in additional settings again, in developer option, enable "USB DEBUGGING"
f. now in pc, connect your phone in fastboot mood, (swithing off then holding power button and volume down will take you to fastboot mood, there is another process of going to fastboot mood, which is described in step 3)
g. if your device is recognized IN MIUI UNLOCK TOOL but after connecting it in miui unlock tool, fastboot mood turns of and says "PRESS ANY KEY TO SHUTDOWN" in your phone, you may try swithing to USB port 2 but it didn't work for me. Instead, I ran this bat file code "AS ADMINISTRATOR" from XDA developer forum, you can do it too. I renamed it as "a.bat" first thing to come it my mind. then disconnect USB and connect again in your fastboot mood. Click Refresh in unlock tool.
(OR, IF YOUR DEVICE IS NOT RECOGNIZED IN MIUI UNLOCK TOOL, FOLLOW THESE:
- remove MI account from unlock tools and again add, if password shows error even after typing correctly, use phone number and pass to log in, in stead of email and password. Check if device if recognized or not.
- If not, try these, Download MIUI Flash Tool and unzip it, run XiaoMiFlash.exe. At the top line, find DRIVER, install all DRIVERS.
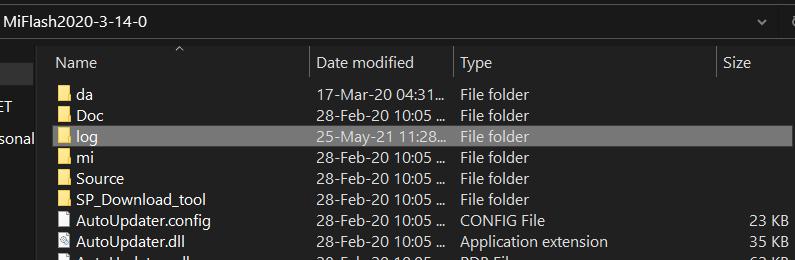
IF YOU FACE LOG FILE ERROR,
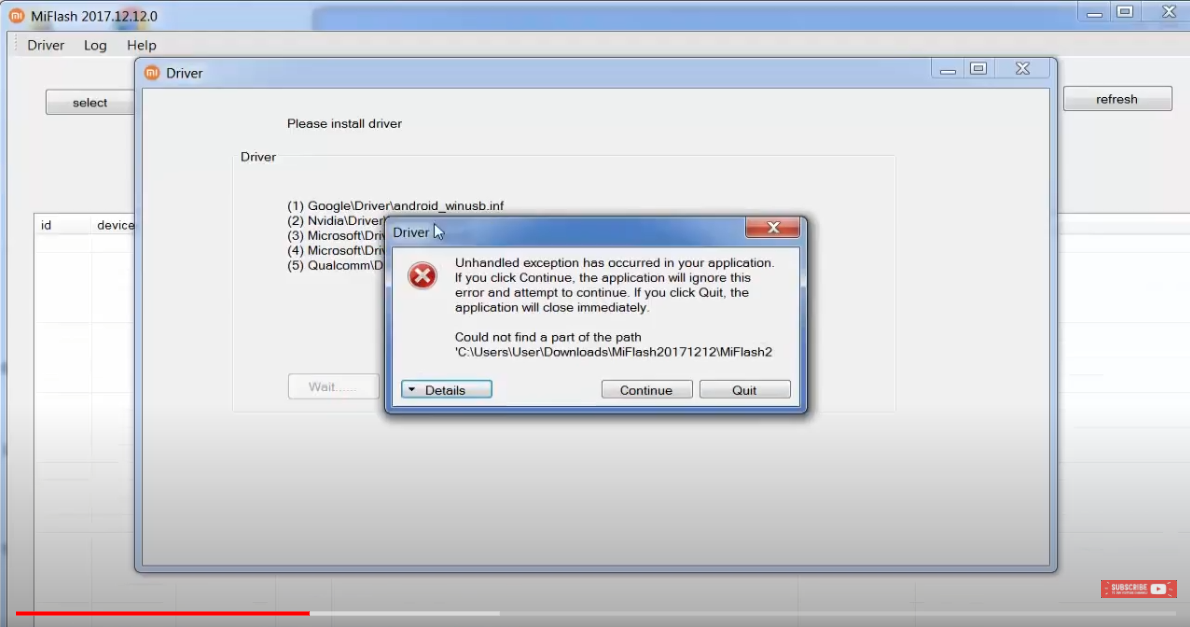
SOLUTION: JUST CREATE A FOLDER NAMED "log" in the same directory. DONE, YOUR DRIVER WILL BE INSTALLED, CLICK YES EVERY TIME, THEN CONNECT YOUR PHONE WITH MIUI UNLOCK TOOL AND CLICK REFRESH.
g. your device will be shown in "batch_unlock" in sha Allah. Click unlock. Remember, your phone will loose all data, just full factory reset.
h. after 99% it will show "unlock sign" at the top of your phone, and your phone will reboot, just let it reboot. It will take at best 12 minutes to reboot. Don't worry, seat tight, watch a YouTube Video of Dr. Zakir Naik or Ahmed Deedat Sir <3.
i. setup your phone as if it's a new device. (it is necessary, because after this, we will flash recovery and root your phone, because it is really important to take a backup of your original "PERSIST.IMG" . it is possible for rooted device only. (though it can be done through recovery, but from magisk, it's the best way and safest).
j. you can restore all backup from your pc now. (not necessary, if you want to change ROM)
Step Nmber 03: Install ADB (PC) & TWRP RECOVERY (Android)
STEPS:
1. download latest SDK from OFFICIAL WEBSITE.

2. name of the download will be "platform-tools_r31.0.2-windows.zip" unzip it in DESKTOP (IMPORTANT). it's name will be "platform-tools", open it. (ADB COMMAND WILL RUN ONLY IN THIS FOLDER.
ALTERNATIVE ADB: you can also do it by one click adb installer, just install the file, and cmd will work at any position. File is given in the telegram, in my .rar file. But sometimes it shows problem, adb command is not recognized by the windows. then, above platform tools folder is useful as it always works.
3. downlead latest TWRP specific for your device from HERE. website guide: >find your device name> device model> Download Links > click either "Primary (Americas)" or "Primary (Europe)" or you can download them from XDA too (XDA process: search in google "TWRP for MI 9 se (your specific device with model number, not Mi9SE) XDA" then, go to the thread, below you will find GITHUB or any other download link, go there and you can download it from there.
4. (YOU CAN IGONORE THIS STEP, LET ME KNOW IF YOU FACED ANY PROBLEM, THOUGH YOU SHOULDN'T) rename the twrp file to twrp.img (not necessary though, check if your device extension is hidden or not, if hidden, you will not see any extension after any file, in that case, you can just rename "twrp" because img extention is already there and it's hidden. How to check hidden extention: in that folder, go to view at the top of the screen of that folder, (at beginning - beside cross, minimize then click "view"> click "option" in one row down, at extreme right side of it > click "view"> in downwards, untick "hide extensions for known file type"> click "apply">click "ok" then close it.)
5. keep the "twrp.img" (the file you downloaded, no need to rename, .img will show depending on unhidden condition) in the "platform tools" folder.
6. now go to "platform tools" folder. it's better to keep the folder in "desktop". go to the folder address, it is above the "Name, Date Modified, Type, Size" row, where it is written all the folders name that you have clicked to come to this folder. Now, click on the folder address, write "cmd", hit enter.
7. now connect your phone making sure "USB DEBUGGING IS STILL ON" because after unlocking bootloader, it will automatically be set to OFF.
write these commands: (after each command hit enter)
adb devices (it will show your device number if it is connected properly, if shows unauthorized, g0 to your phones home screen, disconnect and connect the usb again, in cmd write adb devices, a permission will pop up in your phone at bottom, not in notifications, click YES, your device will be authorized)
adb reboot bootloader (it will take you to fastboot mood instantly)
fastboot devices (it will show your device number it it is connected properly, to make sure it is still connected)
fastboot flash recovery (give space after recovery, then drag the twrp.img file here)
fastboot boot (give space after boot, then drag the twrp.img file here, your phone will boot into recovery.) ALTERNATIVE TO THIS STEP: fastboot reboot (it will reboot, but stop it instanlty by holding "power and volum up button", it is a must, it will take you to twrp manu, if you don't go now, later twrp will be removed by your phone)
AND OF COURSE, YOU HAVE TO ROOT YOUR PHONE RIGHT NOW, EVEN IF YOU DON'T WANT IT, CAUSE IF YOU DON'T, YOUR PHONE WILL REMOVE TWRP AS YOUR RECOVERY.
8. you will see twrp screen, then asking you "to keep system files as read only or swipe to allow modification, tick in DON'T SHOW AGAIN AND SWIPE TO ALLOW MODIFICATION". Then it will ask for a password to decrypt your phone, give the password to decrypt your phone. (to learn about encryption decryption, go to step number 4.3).
IF YOU FACE BOOTLOOP OR ANY OTHER ISSUE LIKE TWRP RECOVERY IS NOT STARTING AS IT SUPPOSED TO:
Again, go to fastboot mood by pressing power + volume down button. Download this vbmeta file. Go to platform tools > cmd > type
fastboot --disable-verity --disable-verification flash vbmeta (space, then drag the vbmeta file and hit enter, then follow step number 3.7
(3 is step number, 7 is the point number under step number 3)
Step Number 04: Install Magisk
STEPS:
1. you should stay in TWRP manu from the last step of STEP NUMBER 3 and your phone is connected with your computer via USB.
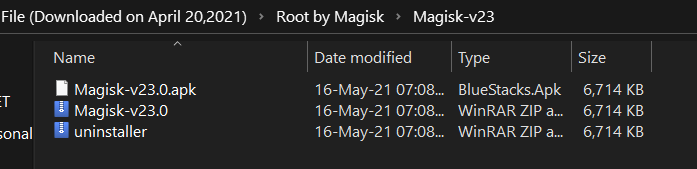
2. In your computer, download MAGISK FROM OFFICIAL GITHUB PAGE . Copy the magisk.apk and paste it twice in the same folder, now you have three magisk apk, rename the second one removing the "copy from name and just add .zip in stead of .apk at last. Rename the third one as this: "uninstaller.zip"
3. Now listen carefully, this is very important part of this topic:
your phone has two state: a. encrypted b. decrypted
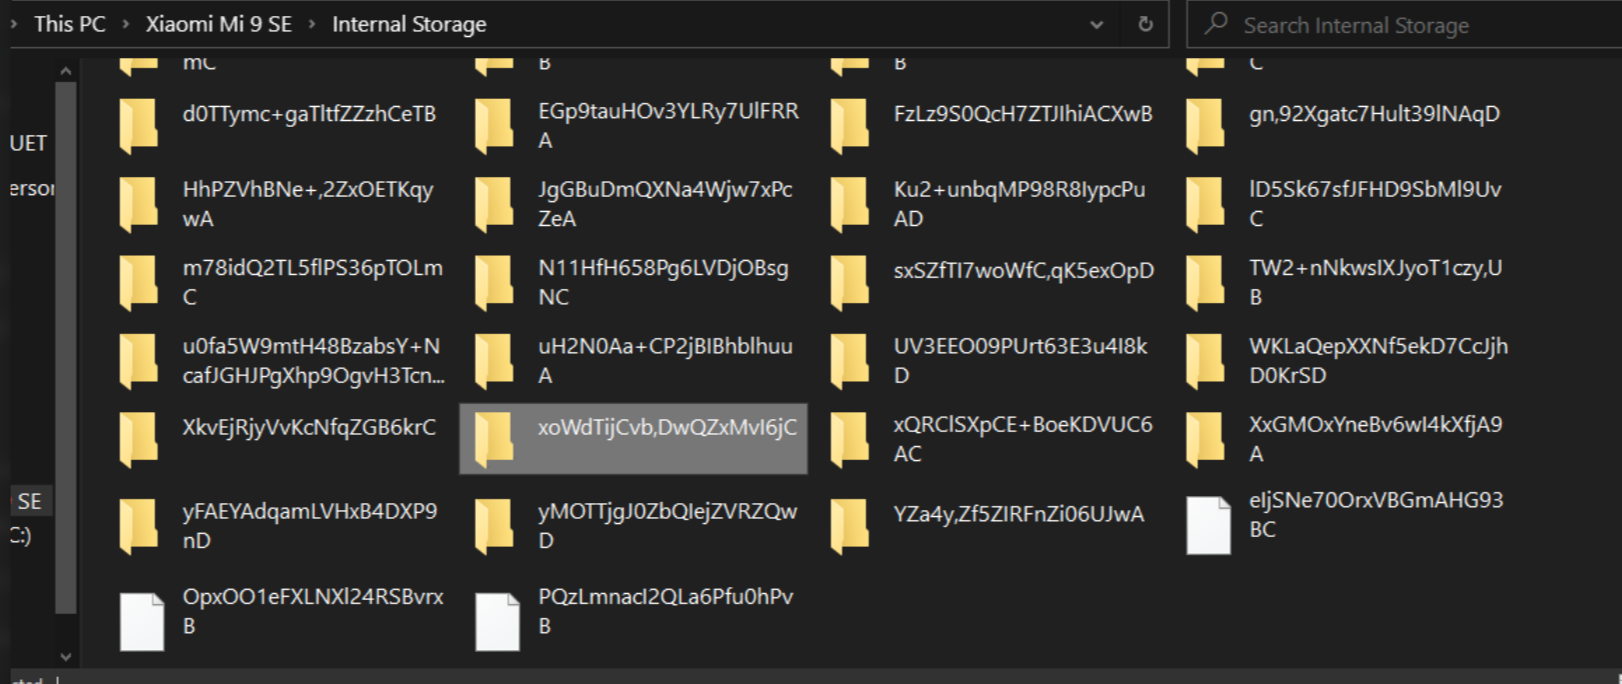
a. IF ENCRYPTED AND CAN'T BE DECRYPTED THROUGH TWRP, that is TWRP IS NOT ASKING PASSWORD AT THE BEGINNING TO DECRYPT YOUR PHONE, THEN: some china rom's security is so encrypted, LIKE MY MI9SE, THAT TWRP CAN'T DECRYPT IT, EVERYTIME I HAVE TO RESET THE PHONE TO DECRYPT, IN THIS CASE ,YOU CAN'T ACCESS YOUR PHONE'S INTERNAL STORAGE NEITHER FROM TWRP NOR FROM PC (TWRP ACTS AS MTP, MEDIA TRANSFER PROTOCOL, MEANING YOU CAN TRANSFER FILE BETWEEN PHONE AND ANDROID IN RECOVERY MOOD), SO YOU CAN'T ACCESS YOUR INTERNAL STORAGE, YOU CAN'T INSTALL MAGISK. HERE, PENDRIVE WITH OTG COMES HANDY. Disconnect your phone Keep those three files in pendrive and connect it in OTG with your phone. go to twrp > install > select storage at bottom > select pendrive > select magisk.zip > swipe to flash. CONGRATULATIONS, YOUR PHONE IS ROOTED.
b. IF YOUR PHONE IS DECRYPTED BY TWRP AFTER GIVING PASSWORD:
Copy those three magisk file from your computer and drop it in your phones internal storage. go to twrp > install > select magisk.zip > swipe to flash. CONGRATULATIONS, YOUR PHONE IS ROOTED.
4. Reboot Your Phone (If your phone is bootlooped, which never happened to anyone I know, still for safety, again go to recovery by holding POWER + VOLUME UP BUTTON. go to twrp > install > select uninstaller.zip > swipe to flash. This will uninstall magisk from your phone and then reboot to system, your phone will reboot normally.)
5. A Magisk app will be shown among your apps which is not like magisk logo. Don't touch it, Goto file manager, find those three magisk files, one file is the original magisk.apk file you downloaded, install it normally like any other app.
6. CONGRATULATIONS, YOUR PHONE IS COMPLETELY ROOTED.
Step Number 05: Backing up your PERSIST.IMG (MOST IMPORTANT)
- You will know from my other threads about what is persist partition of your phone. But let's just back it up now without knowing it. Copy it to your computer, cloud so that you never loose it.
- Assuming you still have your phone connected through usb to the computer.
- Install TERMUX from playstore or from HERE if you don't have play store.
in termux, type su to obtain root permission. A pop up will be shown to grant root permission, if it doesn't work, leave termux app, go to magisk app, at bottom, you will be 4 options, click the second one, you will see this screen.

grant super user permission for termux from here.
4. again go to termux, type this:
su (hit enter)
dd if=/dev/block/bootdevice/by-name/persist of=/sdcard/persist.img (hit enter)
5. your persist.img is backed up in your internal storage.
6. you can transfer it to pc manually or
use this process because it is relatively safe, though I never found any difference,
go to platform tools in cmd, type this:
adb pull /sdcard/persist.img D:\
it will take around 10 seconds, you will find the file persist.img in your PC's D drive folder, whatever the name is, the next folder to C drive, okay? Copy the persist.img wherever you want to keep it. I am again saying, it's not mandatory to do it in this way, just do normal copy paste from your phone's internal storage to your PC, it will do the work.
THANK YOU GUYS FOR READING IT ATTENTIVELY, FROM TOP TO BOTTOM, AND IF YOU DIDN'T, WELL, F*** OFF. IT TOOK MORE THAN 30 DAYS TO ACQUIRE ALL THESE KNOWLEDGE AND YOU ARE GETTING IT WITHOUT ANY EFFORT, FREE, WHAT MORE DO YOU WANT?

CONTACT ME: TELEGRAM
THIS SAME THREAD IN XDA FOR BETTER VISUAL.
My Other Threads (in XDA) according to "how should you read them" serial:
1. MIUI 12.5 Chinese ROM Google PlayStore Stopped Working
2. MIUI Unlocking Bootloader, Flashing Recovery & Rooting Process (This Thread), SAME THREAD IN TELEGRAM
3. Android Terminology You Must Know Before Toying with Your Android, SAME THREAD IN TELEGRAM
4. ROM Naming & CUSTOM ROM, AOSP ROM, TREBLE ROM, GSI ROM, PORTED ROM , SAME THREAD IN TELEGRAM