Combot: a guide to the Announcement Scheduler
Combot
English / 中文 / हिन्दी / Español / Français / العربية / Русский / Português / Bahasa Indonesia / Deutsch / 日本語 / فارسی / Tiếng Việt / 한국어 / Türkçe / Italiano / বাংলা / தமிழ் / Nederlands / Bahasa Melayu / Azərbaycan dili / O‘zbek / Հայերեն
Hi! Announcements in Combot are designed to automatically post to chats and channels. The announcements functionality is currently in beta testing; it is free and does not require a Combot subscription.
To use announcements, you need to:
- Add @combot to a chat or channel.
- Go to the control panel at combot.org.
- Select the "Scheduler" section in the header of the site.
- Create an announcement and select the chats and channels where you want to post them.
Please note that @combot will be able to publish posts even if it does not have administrator rights in the chat (of course, this is possible only if your chat does not restrict message posting to non-administrators). The bot must have admin rights in the channel in any case; otherwise, you will not be able to add it to the channel.
In addition, if you use certain settings, like pinning a message, the bot will also need permissions to do so - most often, in supergroups, only an administrator can pin. Therefore, we recommend that you always add @combot as an administrator to avoid the frustration of something in the announcements not going as you planned.
If, for some reason, the bot doesn't have the rights to pin, for example, the post will still go out but won't be pinned.
Announcements collaboration system
To understand how the sharing system works, it's essential to know the following:
- Created announcements are tied to the chats for which they are created. Each administrator of the chat or channel specified when creating or editing an announcement will see them in their list. Other chats or channels where the user does not have administrative rights will not be displayed.
- Only users who have the same administrative rights (or more) as the creator of the announcement can edit the announcement.
Example:
I administer chats 1 and 2, as well as channel 3. I have created a common announcement for all of them. All administrators of chats 1, 2, and channel 3 will see it in their lists when they log in to the announcements control panel. However, only those among them who are also administrators in chats 1, 2, and channel 3 will be able to edit it.
Additionally, my boss, the lead community manager of the project, who is an administrator of channels 4, 5, and 6, as well as chats 1, 2, and channel 3, will also be able to see and edit my announcement. His administrative rights cover all the chats and channels I specified when creating the publication.
Announcements settings
Announcement title: The announcement will be saved in your list under this name. You can call it anything you want, as long as it allows for easy navigation through the names later. We recommend specifying in the name some important parameters that you want to see immediately in the list of announcements, without needing additional clicks or taps.
Example: Scheduler Announcement (all Combot chats, pin), no weekends, stop at 11.05
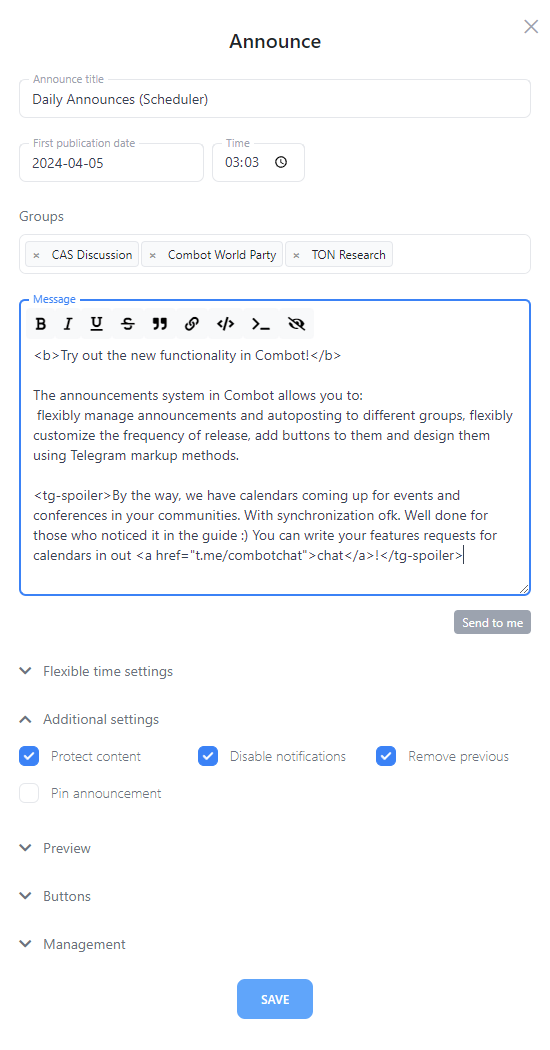
First publication date: The date when the announcement will be published for the first time, or the only time, if you have not configured recurrence.
Please note that the date is set in DD.MM.YYYYY format.
Time: The time of publication is displayed in the 24-hour format. The time is shown locally, based on your browser settings. Other administrators will see the time adjusted to their local time zone. So, if you create an announcement for 16:00 and your local time is GMT+5, another administrator in the GMT+2 zone will see it as 13:00. This will also affect the displayed date if it changes as a result of converting to a different time zone.
Groups: Here, you can select the groups and/or channels where the announcement will be posted. In the selection menu, all chats and channels to which Combot has been added will be available to you, including those you have hidden from your chat list.
You can specify a total of up to 20 groups or channels. This limit may be increased in the future if necessary.
Message: In the message field, you can enter your message. The maximum length is 4096 characters, including markup tags. All markup supported by Telegram is available.
Additionally, there is a button for preview and testing. It sends the text of the announcement with the current markup to you in private messages from @combot. It includes some additional customization such as buttons.
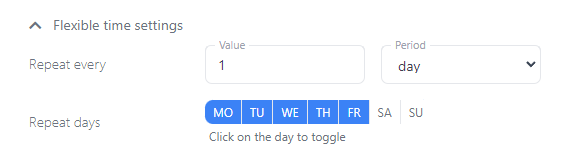
Flexible time settings: Here, you can establish a flexible release schedule for your announcement. You can customize the frequency of release. Additionally, you can select the days of the week on which the announcement will be published.
Example: you can set the announcement to be released once a day, only on weekdays from Monday to Friday. In this scenario, the announcement will be published at the time you specify in the Time settings and will repeat daily at the same time, excluding Saturdays and Sundays.
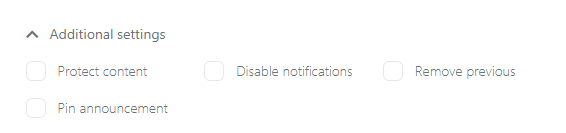
Additional settings: Here, you can manage several advanced publishing settings:
- Protect content disables the ability to share a post or copy its text, regardless of the chat or channel settings. However, it's still possible to take a photo or screenshot of the post, so it's not advisable to post "top secret" information in this manner.
- Turning off notifications makes the posting "silent," even for those who have not muted notifications in a chat or channel.
- Deleting a previous announcement removes the prior publication of the same announcement. Note that this action only affects the specific announcement and not others released via Combot.
- Pinning a post automatically pins the post to a chat or channel. Of course, to pin a post, the bot needs the appropriate permissions in the chat; if it has administrator rights, it likely already possesses them.
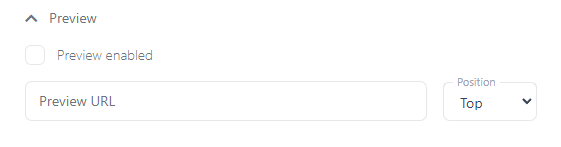
Preview: Here, you can insert an individual link and choose its display position: either at the top or bottom of the main text. Note that by default, the preview for links inserted in the announcement is disabled.
To enable it, you need to insert a link (any link, not just the one mentioned in the text) into this section of the settings.
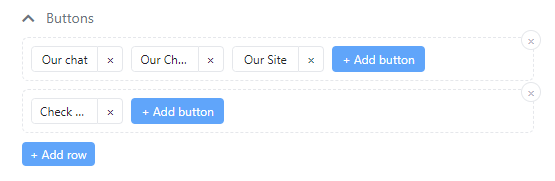
Buttons: You can attach buttons with links to the publication. Up to 20 buttons are allowed, and they can be arranged in multiple rows or columns. Note that the text on the buttons will be compressed depending on the user's screen resolution; thus, placing more than four buttons in a single row is probably a bad idea, unless you include a smiley or another text symbol in the button's text description.
Other types of buttons, such as captcha in the welcome message, are not yet supported.
Management: here you can pause the publication of the announcement.
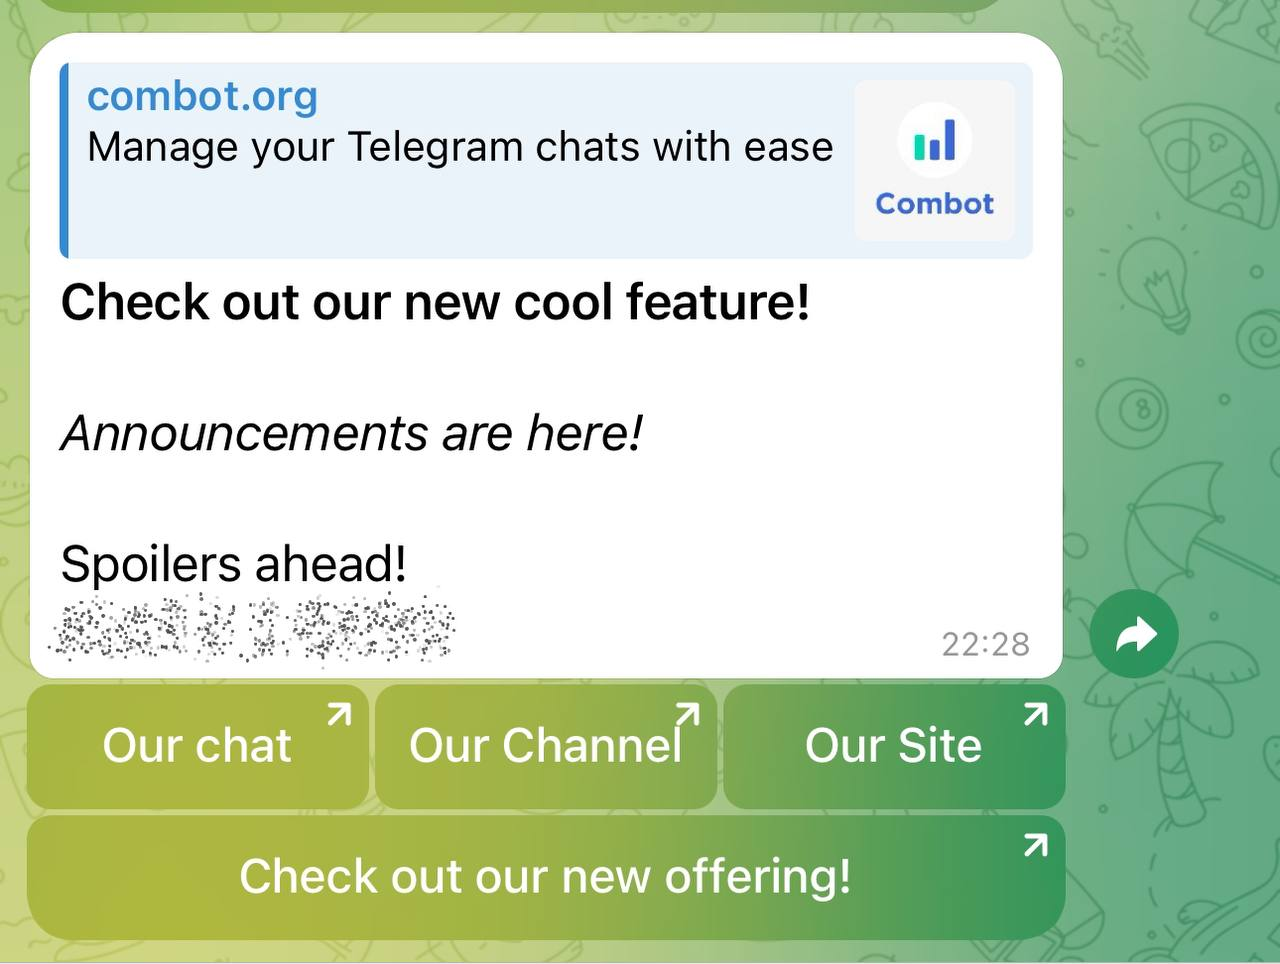
The final publication might look like this, for example: it uses bold text, spoilers, italics, places the link preview at the top, and includes four buttons - three in the top row and one in the bottom row.
Schedule/Announcement list
In the general list of announcements, you can select the type of display for the announcements, either as a list or in calendar form by dates. You can see basic information about them, including the number of groups, frequency, dates, and other details. From here, you can also pause announcements, edit them, or delete them.
That's all folks!
You can send your wishes, comments, and questions about the announcement system to our support chat: https://t.me/combotchat
Wishing you productive work!