order block
For example, their first 20 million order would get matched with the 50 million being sold. That wouldn’t cause a sudden up-move – upsetting price – because the sell orders are still bigger than the buy orders – 20 million vs 50 million. They can then wait for the orders to pick up again before entering their next chunk.
That process – of placing one 20 million order, then another, and another, etc – results in a supply or demand zone forming, specifically, a zone from a tight range consolidation.
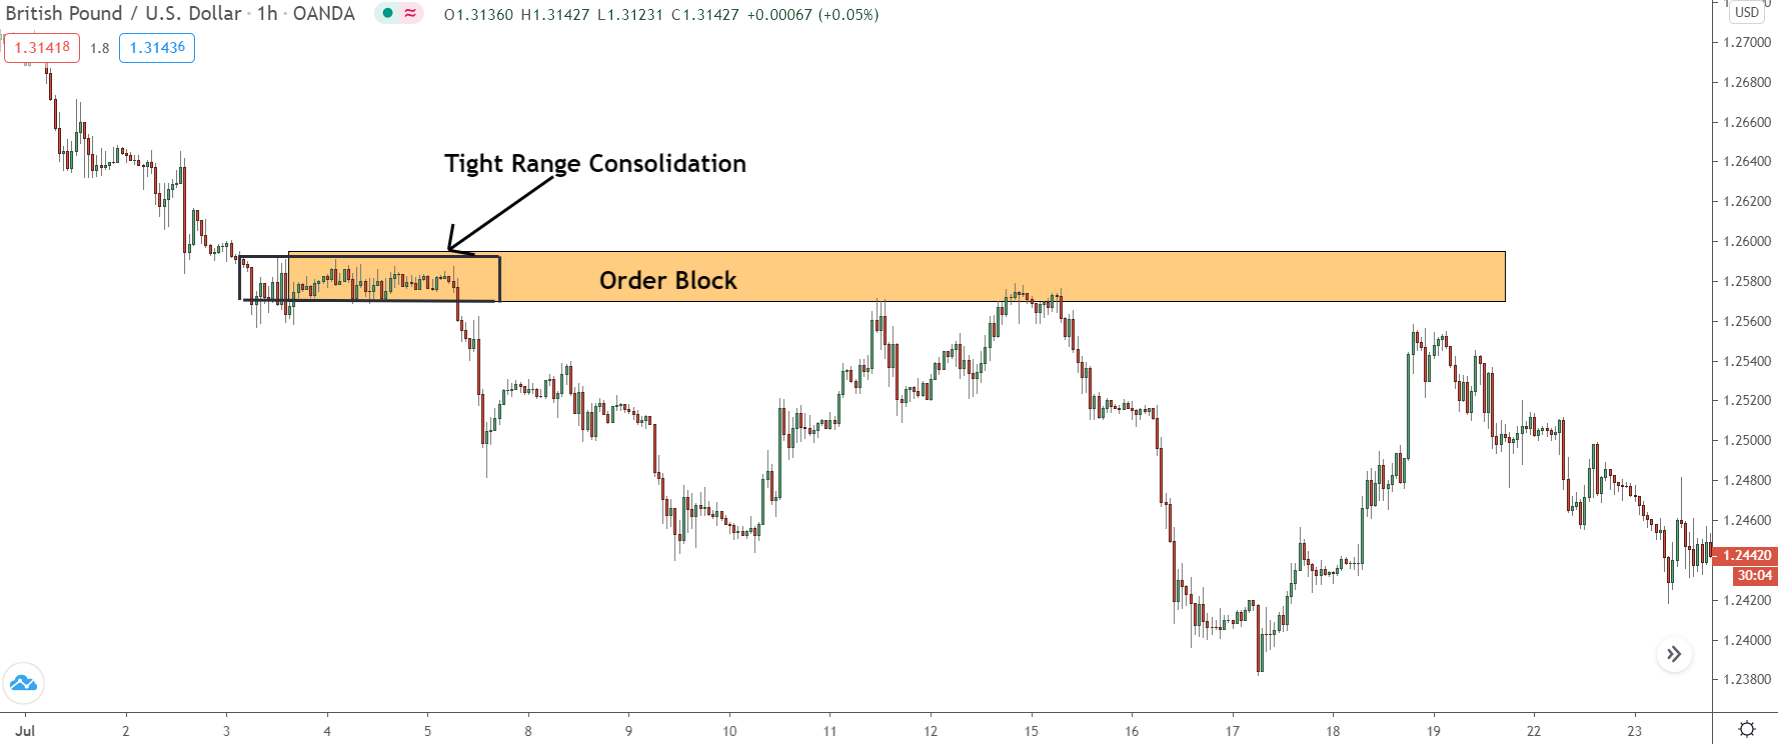
Here’s what your typical order-block zone looks like – seen these before?
Notice the zone forms when price shoots away from a tight range consolidation – a consolation contained within a small price range?
Because of how they work, order-block creates these consolidations.
The banks use order-blocks when they want to place a big position without upsetting the price. They do that by placing a bunch of small positions around similar prices; that way they achieve the same effect of placing a single large position without actually placing one into the market.
The banks placing a bunch of similar positions around similar prices causes a tight range consolidation to form; each position creates a high (or low if they’re shorting) of the consolidation.
So, before we move on, here’s a quick summary of order blocks:
Order blocks are supply and demand zones but of a different type.
They form from the banks buying or selling using a block order, which splits a big position (e.g a trade) into a bunch of smaller positions that makes it easier for the banks to buy/sell without upsetting the price.
The zones themselves are structurally identical to normal supply and demand zones. However, they ONLY form when price moves away from a tight range consolidation that acts as a base. That’s because using a block order to enter a big position means placing smaller positions at similar prices, creating a consolidation with a small range.
[the_ad id=”18640″]
How Order Blocks Are Different To Normal Supply And Demand Zones
Now that we know order blocks are supply and demand zones – just a different type – the question is, how do they differ from the normal zones we see form all the time?
Really, there are two key differences…
First, order blocks have a much higher probability of resulting in a reversal than normal supply and demand zones.
And that’s regardless of where or when they form i.e if they appear after a long rise or decline – which increases the probability of normal zones resulting in a reversal.
The reason why is because the zones are created from the banks buying or selling using a block order, which they only use when they have an especially large position to place. If they’re placing a big position, the banks obviously don’t want price to break beyond the point they bought or sold – the S or D zone.
Therefore, the zone has a high probability of causing a reversal because the banks wouldn’t place a big position unless they were very confident price was heading in the direction they want.
The other difference is how order block zones look.
In general, order blocks look identical to normal supply and demand zones – they form from a sharp rise or decline away from a base like all zones do.
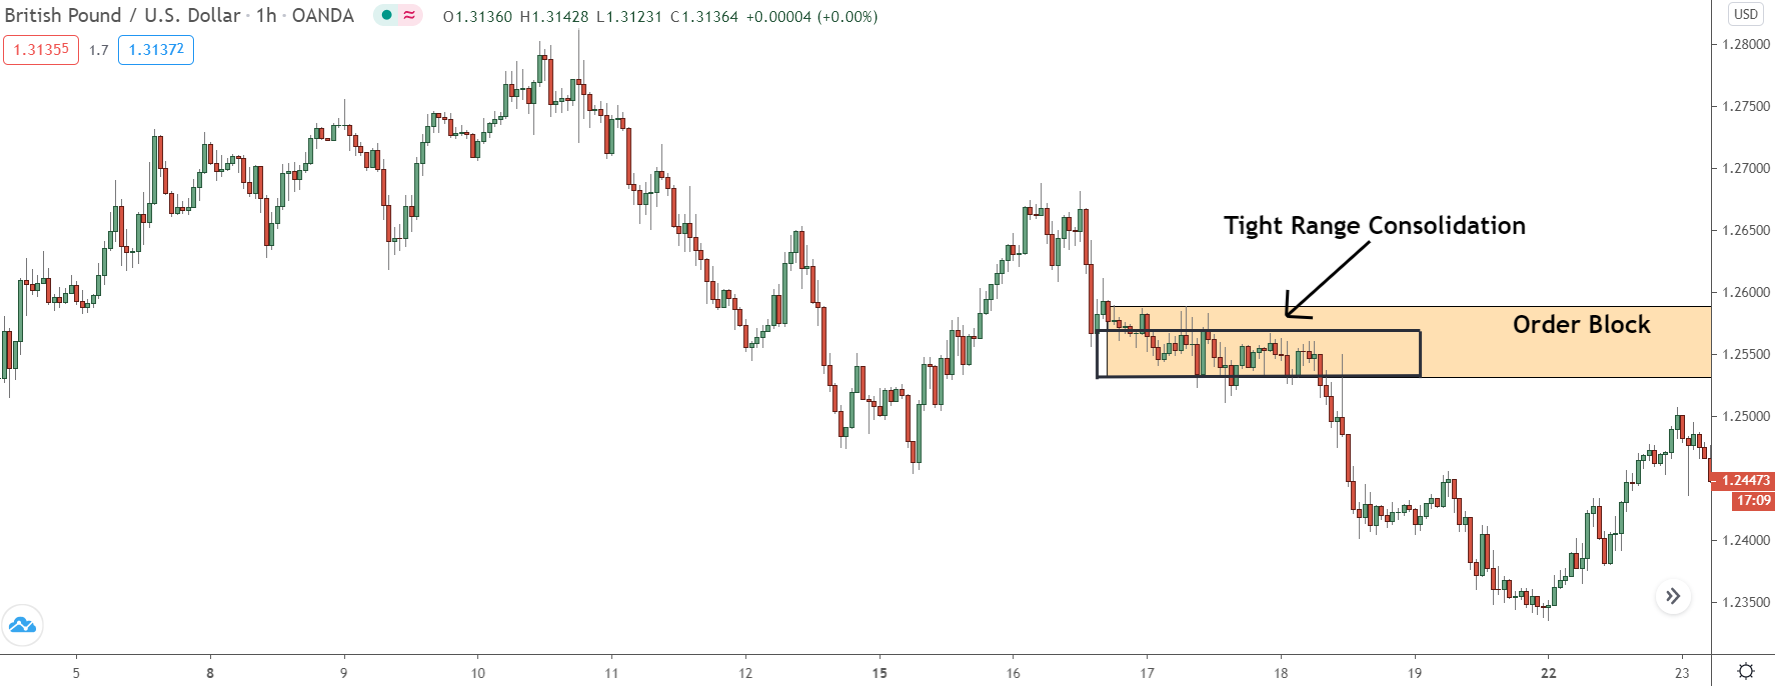
However, the base is ALWAYS a tight range consolidation, like you see below.

Unlike normal zones that form from a reversal – which you can also see above – order blocks are always created from price moving away from a tight range consolidation. Because that’s the structure that forms when the banks use a block order to place their positions into the market.
With a block order, each position gets entered at a similar price, resulting in the highs (or lows in this case) of the consolidation forming at relativity equal prices to one another.
On a chart, that creates a tight range consolidation, like as you see above.
So when it comes to identifying order block zones, all you need to do is look for a small tight range consolidation. They only form from the banks using block orders, meaning a zone MUST exist at the source.
How To Find And Use Order Blocks In Your Trading
The best way to use order-blocks is as a high probability setup to look out for alongside your main trading strategy.
Order block zones don’t form often; you can’t really use them as a single strategy.
If you use them as a setup, however, they can provide you with high probability trade signals you can use to generate additional profit alongside your core trading strategy. That’s how I use them in my trading. Supply and demand is my core strategy, which gives me most of my trades, then I have two or three setups I lookout for alongside…
Order blocks, pin bars, and the reversal pattern in my book.
They allow me to make more money, while at the same time, lower my overall risk due to the diversification they provide to my main trading strategy.
So, how do you find and use order blocks in your trading?
Since order blocks are essentially supply and demand zones – just a much rarer type – the way you trade the zones is the same as how you trade them normally:
You mark a zone on the chart…

Wait for price to enter and provide some sort of confirmation signal – pin bar, engulfing candle, large range candle.

And then place a stop on the other side of the zone and see if price moves away.
Simple.
Finding the zones is a little more difficult, but still simple with a bit of practice.
The key thing to remember is to look for a zone that forms from a consolidation created by a tight range, i.e price rising and falling between two close prices. These consolidations ONLY form from the banks placing a block order, so an order block must exist at the source and create a supply or demand zone.
Let’s go through some examples…
So, here’s what your typical order-block zone looks like.
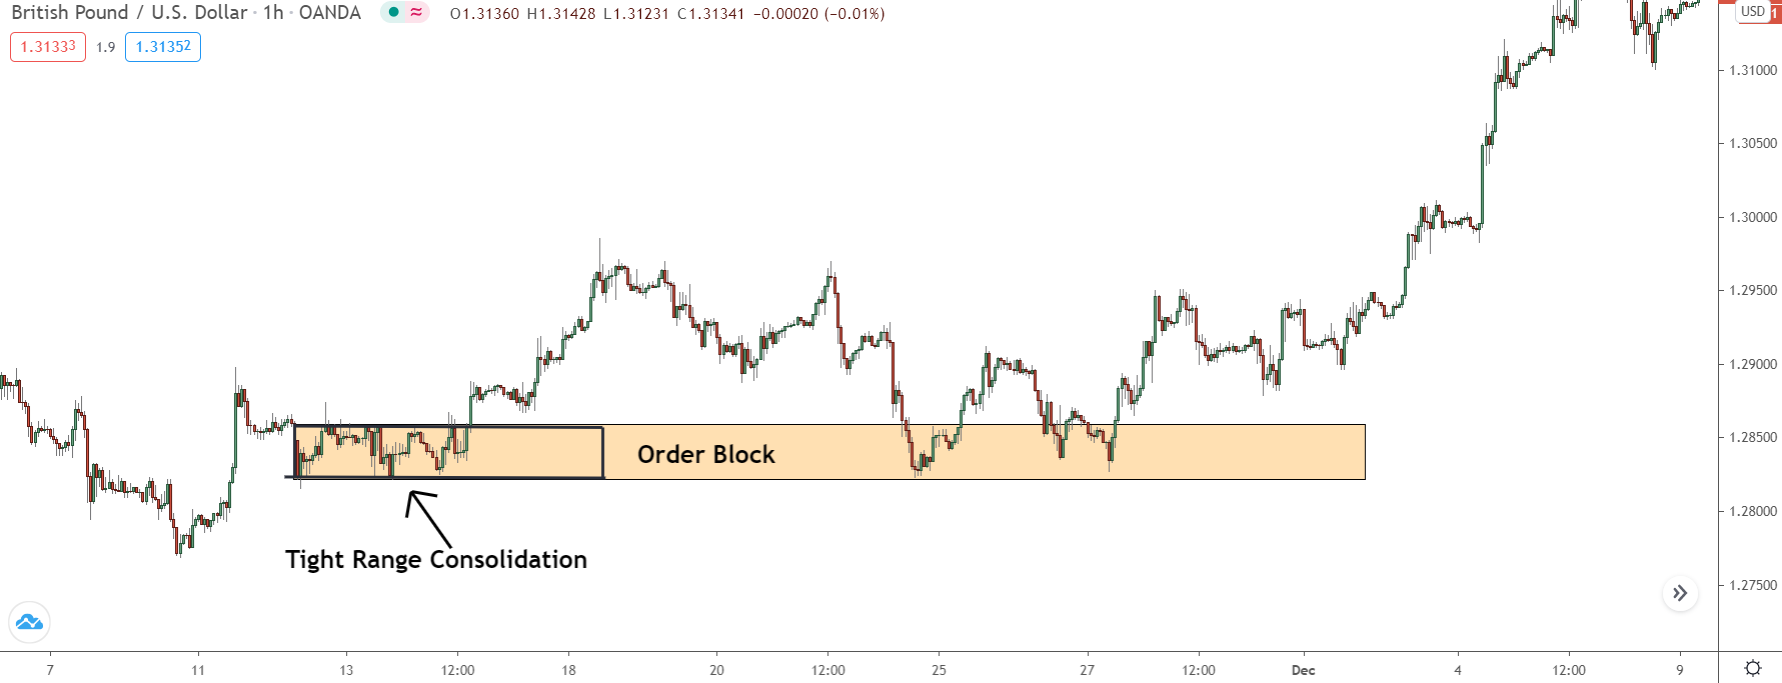
This demand zone forms from a sharp move away from a tight range consolidation. Price moves back and forth between 1.21600 and 1.22000 before breaking higher, forming the order block.
Pay attention to what this consolidation looks like, how tight it is.
It’s not your typical consolidation where price makes big swings up and down with each ending at different prices. Instead, the swings are small and terminate roughly at the same points, leading to price being contained within this really tight range that looks almost like a rectangle.
These are the sorts of consolidation you need to look for to find order blocks.
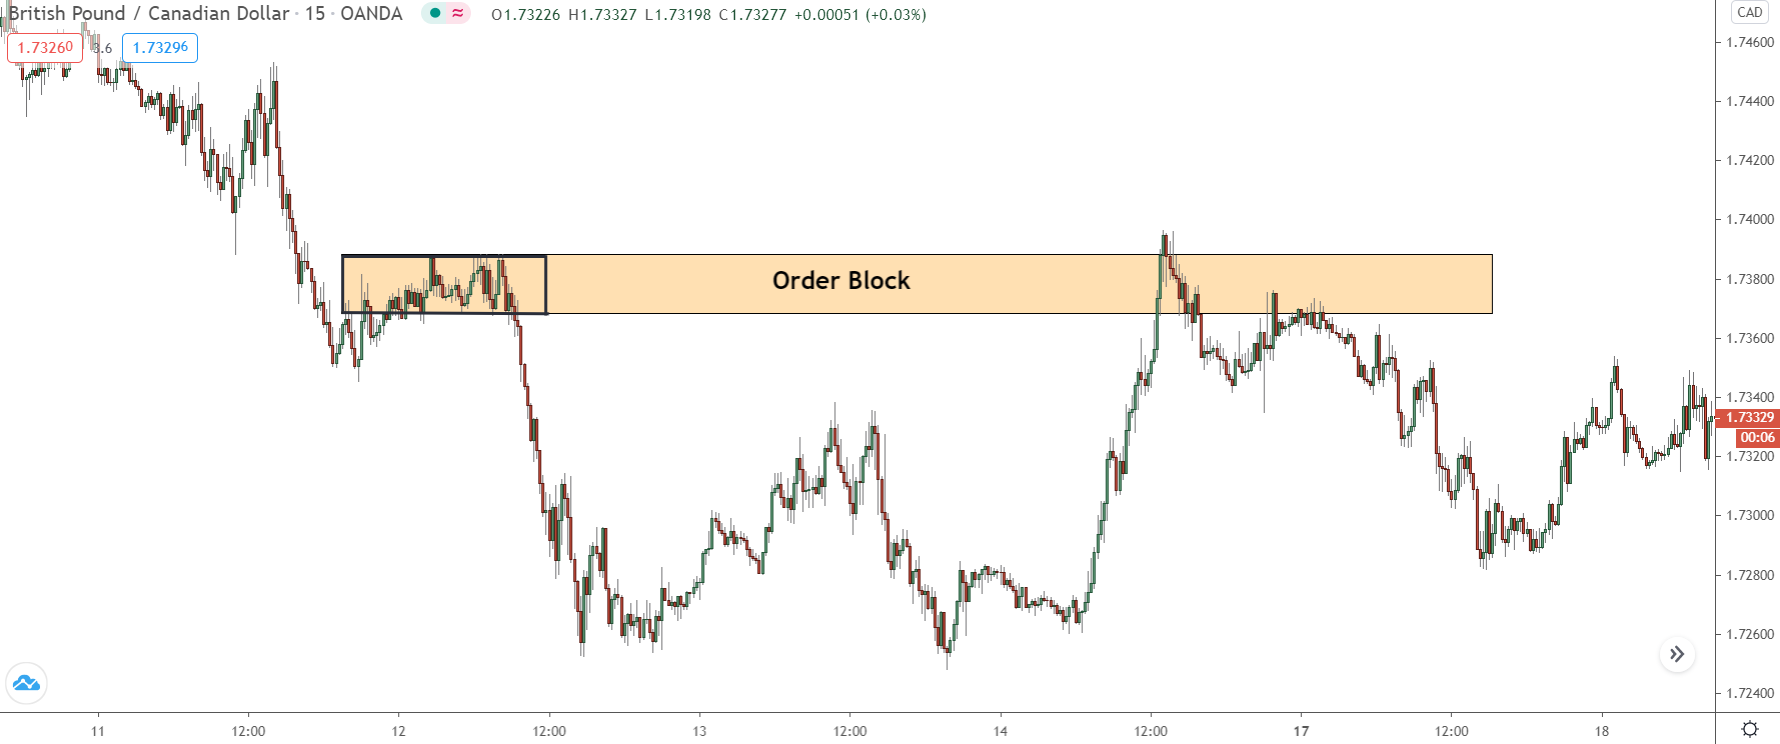
Here’s another one, this time from the 15 minute chart.
Again, look at the consolidation… it’s a small, tight, and forms almost a rectangle shape. We know these only form from the banks using a block order, so an order block zone must exist at the source.
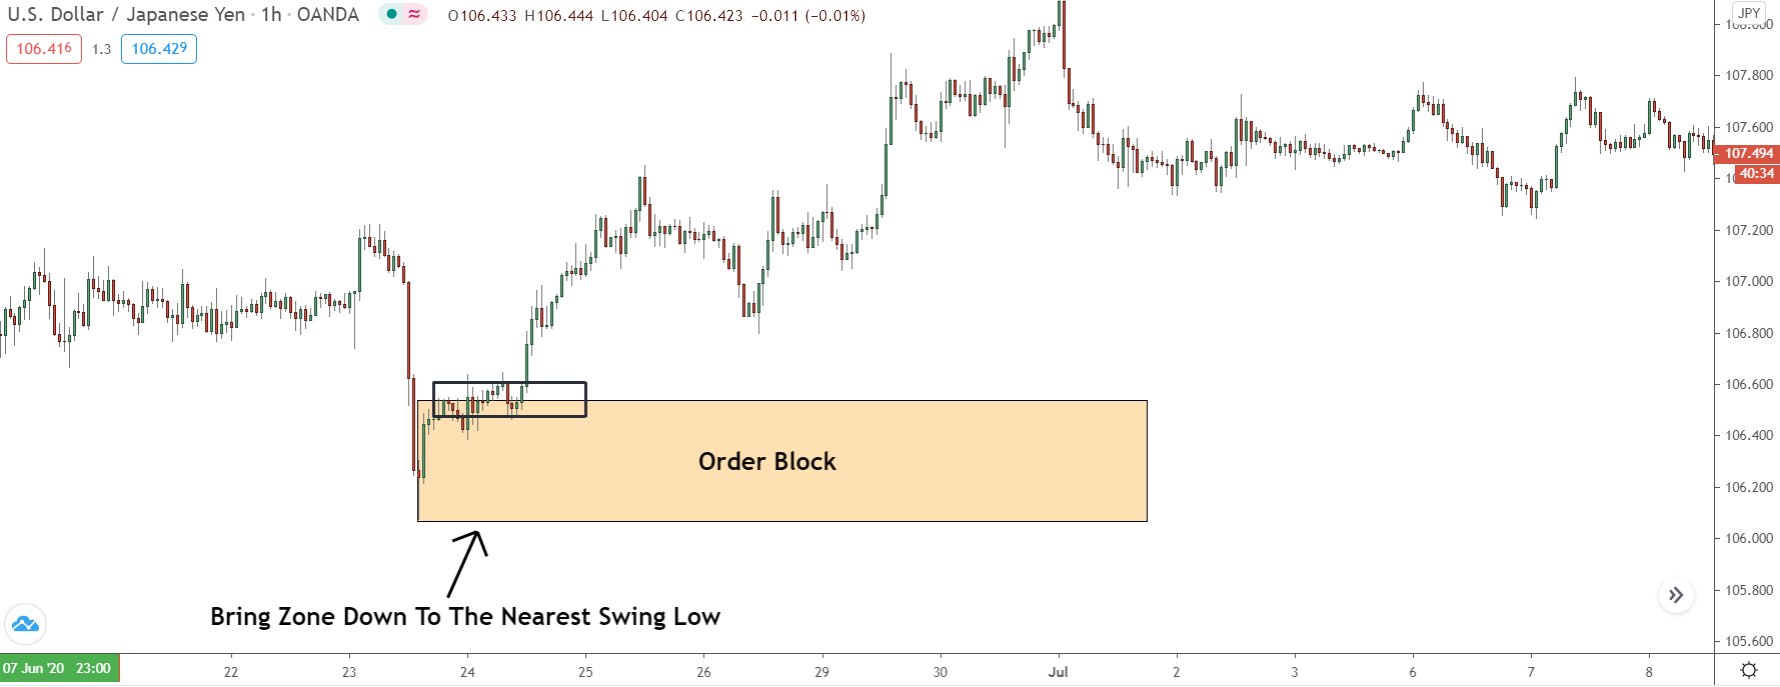
In rare cases, the consolidation will form after a move rather than at a swing low or high.
When you see this, draw the order block zone from the most recent swing low/high up to the consolidation. That’ll make it a valid zone. This happens when the banks place a position, creating the initial move – a rise in our case, which itself is a demand zone – then use a block order to place the remaining positions at a slightly higher price.
Summary
Well, I hope this post has cleared up some of the confusion behind order blocks.
As I said, they make a great setup to watch for alongside your core strategy, that’s how I use them. And since they have a much high probability of causing a reversal than normal supply and demand zones, you can trade them at a slightly higher size as well – pretty neat, huh?
Don’t forget to check out my supply and demand guide if you want a more detailed breakdown of how to trade to order blocks and supply and demand zones.
Location of the Order Block
Move to the H4 timeframe and draw the Fibonacci retracement from upside to downside. While you draw the Fibonacci level, make sure to draw from the last available price, not more than 200 candles. Furthermore, for a buy trade, draw the Fibonacci from the highest price to the lowest price.
After drawing the Fibonacci level, you should consider order blocks residing below the 50% Fibonacci retracement levels. Any price below the 50% Fibonacci retracement level is the discount price and any price above the 50% retracement level is the premium price.
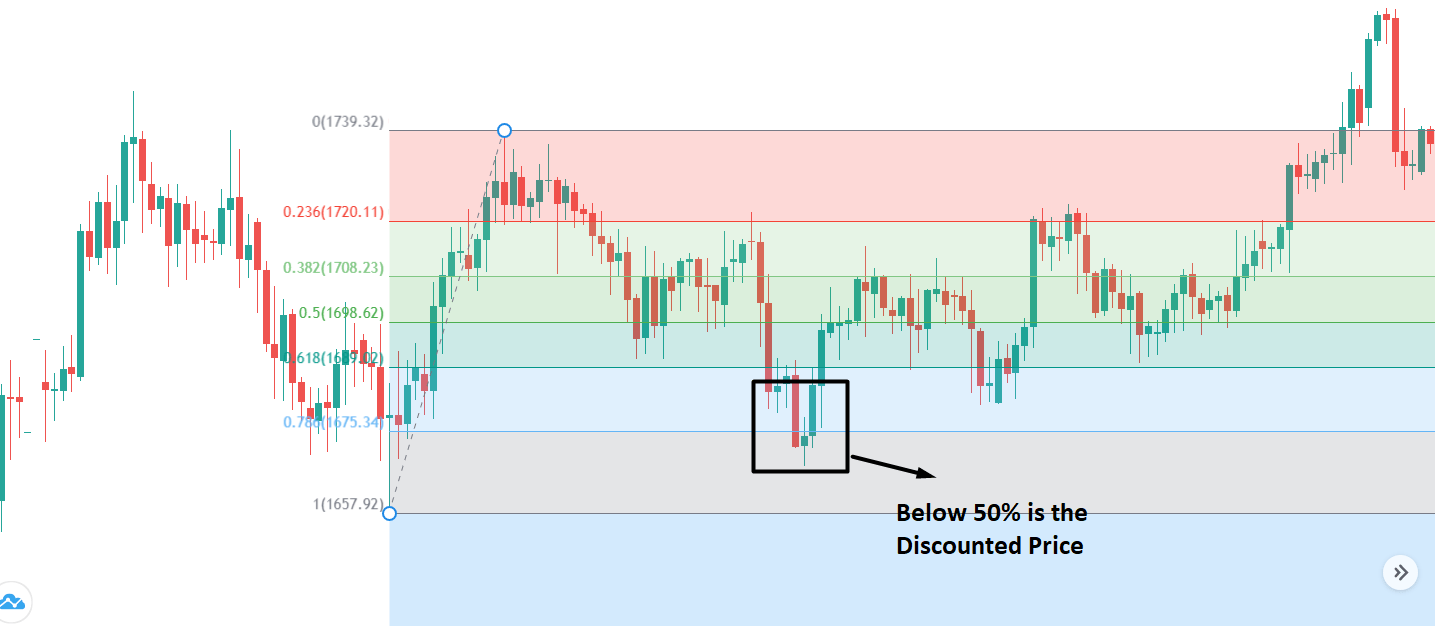
In the bullish order block trading strategy, you should consider the discount price and, in a bearish order block trading strategy, consider the premium price only.
Entry
Wait for the price to break above or below the order block, win an impulsive bullish or bearish pressure. Later on, the price will make new highs or lows, but you should wait when it comes back to the order block. In most cases, the price will come back to the order block and test the 50% level before making the final movement.
Therefore, if you don’t want to monitor the price, you can take a pending order at a 50% level of the order block. However, the best practice is to enter the trade once it starts moving from the order block with a candle close above or below it.
Stop Loss and Take Profit Level
The stop loss level should be below or above the order block with some buffer. In most of the cases, use 10 or 15 pips buffer to avoid unexpected market behavior.
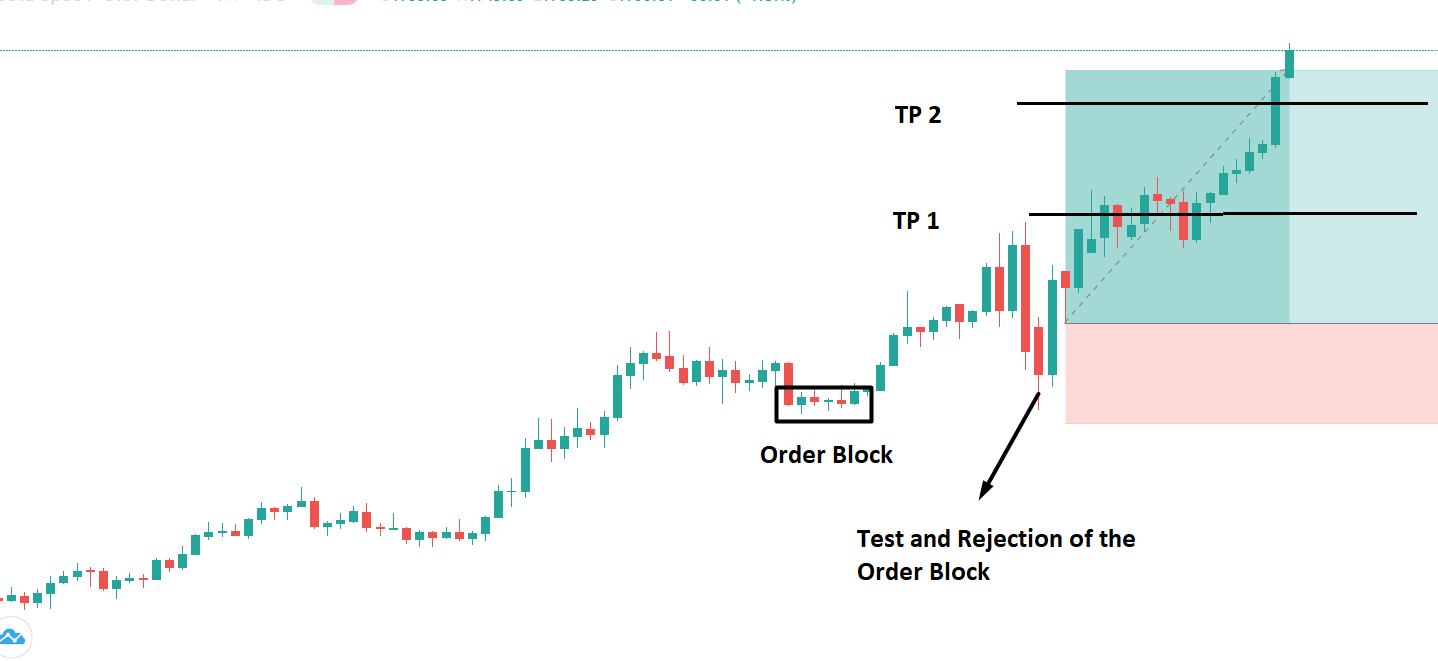
On the other hand, the ordinary take profit level would be towards the order flow with 1:1 risk: reward ratio. However, the final take profit level is Fibonacci 0%, which is usually the top of the available price in a bullish condition and the bottom of the price in a bearish condition.
Summary
Let’s summaries the order block trading strategy:
- Identify the weekly order flow and consider the direction.
- Identify the premium and discount zone level with the Fibonacci retracement levels.
- Move to H1 to H4 timeframe and find the order block within Fibonacci 50% to 100% levels.
- The price should move towards the order flow directly from the order block, but it should come down to test the order block again.
- Enter the trade as soon as the price rejects the order block with a reversal candlestick.
The order block trading strategy is profitable in most of the currency pairs. However, it is essential to keep in mind that the forex market is very uncertain. We, as a trader, anticipate the price, and that’s why we use stop loss. No trading strategy can assure a 100% profit. Although the Order block is a very profitable trading strategy, you should use appropriate trade management and money management rules to avoid unexpected market conditions.
For example, their first 20 million order would get matched with the 50 million being sold. That wouldn’t cause a sudden up-move – upsetting price – because the sell orders are still bigger than the buy orders – 20 million vs 50 million. They can then wait for the orders to pick up again before entering their next chunk.
That process – of placing one 20 million order, then another, and another, etc – results in a supply or demand zone forming, specifically, a zone from a tight range consolidation.
Here’s what your typical order-block zone looks like – seen these before?
Notice the zone forms when price shoots away from a tight range consolidation – a consolation contained within a small price range?
Because of how they work, order-block creates these consolidations.
The banks use order-blocks when they want to place a big position without upsetting the price. They do that by placing a bunch of small positions around similar prices; that way they achieve the same effect of placing a single large position without actually placing one into the market.
The banks placing a bunch of similar positions around similar prices causes a tight range consolidation to form; each position creates a high (or low if they’re shorting) of the consolidation.
So, before we move on, here’s a quick summary of order blocks:
Order blocks are supply and demand zones but of a different type.
They form from the banks buying or selling using a block order, which splits a big position (e.g a trade) into a bunch of smaller positions that makes it easier for the banks to buy/sell without upsetting the price.
The zones themselves are structurally identical to normal supply and demand zones. However, they ONLY form when price moves away from a tight range consolidation that acts as a base. That’s because using a block order to enter a big position means placing smaller positions at similar prices, creating a consolidation with a small range.
[the_ad id=”18640″]
How Order Blocks Are Different To Normal Supply And Demand Zones
Now that we know order blocks are supply and demand zones – just a different type – the question is, how do they differ from the normal zones we see form all the time?
Really, there are two key differences…
First, order blocks have a much higher probability of resulting in a reversal than normal supply and demand zones.
And that’s regardless of where or when they form i.e if they appear after a long rise or decline – which increases the probability of normal zones resulting in a reversal.
The reason why is because the zones are created from the banks buying or selling using a block order, which they only use when they have an especially large position to place. If they’re placing a big position, the banks obviously don’t want price to break beyond the point they bought or sold – the S or D zone.
Therefore, the zone has a high probability of causing a reversal because the banks wouldn’t place a big position unless they were very confident price was heading in the direction they want.
The other difference is how order block zones look.
In general, order blocks look identical to normal supply and demand zones – they form from a sharp rise or decline away from a base like all zones do.
However, the base is ALWAYS a tight range consolidation, like you see below.
Unlike normal zones that form from a reversal – which you can also see above – order blocks are always created from price moving away from a tight range consolidation. Because that’s the structure that forms when the banks use a block order to place their positions into the market.
With a block order, each position gets entered at a similar price, resulting in the highs (or lows in this case) of the consolidation forming at relativity equal prices to one another.
On a chart, that creates a tight range consolidation, like as you see above.
So when it comes to identifying order block zones, all you need to do is look for a small tight range consolidation. They only form from the banks using block orders, meaning a zone MUST exist at the source.
How To Find And Use Order Blocks In Your Trading
The best way to use order-blocks is as a high probability setup to look out for alongside your main trading strategy.
Order block zones don’t form often; you can’t really use them as a single strategy.
If you use them as a setup, however, they can provide you with high probability trade signals you can use to generate additional profit alongside your core trading strategy. That’s how I use them in my trading. Supply and demand is my core strategy, which gives me most of my trades, then I have two or three setups I lookout for alongside…
Order blocks, pin bars, and the reversal pattern in my book.
They allow me to make more money, while at the same time, lower my overall risk due to the diversification they provide to my main trading strategy.
So, how do you find and use order blocks in your trading?
Since order blocks are essentially supply and demand zones – just a much rarer type – the way you trade the zones is the same as how you trade them normally:
You mark a zone on the chart…
Wait for price to enter and provide some sort of confirmation signal – pin bar, engulfing candle, large range candle.
And then place a stop on the other side of the zone and see if price moves away.
Simple.
Finding the zones is a little more difficult, but still simple with a bit of practice.
The key thing to remember is to look for a zone that forms from a consolidation created by a tight range, i.e price rising and falling between two close prices. These consolidations ONLY form from the banks placing a block order, so an order block must exist at the source and create a supply or demand zone.
Let’s go through some examples…
So, here’s what your typical order-block zone looks like.
This demand zone forms from a sharp move away from a tight range consolidation. Price moves back and forth between 1.21600 and 1.22000 before breaking higher, forming the order block.
Pay attention to what this consolidation looks like, how tight it is.
It’s not your typical consolidation where price makes big swings up and down with each ending at different prices. Instead, the swings are small and terminate roughly at the same points, leading to price being contained within this really tight range that looks almost like a rectangle.
These are the sorts of consolidation you need to look for to find order blocks.
Here’s another one, this time from the 15 minute chart.
Again, look at the consolidation… it’s a small, tight, and forms almost a rectangle shape. We know these only form from the banks using a block order, so an order block zone must exist at the source.
In rare cases, the consolidation will form after a move rather than at a swing low or high.
When you see this, draw the order block zone from the most recent swing low/high up to the consolidation. That’ll make it a valid zone. This happens when the banks place a position, creating the initial move – a rise in our case, which itself is a demand zone – then use a block order to place the remaining positions at a slightly higher price.
Summary
Well, I hope this post has cleared up some of the confusion behind order blocks.
As I said, they make a great setup to watch for alongside your core strategy, that’s how I use them. And since they have a much high probability of causing a reversal than normal supply and demand zones, you can trade them at a slightly higher size as well – pretty neat, huh?
Don’t forget to check out my supply and demand guide if you want a more detailed breakdown of how to trade to order blocks and supply and demand zones.