Flutter : A new era of Mobile DevOps
https://t.me/joinchat/PqeEkCK00KC7sVJDCapturé sur : https://fr.wikipedia.org/wiki/Flutter_(logiciel)
Flutter
Informations Créateur Développé par Première version Dernière versionDépôtÉcrit enSystème d'exploitation Type LicenceSite webGoogle
GoogleAlpha (v0.0.6) / 2017[1]3.0.0 (11 mai 2022)
C, C++, Dart[2]Android, iOS, Google Fuchsia, Web, Windows, macOS et LinuxKit de développement
Licence BSDflutter.devmodifier - modifier le code - voir Wikidata (aide)
Flutter est un kit de développement logiciel (SDK) d'interface utilisateur open-source créé par Google. Il est utilisé pour développer des applications pour Android, iOS, Linux, Mac, Windows, Google Fuchsia et le web à partir d'une seule base de code.
La première version de Flutter était connue sous le nom de code "Sky" et fonctionnait sur le système d'exploitation Android. Elle a été dévoilée lors du sommet des développeurs Dart de 2015[3], avec l'intention déclarée de pouvoir effectuer un rendu cohérent à 120 images par seconde[4] . Lors du discours d'ouverture des Google Developer Days à Shanghai, Google a annoncé la sortie de Flutter Release Preview 2 qui est la dernière grande version avant Flutter 1.0. Le 4 décembre 2018, Flutter 1.0 a été publié lors de l'événement Flutter Live, ce qui représente la première version "stable" du Framework. Le 11 décembre 2019, Flutter 1.12 a été publié lors de l'événement Flutter Interactive[5] .
Le 6 mai 2020, le SDK de Dart en version 2.8 et celui de Flutter en version 1.17.0 sont sortis. La prise en charge de l'API Metal a été ajoutée, améliorant les performances des appareils iOS (environ 50 %), de nouveaux widgets Material et de nouveaux outils de suivi de réseau.
Le 3 mars 2021, l'équipe de développement de Flutter a annoncé la release de son SDK en version 2.0.0. De nombreux bugs et problèmes de jeunesse ont été résolus à cette occasion (ajout de null safety par exemple). De plus, l'utilisation de Windows, Linux et la version Web sont ajoutés à la release.
L'Architecture du framework
Les principales composantes de Flutter sont les suivantes :
- La plate-forme Dart
- Le Moteur Flutter
- La Bibliothèque Foundation
- Les Widgets spécifiques à la conception
La Plate-forme Dart
Les applications Flutter sont écrites en Dart et utilisent de nombreuses fonctionnalités avancées du langage.
Sur Windows, macOS et Linux[6] , Flutter est exécuté par la machine virtuelle Dart et dispose d'un moteur d'exécution just-in-time. Lors de l'écriture et du débogage d'une application, Flutter utilise la compilation "Just In Time", qui permet de la recharge à chaud "hot reload", avec laquelle les modifications des fichiers sources peuvent être injectées dans une application en cours d'exécution. Flutter étend cette possibilité avec la prise en charge de la recharge à chaud stateful, où dans la plupart des cas les modifications du code source peuvent être reflétées immédiatement dans l'application en cours d'exécution sans nécessiter de redémarrage ou de perte d'état[7].
Afin d'avoir de meilleures performances sur les plateformes Android et iOS, les applications Flutter sont compilés avec une compilation ahead-of-time (AOT)[8].
Le Moteur de Flutter
Le moteur de Flutter, écrit principalement en C++, fournit un support de rendu de bas niveau en utilisant la bibliothèque graphique Skia de Google. De plus, il s'interface avec des SDK spécifiques à la plate-forme, tels que ceux fournis par Android et iOS. Le moteur Flutter est un runtime portable pour l'hébergement d'applications Flutter. Il met en œuvre les bibliothèques de base de Flutter, y compris l'animation et les graphiques, les entrées/sorties de fichiers et de réseau, le support de l'accessibilité, l'architecture des plugins, et une chaîne d'outils d'exécution et de compilation Dart. La plupart des développeurs interagissent avec Flutter via le Flutter Framework, qui fournit un cadre réactif, et un ensemble de widgets de plate-forme, de mise en page et de foundation.
La Bibliothèque Foundation
La bibliothèque Foundation, écrite en Dart, fournit des classes et des fonctions de base qui sont utilisées pour construire des applications utilisant Flutter, comme une API pour communiquer avec le moteur.
Les Widgets
Le Framework Flutter contient deux styles de widgets, les widgets Material Design qui implémentent le design de Google, et les widgets Cupertino qui implémentent l'interface d'iOS d'Apple.
Exemple de Hello World
Un programme de hello world dans Flutter ressemble à ceci :
import 'package:flutter/material.dart';

void main() => runApp(HelloWorldApp());

class HelloWorldApp extends StatelessWidget {
  @override
  Widget build(BuildContext context) {

     //MaterialApp agit comme un emballage pour l'application et
     //fournit de nombreuses fonctionnalités comme le titre(title), la page d'accueil(home), le thème(theme), etc.
    return MaterialApp(
      title: 'Hello World App',

      //Scaffold agit comme un liant qui lie l'appBar, la barre de navigation inférieure (bottom nav bar) et
     // les autres composants de l'interface utilisateur à leur place.
      home: Scaffold(

        //Le widget AppBar() crée automatiquement un material app bar (barre de titre).
        appBar: AppBar(
          title: Text('Application Hello World'),
        ),

        //Le widget center aligne le child (enfant) au centre.
        body: Center(
          child: Text('Hello World'),
        ),
      ),
    );
  }
}
Voir aussi
Notes et références
- ↑ Chris Bracken, « Release v0.0.6: Rev alpha branch version to 0.0.6, flutter 0.0.26 (#10010) · flutter/flutter » [archive], sur GitHub (consulté le 22 mars 2022)
- ↑ « FAQ - Flutter » [archive] (consulté le 2 avril 2020)
- ↑ « Sky: An Experiment Writing Dart for Mobile (Dart Developer Summit 2015) » [archive]
- ↑ Ron Amadeo, « Google's Dart language on Android aims for Java-free, 120 FPS apps » [archive], Ars Technica, 1er mai 2015
- ↑ (en) « Flutter: the first UI platform designed for ambient computing » [archive], Flutter blog (consulté le 11 décembre 2019)
- ↑ (en) « Canonical enables Linux desktop app support with Flutter » [archive], sur Ubuntu (consulté le 9 juillet 2020)
- ↑ Wm Lelel, « Why Flutter Uses Dart » [archive], sur HackerNoon, 26 février 2018 (consulté le 5 décembre 2018)
- ↑ stephenwzl, « Flutter’s Compilation Patterns » [archive], sur ProAndroidDev, 1er août 2018 (consulté le 6 décembre 2018)
➖➖➖➖➖➖➖➖➖➖➖➖➖➖➖➖➖➖➖➖➖➖➖➖➖➖➖
https://dart.dev/tools/vs-code
Visual Studio Code
With the Dart plugin, you can use Visual Studio Code (VS Code) to develop Dart apps. The Flutter site has details on how to set up and use VS Code for Flutter apps.
Until this page has more information, see the Flutter documentation for instructions that you can apply to other kinds of Dart apps:
- Set up an editor on the Flutter site has instructions for installing the Flutter and Dart plugins into VS Code.
- Visual Studio Code on the Flutter site has details on using VS Code to develop Flutter apps.
➖➖➖➖➖➖➖➖➖➖➖➖➖➖➖➖➖➖➖➖➖➖➖➖➖➖➖
Set up an editor on the Flutter site has instructions for installing the Flutter and Dart plugins into VS Code.
https://docs.flutter.dev/get-started/editor?tab=vscode
Set up an editor
You can build apps with Flutter using any text editor combined with our command-line tools. However, we recommend using one of our editor plugins for an even better experience. These plugins provide you with code completion, syntax highlighting, widget editing assists, run & debug support, and more.
Follow the steps below to add an editor plugin for Android Studio, IntelliJ, VS Code, or Emacs. If you want to use a different editor, that’s OK, skip ahead to the next step: Test drive.
Install VS Code
VS Code is a lightweight editor with complete Flutter app execution and debug support.
- VS Code, latest stable version
Install the Flutter and Dart plugins
- Start VS Code.
- Invoke View > Command Palette….
- Type “install”, and select Extensions: Install Extensions.
- Type “flutter” in the extensions search field, select Flutter in the list, and click Install. This also installs the required Dart plugin.
Validate your setup with the Flutter Doctor
- Invoke View > Command Palette….
- Type “doctor”, and select the Flutter: Run Flutter Doctor.
- Review the output in the OUTPUT pane for any issues. Make sure to select Flutter from the dropdown in the different Output Options.
➖➖➖➖➖➖➖➖➖➖➖➖➖➖➖➖➖➖➖➖➖➖➖➖➖➖➖
https://dart.dev/tools/jetbrains-plugin
Downloading the Dart SDK
If you don’t already have the Dart SDK, install it. You can get it either by itself or by downloading the Flutter SDK, which (as of Flutter 1.21) includes the full Dart SDK.
Choose one:
Configuring Dart support
Here’s one way to configure Dart support:
- Start the IDE, and install the Dart plugin.
- From the Welcome screen, choose Plugins.
- Search for Dart.
- Once you've installed the Dart plugin, restart the IDE.
- Create a new Dart project:
- From the Welcome screen, click New Project.
- In the next dialog, click Dart.
- If you don't see a value for the Dart SDK path, enter it.
- For example, the SDK path might be
<dart installation directory>/dart/dart-sdk.
- Choose a starting template.
- To enable starting templates, click Generate sample content.
- Pick your desired template.
- Click Next and continue project setup.
An alternative to Step 2 is to open an existing Dart project, and then open its pubspec.yaml file or any of its Dart files.
➖➖➖➖➖➖➖➖➖➖➖➖➖➖➖➖➖➖➖➖➖➖➖➖➖➖➖
Visual Studio Code on the Flutter site has details on using VS Code to develop Flutter apps.
https://docs.flutter.dev/development/tools/vs-code
Visual Studio Code
Contents
- Installation and setupUpdating the extension
- Creating projectsCreating a new project
- Opening a project from existing source code
- Editing code and viewing issues
- Running and debuggingSelecting a target device
- Run app without breakpoints
- Run app with breakpoints
- Run app in debug, profile, or release mode
- Fast edit and refresh development cycle
- Advanced debuggingDebugging visual layout issues
- Debugging external libraries
- Editing tips for Flutter codeAssists & quick fixes
- Snippets
- Keyboard shortcuts
- Hot reload vs. hot restart
- TroubleshootingKnown issues and feedback
- Android Studio and IntelliJ
- Visual Studio Code
Installation and setup
Follow the Set up an editor instructions to install the Dart and Flutter extensions (also called plugins).
Updating the extension
Updates to the extensions are shipped on a regular basis. By default, VS Code automatically updates extensions when updates are available.
To install updates manually:
- Click the Extensions button in the Side Bar.
- If the Flutter extension is shown with an available update, click the update button and then the reload button.
- Restart VS Code.
Creating projects
There are a couple ways to create a new project.
Creating a new project
To create a new Flutter project from the Flutter starter app template:
- Open the Command Palette (
Ctrl+Shift+P(Cmd+Shift+Pon macOS)). - Select the Flutter: New Project command and press
Enter. - Select Application and press
Enter. - Select a Project location.
- Enter your desired Project name.
Opening a project from existing source code
To open an existing Flutter project:
- Click File > Open from the main IDE window.
- Browse to the directory holding your existing Flutter source code files.
- Click Open.
Editing code and viewing issues
The Flutter extension performs code analysis that enables the following:
- Syntax highlighting
- Code completions based on rich type analysis
- Navigating to type declarations (Go to Definition or
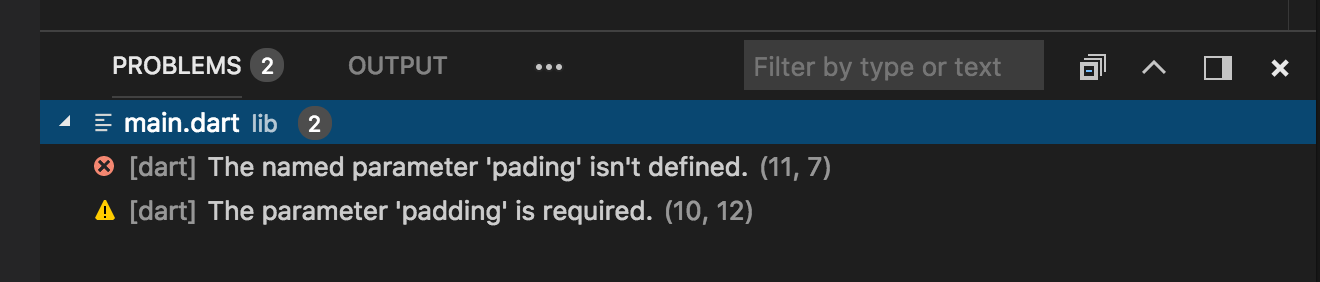
F12), and finding type usages (Find All References orShift+F12) - Viewing all current source code problems (View > Problems or
Ctrl+Shift+M(Cmd+Shift+Mon macOS)) Any analysis issues are shown in the Problems pane:
Running and debugging
- Using DevTools, a suite of debugging and profiling tools that run in a browser. DevTools replaces the previous browser-based profiling tool, Observatory, and includes functionality previously only available to Android Studio and IntelliJ, such as the Flutter inspector.
- Using VS Code’s built-in debugging features, such as setting breakpoints.
Start debugging by clicking Run > Start Debugging from the main IDE window, or press F5.
Selecting a target device
When a Flutter project is open in VS Code, you should see a set of Flutter specific entries in the status bar, including a Flutter SDK version and a device name (or the message No Devices):

- If you do not see a Flutter version number or device info, your project might not have been detected as a Flutter project. Ensure that the folder that contains your
pubspec.yamlis inside a VS Code Workspace Folder. - If the status bar reads No Devices, Flutter has not been able to discover any connected iOS or Android devices or simulators. You need to connect a device, or start a simulator or emulator, to proceed.
The Flutter extension automatically selects the last device connected. However, if you have multiple devices/simulators connected, click device in the status bar to see a pick-list at the top of the screen. Select the device you want to use for running or debugging.
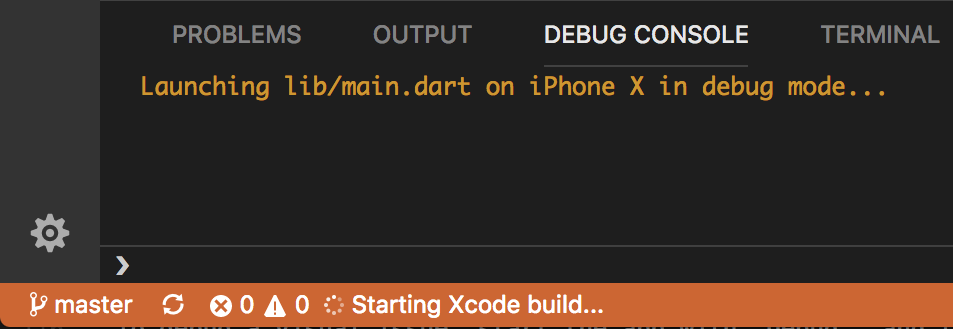
Run app without breakpoints
- Click Run > Start Without Debugging in the main IDE window, or press
Ctrl+F5. The status bar turns orange to show you are in a debug session.
Run app with breakpoints
- If desired, set breakpoints in your source code.
- Click Run > Start Debugging in the main IDE window, or press
F5. - The left Debug Sidebar shows stack frames and variables.
- The bottom Debug Console pane shows detailed logging output.
- Debugging is based on a default launch configuration. To customize, click the cog at the top of the Debug Sidebar to create a
launch.jsonfile. You can then modify the values.
Run app in debug, profile, or release mode
Flutter offers many different build modes to run your app in. You can read more about them in Flutter’s build modes.
- Open the
launch.jsonfile in VS Code. - If you do not have a
launch.jsonfile, go to the Run view in VS Code and click create a launch.json file. - In the
configurationssection, change theflutterModeproperty to the build mode you want to target.For example, if you want to run in debug mode, yourlaunch.jsonmight look like this:content_copy
  "configurations": [
{
  "name": "Flutter",
  "request": "launch",
  "type": "dart",
  "flutterMode": "debug"
}
 ]
- Run the app through the Run view.
Fast edit and refresh development cycle
Flutter offers a best-in-class developer cycle enabling you to see the effect of your changes almost instantly with the Stateful Hot Reload feature. See Using hot reload for details.
Advanced debugging
You might find the following advanced debugging tips useful:
Debugging visual layout issues
During a debug session, several additional debugging commands are added to the Command Palette and to the Flutter inspector. When space is limited, the icon is used as the visual version of the label.
Toggle Baseline Painting
Causes each RenderBox to paint a line at each of its baselines.
Toggle Repaint Rainbow
Shows rotating colors on layers when repainting.
Toggle Slow Animations
Slows down animations to enable visual inspection.
Toggle Debug Mode Banner
Hides the debug mode banner even when running a debug build.
Debugging external libraries
By default, debugging an external library is disabled in the Flutter extension. To enable:
- Select Settings > Extensions > Dart Configuration.
Check theDebug External Librariesoption.
Editing tips for Flutter code
If you have additional tips we should share, let us know!
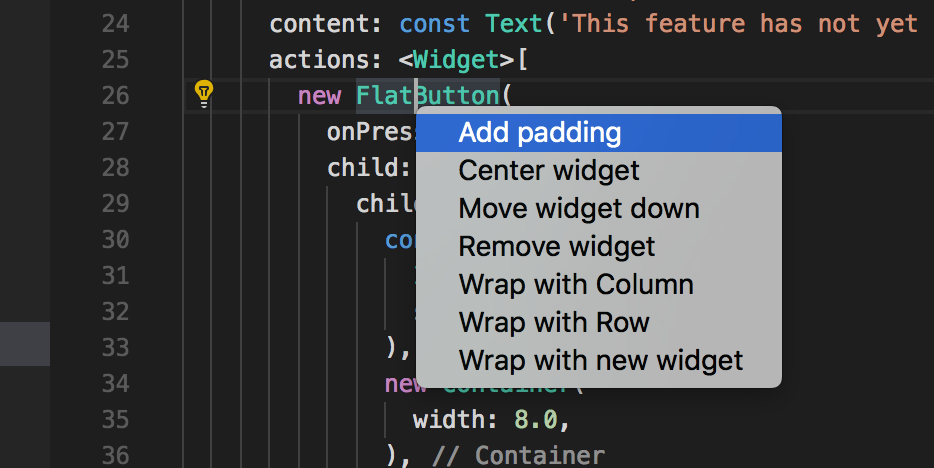
Assists & quick fixes
Assists are code changes related to a certain code identifier. A number of these are available when the cursor is placed on a Flutter widget identifier, as indicated by the yellow lightbulb icon. The assist can be invoked by clicking the lightbulb, or by using the keyboard shortcut Ctrl+. (Cmd+. on Mac), as illustrated here:
Quick fixes are similar, only they are shown with a piece of code has an error and they can assist in correcting it.
Wrap with new widget assist
This can be used when you have a widget that you want to wrap in a surrounding widget, for example if you want to wrap a widget in a Row or Column.
Wrap widget list with new widget assist
Similar to the assist above, but for wrapping an existing list of widgets rather than an individual widget.
Convert child to children assist
Changes a child argument to a children argument, and wraps the argument value in a list.
Convert StatelessWidget to StatefulWidget assist
Changes the implementation of a StatelessWidget to that of a StatefulWidget, by creating the State class and moving the code there.
Snippets
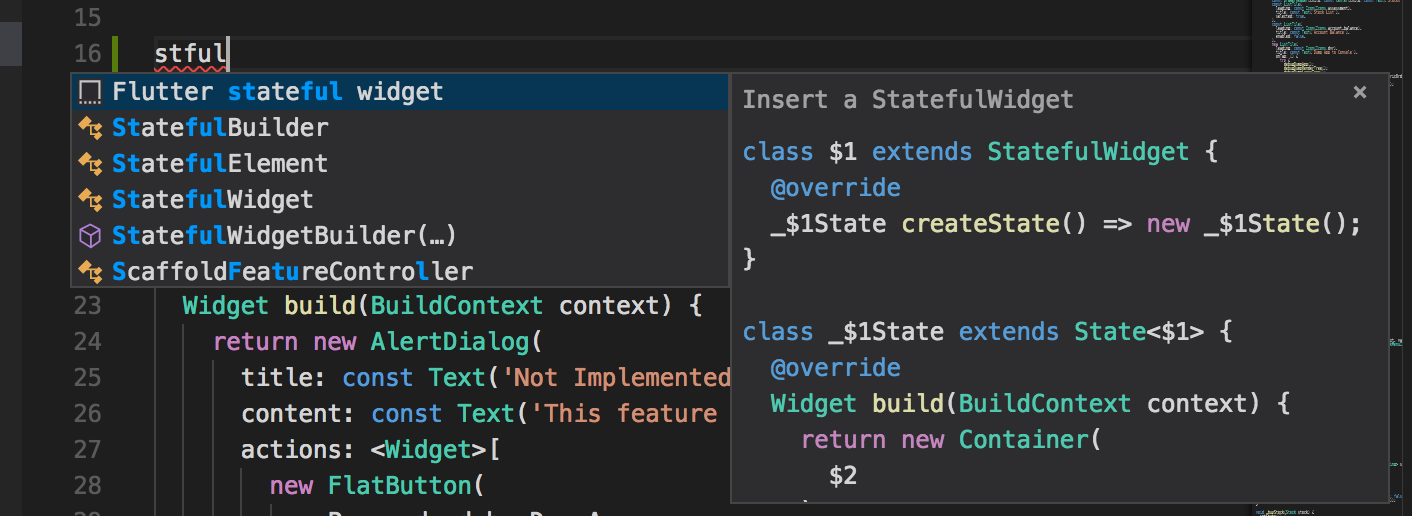
Snippets can be used to speed up entering typical code structures. They are invoked by typing their prefix, and then selecting from the code completion window:
The Flutter extension includes the following snippets:
- Prefix
stless: Create a new subclass ofStatelessWidget. - Prefix
stful: Create a new subclass ofStatefulWidgetand its associated State subclass. - Prefix
stanim: Create a new subclass ofStatefulWidget, and its associated State subclass including a field initialized with anAnimationController.
You can also define custom snippets by executing Configure User Snippets from the Command Palette.
Keyboard shortcuts
Hot reload
During a debug session, clicking the Hot Reload button on the Debug Toolbar, or pressing Ctrl+F5 (Cmd+F5 on macOS) performs a hot reload.Keyboard mappings can be changed by executing the Open Keyboard Shortcuts command from the Command Palette.
Hot reload vs. hot restart
Hot reload works by injecting updated source code files into the running Dart VM (Virtual Machine). This includes not only adding new classes, but also adding methods and fields to existing classes, and changing existing functions. A few types of code changes cannot be hot reloaded though:
- Global variable initializers
- Static field initializers
- The
main()method of the app
For these changes, fully restart your application without having to end your debugging session. To perform a hot restart, run the Flutter: Hot Restart command from the Command Palette, or press Ctrl+Shift+F5(Cmd+Shift+F5 on macOS).
Troubleshooting
Known issues and feedback
All known bugs are tracked in the issue tracker: Dart and Flutter extensions GitHub issue tracker.
We welcome feedback, both on bugs/issues and feature requests. Prior to filing new issues:
- Do a quick search in the issue trackers to see if the issue is already tracked.
- Make sure you are up to date with the most recent version of the plugin.
When filing new issues, include flutter doctor output.