Automation of running shortcuts
Команды (Shortcuts)Since the advent of shortcuts, many people have been thinking about how to automate their launch, and the smartest ones have been figuring out how to do it. This article contains all the existing methods.

Convention:
✴ This is the method is completely reliable and will work.
✳ This is the way Autonomous and requires no additional action from the user to run specified commands
*️⃣, *️⃣*️⃣ — The difficulty levels are placed next to the methods that can cause difficulties for ordinary users.
1. Automations
✳️✴️ │ iOS 13.0.0~beta 1 — 13.0.0~beta 5, io13.1.0+; iPadOS 13.0.0~beta 1 — 13.0.0~beta 5, 13.1.0+
Full list of triggers with a descriptions
Description
Automations are a mechanism built into the shortcuts. Apple added automations in ios 13 beta 1, and removed them in subsequent betas, returned them again in ios 13.1. Automations are easy to create, reliable, will work accurately, and will not increase battery consumption. There are 15 triggers in automations. However, despite all these advantages, automations have a very significant disadvantage: many of them (including by location) request confirmation in the form of a notification before running. To find out whether confirmation is disabled for automation, you need to click on it if it is created, and if you are just creating it, look at the last step of creation whether the corresponding switch is available.

But despite the fact that automations in most cases are not automatic at all, there are two lifehacks on how to make real automation.
UPD: With the release of iOS 14 the switch "Before launch" is now available for time-based automation, so the second life hack is no longer needed, and the first one is not needed at all, so it is only relevant if you have iOS 13.
The second and best of them, which allows you to run any commands on any triggers, will be showed at the end of the article, because it requires familiarization with other information in the article. The first one is as follows: Go to settings and set the do not disturb mode activation time for the time you need for automation to start.

Then create an automation that starts when the do not disturb mode is enabled, and disable its confirmation request (this trigger disables the request).
So how can you create automation? This is extremely simple, just like everything else from Apple.
Creating automation
Go through the lower touch bar to the section "automation"

Here we see an opportunity to create automation for yourselve and for the smart home. Consider an example with "Create automation for yourself"

By clicking "Create automation for yourself " select a trigger, which is a condition under which automation will run.

Next, configure the trigger

Then click "next" and select the actions that will be run when the automation is triggered. For example, we can set the shortcut to run.

Now disable confirmation, if it's possible (at thid case it's impossible)

Automation is ready.
Additionally
If you have a jailbreak installed on your device, you can upgrade the automation with some tweaks:
Truecuts adds "ask before startup" switches to all automations
StopShortcutsNotifications disables notifications from commands so that they don't appear when automations are triggered.
TruestCuts combines the two previous tweaks.
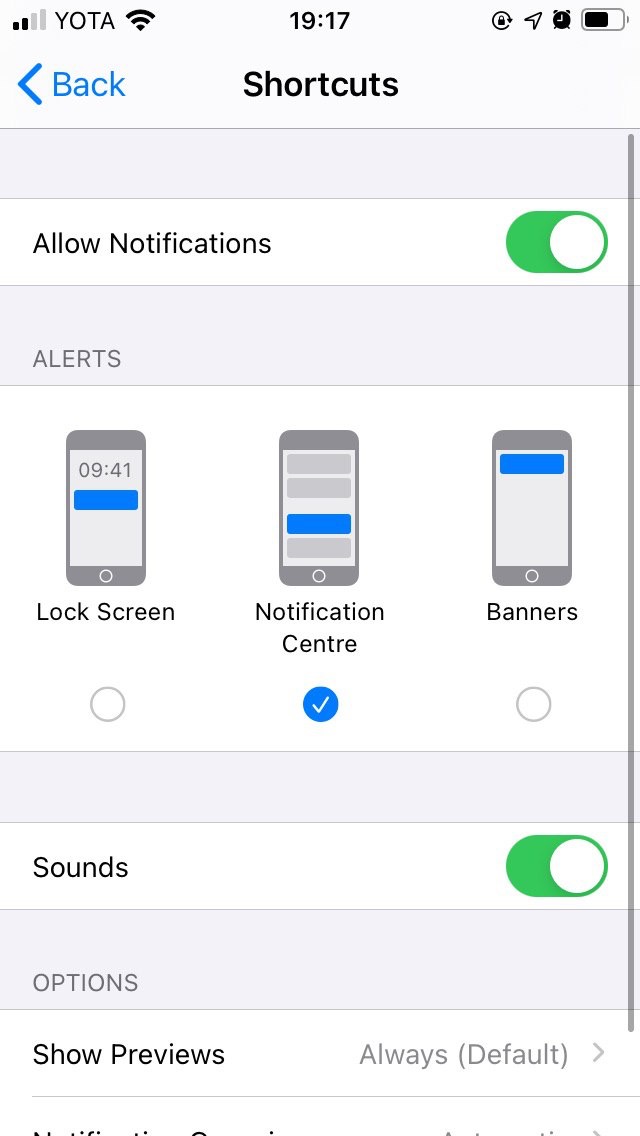
(IOS 14 ONLY) If you don't have jailbreak, you can turn off notifications from shortcuts another way.
Go to Screen time → See all Activity

Scroll down unless find "notifications" and click "Shortcuts"

Turn off notifications on Lock screen and as banners. It will allow shortcuts with notifications work, but you won't see notifications from automations anymore
2. Cronios
✳️*️⃣ │ iOS 9.0.0 (?) — 12.4.9
Download Cronios
Full documentation about the work of Cronios
Description
Cronios, a hybrid of the names "cron" and "ios" is a shortcut that is able to hold Shortcuts app in the background and run the specified shortcuts once in a given time period. Automation in cronios is called a "cron job". Unlike automations, cronios does not request confirmation for completing cron job, but it is unstable: sometimes it stops after an hour, sometimes it works a day or longer. Also, one of the disadvantages is increased energy consumption. In General, cronios is more suitable not for permanent work, but for temporary work, for example, if you do not have access to the phone for several hours, but you need to send an SMS, etc.
Example of shortcuts integrated with cronios:
If you don't have time to read the full documentation, read the instructions for creating a cron job.
Creating a cron job
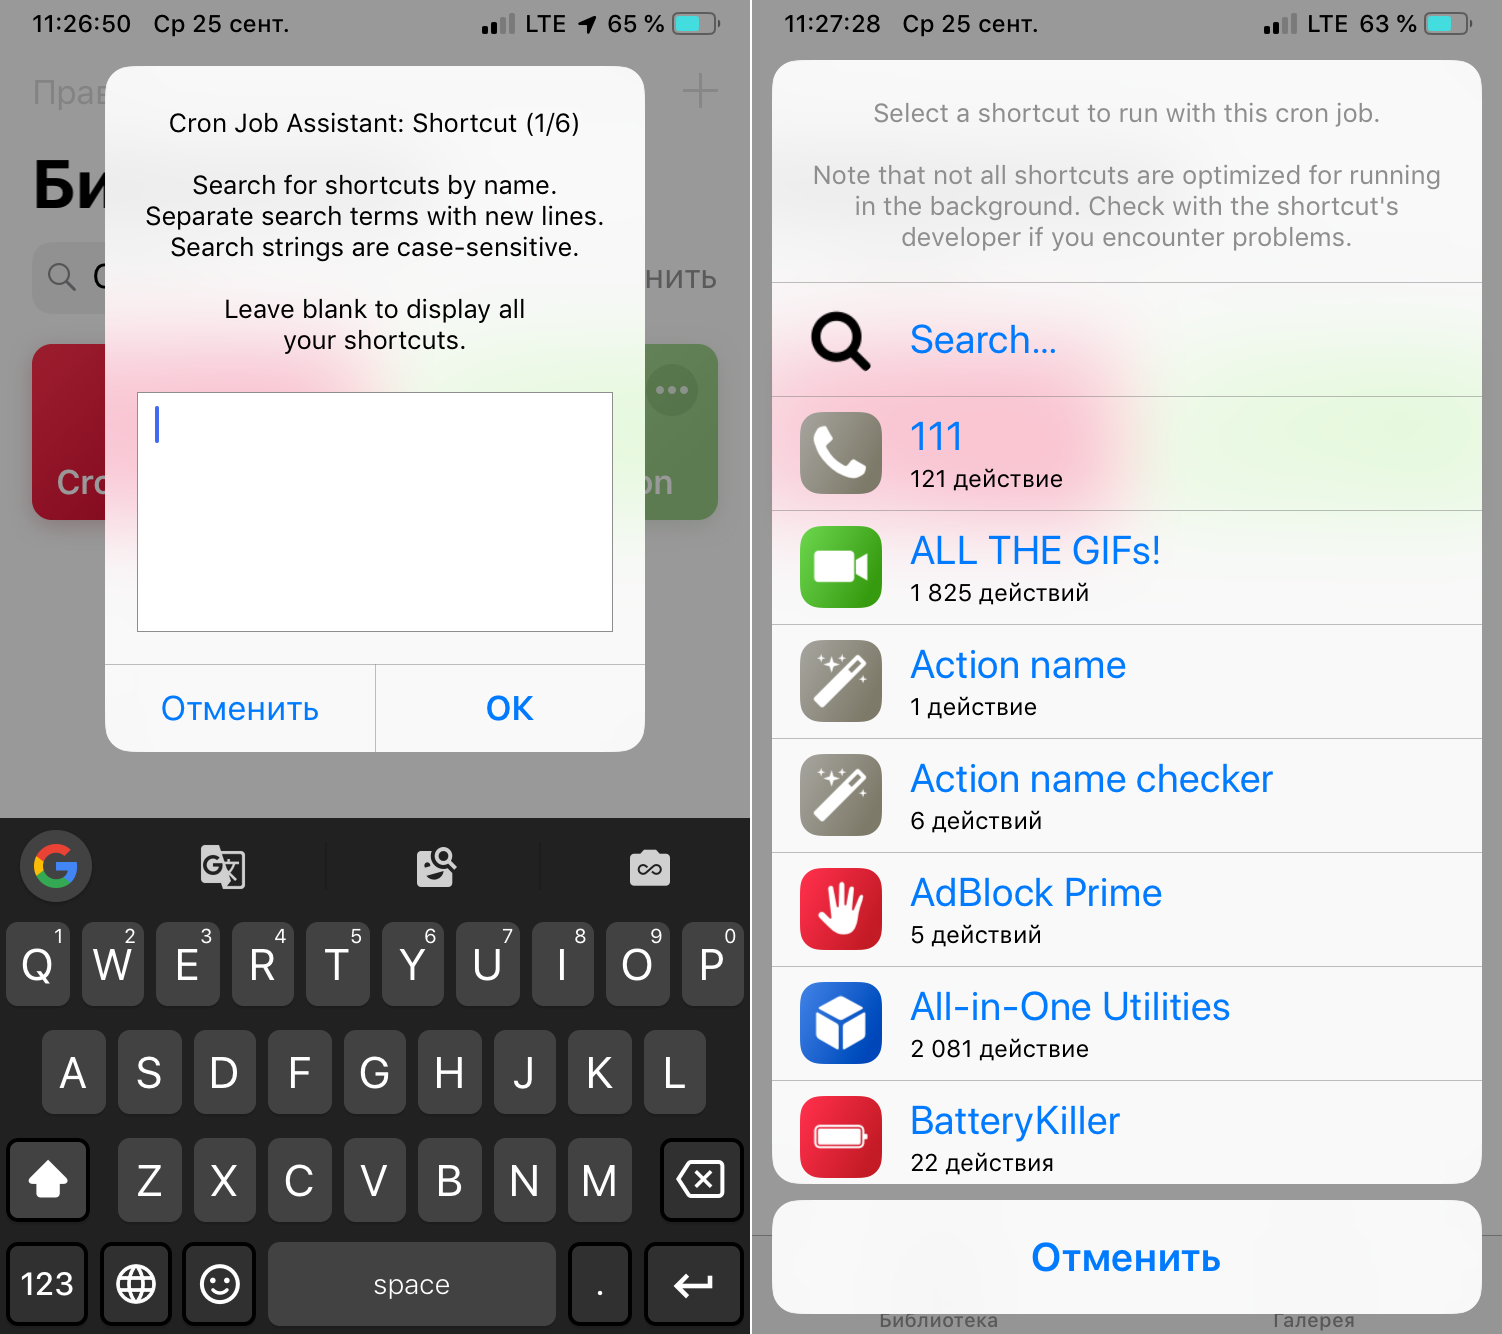
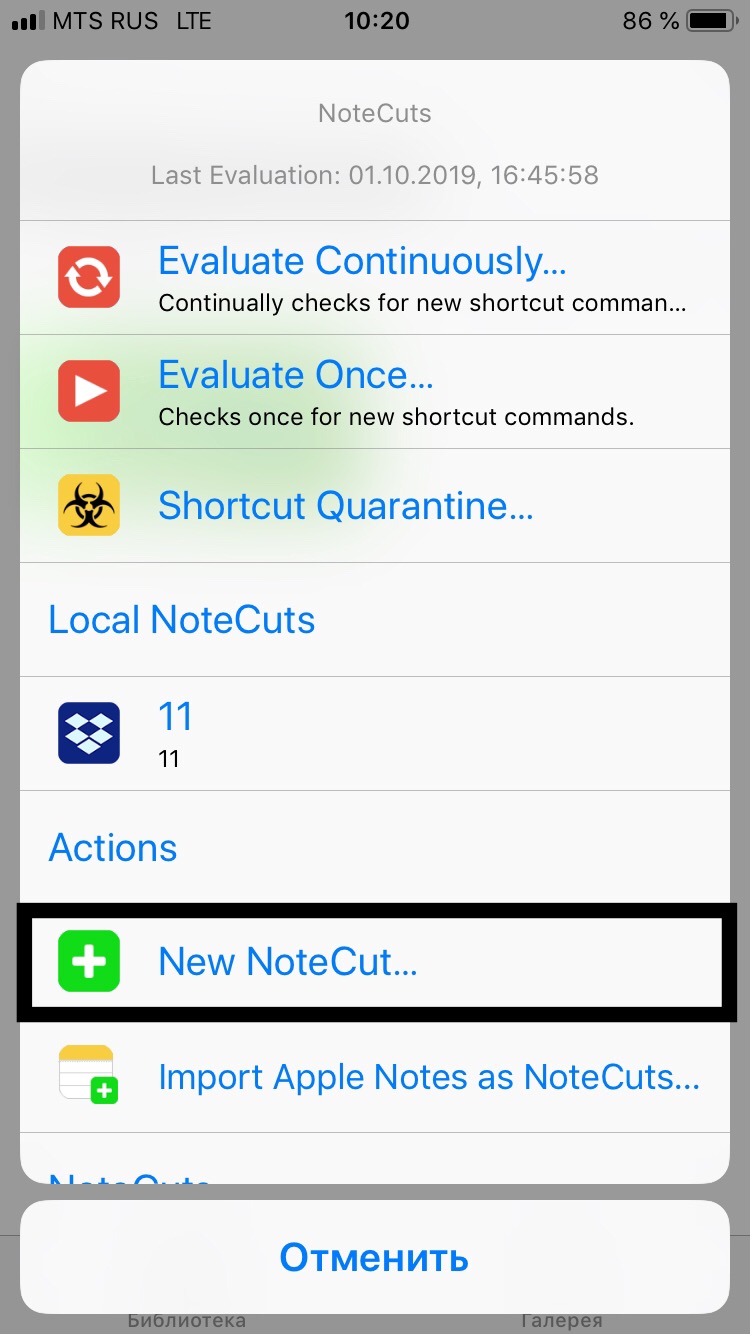
Launch cronios and click on New Cron Job...

Then, in the window that opens, enter the name of the shortcut that you want to run on time for, or leave the field empty to manually select a shortcut from the list. Select the appropriate shortcuts.
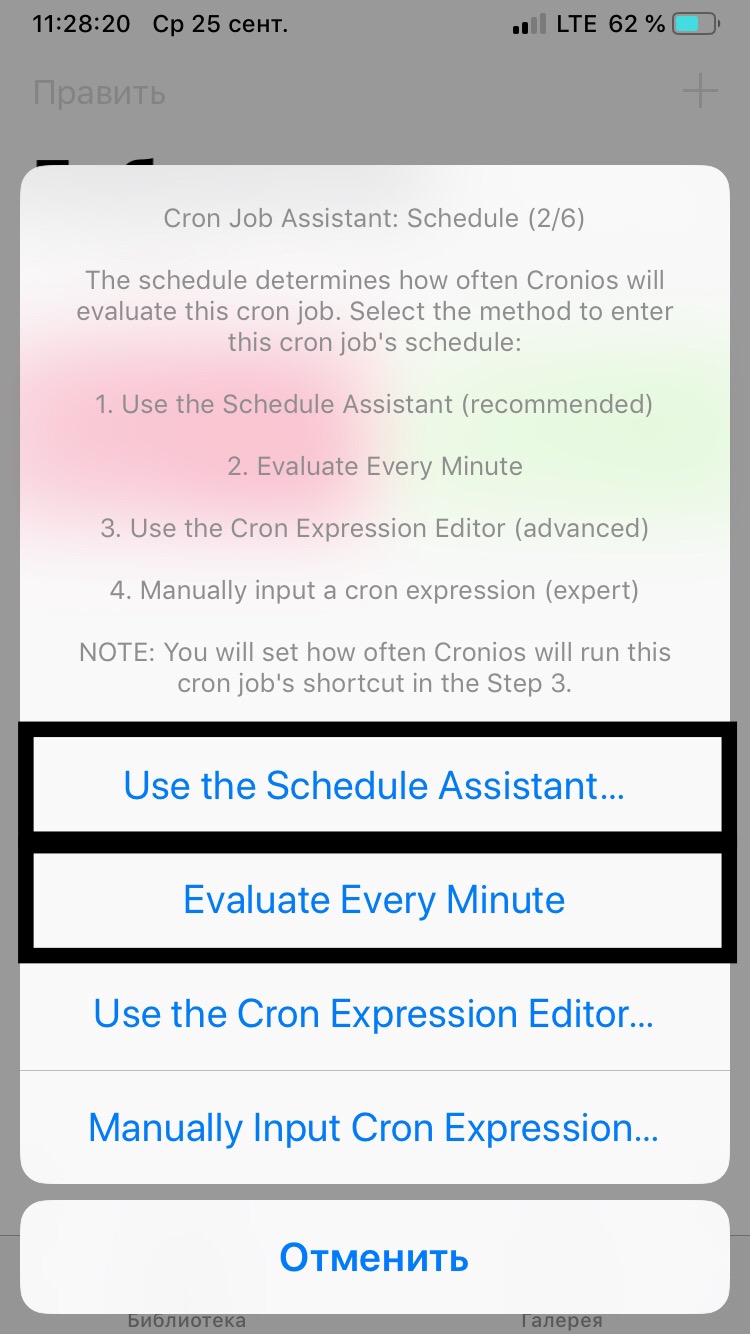
Click "Use the schedule assistant..." To set the shortcut start at a specific time, or "Evaluate Every Minute" if your shortcut has a built-in trigger (for example, the command checks the charge level, and if it is less than 20% sends a notification)
Select the time at which cronios can run the shortcut; "Run Every Time" is recommended.

Then select "Use Default Options"

In the next window, enter a number from one 1 to 100. This is the degree of importance of the shortcuts. If you have several shortcuts scheduled to run at the same time, the one with the lower number will start earlier.

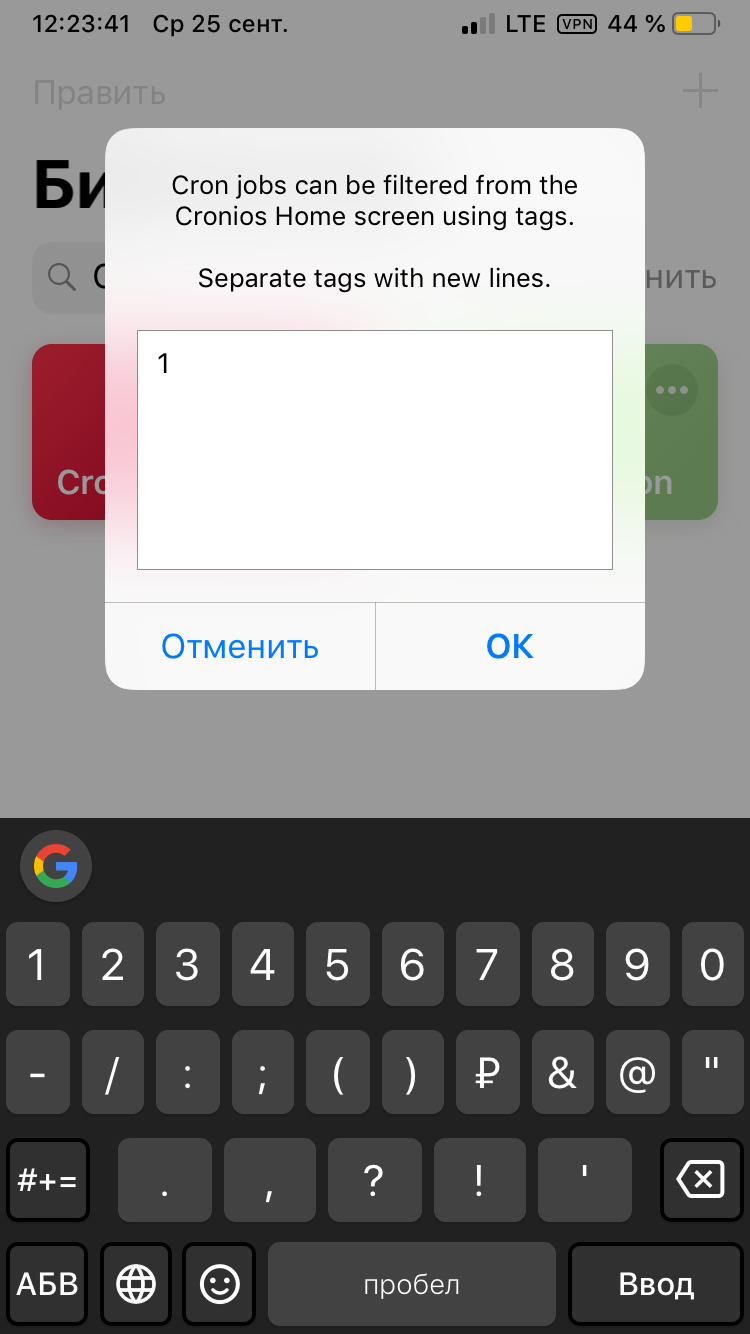
In this window, enter any characters, this is the cron job tag, which will make it easier to find it.
Enter the name of the cron job.

Cron job was created!

To start cronios, click "Run Continuously" and "Start and Don't Show Again"
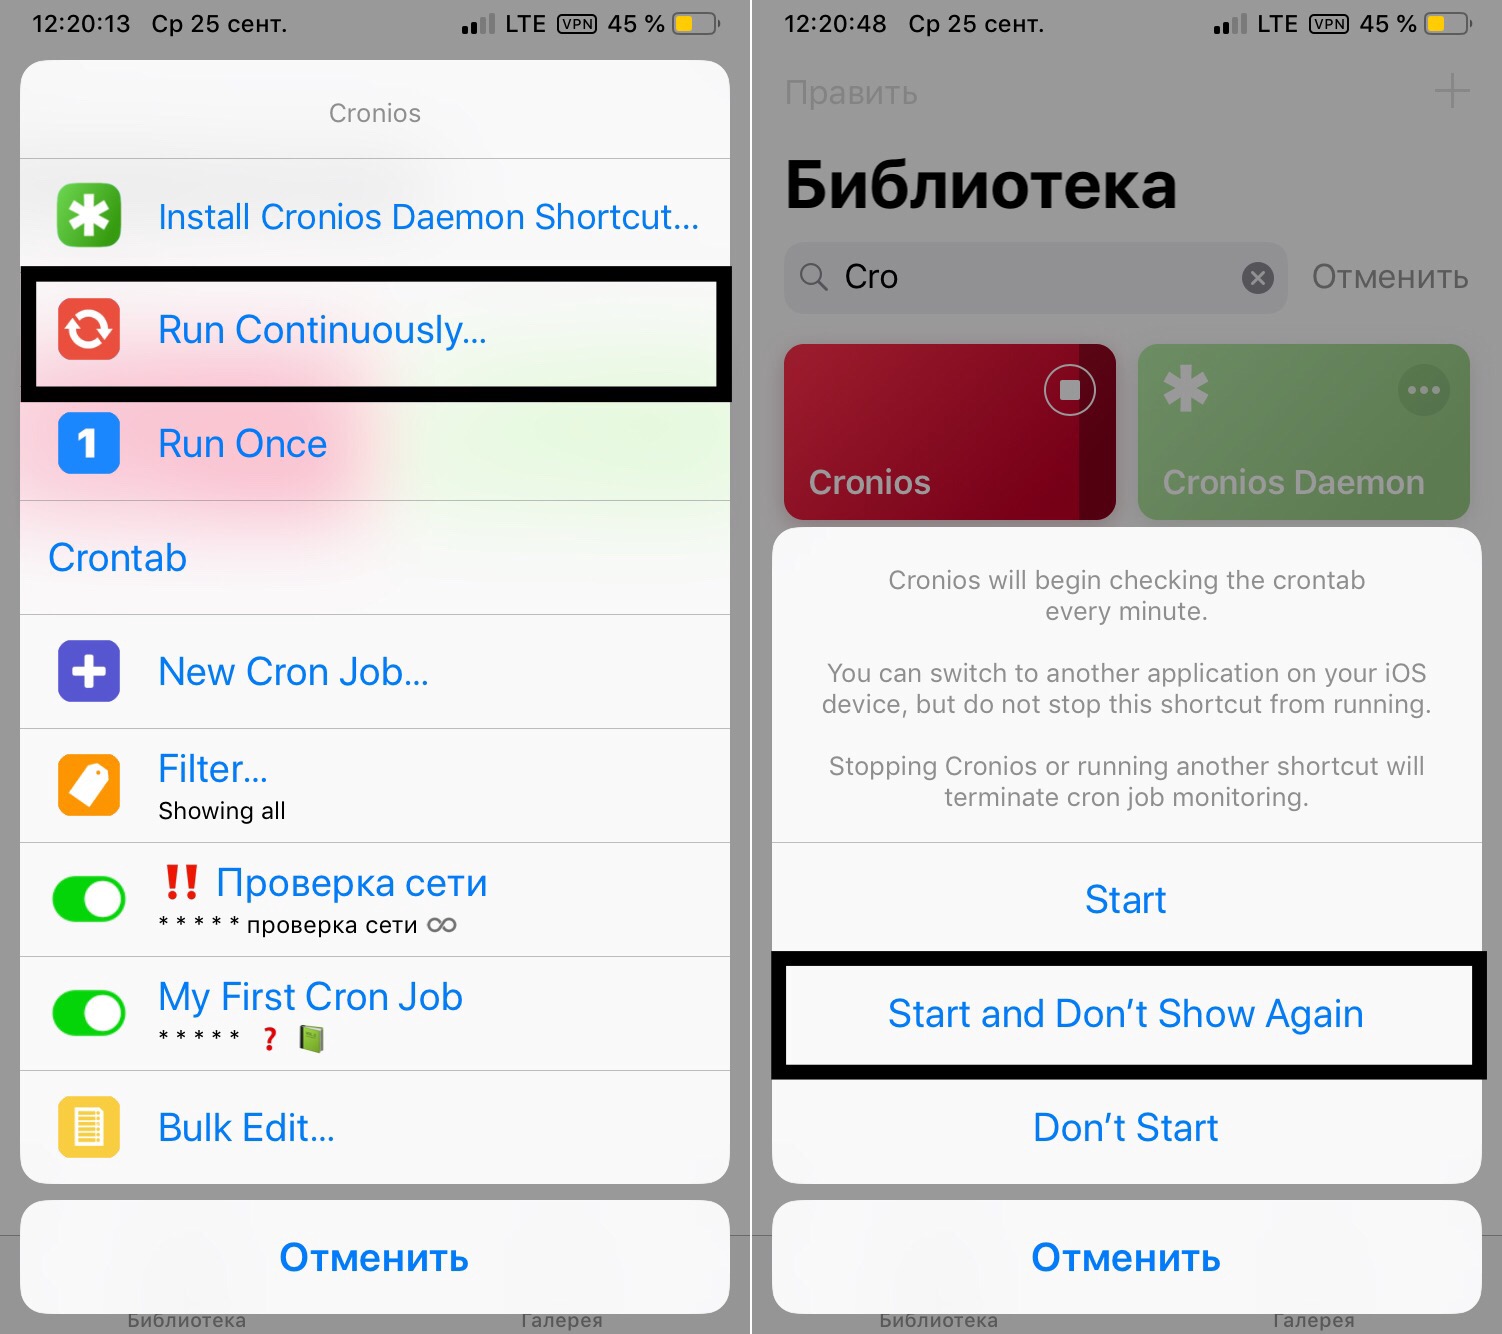
To launch cronios with a single tap, tap "Install Cronios Daemon Shortcut" and install the Cronios Daemon shortcut. When you click on it, cronios starts in "run continuously" mode.

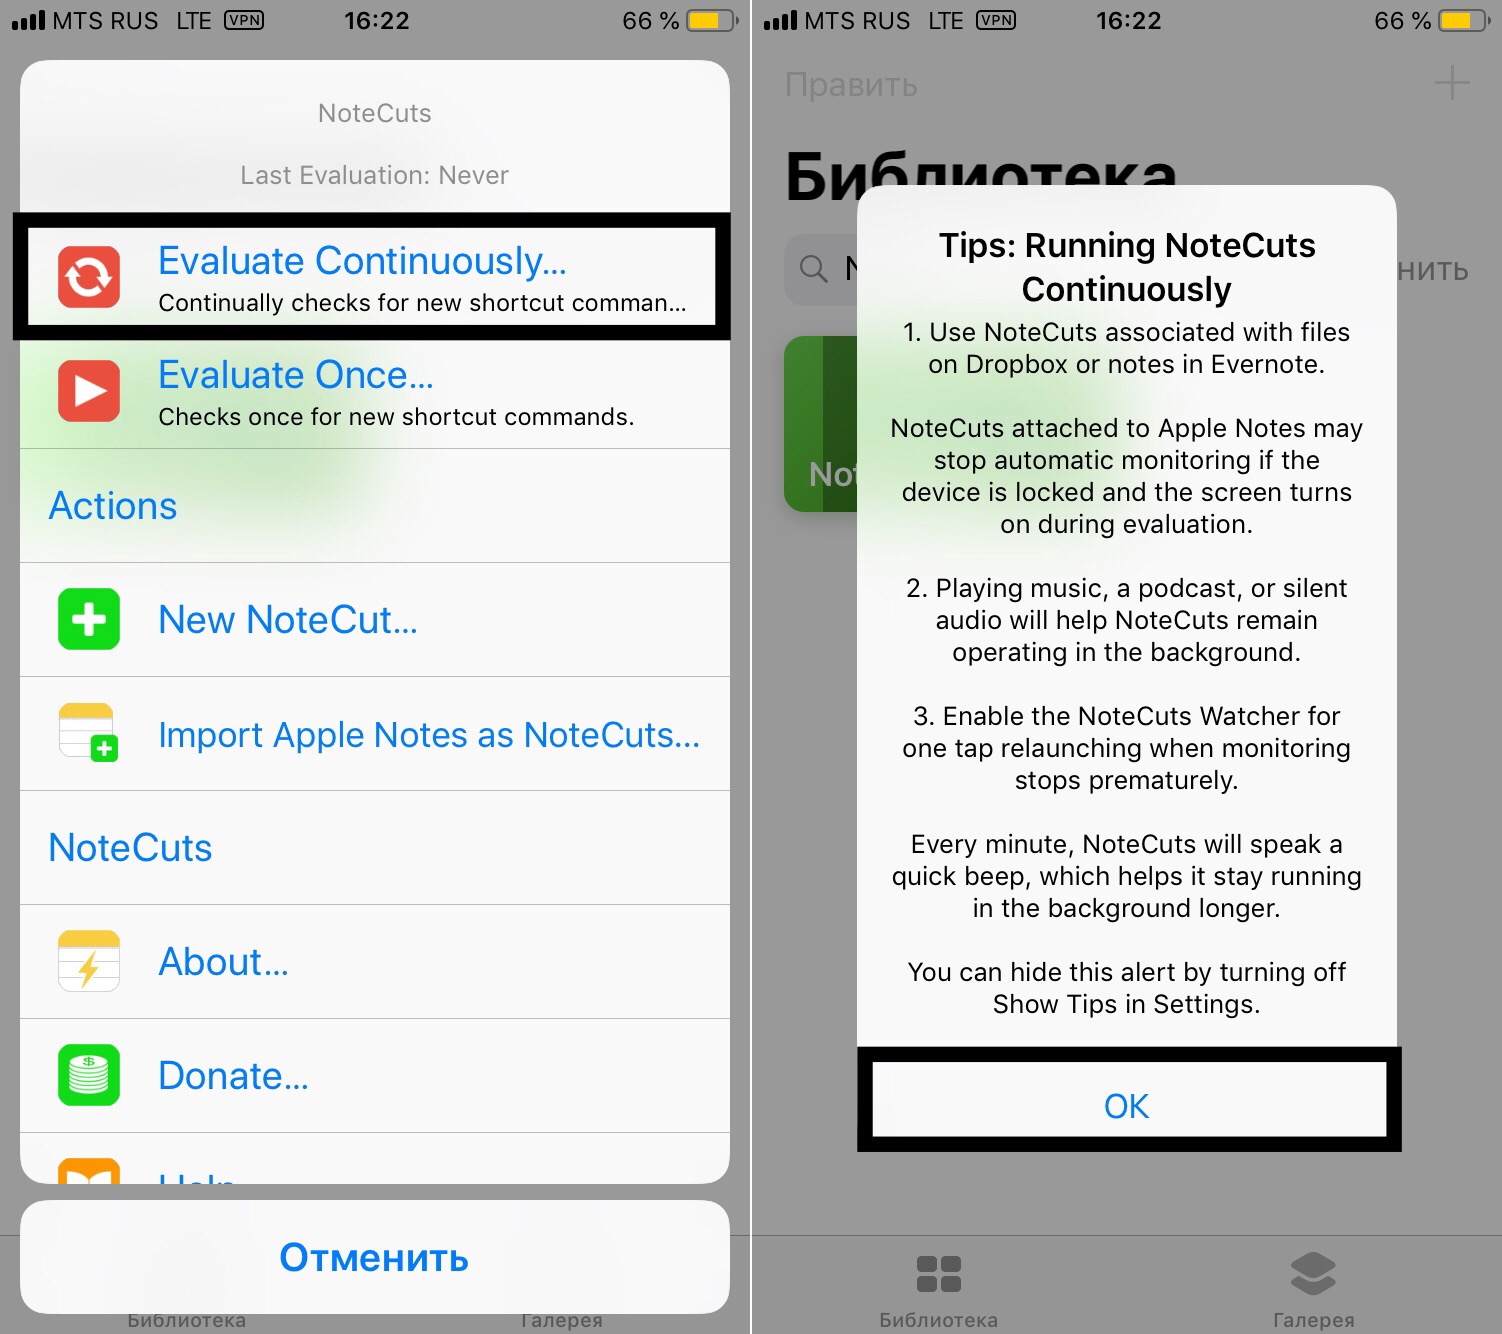
3. NoteCuts
✳️*️⃣*️⃣ │ iOS 9.0.0 (?) — 12.4.9
Download Notecuts
Command to start NoteCuts with one click
This shortcut is from the creator of Cronios, so it is similar to cronios in its interface and working principle, but it has serious differences from Cronios too. Unlike Cronios, it does not check the time and date, but there is a trigger in the file, which is previously saved in Dropbox/Notes/Evernote. For example, you can configure IFTTT to add a command for run specific shortcut on your device. Notecuts will check the file, find the command, and run the shortcut. All of this will happen in the background. The main disadvantages of this method, like with cronios, are increased power consumption and stopping after some time.
The full instructions can be found in the NoteCuts.
Creation of notecut
Consider creating a notecut in Dropbox
Click "New Notecut...".
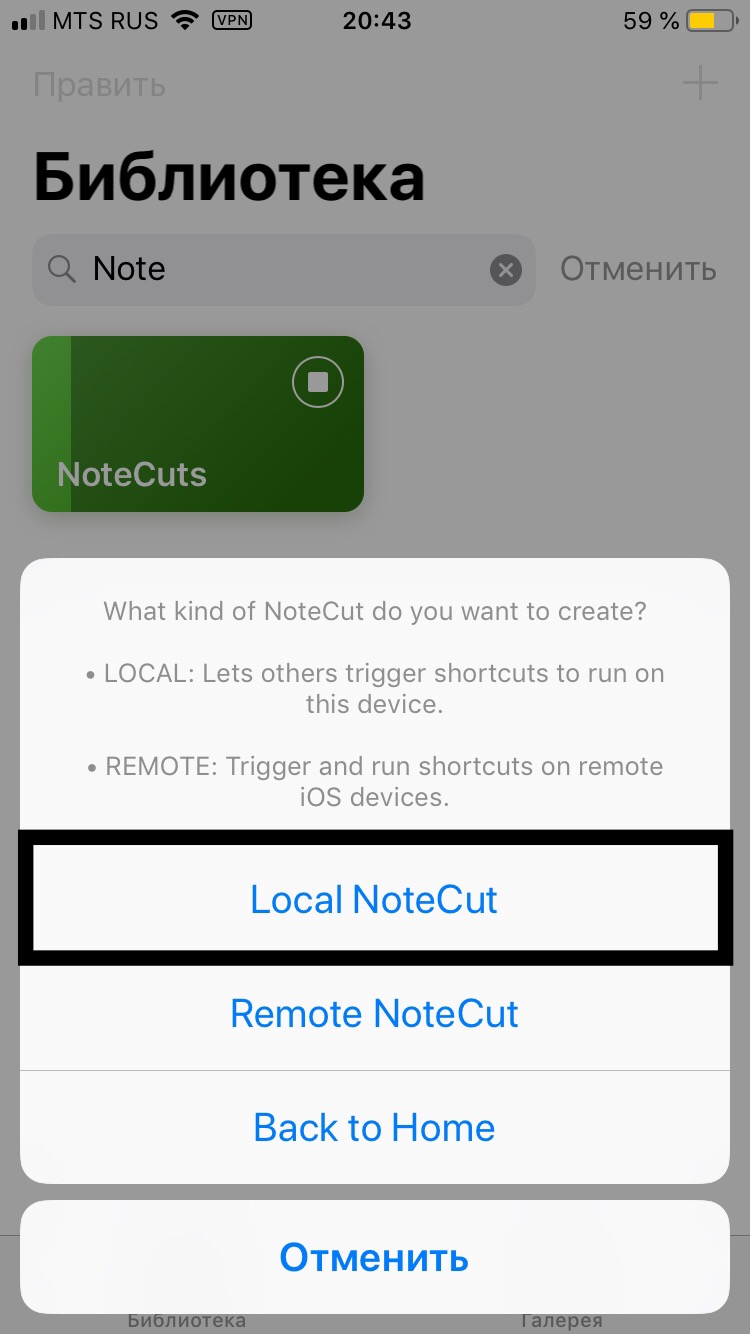
Select "Local NoteCut".
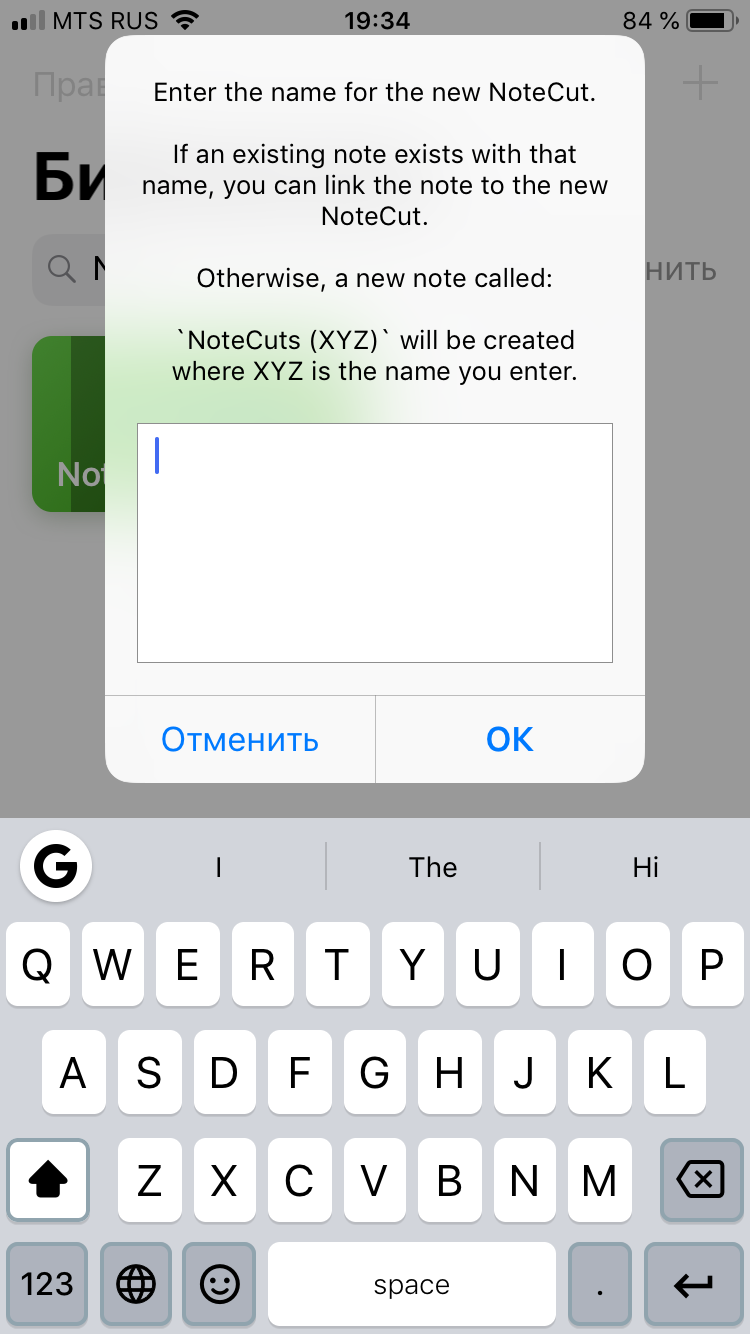
Enter a name (any characters) for your notecut.
Select storage to save the file needed for NoteCuts to work. We'll look at the method with Dropbox , but if you don't want NoteCuts to consume traffic, you can choose Apple Notes and disable note syncing in iCloud settings.
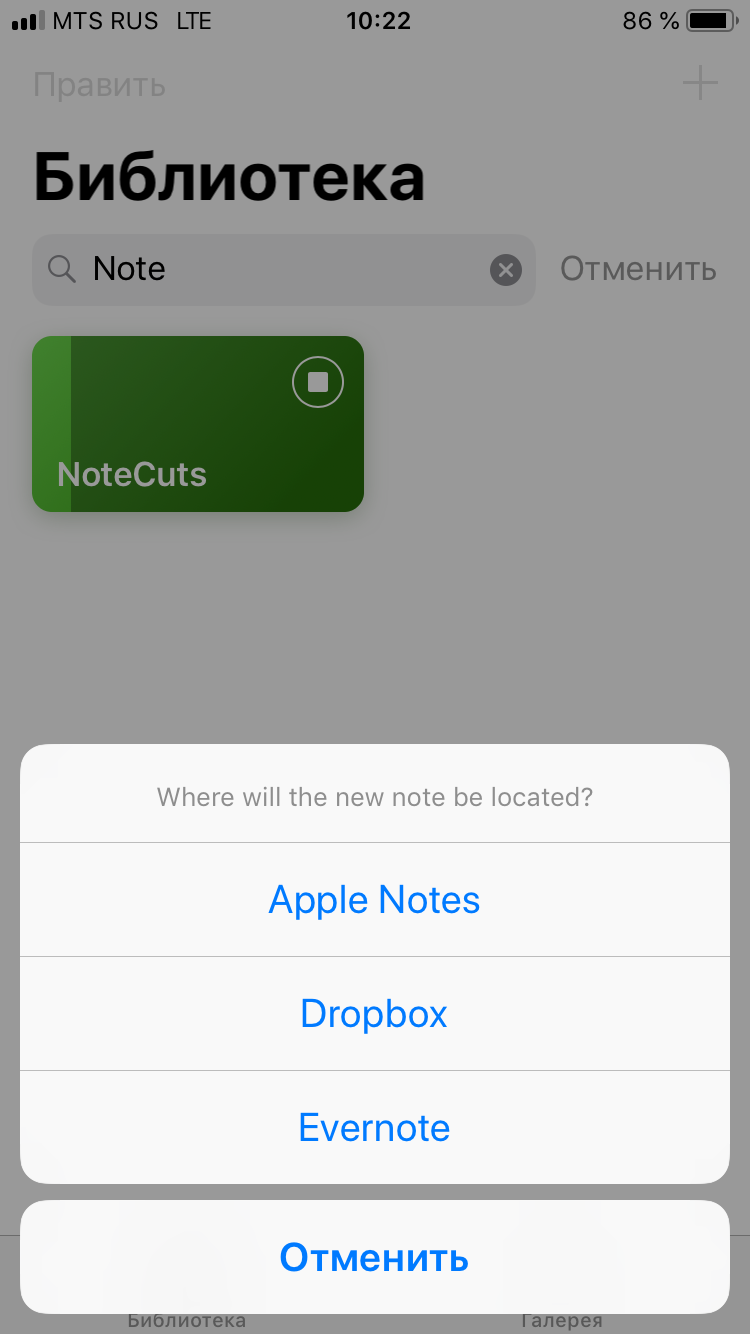
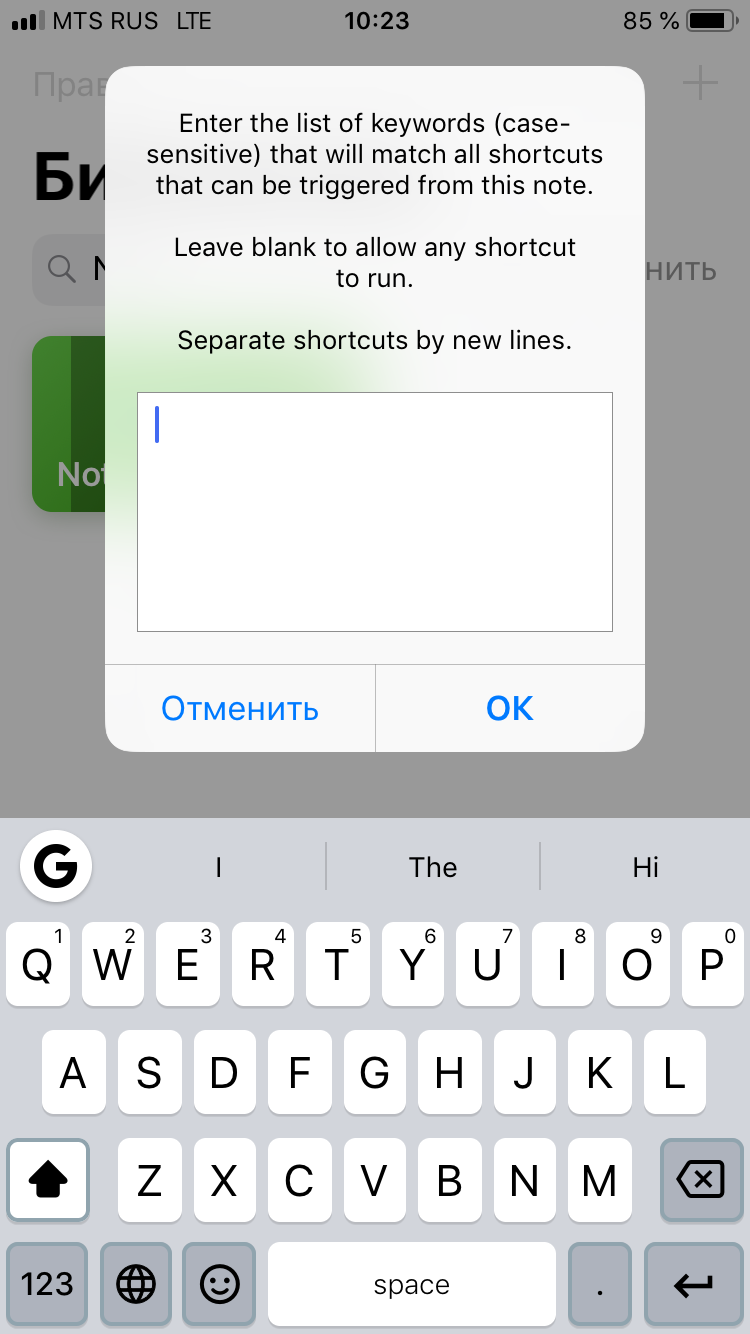
Leave the next field empty
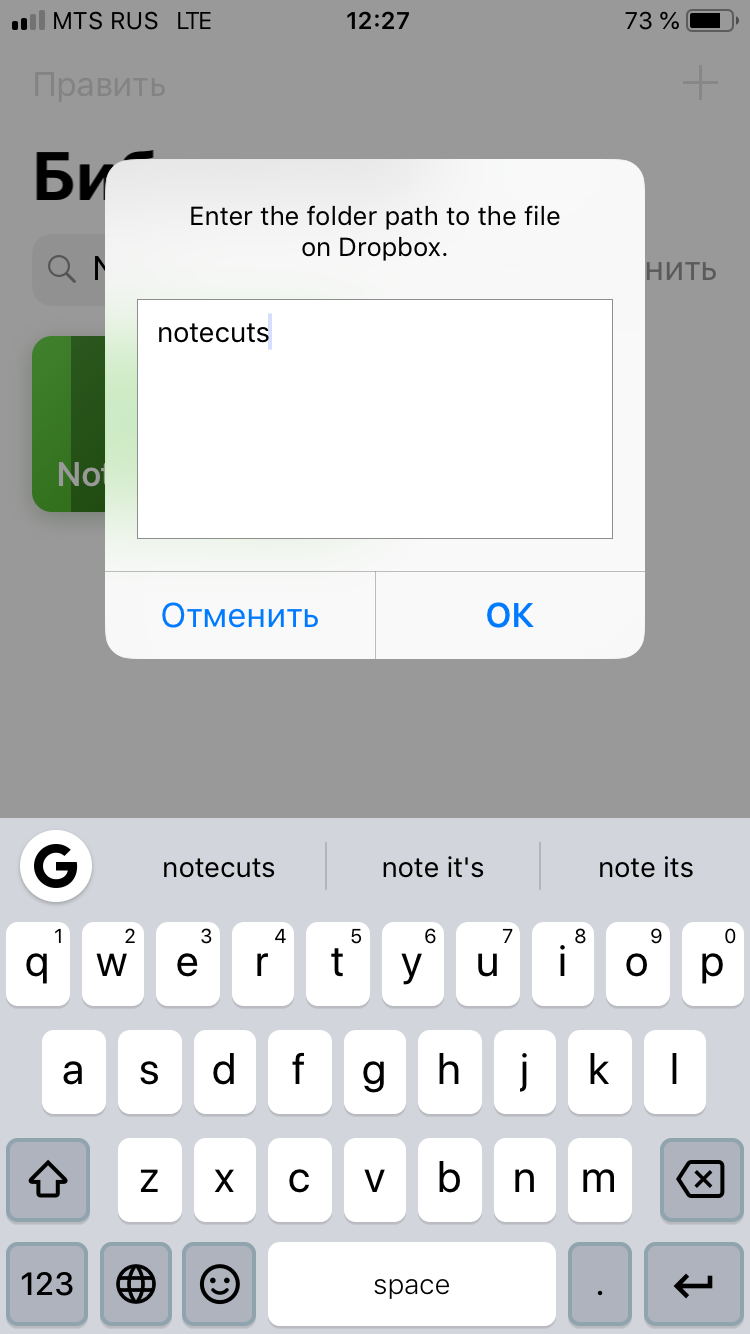
Enter the path to the Dropbox folder where NoteCuts will save the required file. If the folder is located in the root and not in another folder, just write its name without additional characters.
Notecut created. By clicking "Back to home", you will see it in the main menu.
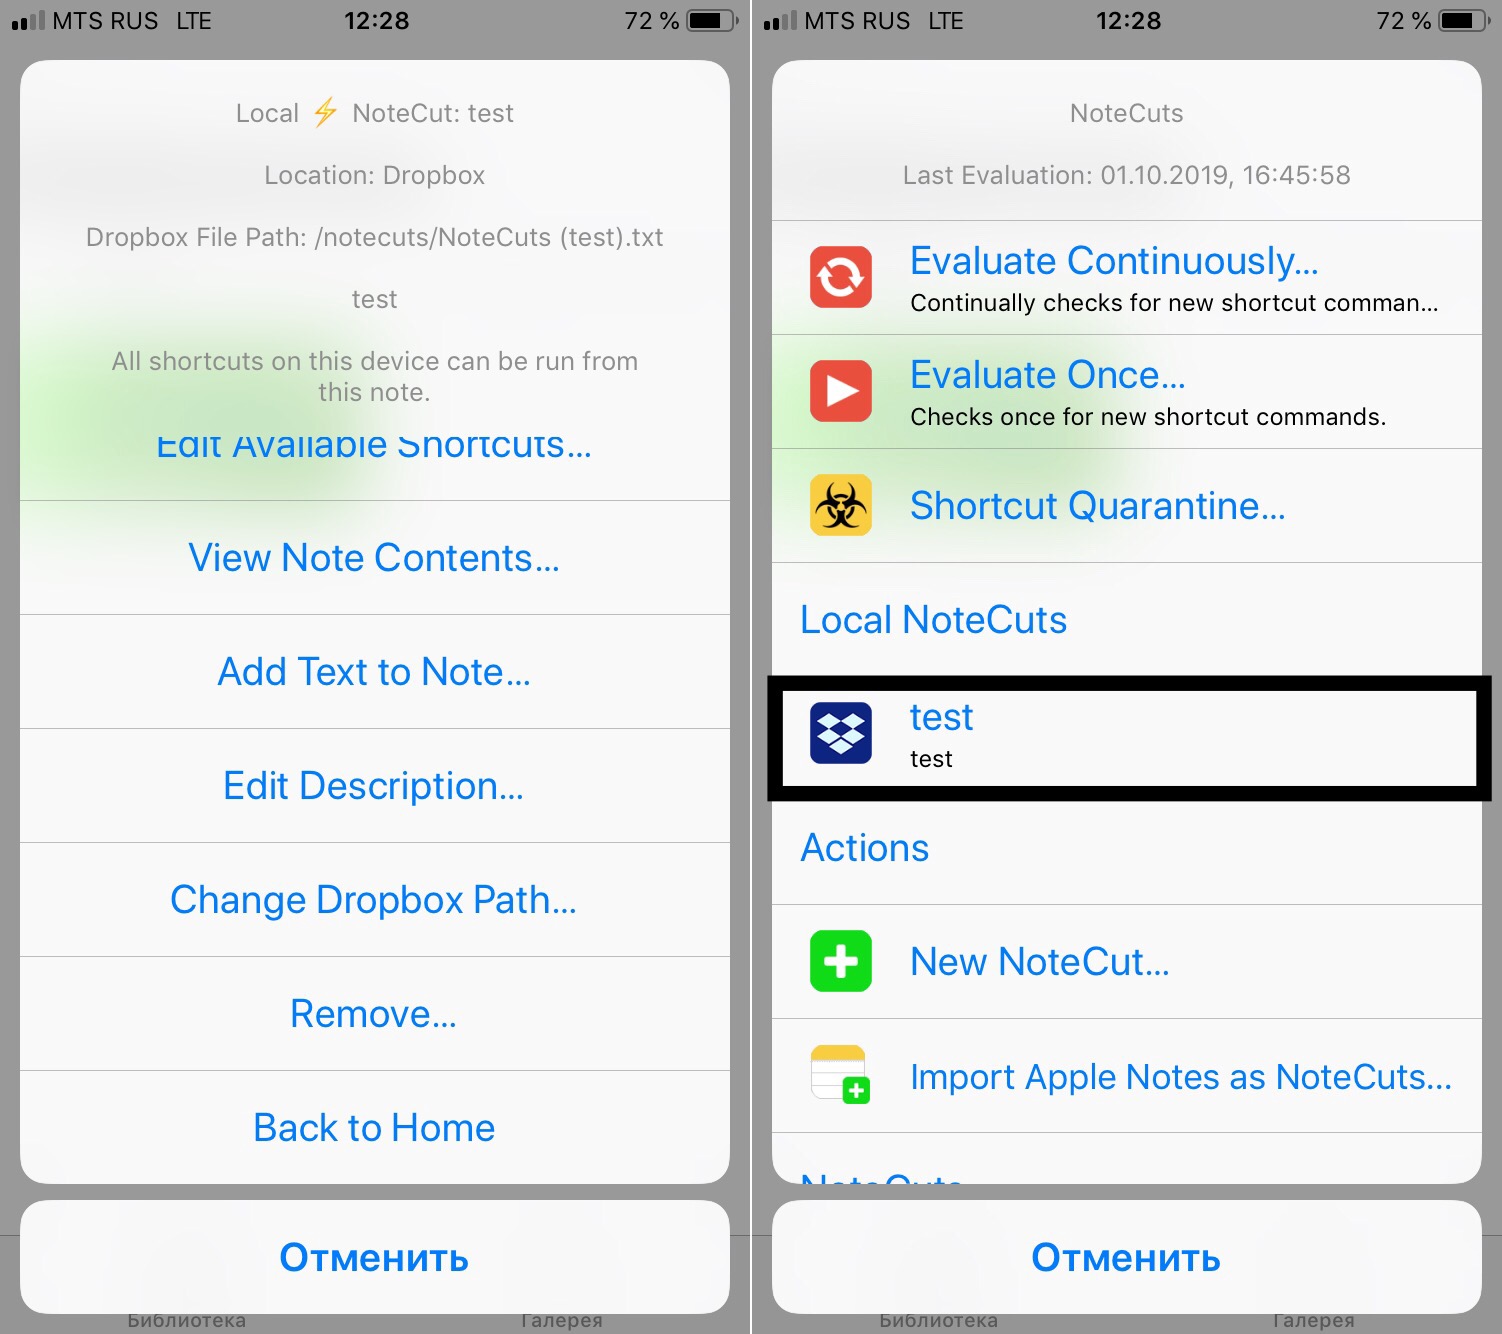
Start and work with NoteCuts
Run the shortcut, click "run continuously" and "OK"
Now the shortcuts is running. Let's figure out how to make it run by a command.
Let's open the folder from Dropbox that you specify in a file Manager that allows you to edit text files.
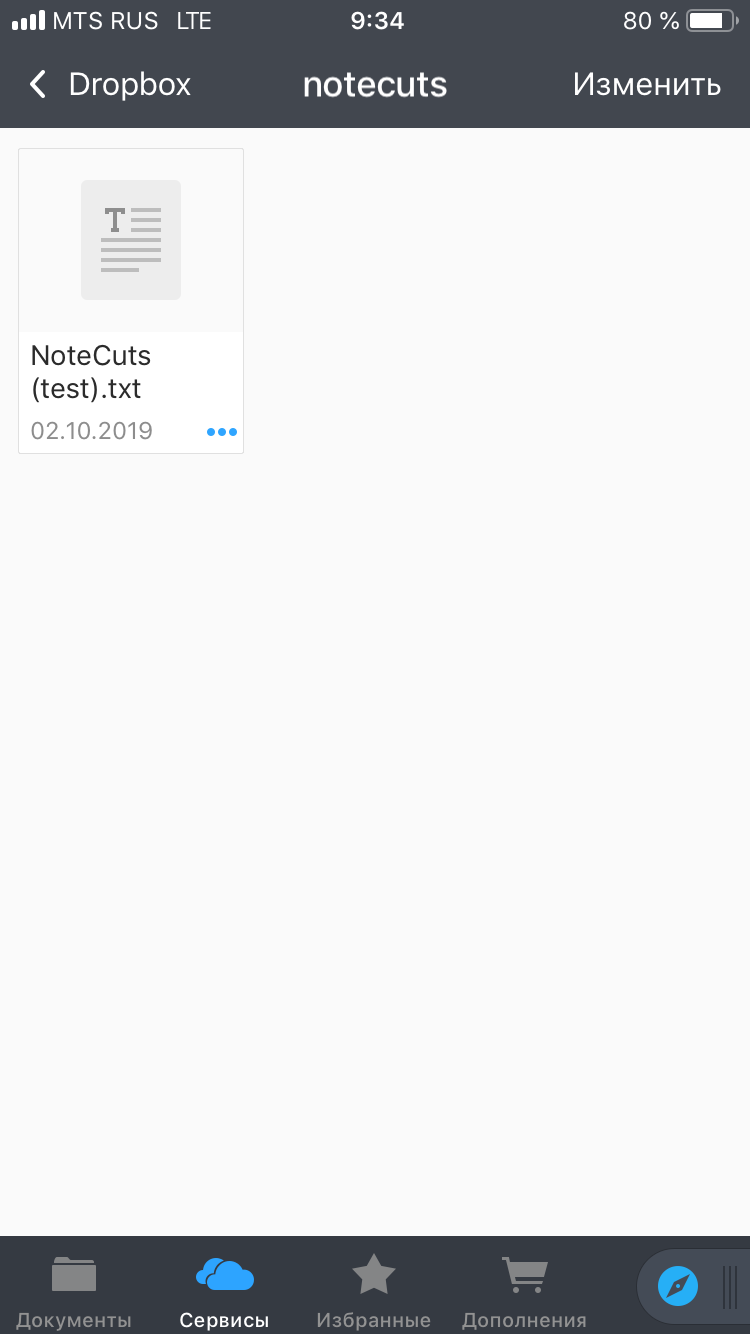
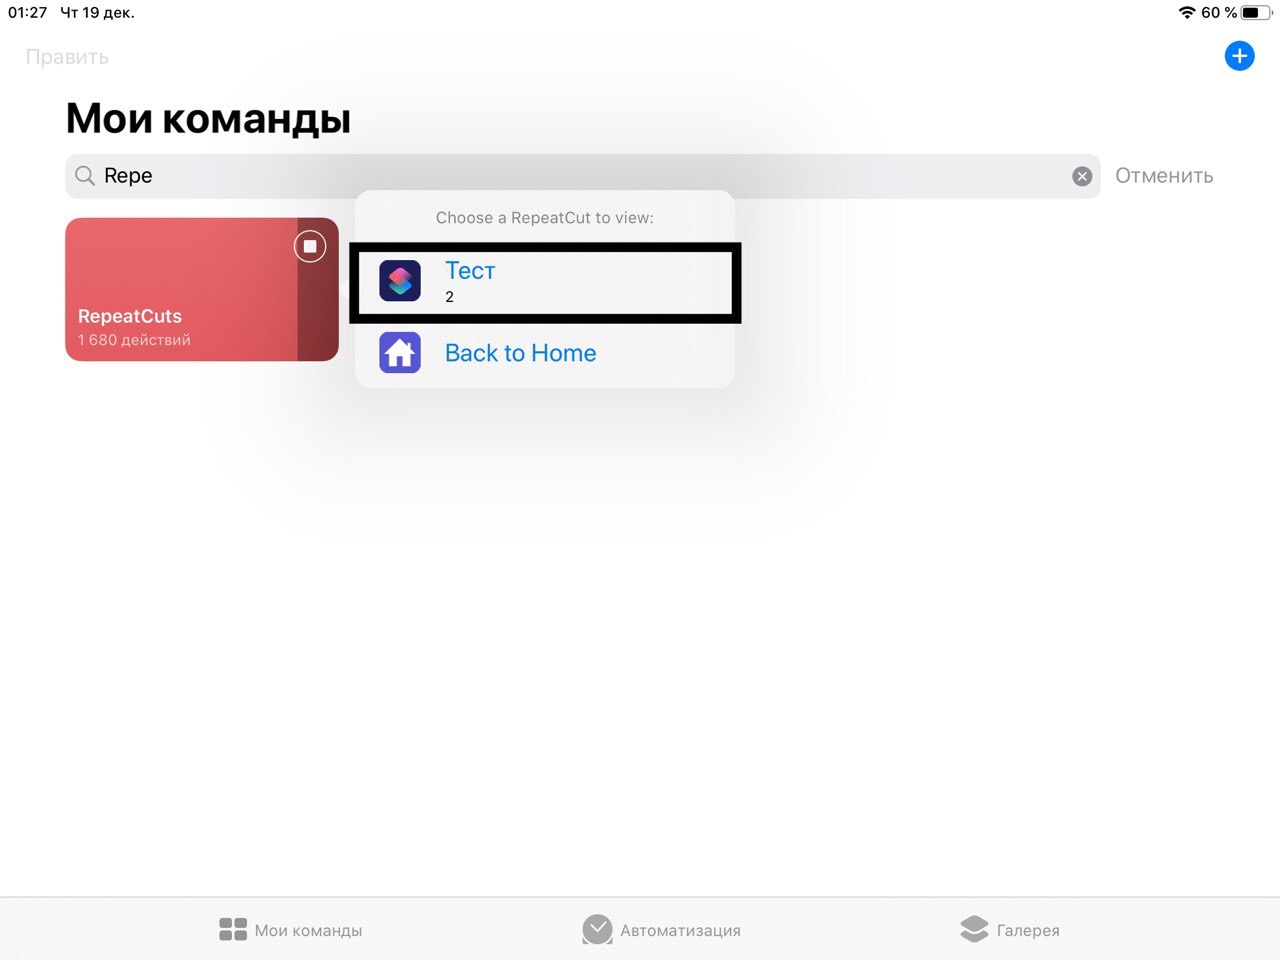
Opening the NoteCuts text file. To run any of the commands from your library, add " ▶ ⟨shortcut name⟩" at the end of this file, where ⟨shortcut name⟩ is the name of shortcut you want to run. You don't need to write brackets or quotation marks. For example, the image below shows you how to run a shortcuts named "Test".

Approximately 30 seconds after you have specified the shortcut, it will start.
Thus, when you specify a comnand to run a specific shortcut, you can run any shortcuts from anywhere in the world on devices with your Dropbox account and running NoteCuts. For example, on a child's phone, or on an iPad that stays at home.
However this was only the foundation for the main functionality of the shortcut
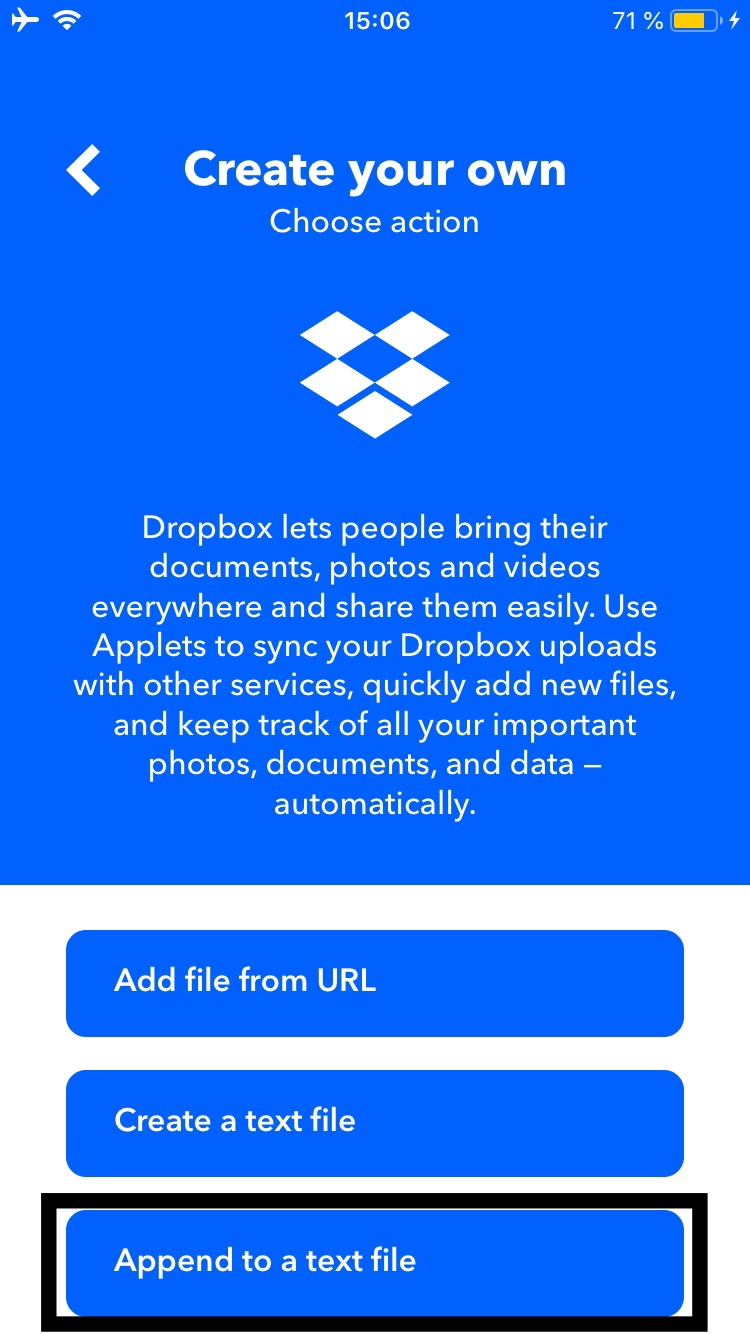
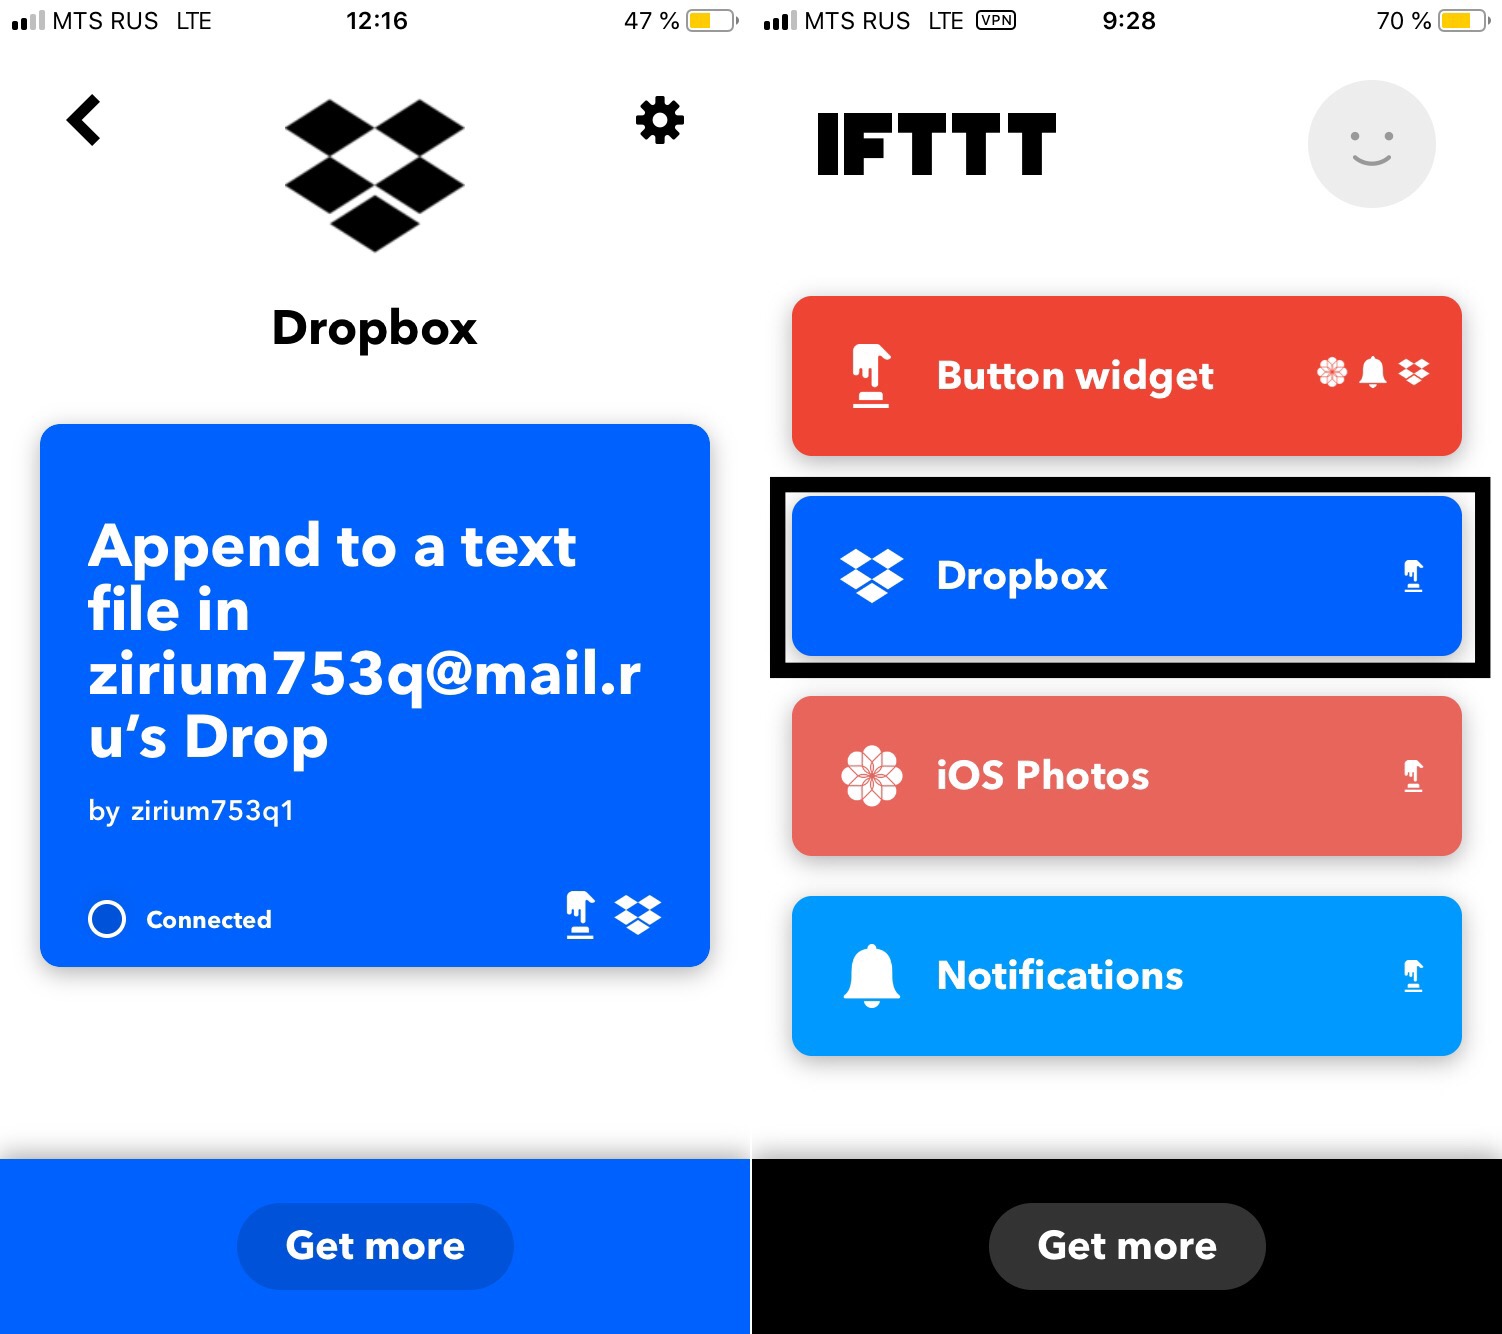
NoteCuts allows you to run commands using third-party software services such as Zapier and IFTTT . The main thing is that the service can add text to the Dropbox file. Let's look at integration with IFTTT .
Creating a new applet in IFTTT.

Click "This" and select any available trigger.

Then click "that", find and select "Dropbox".

Click "Append to a text file".
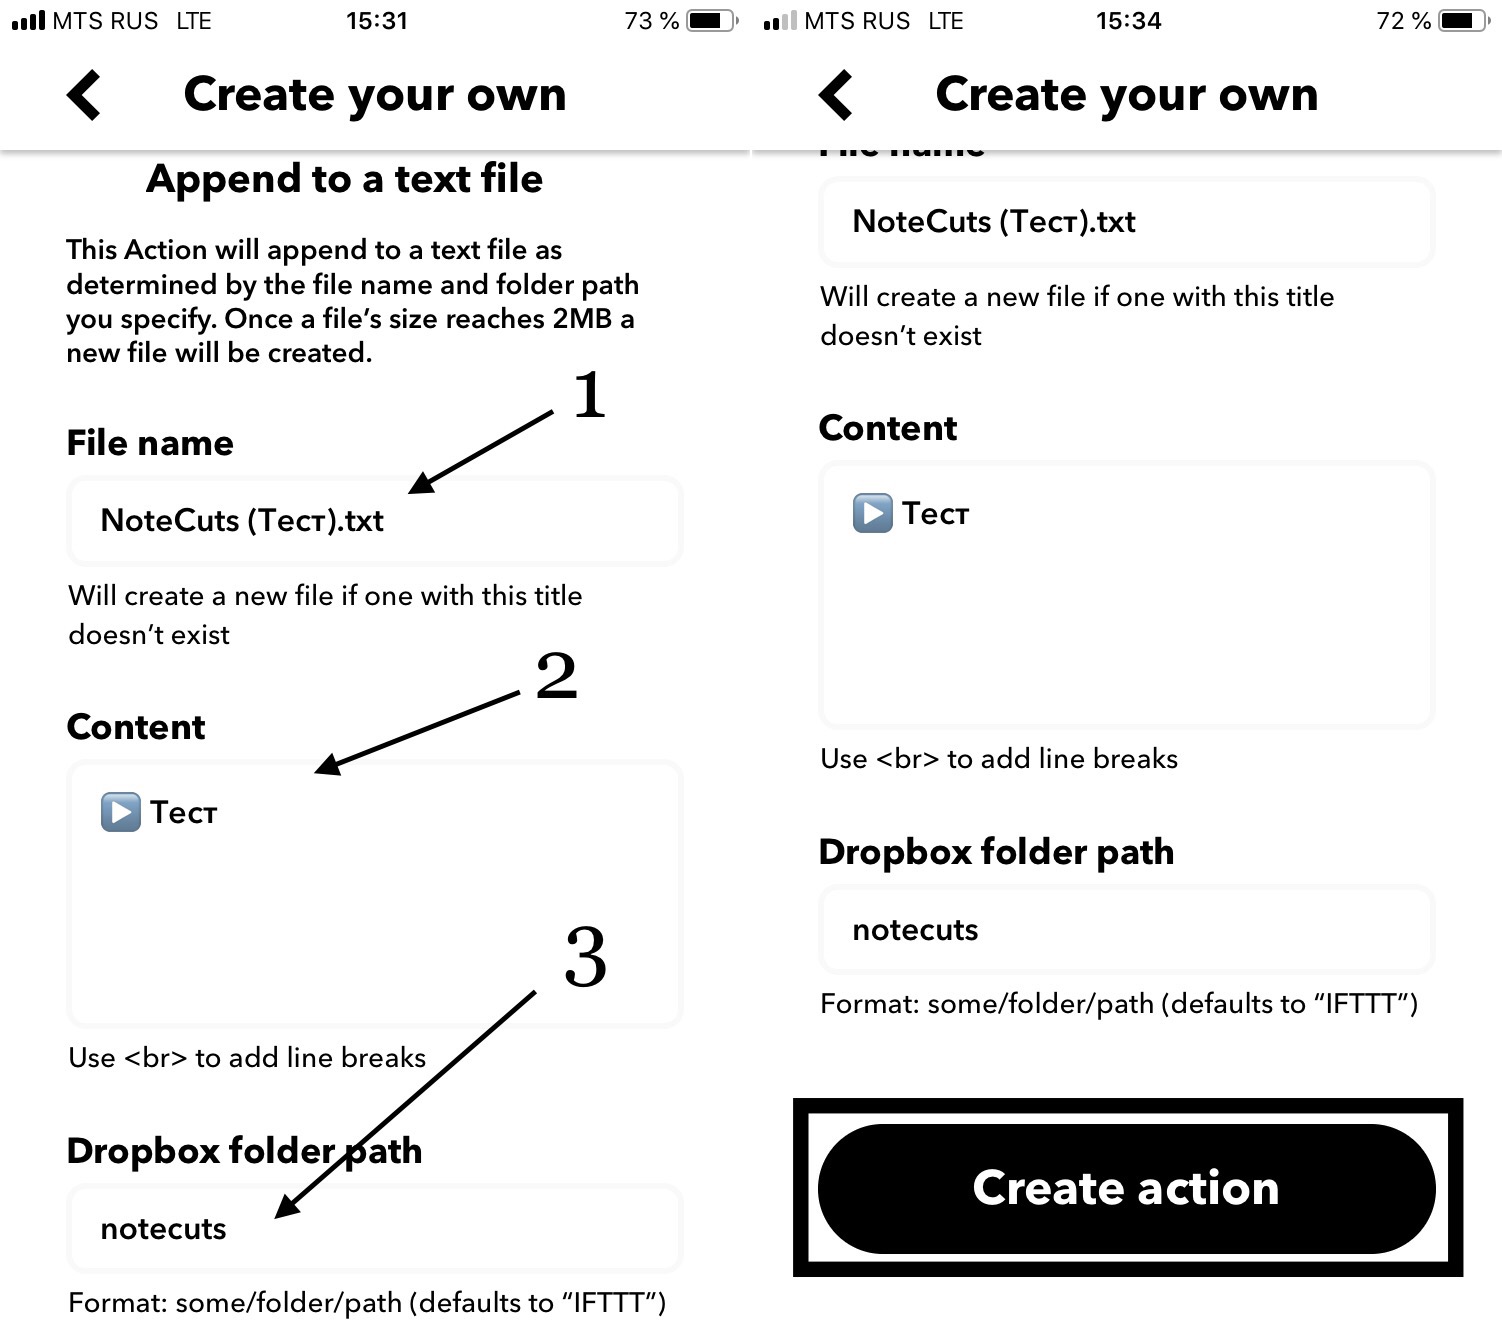
Write:
- Name of the notecut file in Dropbox
2. Type command for running the desired shortcut, as explained above.
- The path to the file in Dropbox, as explained above.
For example, the screenshot shows how to configure the launch of a shortcut named "Test" by writing "NoteCuts" to the file, which is located in the "notecuts"path.
Click "Create action".
Click "Finish".

Integration with IFTTT is completed.
This way, you can automate your location, time, and so on without having to ask for confirmation before launching it.
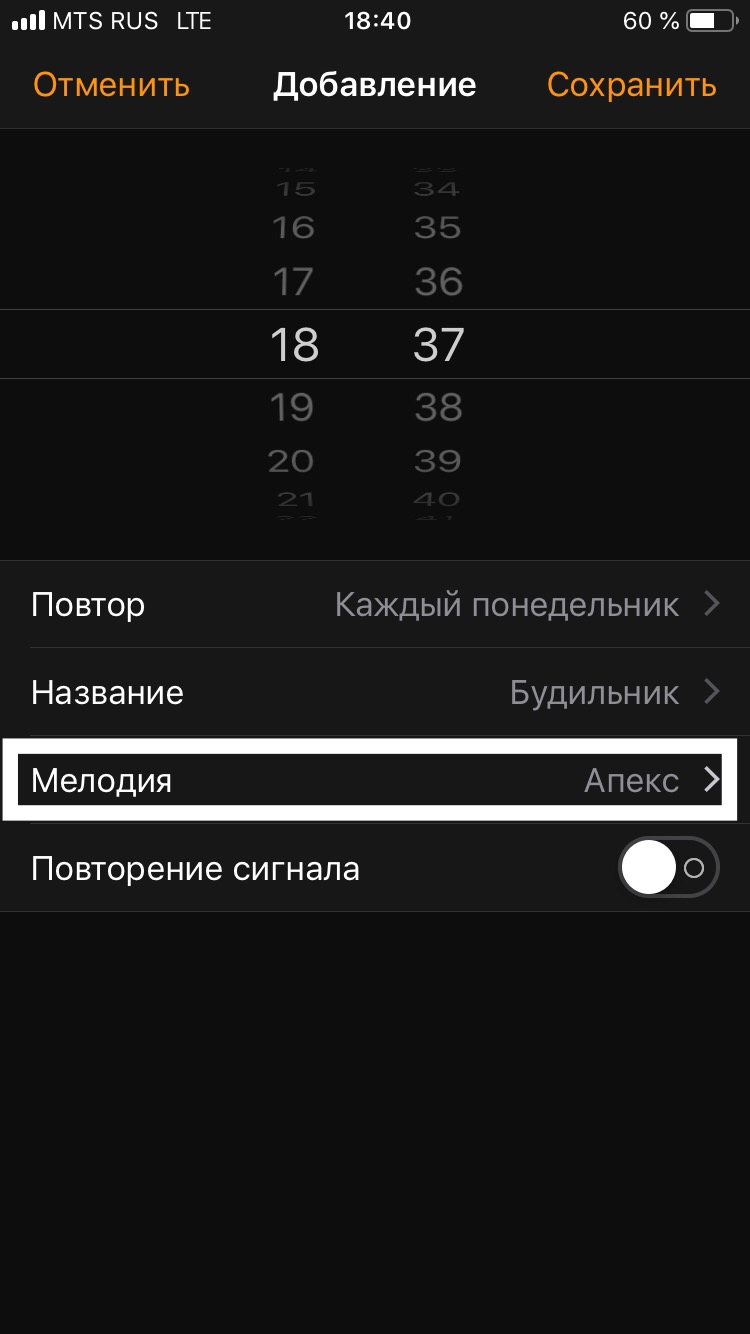
4. Alarm Clock + Siri
✳️*️⃣ | iOS 12.0.0+ ; iPadOS 13.0.0+
THE METHOD WAS NOT TESTED
The essence of this tricky way is creation of a ringtone for an alarm clock that contains a command for Siri for run the shortcut. To implement this method, there is a special shortcut — AlarmCuts, but you can implement this way without it.
The next few steps are only available for iOS 12
First, open the Shortcuts.
Then open the inside of the shortcut running that you want to schedule.
Go to the shortcut settings by clicking on the "toggle" on iOS 12 - or on the "ellipsis" on iOS 13+.
Click "Add to Siri"
The next steps are for both iOS 12 and iOS 13.0.0+.
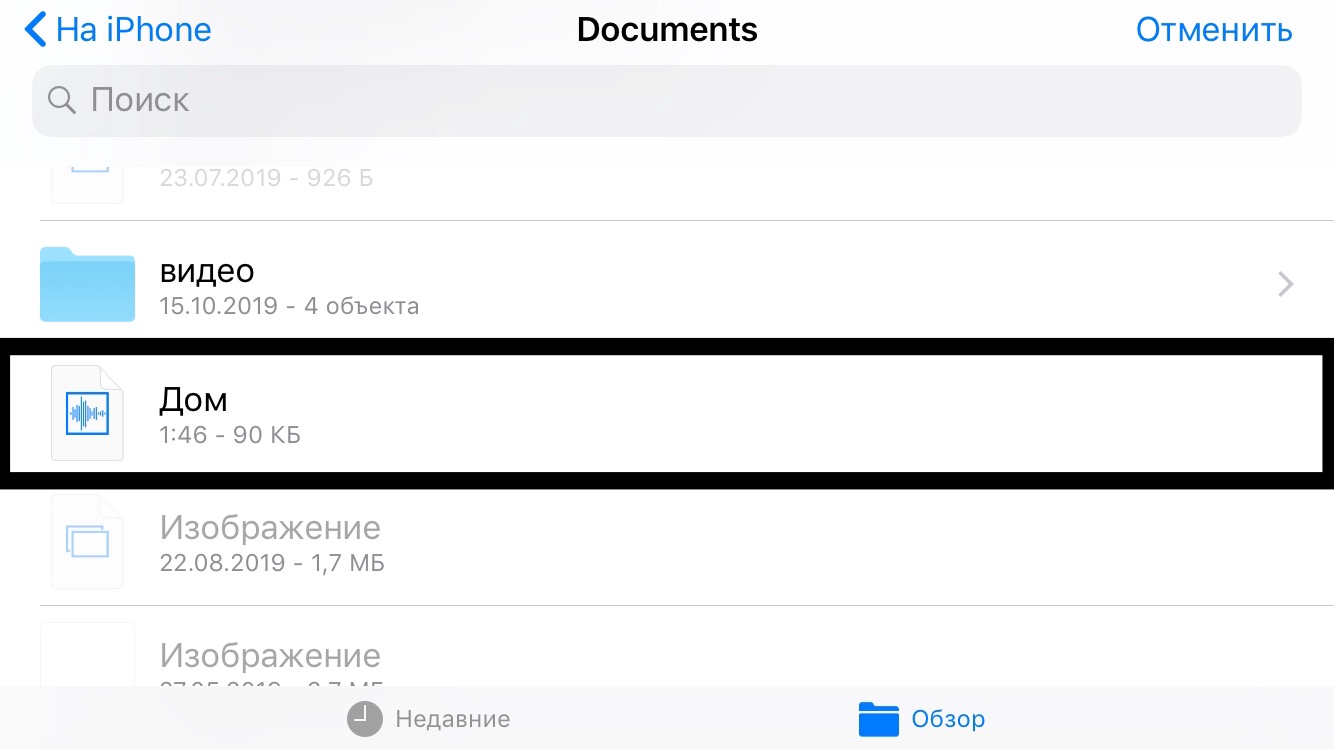
Open your voice recorder and record a phrase like "hi, Siri! ⟨shortcut name⟩". Then share the resulting audio recording and save it to " files"
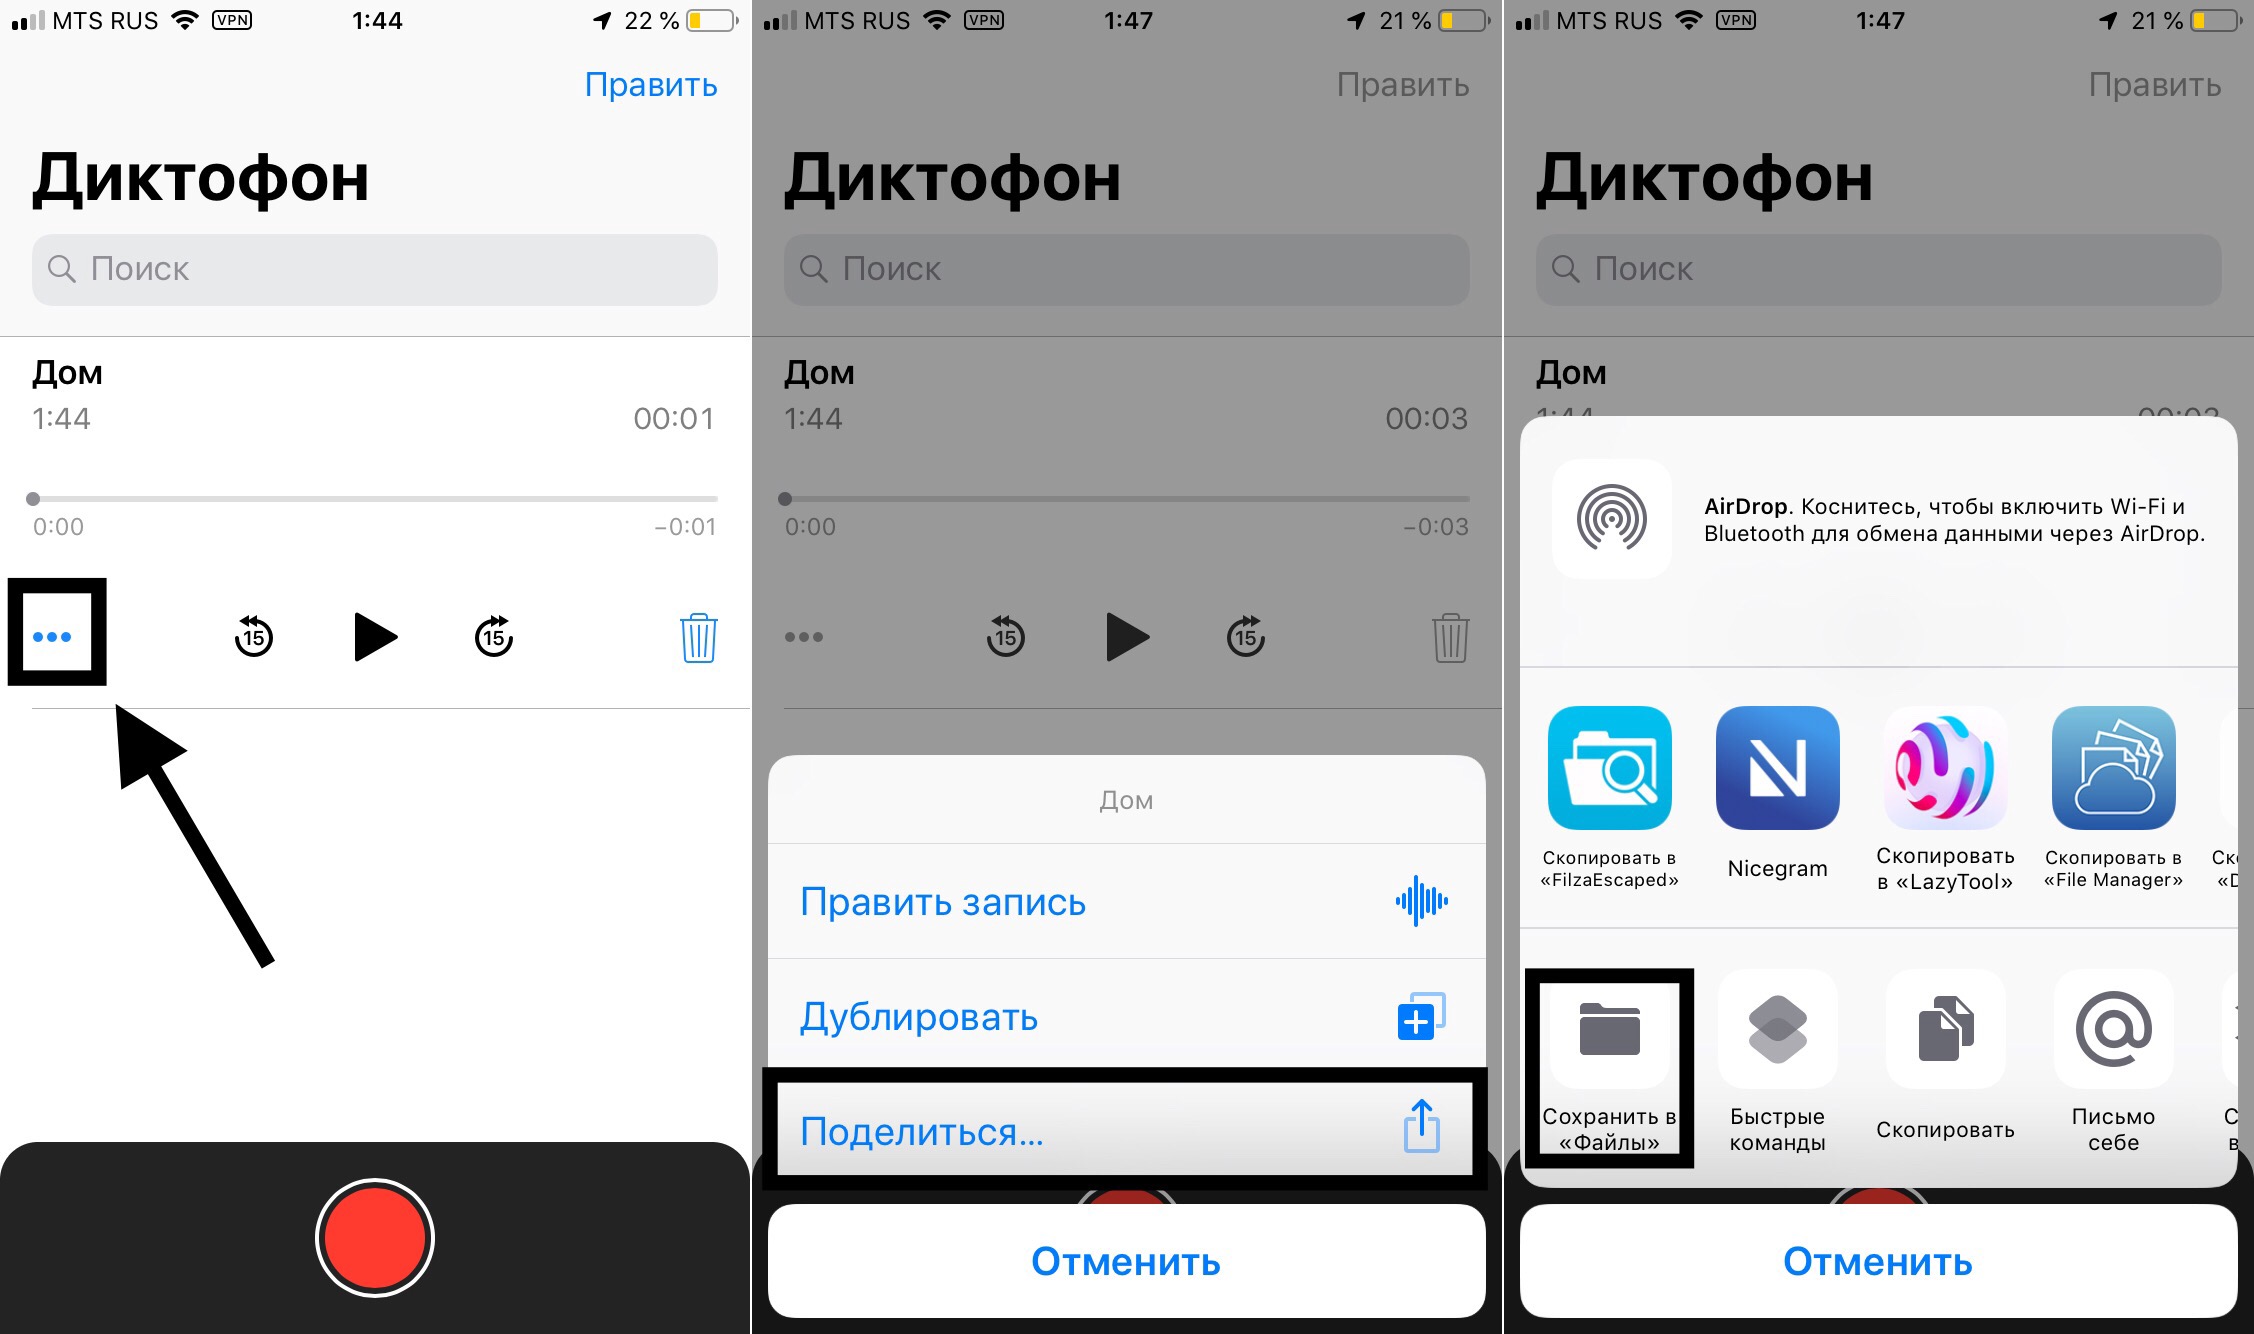
Download the Garage band app, if you don't have it and open it.
Scroll until you find "audio Recorder". Press it.

Tap on the blue triangle to turn it gray

Tap the button with the gray stripes.
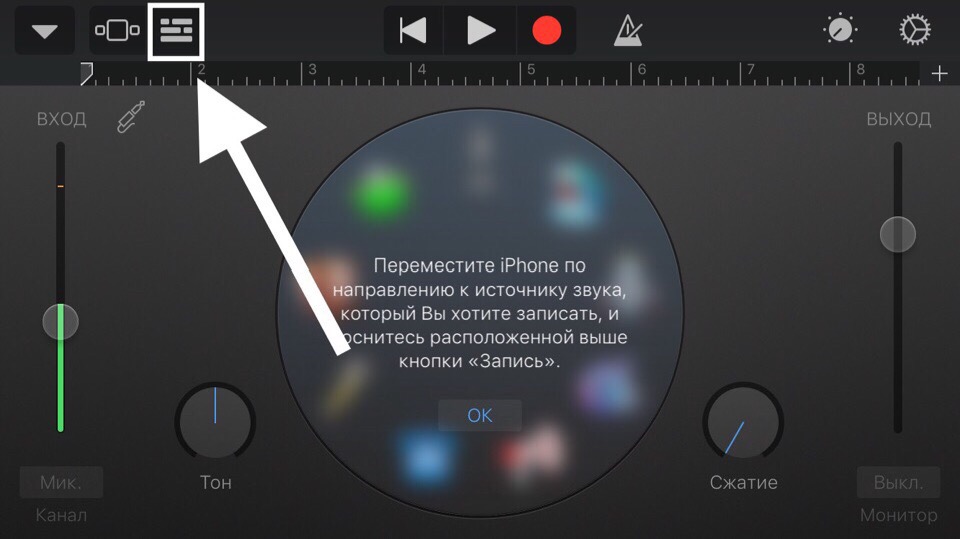
Tap on the loop.
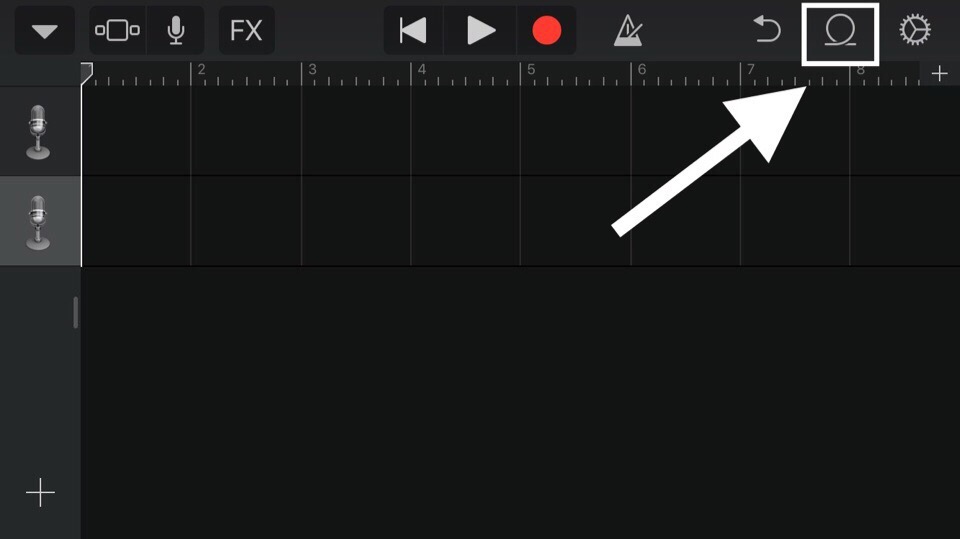
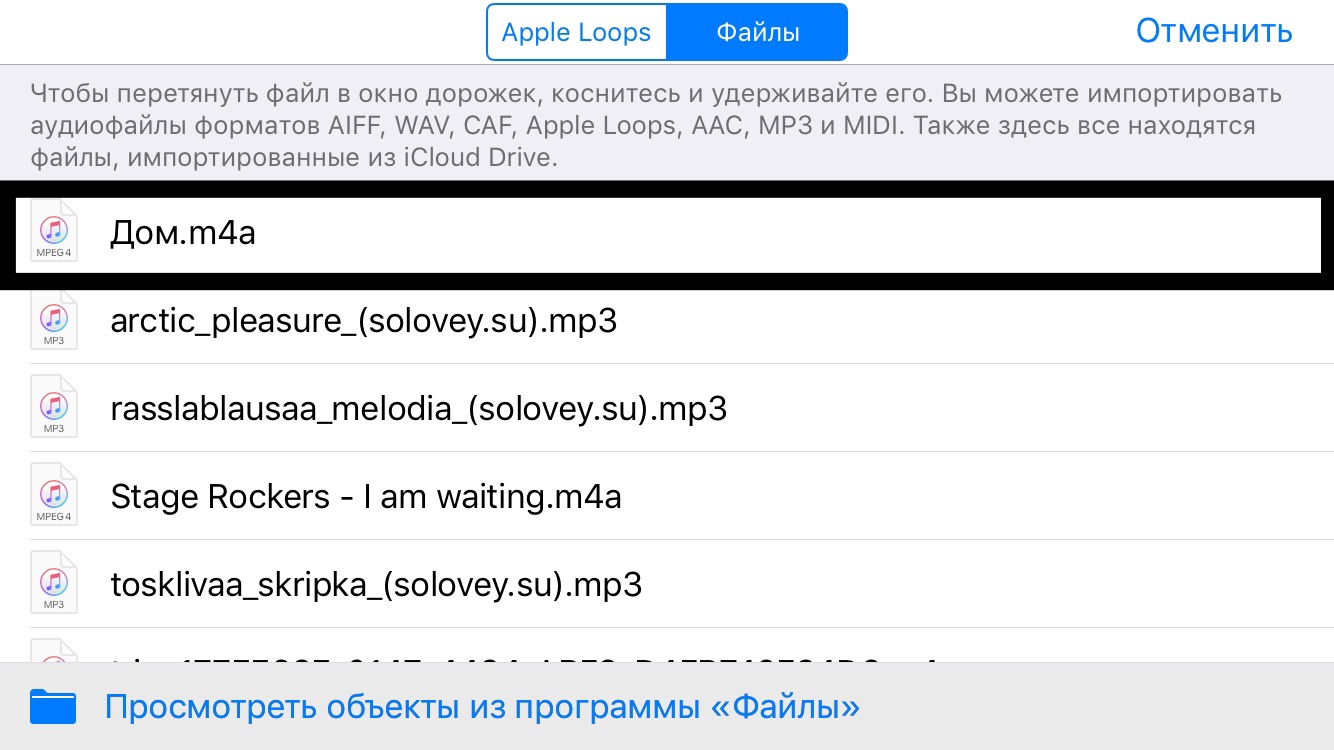
Click on " files"

Click "View objects from the «Files» app»"
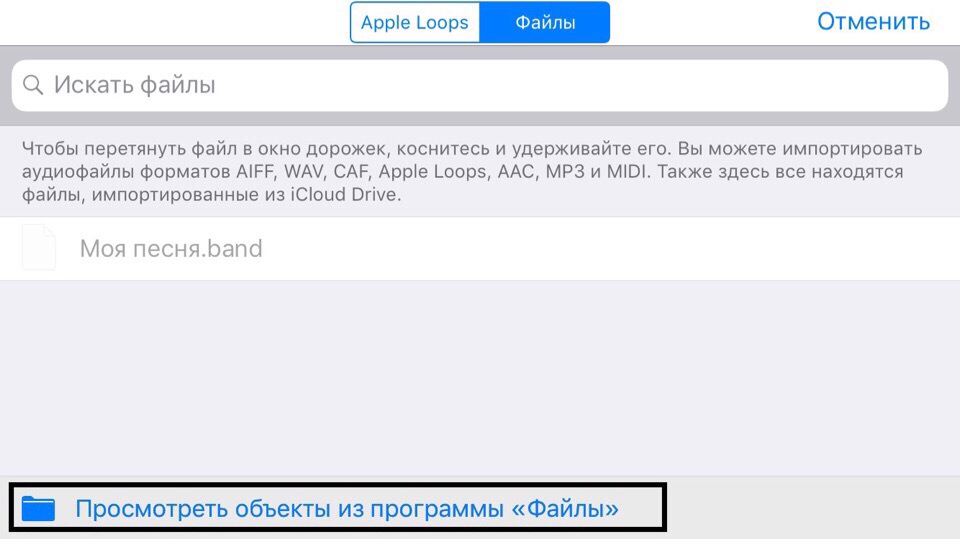
Select the record that you made before from the files.
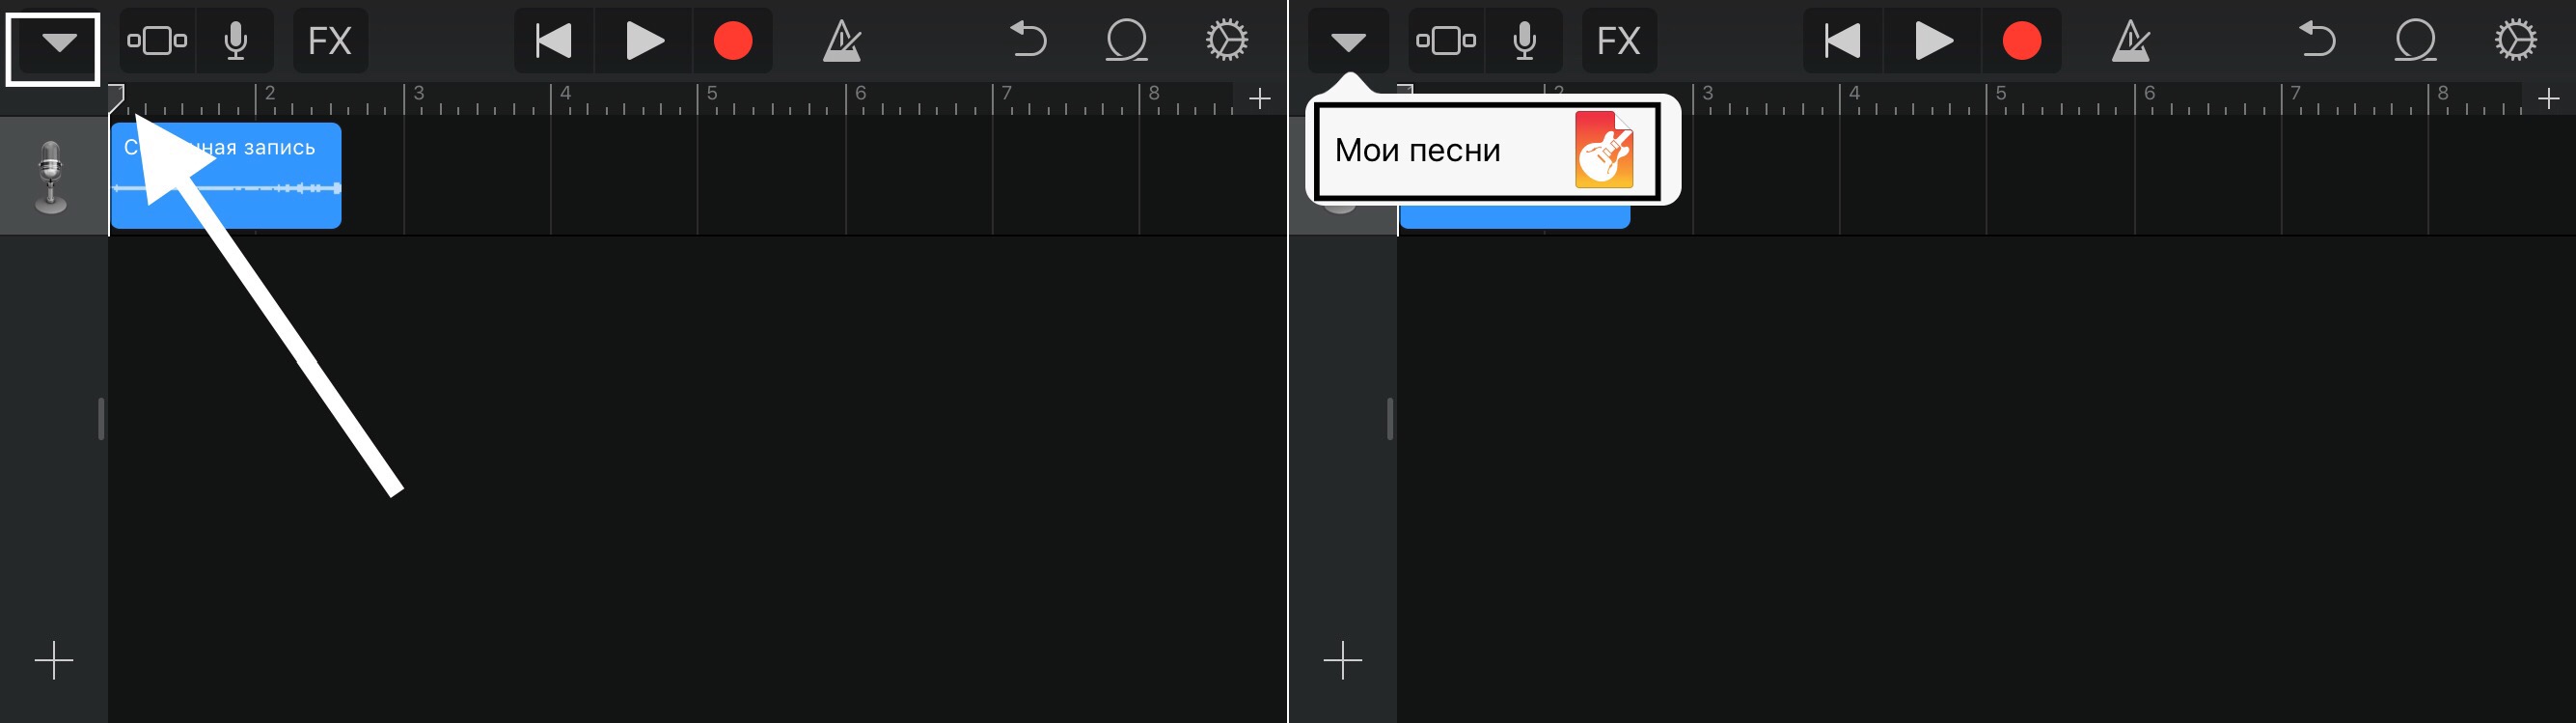
Push and pull it.
If necessary, cut it. Click the down arrow. Then, click "My songs"
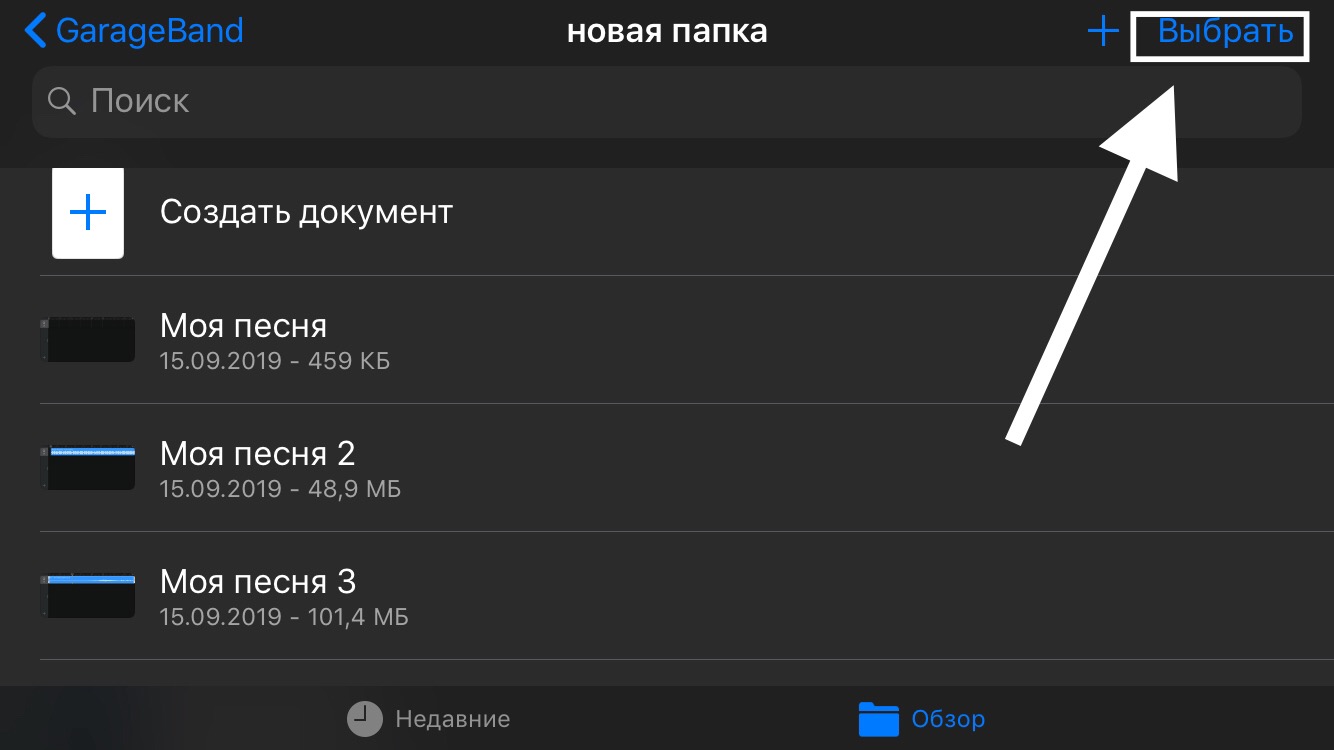
The ringtone was uploaded. Click "Select".
Select the created ringtone and click on the "share" button"
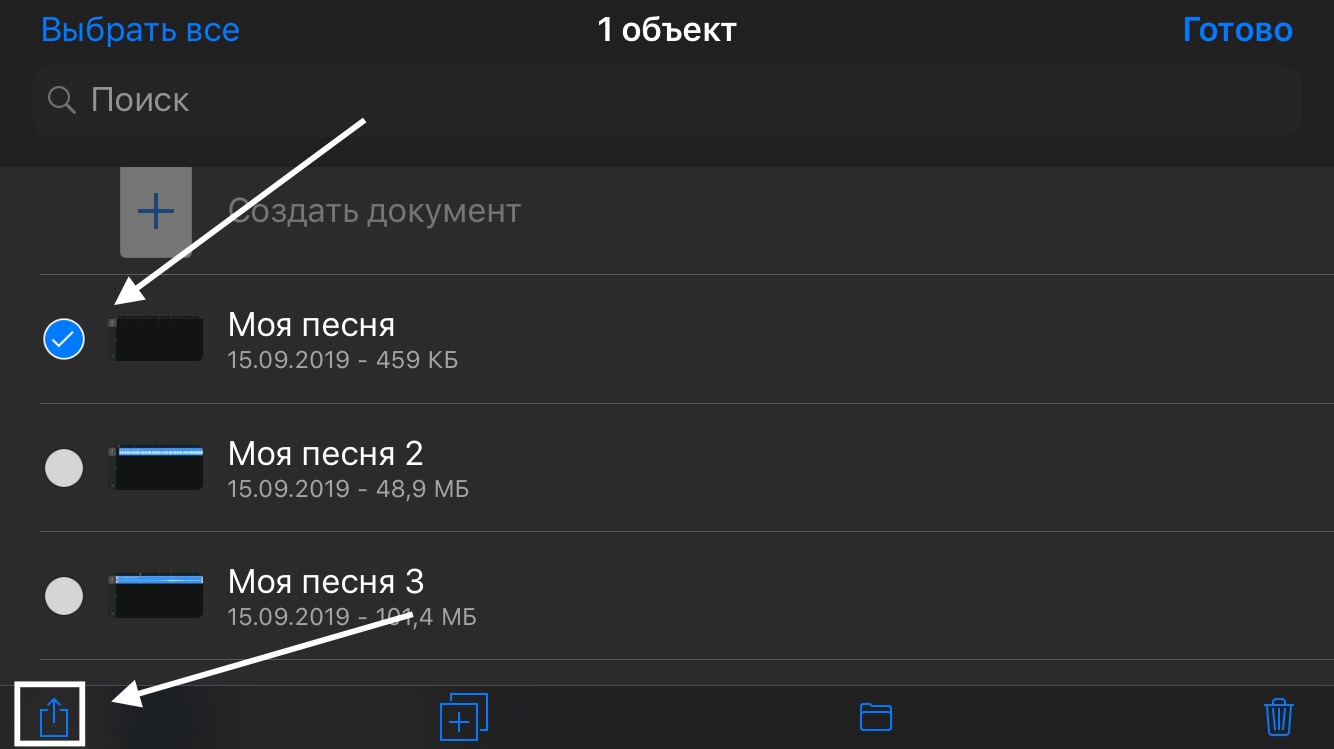
Select " Rigton"
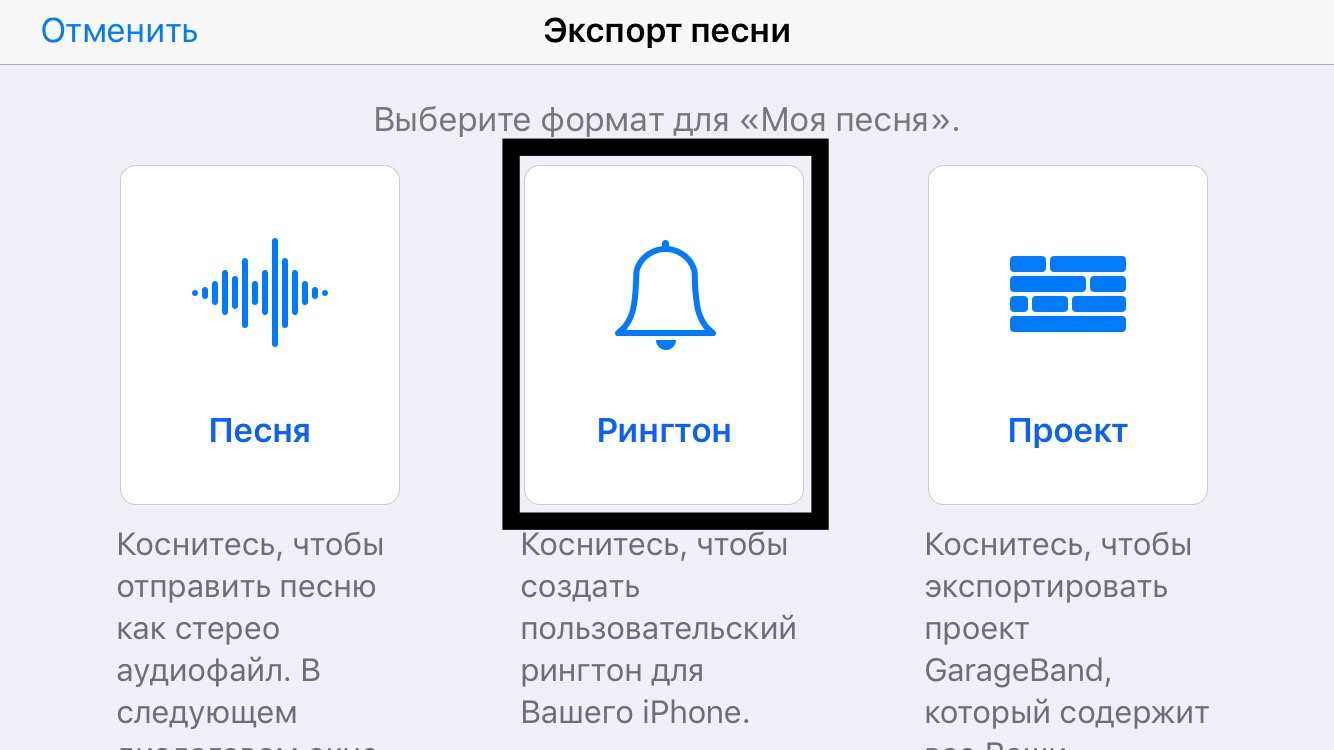
Enter the name of your rigton and click "Export" and "OK"

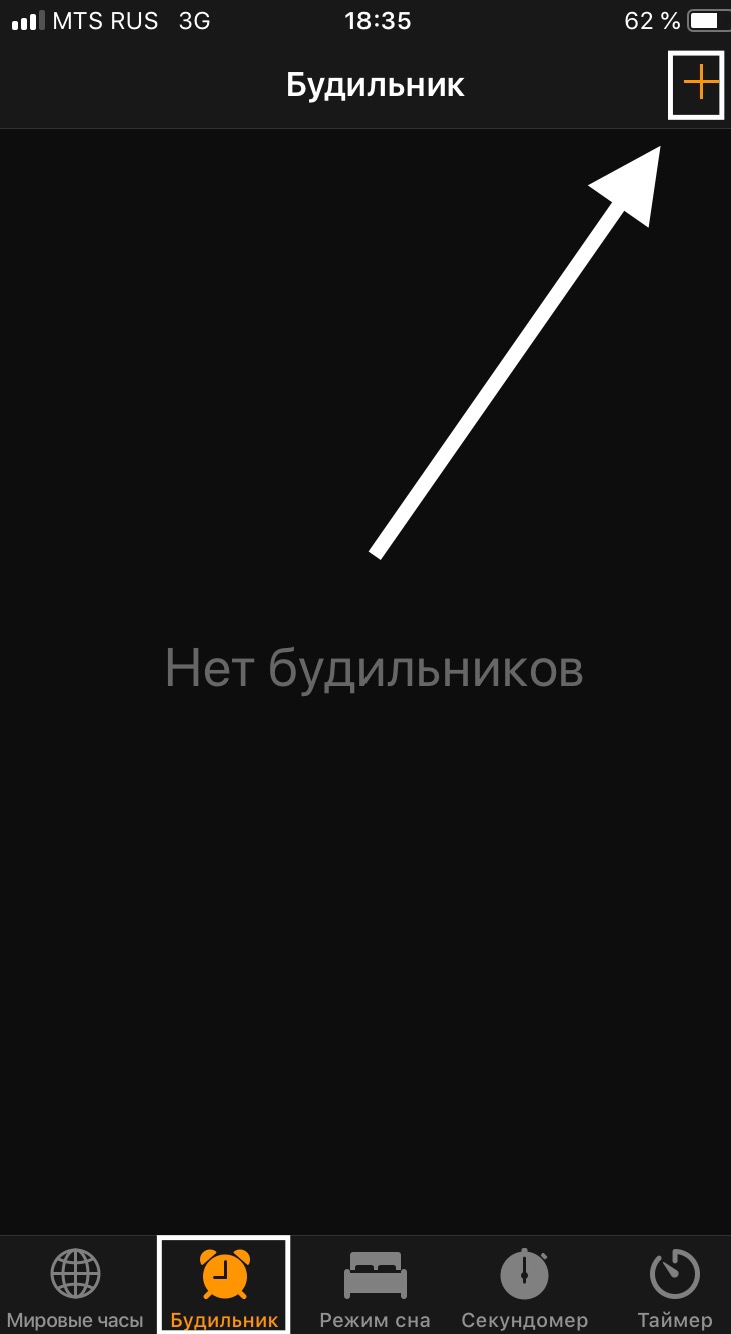
Ringtone exported. Now go to the "Watch app"
Open the section "Alarm"and press "+"
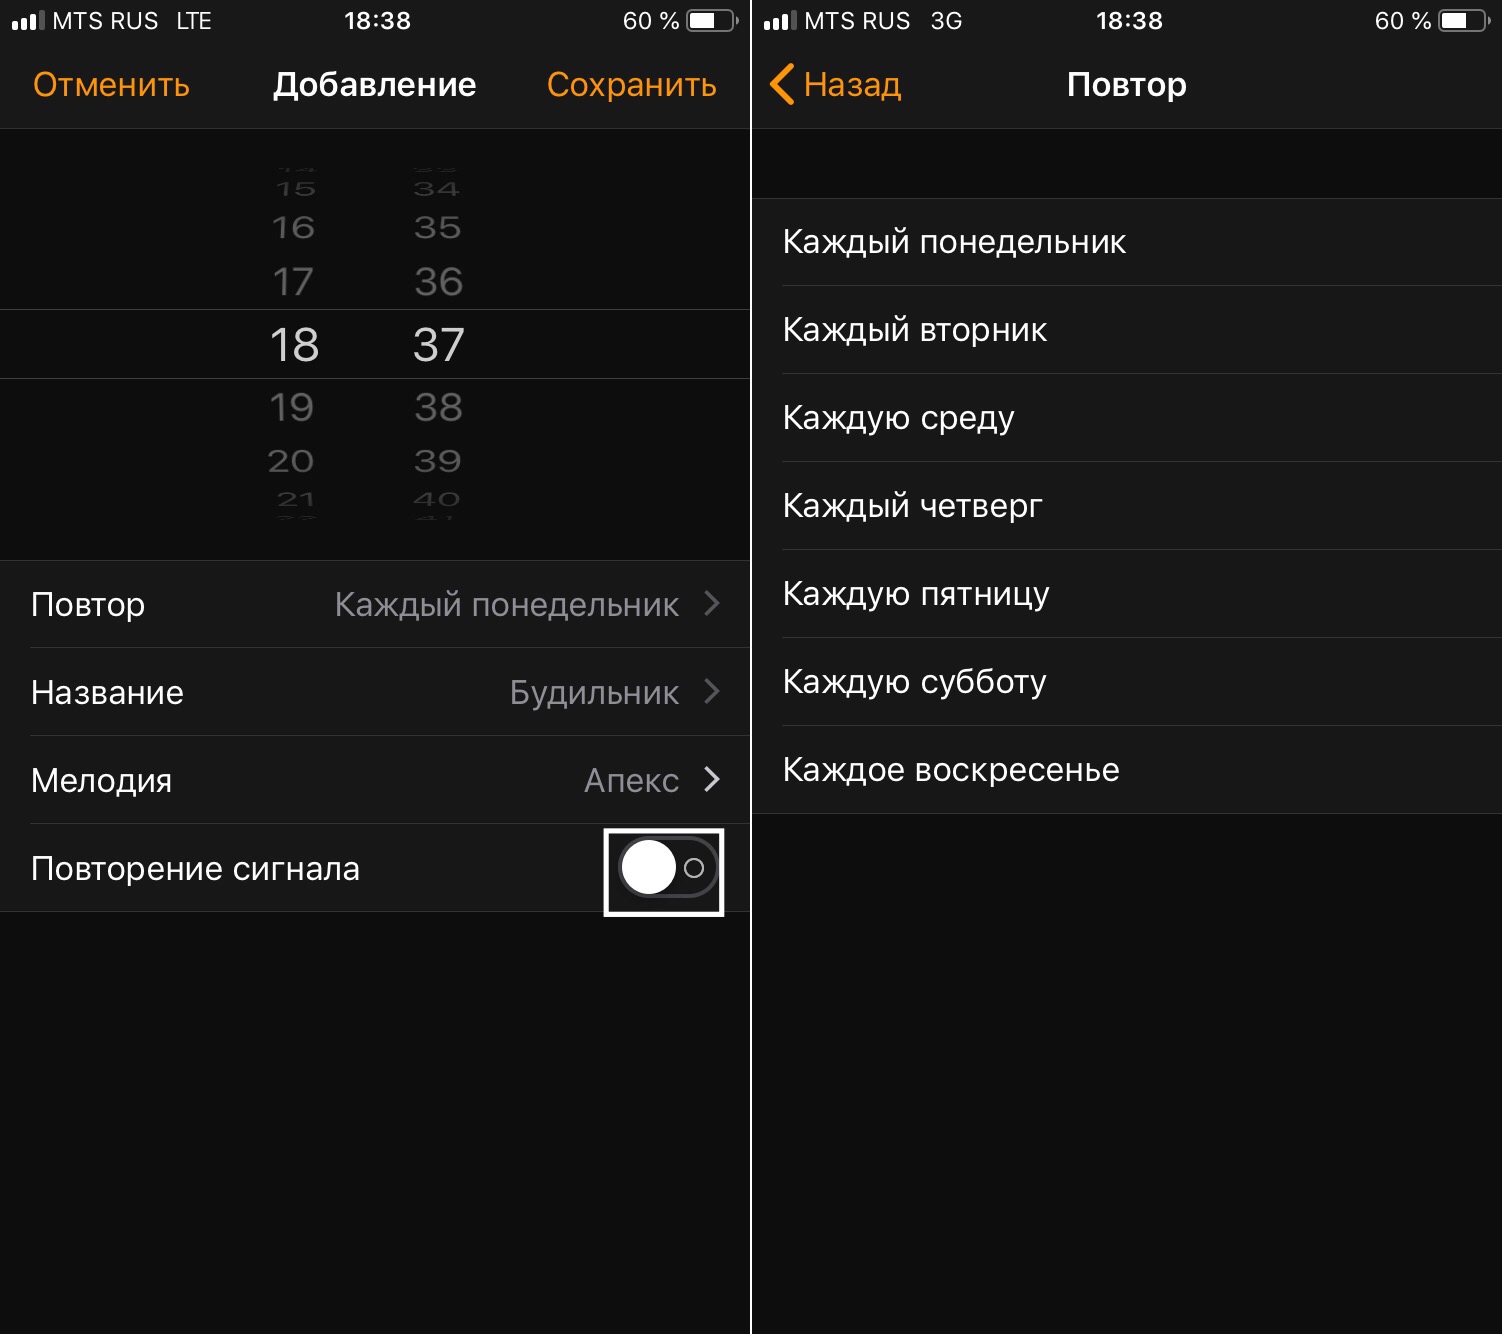
Set an alarm for the time when your shortcut need to be runned. Disable "Repeat signal".
Go to the ringtones section
Select the previously exported record.
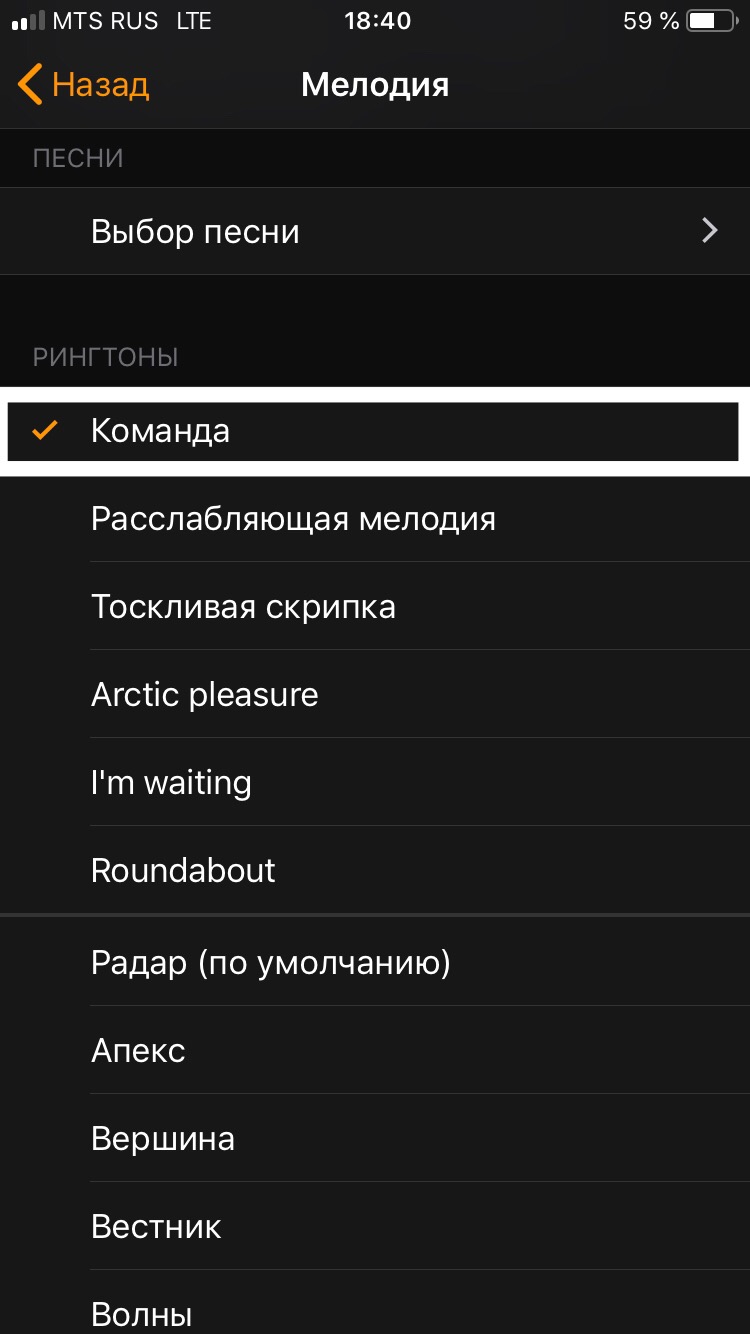
Click "Save".
The alarm has been created.
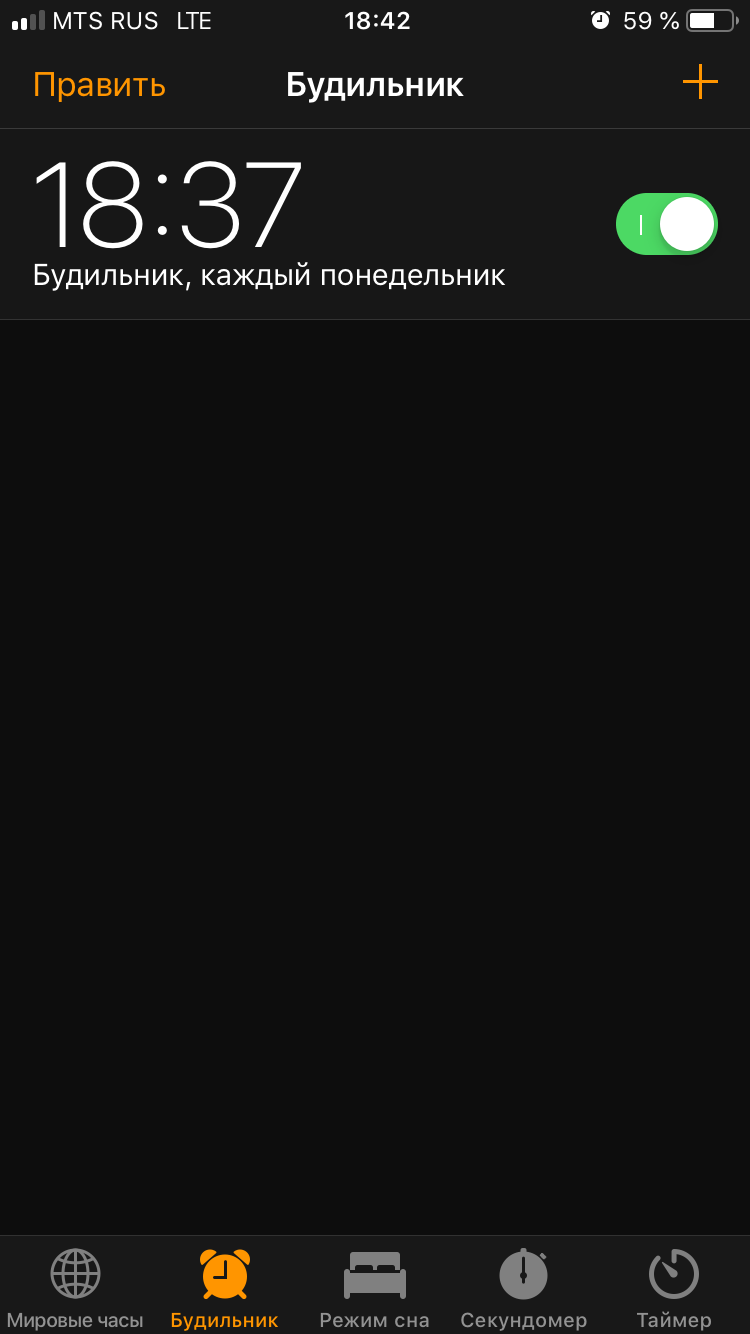
Everything is ready!
5. Autocuts
✴️*️⃣ │ iOS 13.0.0~beta 1 — 13.0.0~beta 5, 13.1.0+ ; iPadOS 13.0.0~beta 1 — 13.0.0~beta 5, 13.1.0+
Download Autocuts Suite Installer
Full documentation
Autocuts is another shortcut from Adam Tow. It must be tied to automation for opening an application: after creation that automation, the shortcut is launched after opening the assigned application. You can configure the shortcut to run on web triggers or after a certain time. It must work when the screen is turned on and the assigned applications are started, but we can use it and when the skreen turn off (later about this)
Autocuts creation
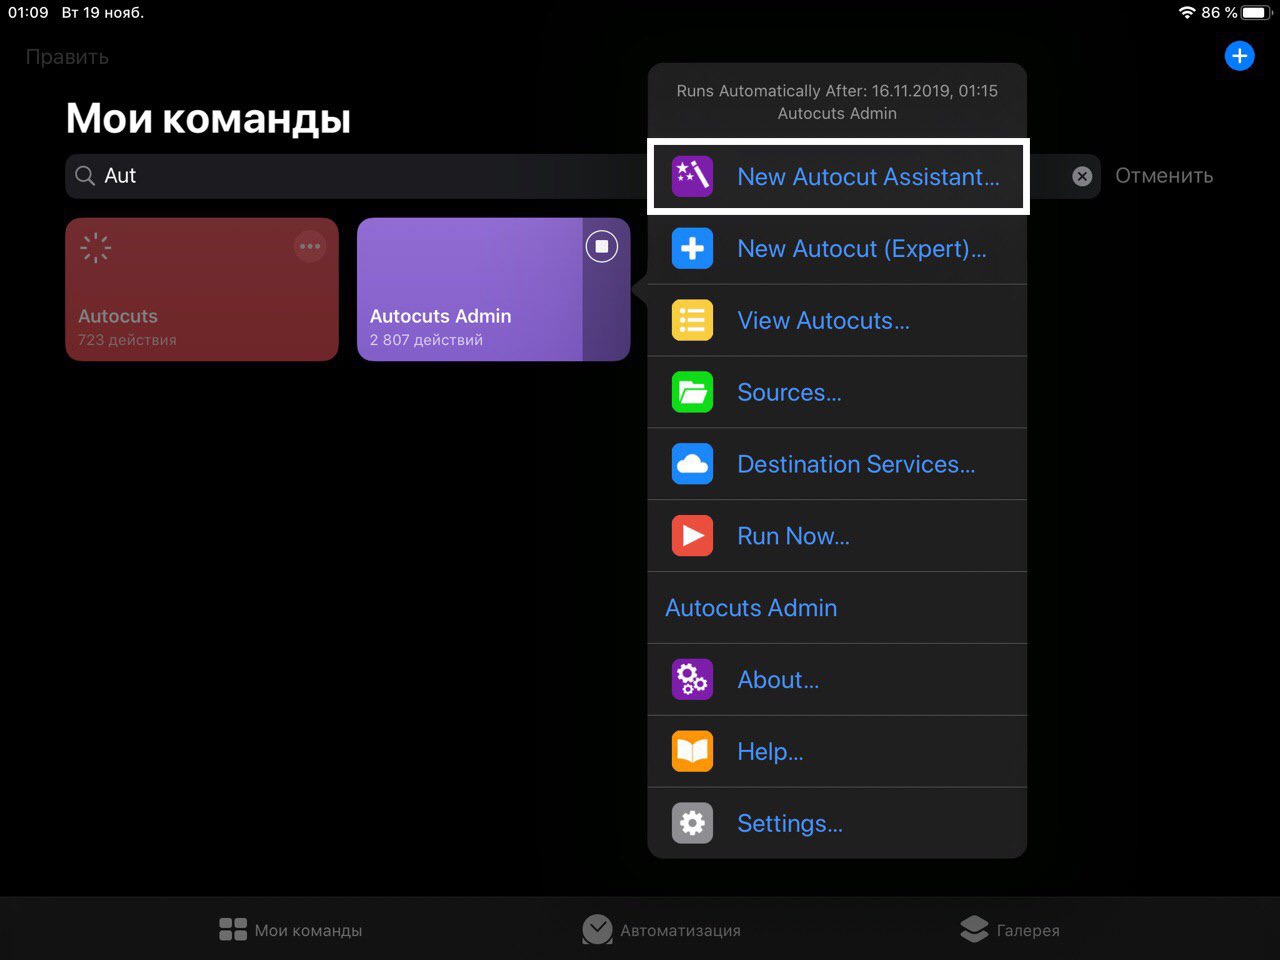
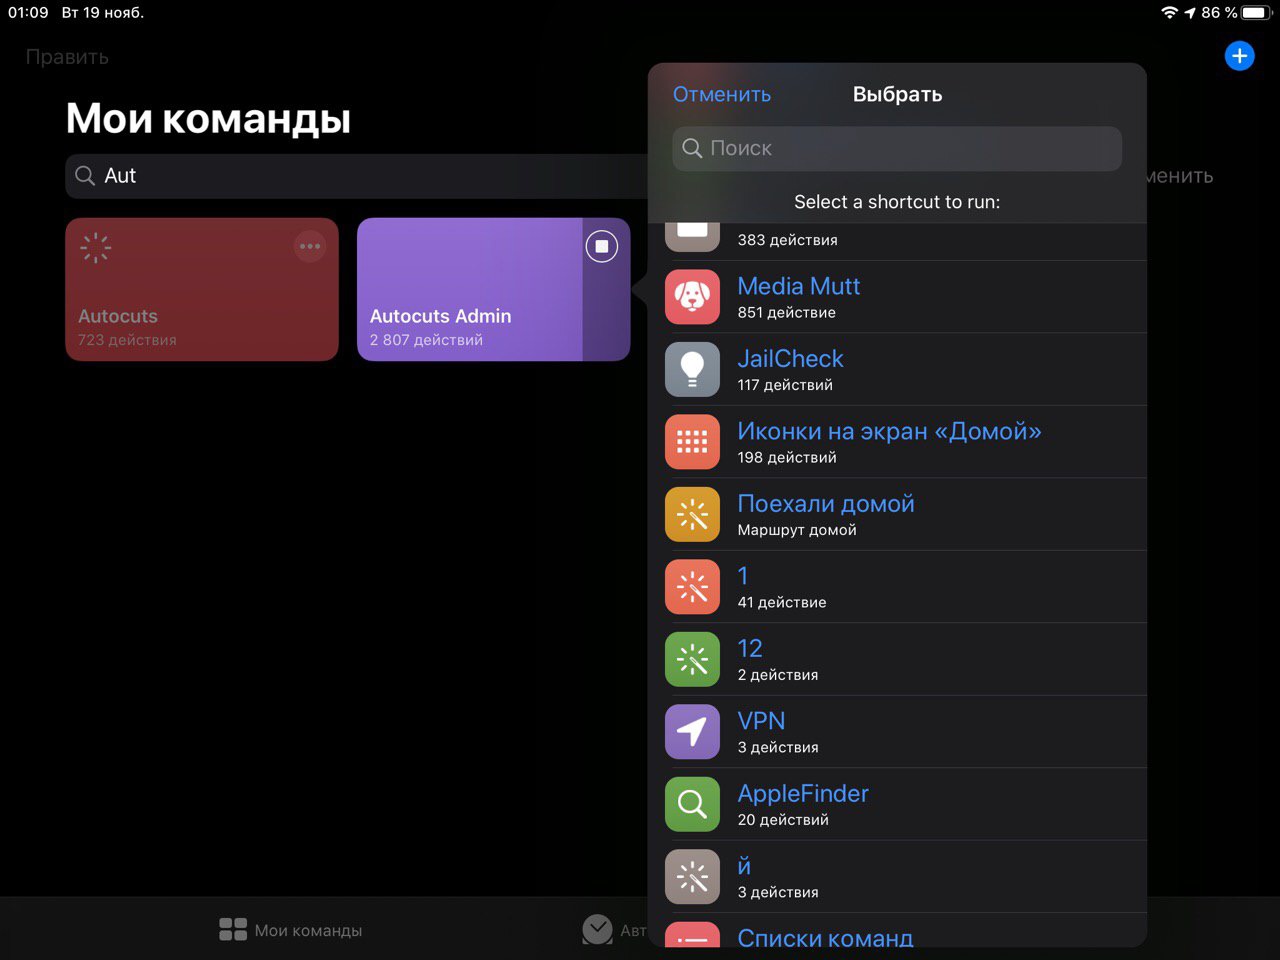
Run the shortcut and click "New Autocut Assistant...".
Select the shortcuts that you want to automate.
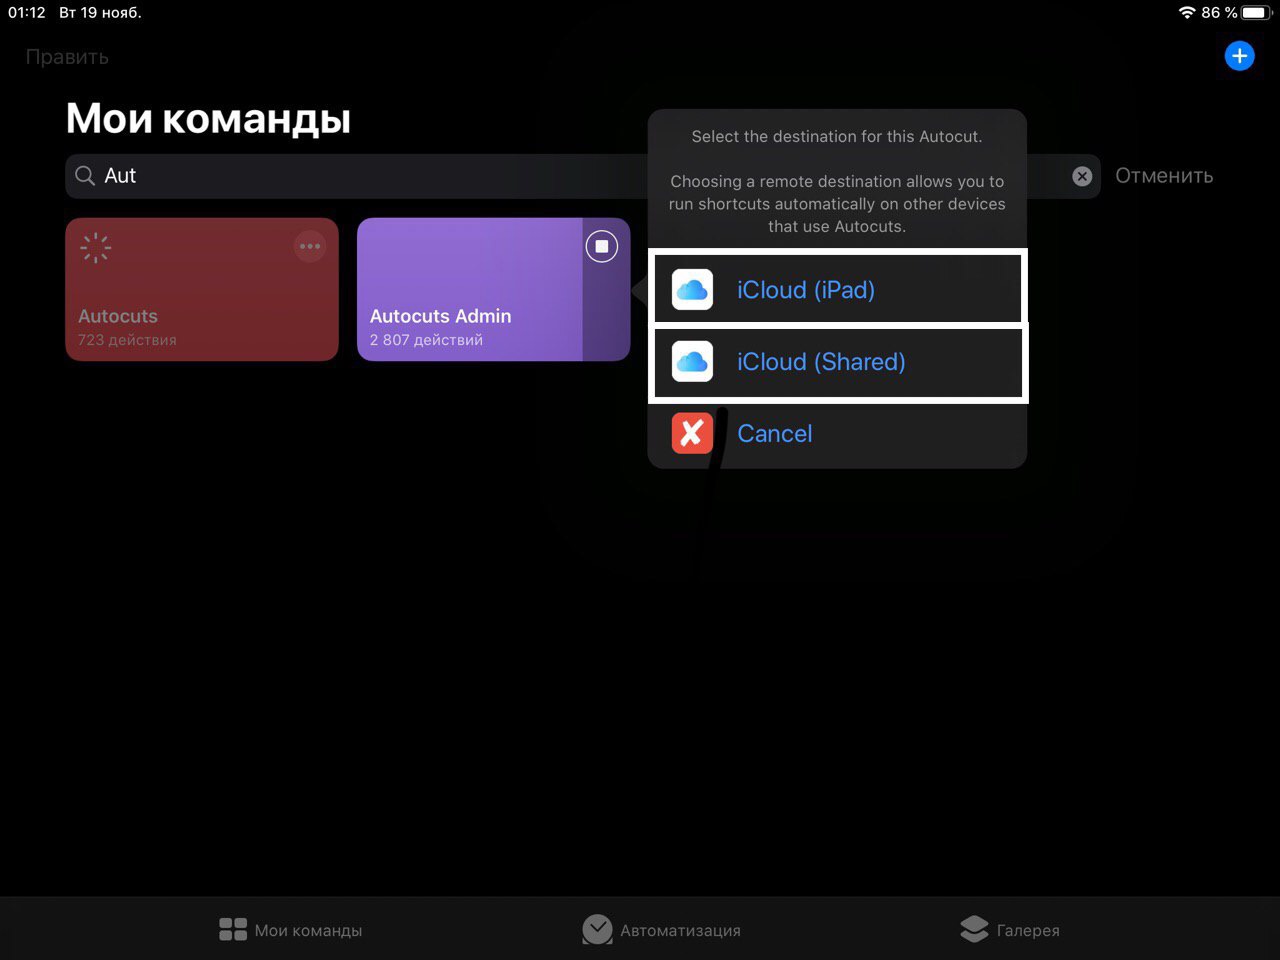
If you want shortcuts to run only on your device, click "iCloud (⟨Your device⟩)". Otherwise, click " iCloud (Shared)"(autocuts should be running on another device)
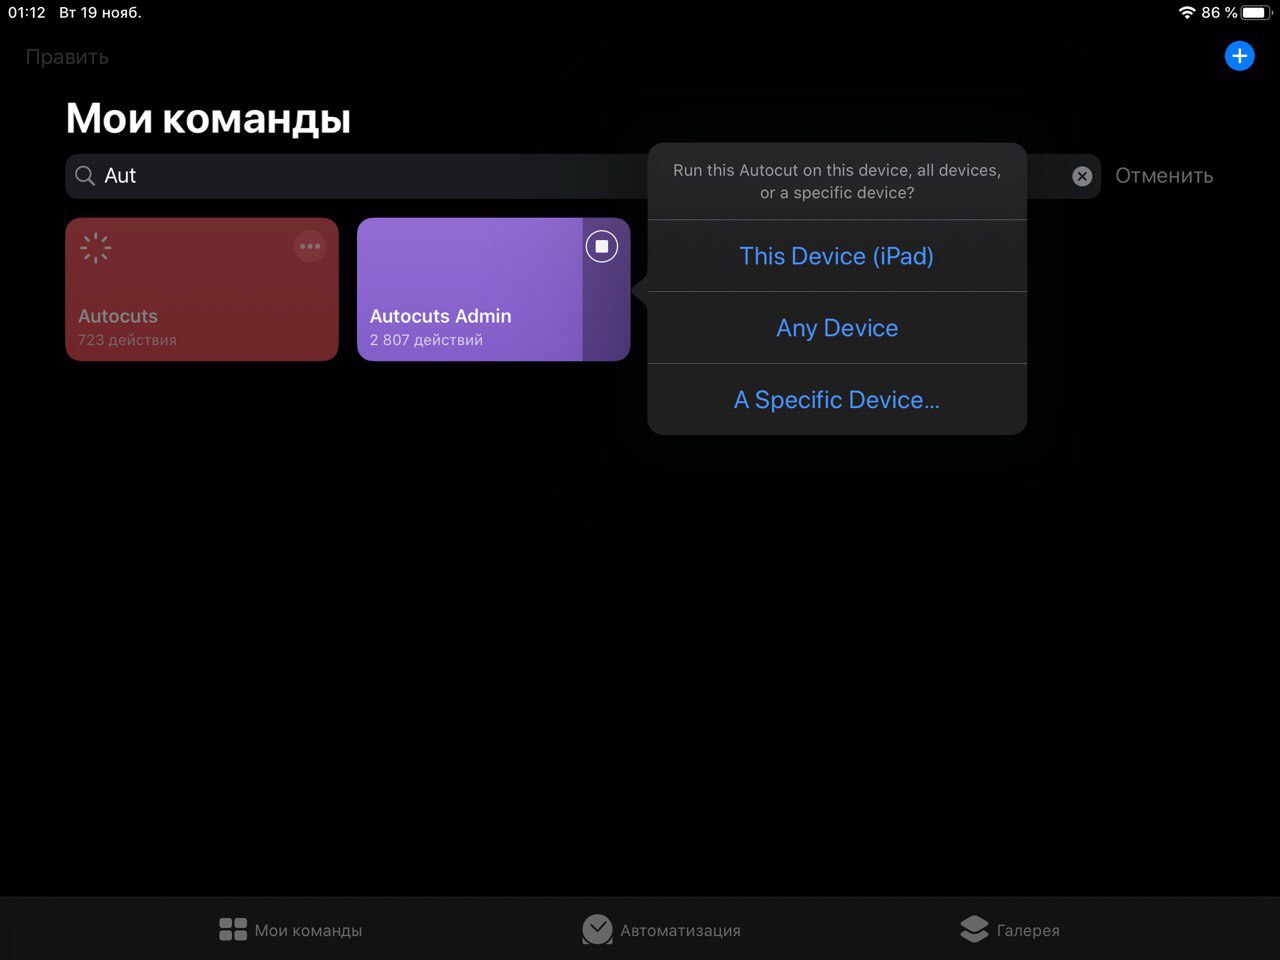
Select: run shortcuts on this device "The Device (⟨Your device⟩)", on all devices "Any Device", and on another specific device "A specific Device"
Enter the name of the autocut.

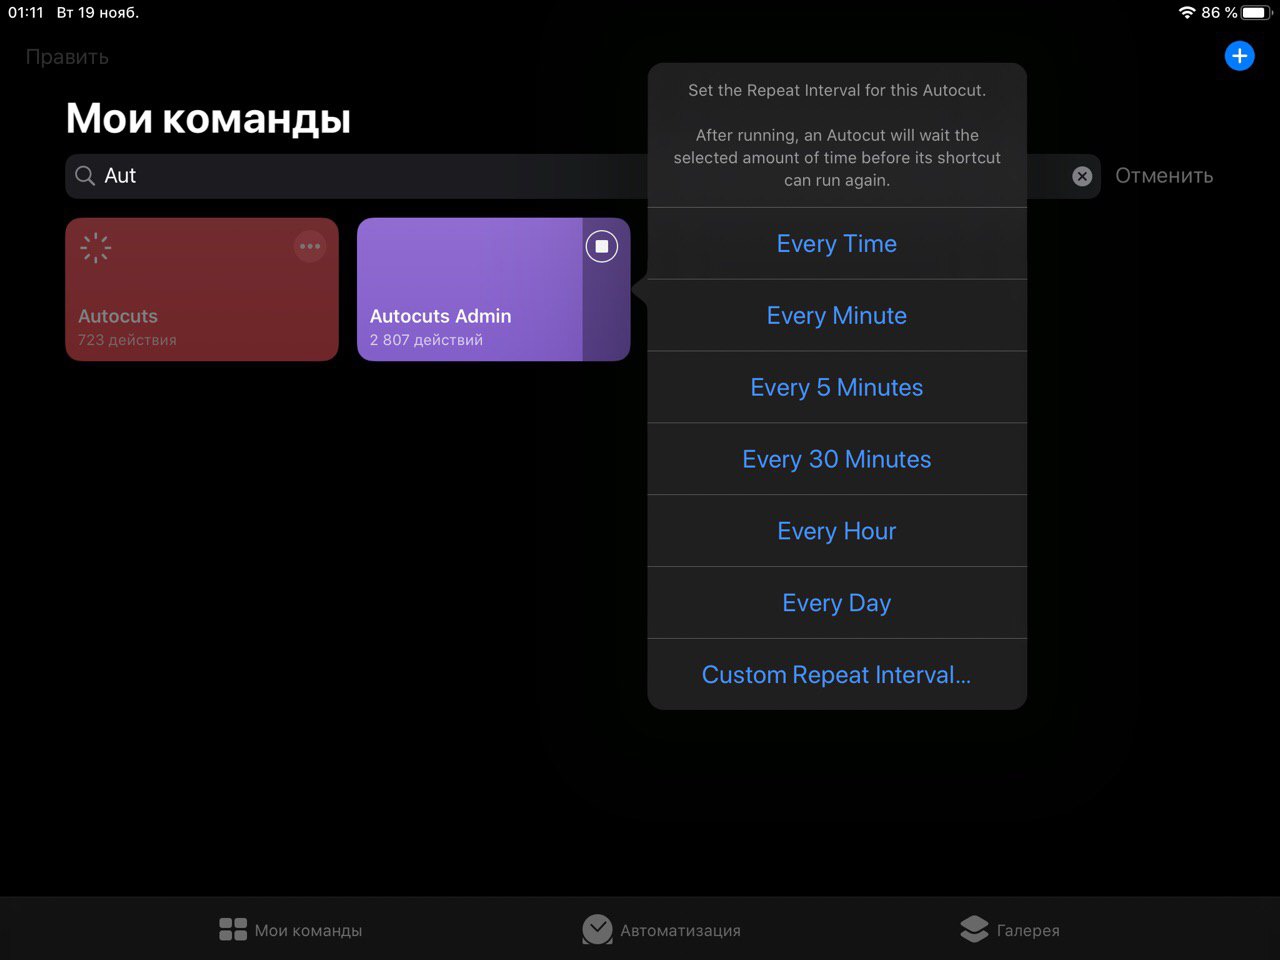
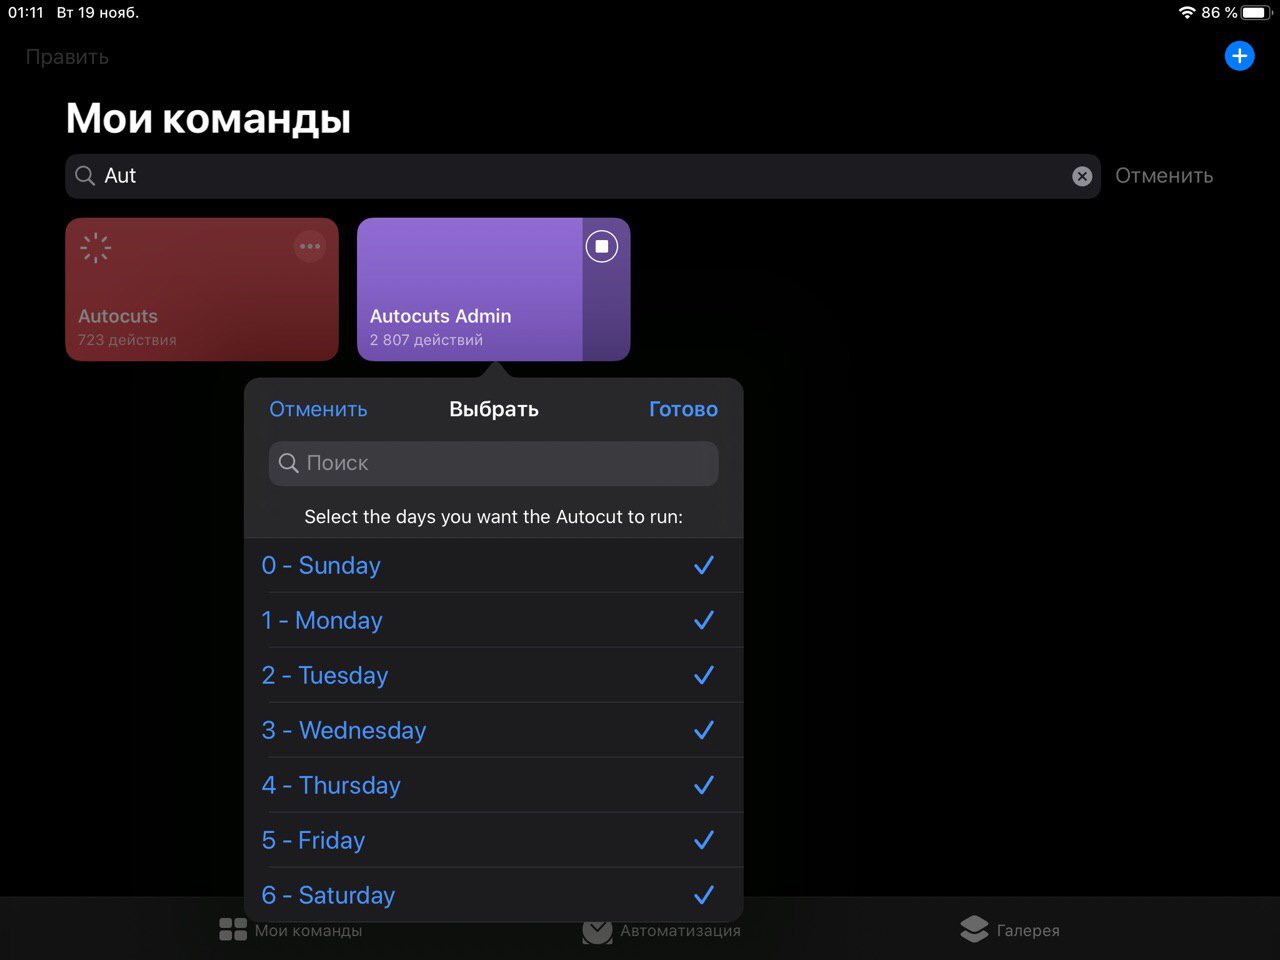
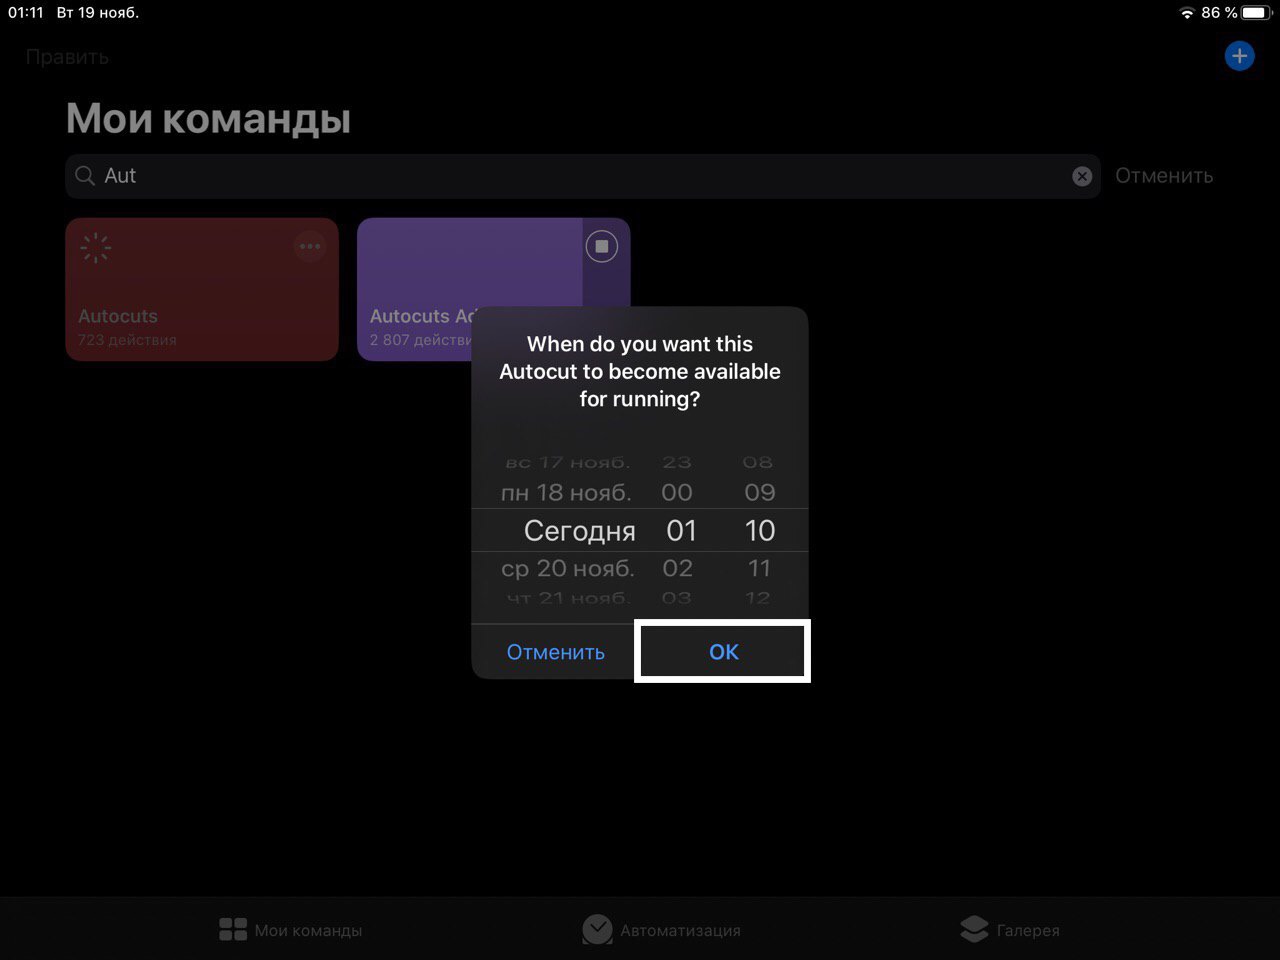
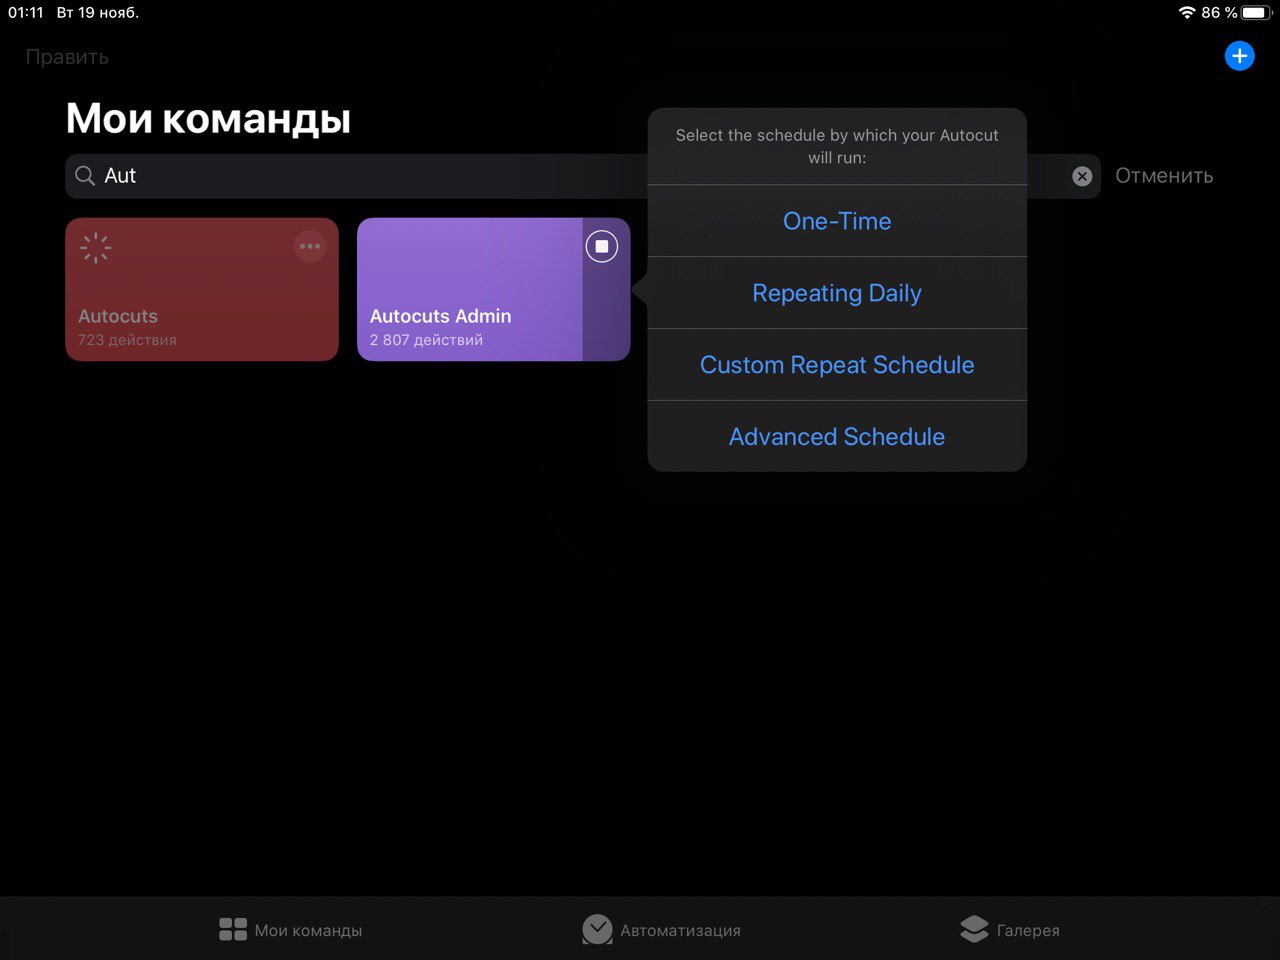
Select once at what time this autocut will run shortcuts.
Select which days of the week autocut will work.
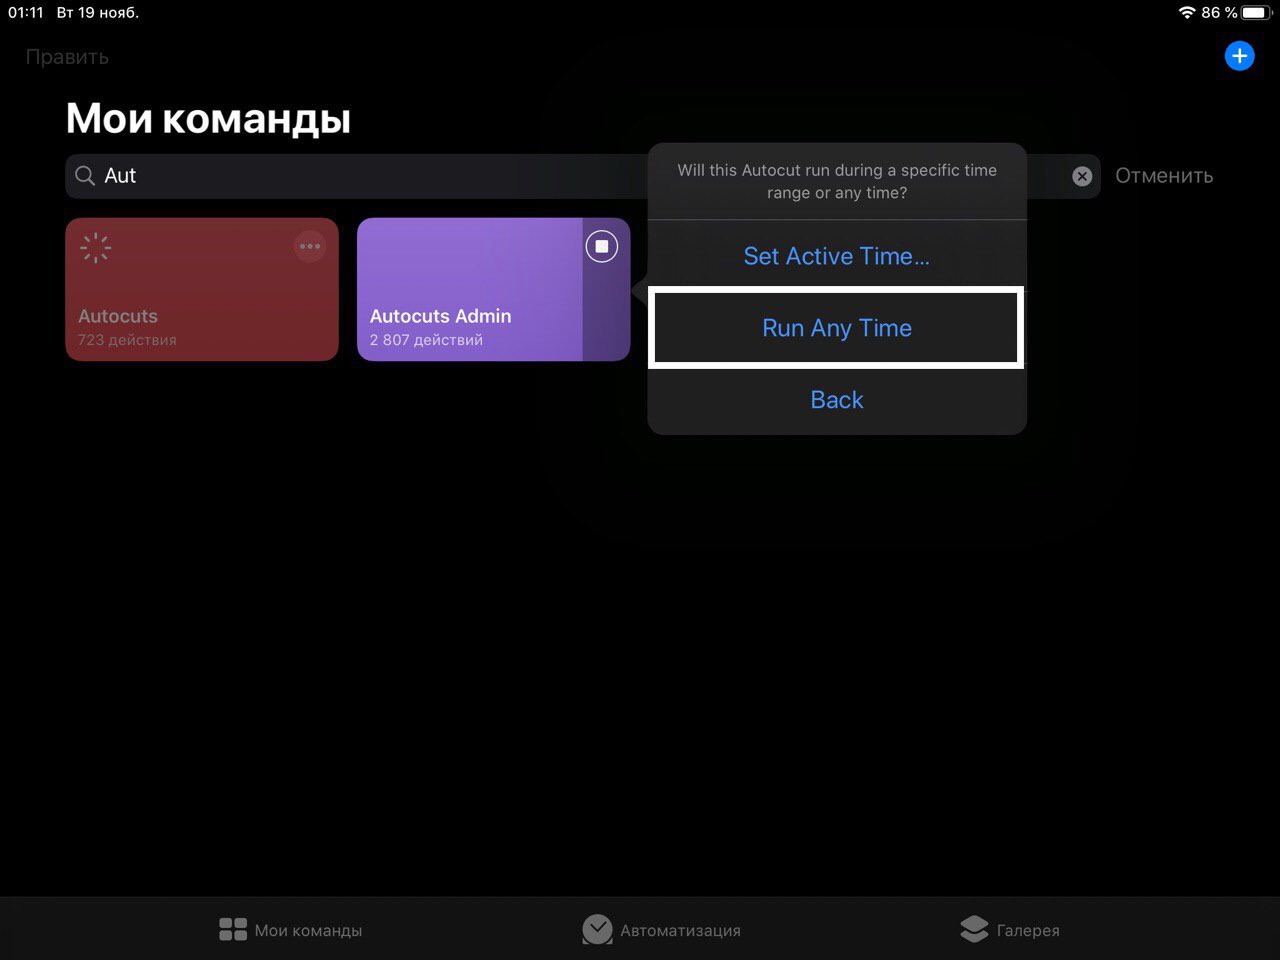
Click "Run Any Time".
Click "OK"
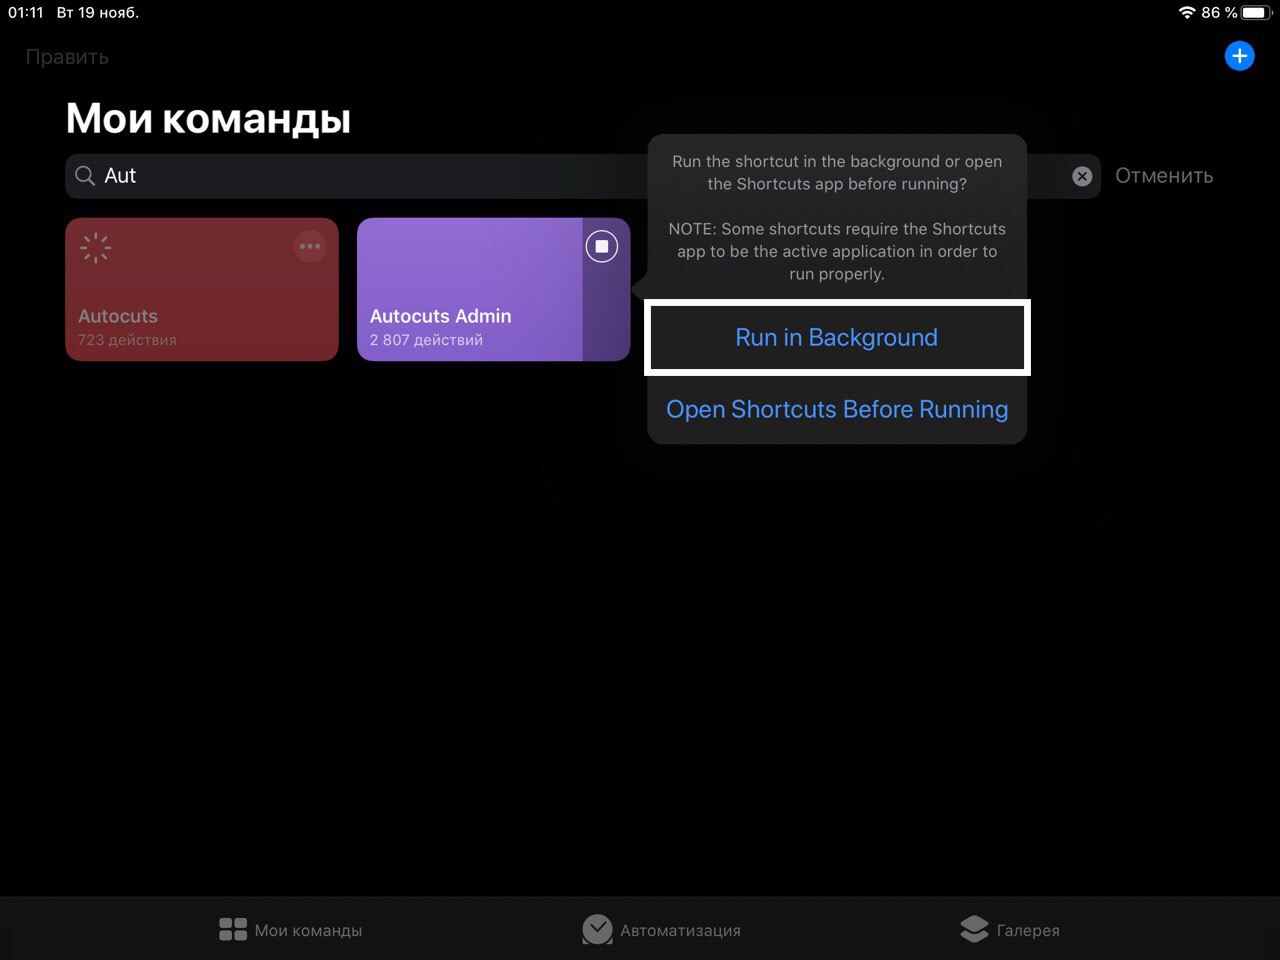
Click "Run in Background"
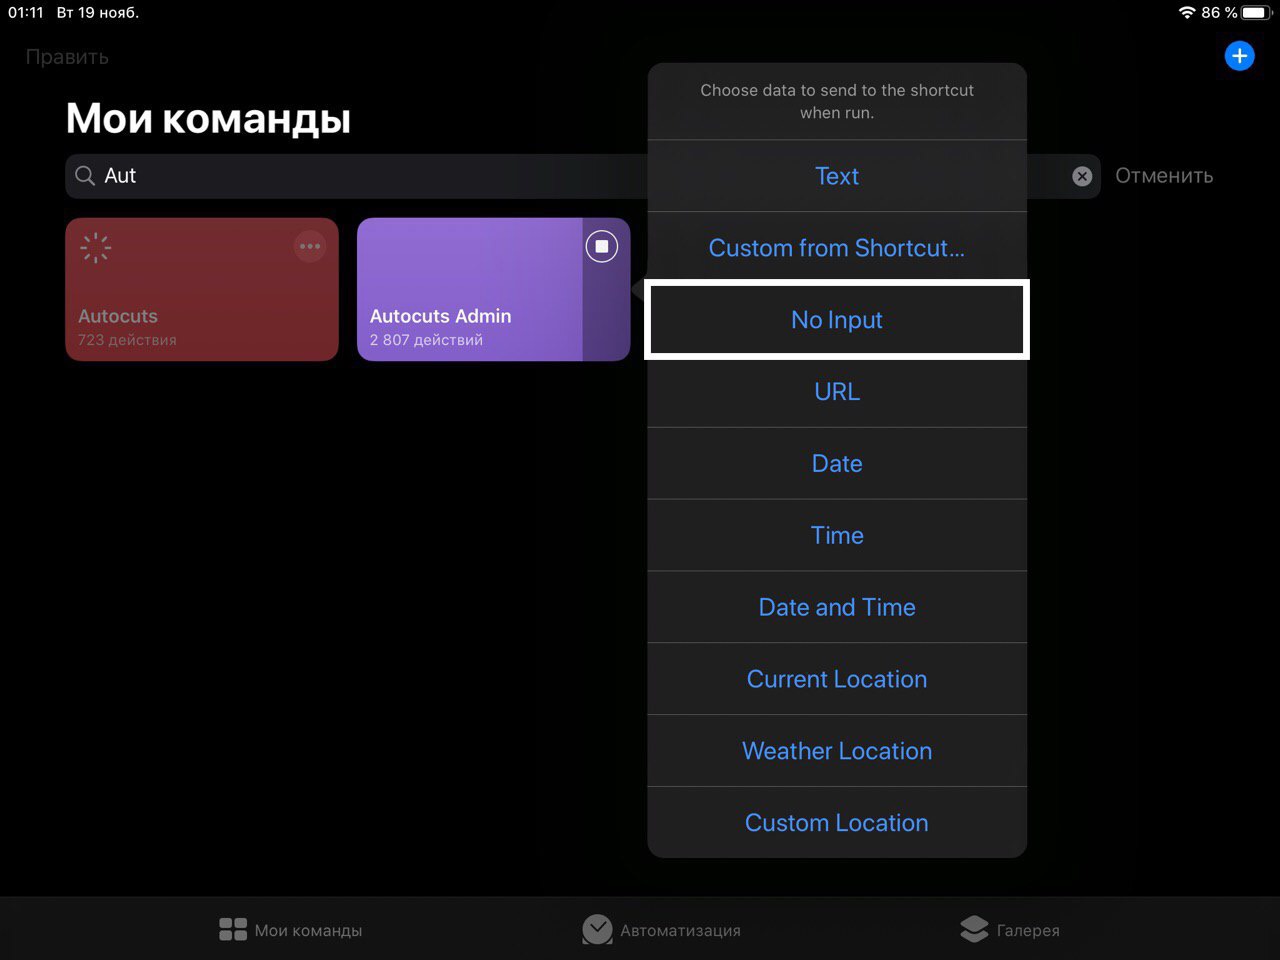
Select "No Input" if you want autocut not to send input data to shortcuts.
It is also advisable to disable the notifications in order to avoid unnecessary notifications.

Autocut is ready.
Remember this information, because AutoCuts will come in handy later for full automation.
6. RepeatCuts
✳️*️⃣ │ iOS 13.0.0~beta 1 — 13.0.0~beta 5, 13.1.0+ ; iPadOS 13.0.0~beta 1 — 13.0.0~beta 5, 13.1.0+
Download ReapeatCuts
Full documentation
This shortcut for automation processes on iOS 13 is can work while the device is turned off. In principle, it is similar to Cronios, because it run a shortcut once in a while. It has the same disadvantages: fast battery discharge and unreliability.
RepeatCuts can be used for shortcuts that must check a certain state once at a certain time, or run certain processes at the right time.
Creating repeatcut
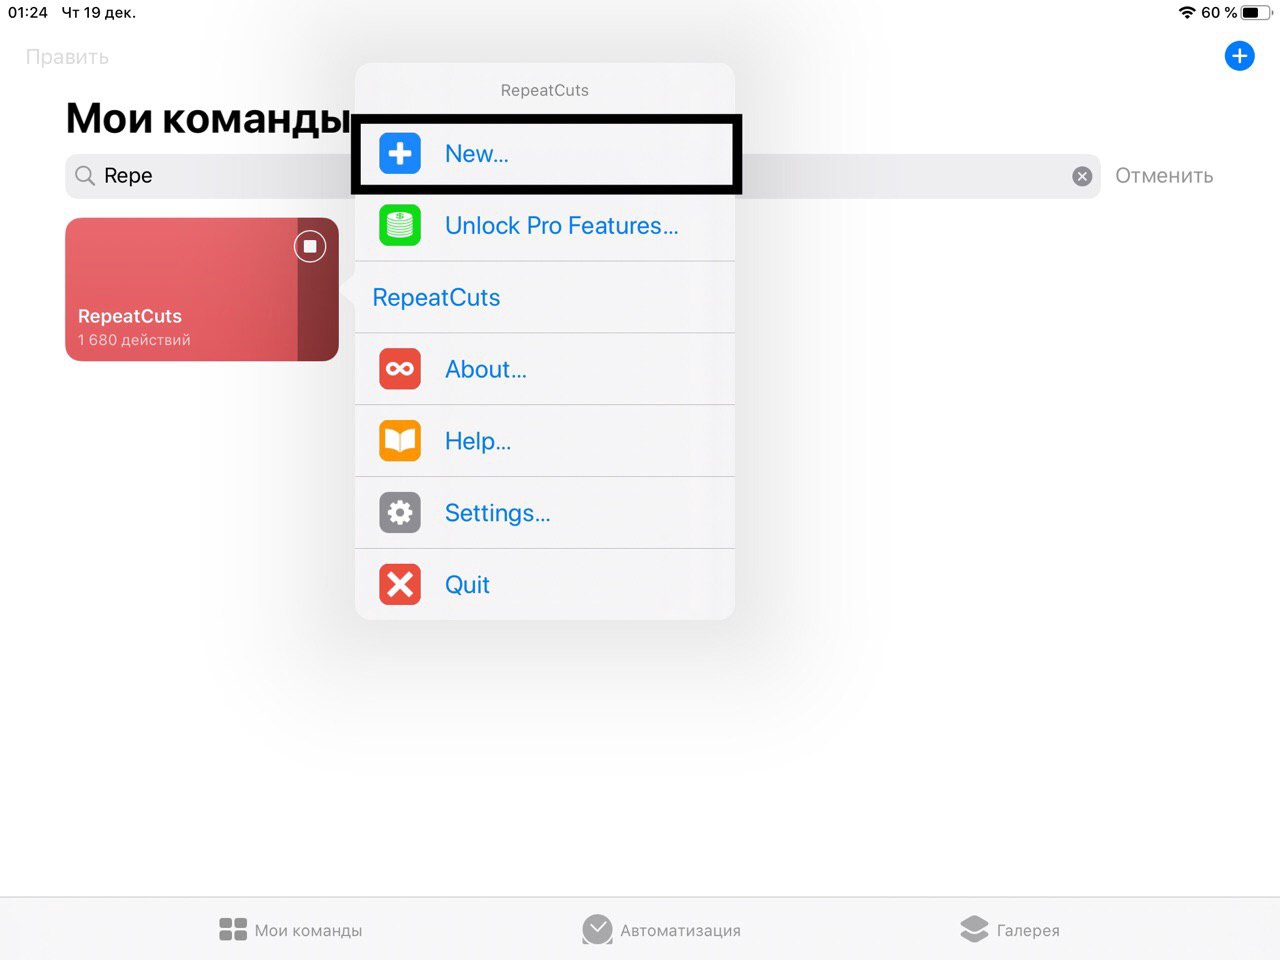
Run the shortcut and click "New"
Select the shortcuts that you want to run automatically

Click "OK"
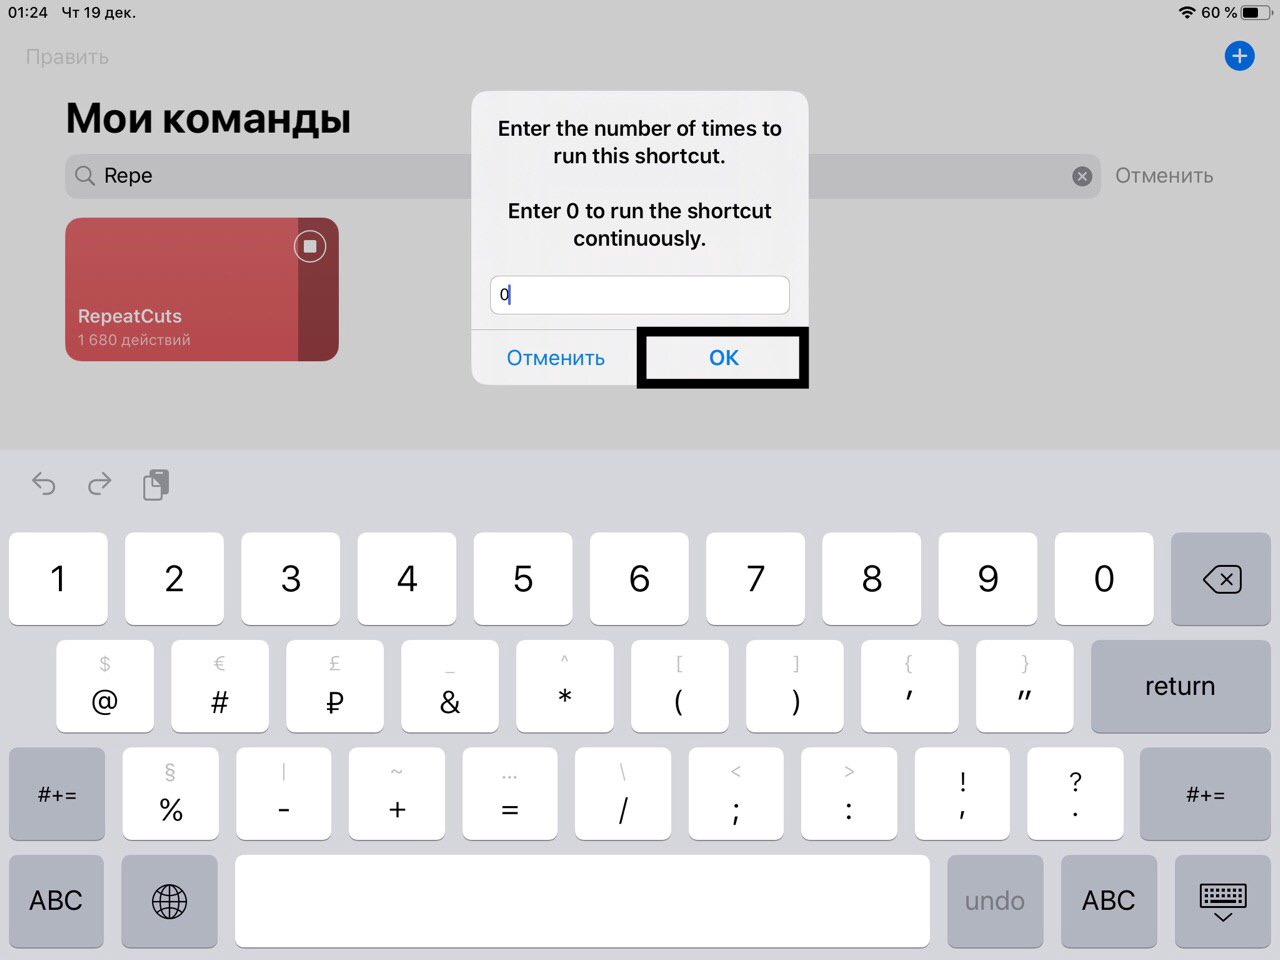
Click "Seconds"
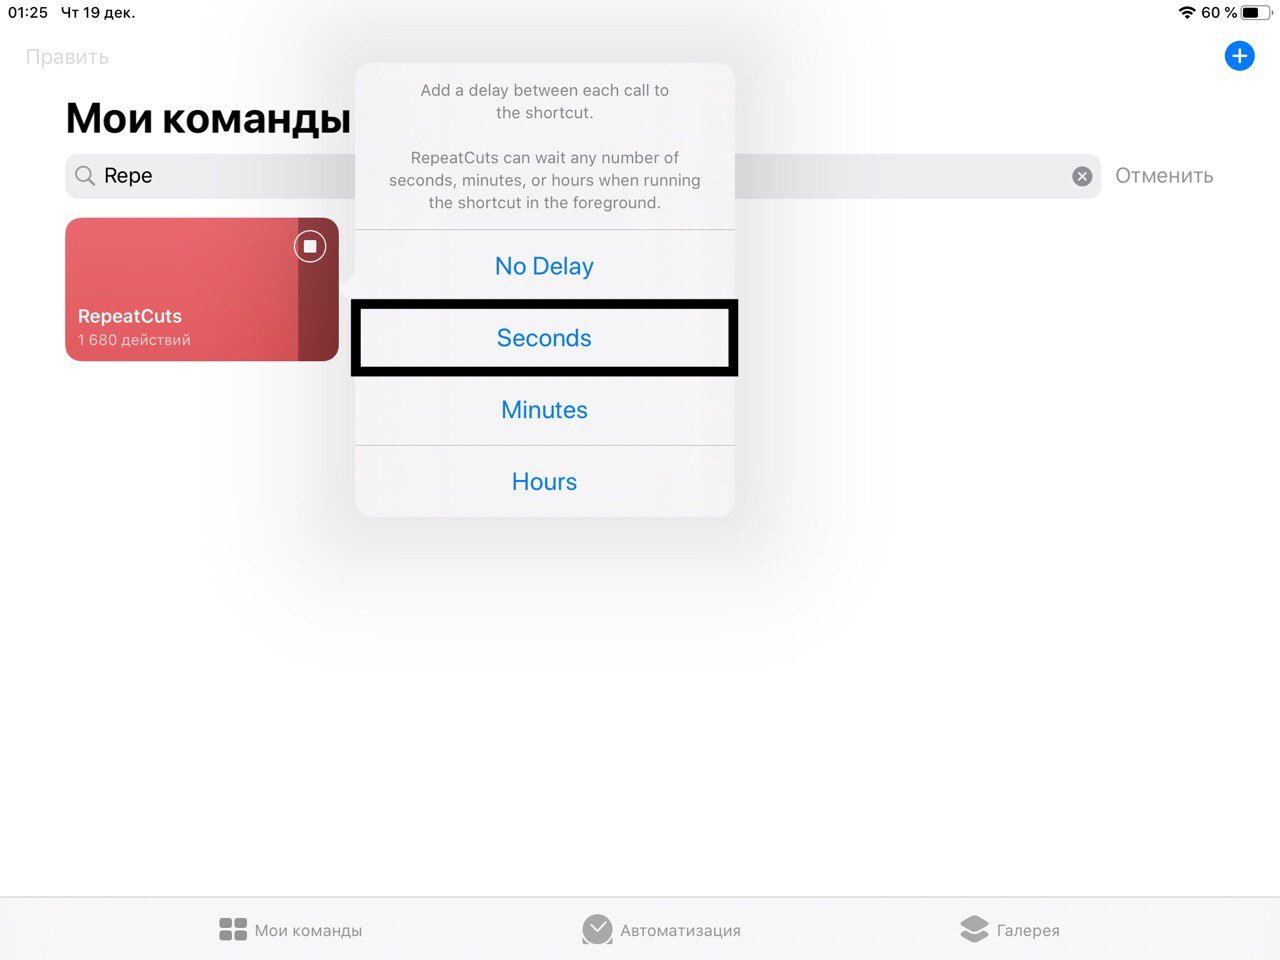
Enter the time at which the shortcut(s) should be runned and click "OK"
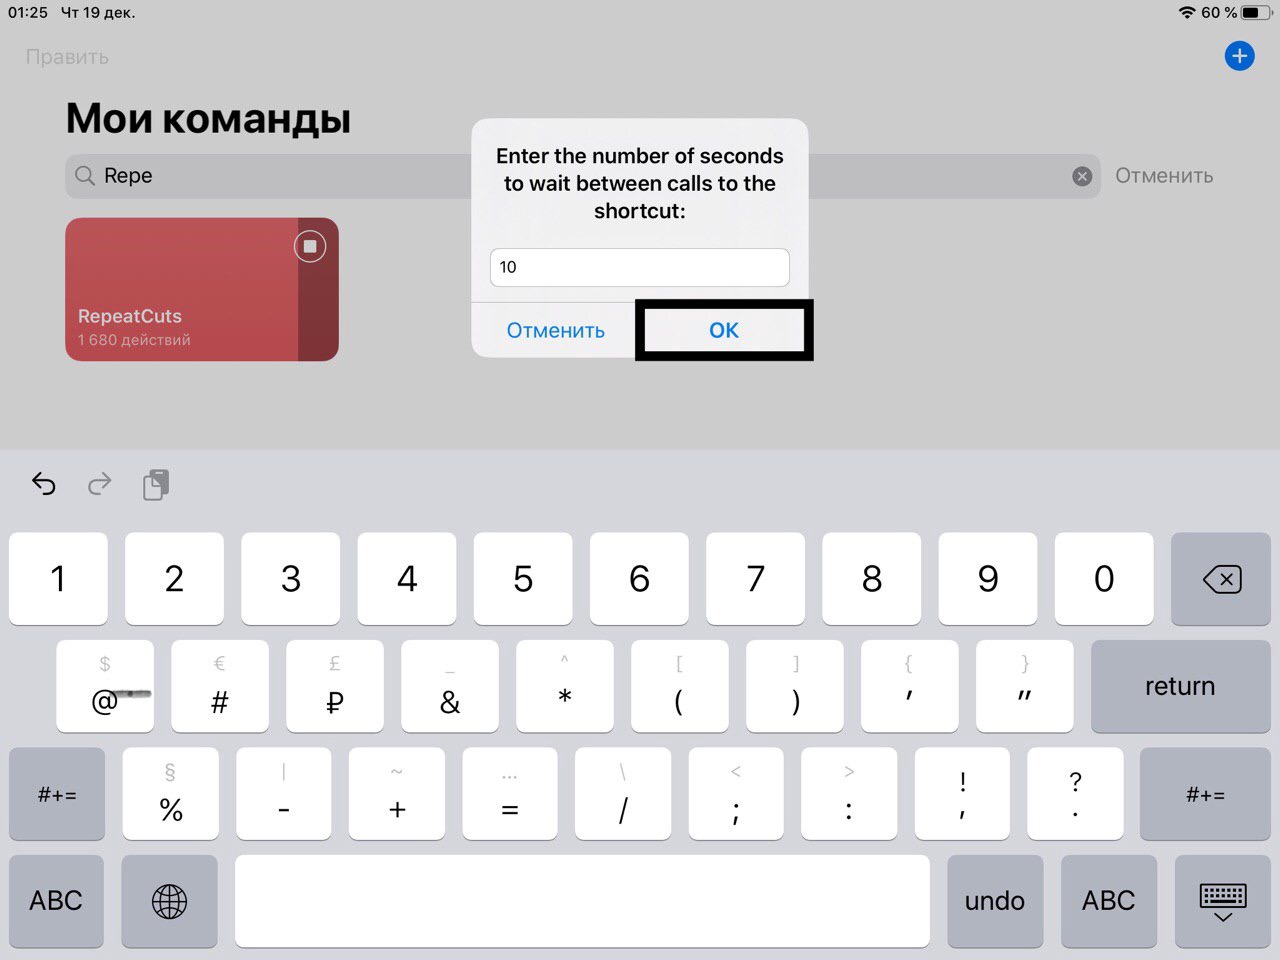
Enter the name of your repeatcut and click "OK"

Repeatut is ready.
It is also advisable to disable the notification at startup in order to avoid unnecessary notifications

7. AutoCuts helper
✳️✴️*️⃣ │ iOS 13.0.0~beta 1 — 13.0.0~beta 5, 13.1.0+ ; iPadOS 13.0.0~beta 1 — 13.0.0~beta 5, 13.1.0+
Download AutoCuts helper
Well, the article is going to finish and it's time for real full-fledged automation...
This shortcut will allow you to run AutoCuts in cycles and keep the shortcuts from falling asleep. To configure AutoCuts, find its description above. The principle of work of this shortcut is as follows. As you know, only some automations can be started without confirmation, and this list includes the "do not disturb" mode automation. All that remains is to somehow make this automation run regularly. What this shortcut does: once at a certain time, it turns on the "do not disturb" mode with a shutdown timer after 30 seconds, and then stops working. After 30 seconds, the "do not disturb" mode is turned off, automation is triggered, and AutoCuts helper is started again. After that the cycle repeate again. In the intervals between awakenings, it runs AutoCuts. The length of all intervals is configurable.
What should you do before running AutoCuts:
* — optional
• — necessarily
* Go to the "do not disturb" mode settings and set "silence" to "While iPhone is Locked"; "Allow Calls From" — "everyone"

• Go to the automation section and create an automation "when do not disturb mode is turned on or off"

• Set the "text" action and paste the text that you can copy below
𝖠𝗎𝗍𝗈𝗆𝖺𝗍𝗂𝗈𝗇
• Then Set the "run shortcut" action, select the "AutoCuts helper" shortcut, and turn off "Show while running"

• Turn off "Ask before running"

Done. Now run AutoCuts helper and configure it.
• By clicking on "AutoCuts running interval", enter the time that AutoCuts helper will run AutoCuts once. The recommended is 20 seconds.
• By clicking on "Wake up interval", enter the time that the shortcut application will wake up once. The recommended time is 1 min.
* "Notifications ". When working while the screen is off, shortcuts often fall asleep for short periods of time, from a few minutes to twenty. This is not a big deal if you don't do automations that need to be performed at precise times up to minutes. However, there is a solution for this as well. You will need to install the Toolbox pro application (To get premium for free, install beta), which is an extension for shortcuts that adds new actions. Among other actions, this app adds deferred notifications. This way, periodically, if the screen is turned off, the shortcut will put a delayed notification, which should come in a minute. If the shortcutd fall asleep after a minute, the incoming notification turns on the screen, which causes the shortcuts to wake up and postpone the new notification.
To stop the shortcut, click " stop"
As for the charge consumption, according to preliminary tests, it almost does not increase.
Using The autocuts + AutoCuts helper +your shortcuts, you can create any automations: by time, by geolocation, by web triggers, and so on.
Our article is coming to an end, and now you know all about shortcut automation!
••••••••••••••••••••••••••••••