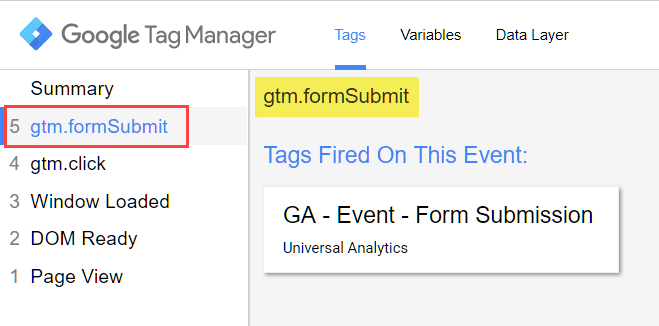
Wpcf7 Submission

💣 👉🏻👉🏻👉🏻 ALL INFORMATION CLICK HERE 👈🏻👈🏻👈🏻
Contact Form 7 CSS styling: Customize CF7 with CSS
Contact Form 7 is one of the most popular WordPress plugin for creating a contact form in WordPress sites. Unfortunately, Contact Form does not have any control panel to style the form. But the good news is, it could be customized with the CSS code. In this article, I am going to present some codes with examples for styling Contact Form 7.
If you never deal with CSS code, I know the first question that arises in your mind is …
Where to put CSS code for Styling Contact Form 7?
There are many ways to put custom CSS code in our WordPress websites. We can put additional CSS in the style.css file or ‘Additional CSS’ area in the theme customize section (popular theme like ASTRA provide the option in its free version)
But personally I don’t go with the above. I preferred the easiest and safest way to put additional CSS with the help of a lovely plugin-Simple Custom CSS and JS. You may go with it.
How to change background colour in Contact Form 7 ?
If you use a page builder like Elementor. Put the shortcode of Contact Form 7 in Elementor ‘Short Code’ element then go to the Style tab of the ShortCode element and change the background color.
If you do not use any page builder then put the CSS code:
.wpcf7 {
background: #9CCC8E;
padding: 25px 25px 25px 25px !important;
}
You are free to choose any background color by changing the hex code. You may find the color hex code from the online HTML color codes. In this code, the padding is important for the design, without padding background color doesn’t visible properly. The sequence of the padding is Top-Right-Bottom-Left.
Put this CSS code snippet for adding border in Contact Form 7
.wpcf7 {
border: 5px solid #2F8040;
}
You can change the border width by changing the pixels value and also the border color by changing the color hex code.
How to add Box Shadow in Contact Form 7 ?
Adding shadow or box-shadow makes the Contact Form attractive. Put the code for the shadow:
.wpcf7 {
box-shadow: 10px 10px 5px 1px rgba(0,0,0,0.3);
}
I find an interesting site cssmatic.com to generate desired box shadows. We can create shadows with real-time previews from the site. So go there, generate shadow code and put the code into the CSS snippet.
Note: You are able to merge multiple codes in a single snippet. i.e. you can combine border and box-shadow in one:
.wpcf7 {
border: 5px solid #2F8040;
box-shadow: 10px 10px 5px 1px rgba(0,0,0,0.3);
}
How to adjust width of Contact Form 7 ?
CF7 comes with auto width, that is nice for our design. But sometimes we need a specific width. In this situation we have to put CSS for it.
.wpcf7 { width: 500px;}
@media screen and (max-width: 500px) {
.wpcf7 { width: auto;}
}
In this code @media screen and (max-width: 500px) is the responsive code for mobile devices. We set width ‘auto’ for the mobile devices.
How to customize input field in CF7 ?
We can customise specific input field in Contact Form 7 by the help of CSS
.wpcf7 input[type="text"],
.wpcf7 input[type="email"],
.wpcf7 input[type="textarea"],
.wpcf7 input[type="submit"],
textarea {
font-size: 16px;
font-family: Georgia;
font-weight: bold;
background-color: #F9F98F;
border: 2px solid #000000;
box-shadow: 10px 10px 5px 1px rgba(0,0,0,0.3);
}
In this code text, email, textarea and submit fields are targeted for customisation. You can add, remove or change any value from the code, as per your requirement.
How to adjust the height of the message box in Contact form 7 ?
Put this code to adjust the height of the message box, which is a ‘textarea’ field in CF7
.wpcf7-form textarea {
height: 200px;
}
Adjust the value of the height as per your requirement.
How to adjust the size and alignment of the Submit Button ?
Best way to adjust the width of the Submit Button is specify the width percentage of the button. If we specify the button width as 50%, the button size increases its width to 50% of the total form area. In this method we are able to adjust the button size responsively.
But the position of the button align is left by default. but we can align the button position center with the code.
.wpcf7 input[type="submit"] {
width: 60%;
position:relative;
left:20%;
}
In this code width is set 60% of the form area and position are set ‘relative’ but we adjust the position with 20% left position Property. The calculation is 100%(total form area) – 60%(button area) = 40% (rest area) we center the button by positioning it half of the rest area, that is left 20%.
If we set 50% button width, then the ‘left position’ should be 100%-50%= 50% and the half of the 50% = 25%
How to Customize the Submit Button of CF7 ?
Put the CSS code snippet to customize the Submit Button.
.wpcf7 input[type="submit"] {
color: #ffffff;
font-size: 18px;
font-weight: 700;
background: #E2272E;
padding: 15px 25px 15px 25px;
border: none;
border-radius: 33px;
text-transform: uppercase;
letter-spacing: 5px;
}
.wpcf7 input:hover[type="submit"] {
background: #0A9E1C;
transition: all 2.0s;
}
.wpcf7 input:active[type="submit"] {
background: #092AE4;
}
You are free to edit all the values and range in the code. Change the border-radius for creating different shapes of the button. You may use the online tool for real-time preview.
11 thoughts on “Contact Form 7 CSS styling: Customize CF7 with CSS”
Really amazing tutorial in hindi I saw your videos thanks.
Thank you, Mohit. Thank you for your appreciation.
Good Plugin thank you for information.
wow its very easy trick for eveyone thank you so much sir , can you share your number , i will touch with you
I saw all the tutorial of Contact form 7 thats amazing
Thank You dear for the application.
Your email address will not be published. Required fields are marked *
Save my name, email, and website in this browser for the next time I comment.
Great looking Contact Form 7 forms made easy
Contact Form 7 (CF7) is one of the most popular plugins available for WordPress. It allows users to quickly create customised forms, anywhere on a WordPress website.
While the forms are easy to create and implement, the fields within them are styled minimally – allowing them to blend in with most websites. The appearance of each CF7 form depends on the CSS styling applied to standard HTML form elements used in your current WordPress theme.
This article shows users, skilled at using HTML and CSS, how to style Contact Form 7 forms to their particular requirements.
You will need to be skilled at using HTML and CSS to follow along in this article. If that description does not fit you, you can learn all you need to know about both HTML and CSS at http://www.w3schools.com/ and come back to this article when you’ve done that.
You will also need to be skilled at using Firebug or Chrome Dev Tools to examine the HTML and CSS of your CF7 form in detail to follow along in this article. If that description does not fit you, you can learn about Firebug or Chrome Dev Tools and come back to this article when you’ve done that.
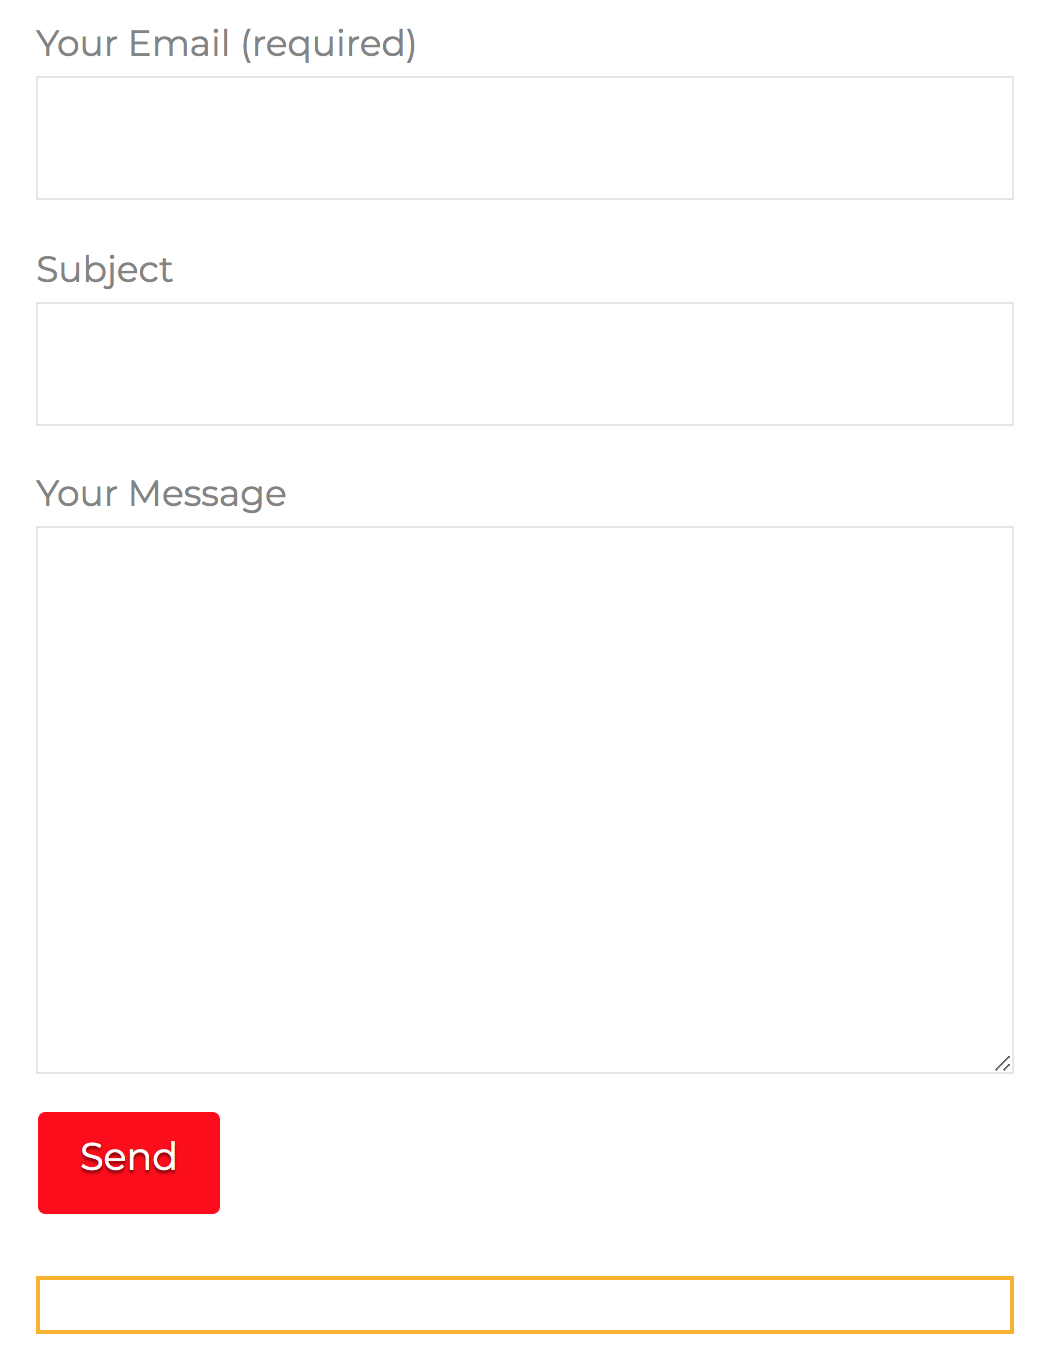
We use the default CF7 form (normally named “Contact form 1” & installed automatically on every install of the CF7 plugin) as the basis of this article.
The actual look of this default form on your WordPress website will depend on the current WordPress theme used on your website and the CSS styling that theme applies to standard HTML form elements.
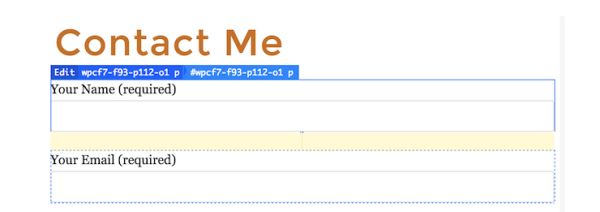
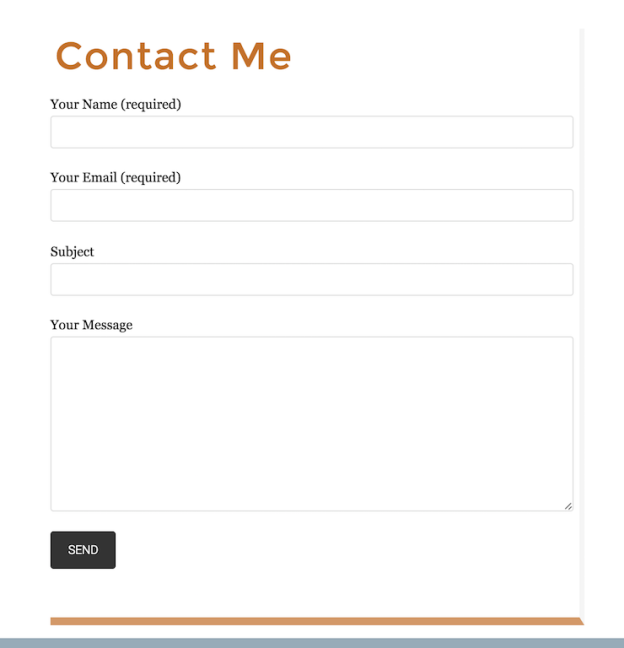
In this case our website uses the The7 theme by Dream-Theme and the default Contact Form 7 form appears as follows:
Tip: The appearance of the default CF7 form on your WordPress website will depend on the current WordPress theme used and the CSS styling that theme applies to standard HTML form elements.
You may notice this form has a couple of styling issues:
In this article we’ll be demonstrating how to change the style of this form, using HTML and CSS, to meet particular requirements.
Forms are a common part of many websites and are a very powerful tool for interacting with users. They provide an easy way for visitors to your website to start a conversation with you about their particular requirements.
While the CF7 plugin makes it quick and easy to create forms with little or no knowledge of HTML, Contact Form 7 forms are based firmly on the general HTML form process.
HTML includes a number of elements which are specifically designed for use in forms. The CF7 plugin provides support for most of the commonly used HTML form elements, including some recently added HTML5 elements.
The appearance of each CF7 form depends on the HTML form elements used
and the CSS styling applied to these elements in your current WordPress theme.
In any web form, the HTML provides the form content and layout (structure) of the form while the CSS controls the forms appearance and presentation (style).
HTML – form content and layout (structure)
CSS – form appearance and presentation (style).
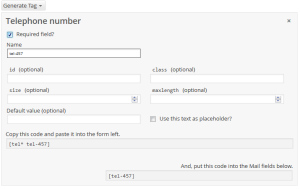
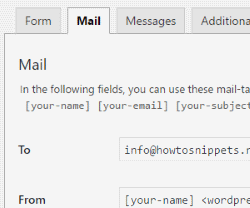
The HTML in each CF7 form is created by the CF7 plugin based on information supplied by you in the Form section on the CF7 interface.
Any HTML elements added by you in the Form section on the CF7 interface are combined with HTML generated by the CF7 plugin.
HTML (supplied by you) + HTML (added by the CF7 plugin) = FORM Content & Layout (structure)
The default Contact Form 7 form uses label elements Label Content as the basis for the form.
While this is probably the simpliest way to create a form, it has a number of shortcomings, which we discuss in further articles – ( see Why we use Fieldset, Legend & Lists in CF7 Skins and Making your form easy to read by using Fieldsets ).
You can in fact use any HTML elements you want in the Form section on the CF7 interface and this is a key part of building CF7 forms that match your functional and appearance requirements.
With practice you can learn how to create increasingly complex CF7 forms by combining your HTML elements with those added automatically by the CF7 plugin.
The box below shows the content of the Form section of the CF7 interface for the default CF7 form.
[textarea your-message]
As you examine this code you should notice that it includes:
The standard HTML Elements you add in this section are output largely unchanged by the CF7 plugin. CF7 then uses the CF7 Tags to create fully functioning standard HTML form elements which can include a number of additional HTML attributes.
If you are not sure how Contact Form 7 uses CF7 Tags you can read all about them at Contact For 7 Tag Syntax.
The box below shows the complete HTML code generated on the actual website, based on information supplied by you in the Form section on the CF7 interface and the additional HTML code added by the CF7 plugin.
Take a moment to compare these two bits of code and notice where the information from the form section of the CF7 interface has made it into the HTML on the actual website.
Tip: If you unable to understand easily what is going on in the code included in these two boxes, you probably don’t have adequate skills to change the style of CF7 forms, without at least some external support or advice.
In that case you should continue to learn what you need to know about both HTML and CSS at http://www.w3schools.com/ and come back to this article when you’ve done that.
You may notice that Contact Form 7 adds a number of CSS classes & ids to the individual HTML form elements – for example:
These are added, by the plugin author, to allow users skilled at using HTML and CSS, to style their CF7 forms to their particular requirements.
The list of available classes that can be targeted within CF7 forms include:
It makes sense to target these individual CSS classes available within your CF7 forms.
WordPress theme developers also can use these CSS classes & ids to build support for the CF7 plugin within their theme. As CF7 is one of the most popular plugins in WordPress, it makes sense for theme developers to do this.
You can also give your HTML form elements individual classes & ids within the CF7 tags in the Form section of the CF7 interface. This can be very useful when you have number of elements you want to style the same way.
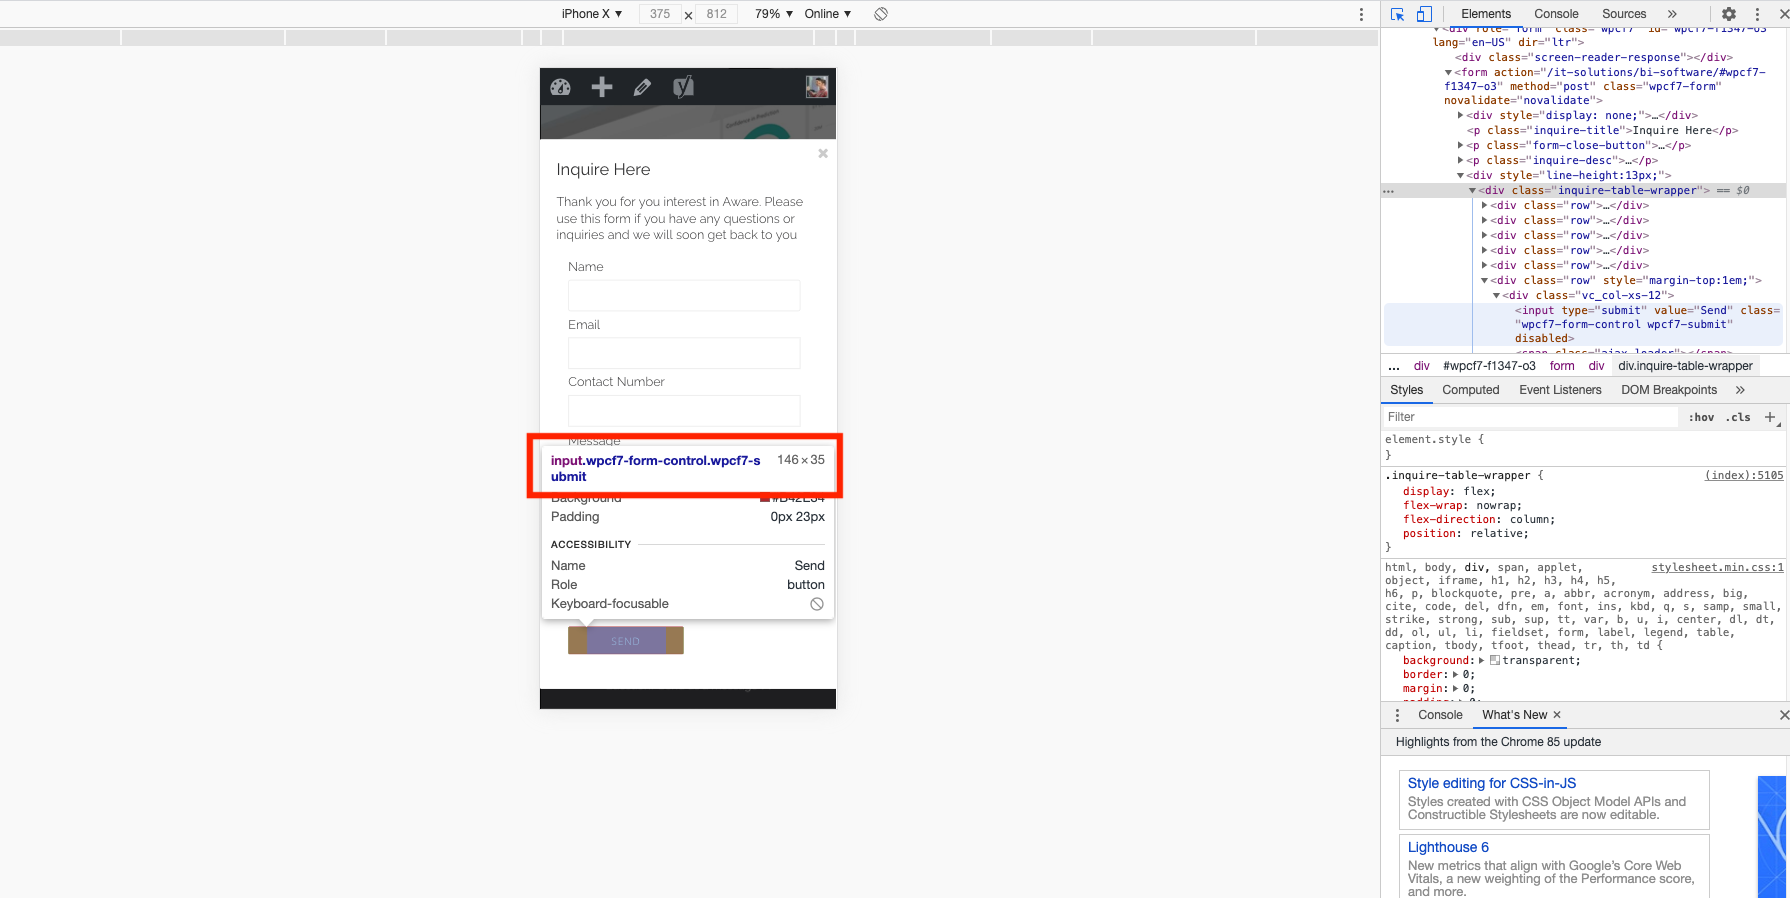
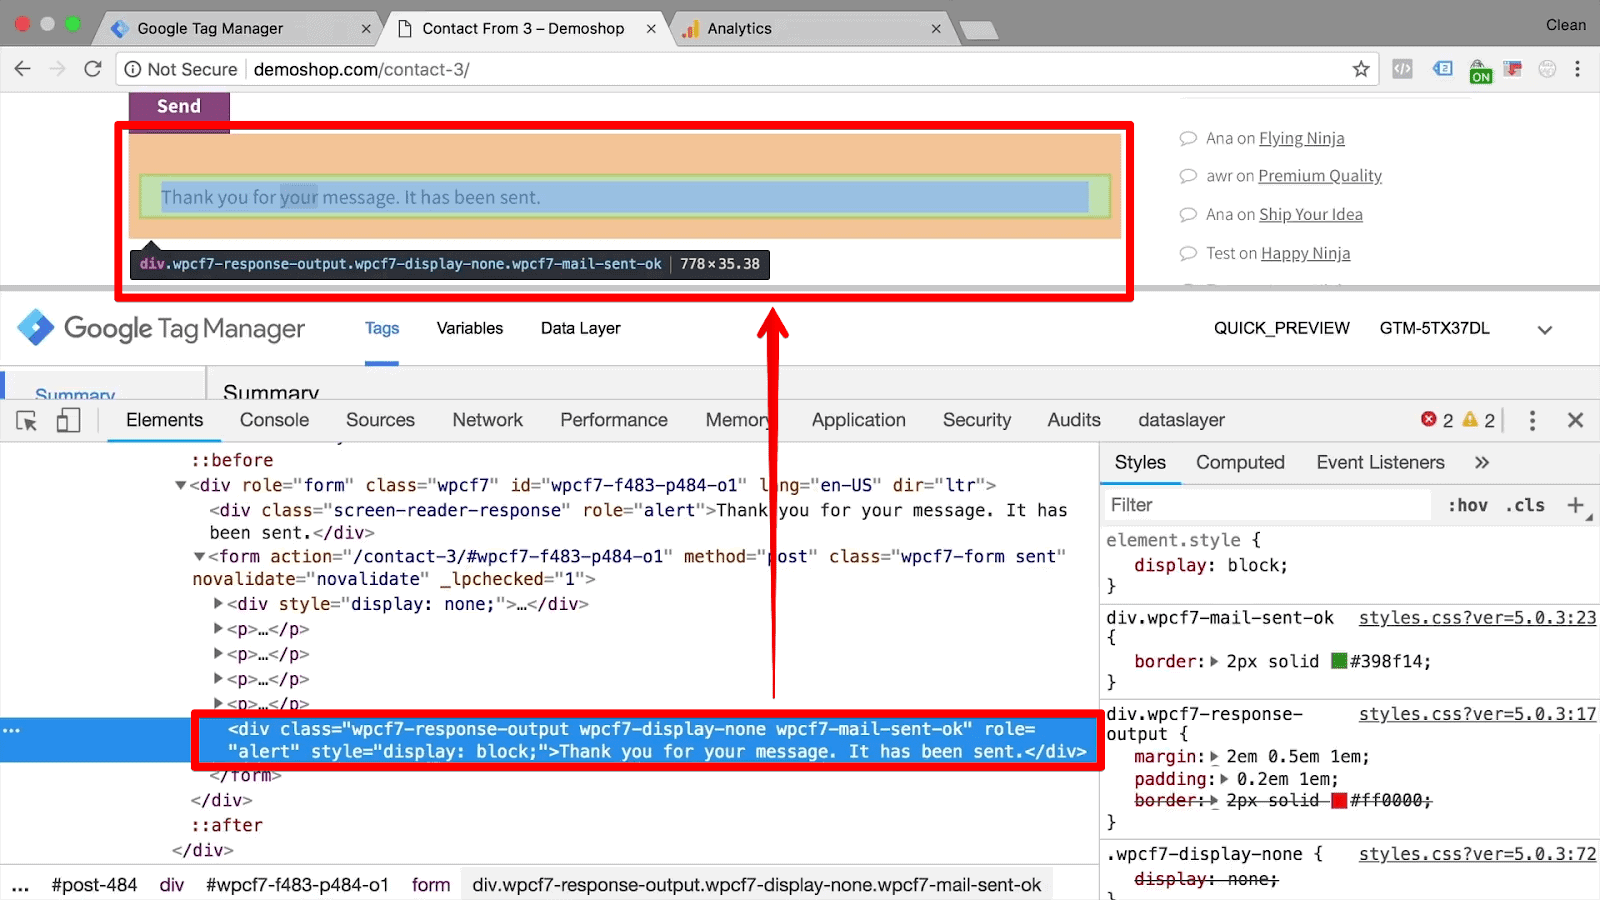
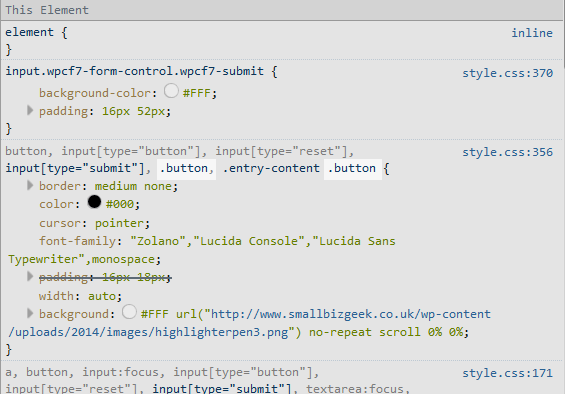
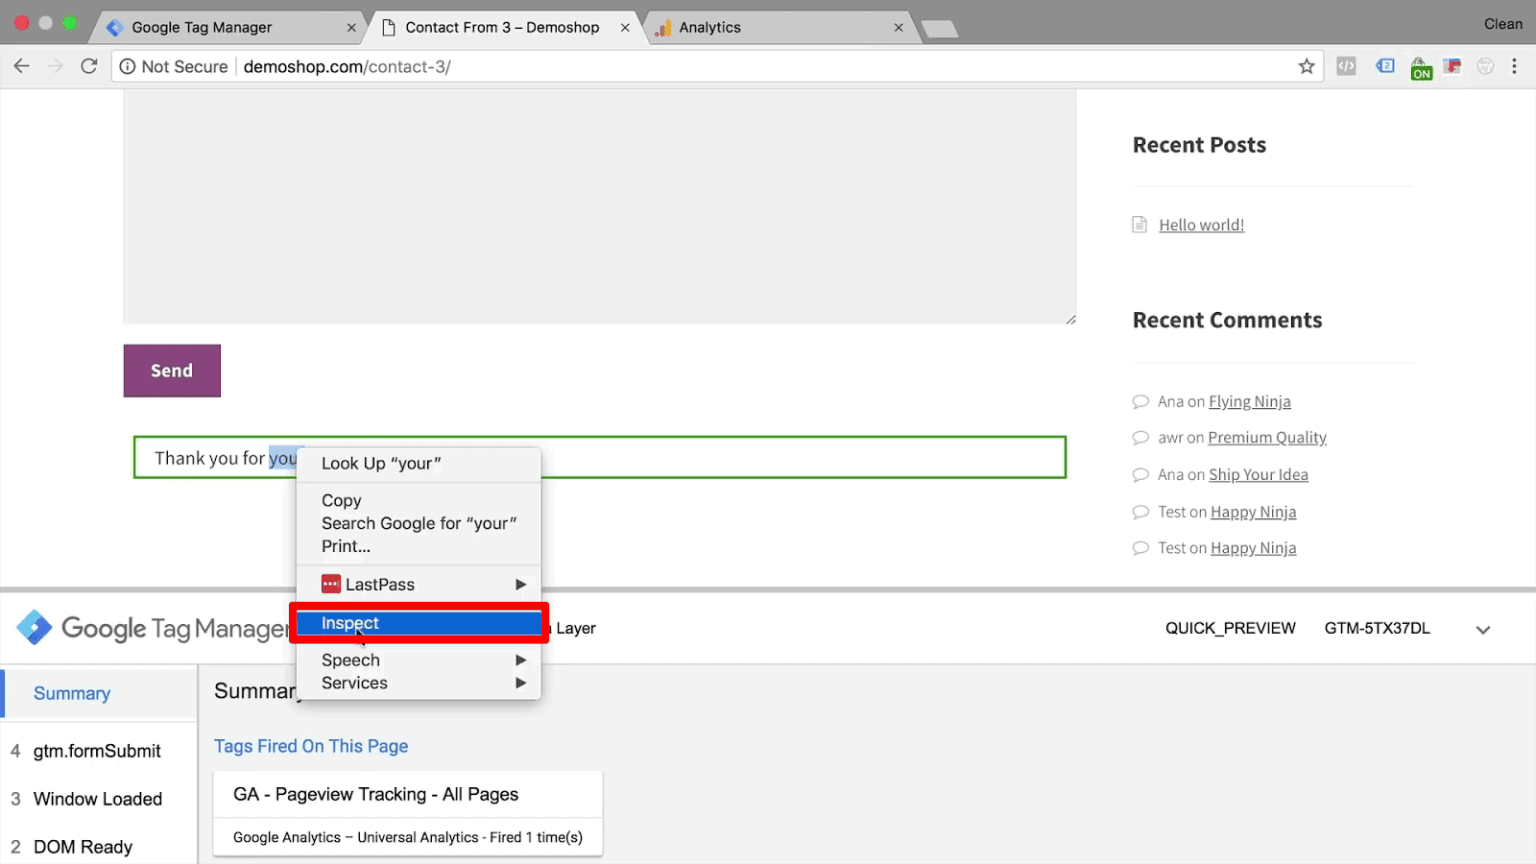
At this point you should use Firebug or Chrome Dev Tools to examine the HTML and CSS of your CF7 form in detail.
Default CF7 form in Firebug – Click on image to open a larger version
Use one of these tools to explore all the HTML form elements in your CF7 form and see how each element is being styled in detail by the CSS in your current WordPress theme.
In particular take note of the various style sheets that are contributing to the final style used and how individual style elements are being overwritten (or not) by the CSS hierarchy.
Once you understand how the HTML and CSS is configured in your CF7 form, you can begin to plan the CSS changes you need to change the appearance of the form to suit your requirements.
You will need to be skilled at using Firebug or Chrome Dev Tools to examine the HTML and CSS of your CF7 form in detail to follow along in this article.
If that description does not fit you, you can learn about Firebug or Chrome Dev Tools and come back to this article when you’ve done that..
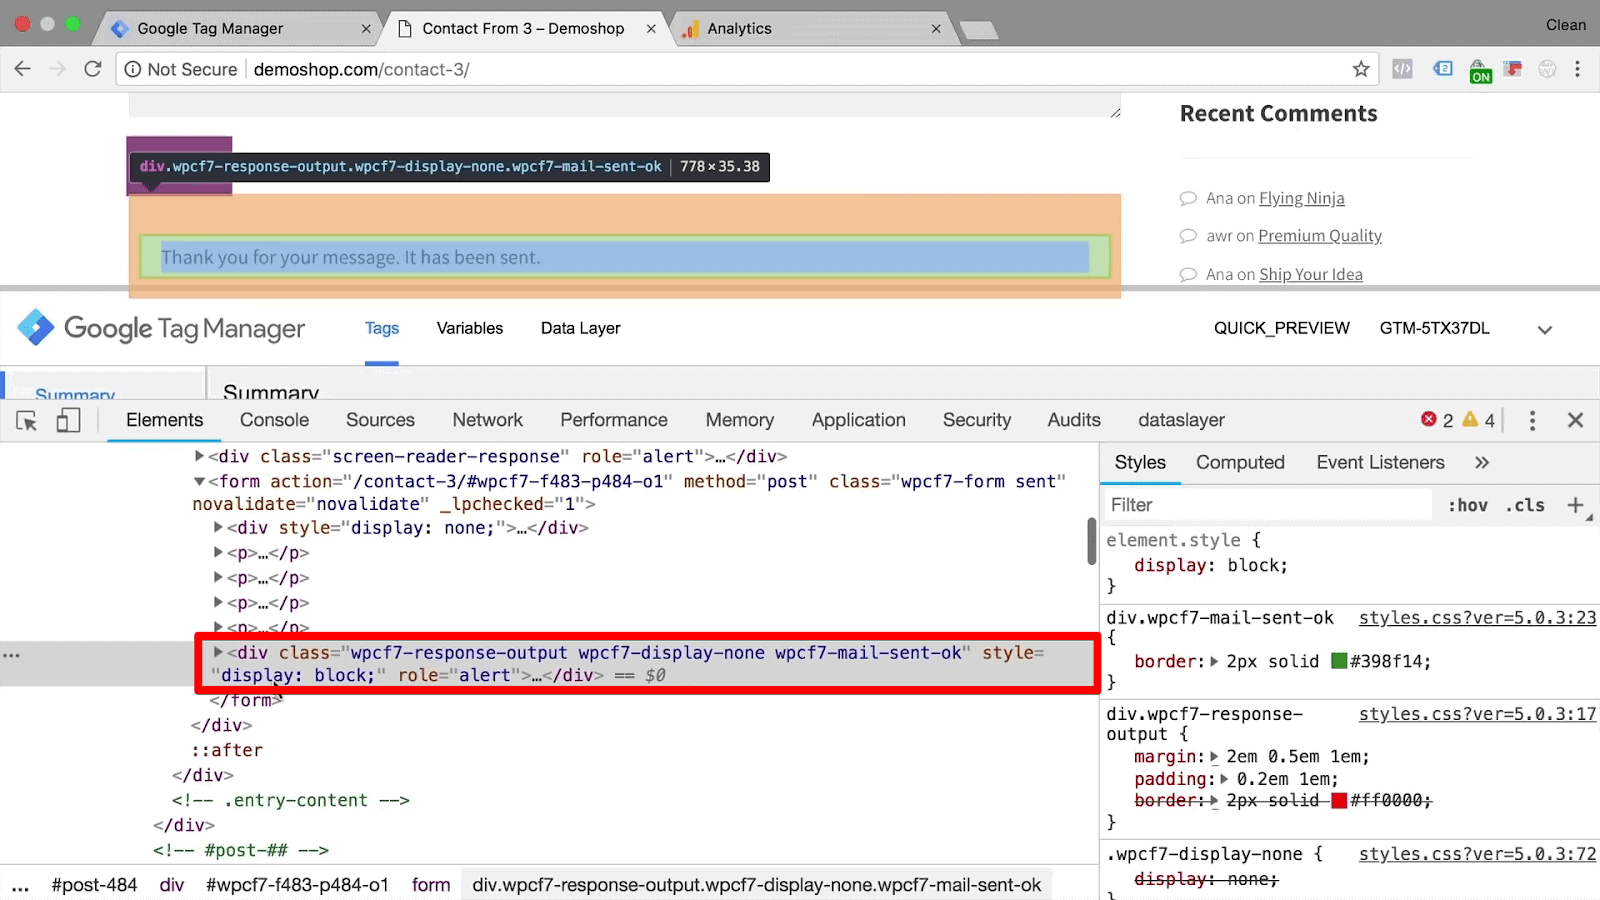
We used Firebug to produce the following diagram which shows the overall structure if the default CF7 form we are using in this article.
Click on image to open larger version
The diagram shows how each element of the form is created using standard HTML form elements and how those elements are arranged in relation to each other.
With experience, using Firebug or Chrome Dev Tools should give you all the information you need to change the style of your CF7 forms quickly and easily, but it may definitely help you initially to produce a hand drawn paper sketch similar to this diagram.
There is a common misconception that the CF7 plugin controls the appearance of CF7 forms though the plugins CSS style sheets.
In truth the Contact Form 7 plugin uses only very minimal CSS styling to allow CF7 forms to blend in with most websites. For a listing of complete style sheet used by the CF7 plugin see Default CF7 CSS style.
The appearance of CF7 forms on your website will depend largely on the current WordPress theme used and the CSS styling that theme applies to standard HTML form elements.
The actual look of CF7 forms on your website will depend largely on the current WordPress theme used and the CSS styling that theme applies to standard HTML form elements.
To change the appearance of your CF7 forms to suit your requirements, you will need to:
Your current theme may not do a good job of styling forms
For some reason many WordPress themes do not provide CSS styling for standard HTML form elements. We regard this as poor practice and always look closely at how a theme styles standard HTML form elements when selecting themes.
Importantly if your theme neglects to provide appropriate CSS for these standard HTML form elements then the appearance of your form will fall back to that provided by default by the browser – which can be different in different browsers.
The most common and preferred method to makes changes to CF7 form styling is to create a Child Theme.
Make any necessary additions to the CSS in the child themes style.css only, rather than directly in the themes styles.css. That way you don’t lose your changes when you update the theme.
The style.css file of the child theme usually imports all styling from the parent theme by including the following CSS code at the top of the child theme’s style.css file.
@import url('../twentyeleven/style.css');
Any CSS changes that alter the appearance of our CF7 forms are added below this. Due to the CSS loading heirachy, any CSS changes made here will overwrite styles previously set in the parent theme.
Alternatively you could use a custom CSS plugin to make your CSS changes.
When making CSS changes you want to make sure that your CSS changes don’t inadvertantly effect other elements on your website.
The preferred way to do this is to use CSS inheritance to target the relevant HTML elements within your CF7 forms only.
For CF7 forms we have several ids & classes which can be used to give the necessary targeted inheritance including:
For example we can use the class .wpcf7-form to change the appearance of all HTML input text elements within CF7 forms only:
Use CSS inheritance to ensure that your CSS changes don’t inadvertently affect other elements on your website.
Depending on how your theme styles standard HTML form elements in general, and CF7 form elements in particular, you may need to add extra CSS specificity to get your CSS changes showing.
For example we can use an extra the CF7 class to give higher CSS Specificity:
.wpcf7 .wpcf7-form input[type="text"] {
For WordPress themes with high levels of unnecessary CSS specificity, you may need to target the #id of specfic CF7 forms as explained in Styling a Specific Contact Form 7 Form.
You can add additional CSS styling to any CF7 form elements you want to modify.
The list of common elements that can be targeted within CF7 forms include:
You can use Firebug or Chrome Dev Tools to explore the full range of ids & classes used by Contact Form 7.
For example to change the background colour of the Send button when the mouse pointer hovers over the button:
.wpcf7 input[type="subm
World Of Brazzers
Bokep Bangbros
Massage Istanbul
Old Teen Porn Hd
Sexual Schoolgirls
WPCF7_Submission::get_instan…
Wpcf7 Submission | ВКонтакте
Contact Form 7 CSS styling: Customize CF7 with CSS
Styling Contact Form 7 Forms | Great looking Contact Form ...
Contact Form 7 Tips [Beginner to Advanced] | [ Updated in ...
wordpress - How to hook into Contact Form 7 Before Send ...
Use Contact Form 7 CSS To Style Almost Anything in CF7
Советы, хаки, секреты — Contact Form 7
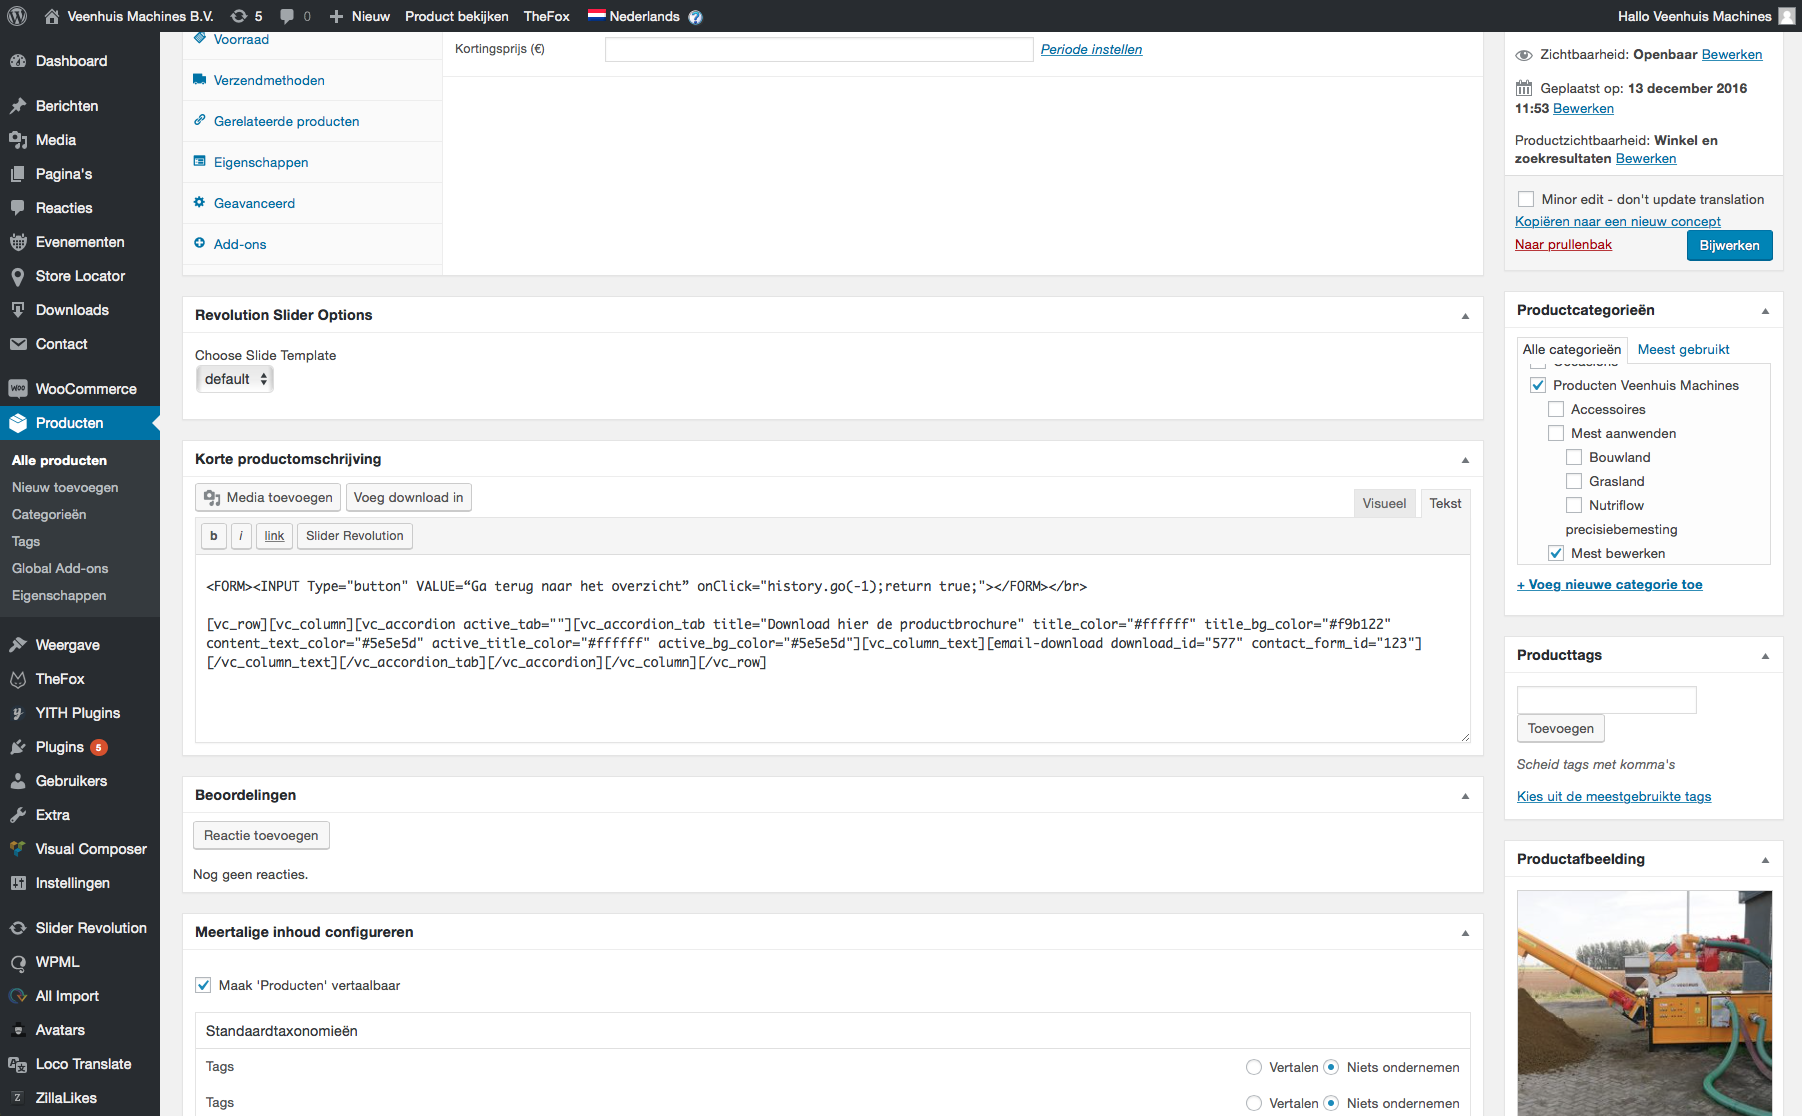
Add Contact Form 7 - Slider Revolution
ContactForm7のフォーム送信時にユーザー登録を自動でおこなう方法
Wpcf7 Submission