Unlock Native Power in Flutter. Part 2
FlutterPulseWelcome back! In Part 1, we explored Method Channels and Event Channels — the communication foundation between Flutter and native code. In Part 2, we'll dive into Platform Views, which allow you to embed native UI components directly into your Flutter app, along with best practices and testing strategies.
📖 Part 2: Platform Views and Advanced Patterns (You're here)
Platform Views: Embedding Native UI
Sometimes you need to embed native UI components directly into your Flutter app. This is where Platform Views come in. They allow you to display native Android Views or iOS UIViews within your Flutter widget tree.
Common Use Cases
- Google Maps SDK
- WebView with platform-specific features
- Camera preview
- Video players
- Native ads
- AR components
Performance Considerations
Platform Views come with a performance cost because they require hybrid composition or virtual displays. Use them only when necessary.
Platform Comparison
Android — Hybrid Composition (Default)
✅ Better performance
✅ Recommended for production apps
Android — Virtual Display (Legacy)
⚠️ Legacy mode
⚠️ Use only for backward compatibility
iOS — UIKitView
✅ Good performance
✅ Standard approach for iOS
Implementation Example: Native Text View
Let's build a simple native text view that renders a platform-specific label (TextView on Android, UILabel on iOS).
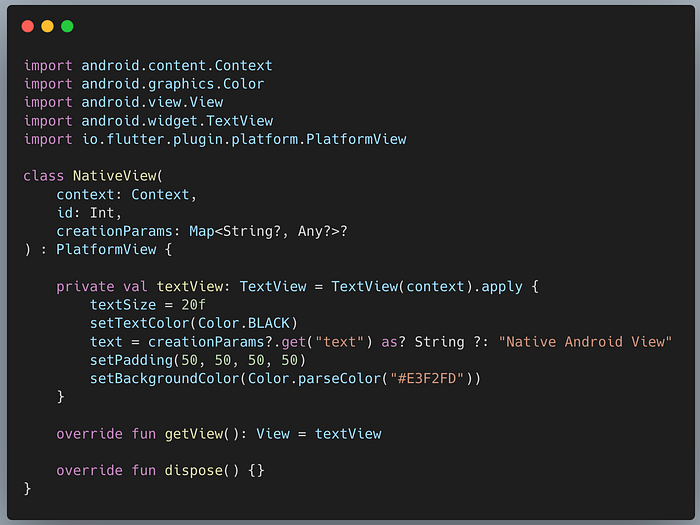
Step 1: Add an Android platform-specific implementation
Start by creating the Native View logic. This class implements PlatformView and handles the actual rendering of the Android view.
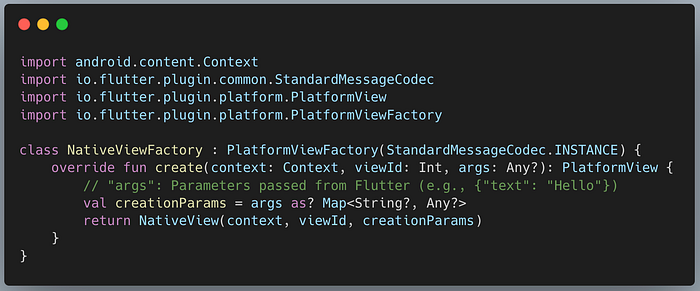
Next, create a Factory class that creates instances of your native view.
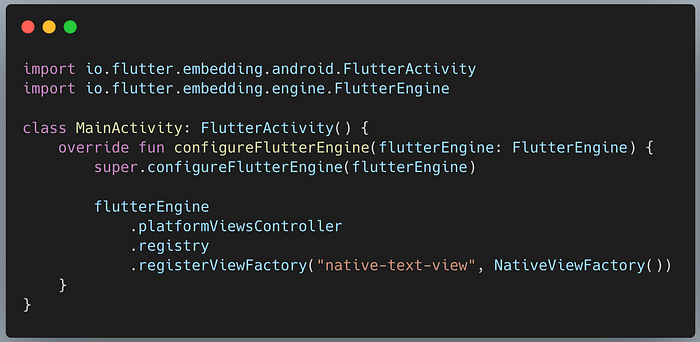
Finally, register the factory in your MainActivity.kt. This tells the Flutter engine about your custom view type.
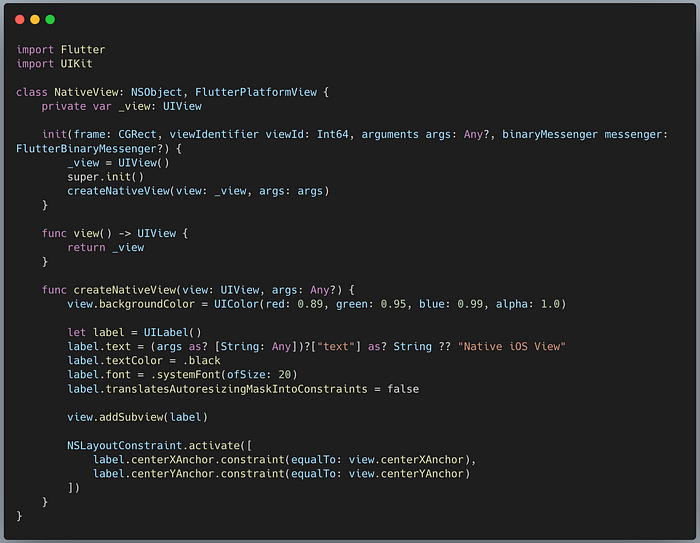
Step 2: Add an iOS platform-specific implementation
First, create the Native View class. This class inherits from NSObject and implements FlutterPlatformView.
Next, create the Factory class.

Finally, register the factory in AppDelegate.swift.
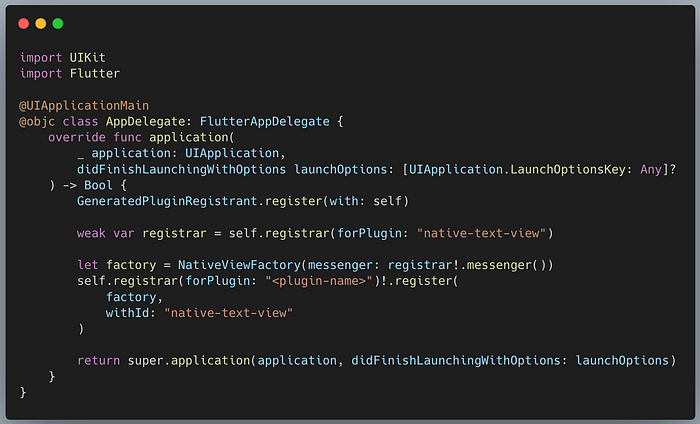
Note: In a real plugin, you would register this in your plugin's main class. For the app runner, you can register it in the App Delegate.
Step 3: Create the Flutter Platform View widget
Now you can use the native view in your Flutter layout. Use AndroidView for Android and UiKitView for iOS.

Limitations of Platform Views
Platform Views are a powerful tool, but they are not a silver bullet. Consider these limitations:
- Performance Impact: Rendering native views is more expensive than rendering Flutter widgets. Each frame requires synchronization between the Flutter engine and the native UI system.
- Gesture Conflicts: Touch events pass through multiple layers. Sometimes, gestures might be consumed by the native view and not reach Flutter, or vice-versa. Careful configuration of
gestureRecognizersis often needed. - Keyboard Interactions: Handling focus and soft keyboards can be tricky when mixing Flutter text fields with native text fields, especially on Android versions using Virtual Displays.
- Frame Lag: In some scenarios, particularly with complex animations, the native view might lag one frame behind the Flutter UI due to the asynchronous nature of the rendering pipeline.
- Creation Param Size Limit: The
creationParamsare passed from Flutter to the native side using a platform channel. Therefore, they are subject to the same buffer size limitations as standard method calls (approx. 1MB on Android).
Best Practices for Platform Views
- Size constraints: Always provide explicit size constraints
- Gesture handling: Configure gesture recognizers appropriately
- Memory management: Properly dispose of resources
- Performance: Use sparingly, as they can impact rendering performance
- Hybrid composition: Prefer Android's hybrid composition for better performance
Security Considerations
- Validate inputs: Never trust data from either side
- Permission handling: Request permissions appropriately
- Secure data transmission: Encrypt sensitive data
- Resource limits: Prevent resource exhaustion
Testing Platform Channels
Testing platform interactions doesn't require running on a real device. You can mock the channel responses in your widget tests or unit tests.
Step 1: Test Setup
Ensure you have the flutter_test dependency. In your test file, initialize the test binding.

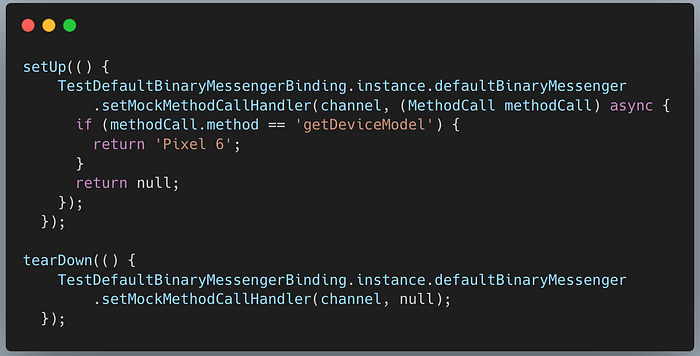
Step 2: Mock the Method Call Handler
Intercept calls to the platform channel and return a mock response. This simulates the native side returning data.
Step 3: Verify Results
Write the actual test case to verify that your Dart code responds correctly to the mocked native data.

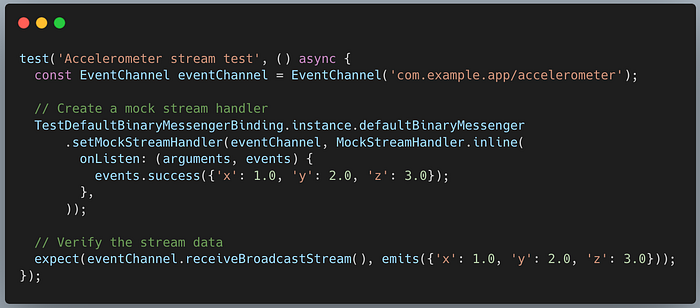
Testing Event Channels
Testing EventChannel streams require mocking the defaultBinaryMessenger to emit events.
Bonus: Type-safe Channels with Pigeon
Writing manual method channel code (strings and maps) is error-prone. For production apps, consider using Pigeon.
Pigeon generates type-safe Dart, Java/Kotlin, and Objective-C/Swift code from a simple API definition.
- Define API in Dart: <code>abstract class DeviceApi { String getDeviceModel(); }</code>
- Run Pigeon: Generates the glue code for you.
- Implement: Just implement the generated interface on Android/iOS.
- Call: Use the generated Dart class to call native methods safely.
Quick Decision Guide
- Use Method Channels when: ✔️ Making one-off API calls ✔️ Calling platform-specific functions ✔️ Need bidirectional communication
- Use Event Channels when: ✔️ Streaming continuous data ✔️ Monitoring sensors or system events ✔️ Real-time updates from native code
- Use Platform Views when: ✔️ Embedding native UI components ✔️ Integrating third-party native SDKs with UI ✔️ Need platform-specific rendering
Conclusion
Mastering Flutter's native integration isn't just about adding features; it's about removing the invisible barriers of cross-platform development. By leveraging Method Channels, Event Channels, and Platform Views, you effectively "hack" the limitations of a UI-only framework, transforming Flutter into a high-performance, native-powerhouse builder.
The real "power" doesn't come from choosing between Flutter or Native. It comes from the ability to bridge them seamlessly. You now have the architectural blueprints to build apps that are as fluid as Dart and as powerful as the underlying OS.
The bridge is built. The power is unlocked. What will you build next?
Further Resources
- Official Platform Channels Documentation
- Flutter Plugins Development
- Platform Views Deep Dive
- Sample Code Repository
For more updates on the latest tools and technologies, follow the Simform Engineering blog.