Unlock Native Power in Flutter [Part 1]
FlutterPulseThis article was translated specially for the channel FlutterPulseYou'll find lots of interesting things related to Flutter on this channel. Don't hesitate to subscribe!🚀
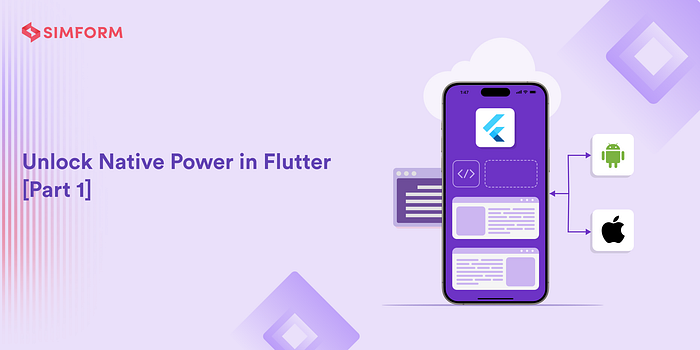
Learn how to bridge Flutter with native Android and iOS code using Method Channels and Event Channels
Flutter has revolutionized cross-platform development, but let's face it, there are times when you need to tap into platform-specific APIs that Flutter doesn't expose out of the box. Whether it's accessing native sensors, integrating third-party SDKs, or leveraging platform-specific UI components, understanding how to bridge the gap between Flutter and native code is essential for building production-ready apps.
In this two-part series, we'll learn about the complete spectrum of Flutter-native interaction mechanisms. Part 1 focuses on Method Channels and Event Channels the foundation of Flutter-native communication. Part 2 will cover Platform Views and advanced integration patterns.
📖 Part 1: Method Channels and Event Channels (You're here)
Why Native Integration Matters📖 Continue to Part 2: Platform Views and Advanced Patterns →
Before we dive into the technical details, let's understand why native integration is crucial:
- Platform-specific APIs: Bluetooth, NFC, advanced camera features
- Third-party SDKs: Payment gateways, analytics, crash reporting
- Performance optimization: Heavy computations, image processing
- Native UI components: MapView, WebView with advanced features
- Background tasks: Geolocation tracking, push notifications
Flutter provides excellent coverage for most use cases, but the ecosystem is vast, and sometimes you need that extra mile of platform-specific functionality.
Platform ChannelsAt its core, Flutter uses platform channels to communicate between Dart code and native code (Kotlin/Java for Android, Swift/Objective-C for iOS). Think of it as a message-passing bridge that serializes data across the platform boundary.
Key Concepts
- Channel Names: Unique identifiers for communication channels
- Method Codecs: Serialize data between Dart and native (StandardMethodCodec, JSONMethodCodec)
- Platform-specific implementations: Separate code for Android and iOS
Method Channels: Bidirectional Communication
Method Channels are the most common way to invoke platform-specific code from Flutter. They support asynchronous method calls with responses.
How It Works
- Flutter calls a method on the Dart side
- The call is serialized and sent to the native side
- Native code processes the request
- Result is serialized and returned to Flutter
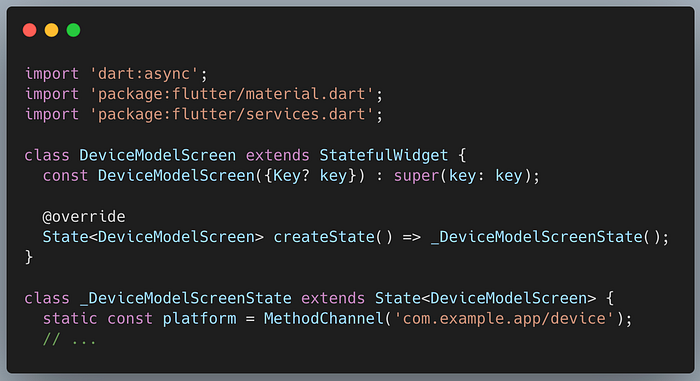
Implementation Example: Device Model
Let's build a practical example to fetch the device model name (e.g., "Pixel 6" or "iPhone 14").
Step 1: Create the Flutter platform client
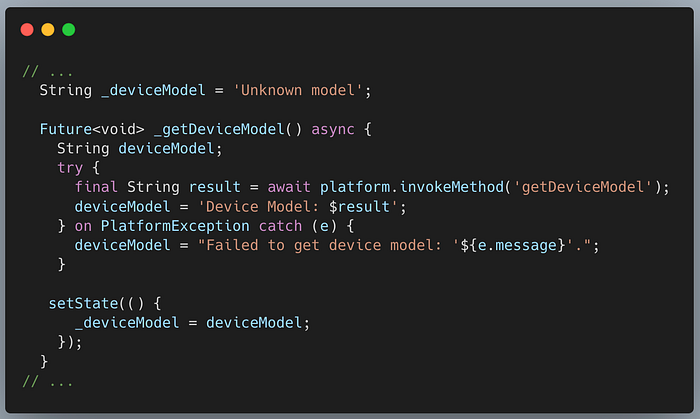
The app's State class holds the current app state. Extend that to hold the current device model.
First, construct the channel. Use a MethodChannel with a single platform method that returns the device model.
The client and host sides of a channel are connected through a channel name passed in the channel constructor. All channel names used in a single app must be unique; prefix the channel name with a unique 'domain prefix', for example: com.example.app/device.
Next, invoke a method on the method channel, specifying the concrete method to call using the String identifier getDeviceModel. The call might fail—for example, if the platform doesn't support the platform API (such as when running in a simulator), so wrap the invokeMethod call in a try-catch statement.
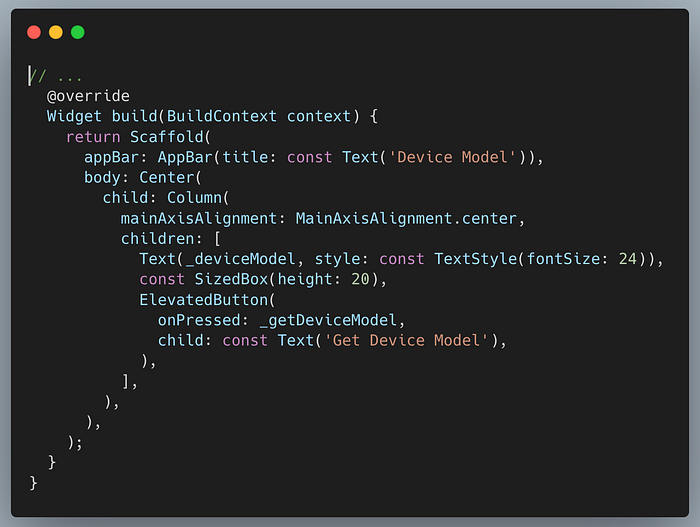
Finally, replace the build method from the template to contain a small user interface that displays the device model in a string, and a button for refreshing the value.
Step 2: Add an Android platform-specific implementation
Start by opening the Android host portion of your Flutter app:
- Navigate to the directory holding your Flutter app, and select the
androidfolder inside it. - Open the file
MainActivity.ktlocated in thekotlinfolder in the Project view.
Inside the configureFlutterEngine() method, create a MethodChannel and call setMethodCallHandler(). Make sure to use the same channel name as was used on the Flutter client side.
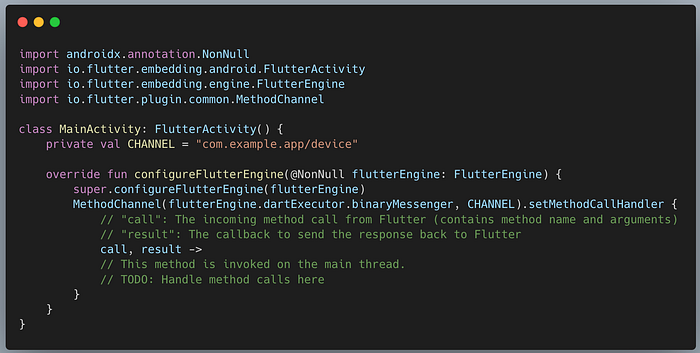
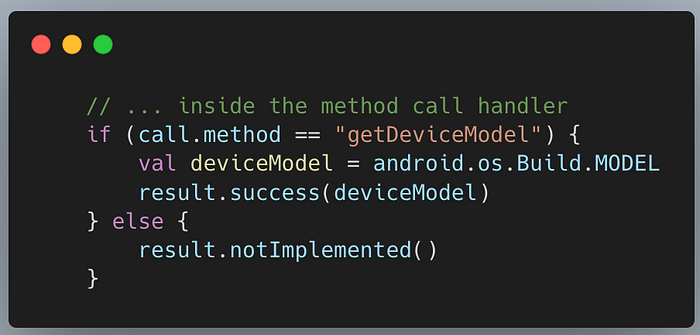
Add the Android Kotlin code that uses the Android Build API to retrieve the device model. This code is exactly the same as you would write in a native Android app.
Step 3: Add an iOS platform-specific implementation
Start by opening the iOS host portion of your Flutter app:
- Navigate to the directory holding your Flutter app, and select the
iosfolder. - Open the file
AppDelegate.swiftlocated under Runner > Runner in the Project navigator.
Override the application:didFinishLaunchingWithOptions: function and create a FlutterMethodChannel tied to the channel name com.example.app/device.
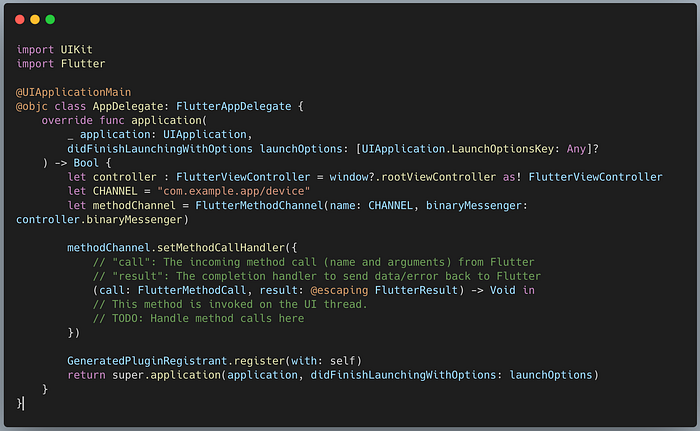
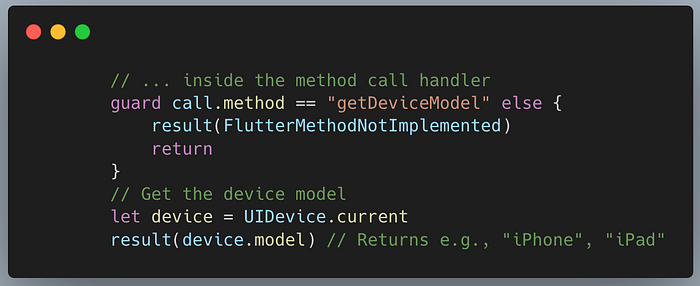
Next, add the iOS Swift code that uses the UIDevice API to retrieve the device model.
Understanding the Response Mechanism
The result object (Android) and completion handler (iOS) are used to communicate back to the Flutter client. There are three primary responses:
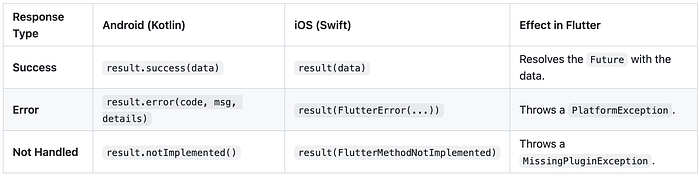
- success: Use this to return data (Strings, Maps, Lists, etc.) or
nullif the operation completed but has no return value. - error: Use this for expected failures (e.g., "SENSOR_MISSING", "PERMISSION_DENIED"). This allows you to handle platform errors gracefully in Dart using
try-catch. - notImplemented: This is a fallback to inform the Flutter client that the channel is registered, but the specific method name requested is not recognized by the native implementation.
Key Takeaways
- Channel naming: Use reverse domain notation for uniqueness
- Error handling: Always wrap calls in try-catch blocks
- Type safety: Method channels support standard Dart types (int, String, List, Map)
- Async nature: All method calls are asynchronous
While Method Channels are great for one-off requests, Event Channels shine when you need continuous streams of data from native code to Flutter. Think sensor data, location updates, or real-time notifications.
Use Cases
- Accelerometer/Gyroscope data
- GPS location tracking
- Battery state monitoring
- Network connectivity changes
- BLE device scanning
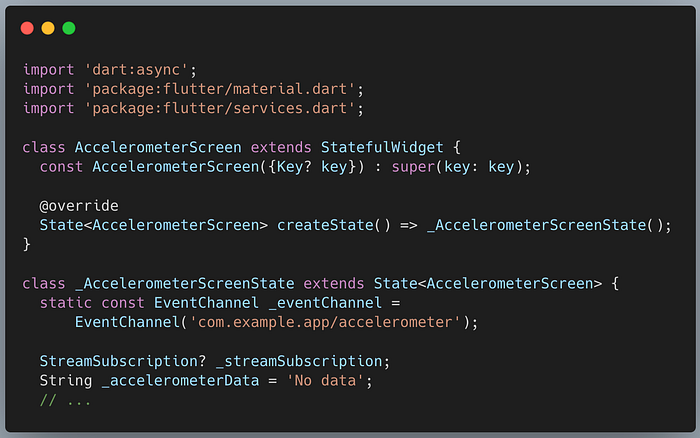
Implementation Example: Accelerometer Stream
Let's implement a stream that listens to accelerometer sensor updates.
Step 1: Create the Flutter platform client
The app's State class holds the current app state. Extend that to hold the current accelerometer data.
First, construct the channel. Use an EventChannel instead of a MethodChannel, as we are listening to a stream of events.
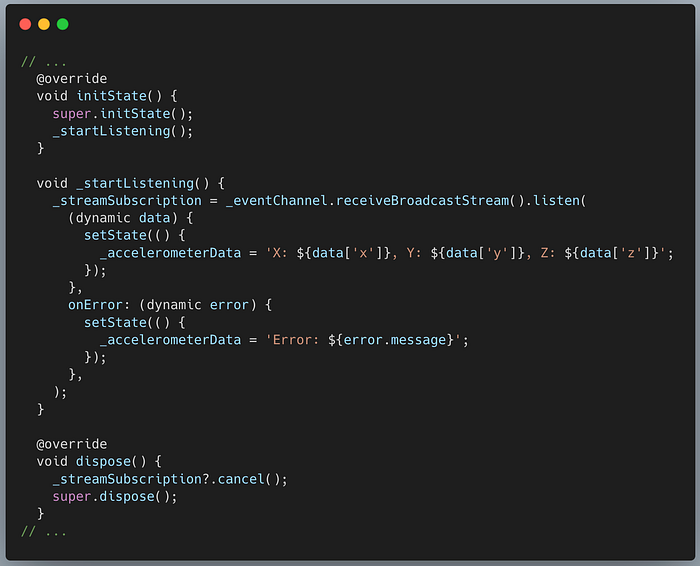
Next, listen to the stream. We'll start listening in initState and cancel the subscription in dispose. The receiveBroadcastStream() method returns a stream that we can listen to.
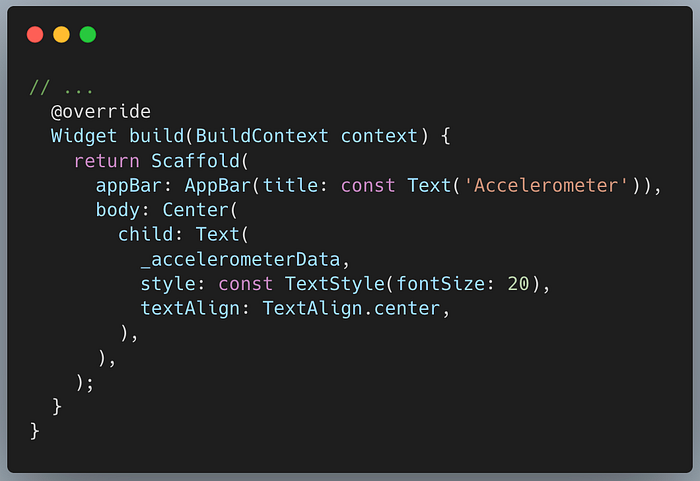
Finally, replace the build method to display the streaming data.
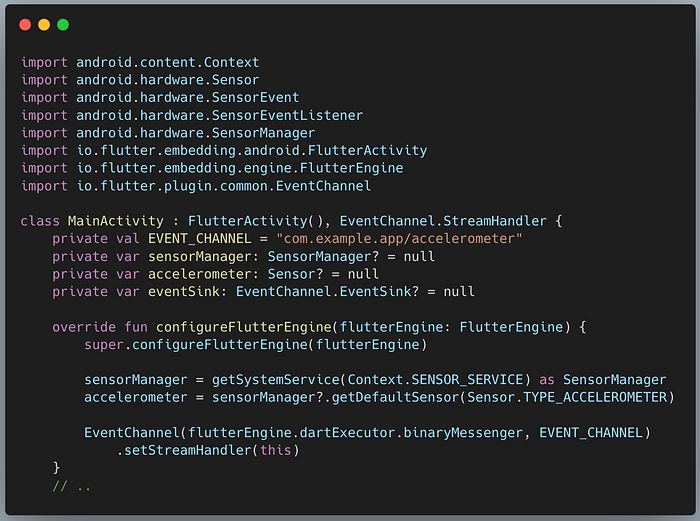
Step 2: Add an Android platform-specific implementation
Start by opening the Android host portion of your Flutter app in Android Studio.
Inside MainActivity.kt, implement the EventChannel.StreamHandler interface. This interface requires two methods: onListen (called when the Flutter client subscribes) and onCancel (called when the subscription ends).
Register the stream handler in configureFlutterEngine.
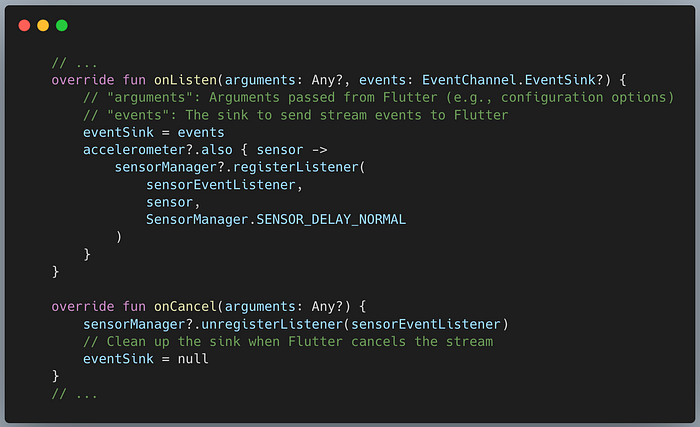
Implement the onListen and onCancel methods to register/unregister the Android sensor listener.
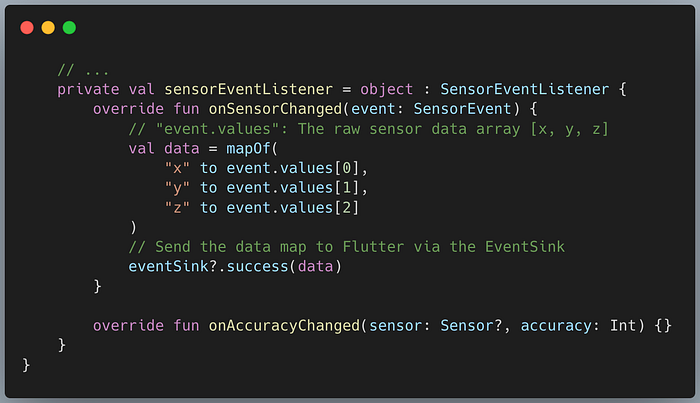
Finally, implement the SensorEventListener to send sensor data to Flutter using the eventSink.
Step 3: Add an iOS platform-specific implementation
Start by opening the iOS host portion of your Flutter app in Xcode. Open AppDelegate.swift and implement the FlutterStreamHandler protocol.
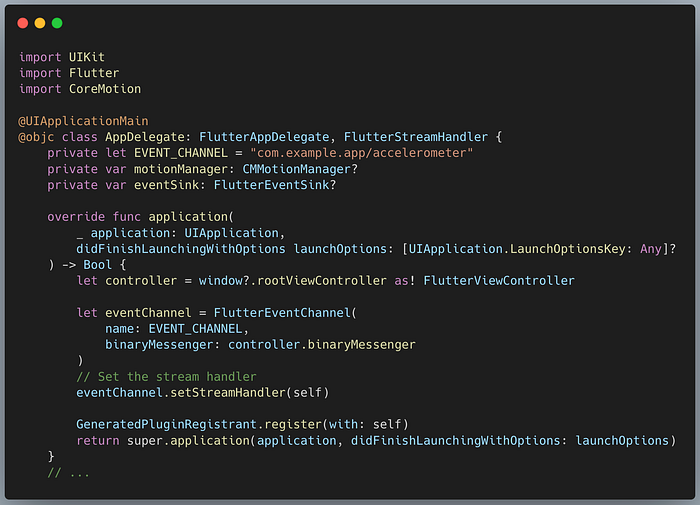
Implement onListen to start accelerometer updates using CoreMotion and send data to the eventSink.

Implement onCancel to stop updates and clean up.
 Method Channel vs Event Channel
Here's a quick comparison to help you choose the right approach:
 Limitations of Platform Channels
While powerful, platform channels come with some constraints you should be aware of:
- Main Thread Blocking: Platform channels run on the platform's main thread (UI thread). Heavy processing on the native side can block the Flutter UI. Always offload intensive tasks to background threads.
- Serialization Overhead: All data passed between Flutter and native code must be serialized and deserialized. Transferring large chunks of data (like images or large files) directly through channels can be slow.
- Limited Data Types: Only a specific set of data types (Map, List, String, int, bool, etc.) are supported by the
StandardMessageCodec. Complex custom objects need to be converted to Map/JSON. - Transaction Size Limit: Arguments codified into the envelope are subject to buffer size limits (e.g., on Android, the Binder transaction buffer is ~1MB). Sending data larger than this can crash the app with a
TransactionTooLargeException.
In Part 1, we've covered the fundamental communication mechanisms between Flutter and native platforms using Method Channels and Event Channels. You now understand how to make one-off API calls and stream continuous data from native code.
Part 2 will dive into:
- 🎨 Platform Views: Embedding native UI components
- ⚡ Best Practices: Performance optimization and security
- 🧪 Testing: How to test platform channel code
📖 Continue to Part 2: Platform Views and Advanced Patterns →
For more updates on the latest tools and technologies, follow the Simform Engineering blog.