UniBorg Environment Variables
SpEcHiDe😍 Environment Variables available in @UniBorg 🌝
https://GitHub.com/SpEcHiDe/UniBorg depends on various third-party service providers. The third-party services can stop their services / or change the instructions as when they feel, without any liablity. The instructions mentioned in this channel, was last tested on 8th August 2020, 19:30 Indian Standard Time.
As a general courtesy to other Telegram Users, please use common-sense* where required!
😍 Environment Variables available in @UniBorg 🌝
APP_ID
API_HASH
Get the above two variable values by following this procedure: https://git.io/Jembp
TG_BOT_TOKEN_BF_HER and TG_BOT_USER_NAME_BF_HER
Open @BotFather
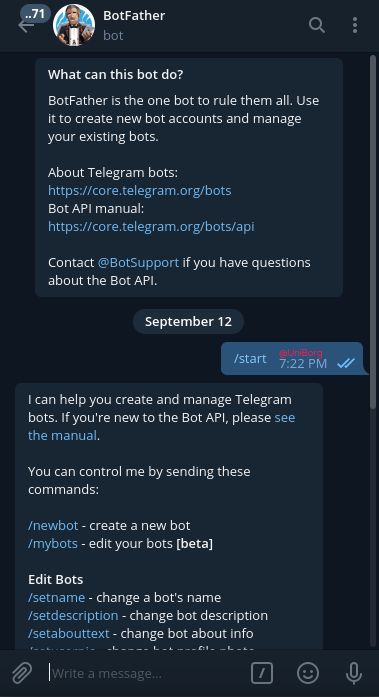
Send /newbot command.
Send the name for the bot.
Send the username for the bot, (without the @)

if the Previous Step was successful, @BotFather will reply with Done! and an API token in monospace.
TG_BOT_TOKEN_BF_HER is the HTTP API token obtained in the above message.
TG_BOT_USER_NAME_BF_HER is the username (you entered) with the @
There are some more additional steps to be done inside @BotFather
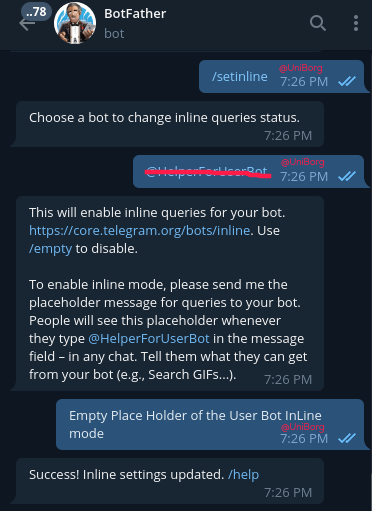
Send /setinline command to @BotFather
Select the bot you created from the given options.
Type a placeholder message that can be used for inline queries.
Example: it can be ...
@BotFather will reply Success! Inline settings updated.
Send /setjoingroups command to @BotFather
Select the bot you created from the given options.
Send Enable message.
@BotFather will reply with Success! message.

---
The above FOUR keys are the mandatory keys and should be given while deploying the UserBot by clicking on the button.
The below keys are optional, and are needed for some of the plugins to work.
To check which plugin requires a KEY, you can do .exec grep -r "KEY" . in your Saved Messages. ! Do not try this in any public chats, as this command can expose your personal keys to other users.
How to add an Environment Variable in Heroku?
Open https://dashboard.heroku.com/apps
Select the application you had deployed.
It is recommended to use a desktop, or simulate desktop mode in your mobile browser.
Click on the Settings tab.
Click on the Reveal Config Vars button.
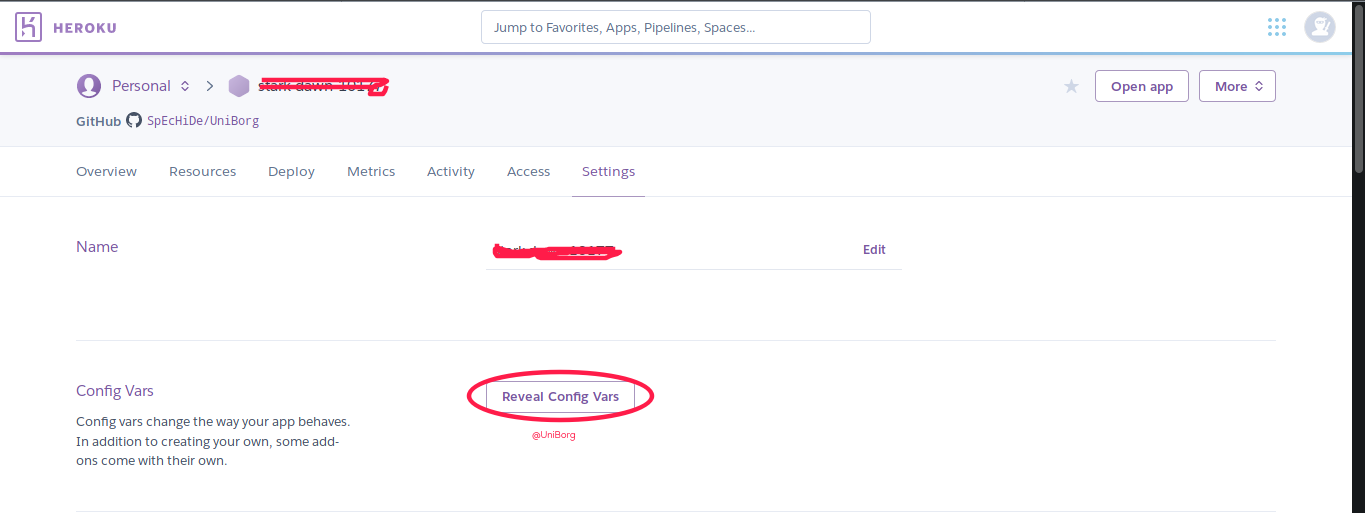
Scroll Down till the end.
There will be two text fields, and a disabled button.
Enter the required Key in the first textfield, and the required value in the second textfield.

Then click on the Add button.
---
UB_BLACK_LIST_CHAT
This variable prevents the userbot from running in specific chats.
You can get the ID of the chats that you want to blacklist the userbot from running and add the IDs in the value of this key seperated by space.
Example Value: -1001220993104 -1001365798550 -1001158304289 -1001212593743 -1001195845680 -1001330468518 -1001221185967 -1001340243678 -1001311056733 -1001135438308 -1001038774929 -1001070622614 -1001119331451 -1001095401841
NO_OF_BUTTONS_DISPLAYED_IN_H_ME_CMD
This variable indicates the number of rows that should appear in one page.
This is currently used for the .helpme command.
You can enter any number between 1 and 100.
COMMAND_HAND_LER
This indicates the prefix that should be used for commands.
Not giving this value should be ok.
The default prefix is . (DOT)
OPEN_WEATHER_MAP_APPID
Sign Up / Log In on https://home.openweathermap.org/users/sign_up by giving the credentials.
After Logging In, open the API key tab. https://home.openweathermap.org/api_keys
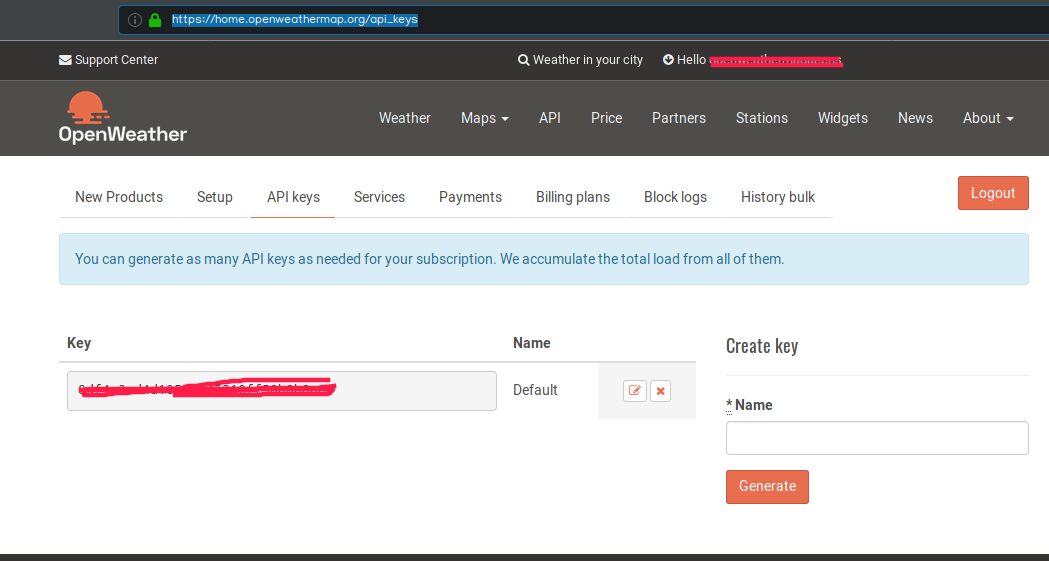
Add the key obtained from the above webpage to Heroku Environment variable.
PRIVATE_GROUP_BOT_API_ID
Create a Private Group.
You can use your UserBot to create a group, by doing .create b Group Name in your Saved Messages.
Open the created group.
Send .get_id in the Group.
Touch on the ID beginning with - if you are using Telegram Android application. Telegram X users can long press and copy.
Paste this ID to Heroku environment variable.
PRIVATE_CHANNEL_BOT_API_ID
Create a Private Channel.
You can use your UserBot to create a group, by doing .create c Channel Name in your Saved Messages.
Open the created channel.
Send .get_id in the channel.
Touch on the ID beginning with - if you are using Telegram Android application. Telegram X users can long press and copy.
Paste this ID to Heroku environment variable.
TELEGRAPH_SHORT_NAME
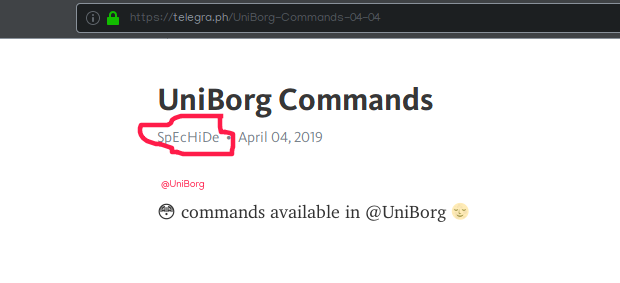
The value of the key decided what would appear in the highlighted place in the above image.
OCR_SPACE_API_KEY
Obtain API key from https://ocr.space/OCRAPI
Follow the procedures in the above website, and get an API Key.
In Heroku Environment Variable, add OCR_SPACE_API_KEY and value should be the API Key obtained from the above website.
G_BAN_LOGGER_GROUP
Create a group.
Add all the Group Administration bots, where you are SUDO.
Send .get_id in the Group.
Touch on the ID beginning with - if you are using Telegram Android application. Telegram X users can long press and copy.
Paste this ID to Heroku environment variable.
TG_GLOBAL_ALBUM_LIMIT
This variable is currently used to decide the number of images to be sent, when doing a .google image search.
You can put any number between 1 and 9 as the value of this key.
VERY_STREAM_LOGIN and VERY_STREAM_KEY
Sign Up / Log In for an account on verystream.com
Open https://verystream.com/panel#settings

Copy the Username and Password from the API/FTP Access area and it to VERY_STREAM_LOGIN and VERY_STREAM_KEY Heroku Environment Variable keys, respectively.
OPEN_LOAD_LOGIN and OPEN_LOAD_KEY
This is completely optional.
None of the plugins requires this.
These two keys are required if you do not want to solve the captcha for OpenLoad downloads.
Sign Up / Log In for an account on openload.co
Open https://openload.co/account#usersettings
On the Right Corner of the screen, you will see API/FTP Access.

Fill the OPEN_LOAD_LOGIN and OPEN_LOAD_KEY heroku variables with the appropriate values obtained from the above webpage.
gDrive [a.k.a. Google Drive]
Open https://da.gd/so63O
Login to your gmail.com account. It is recommended to use a gmail.com for creating the API.
Select Create a Project, Accept the Terms of Service, and select your Country of Residence.

Click on Agree and Continue button.

Click on Get Credentials button.
In the new screen, scroll down.
For Which API are you using? select Google Drive API from the dropdown.
For Where will you be calling the API from? select Other UI (e.g. Windows, CLI tool)
For What data will you be accessing? select User data.
Click on What credentials do I need?

A pop-up will appear.
Click on SET UP CONSENT SCREEN.
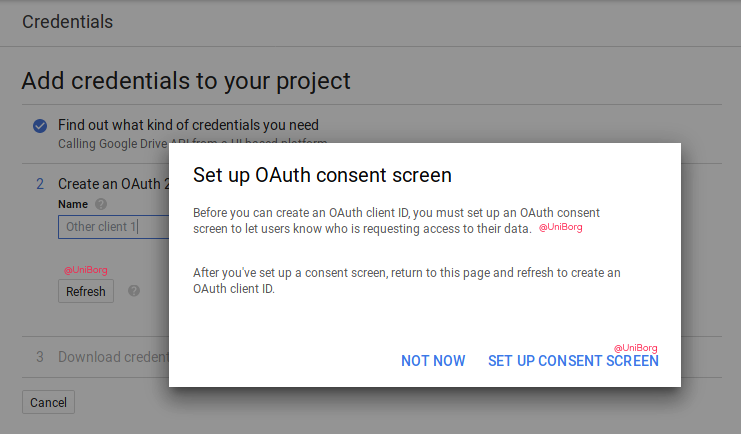
A new tab will open.
Give your application name, and logo that should display on the consent screen.
Since this is going to be used for your personal purposes, we do not need verification.
Google allows the first 100 users to be authenticated without the verification status.
Scroll Down and Click on the Save button.
You can now close this tab, and return to the previous tab.
Click on the Refresh button.
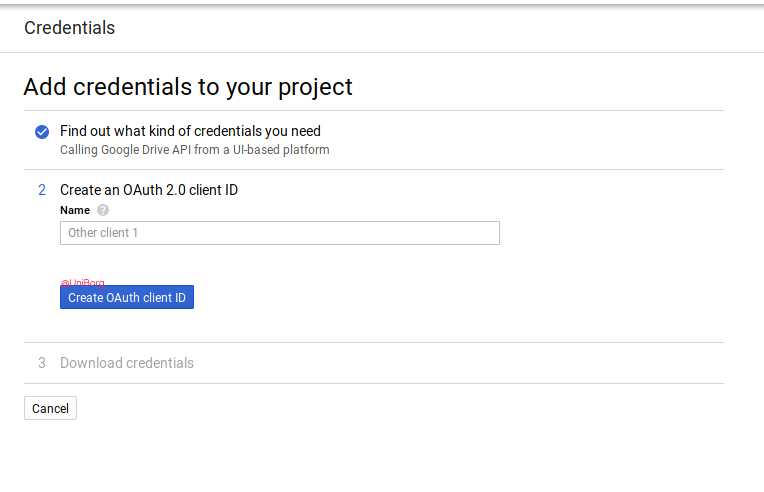
Click on the Create OAuth Client ID button.
Click on the Done button.
The page will get refreshed.
Click on the Edit button, as shown in the below screenshot.
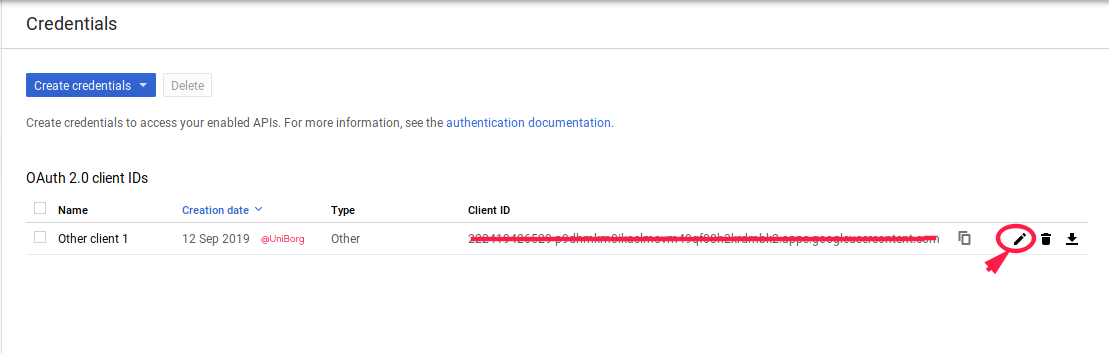
Copy the Client ID and Client secret.
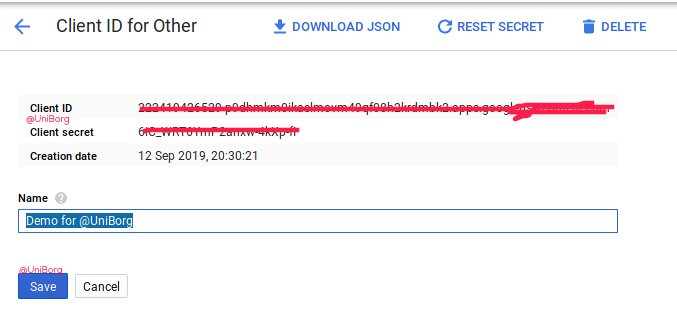
Add the Client ID to the G_DRIVE_CLIENT_ID key, in Heroku Environment Variable.
Add the Client secret to the G_DRIVE_CLIENT_SECRET key, in Heroku Environment Variable.
This plugin also requires the PRIVATE_GROUP_BOT_API_ID to be set.
Now, restart the heroku dyno.
Send a small file, in your PRIVATE_GROUP_BOT_API_ID group.
Reply .ugdrive to this file.
A link will appear.
The below six steps should be done in less than 1 minute.
Open the link in your browser, and login to the Google Drive account.
All gDrive functionalities will be done on this account.
This need not be the same account that you created your API in.
After login, it will display a code.


Reply this code to the in your PRIVATE_GROUP_BOT_API_ID.
The above six steps should be done in less than 1 minute.
The previous .ugdrive command response would now have been edited to show the uploaded link.

If the above steps were successful, then
.exec G_DRIVE_TOKEN_FILE="${TMP_DOWNLOAD_DIRECTORY}/auth_token.txt" && cat ${G_DRIVE_TOKEN_FILE}
Execute the above code in your Saved Messages.
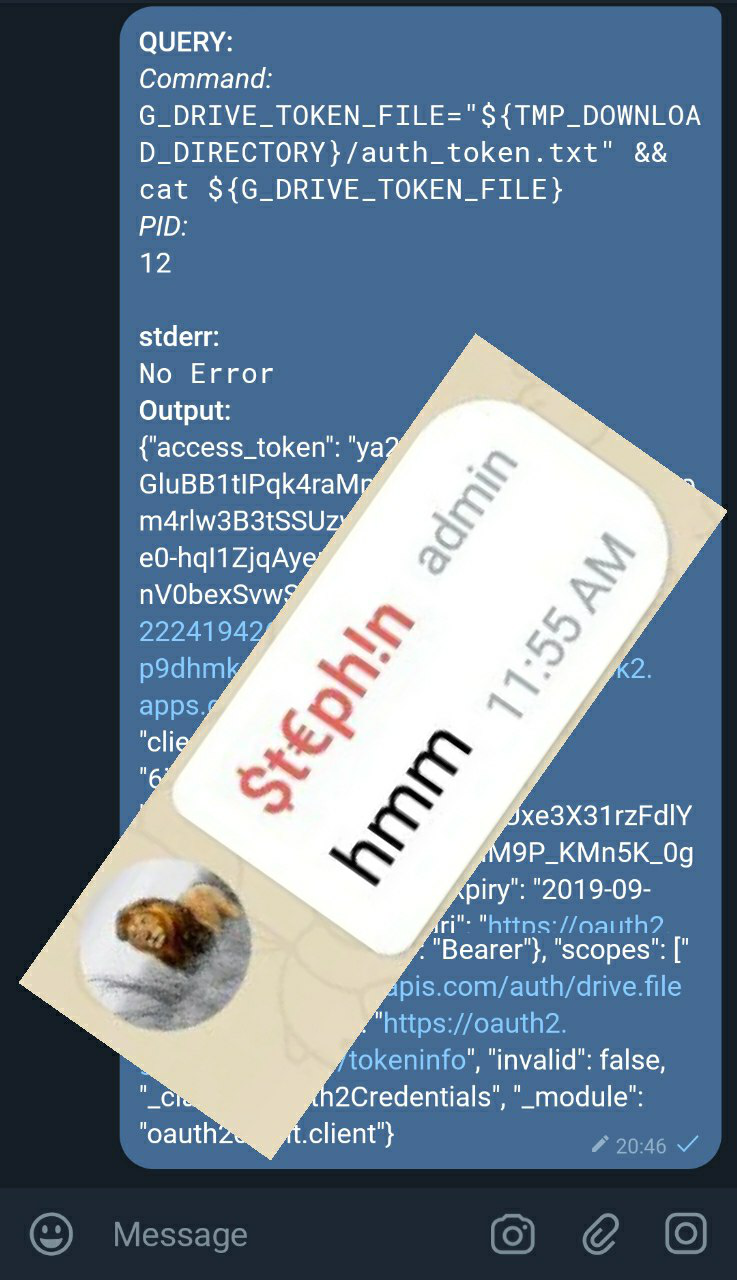
Copy the entire output, and paste it in Heroku Environment Variable value, with key G_DRIVE_AUTH_TOKEN_DATA.
Now, restart your dyno, and all gDrive functionalities has been added.
LYDIA_API
Create a Intellivoid Account by visiting: https://coffeehouse.intellivoid.info/
When done, check @Intellivoid discussion group, and send #activateapi to get the instructions on how to activate your account.
After this open the above link again, and copy the API key.
This value should be added to Heroku Environment Variable.
TELE_GRAM_2FA_CODE
This is required for the transfer_channel.py plugin. The value should be your Two Step Verification code that is set on Telegram.
You absolutely must set this Two Step Verification code, if you need to use this plugin.
IBM_WATSON_CRED_URL and IBM_WATSON_CRED_PASSWORD
Obtain API key from https://console.bluemix.net/docs/services/speech-to-text/getting-started.html
Sign Up / Log In for the service.
Open this URL after logging in: https://cloud.ibm.com/catalog/services/speech-to-text
Click on the Create button. It is at the right side of the screen, when opened in Desktop mode.
In the Left Side Nav Menu, click on Manage button.
Now, in the main screen, you will be able to see API Key and URL.
There will be a copy button to the right side of the text field.
Add these to the corresponding Heroku Environment Variable keys.
IBM_WATSON_CRED_URL and IBM_WATSON_CRED_PASSWORD
REM_BG_API_KEY
Obtain API key from https://www.remove.bg/api.
Sign up on the website.
Open the API Key tab.

Add REM_BG_API_KEY to your Heroku Environment Variable.
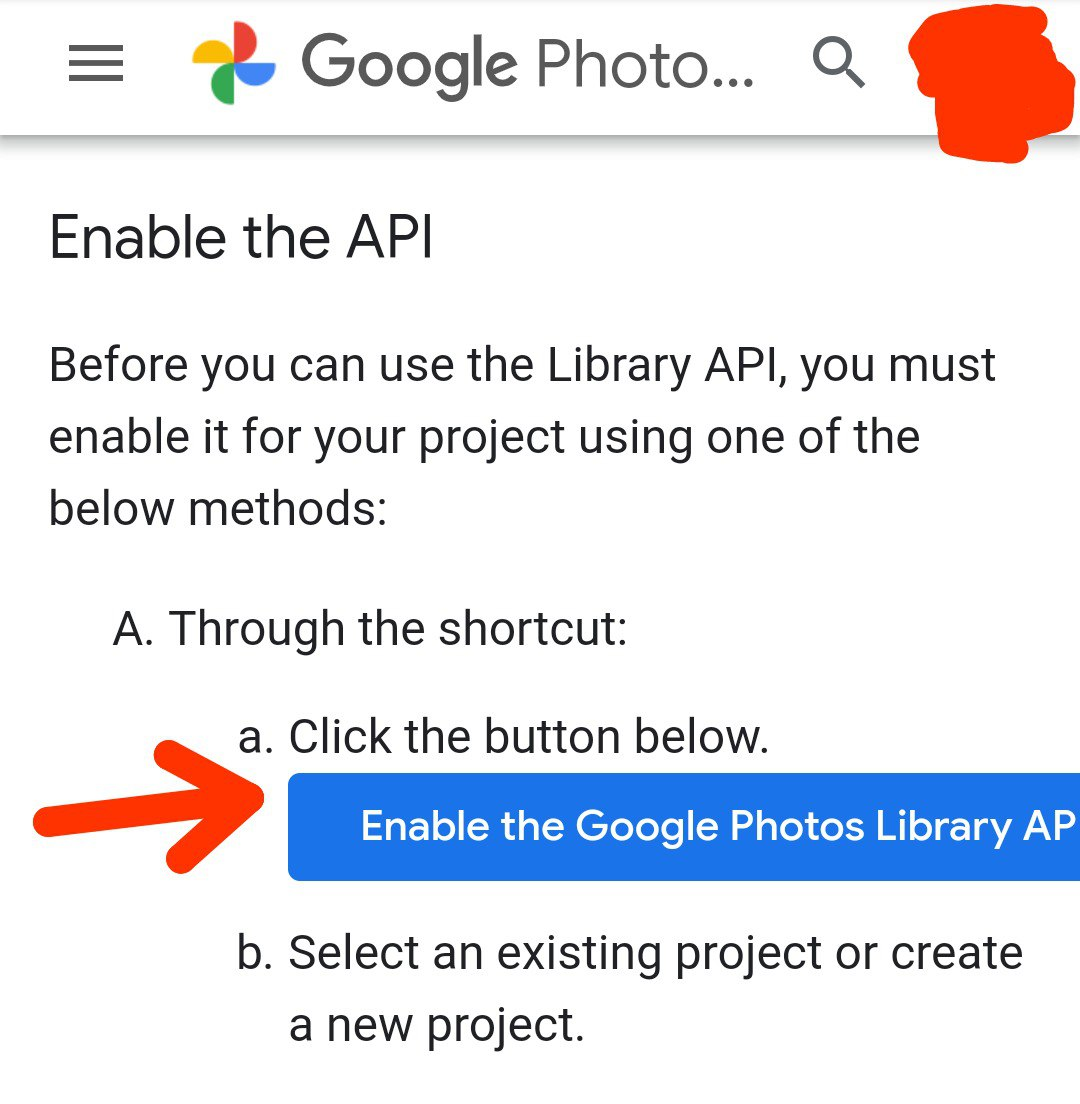
gPhoto [a.k.a. Google Photos]
1️⃣ Open https://da.gd/PUniTBorg
2️⃣ Click on the "Enable the Google Photos Library API button".
3️⃣ Follow the OnScreen Instructions.
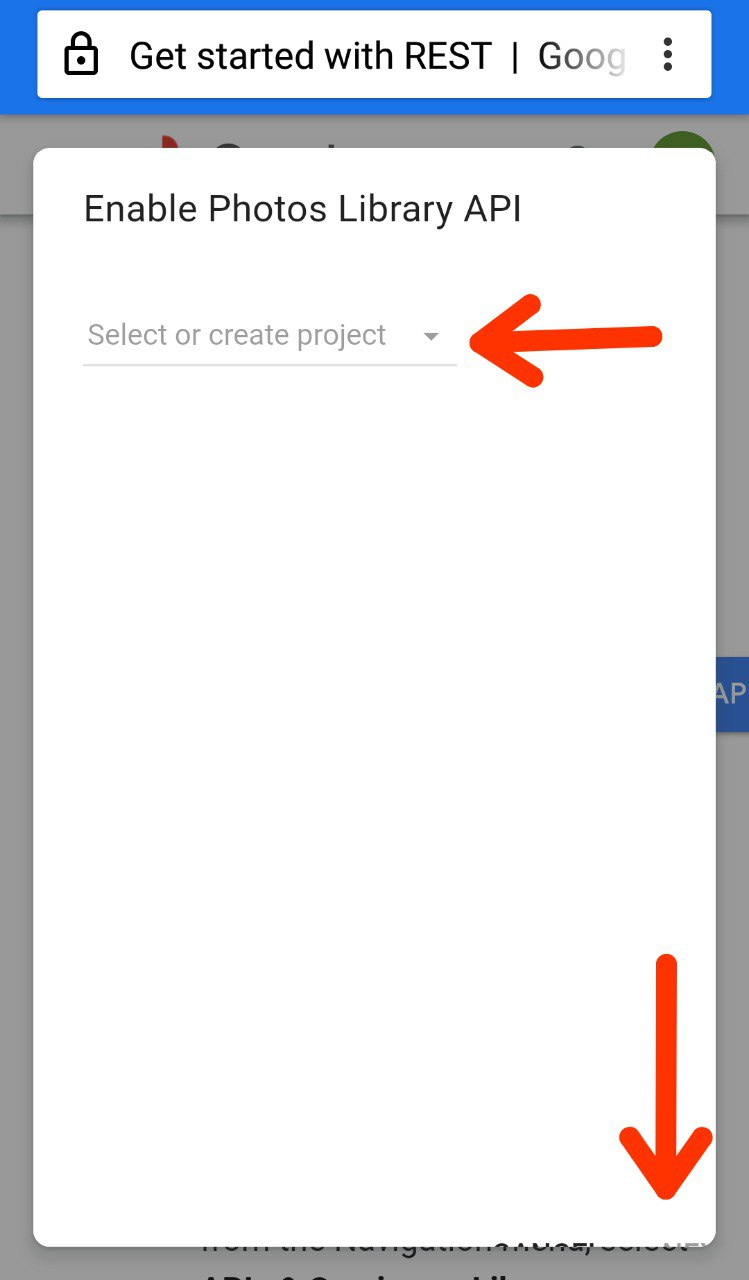


4️⃣ Fill the "G_PHOTOS_CLIENT_ID" and "G_PHOTOS_CLIENT_SECRET" variables.

5️⃣ open your "PRIVATE_GROUP_BOT_API_ID" and send ".gphoto setup"
6️⃣ you will get a link, Open the link and reply the code within 60 seconds.
7️⃣ Add the "G_PHOTOS_AUTH_TOKEN_ID" variable.
8️⃣ now, you can use ".gphoto upload" as reply to any media.

Non Heroku users
Users not using Heroku need to set these variables so that some of the plugins work properly.
TMP_DOWNLOAD_DIRECTORY
DB_URI