Theremin ESPE01 module
Etherwave Standard ESPE01 Installation Protocol
- Remove the antennae and cover from the Etherwave.
- Desolder the wires leading from the circuit board to the antennae sockets.
- Remove connector CN1 and remove the screws holding the circuit board in place.
- The module will be soldered onto the solder pads on the back of the circuit board. Some Etherwaves have a diode soldered between pads Ground and +12V. If your Etherwave has this diode, it must be removed and the holes opened up for the ESPE01. Place the diode close by so that it can be replaced later.
- Capacitors C2 and C6 need to be partially de-soldered. First, locate and mark these on the back side of the circuit board. The leads that need to be detached from the circuit board are the ones closest to the center of the board. With C2, the lead furthestfrom the solder pad needs to be cut, and with lead C6, the leadclosestto the solder pad needs to be cut. With your soldering iron, melt the solder around the lead and push the lead upward as far as possible without using too much force. With a small cutting tool, carefully snip the lead as close to the circuit board as possible, so that as much free lead as possible is still attached to the capacitor. Then, gently bend the capacitors upwards a bit so that the free leads stick up into the air. If a capacitor has become damaged, remove it completely and replace it with one of the capacitors shipped with the ESPE01.
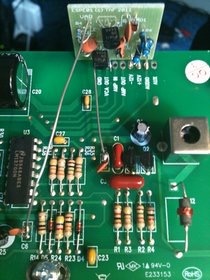
- Examine the ESPE01 module. You will notice 3 leads grouped together next to a 4thsingle lead. The single lead should go in the hole that is marked “Ground”. The 3 grouped leads go into the holes marked “-12V”, “+12V” and “Audio”. Insert leads all the way into the circuit board until the ESPE01 module is resting on the circuit board. Carefully turn the circuit board over then solder the 4 leads to the bottom of the circuit board. Re-solder the diode removed earlier to the back of the board. The ring side of the diode should be soldered to the +12V pad, and the other end to the Ground pad. Trim away the excess leads from the module, then turn the circuit board back over to right side up.
- Select the 2 wires connected to the ESPE01 module. They are cut to exactly reach the free leads of capacitors C2 and C6. Solder the shortest wire, labeled “Fix” on the ESPE01 to the free lead of capacitor C2. Solder the longer wire, marked “Var” on the ESPE01 to the free lead of capacitor C6.
- Screw the circuit board back down, connect CN1, and re-solder the antenna leads into place.
- Place the theremin onto its stand (cover off), away from obstructions. Re-attach the antennae and power and audio lines. Turn on the power switch and check for tone.
==============================
The ESPE01 module adds 2 octaves of range in the bass register of the Moog Etherwave Standard and PLUS theremins. It consists of a small electronic circuit that is installed onto the circuit board of the Etherwave. The installation should only be performed by people with experience in soldering and electronics. (See below)
The unaltered Etherwave theremin usually has a reliable pitch range from 1.5 octaves below middle C to 2.5 octaves above middle C. With the ESPE01 module installed the pitch range will start at 3.5 octaves below middle C, while the high register remains unaltered.
What is very important with any theremin is the linearity of the pitch field. Better linearity means more reliable pitch control. Usually the distances between notes are getting smaller in the high register, and larger in the low register, while in the lowest octave the distances gets smaller again. The ESPE01 module not only extends the pitch range, but also the linearity is improved, and continues into the lowest register.
Additionally the timbre of the Etherwave is a bit smoother when the ESPE01 module is present. This is especially noticeable in the low register, where with the original design the timbre can get quite harsh. With the ESPE01 module installed, the selected timbre is continued in the added low register, giving the Etherwave theremin an even more natural sonic flow through its full pitch range.
After installing the module you will notice that the 0-beat field, the silent bit below the lowest note, has become much smaller. When you move further away from the pitch antenna, the sound will come up again, becoming higher when you move away. This is a natural trade of theremins, which becomes more prominent with the module installed.
The installation of the ESPE01 module is a delicate process. The module itself is installed onto the solder pads on the back of the Etherwave circuit board. Two wires insert the module in the circuitry of the Etherwave via two partly desoldered capacitors the Etherwave board itself.
By buying and installing the ESPE01 module in you Etherwave theremin you indicate that you do so on your own risk, and you take full responsibility. Damage to your Etherwave theremin due to installing and/or using the ESPE01 module will not be repaired by Moog Music or your theremin dealer, and it will not be covered by their warranties.