Short list of Native Linux Command Line Forensics without specials tools
White 2 hack
Intro
Сегодня на обеденное чтиво у нас подборка базовых нативных команд для ручного поиска, сбора и коллекции артефактов указывающих на взлом Linux системы. Все манипуляции выполняются в командой строке, никакого дополнительного софта или специальных дистров не требуется. То, что можно сделать своими руками пока чашка медленно остывающего кофе стоит рядом. Зная эти команды наизусть вы можете в определенных ситуациях показать свой уровень знаний, профессиональную хватку и за короткое время провести хотя бы экспресс анализ кейса.
Ну, что, мэн, погнали!
1. Processes - собираем инфу по процессам в системе
Large amounts of CPU/RAM:
top
Process tree:
ps -auxwf
Open network ports or raw sockets:
netstat -nalp
netstat -plant
ss -a -e -i
lsof [many options]
Deleted binaries still running:
ls -alR /proc/*/exe 2> /dev/null |
grep deleted
Process command name/cmdline:
strings /proc/<PID>/comm
strings /proc/<PID>/cmdline
Real process path:
ls -al /proc/<PID>/exe
Process environment:
strings /proc/<PID>/environ
Process working directory:
ls -alR /proc/*/cwd
Process running from tmp, dev dirs:
ls -alR /proc/*/cwd 2> /dev/null | grep tmp
ls -alR /proc/*/cwd 2> /dev/null | grep dev

2. Directories and Files - чекаем директории и файлы в них
Commonly targeted directories:
/tmp, /var/tmp, /dev/shm, /var/run,
/var/spool, user home directories
List and delimit spaces, etc. in names:
ls -lap
List all hidden directories:
find / -type d -name ".*"
Immutable files and directories:
lsattr / -R 2> /dev/null | grep "\----i"
Find SUID/SGID files:
find / -type f \( -perm -04000 -o -perm -02000 \) -exec ls
-lg {} \;
Files/dirs with no user/group name:
find / \( -nouser -o -nogroup \) -exec ls -lg
{} \;
List all file types in current dir:
file * -p
Find executables anywhere, /tmp, etc.:
find / -type f -exec file -p '{}' \; |
grep ELF
find /tmp -type f -exec file -p '{}' \; |
grep ELF
Find files modified/created within last day:
find / -mtime -1
Persistence areas:
/etc/rc.local, /etc/initd, /etc/rc*.d, /etc/modules, /etc/
cron*, /var/spool/cron/*
Package commands to find changed files:
rpm -Va | grep ^..5.
debsums -c

3. Users - юзера, юзера, куда без них
Find all ssh authorized_keys files:
find / -name authorized_keys
History files for users:
find / -name .*history
History files linked to /dev/null:
ls -alR / 2> /dev/null | grep .*history |
grep null
Look for UID 0/GID 0:
grep ":0:" /etc/passwd
Check sudoers file:
cat /etc/sudoers and /etc/group
Check scheduled tasks:
crontab -l
atq
systemctl list-timers --all

4. Logs - логи, классика
Check for zero size logs:
ls -al /var/log/*
Dump audit logs:
utmpdump /var/log/wtmp
utmpdump /var/run/utmp
utmpdump /var/log/btmp
last
lastb
Find logs with binary in them:
grep [[:cntrl:]] /var/log/*.log

4. Targeted Directories for analysis - то что нужно чекать в первую очередь
/tmp, /var/tmp
/dev
/dev/shm
/bin
/sbin
/usr/bin
/usr/sbin
/lib, /lib64, /lib32
/usr/lib, /usr/lib64, /usr/lib32
/etc
/var
/var/log
/var/spool/cron
Login information:
There are three places to find this information:
(1) /var/log/auth.log records connections/authentication to the Linux host. The command “grep -v cron auth.log*|grep -v sudo|grep -i user” filters out most of the unnecessary data and leaves only information regarding connection/disconnection.
(2) /var/log/wtmp maintains the status of the system, system reboot time and user logins (providing time, username and IP address if available).
(3) /var/log/btmp records failed login attempts.
Account and group
may provide more inside about permission of an interested user or find out whether any suspicious account was created. Those information are stored in /etc/passwd (user account), /etc/groups (group information). Furthermore, it is recommended to check the /etc/sudoers file as well since it describes what commands a user can run with privilege permission.
Persistence mechanisms:
- Cron jobs are often used for persistence. Cron jobs can be examined in /etc/crontab (system-wide crontab) and /var/spool/cron/crontabs/<username> (user-wide crontab)
- Bash Shell initialization: when starting a shell, it will first execute ~/.bashrc and ~/.bash_profile for each user. /etc/bash.bashrc and /etc/profile are the system-wide versions of ~/.bashrc and ~/.bash_profile (If another shell is used, checked in documents of that shell for similar configuration files).
- Service start-up: System V (configuration files are in /etc/init.d/* and /etc/rd[0–6].d/*) , Upstart (configuration files are in /etc/init/*) and Systemd (configuration files are in /lib/systemd/system/* and /etc/systemd/system/*).
- RC (Run-control) is a traditional way with init to start services/programs when run level changes. Its configuration can be found at /etc/rc.local
Find recently accessed/modified/changed files by a user with find:
Example find command for files accessed/modified/changed by <username> in the last 7 days:
→ find . -type f -atime -7 -printf “%AY%Am%Ad%AH%AM%AS %h/%s/%f\n” -user <username>|sort -n
→ find . -type f -mtime -7 -printf “%TY%Tm%Td%TH%TM%TS %h — %s — %f\n” -user <username>|sort -n
→ find . -type f -ctime -7 -printf “%CY%Cm%Cd%CH%CM%CS %h — %s — %f\n” -user <username>|sort -n
Process Execution
Bash history: contains commands executed in the bash shell. it often recorded historical executions without timestamps. The bash history file for a user is located in his home folder ~/.bashrc and in /root/.bashrc for the root account. Hence, it is important to examine the bash histories of both users and root.
Execution with Sudo: is necessary when the execution requires root privilege. All executions with Sudo are recorded in auth.log
Find recently accessed executable files by a user. The example below finds all executable files run in the last 7 days.
find . -type f -perm /111 -user thole -atime -7 -printf “%AY%Am%Ad%AH%AM%AS %h — %s — %f\n” |sort -n
5. Image capture and mounting - "хватаем" образ через dd
dd (a command-line tool, available in most Unix and Linux) is a tool to copy files at the bit level. Below is the command in action, in which input is the hard drive of the given Linux box (e.g. /dev/sdb) and output is where the image is stored (e.g. /home/forensics/linux_disk.img).
dd if=input of=output
For the forensic investigation, you may want to mount a copy of the original image in another Linux machine. The steps below illustrate how to mount a raw image in a Debian Linux machine:
- Step 1: attach the image to a loop device:
- sudo losetup /dev/loop0 <raw_image_to_mount> (if /dev/loop0 is already occupied, /dev/loopX can be used instead)
- Then to verify that the image is attached using losetup -a
- Step 2: Using kpartx (available to most Linux system) to map image partitions. Each partition will be mapped to /dev/mapper/loop0pX (X is a number)
- sudo kpartx -a /dev/loop0
- Step 3: Mount mapped loopback as read-only
- sudo mount -o ro /dev/mapper/loop0pX
6. Malware Analysis - поиск следов использования вредоносного ПО в системе
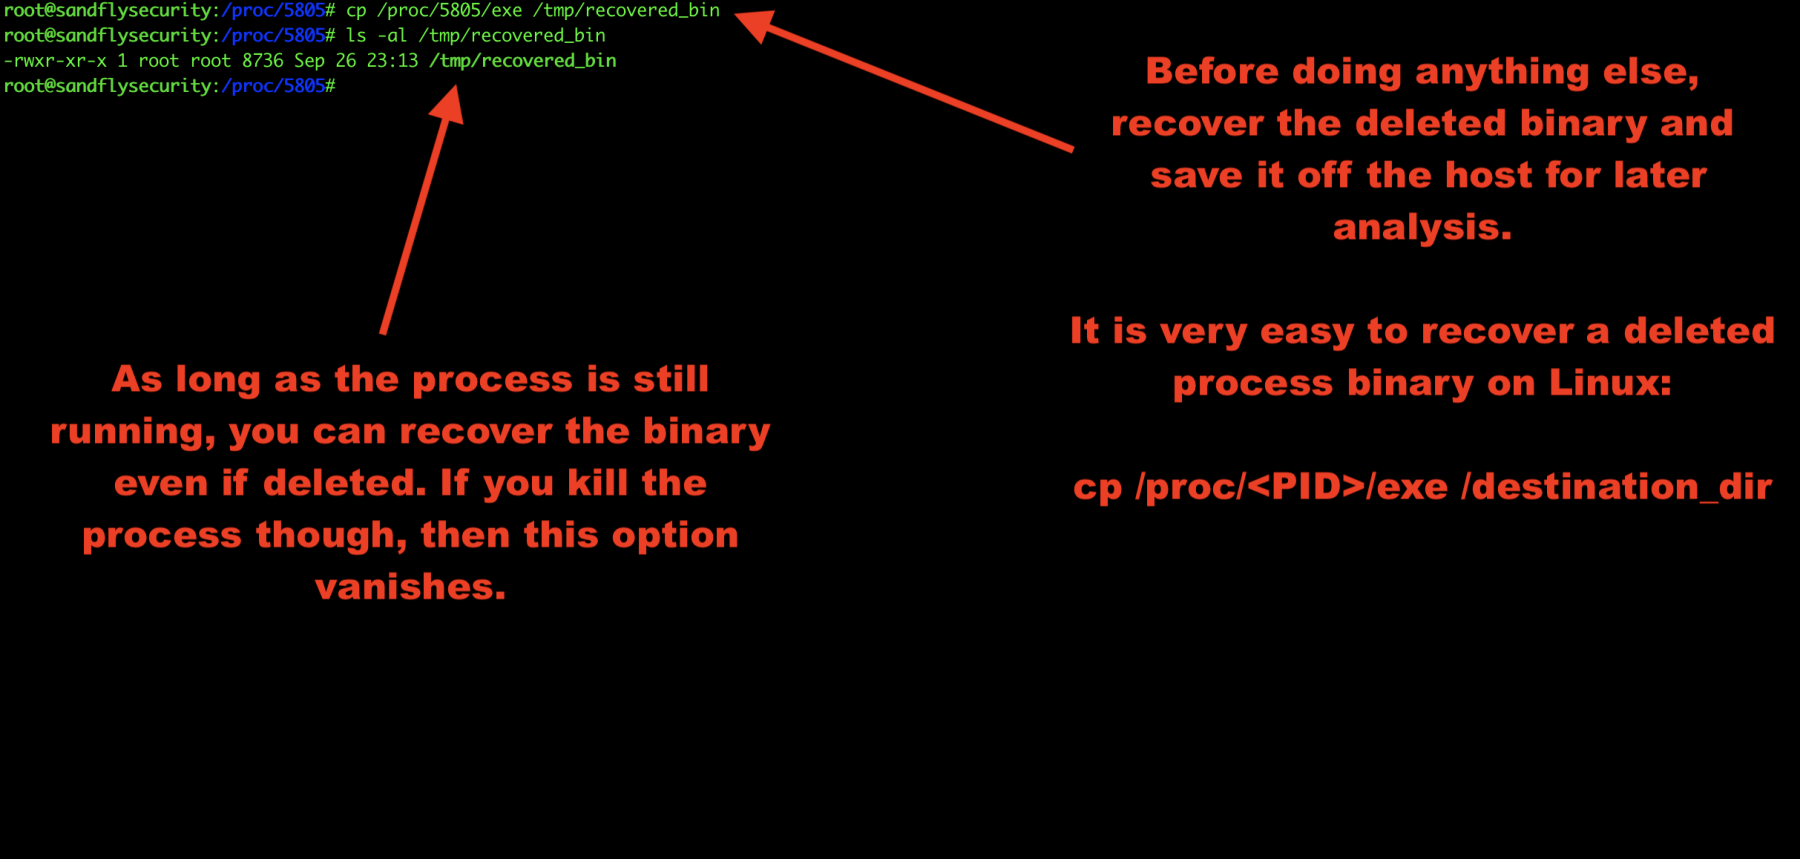
Recover deleted Linux malware binary
Before we do anything else, we’ll recover the deleted binary. As long as the process is still running, it is very easy to recover a deleted process binary on Linux:
cp /proc/<PID>/exe /tmp/recovered_bin
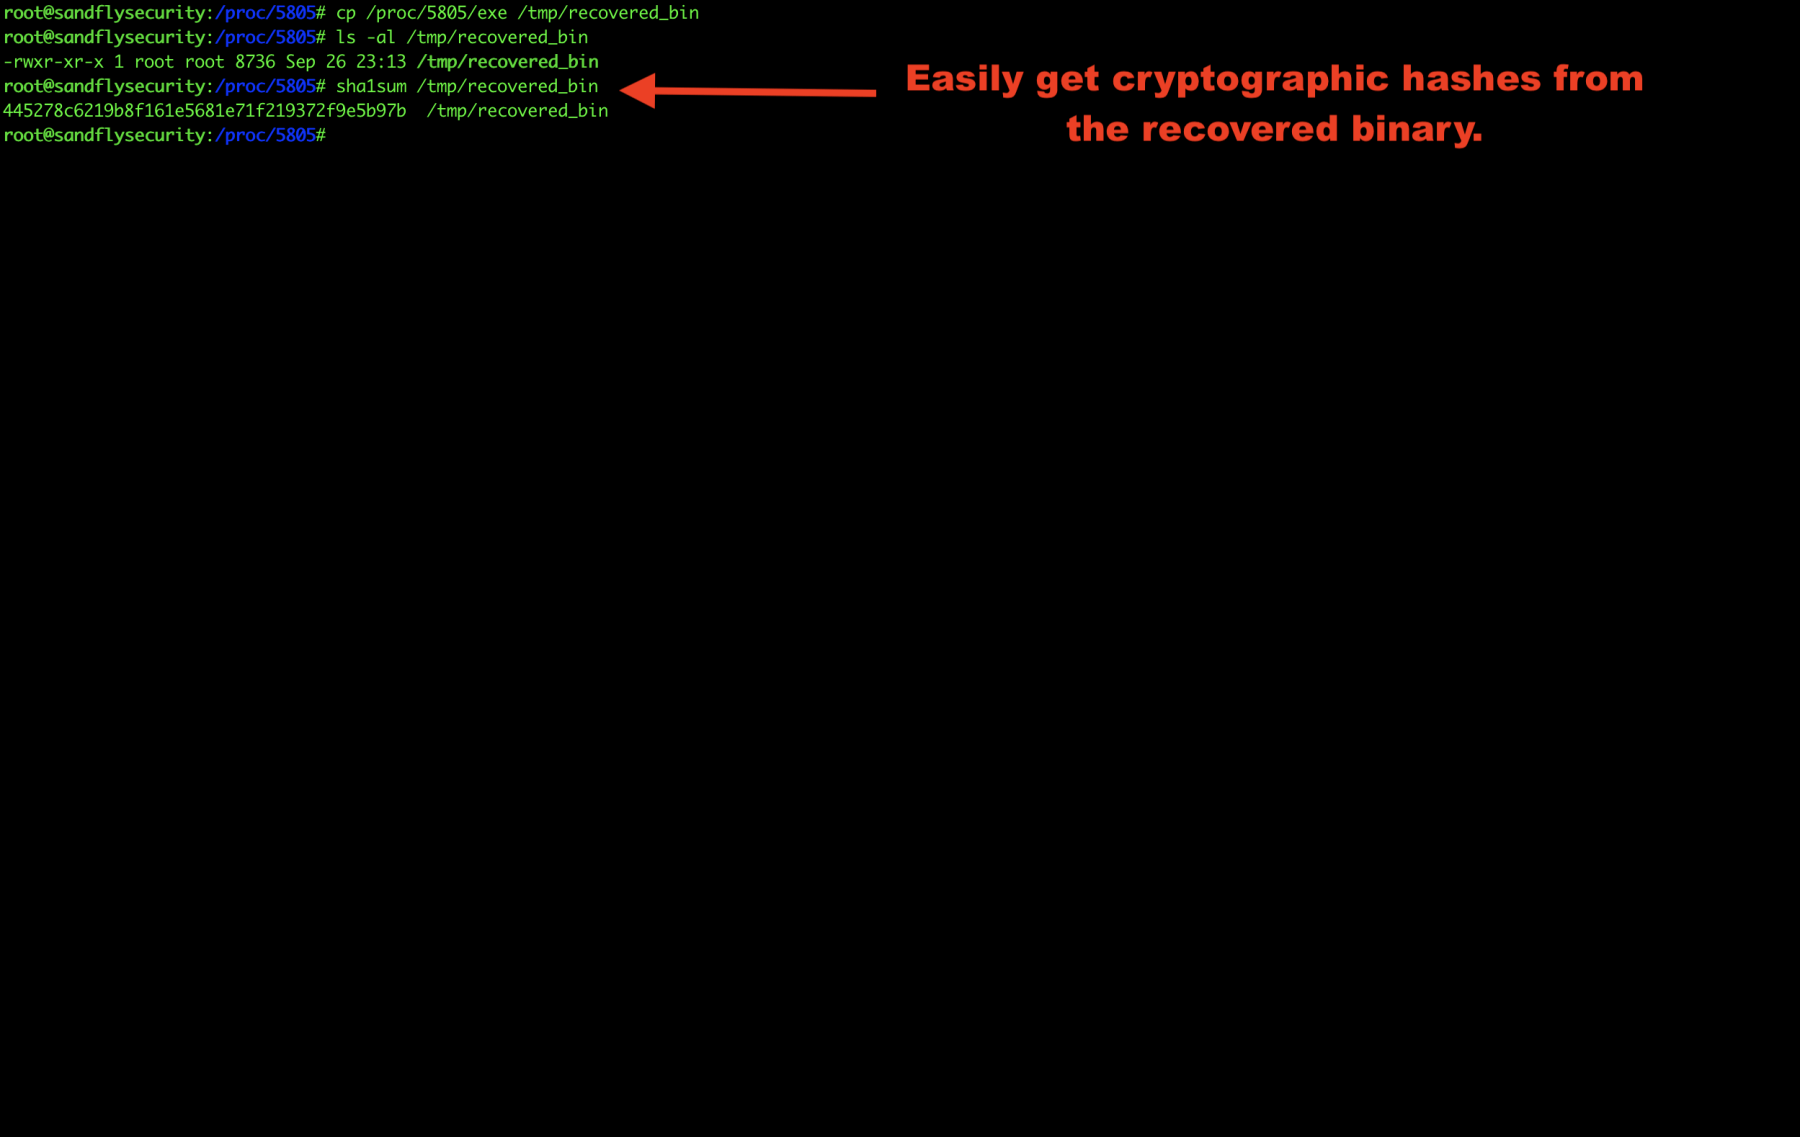
Obtain deleted Linux malware hashes
Now that we’ve saved the Linux binary somewhere off the system, we can recover the hashes easily.
If you are using netcat to simulate the attack, you can recover the deleted binary and run a hash on the system netcat command and the recovered binary and see they match.
sha1sum /bin/nc
<hash here>
sha1sum /tmp/recovered_bin
<identical hash here>
Explore Linux malware command line
The command line is stored under /proc/<PID>/cmdline and the command name is shown under /proc/<PID>/comm.
Some malware will cloak this data to masquerade as another process. You may see different names for the program in this case or even names that are trying to hide as something else like apache or sshd.
If you see multiple different names, then it is very likely the program is malicious.
cat /proc/<PID>/comm
cat /proc/<PID>/cmdline

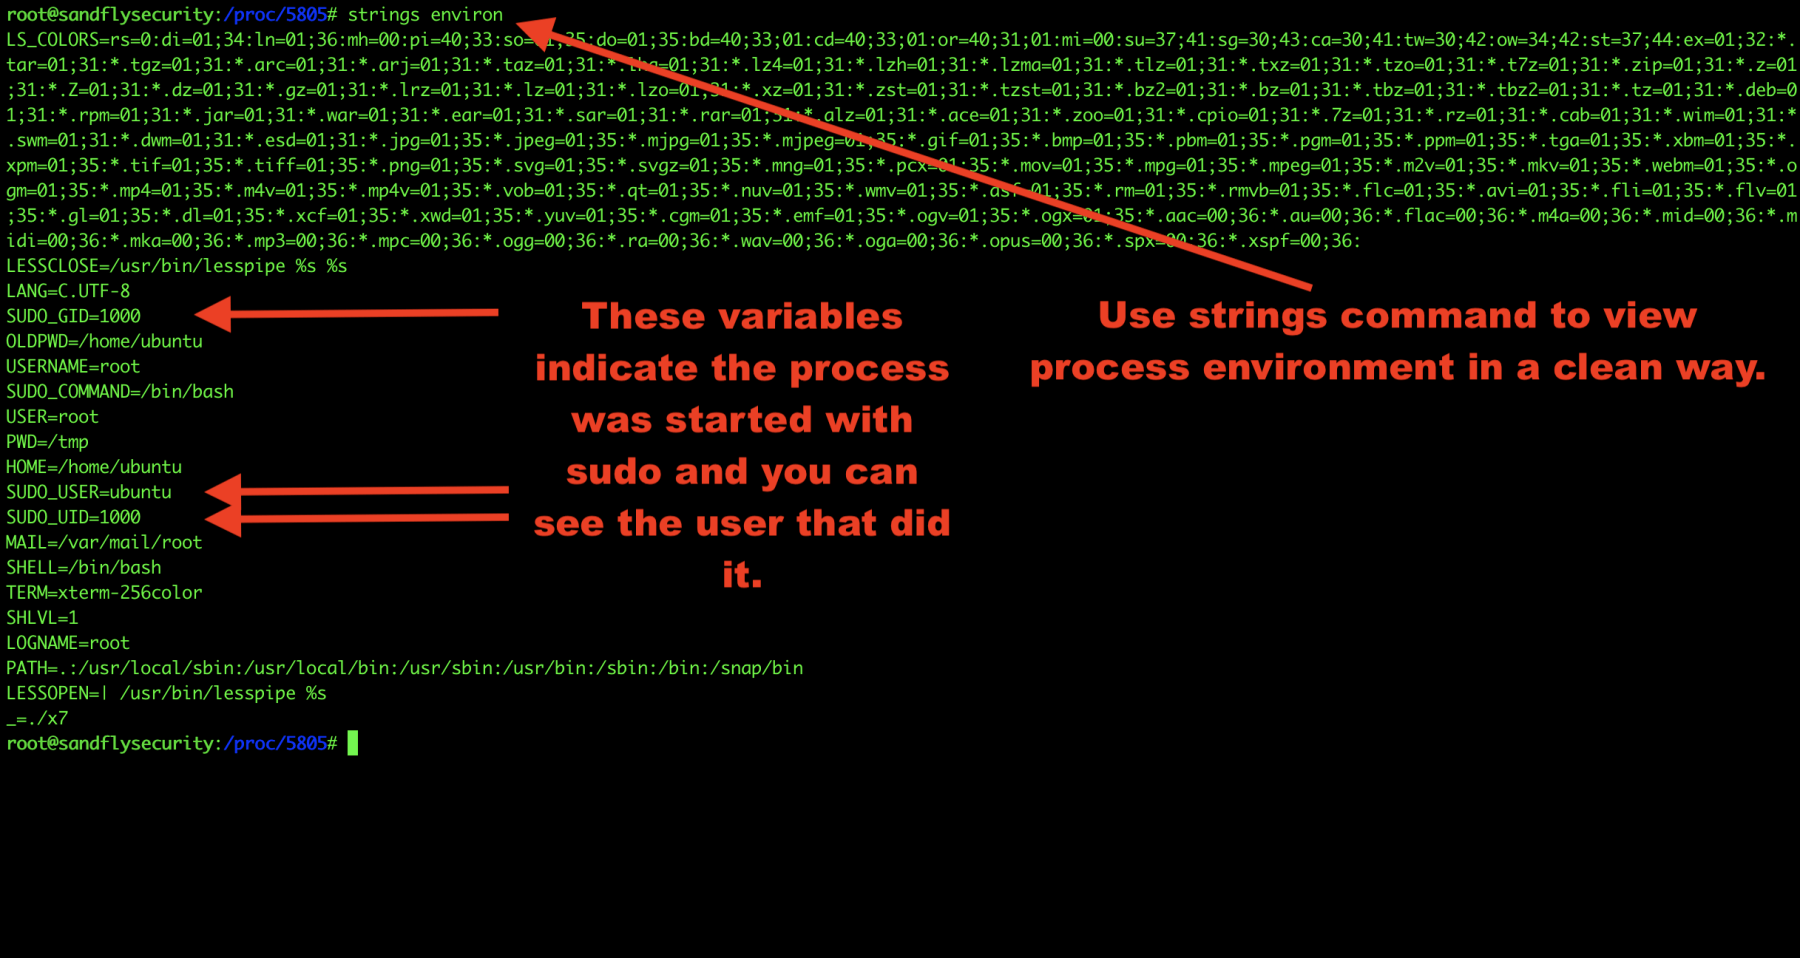
Explore Linux malware process environment
Now let’s take a look at the environment our malware inherited when it started. This can often reveal information about who or what started the process. Here we see the process was started with sudo by another user:
strings /proc/<PID>/environ
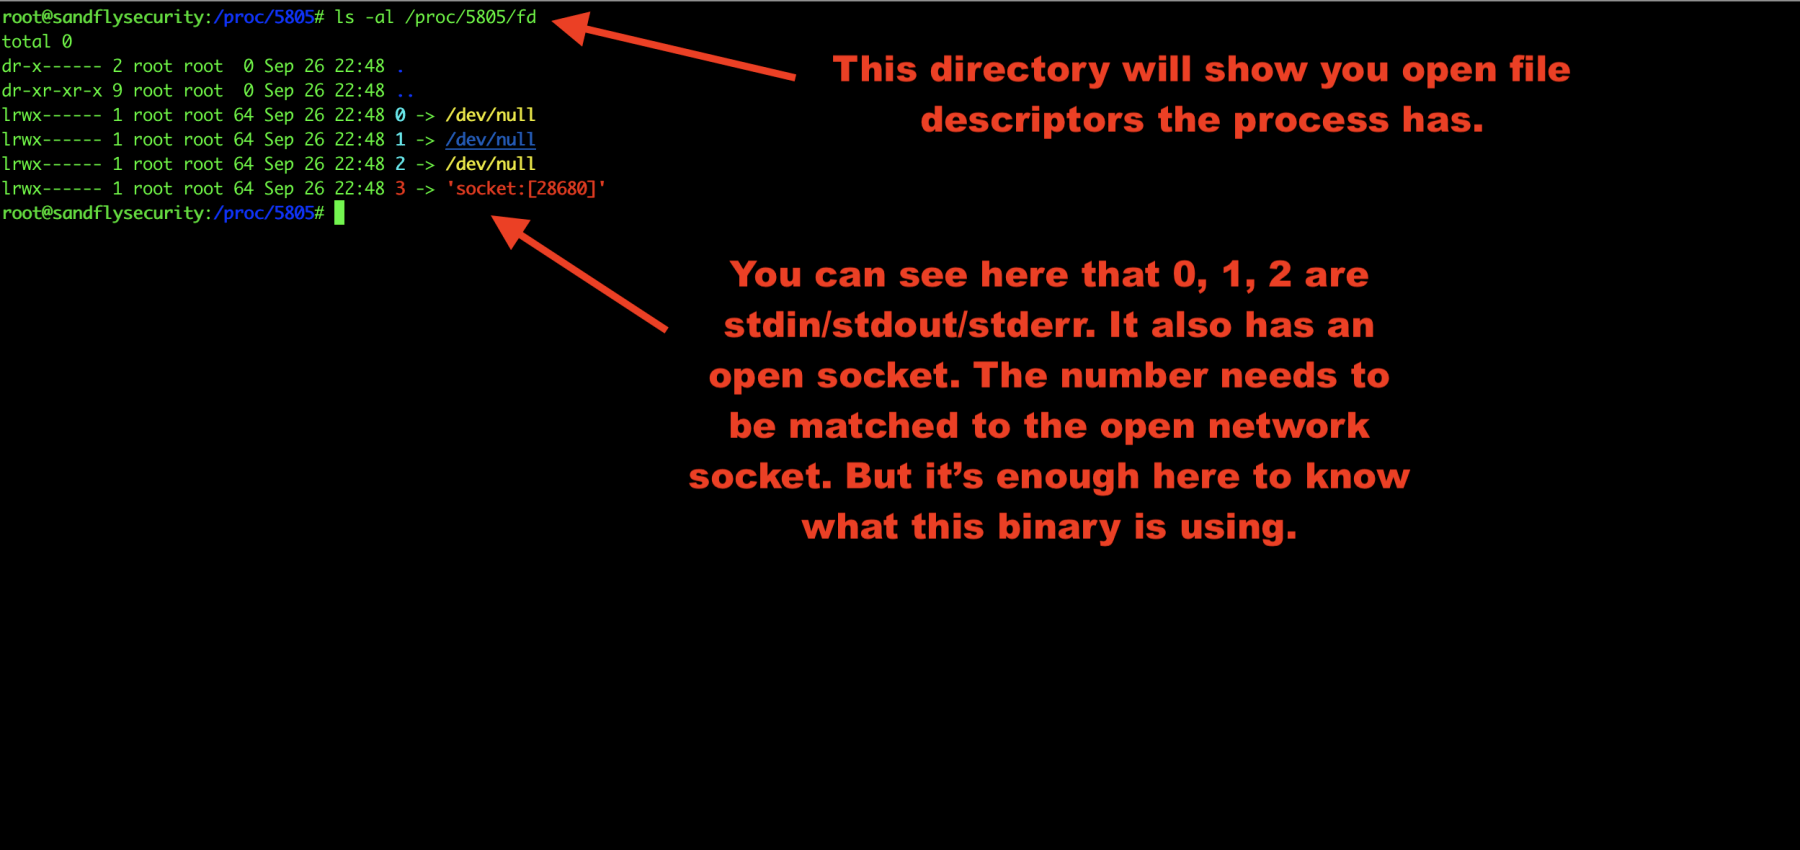
Investigate Linux malware open file descriptors
We’ll now investigate the file descriptors the malware has open. This can often show you hidden files and directories that the malware is using to stash things along with open sockets:
ls -al /proc/<PID>/fd
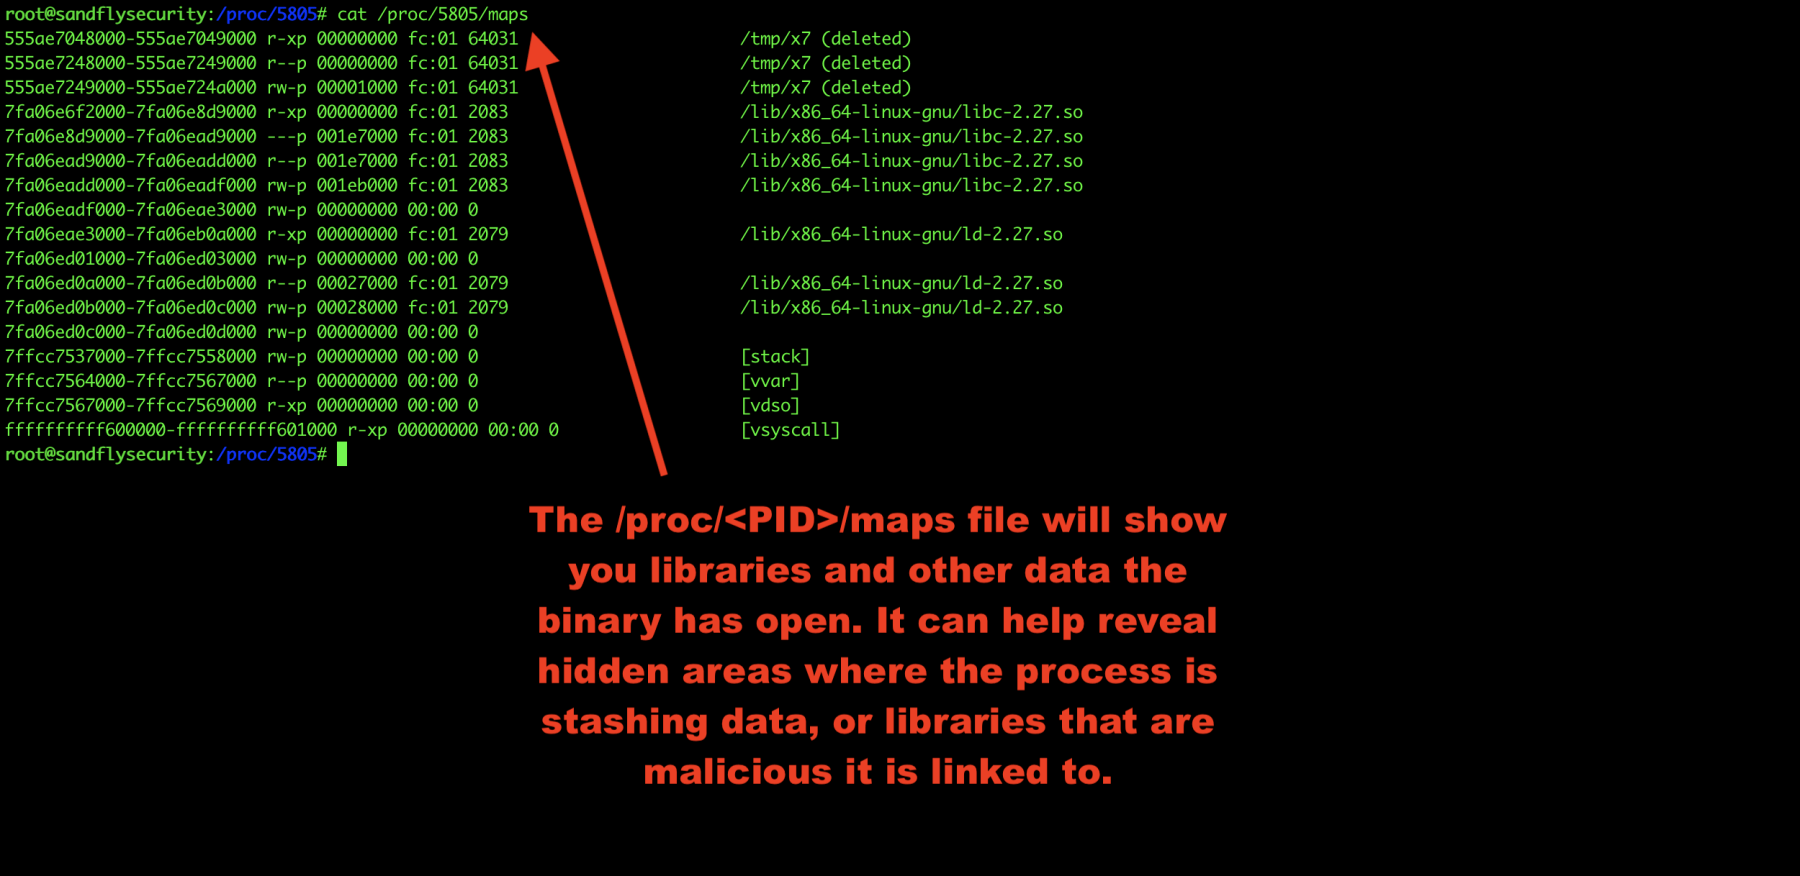
Investigate Linux malware process maps
Another area to look into is the Linux process maps. This shows libraries the malware is using and again can show links to malicious files it is using as well.
cat /proc/<PID>/maps
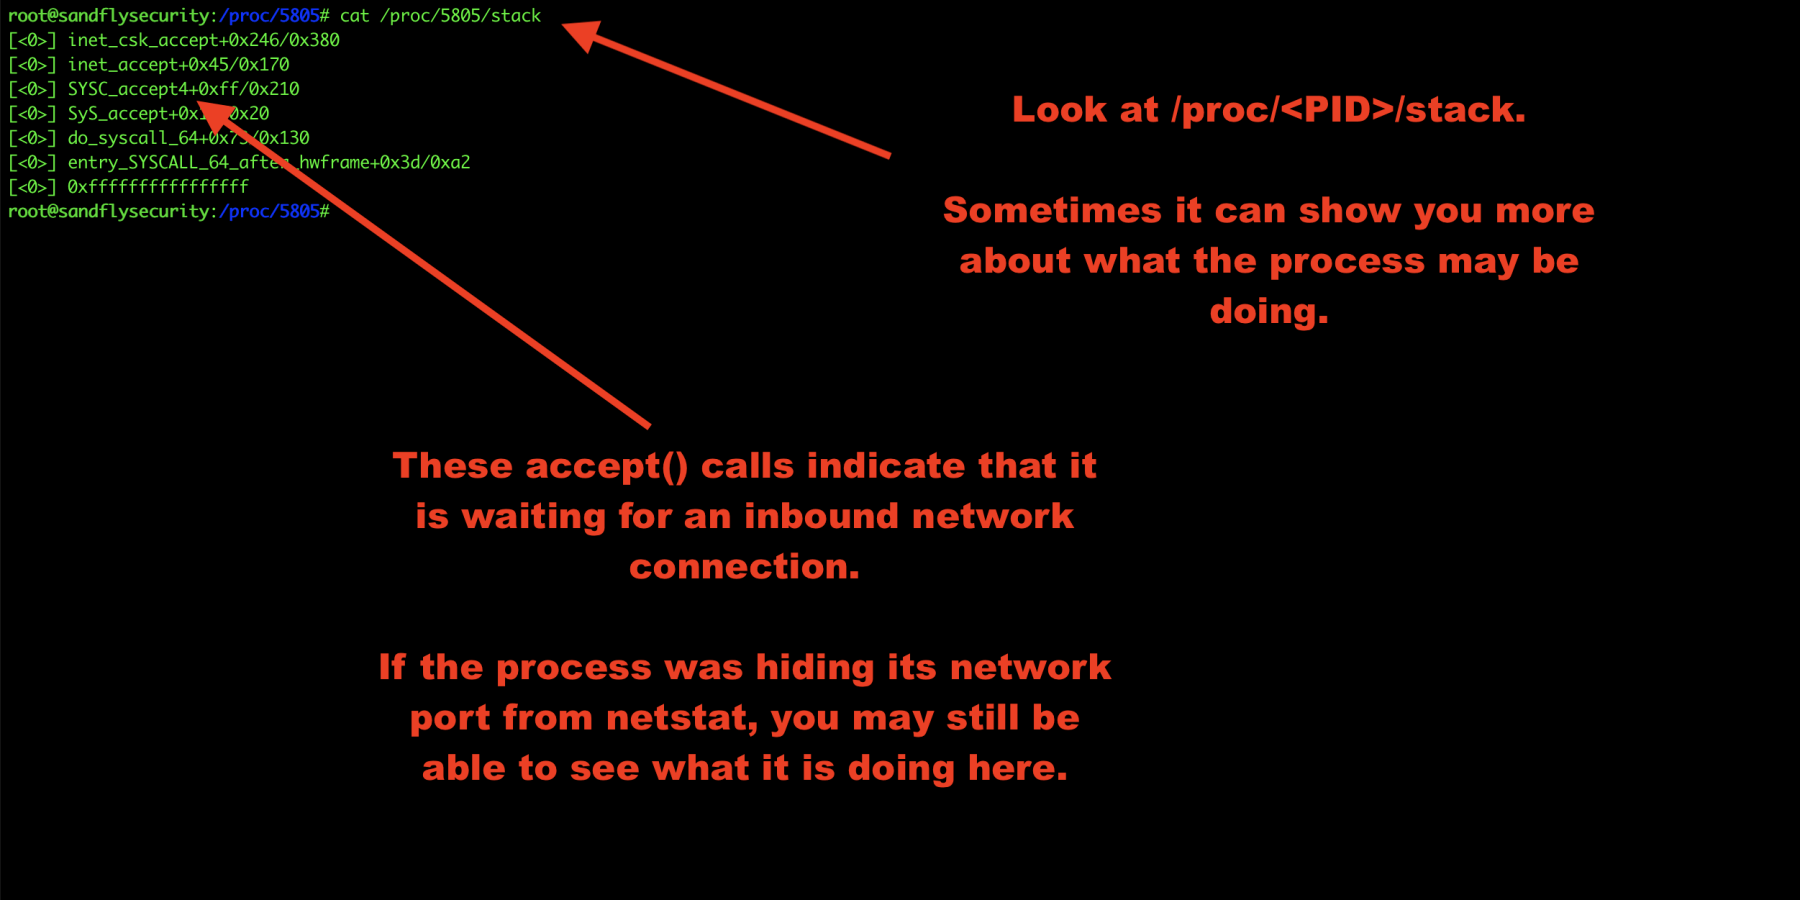
Investigate Linux malware process stack
The /proc/<PID>/stack area can sometimes reveal more details. We’ll look at that like this:
cat /proc/<PID>/stack
In this case, we see some network accept() calls indicating this is a network server waiting for a connection. Sometimes there won’t be anything obvious here, but sometimes there is. It just depends on what the process is doing so it’s best to look.
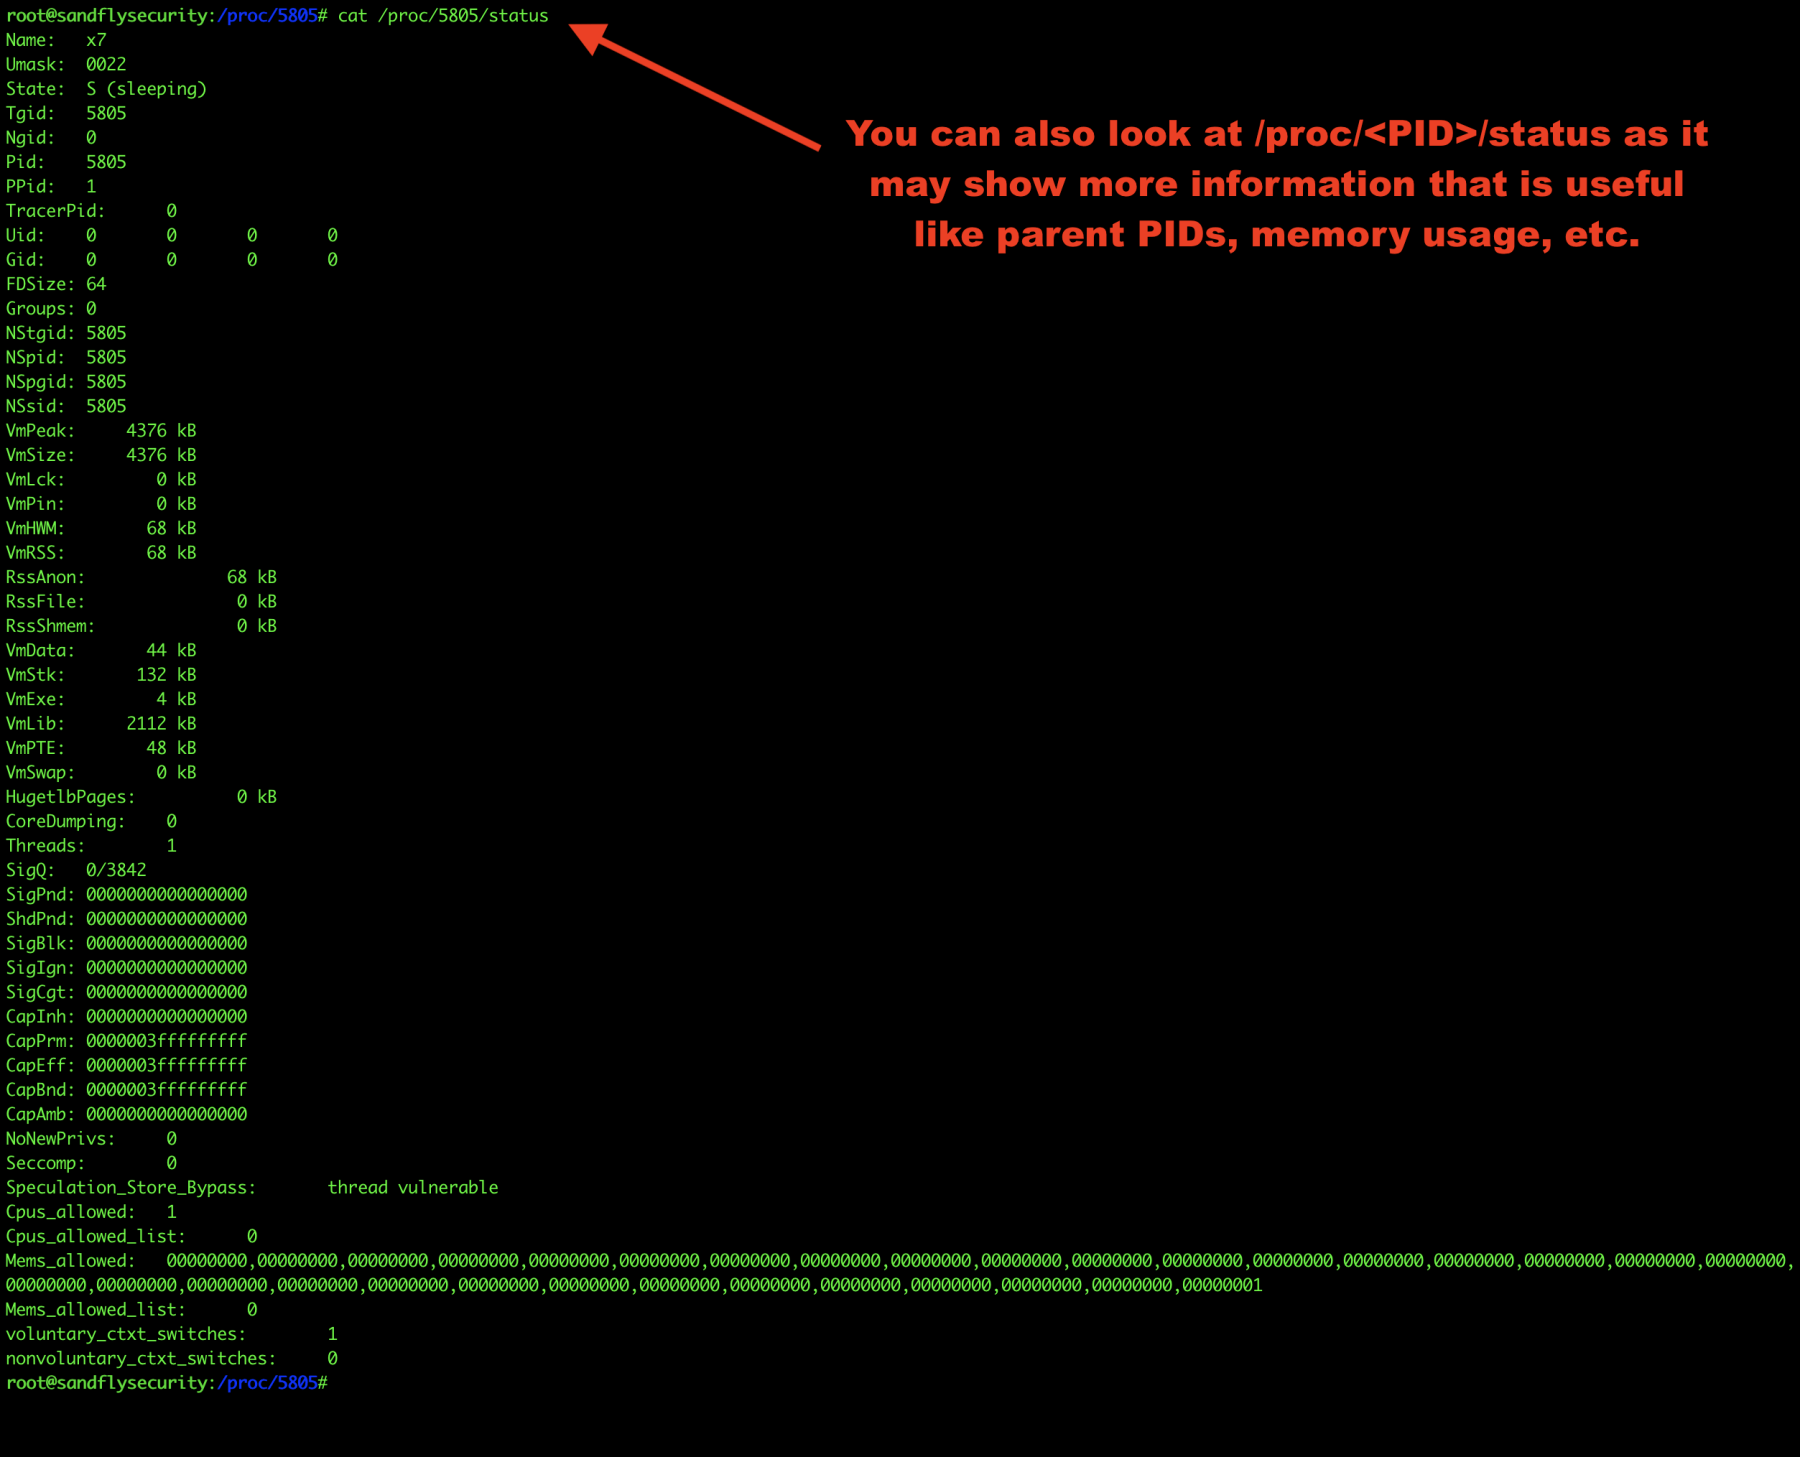
Get Linux malware status
Finally, let’s look at /proc/<PID>/status for overall process details. This can reveal parent PIDs and so forth.
cat /proc/<PID>/status
7. Шпаргалки по самым ключевым командам


Всем бодрого настроения, топите за себя, за свою мечту! с вами w2hack