STON.fi: from S to i
STON.fi DEX
Table of Contents
- What DEX is and how it works
- How to create a TON-wallet
- How to buy Toncoin using a Telegram Bot
- How to connect your wallet to STON.fi DEX
- How to exchange tokens on STON.fi
- What a liquidity pool is
- How to earn on STON.fi (liquidity provision)
- How to choose a liquidity pool for liquidity provision
- Farming
- How to create a new liquidity pool and import your own asset with a contact address
- Impermanent Loss
- Blockchain and DEX fees
What DEX is and how it works
DEX stands for ‘decentralized exchange’, where users can trade and exchange cryptoassets (coins and tokens) directly, with no intermediaries such as the exchange itself or a broker. Users don’t have to keep their cryptoassets at the exchange unless they want to. The blockchain fulfills the role of the intermediary and guarantor of the deal’s completion on a DEX.
In fact, a DEX is a marketplace where any person with access to the Internet can trade. And there is no need to generate accounts or obtain permission from the exchange. Technically speaking, a DEX is a set of smart contracts, or software which, when specified conditions occur (for example, when a user’s an order to sell or buy tokens is received), automatically performs the functions in its programming. No one and nothing has the technical capability to prevent a user from selling or buying tokens on such an exchange. Moreover, no one and nothing can block or cancel the user’s operation. This is what separates a DEX from the centralized exchanges (CEX).
The smart contract CANNOT fail to perform an operation or perform it in a way that differs from how the user instructed. As a rule, the smart contracts of decentralized exchanges are open-source software, meaning that any person can check the source code of the smart contract and make sure that the contract really contains only the stated functions.
As it happens, decentralized exchanges most often use Ethereum Blockchain, but new DEXs that work on different blockchains are appearing. For example, STON.fi works on TON Blockchain. It offers a few advantages over Ethereum, such as higher speeds and practically zero transaction fees.
How to create a TON-wallet
To interact with decentralized applications on the TON blockchain, such as STON.fi, you will need a non-custodial wallet for the TON network. The most popular mobile wallets are Tonkeeper and Tonhub.
Below, we offer video guides on how to create Tonkeeper and Tonhub wallets:
On a desktop you can use such wallets as TON Wallet, Open Mask, MyTonWallet
How to buy Toncoin using a Telegram Bot
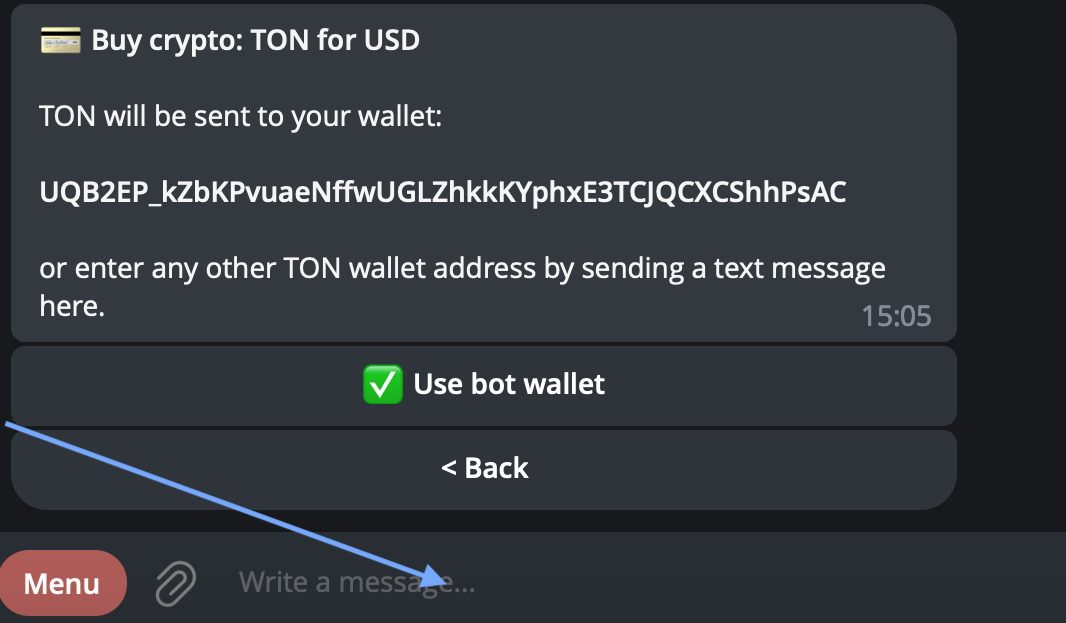
Step 1: Open Telegram and find the wallet-bot: https://t.me/wallet and press ‘Start’.
Step 2: Verify your phone number and press ‘Confirm’.

Step 3: Press ‘My Wallet’ in the ‘Menu’ section.

Step 4: Choose ‘Buy crypto with a bank card’ and press ‘TON’.


Step 5: Choose the currency you’re using and the amount of money you’d like to exchange.


Attention! @wallet is a custodial wallet that cannot be used for operations on DEX. After purchasing Toncoin in @wallet, you will need to withdraw these coins to your non-custodial wallet.
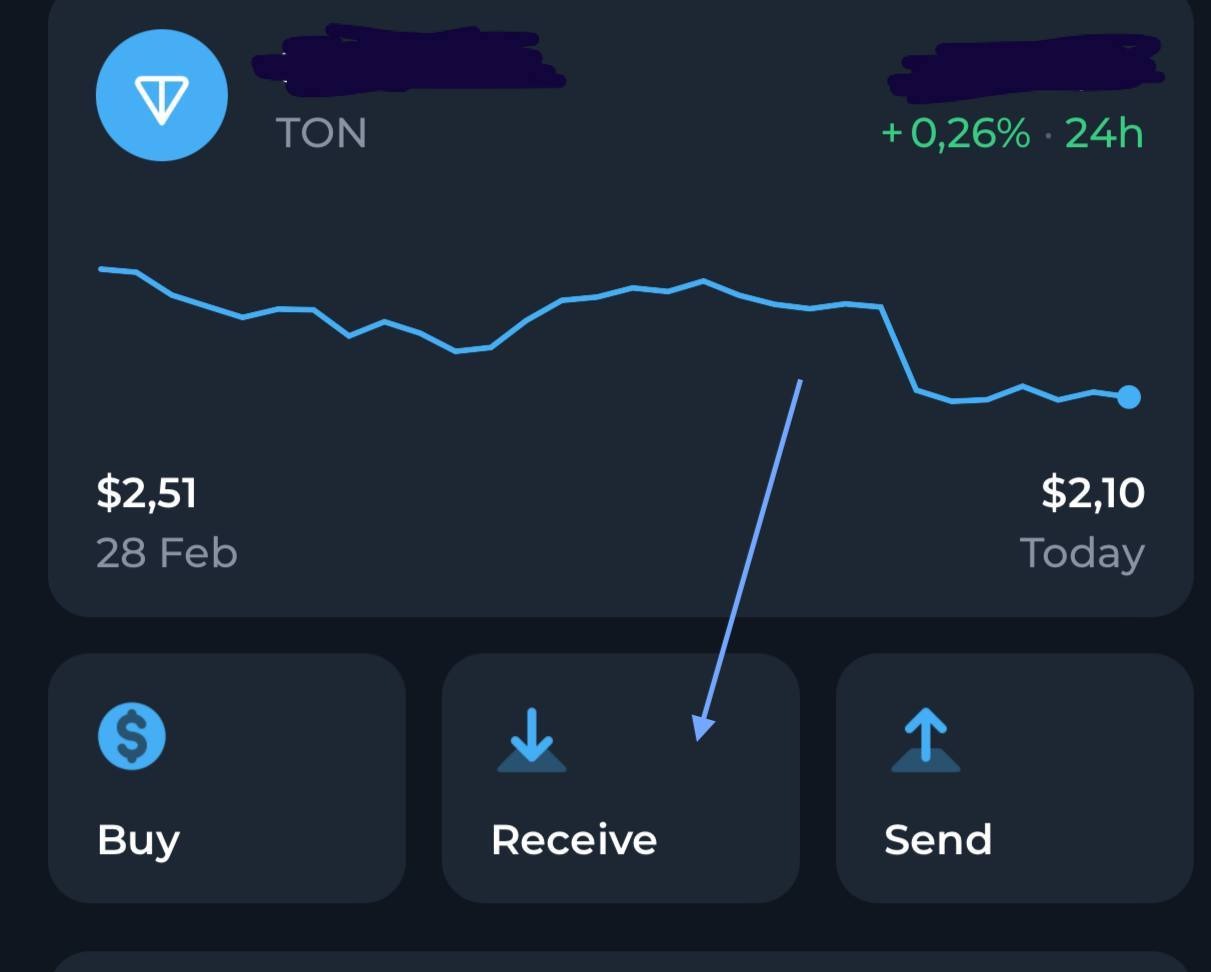
Step 6: Open your TON-wallet, press ‘Receive’ and copy your wallet address.
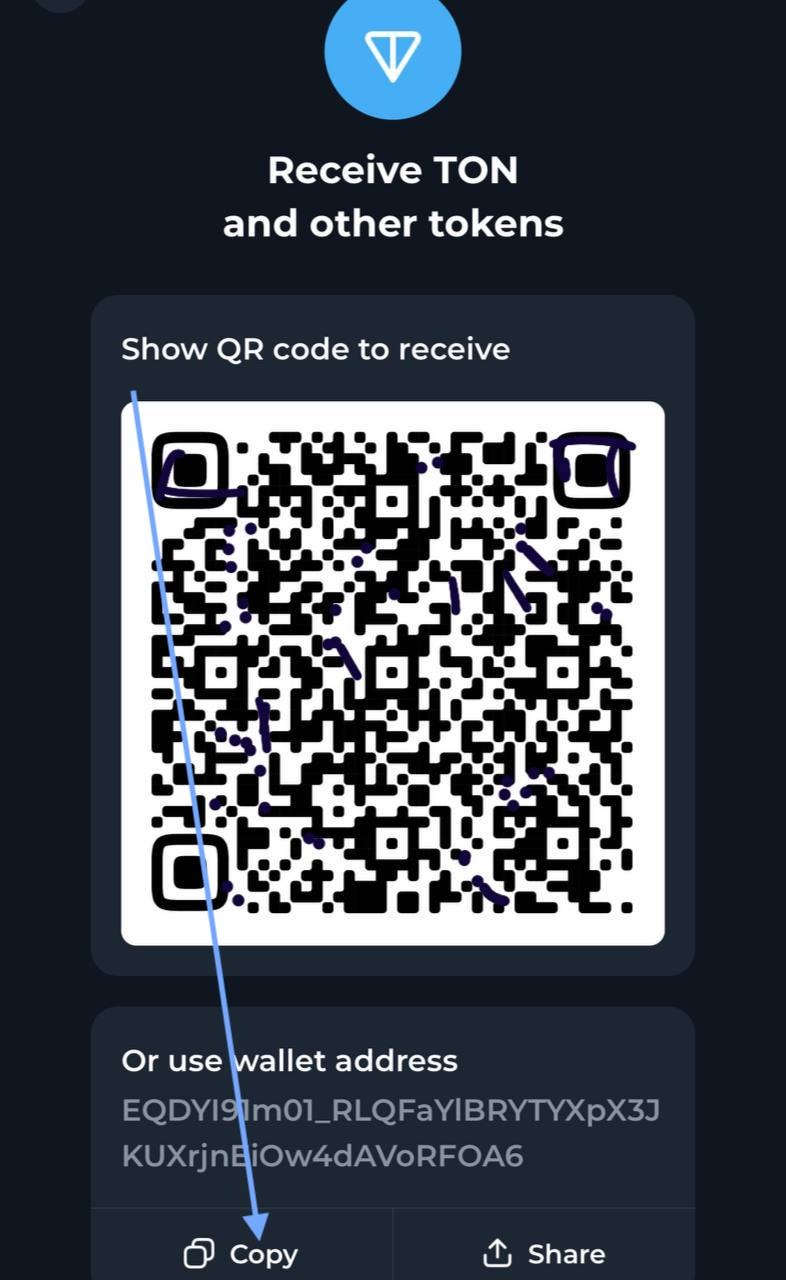
Step 7: Enter the wallet address in the telegram bot and confirm the payment.
How to connect your wallet to STON.fi DEX
Step 1: Press “Connect wallet” on the right of the page.

Step 2: Scan QR-code or choose your wallet in the list of wallets.
Step 3: Scan QR code with mobile app or use browser extension (we use Tonkeeper as an example).
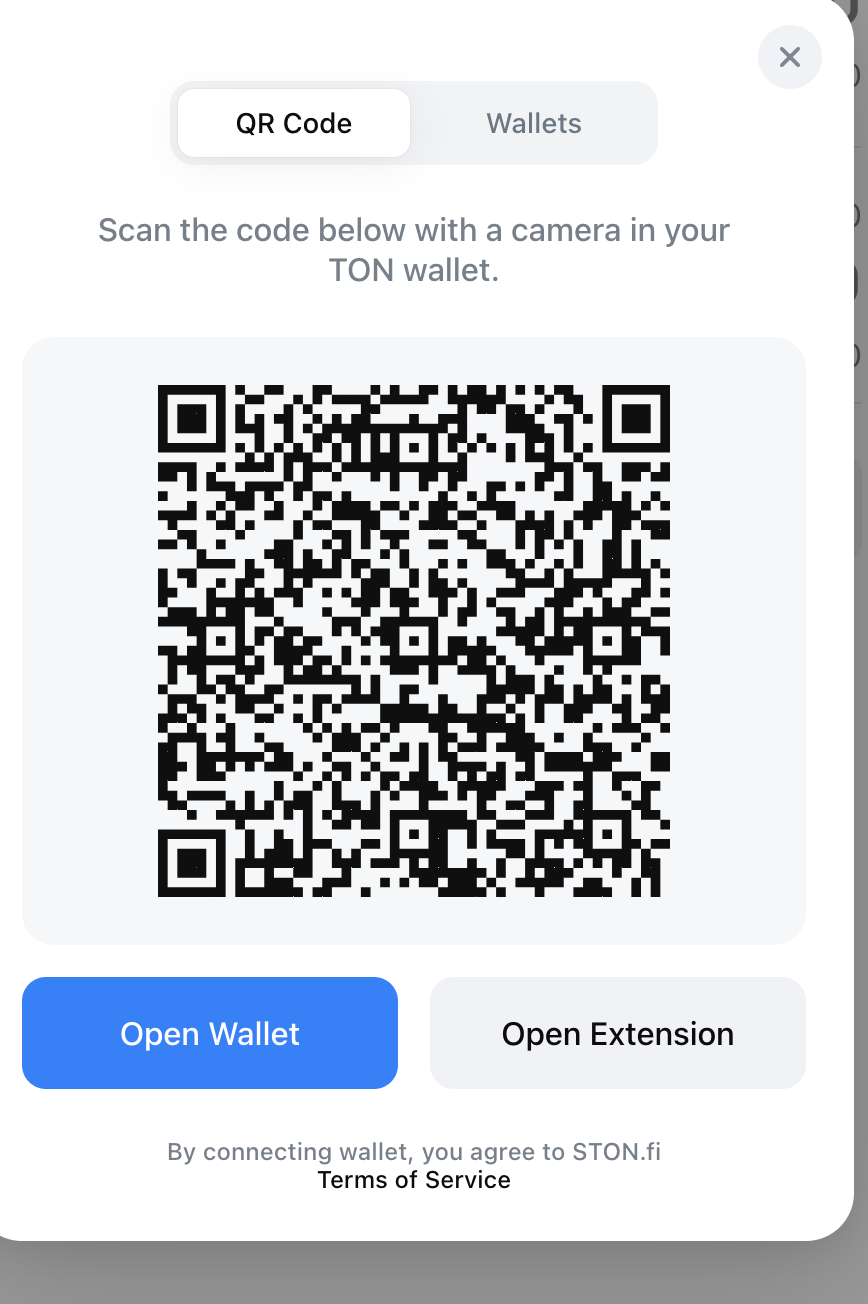

Step 4: Press “Connect wallet”.

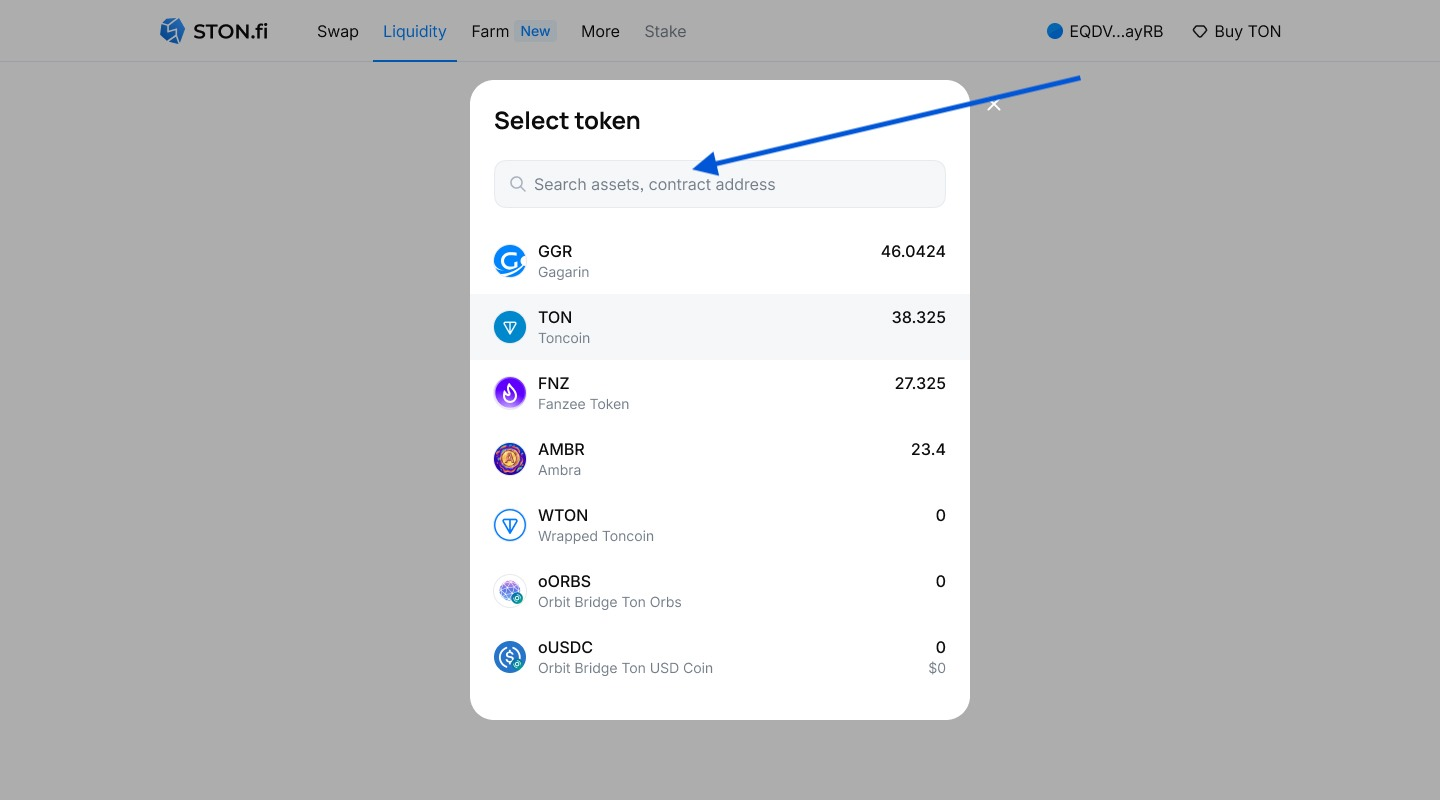
How to exchange tokens on STON.fi
Step 1: Choose the token you would like to exchange.
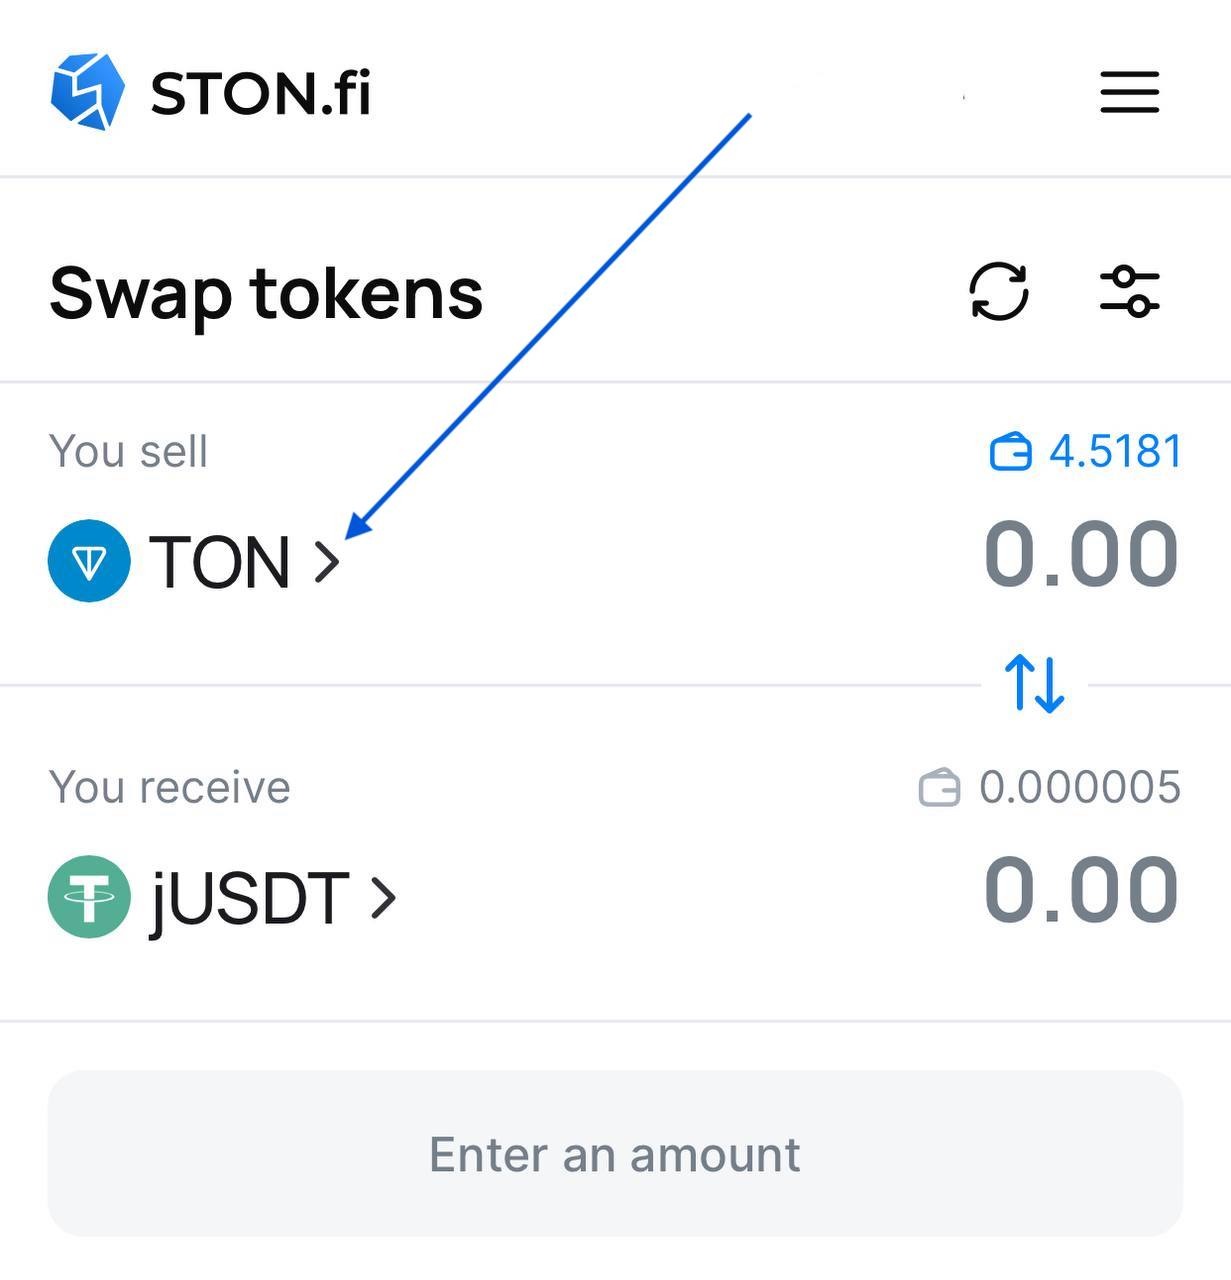
Step 2: Choose the token you would like to receive (jUSDT is an example you can choose any from the list).
Step 3: Enter the amount of tokens you’d like to sell or receive (in any case, the second number will be calculated automatically).
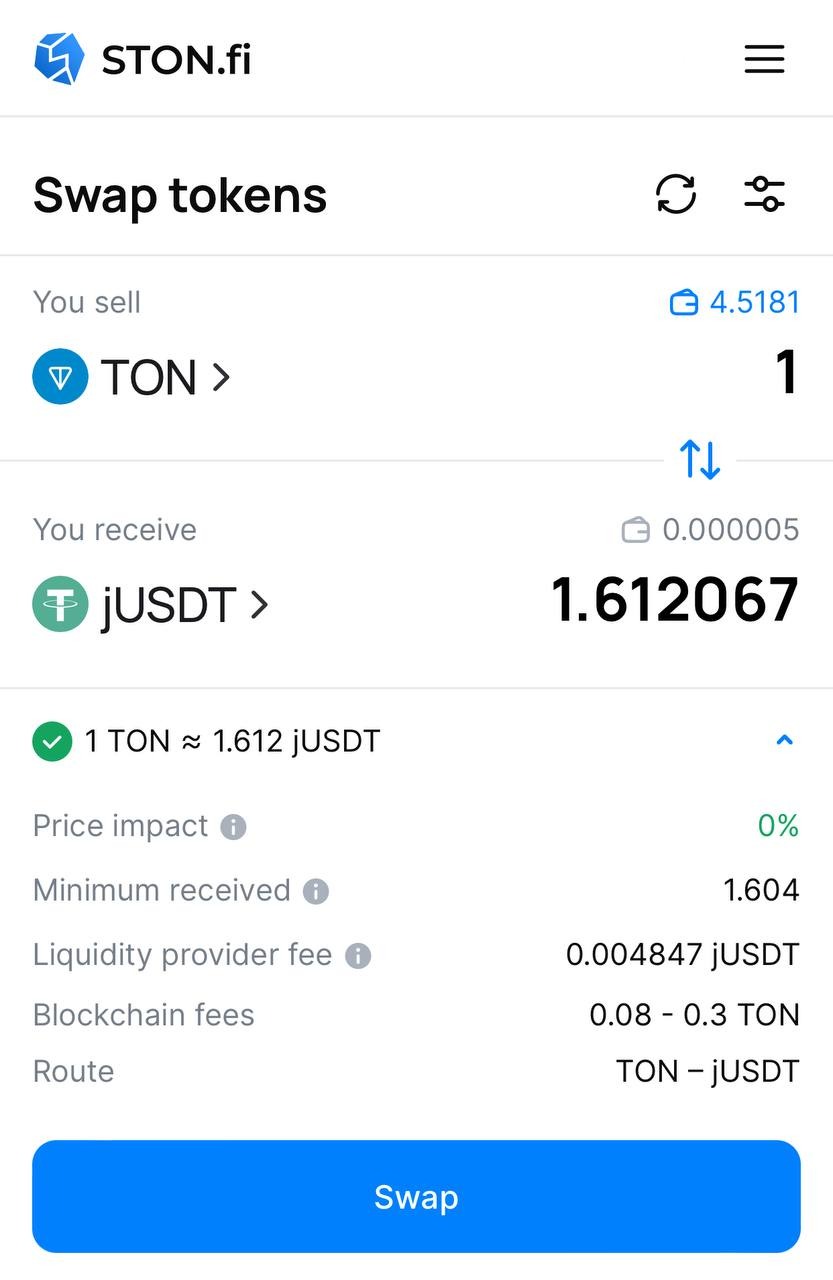
Step 4: Press “Swap” and confirm the transaction in your wallet.

What a liquidity pool is
Liquidity pool is a kind of "reservoir with cryptocurrencies". If a trader wants to exchange, for example, their jUSDT (jUSDT) for Toncoin, then the DEX will take Toncoin from the liquidity pool and transfer them to the trader, and jUSDT will go to another similar reservoir.
This way, transactions happen as quickly as possible: the required assets are always at hand for the exchange.
Of course, we are simplifying things a bit: in reality, the exchange does not "take" anything from anywhere - everything happens automatically, according to the specified code.
The code is publicly available and can be studied by anyone to ensure its safety
Where do the coins in the liquidity pool come from?
They are provided by liquidity providers, who fill up this reservoir.
Why would someone invest their cryptocurrency in a liquidity pool?
The exchange cannot function successfully without liquidity pools.
Therefore, liquidity providers receive income - they are paid a percentage for each transaction within the pool. In the case of STON.fi, this is 0.2% per transaction. These 0.2% are distributed among all liquidity providers in proportion to their share.
It's like passive investments in cryptocurrencies.
"I have 10 Toincoin. Can I become a liquidity provider and receive income?"
Not exactly. In reality, there is no "common pot with cryptocurrencies" where different tokens float together.
The liquidity pool is always a trading pair.
For example, there is a Toncoin/Ambra pool. Or Ambra/Fanzee. Or Toncoin/USDT. These are separate "pots" where only two cryptocurrencies are located.
For example, to become a liquidity provider for the Toncoin/jUSDT pool, you will need to deposit both Toncoin and jUSDT into the reservoir in a 50/50 ratio.
By becoming a liquidity provider in the Toncoin/jUSDT pool, you will receive income from all exchanges made between these two coins.
If someone exchanges Toncoin for Ethereum, it is already a completely different pool: you have no relationship with it and will not receive any income from it.
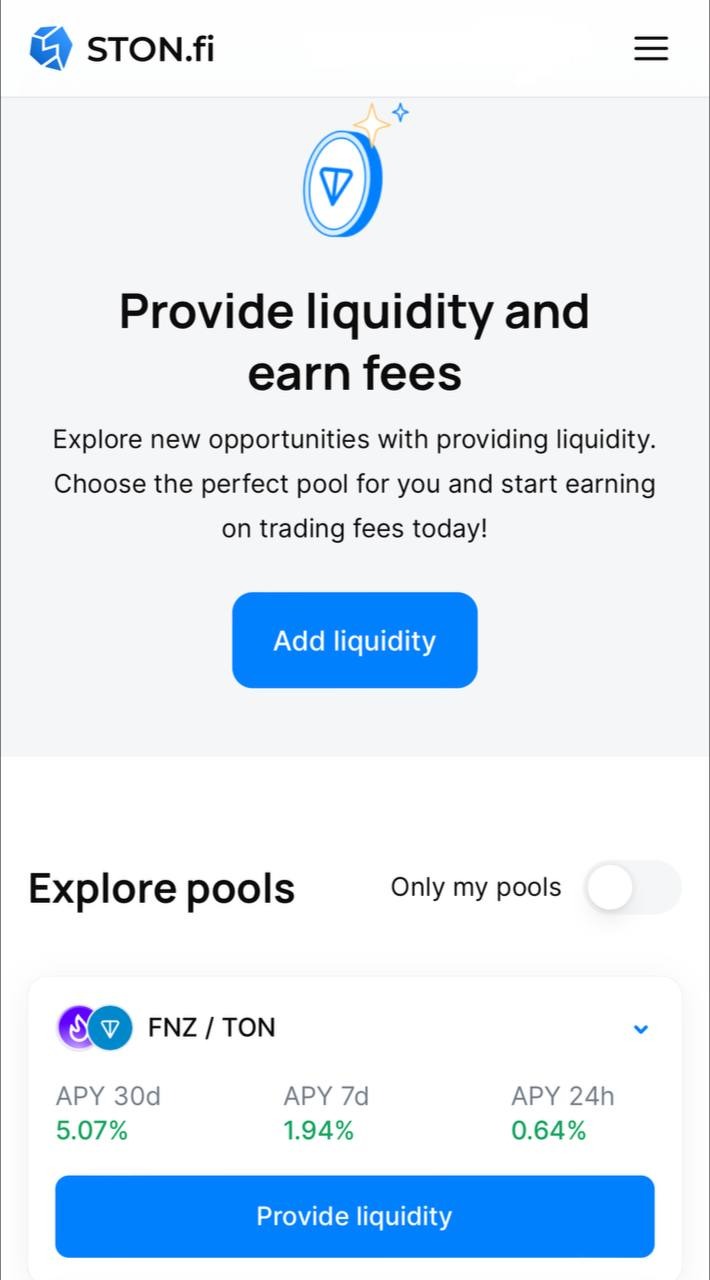
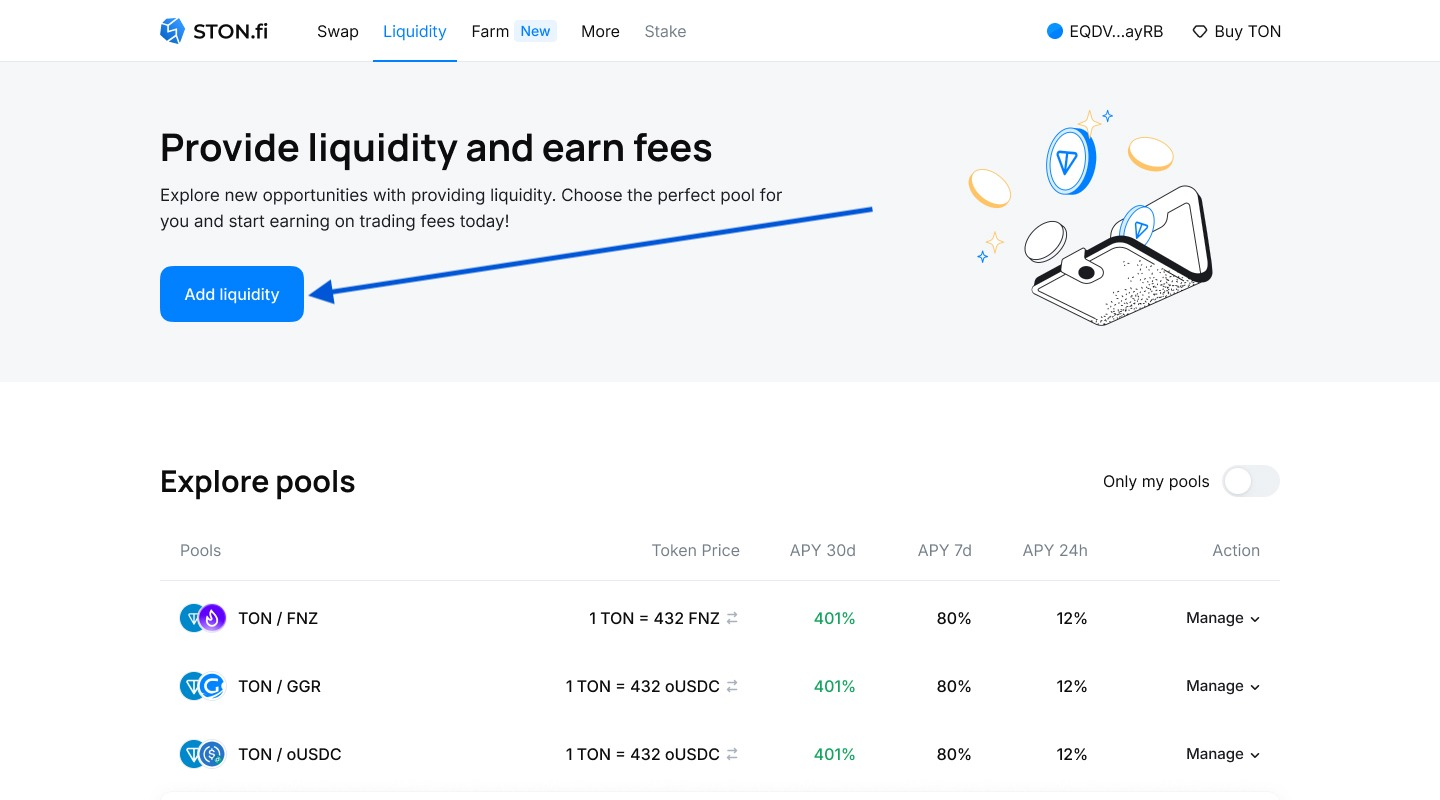
How to earn on STON.fi (liquidity provision)
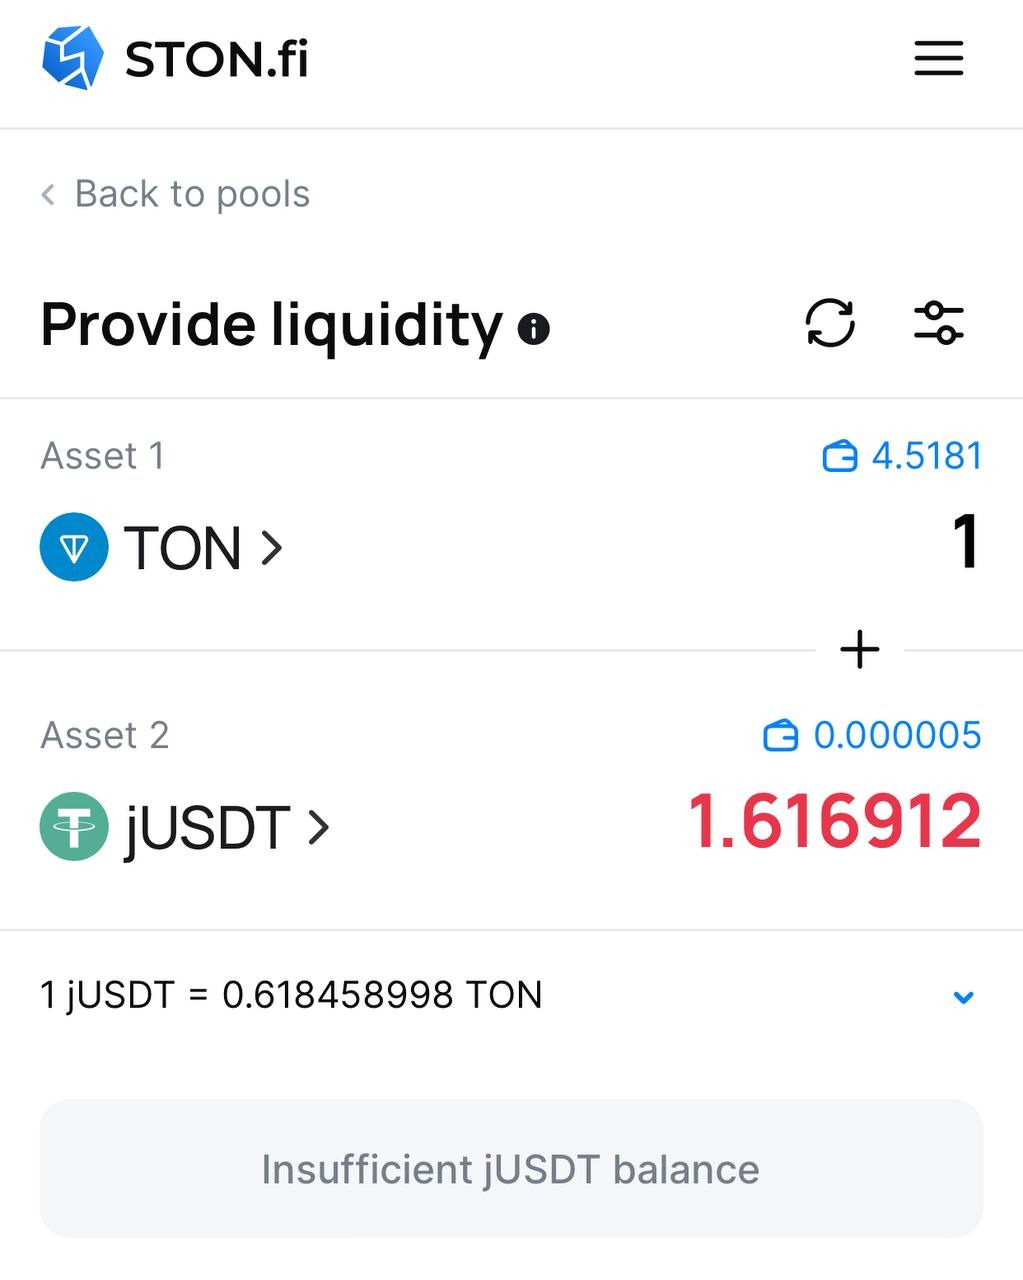
Step 1: Choose “Liquidity” Section and press “+ Add liquidity” or “provide liquidity"near the pool where you would like to provide liquidity.
Step 2: Enter the amount of token (in our case — jUSDT) or TON you want to deposit into the pool, and the system will automatically calculate the amount needed for the other token.

Step 2.1: You will need to buy something if you have insufficient amount of one of the tokens of the pair. Remember that the value of tokens in the pool should be 1:1.
Step 3: Press "Transfer" for one token (TON in our case).
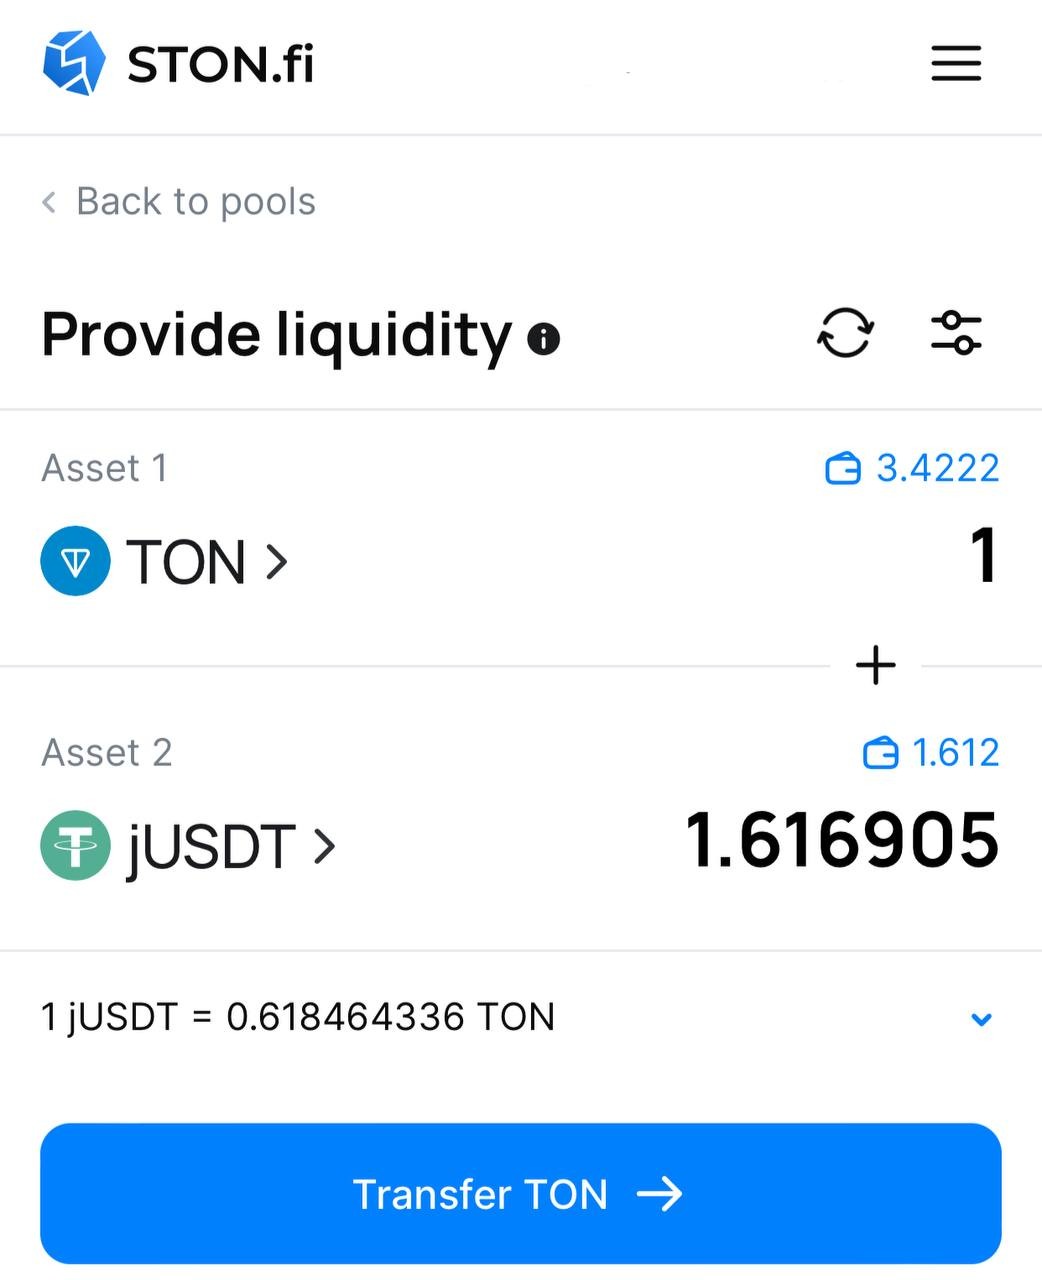
Step 3.1: Confirm the transaction in your wallet.

Step 4: Press Approve for another token (jUSDT in our case)
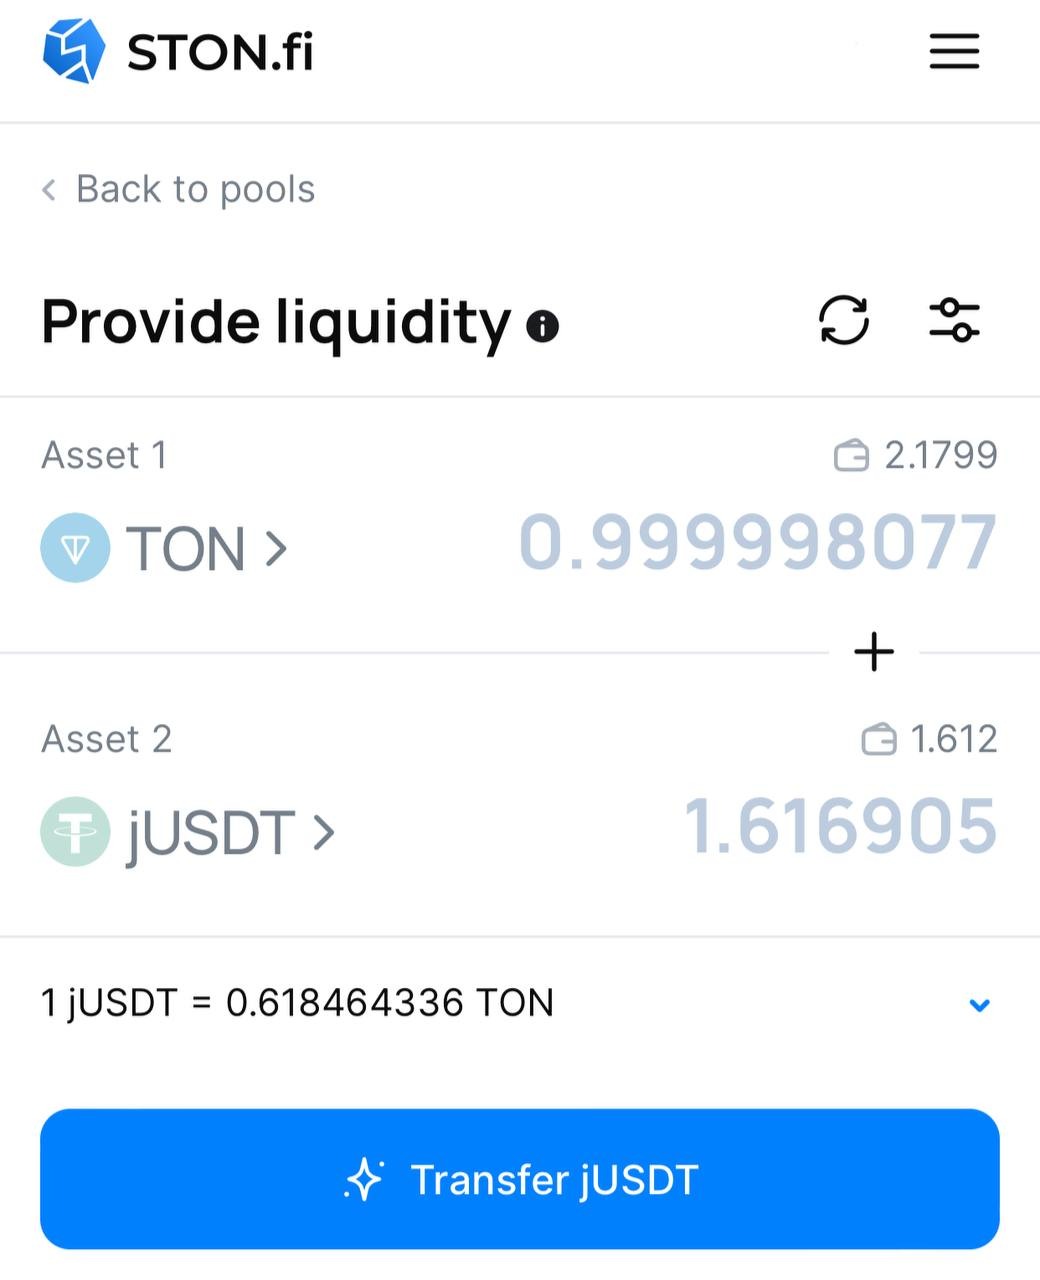
Step 4.1: Confirm the transaction in your wallet.

Step 5: After depositing your tokens into the liquidity pool, you’ll be able to view your position’s details.
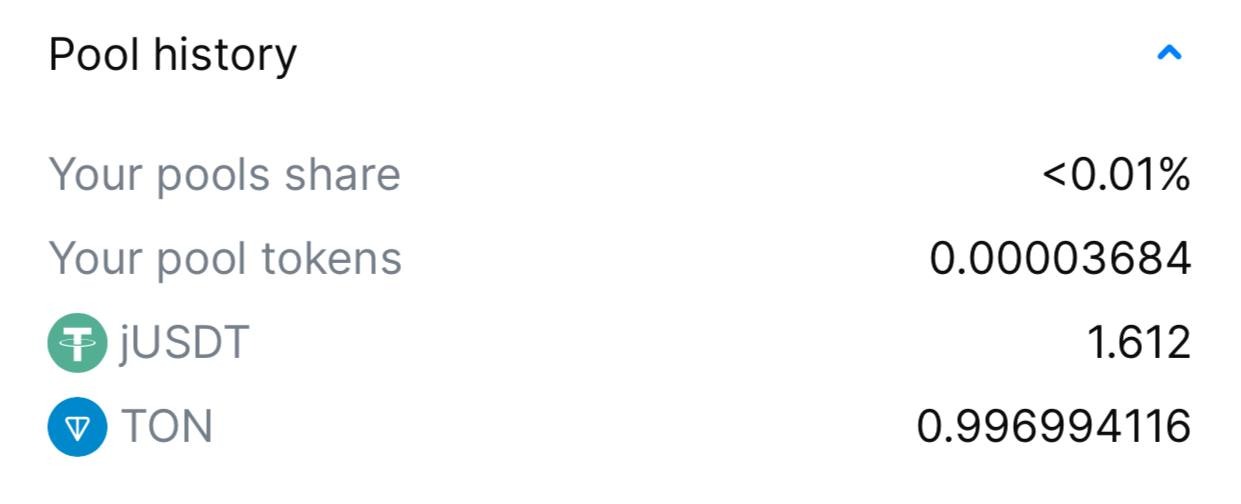
After providing liquidity, you’ll receive a so-called “pool tokens” that confirm your participation. Don’t burn them! These tokens represent your commission rewards from pool transactions, and you’ll need them if you want to claim the profits earned.
By adding liquidity you'll earn 0.2% of all trades on this pair proportional to your share of the pool. Fees are added to the pool, accrue in real time and can be claimed by withdrawing your liquidity.
⚠️ At the moment, there is no way to see how much you have earned from providing liquidity in the STON.fi interface, so it is advisable to take a screenshot of how many of each token you deposited into the pool in order to compare it with the result when you want to calculate how much you earned.
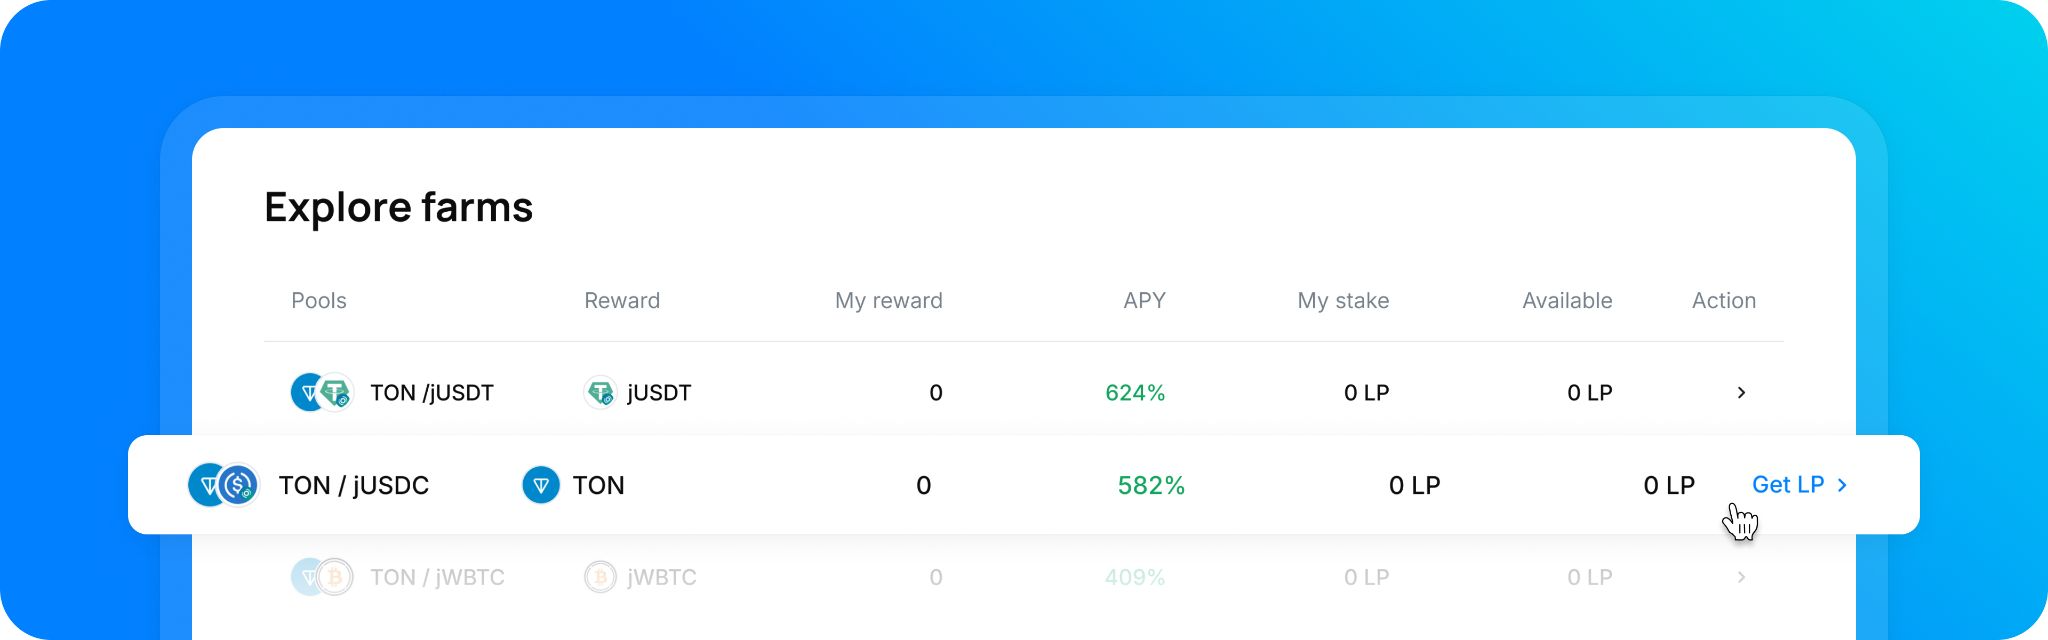
How to choose a liquidity pool for liquidity provision
In “Liquidity” section of STON.fi DEX you can see pools’ APYs for last 30 days as well as 24H trading volume and TVL of a pool.
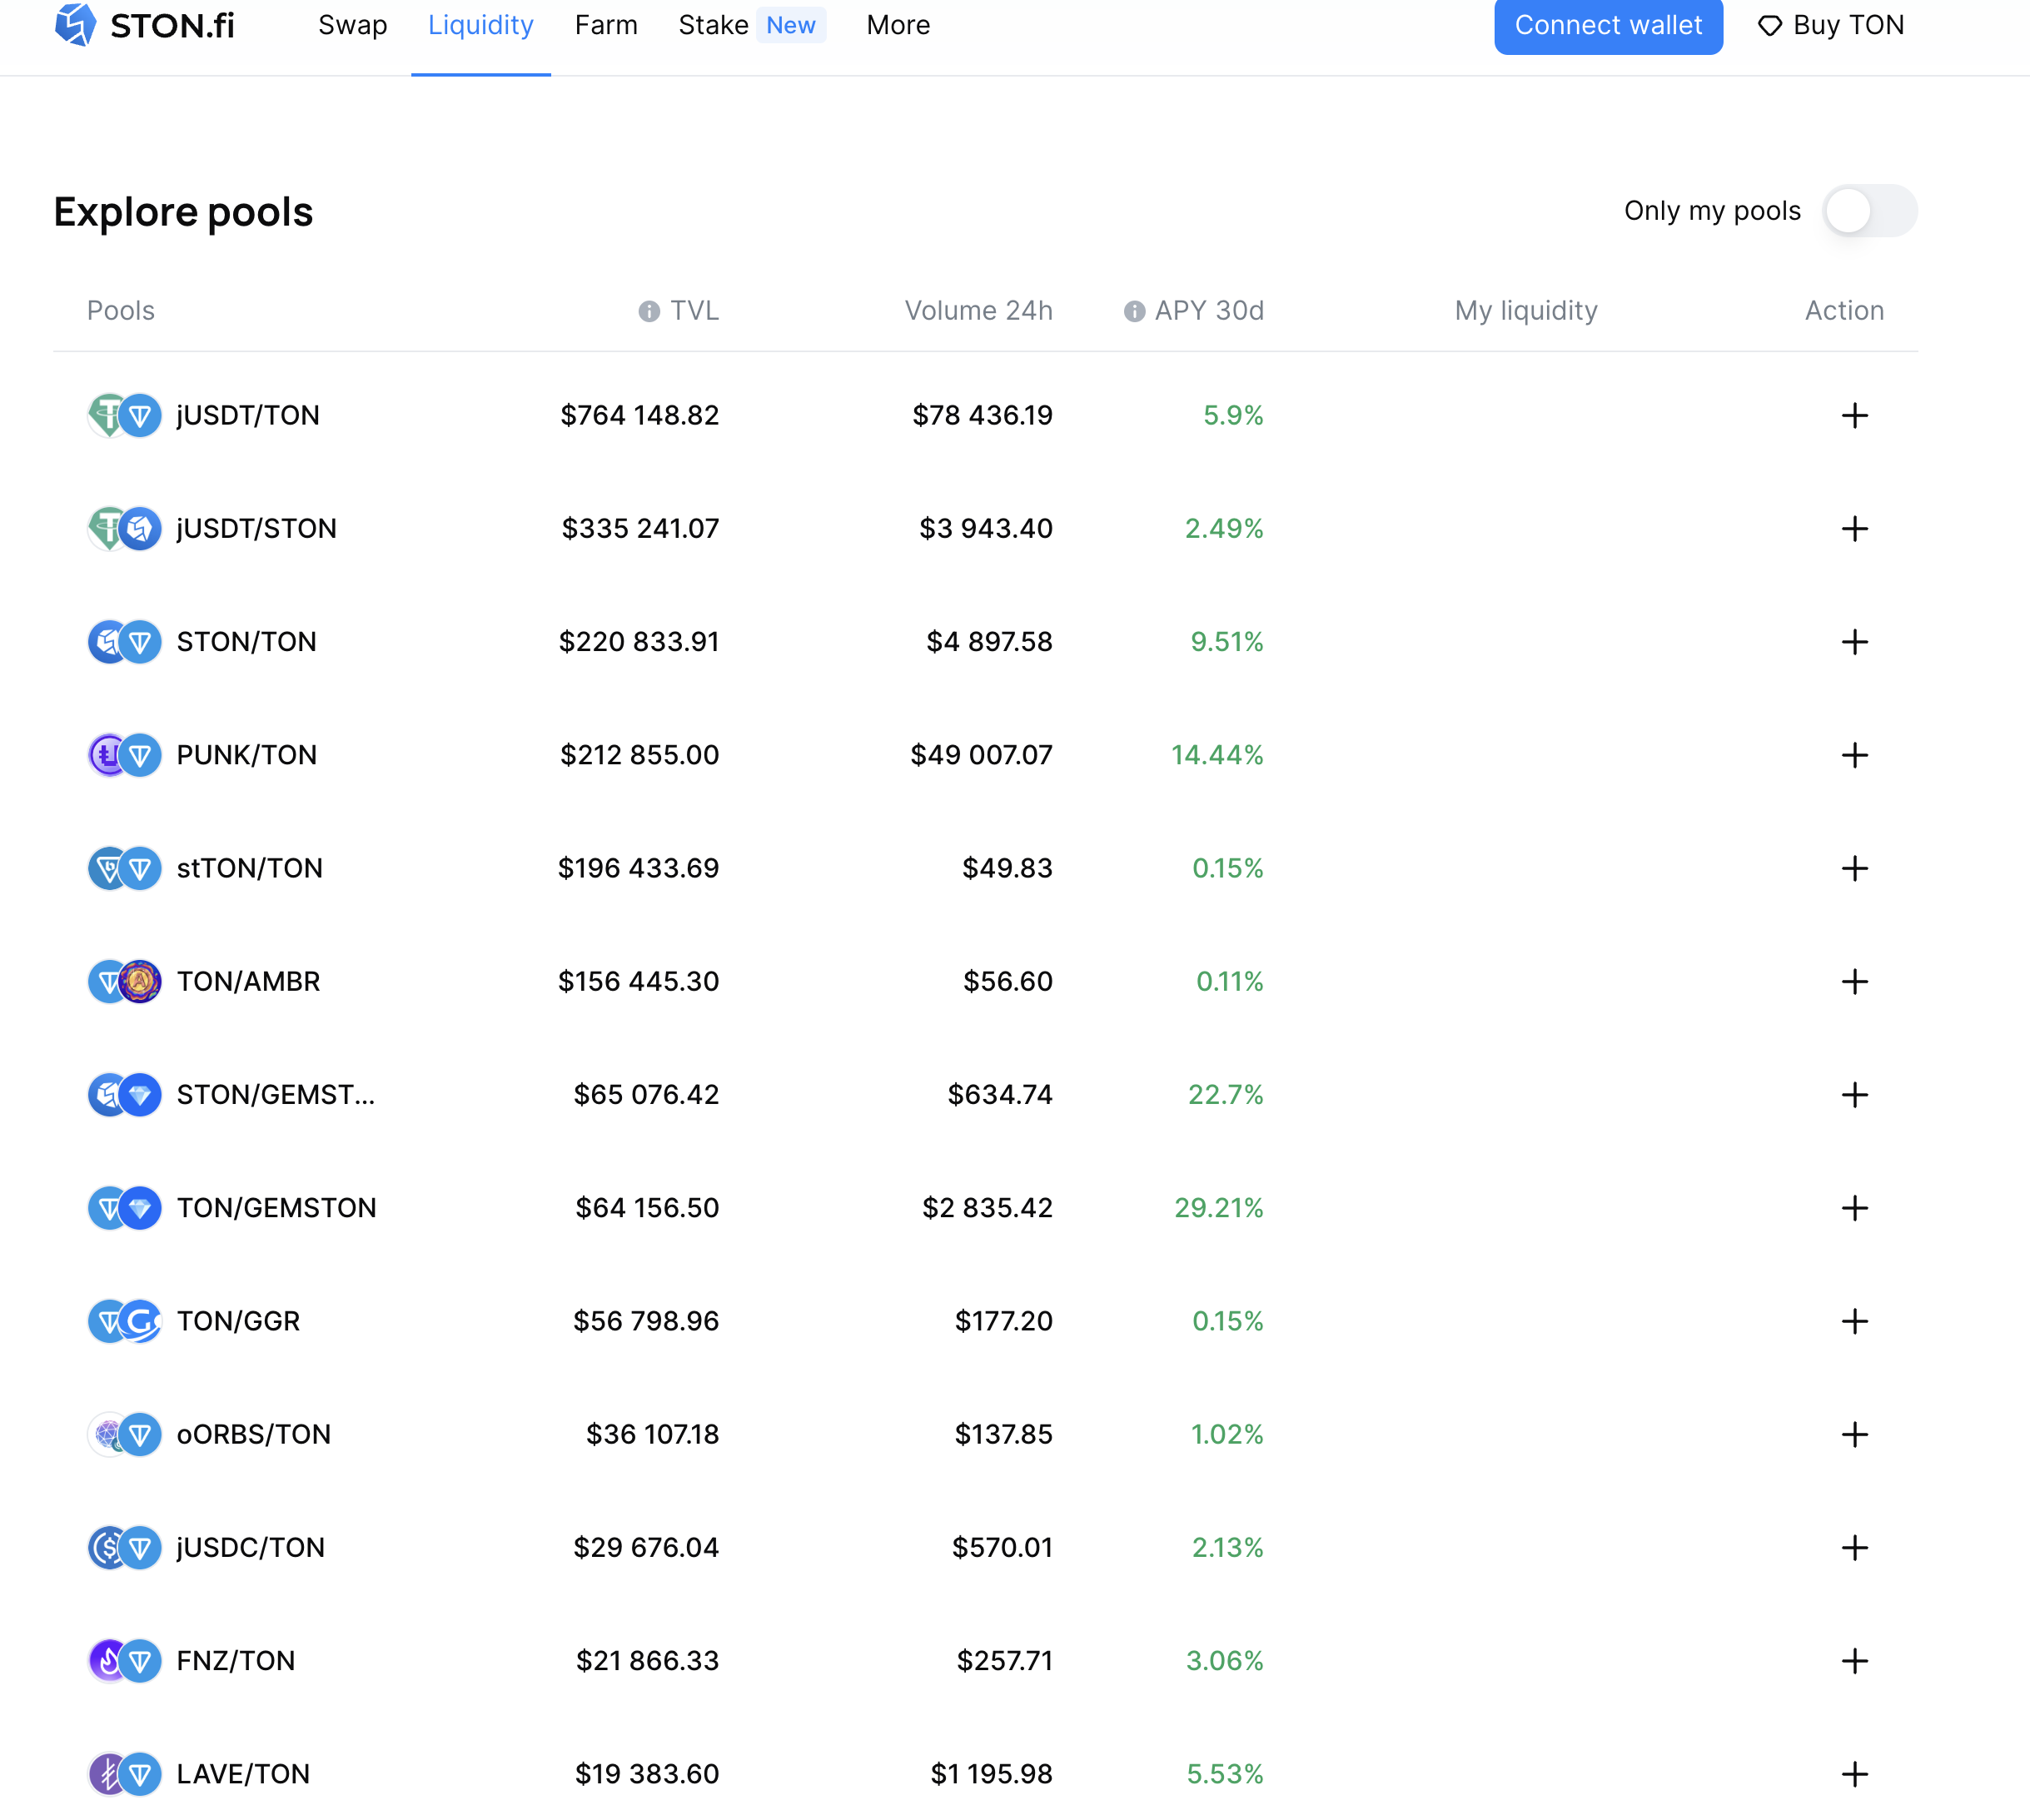
Please note that past APY does not guarantee future profits. It can only be used as a reference.
The most important criteria that determine the profitability of a liquidity pool are the total value locked (TVL) and the trading volume.
The greater the trading volume, the higher the profitability for liquidity providers from trading fees.
However, the profitability is higher with lower liquidity in the pool and higher trading volume.
Therefore, it is most profitable to provide liquidity to a pool with high trading volume and low TVL.
Farming
What is yield farming and how it works
Farming is a method of generating additional income through the stacking of LP tokens.
With farming, users only need to block one token in a smart contract, whereas farming requires the staking of LP tokens, which can be obtained by providing liquidity to the STON.fi DEX.
In the case of farming, users receive an additional return on top of the one generated from trading commissions. It's important to note that 0.2% of the volume of each transaction is distributed to liquidity providers.
Video Guide:
Step 1: Choose the pool that fits your requirements
Step 2:
If you don’t have any LP tokens to stake, you need to get them. For this refer to chapter 7 (How to earn on STON.fi (liquidity provision)
When you have LP tokens press “Farm” button
Step 3: Enter the amount of LP tokens to stake and press “Stake” button
Step 4: confirm the transaction in your wallet

Amazing! You are all set and now earning a higher yield with your LP tokens, while also earning fees at the same time.
NB: You will be able to unstake LP tokens only after 14 days after staking!
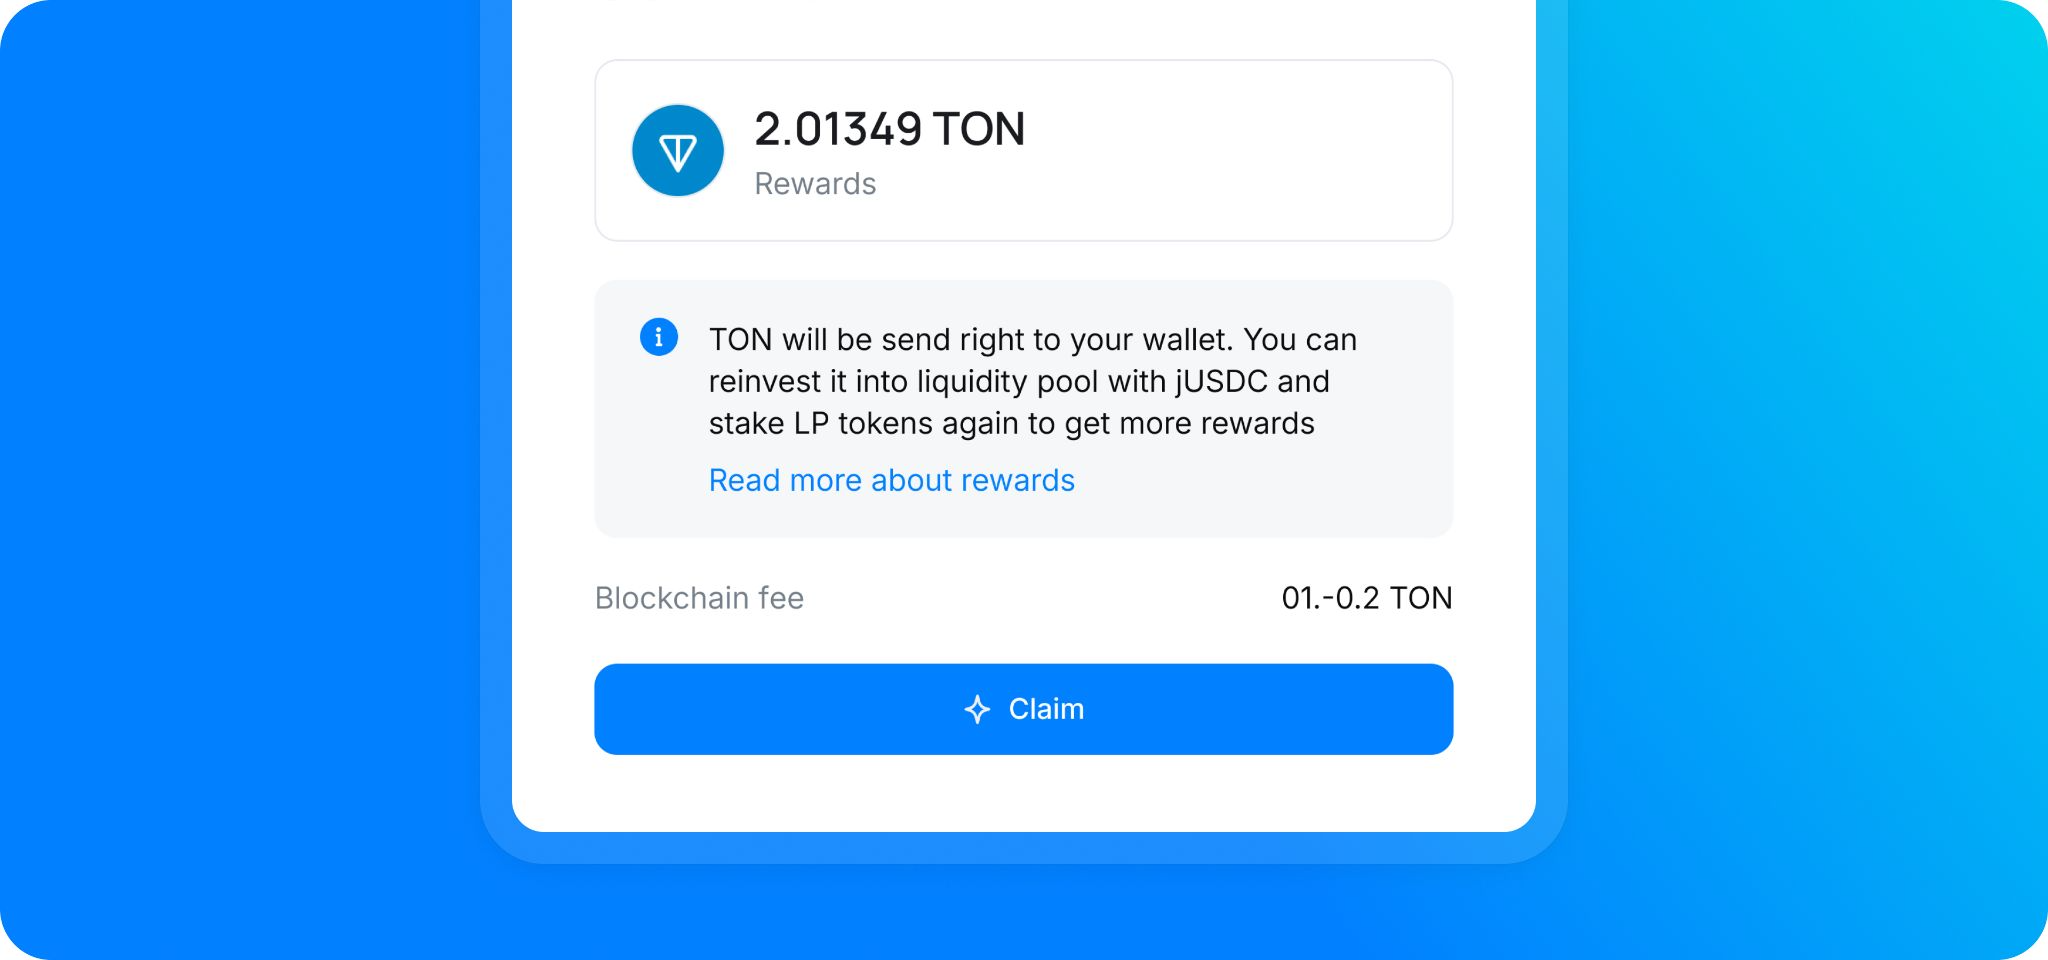
How to claim farming rewards
Step 1: Press “claim” button
Step 2: “claim” again
Step 3: confirm the transaction in your wallet
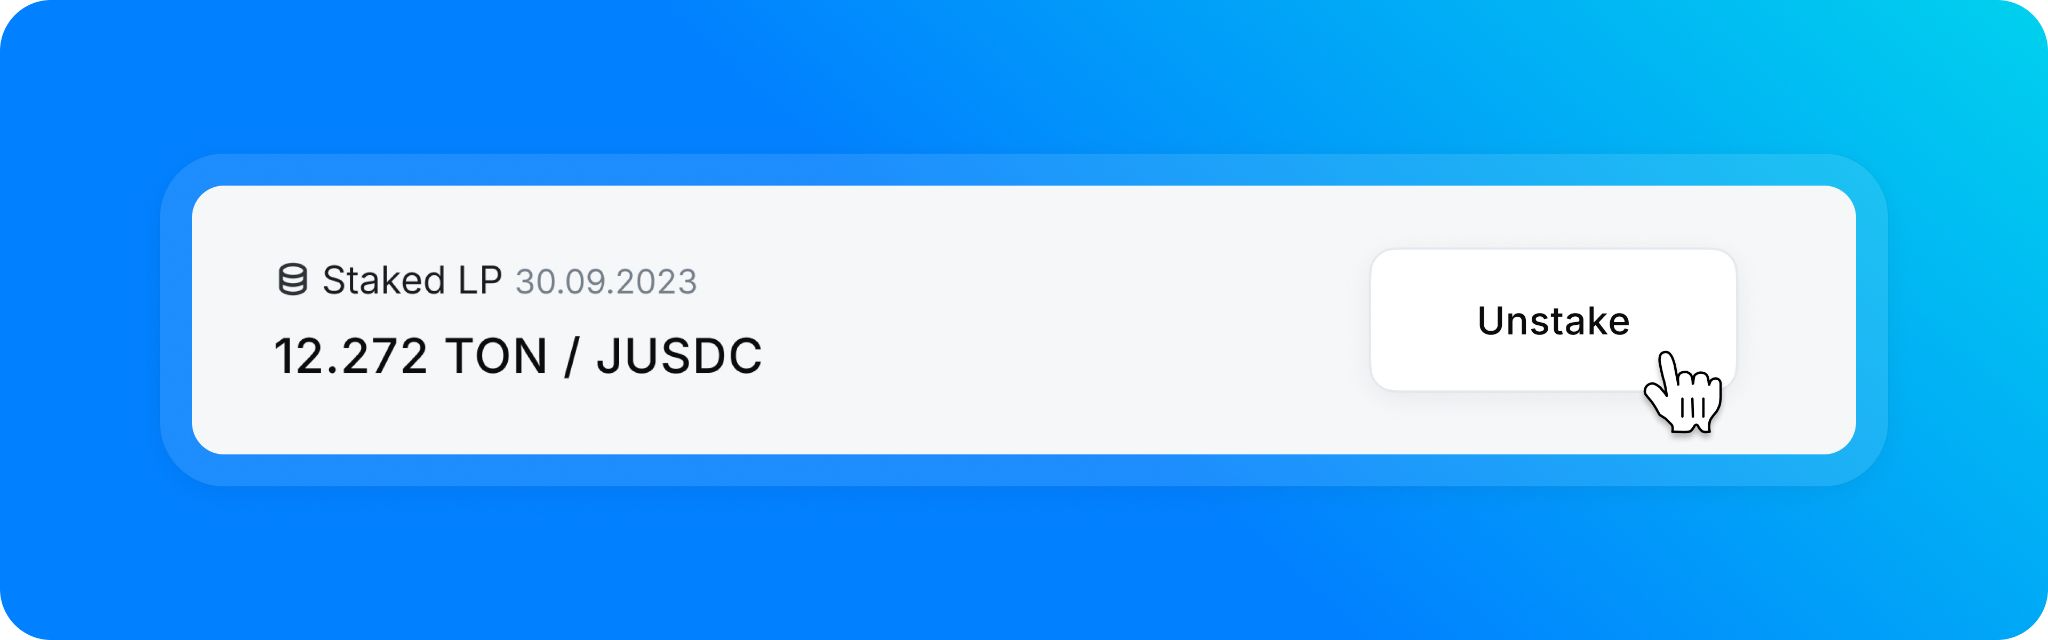
How to unstake LP tokens
Step 1: Press “Unstake” button
Step 2: Press “Unstake and Claim”
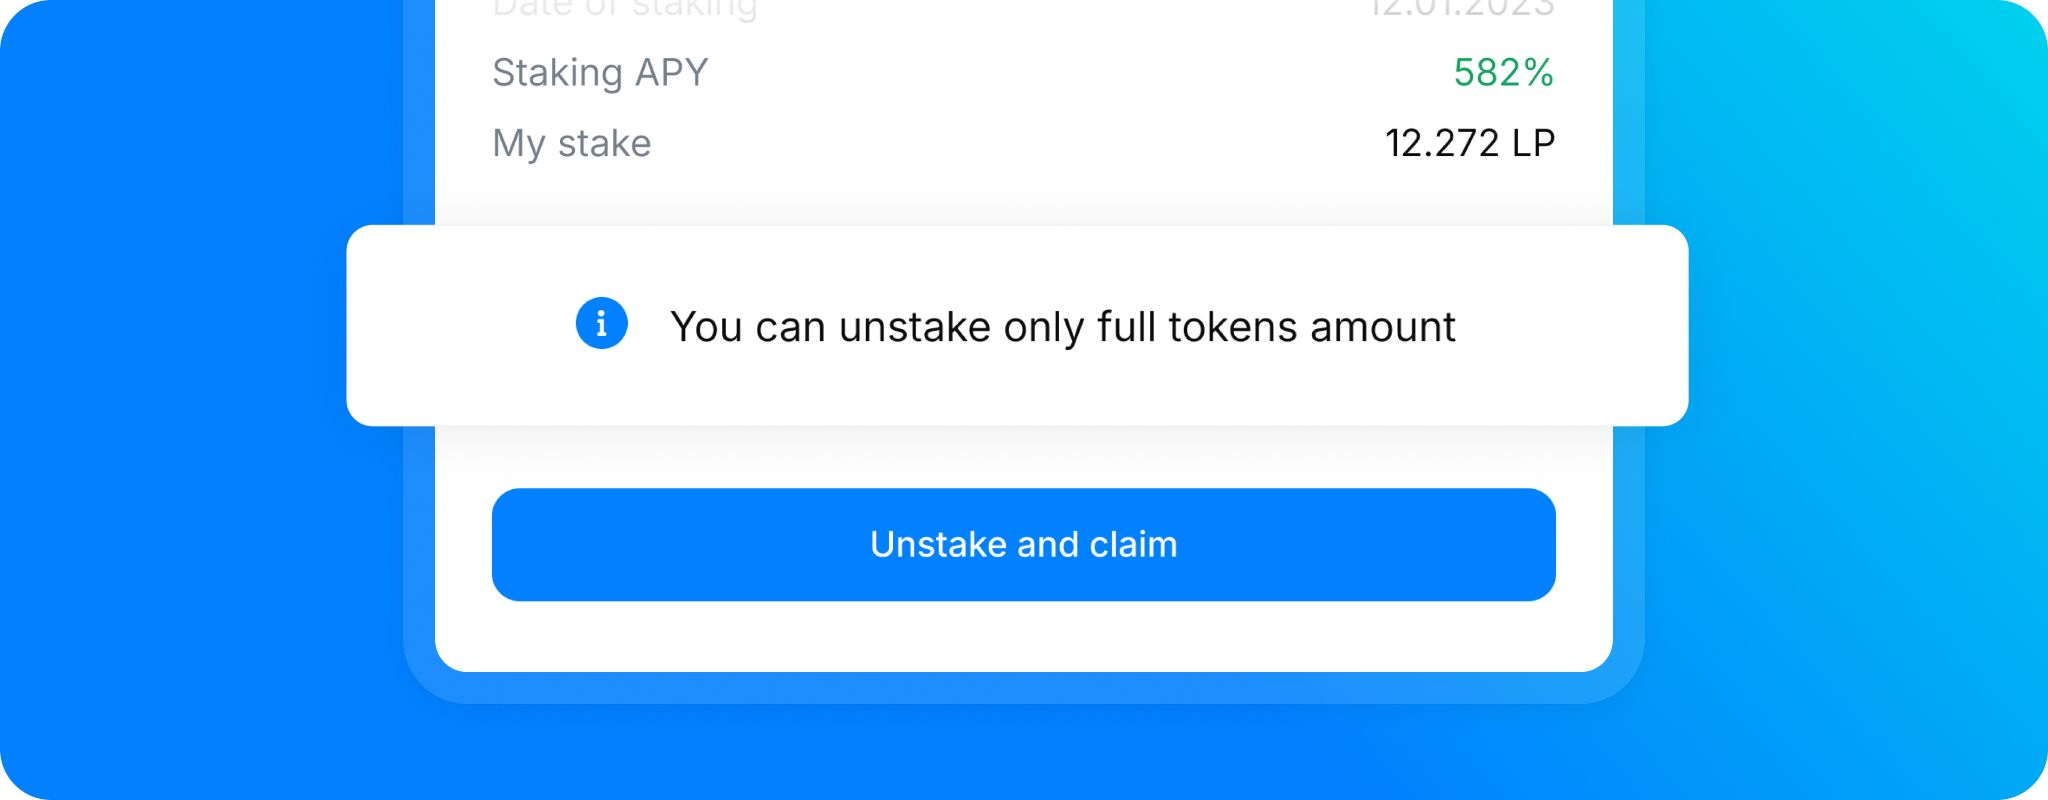
NB: 1) you can unstake only full tokens amount, 2) when you unstake, you also automatically claim earned rewards
Step 3: Confirm the transaction in your wallet
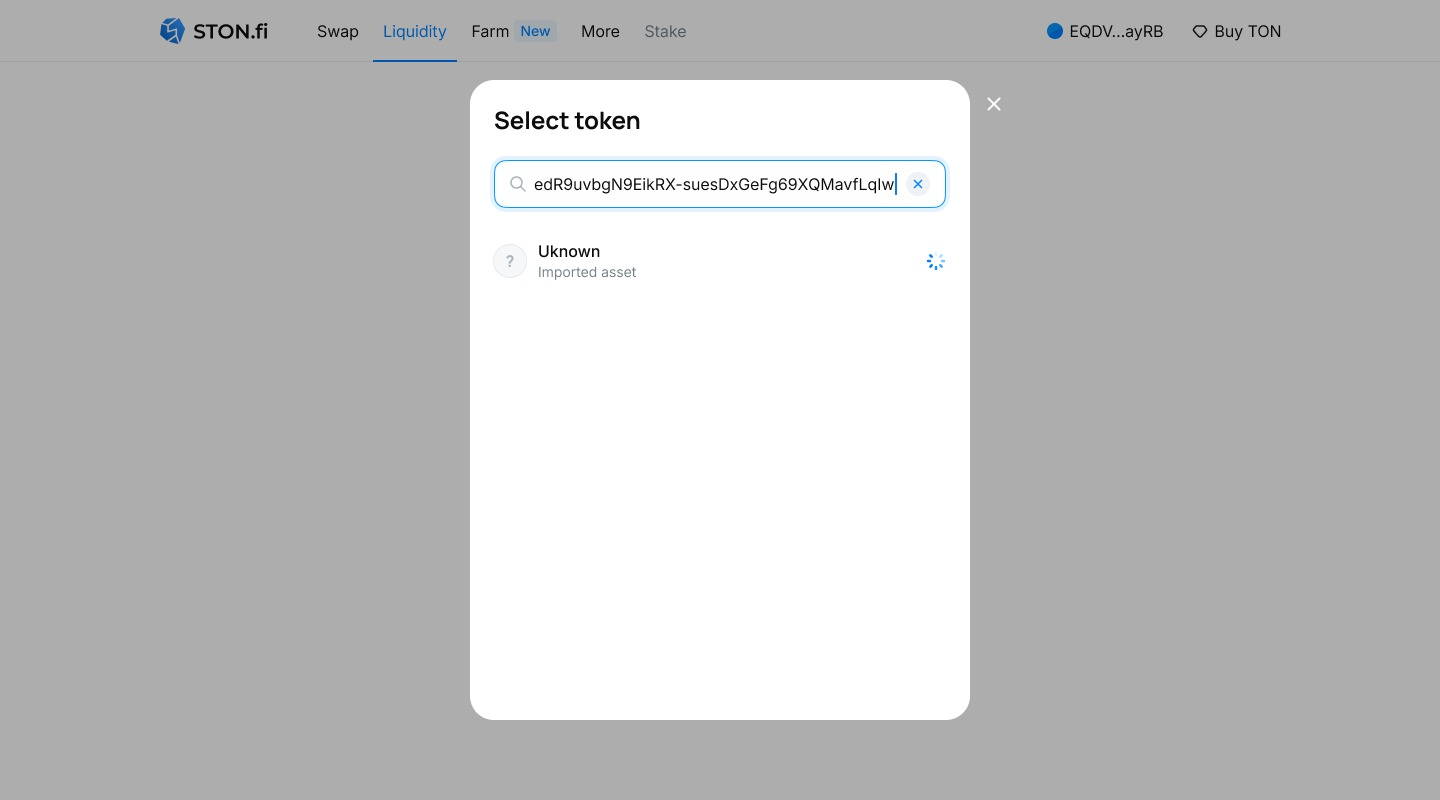
How to create a new liquidity pool and import your own asset with a contact address
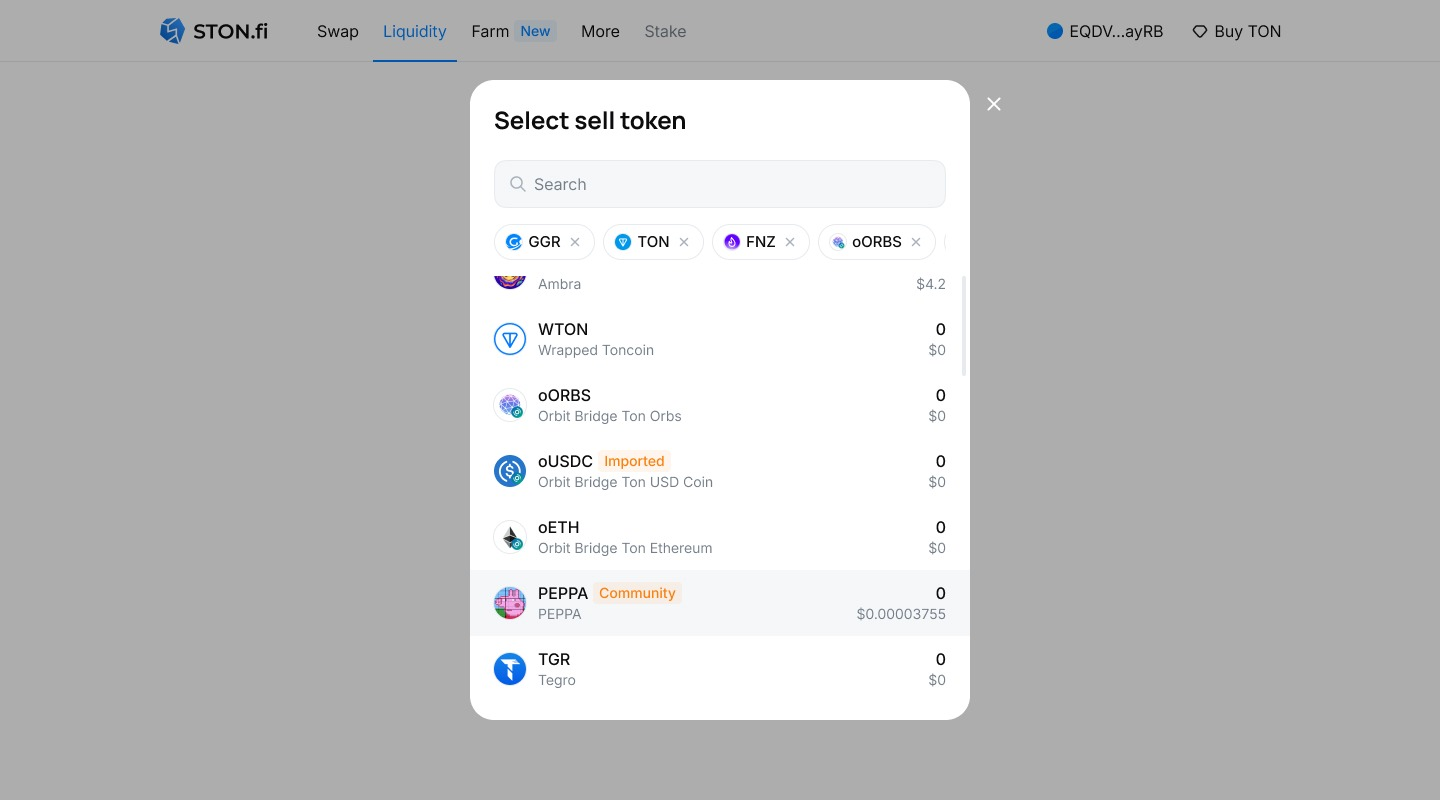
Token import
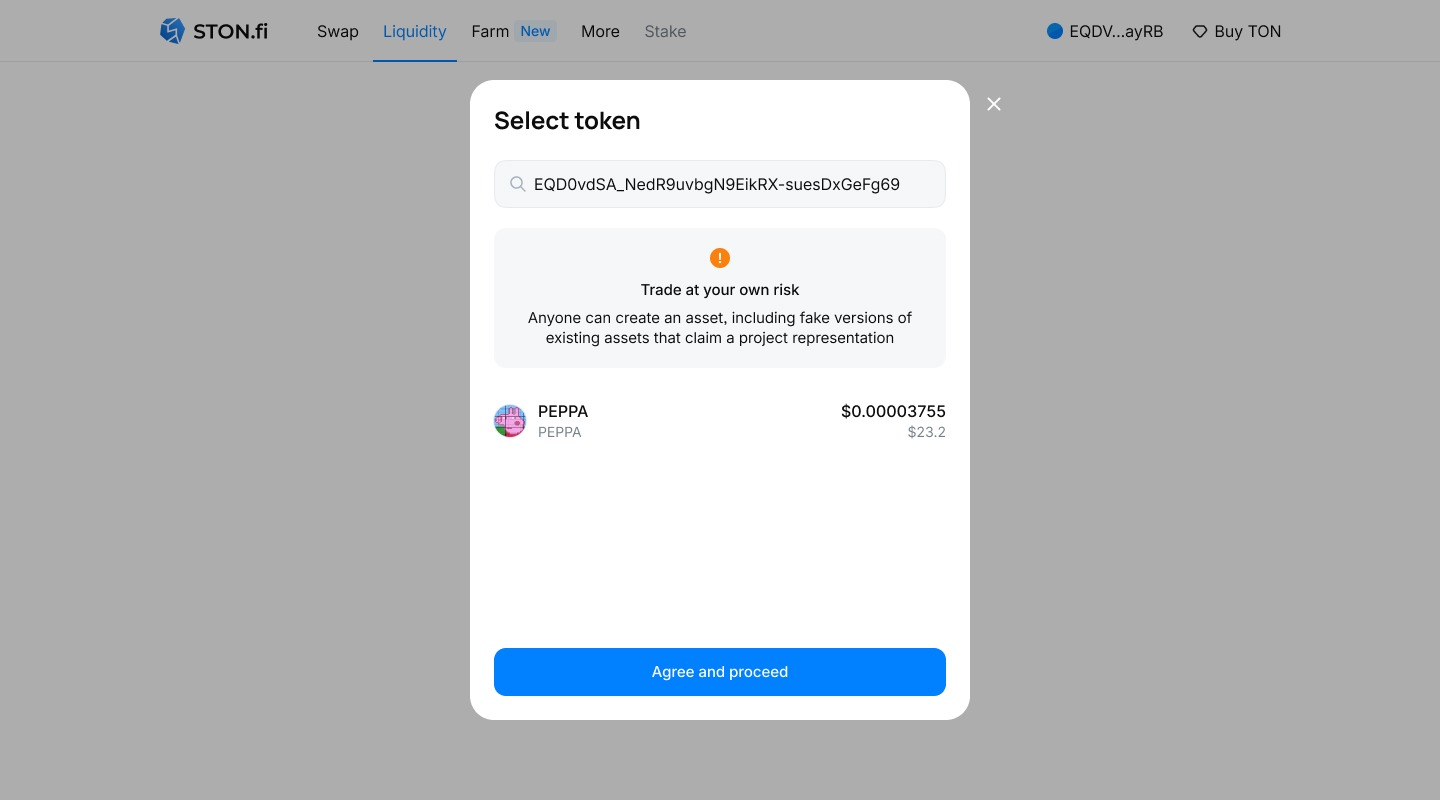
- Enter a contact address into the search bar.
2. Wait until the token information from the blockchain is uploaded.
3. Press 'Agree and Proceed'.
NB: Please note that community tokens (not displayed on the main STON.fi token list) can be created and added to DEX by anyone, trade them at your own risk.
After you have added your token, it will always be displayed in the token list on the current device with an 'Imported' tag, and other users will see it as 'Community' (provided that the 'Community assets' feature is enabled in settings, or that the token is found by contract address, or the user has it is in his wallet).
Community tokens display
You can also display all tokens added by users.
To do this, in the settings tab, move the 'Community assets' slider to the right.
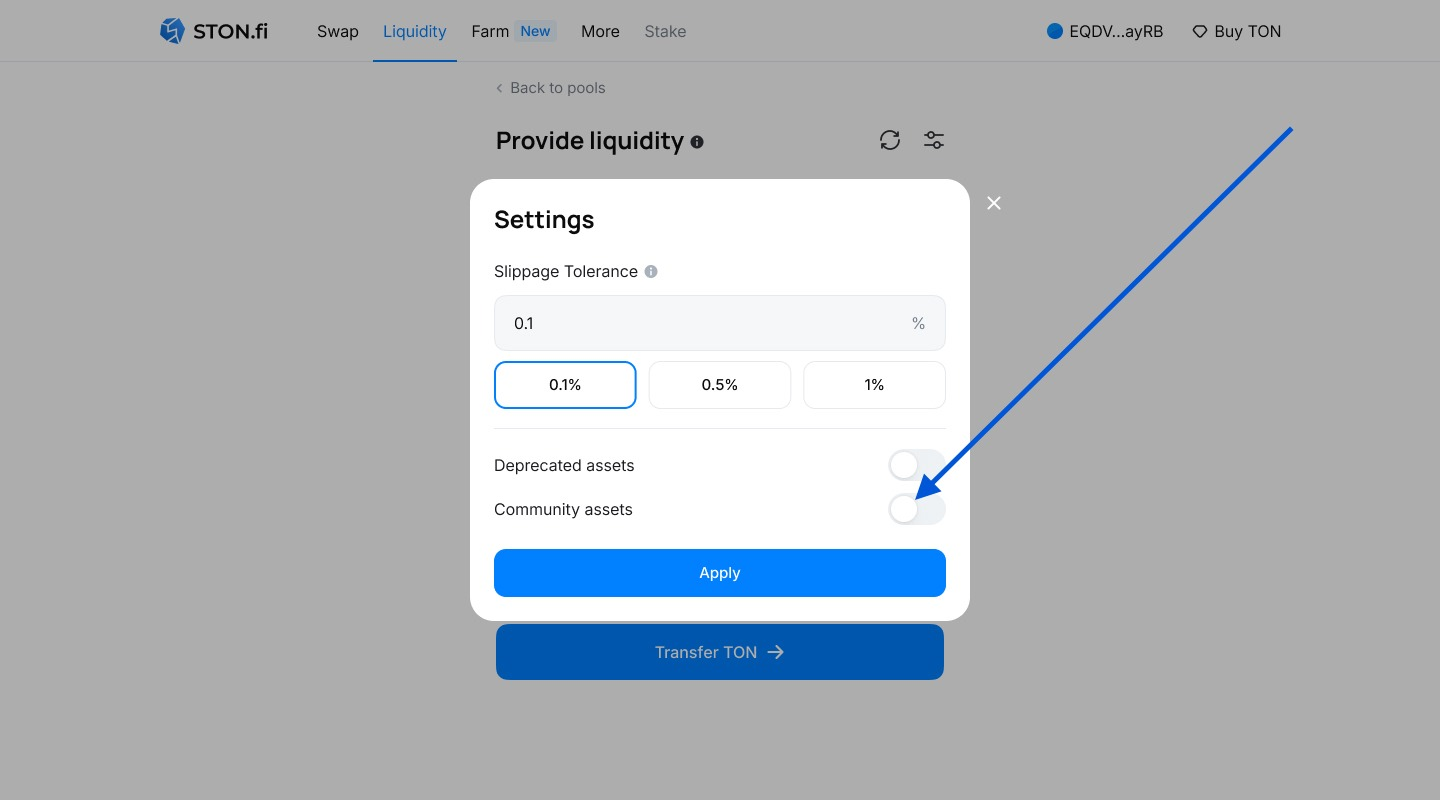
It is also possible to display Deprecated assets, that were previously on the STON.fi whitelist, but were removed from the interface for some reason.
With Community assets and Deprecated assets enabled, you will always see ALL tokens traded on STON.fi. In this case you will not have to search for any tokens at the contract address.
New liquidity pool creation
- Press 'Add liquidity'.
2. Select the tokens you want to create a pool with.
NB: You can create pool-pairs with both newly added and already existing tokens, such as STON/jWBTC.
3. Confirm your action by pressing the 'Accept' button. Please note that fees charged on the next steps will not be refunded.
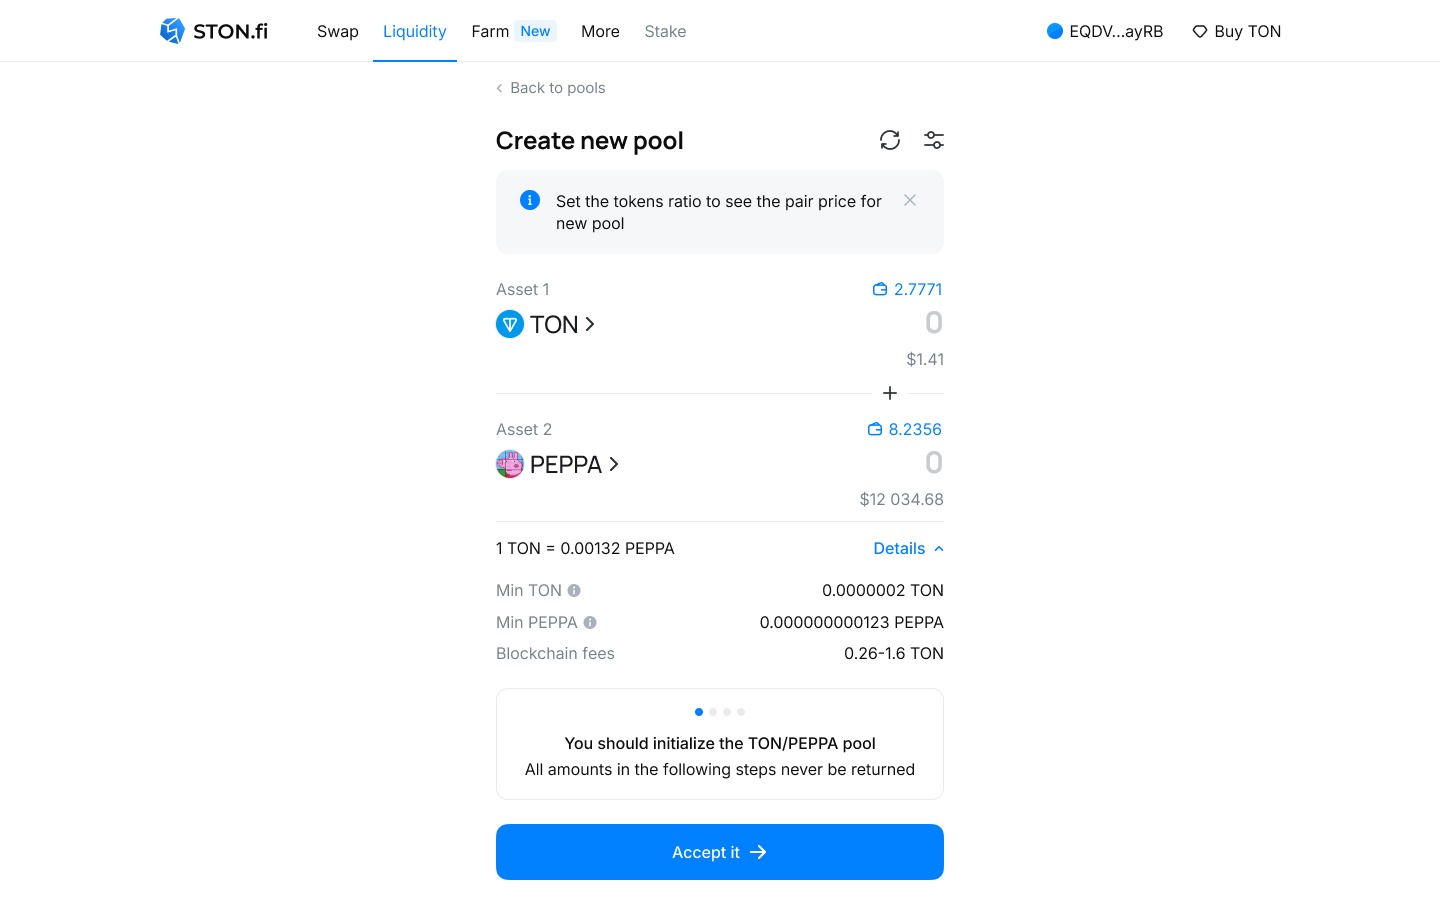
4.1 Enter the asset ratio, which will determine the starting price in the pool. The relation can be given by any convenient numbers (1/10 = 0.1/1 = 10/100, etc.). Please note that the fee amount, charged from the wallet, is not the amount you enter, but the values indicated as 'min TON' and 'min PEPPA'. These amounts should be in your wallet, and are the minimum to create a liquidity pool!
4.2 Click 'Provide 1 TON' and confirm the transaction in your wallet.
Attention: this fee is required to initialize the pool and will not be returned!
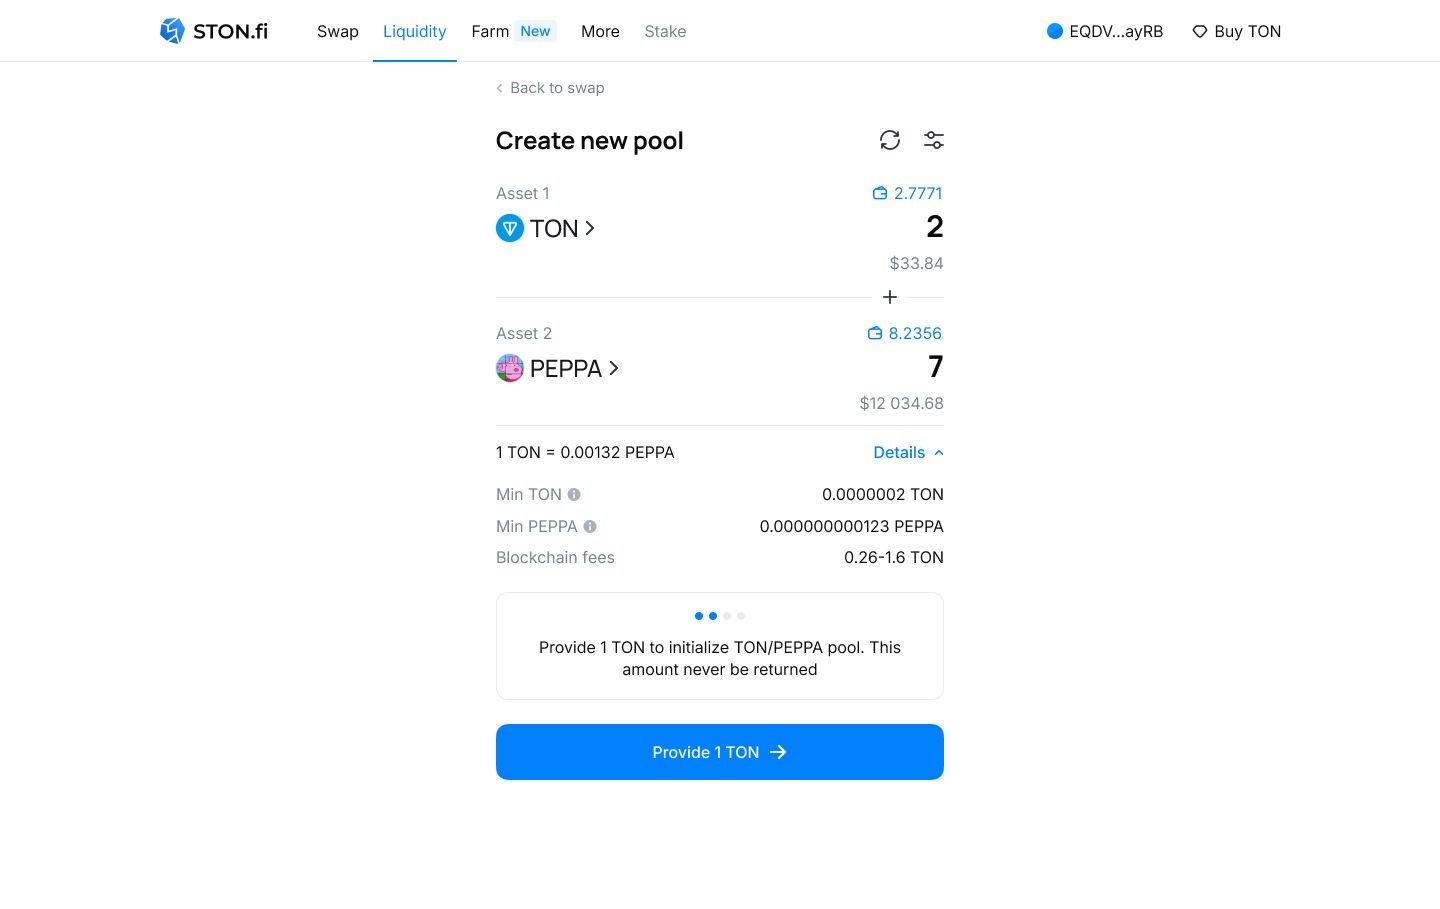
5. Click the 'Transfer TON' button (TON and PEPPA are just examples here, this instruction applies to any tokens) to transfer a small amount of the first asset, then confirm the transaction in your wallet.
Attention: this fee is required to initialize the pool and will not be returned!

6. Click the 'Transfer PEPPA' button (TON and PEPPA are just examples here, this instruction applies to any tokens) to transfer a small amount of the second asset, then confirm the transaction in your wallet.
Attention: this fee is required to initialize the pool and will not be returned!
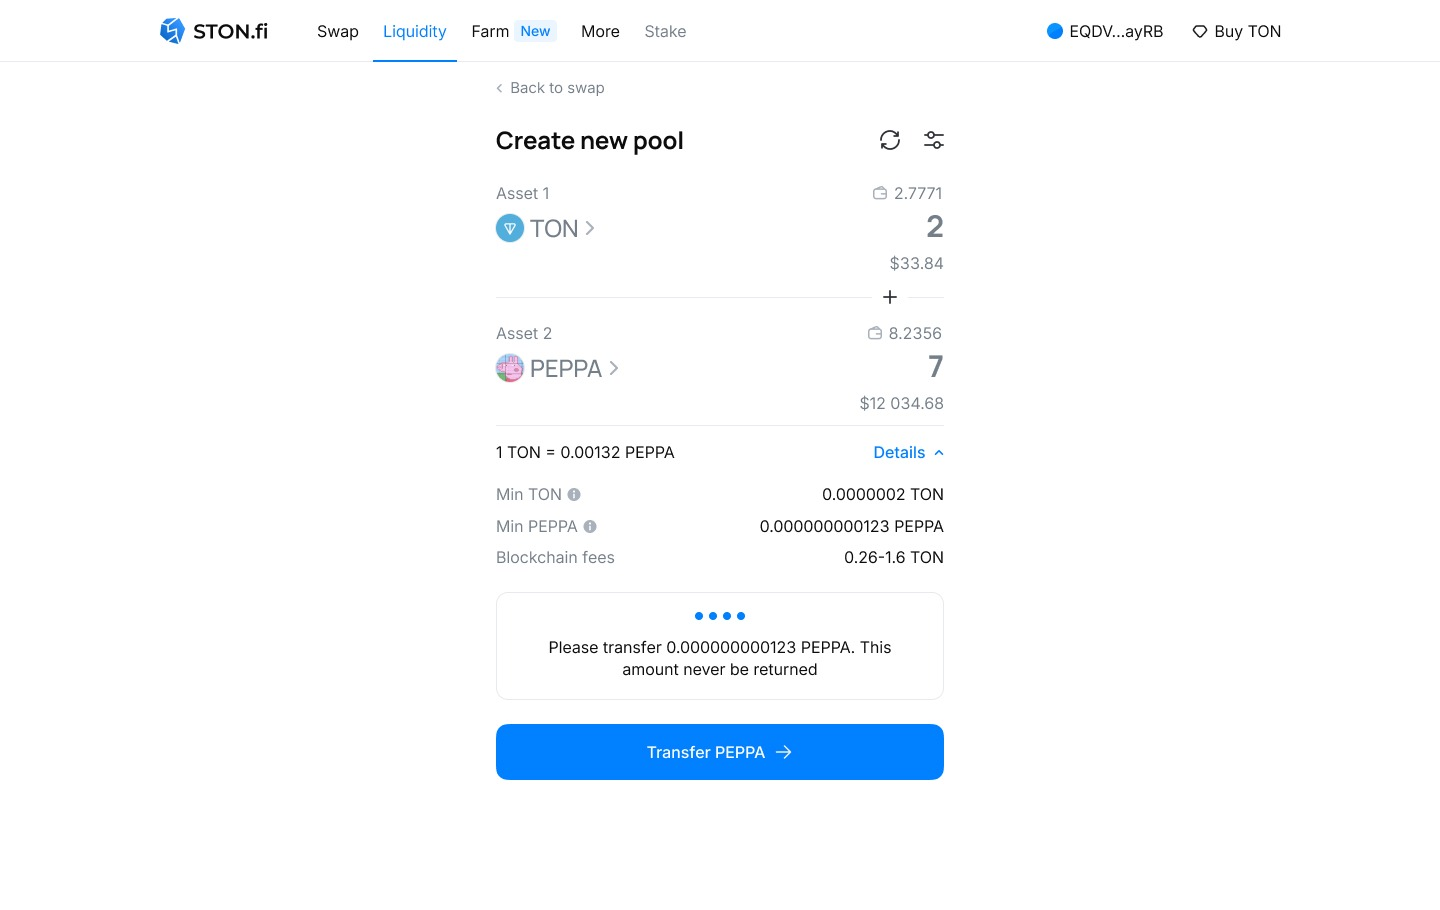
Voila! Liquidity pool created!
Don’t forget to add liquidity to your pool: the more tokens in the pool, the lower the price impact and, consequently, the better the trading and higher the attractiveness of the token.
Impermanent Loss
Supplying liquidity to a DEX, like any method of earning higher returns, has its risks that must be taken into account. One of the main risks is impermanent loss (IL).
Impermanent loss is borne by liquidity providers who have loaded their assets into a pool, and the ratio of the value of these tokens has changed significantly. The stronger this ratio has changed, the greater the losses that the liquidity provider will incur.
In most cases, especially when the value of tokens changes insignificantly, impermanent losses are compensated by trading fees. But every liquidity provider should remember the risk of impermanent losses.
Let's consider an example:
You deposit 1A and 100B tokens in the liquidity pool, which is equivalent to 100 USD on each side (the total amount is 200 USD, 1A = 100 USD, 1B = 1 USD). In the A-B pool, there are now a total of 10A and 1000B tokens, which other liquidity providers have contributed along with you.
Your share of the liquidity pool is 10%. The overall liquidity of the pool is calculated by multiplying the number of tokens on the left and right sides, and we can express this sum as 10000B.
At the time of depositing funds into the liquidity pool, 1A was equal to 100B. Suppose that after some time, the price of token A increases, and now 1A = 400B. The value of token B remains unchanged.
Arbitrage traders will add B to the pool and remove A from it until the ratio reflects the current price (as the price of token B is insufficient to maintain their even ratio due to the change in the price of the tokens). Since AMM does not have an order book, prices here are determined by the ratio between the assets in the pool. As long as the liquidity of the pool remains stable, the ratio of assets in it changes.
Thanks to arbitrage traders, the ratio of tokens in the pool has become 5A-2000B.
You decide to withdraw your funds. Since your share of the liquidity pool is 10%, you will receive 0.5A and 200B tokens. At the new token price of 1A = 400B = 400 USD (remembering that token A has increased while token B has remained the same), you withdraw cryptocurrency worth 0.5400+2001 = 400 USD. It would seem that your asset has doubled!
But what if you decided to hold onto the tokens and not provide liquidity to the pool? Due to the spike in the price of token A, your 200 USD would have turned into 1400+1001 = 500. The difference of 100 USD is called impermanent losses.
❗️However, impermanent losses only occur when liquidity is withdrawn. If this is not done, exchange rates may stabilize and the impermanent losses will disappear. That is why they are called "impermanent".
What else should be remembered?
In this example, we did not consider trading fees. Often, the percentage of trading fees covers impermanent losses (if, of course, the ratio of token values has not changed to critical values).
A four-fold increase in the price of one token and an unchanged value of the other is an extremely rare situation, and you should always assess the risks before supplying liquidity to a DEX.
Blockchain and DEX fees
For each operation with smart contracts, a blockchain fee is charged. When exchanging tokens for TON, this fee is 0.08-0.13 TON. However, since the fee is unknown in advance in TON, the STON.fi smart contracts charge users' wallets 0.3 TON, most of which is usually returned. But it is also possible that the blockchain fee may reach 0.3 TON.
When providing liquidity, the blockchain commission is paid twice (for each of the two tokens in the pair), but any unused amount is also returned afterwards.
The DEX commission is charged at a rate of 0.3% per transaction in the receiving tokens. Of these, 0.2% are returned to the pool and distributed among liquidity providers, while 0.1% goes to STON.fi.