Retro-Go on GnW
@sharkGracias a @neohroot y a @shxmario
Enlace al documento en ingles con las instrucciones.
NOTA: No me responsabilizo de nada de lo que comento aquí.
1. MATERIALES.
Necesitamos para el proyecto:
1.1. Para la conexión entre la GW y el ordenador. Por orden de prioridad/calidad.
- 1. Recomendado --> ST-Link V2 original
- 2. Placa de Desarrollo NUCLEO
- 3. Clon Aliexpress ( funciona) * Este es el usado en el tutorial.
- 4. Clon Amazon
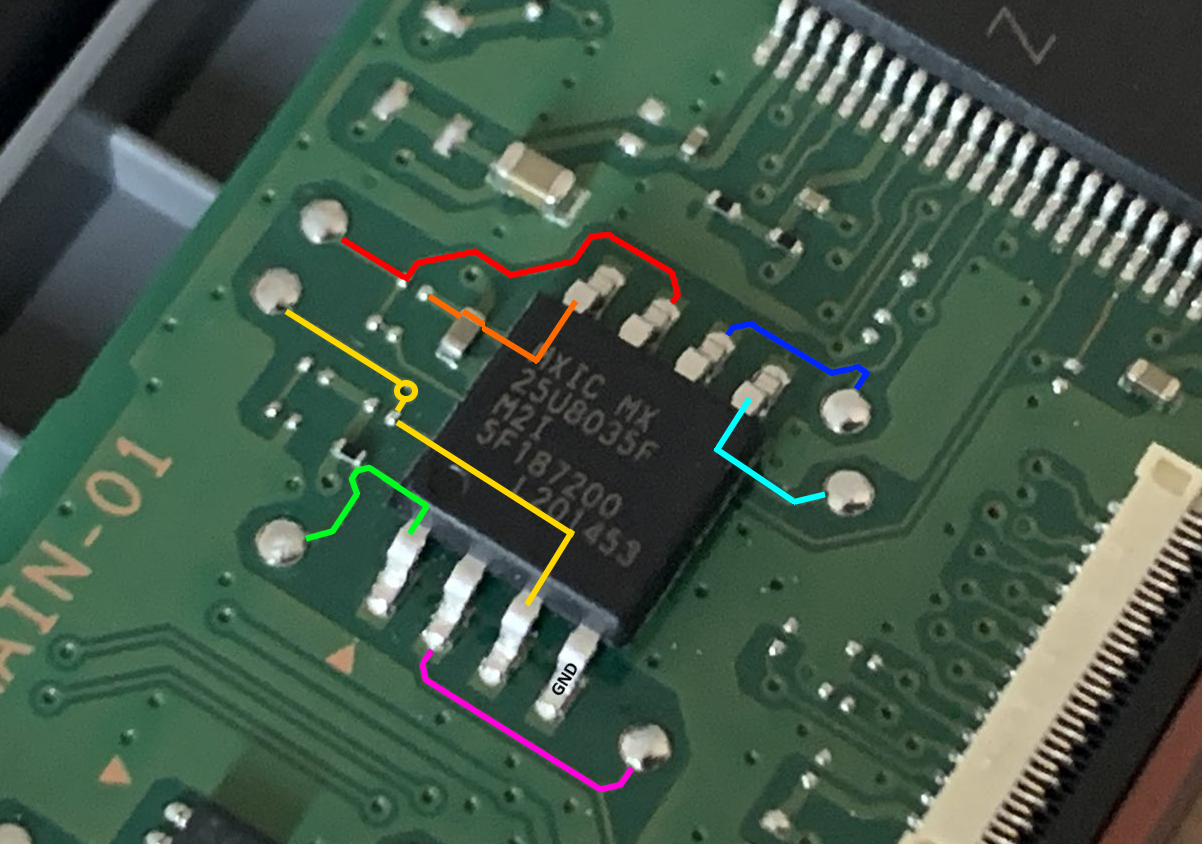
1.2. Ampliación memoria (opcional y recomendado, pero hay que hacer antes el porceso de backup y liberación de la gnw) tipo flash SPI a 1.8v. Listado de memorias "compatibles":
- MX25U8035F (1MB) stock
- MX25U12835F (16MB) probada por neohroot enlace aliexpress y las que estamos usando varios.
- Si son de mayor tamaño, hay que hacer cambios enlace
- MX25U25635F (32MB)
- W25Q128FWSIG (32MB)
- MX25U51245G (64MB)
1.3. Ordenador/Raspberry Pi con Ubuntu
Se pueden tener Windows y Ubuntu a la vez. Con la herramienta rufus se puede crear un usb auto-instalable y cargar en live. El USB necesita al menos 4Gb. Quizás funcionen máquinas virtuales. Programas Gratuitos.
También se puede realizar con una Raspberry Pi instalando Ubuntu Server 20.04.2 LTS
NOTA: You can use a Raspberry Pi to back up your Game and Watch. In this case you should use a Raspbian install and follow the steps in the Ubuntu setup section but on Raspberry Pi. You need to use 3 wires: GPIO25 for SWCLK, GPIO24 for SWDIO and GND for GND (in BCM pinout notation) or you can hardcode your own gpios in openocd/rpi.cfg. A quick pinout reference on RPi can be seen by opening a terminal and running pinout.
1.4. Herramientas.
- 1.4.1. Destornillador Y 2.0 (nintendo).
- 1.4.2. Soldador - Estaño - Flux/Pasta
- 1.4.3. Multímetro
- 1.4.4. Sondas con pinza (forma de "gancho") *opcional, se pueden soldar los cables
2. APERTURA DE CONSOLA
2.1. Con un destornillador Y 2.0, el típico de las consolas de nintendo, quitamos los 4 tornillos de la parte posterior.
Después, abrimos con cuidado, ya que la parte trasera está sujeta con pestañas de presión. También puede saltar el botón de encendido, pero se coloca fácil.

Con la memoria y el usb en posición.

3. Programas necesarios. Esquema de conexiones. Copia de seguridad y liberación.
3.1. Programas necesarios. Sobre Ubuntu 20.04.1 limpio.
Apenas he usado Ubuntu, y me limito a copiar lo del documento, intentaré explicarlo. Hay "scripts" para agilizar el proceso. Abrimos "Terminal", que es la consola y "se parece" a ms-dos, copiamos los spoilers y damos "intro". Los siguientes pasos son sobre Ubuntu, para tener los archivos necesarios.
- Instalamos GIT. Para descargar de repositorios tipo GitHub directamente.
sudo apt install git
- Instalamos el software de backup git fetch (install) game-and-watch-backup. Lo descarga el automáticamente, no hay que descargarse nada.
mkdir game-and-watch-backup
cd game-and-watch-backup
git init .
git fetch https://github.com/ghidraninja/game-and-watch-backup
git merge FETCH_HEAD
- Instalamos paquetes adicionales. ¿Soporte para ARM de la G&W?
sudo apt-get install gcc-arm-none-eabi binutils-arm-none-eabi python3 libftdi1
NOTA: Ubuntu doesn't package arm-none-eabi-gcc 10 yet afaik, so I recommend downloading arm-gcc-none-eabi 10 from over here https://developer.arm.com/tools-and-software/open-source-software/developer-tools/gnu-toolchain/gnu-rm/downloads . gcc is for building Linux binaries, we need to build for bare metal.
You can then extract is somewhere and set the environment variable GCC_PATH to the bin directory, e.g. /opt/gcc-arm-none-eabi-10-2020-q4-major/bin.
-> gcc-arm-none-eabi-10-2020-q4-major-aarch64-linux.tar.bz2 for Rapsberry Pi 3B+
Remove arm-none-eabi-gcc from your system:
sudo apt remove gcc-arm-none-eabi
Download latest version (Linux x86_64 Tarball) from their website, check its MD5. Unpack it into some directory. I used /usr/share/ :
sudo tar jxvf gcc-arm-none-eabi-your-version.bz2 -C /usr/share/
Create links so that binaries are accessible system-wide:
sudo ln -s /usr/share/gcc-arm-none-eabi-your-version/bin/arm-none-eabi-gcc /usr/bin/arm-none-eabi-gcc
sudo ln -s /usr/share/gcc-arm-none-eabi-your-version/bin/arm-none-eabi-g++ /usr/bin/arm-none-eabi-g++
sudo ln -s /usr/share/gcc-arm-none-eabi-your-version/bin/arm-none-eabi-gdb /usr/bin/arm-none-eabi-gdb
sudo ln -s /usr/share/gcc-arm-none-eabi-your-version/bin/arm-none-eabi-size /usr/bin/arm-none-eabi-size
Install dependencies. ARM's "full installation instructions" listed in readme.txt won't tell you what dependencies are - you have to figure it out by trial and error. In my system I had to manually create symbolic links to force it to work:
sudo apt install libncurses-dev
sudo ln -s /usr/lib/x86_64-linux-gnu/libncurses.so.6 /usr/lib/x86_64-linux-gnu/libncurses.so.5
sudo ln -s /usr/lib/x86_64-linux-gnu/libtinfo.so.6 /usr/lib/x86_64-linux-gnu/libtinfo.so.5
Check if it works:
arm-none-eabi-gcc --version
arm-none-eabi-g++ --version
arm-none-eabi-gdb --version
arm-none-eabi-size --version
- Instalamos OpenOCD. Este es el controlador del USB, por ejemplo el ST-LINK.
wget https://nightly.link/kbeckmann/ubuntu-openocd-git-builder/workflows/docker/master/openocd-git.deb.zip
unzip openocd-git.deb.zip
sudo dpkg -i openocd-git_*_amd64.deb
sudo apt-get -y -f install
- En el pdf recibe unos errores, y los corrige con esto. (Corrección 1)
sudo apt install libftdi1-2
sudo apt install libhidapi-hidraw0
- Vuelve a recibir errores sobre la corrección 1 y ejecuta (corrección 2):
sudo apt --fix-broken install
- Regresa a la corrección 1:
sudo apt install libftdi1-2
sudo apt install libhidapi-hidraw0
- Y vuelve a instalar el controlador del USB sin errores:
sudo dpkg -i openocd-git_*_amd64.deb
sudo apt-get -y -f install
- Comprobación de que está bien instalado:
/opt/openocd-git/bin/openocd --vers
- Exporta el valor de la variable:
export OPENOCD="/opt/openocd-git/bin/openocd"
- Lo comprueba otra vez:
$OPENOCD --vers
3.2. Esquema de conexiones. G&W y ST-LINK V2
De Twitter Estos puntos corresponden con los del ST-LINK.

ST-Link 2: SWCLK->Sonda o soldar cable -> Game & Watch SWCLK
ST-Link 4: SWDIO->Sonda o soldar cable -> Game & Watch SWDIO
ST-Link 6: GND ->Sonda o soldar cable -> Game & Watch GND
·Raspberry Pi (ubuntu@ubuntu:/$ pinout):
GPIO25 (pin 22) -> SWCLK (verde)
GPIO24 (pin 18) -> SWDIO (azul)
GND (pin 20) -> GND (negro)
La alimentaremos con el USB original que tenemos.
3.3. Copia de seguridad y liberación
Comprobamos que estemos en el directorio de Game-and-watch-backup.
pwd
Estaremos en algo así:
ubuser@ub-SystemOS:~/Game-and-Watch/game-and-watch-backup$
Definimos la variable de entorno:
export OPENOCD="/opt/openocd-git/bin/openocd"
Se pueden consultar los "logs-registros" de los procesos en cualquier momento, (en paralelo o en vivo), en otra terminal con el código:
cd logs/
tail -f X_openocd.log
Donde la X es la id del proceso a consultar. Yo no lo he utilizado.
Utilizamos los siguientes códigos. Es recomendable hacerlos en orden, aunque siempre puedes ejecutar el 5 para restaurar (si tienes copia, claro).
- ./1_sanity_check.sh
- ./2_backup_flash.sh stlink
- ./3_backup_internal_flash.sh stlink
- ./4_unlock_device.sh stlink
- ./5_restore.sh stlink
Si tenemos un jlink, cambiarlo dónde pone stlink.
Comprobación de las conexiones:
./1_sanity_check.sh
Copia de seguridad del firmware original. No te deja sobre escribirla si ya tienes una copia correcta. Guardala en lugar seguro.
./2_backup_flash.sh stlink
Copia de seguridad de la flash interna. Esto punto a veces da error. Hay que seguir los pasos de la terminal para restaurarla.
./3_backup_internal_flash.sh stlink
Liberación de la G&W
./4_unlock_device.sh stlink
Restauración de la G&W pero sigue liberada.
./5_restore.sh stlink
** Se puede restaurar la flash original sobre la flash cambiada de 16 MB.
Y hasta aquí la consola liberada, lista para cargar retro-go, el emulador LCD o lo que cada uno quiera.
4. Flasheo con retro-GO. Programas y compiladores.
Utilizaremos retro-go y el programa de flasheo. Suponiendo que lo hacemos todo seguido. Subimos de nivel, creamos la carpeta y bajamos.
Para flashear la consola:
cd ..
mkdir game-and-watch-flashloader
cd game-and-watch-flashloader
git init .
git clone https://github.com/ghidraninja/game-and-watch-flashloader
make -j4
Dónde "4" es el número de procesadores que tengamos en el pc. Y esperamos compilar sin errores. Este proceso, sólo lo hacemos una vez.
Para el retro-go:
cd ..
mkdir game-and-watch-retro-go
cd game-and-watch-retro-go
git init .
git clone --recurse-submodules https://github.com/kbeckmann/game-and-watch-retro-go
Ahora, tendremos que hacernos con una rom, copia de seguridad, de los juegos que queramos y meterlas en la carpeta correspondiente, dependiendo del sistema. Recomiendo probar las rom 1 a 1, ya que algunas dan error. Ahora compilamos el archivo para la G&W.
make -j4
o
make -j4 LARGE_FLASH=1
Y esperamos compilar sin errores (aunque sí avisos). Y procedemos a subirlo (flashear) la G&W.
make flash
o
make -j4 EXTFLASH_SIZE_MB=16 COMPRESS=zopfli flash

Si en algún momento nos da error al compilar (cambiamos las roms) o actualizamos la lista de roms, ejecutamos:
make clean
y volvemos a compilar.
Para actualizar el repositorio:
git pull --recurse-submodules
git reset --hard
git submodule update --init --recursive
git reset --hard
Y compilamos (versión antigua):
make clean
make -j4
make flash
Compilar en la versión actual:
make clean
make -j2 EXTFLASH_SIZE_MB=16 COMPRESS=zopfli flash
** Flashea retro-go sin el firmware original (ya sea en 1mb o en los 16mb sustituidos)
4.1. Retro-Go con stock firmware
Compilamos el Retro-Go para prepararlo para una flash de 16MB:
make clean
make -j2 EXTFLASH_SIZE_MB=15 EXTFLASH_OFFSET=1048576 INTFLASH_BANK=2
Ahora parcheamos el stock firmware:
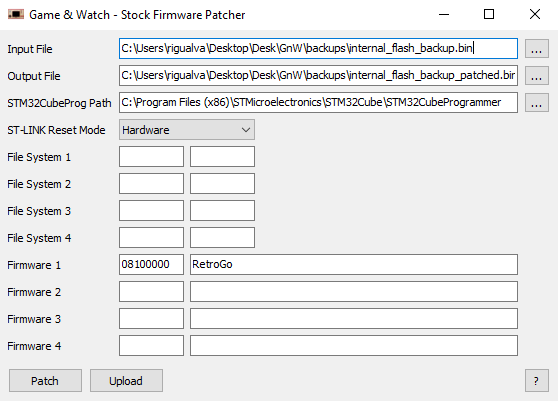
08000000 => stock firmware, interno
08100000 => retro-go "internal flash" bin
90000000 => data for stock firmware, externo
90100000 => retro-go "external flash" bin
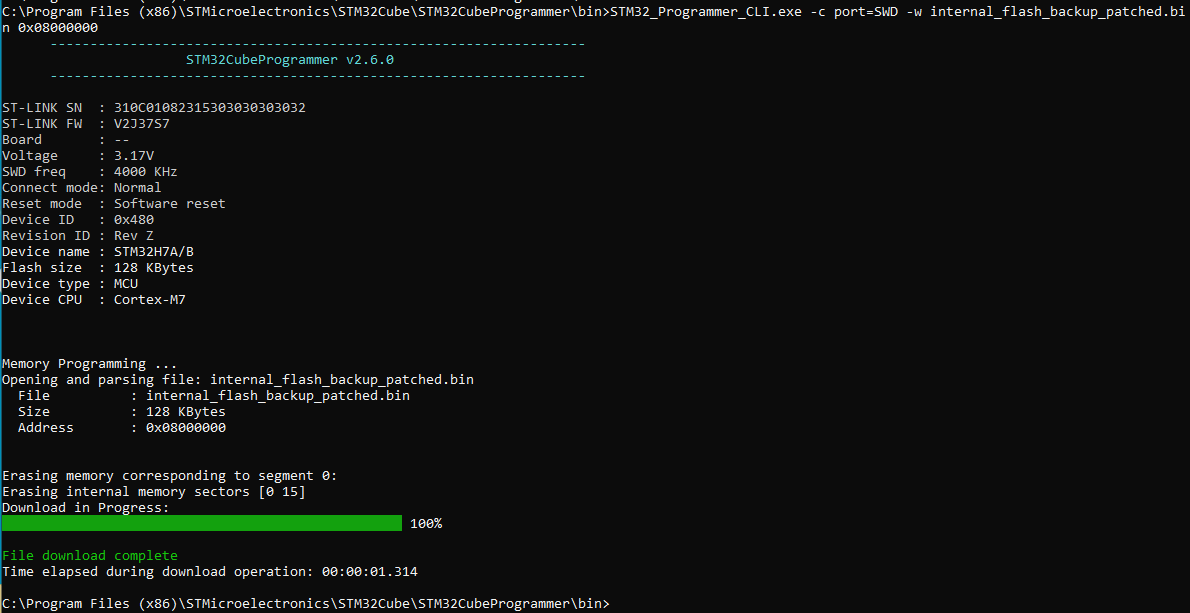
cd C:\Program Files (x86)\STMicroelectronics\STM32Cube\STM32CubeProgrammer\bin
- 08000000 => stock firmware, interno
STM32_Programmer_CLI.exe -c port=SWD -w internal_flash_backup_patched.bin 0x08000000
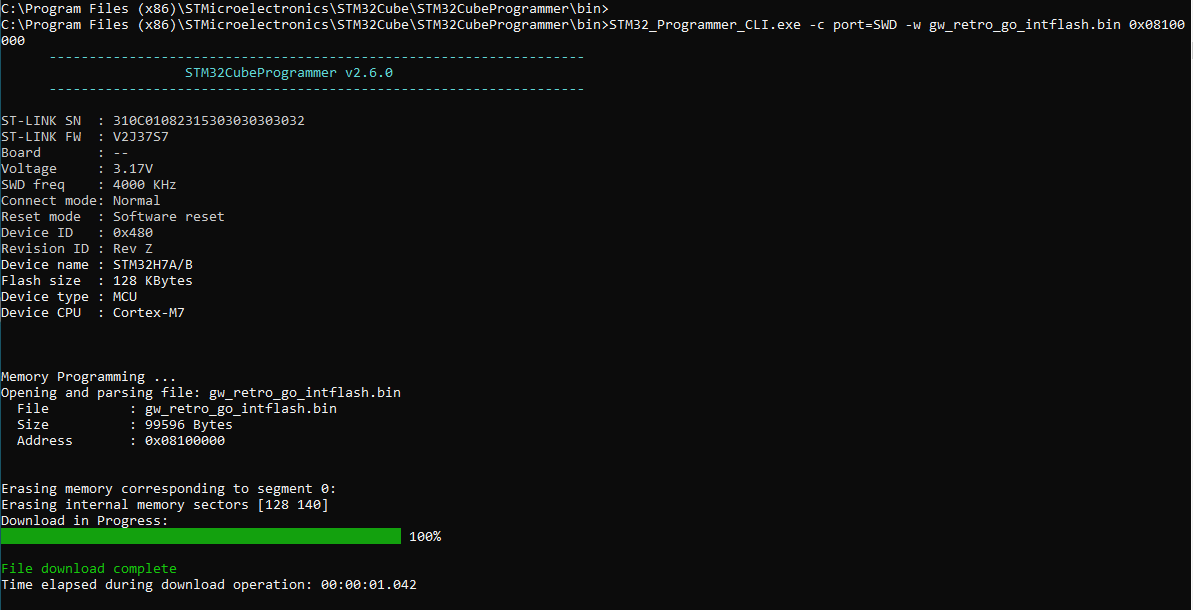
-08100000 => retro-go "internal flash" bin
STM32_Programmer_CLI.exe -c port=SWD -w gw_retro_go_intflash.bin 0x08100000
-90000000 => data for stock firmware, externo
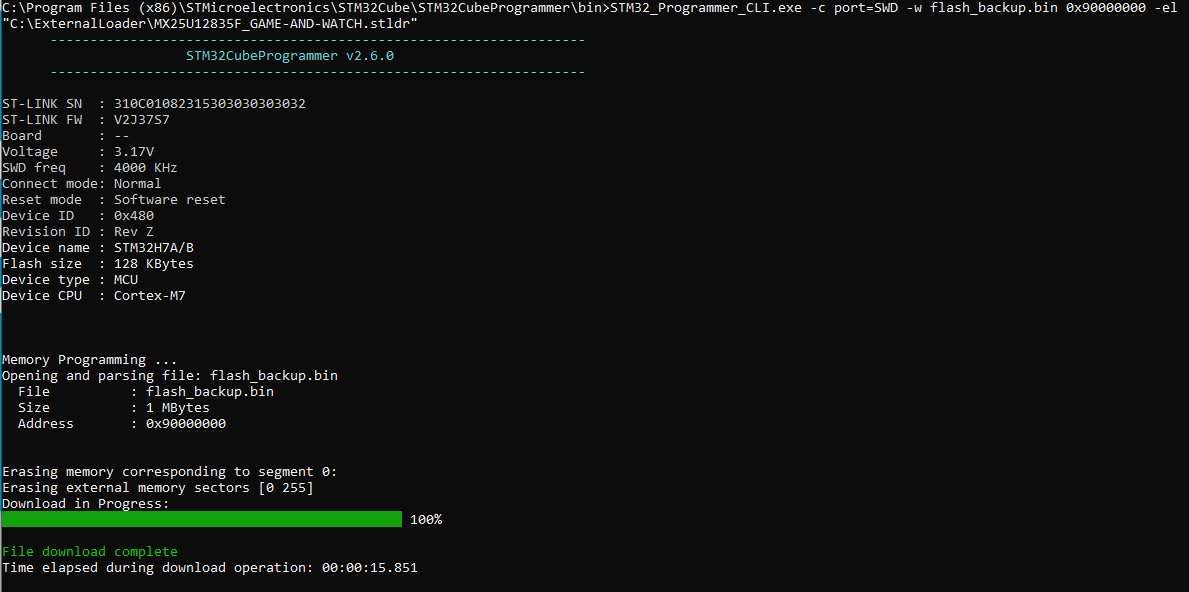
STM32_Programmer_CLI.exe -c port=SWD -w flash_backup.bin 0x90000000 -el "C:\ExternalLoader\MX25U12835F_GAME-AND-WATCH.stldr"
-90100000 => retro-go "external flash" bin
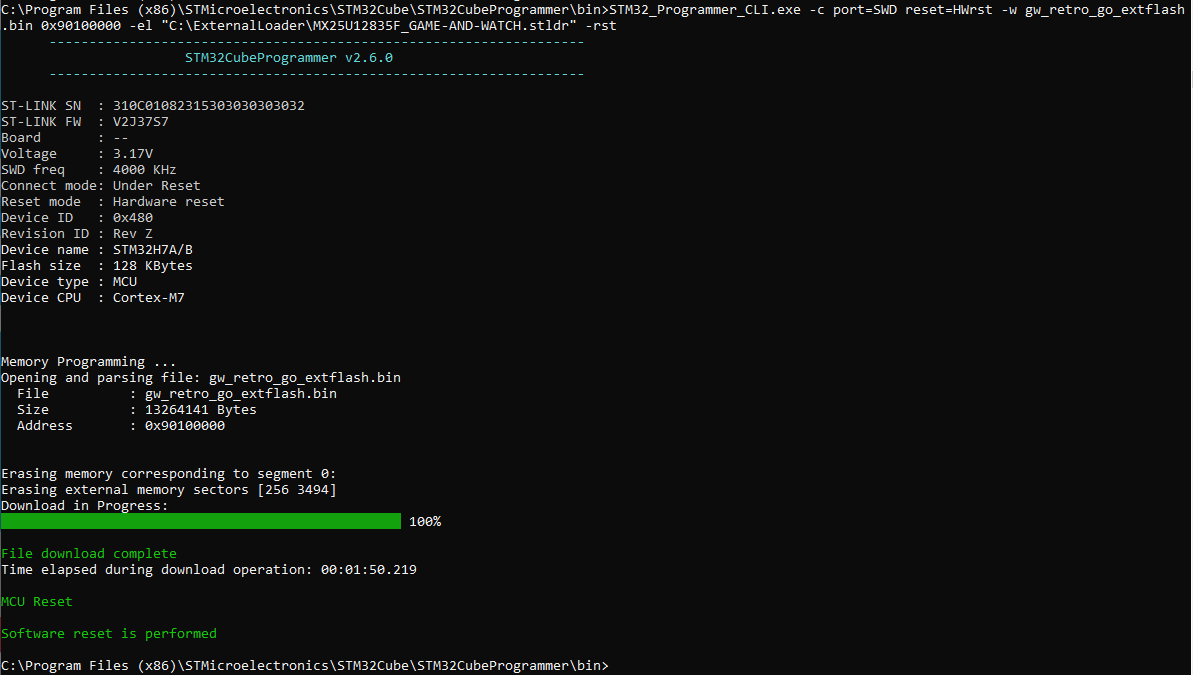
STM32_Programmer_CLI.exe -c port=SWD reset=HWrst -w gw_retro_go_extflash.bin 0x90100000 -el "C:\ExternalLoader\MX25U12835F_GAME-AND-WATCH.stldr" -rst
4.2. LCD Game Shrink
https://github.com/bzhxx/LCD-Game-Shrinker
You can change orientation of vertical dual screen games by editing the custom script of LCD-Game-Shrinker, for example: Green House.
You can edit /custom/gnw_ghouse.py at line 32 to change orientation.
by default, line 32 is commented, it sets the orientation to normal.
#rom.rotate = True
You can uncomment this line to change dual screen orientation.
You can change this parameter ’rom.rotate’ for all vertical dual screen games.
The DPAD is remapped accordingly. It’s also done in custom script.
You can also change aspect ratio for both orientation using:
# define width and height borders to keep an acceptable ratio
rom.width_border_ratio = 10/100
rom.height_border_ratio = 0
4.3. Info
https://www.youtube.com/watch?v=fFf6EUv1VIE
https://maco.link/how-to-get-launcher-a ... ur-g&w.php (algunos enlaces caídos)
-Stock Firmware Patcher
https://www.schuerewegen.tk/gnw/#win_stock_firmware_patcher
https://www.schuerewegen.tk/download/STM32CubeProgrammer%20External%20Loaders%20%282021-05-02%29.zip
5. Sustitución de memoria. Escritura de memoria. Programas. Adaptadores.
La verdad que no es fácil sustituir la memoria. Hay que tener cierta experiencia y habilidad.
Tendríamos que compilar según la memoria que tengamos (quizás flag LARGE>16mb), y flashear igual.
Por confiarme y hacerlo demasiado deprisa, 3 pistas fuera.

Por suerte, hay un enlace dónde vienen los puntos alternativos:
https://github.com/Upcycle-Electronics/game-and-watch-hardware
Con la memoria de 16MB lo máximo que conseguí es esto:

Estando los puntos correctos. Volví a poner la memoria de 1mb y obtuve:

Pero al restaurar con el punto ./5, ya está de fábrica (liberada claro) y funcionando perfectamente.
He probado con otra memoria de 16mb y ya funciona bien.
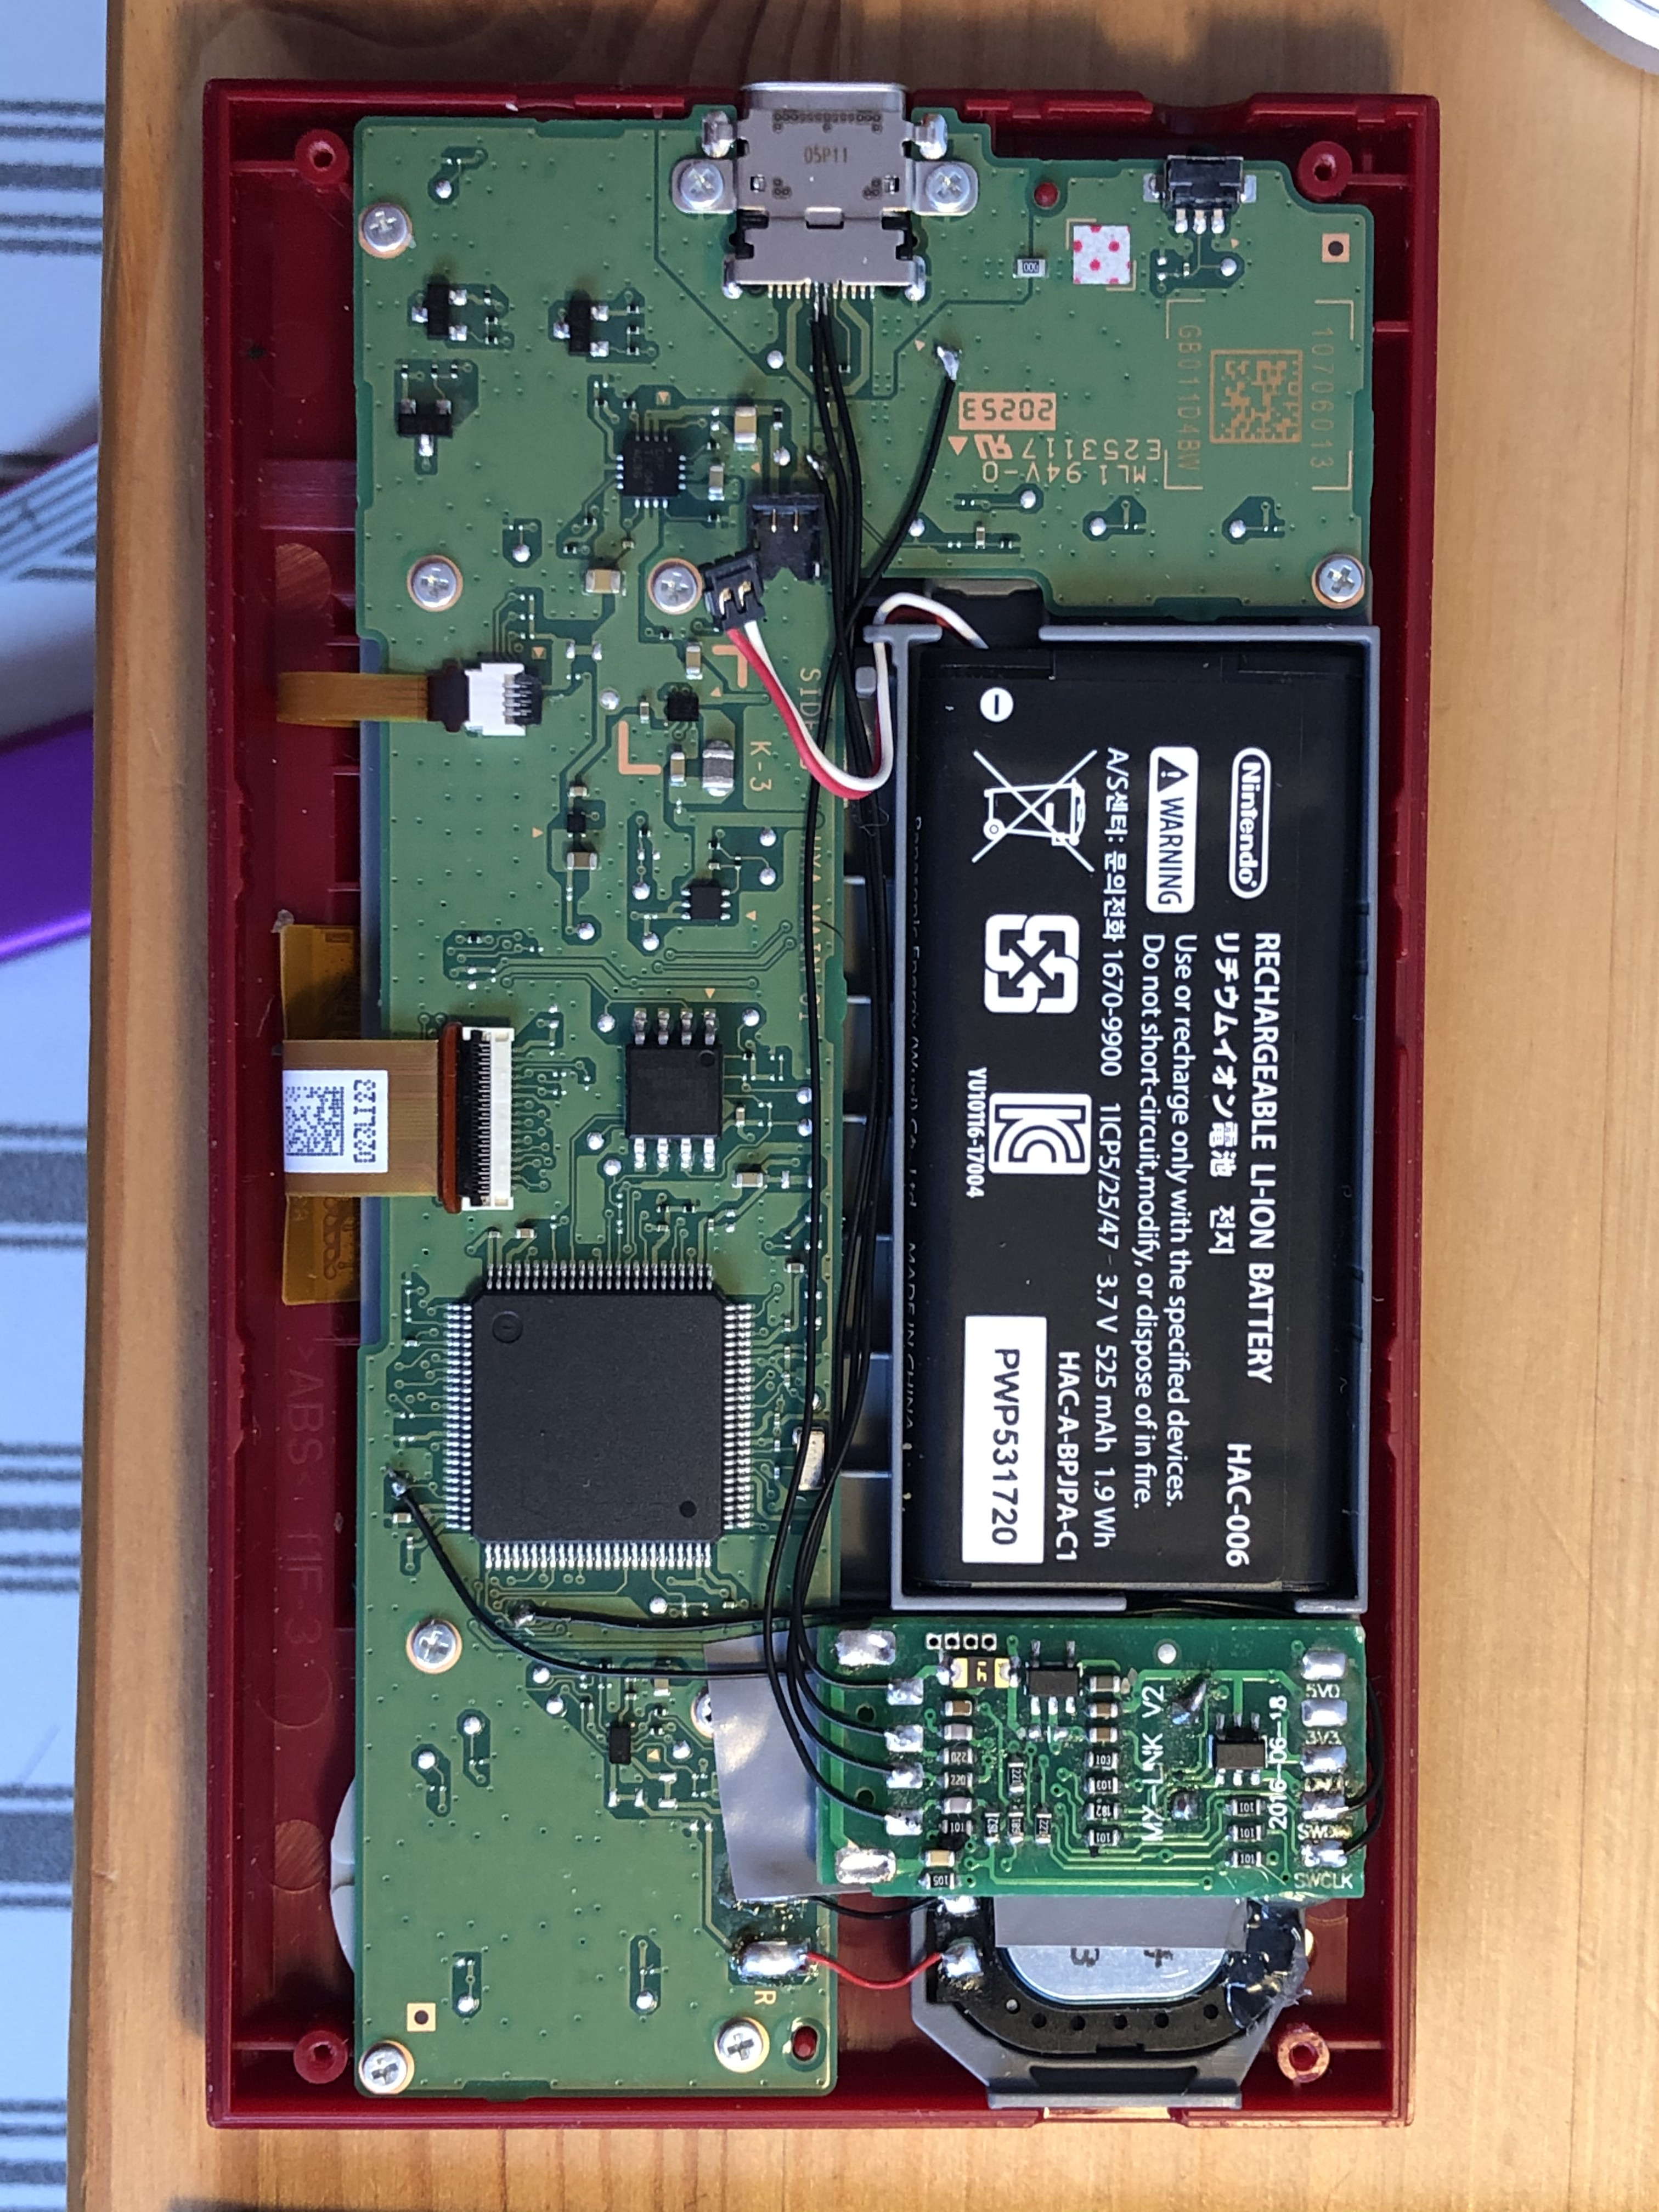
6. Instalación del Stlink interno. Esquemas.
Con permiso de @neohroot
7. Editores de código "custom". (esto quizás será mas avanzado).
8. Noticias, actualizaciones.
9. Software necesario y demás by _Tim_
https://www.schuerewegen.tk/gnw/
10. Github
https://github.com/ghidraninja/game-and-watch-backup
https://github.com/ghidraninja/game-and-watch-flashloader
https://github.com/ghidraninja/game-and-watch-flashdumper
https://github.com/kbeckmann/game-and-watch-retro-go/wiki/WIP:-How-to-extend-flash-storage
https://www.reddit.com/r/GameAndWatchMods/wiki/index
· gnw_flash_menu.sh
https://gist.github.com/DNA64/1b3aa3ef14378cb5bb6fdff0411e17c3
11. How to install gcc on Ubuntu 20-04
https://linuxize.com/post/how-to-install-gcc-on-ubuntu-20-04/
Install the desired GCC and G++ versions by typing:
sudo apt install gcc-8 g++-8 gcc-9 g++-9 gcc-10 g++-10
The commands below configures alternative for each version and associate a priority with it. The default version is the one with the highest priority, in our case that is gcc-10.
sudo update-alternatives --install /usr/bin/gcc gcc /usr/bin/gcc-10 100 --slave /usr/bin/g++ g++ /usr/bin/g++-10 --slave /usr/bin/gcov gcov /usr/bin/gcov-10
sudo update-alternatives --install /usr/bin/gcc gcc /usr/bin/gcc-9 90 --slave /usr/bin/g++ g++ /usr/bin/g++-9 --slave /usr/bin/gcov gcov /usr/bin/gcov-9
sudo update-alternatives --install /usr/bin/gcc gcc /usr/bin/gcc-8 80 --slave /usr/bin/g++ g++ /usr/bin/g++-8 --slave /usr/bin/gcov gcov /usr/bin/gcov-8
Later if you want to change the default version use the update-alternatives command:
sudo update-alternatives --config gcc
Copy
There are 3 choices for the alternative gcc (providing /usr/bin/gcc).

  Selection    Path            Priority   Status
------------------------------------------------------------
* 0            /usr/bin/gcc-10   100       auto mode
  1            /usr/bin/gcc-10   100       manual mode
  2            /usr/bin/gcc-8    80        manual mode
  3            /usr/bin/gcc-9    90        manual mode

Press <enter> to keep the current choice[*], or type selection number:
Copy
You will be presented with a list of all installed GCC versions on your Ubuntu system. Enter the number of the version you want to be used as a default and press Enter.
12. Otros documentos
· Hacking The Nintendo Game & Watch: Homebrew Launcher + RetroGO + LCD Emulator
https://docs.google.com/document/d/14Y50U7PHZ8YHbMfu-hNeLxReGyYQ_FY3qA2PbvrPZhs/edit
·Fast Guide
https://docs.google.com/document/d/1-x6tibLxtOPf6ZbQL0ZM48XGe1-LLEfl8HpBg8gBu_M/edit
13. Game And Watch Mods Wiki
https://www.reddit.com/r/GameAndWatchMods/wiki/
14. ROMs
· GB
https://edgeemu.net/browse-gbc-T.htm
· GB Artworks
https://drive.google.com/drive/folders/1WLKcvynl0ky2mRL1UacA9yaiMTnNs4x5
https://www.progettosnaps.net/artworks/artworks_files.php?letter=g
· NES
https://www.romsgames.net/download/nintendo-rom-legend-of-zelda-the/
15. How to get launcher and retro-go on your G&W by @macohime ******
https://maco.link/how-to-get-launcher-and-retrogo-on-your-g&w.php
1. get modified RetroGo on linux or mac
https://github.com/kbeckmann/game-and-watch-retro-go
2. modify 5 files on linux or mac
in Core/Src/main.c
223: uint32_t save_address = flash_ptr - &__EXTFLASH_REAL__;
263: uint32_t save_address = flash_ptr - &__EXTFLASH_REAL__;
431:// MX_RTC_Init();
597: PeriphClkInitStruct.RTCClockSelection = RCC_RTCCLKSOURCE_LSE;
in Core/Src/system_stm32h7xx.c
267: SCB->VTOR = FLASH_BANK2_BASE | VECT_TAB_OFFSET; /* Vector Table Relocation in Internal FLASH */
in Core/Inc/gw_linker.h
add this line under line 007:
008:extern uint8_t __EXTFLASH_REAL__;
in STM32H7B0VBTx_FLASH.ld
075: __EXTFLASH_START__ = 0x90100000;
088: __EXTFLASH_LENGTH__ = DEFINED(__EXTFLASH_TOTAL_LENGTH__) ? __EXTFLASH_TOTAL_LENGTH__ - (__CONFIGFLASH_LENGTH__ + __SAVEFLASH_LENGTH__ + 1024K) : 1024K - (__CONFIGFLASH_LENGTH__ + __SAVEFLASH_LENGTH__);
107: FLASH (xr ) : ORIGIN = 0x08100000, LENGTH = __FLASH_LENGTH__
then add this line under line 075:
076:__EXTFLASH_REAL__ = 0x90000000;
in /Core/Src/porting/odroid_system.c
add this line under line 080:
081: *((uint32_t *)0x2001FFF8) = 0x544F4F42; // "BOOT"
082: *((uint32_t *)0x2001FFFC) = 0x08100000; // vector table
3. build on linux or mac
$ make -j8 LARGE_FLASH=1
put these 2 files to windows disk.
build/gw_retro_go_intflash.bin
build/gw_retro_go_extflash.bin
you need internal_flash_backup.bin and flash_backup.bin in next step. also put the file to windows disk. maybe the file is in game-and-watch-backup/backups/
4. patch stock internal firmware on windows
get "Game & Watch - Stock Firmware Patcher"
http://users.skynet.be/bk327964/gnw/
extract on windows and patch internal_flash_backup.bin and save as internal_flash_backup_patched.bin
select SPI Flash you use.
FileSystem address as 90100000.
FileSystem Size as 00F00000.
Firmware as 08100000.
then press Patch button.
5. install STM32CubeProg on windows
https://www.st.com/en/development-tools/stm32cubeprog.html
** I tested only win32 version.
6. install "SPI flash external loaders for STM32CubeProgrammer and STM32CubeIDE"
http://users.skynet.be/bk327964/gnw/
7. flash files using STM32_Programmer_CLI.exe on windows
STM32_Programmer_CLI.exe is in C:\Program Files (x86)\STMicroelectronics\STM32Cube\STM32CubeProgrammer\bin
connect stlink and g&w, then use these command.
>STM32_Programmer_CLI.exe -c port=SWD -w internal_flash_backup_patched.bin 0x08000000
>STM32_Programmer_CLI.exe -c port=SWD -w gw_retro_go_intflash.bin 0x08100000
>STM32_Programmer_CLI.exe -c port=SWD -w flash_backup.bin 0x90000000 -el "\path\to\ExternalLoader\MX25U12835F_GAME-AND-WATCH.stldr"
>STM32_Programmer_CLI.exe -c port=SWD reset=HWrst -w gw_retro_go_extflash.bin 0x90100000 -el "\path\to\ExternalLoader\MX25U12835F_GAME-AND-WATCH.stldr" -rst
8. get some coffee or beer with G&W
normally boot up.
push left+a+game and release the buttons.
launcher menu shown up.
select LAUNCHER -> FW @08100000
now, you can see retro-go menu.
*. known issues
nothing!!
*. fixed issues
time will not reset by booting retro-go. Thanks _tim_!
save & quit / quit to menu now return to retro-go menu. Thanks GaryZ!
state save feature now works fine. Thanks _tim_!
--------
2021/02/28 fixed RTC feature.
2021/02/28 fixed quit to menu feature.
2021/02/28 fixed state save feature.
2021/02/28 initial release(my birthday)
by macohime
_______________________________________________________________________
> How to install G&W homebrew menu AND G&W original ROM AND
> G&W port of retrogo GB/GG/NES/PCE/SMS emulator AND LCD game emulator
> on the Game & Watch anniversary edition.                  WB20210505
_______________________________________________________________________

Prerequisites:
- Nintendo G&W anniversary edition in which the 1MB flash chip has
  been replaced with a 16MB flash chip, in this guide I will presume
  you have an MX25U12835F chip, if not, change occurence of MX25U12835F
  with the correct chip (larger chips are possible too, just adapt the
  sizes throughout this document)
- The Nintento G&W should be unlocked and the flash files saved
  See https://github.com/ghidraninja/game-and-watch-backup/
- SPI programmer hooked up to the G&W (guides to be found elsewhere)
- ROMs for GB/GG/NES/PCE/SMS/LCD (find them yourself)
- UNIX machine (Linux, macOS or other)
  It has to have a recent arm-gcc-none-eabi toolchain (10.2.0 or newer)
  as explained in https://github.com/kbeckmann/game-and-watch-retro-go
- Windows machine with the tools from
  https://www.schuerewegen.tk/gnw/
  Follow the instructions to download DLL, install ImageMagick

The G&W has FLASH memory (starting at address 0x08000000).
It also has an EXTFLASH flash memory (starting at address 0x90000000).

The FLASH (ST32) memory will be flashed with the original firmware, that
has been patched to allow for the rest to be started with the special key
combo. Also it will hold the retro-go internal flash binary.

The EXTFLASH (SPI) memory is what you have increased to 16MB by soldering
another chip into the G&W. We will reserve the first 1MB for data storage
by the original firware. The other 15MB we will use for the retro-go
ROMs, the retro-go saves/config, and the LCD games emulator with games.
In this example, I am using 9MB for retro-go and 6MB for the LCD games.
The LCD games and emulator are combined into a file system before flashing.
You can change these numbers (9/6MB), just make sure they all relate
correctly to each other and add up to 15MB to leave 1MB for the original
ROM (when using 16MB flash chip).

STM32 flash layout (each X is 128KB)
    X.. (patched stock firmware)   0x08000000
    .X. (retro-go "internal flash" binary) 0x08100000
    ... (unused)       0x08200000
                                0x082FFFFF end

SPI flash layout (each X is 1MB)
 X............... (stock firmware data)   0x90000000
 .XXXXXx......... (retro-go roms)    0x90100000
 .......xXX...... (retro-go saves/config)  0x90700000
 ..........XXXXXX (file system for .elf files) 0x90A00000
             0x90FFFFFF end

The amount of space needed for the retro-go config is 4KB. The amount
needed for saves is calculated during the build of retro go and shown at the
end of the build process.

On the UNIX machine, get flashloader and retro-go:
git clone https://github.com/ghidraninja/game-and-watch-flashloader
cd game-and-watch-flashloader
make -j8
(The -j8 starts 8 parallel jobs to speed up the process, if you have
more/less cores, you can adapt the number.)
cd ..
git clone --recurse-submodules https://github.com/kbeckmann/game-and-watch-retro-go
cd game-and-watch-retro-go
make download_sdk
make -j8
This should build retro-go. If not, fix this first.

Now patch retro-go software so it knows the ROMs will be at 0x90100000:
Make sure you are in the game-and-watch-retro-go directory and type:
wget https://giga.nl/retrogo.patch
patch -p0 < retrogo.patch
(You might need to install the utility 'patch'.)
The software is now changed to sit at the new location. Now we need to
build with the game ROMs and stay within the 9MB limit (in our example).
Put roms you want to include in retrogo in the roms/* subdirectories.
You'll have to find and download them yourself.
We tell the build process that we have at most 9MB by specifying this
as the EXTFLASH_SIZE. Normally, this is set to 1MB (stock) or 16MB
(when LARGE_FLASH is set), but we need to specify 9MB (9x1024x1024 bytes)
as the rest of the 16MB is stock firmware (1MB) and the LCD emulator (6MB):
make clean
make -j8 EXTFLASH_SIZE=9437184
You will get feedback on the size and wether it fits or not. If you have
too many roms, remove some. If there's space left, you can add some.

My result:
extflash 8011912 / 8077312 (65400 bytes free (0,062 MB))
saveflash 1355776 / 1355776 (0 bytes free (0,000 MB))

This should just fit. Move the files build/gw_retro_go_intflash.bin and
build/gw_retro_go_extflash.bin to the Windows host.

We now have the "intflash" file that will go into FLASH at 0x08100000 and
the "extflash" file with the ROMs will go into the EXTFLASH at
0x9010000. But first we'll flash the patched firmware into 0x08000000:

STM32 flash layout (each X is 128KB)
X.. (patched stock firmware)   0x08000000 first this
.X. (retro-go "internal flash" binary)  0x08100000 than this
... (unused)     0x08200000
      0x082FFFFF end

SPI flash layout (each X is 1MB)
X............... (stock firmware data)  0x90000000
.XXXXXx......... (retro-go roms)  0x90100000 and this
.......xXX...... (retro-go saves/config) 0x90700000 (made when used)
..........XXXXXX (file system for .elf files) 0x90A00000
      0x90FFFFFF end

Now on Windows, use Tim's Stock Firmware Patcher.
Input file: point to internal_flash_backup.bin file that you extracted
from your G&W with the game-and-watch-backup tools.
Output file: internal_flash_backup_patched.bin, put it somewhere you like
STM32CubeProg Path: point to STM32Cube binary directory
ST-LINK Reset Mode: (doesn't matter)
File System 1: 90A00000   6 MB
Firmware 1: 08100000   Retro Go
Click "Patch", then "Upload"

The name "Retro Go" is what you will see when you press the special key
combination.

Now the 128kB at 0x08000000 has been flashed:

STM32 flash layout (each X is 128KB)
X.. (patched stock firmware)   0x08000000 done
.X. (retro-go "internal flash" binary)  0x08100000
... (unused)     0x08200000
      0x082FFFFF end

SPI flash layout (each X is 1MB)
X............... (stock firmware data)  0x90000000
.XXXXXx......... (retro-go roms)  0x90100000
.......xXX...... (retro-go saves/config) 0x90700000 (made when used)
..........XXXXXX (file system for .elf files) 0x90A00000
      0x90FFFFFF end

Next, we'll flash the two parts (internal/external) of retro go, from the
command line, so we need the two files we transferred to Windows earlier:

STM32_Programmer_CLI.exe -c port=SWD -w gw_retro_go_intflash.bin 0x08100000

STM32_Programmer_CLI.exe -c port=SWD reset=HWrst -w gw_retro_go_extflash.bin 0x90100000 -el "ExternalLoader\MX25U12835F_GAME-AND-WATCH.stldr" -rst

Situation now:

STM32 flash layout (each X is 128KB)
X.. (patched stock firmware)   0x08000000 done
.X. (retro-go "internal flash" binary)  0x08100000 done
... (unused)     0x08200000
      0x082FFFFF end

SPI flash layout (each X is 1MB)
X............... (stock firmware data)  0x90000000
.XXXXXx......... (retro-go roms)  0x90100000 done
.......xXX...... (retro-go saves/config) 0x90700000 (made when used)
..........XXXXXX (file system for .elf files) 0x90A00000
      0x90FFFFFF end

Next, take the flash_backup.bin file from game-and-watch-backup/backups
and put it on the Windows system to be flashed. This is what was in the
original 1MB ROM and it needs to be at 0x90000000. Flash it like this:

STM32_Programmer_CLI.exe -c port=SWD -w flash_backup.bin 0x90000000 -el "ExternalLoader\MX25U12835F_GAME-AND-WATCH.stldr"

Situation now:

STM32 flash layout (each X is 128KB)
X.. (patched stock firmware)   0x08000000 done
.X. (retro-go "internal flash" binary)  0x08100000 done
... (unused)     0x08200000
      0x082FFFFF end

SPI flash layout (each X is 1MB)
X............... (stock firmware data)  0x90000000 done
.XXXXXx......... (retro-go roms)  0x90100000 done
.......xXX...... (retro-go saves/config) 0x90700000 (made when used)
..........XXXXXX (file system for .elf files) 0x90A00000
      0x90FFFFFF end

All that's left is the LCD game emulator and LCD games.

Grab games/artwork somewhere from the internet. Use the LCD Game Converter
from Tim to convert LCD game binaries and artwork into .bin and .jpg files.
Create a new directory, let's call it "lcd". Put gnw_lcd_games_preview.elf
in there. Create a subdirectory lcd\games in which you put all the .bin
and .jpg files made by the LCD Game Converter.
You can also put other ELF binaries in the lcd directory, such as
mandelbrot, JPEG viewer etc. Use the lcd directory as input for the
File System Builder. In the File System Builder, you will have to specify
where it will sit in memory:
File System   90A00000 # 6 MB

Click Build and then Upload (and Verify to check the upload).

Situation now:

STM32 flash layout (each X is 128KB)
X.. (patched stock firmware)   0x08000000 done
.X. (retro-go "internal flash" binary)  0x08100000 done
... (unused)     0x08200000
      0x082FFFFF end

SPI flash layout (each X is 1MB)
X............... (stock firmware data)  0x90000000 done
.XXXXXx......... (retro-go roms)  0x90100000 done
.......xXX...... (retro-go saves/config) 0x90700000 (made when used)
..........XXXXXX (file system for .elf files) 0x90A00000 done
      0x90FFFFFF end

All is now flashed. Enjoy :)

Thanks to stacksmashing, kbeckmann, Tim Schuerewegen and everybody
on discord helping me out!