Recognizing posture in Flutter web with MediaPipe
FlutterPulseThis article was translated specially for the channel FlutterPulse. You'll find lots of interesting things related to Flutter on this channel. Don't hesitate to subscribe!🚀
How to connect the Google's library MediaPipe as a Flutter web plugin to recognize body position on webcam live video.
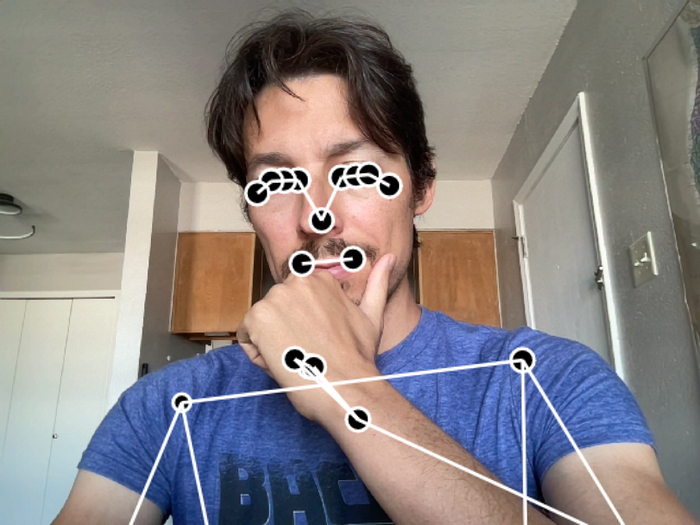
Let's recognize postures on video like this:

The final app we will make in this article.
There is a library called MediaPipe that can do a lot of recognition and detection tasks on images, texts, and sounds. Among others, it has a model to recognize postures on images.
Try its official demo here:
https://mediapipe-studio.webapps.google.com/demo/pose_landmarker

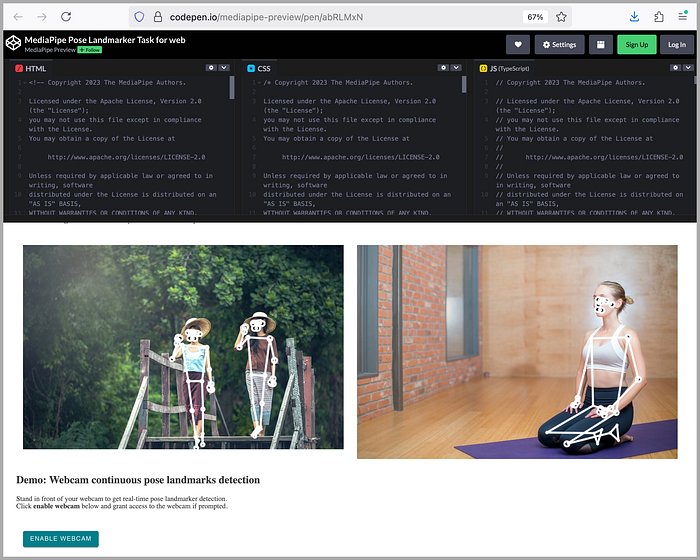
It also has a CodePen snippet for quick hands-on in JavaScript:
https://codepen.io/mediapipe-preview/pen/abRLMxN
However, the model only works on Android, on iOS, in Python, and in JavaScript, not in Flutter directly.
Someone made a package called flutter_mediapipe, but it's abandoned 4 years ago and does not support web.
So let's wrap the official JavaScript implementation into our own Flutter plugin.
The final demo app from the first screenshot is here:
https://alexeyinkin.github.io/flutter-mediapipe/ (Chrome only)
Download the source code here to follow (I will be skipping some things):
https://github.com/alexeyinkin/flutter-mediapipe
Creating the plugin
A plugin is a special type of a Dart package that swaps in different implementations depending on the platform you compile for.
This official article is a great tutorial on writing plugins:
https://docs.flutter.dev/packages-and-plugins/developing-packages
There's also an awesome introduction into writing specifically web plugins, from the author of the official url_launcher package. It explains how they first added web support to the package when Flutter just started supporting web:
- Part 1 explains the basic approach, the same as with Android and iOS plugins that use something called a method channel to delegate things to native code on those platforms.
- Part 2 simplifies this by removing a method channel because the web implementation code is written in Dart anyway so you can just call methods of the specific implementation directly.
Both articles only use the standard browser API and don't invoke any custom JavaScript. So this article builds on top of them and adds importing and calling custom JavaScript.
Following the architecture from the last url_launcher article, I created three Dart packages:
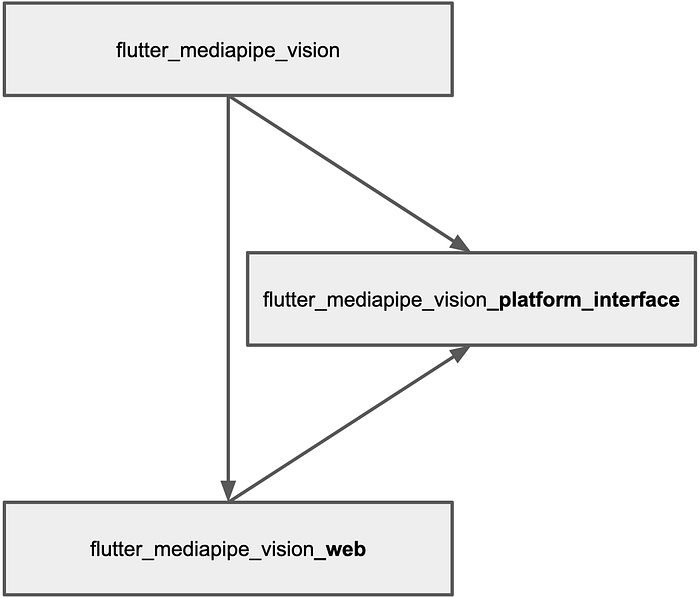
- flutter_mediapipe_vision is the main package. All apps that want to recognize poses on images need to add it as a dependency, and only it. It brings in other packages as dependencies and forwards calls to the specific implementation depending on the platform. And Flutter tree-shakes other platform implementations.
- flutter_mediapipe_vision_platform_interface defines the interface that all platform implementations must follow. This package does no useful work in itself. All it does is swaps implementations without the first package knowing.
- flutter_mediapipe_vision_web is the specific implementation for web, the main focus of this article. It depends on the second package because it implements the same interface. It does not know anything about the first package. The first package in turn depends on it just to bring it into projects recursively.
flutter_mediapipe_vision
What interface do we want for the user-facing package? Static functions are best if we want swappable implementations:
class FlutterMediapipeVision {
  static Future<void> ensureInitialized() async {
    await FlutterMediapipeVisionPlatform.instance.ensureInitialized();
  }

  static Future<PoseLandmarkerResult> detect(Uint8List bytes) async {
    return await FlutterMediapipeVisionPlatform.instance.detect(bytes);
  }
}
This class will turn static function calls to instance method calls on the specific implementation.
The first function will initialize the model. We could name it anything we want, but ensureInitialized() is the conventional name for that. Think WidgetsFlutterBinding.ensureInitialized()
The second function will take the bytes of an image (every frame from the webcam) and invoke detect() function on the model. It's named like that in all platform implementations.
Also note the return type which we will define soon.
flutter_mediapipe_vision_platform_interface
Data types
Let's start with the data types. The JavaScript library we will connect to has data types for recognized points and for the aggregate result. However, we need our plugin to return something platform-agnostic, so we need to define our own types.
This is a landmark, a recognized point of a pose:
class NormalizedLandmark {
  final double x;
  final double y;

  const NormalizedLandmark({required this.x, required this.y});

  Offset get offset => Offset(x, y);
}
It's called normalized because both x and y are from 0 to 1 if they are within the frame. They can also be below zero or above 1 if the image is cropped and the model thinks this specific point is outside the image, like in this webcam example:
Some points are outside of the frame, and the model tried to guess where by elbow would be.
Why not just use the Offset type from dart:ui? The library also gives us z, the distance to camera, and a few other things we don't need at the moment, but it's good to be able to add them later. So Offset will not suffice.
Also, this NormalizedLandmark type is defined in each separate implementation: TypeScript, Java, etc. So let's keep things consistent.
Next, this is the recognition result:
class PoseLandmarkerResult {
  final List<List<NormalizedLandmark>> landmarks;

  const PoseLandmarkerResult.empty() : landmarks = const [];

  const PoseLandmarkerResult({required this.landmarks});
}
The library returns the list of recognized poses (first dimension of the list). Each pose is a list of landmarks at specific indexes (second dimension of the list):
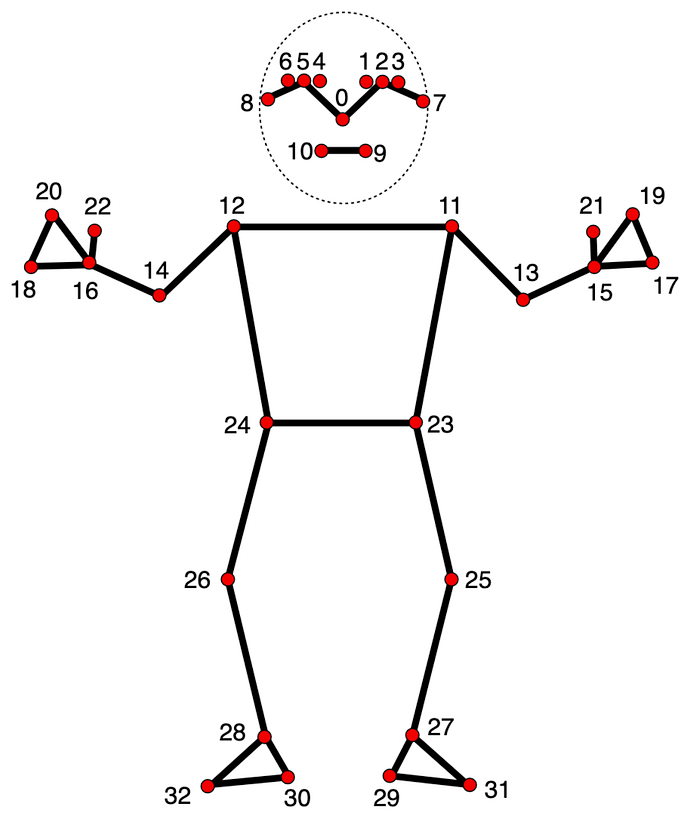
The indexes of the points in PoseLandmarkerResult.
The platform interface
With the data types in place, we can define the interface that each plugin will extend:
abstract class FlutterMediapipeVisionPlatform extends PlatformInterface {
  FlutterMediapipeVisionPlatform() : super(token: _token);

  static final Object _token = Object();

  static FlutterMediapipeVisionPlatform _instance =
    FlutterMediapipeVisionMethodChannel();

  static FlutterMediapipeVisionPlatform get instance => _instance;

  static set instance(FlutterMediapipeVisionPlatform instance) {
    PlatformInterface.verify(instance, _token);
    _instance = instance;
  }

  Future<void> ensureInitialized() {
    throw UnimplementedError();
  }

  Future<PoseLandmarkerResult> detect(Uint8List bytes) {
    throw UnimplementedError();
  }
}
Many things happen here.
Most importantly, we define our two business logic functions, ensureInitialized and detect.
Next, _instance needs to default to something, so we create an instance that we will talk about later.
Finally, notice the object named _token. Here's why we need it. Flutter reserves the right to add things to its PlatformInterface class, and that should not be a breaking change for us. So the rule is to always extend it and never implement. We make sure we use extends here, but generally anyone can write an implementation of our platform interface for another platform (or even override our implementation on the same platform), and we don't control if they use extends or implements there. If they use implements, things may work for a while, and then suddenly stop building for this specific package on this specific platform. So we make sure we don't wait for that and break things early. For that, we use _token object whose only job is being the same (like the deep south). If someone else's plugin implements ours, it won't have the same _token, and the test in set instance will fail.
Now, what was about that default instance?
const MethodChannel _channel = MethodChannel('ainkin.com/flutter_mediapipe_vision');

class FlutterMediapipeVisionMethodChannel
  extends FlutterMediapipeVisionPlatform {
  @override
  Future<void> ensureInitialized() async {
    await _channel.invokeMethod<void>('ensureInitialized');
  }

  @override
  Future<PoseLandmarkerResult> detect(Uint8List bytes) async {
    final native = await _channel.invokeMethod<void>('detect');
    throw UnimplementedError('TODO: Convert.');
  }
}
Back when Flutter only supported Android and iOS, the only way of calling anything platform-specific was to create an object called MethodChannel and 'call methods' on it using invokeMethod(name). Flutter would process the names of both the channel and the method and route the call to specific native code. There were no swappable instances in Dart code because all swapping was made when building the app.
For backward compatibility, if Flutter won't ask our plugin to do anything differently, this is what we need to default to. This is why we make this the default instance.
We won't support platforms other than web for now though. So we don't need the method channel implementation to work. It wouldn't hurt us to call a hypothetical native ensureInitializee() and wait for it to return. But we can't do anything meaningful in detect() yet because that would require a contract for passing data to and from the native implementation. So we can just throw an error there.
flutter_mediapipe_vision_web
Let's begin our plugin with this:
class FlutterMediapipeVisionWeb extends FlutterMediapipeVisionPlatform {
  static void registerWith(Registrar registrar) {
    FlutterMediapipeVisionPlatform.instance = FlutterMediapipeVisionWeb();
  }

  Future<void>? _initFuture;

  @override
  Future<void> ensureInitialized() =>
      _initFuture ?? (_initFuture = _initOnce());

  Future<void> _initOnce() async {
    // ...
  }

  @override
  Future<PoseLandmarkerResult> detect(Uint8List bytes) async {
    // ...
  }
}
registerWith() is the magic function Flutter will call for us early on if the app is built for web. We then create an instance of the current class and set it for use for all platform calls.
Welcome to Web!
Dart code transpiles to JavaScript or WASM. Either way, it can directly access the browser's global scope through globalContext variable made available through dart:js_interop import. So there's nearly no difference between Dart and JavaScript objects, they are all just objects to the browser running our app.
Loading MediaPipe's JavaScript
I've borrowed this code from Firebase and simplified it a bit. It's a shame we need to reproduce this large snippet and Flutter haven't prepared a one-liner for us.
This code loads a script from src and stores its module object in a global variable determined by windowVar.
  Future<void> _injectSrcScript(String src, String windowVar) async {
    final web.HTMLScriptElement script =
        web.document.createElement('script') as web.HTMLScriptElement;
    script.type = 'text/javascript';
    script.crossOrigin = 'anonymous';

    final stringUrl = src;
    script.text =
        '''
    window.my_trigger_$windowVar = async (callback) => {
      console.debug("Initializing MediaPipe $windowVar");
      callback(await import("$stringUrl"));
    };
    ''';

    web.console.log('Appending a script'.toJS);
    web.document.head!.appendChild(script);

    Completer completer = Completer();

    globalContext.callMethod(
      'my_trigger_$windowVar'.toJS,
      (JSAny module) {
        globalContext[windowVar] = module;
        globalContext.delete('my_trigger_$windowVar'.toJS);
        completer.complete();
      }.toJS,
    );

    await completer.future;
  }
We can now define _windowVar to be anything that won't conflict with Flutter or MediaPipe and begin our _initOnce() function with loading the MediaPipe code:
const _windowVar = 'flutter_mediapipe_vision';

// ...

  Future<void> _initOnce() async {
    await _injectSrcScript(
      'https://cdn.jsdelivr.net/npm/@mediapipe/tasks-vision/vision_bundle.js',
      _windowVar,
    );

    // ...
This loads the recent version. An alternative would be to download it and package with our assets to reduce dependencies, but that's good for now.
After this completes, the MediaPipe module is in the global variable and is available as globalContext[_windowVar]. We can potentially start calling functions from it right now:
globalContext[_windowVar]['PoseLandmarker'].callMethod(
  'createFromOptions',
  ...
);
But it's better to have some type safety on it.
Imposing Dart interfaces on JavaScript objects
Remember the NormalizedLandmark class we declared? On the JavaScript side, it's a regular object with x and y properties, which can be accessed in our Dart code like landmark['x'] and landmark['y']. This is error-prone. Luckily, we can define a Dart interface like this:
extension type NormalizedLandmark._(JSObject _) implements JSObject {
  external num get x;
  external num get y;
}
If we then cast such a landmark object to this class, we can access its properties in a type-safe way:
final landmark = unsafeLandmark as NormalizedLandmark;
print(landmark.x);
Extension types
What exactly is this interface? This is extension type construct that literally imposes an interface on an object without creating a wrapper. It woks as a compile-time abstraction that does not exist at runtime. You can read about this construct in the Dart documentation here.
Let's take a short detour to learn more about extension types and then return to your JavaScript work with this new knowledge.
So the Dart documentation on extension types shows this example that narrows down the interface of int to only allow a single operation:
extension type IdNumber(int id) {
  // Wraps the 'int' type's '<' operator:
  operator <(IdNumber other) => id < other.id;
  // Doesn't declare the '+' operator, for example,
  // because addition does not make sense for ID numbers.
}

// ...
final safeId = IdNumber(42);
This code says:
- We will be using something called
IdNumberto handle some IDs. - It's not a class that exists at runtime because that would be too expensive, hence
extension type. - Instead, we will be using
intfor storing those IDs because anintis the most efficient way to store a number. Hence(int id)after the type name, which shows what this abstraction wraps. - This interface strips
intof all methods, operators and properties that we don't define explicitly. - We defined
operator <, and that's the only thing you can do with such an ID. - The constructor of an extension type is not defined as a member like with regular types, because regular types potentially have multiple constructors, because construction is some actual work for them and we may want to have it done in different ways. On the other hand, for an extension type, construction is just compile-time wrapping that does not translate to anything, so it always has exactly one constructor, and therefore it didn't make sense to have it as a member, so they made the syntax to have the constructor
(int id)right after the type name.
How does that apply to our example?
extension type NormalizedLandmark._(JSObject _) implements JSObject {
  external num get x;
  external num get y;
}
In our extension type:
- We wrap a
JSObjectand immediately implementJSObject. This means we don't strip anything from the interface but only add. We need this because we will soon haveJSArray<NormalizedLandmark>, andJSArraycan only be ofJSObjectand its subclasses. - We have
_for a name because unlike with the ID example we don't delegate anything to the object we wrap and don't need a name. - We have a private constructor because of
._
So this wrapper can never be created like we createdIdNumberwithfinal safeId = IdNumber(42);
Instead, we can only cast to it withas. - We mark the getters as
external. This means "they are already there in JavaScript and will just work".
When we use an extension type to represent an object that comes from an external JavaScript or WASM library, it's called an 'interop type', from inter-operation.
Defining the interop types
We need many more interop types to create the landmarker object from the MediaPipe library, call its methods and get data from the result object.
These can be written manually by looking at the TypeScript sources of MediaPipe:
- fileset_resolver.ts.template
- landmark.d.ts
- pose_landmarker.ts
- pose_landmarker_options.d.ts
- pose_landmarker_result.ts
- task_runner_options.d.ts
- vision_task_options.d.ts
The interop types in Dart can potentially be generated from TypeScript sources, but I haven't explored that yet. It's good to practice that manually for a while.
Here's what I scrapped from TypeScript, with only the methods and properties we will actually use.
The result of the detect function:
extension type PoseLandmarkerResult._(JSObject _) implements JSObject {
  external JSArray<JSArray<NormalizedLandmark>> get landmarks;
}
The landmarker:
extension type PoseLandmarker._(JSObject _) implements JSObject {
  external JSPromise<PoseLandmarker> createFromOptions(
    WasmFileset fileset,
    PoseLandmarkerOptions options,
  );

  external void detect(HTMLImageElement img, JSFunction callback);
}
The options to create the landmarker:
extension type PoseLandmarkerOptions._(JSObject _) implements JSObject {
  external PoseLandmarkerOptions({
    BaseOptions baseOptions,
    int numPoses,
    String runningMode,
  });

  external BaseOptions get baseOptions;

  external int get numPoses;

  external String get runningMode;
}
Base options within PostLandmarkerOptions:
extension type BaseOptions._(JSObject _) implements JSObject {
  external BaseOptions({String modelAssetPath});

  external String get modelAssetPath;
}
WasmFileset, whatever it is:
extension type WasmFileset._(JSObject _) implements JSObject {}
Fileset resolver:
extension type FilesetResolver._(JSObject _) implements JSObject {
  external JSPromise<WasmFileset> forVisionTasks(String basePath);
}
Finally, the root object of the MediaPipe module:
import 'fileset_resolver.dart' as fsr;
import 'pose_landmarker.dart' as plm;

extension type MediaPipe._(JSObject _) implements JSObject {
  external fsr.FilesetResolver get FilesetResolver;

  external plm.PoseLandmarker get PoseLandmarker;
}
Initializing the model
Let's continue the function that sets up the plugin and initialize the model:
MediaPipe get mp => globalContext[_windowVar] as MediaPipe;
PoseLandmarker? _landmarker;

Future<void> _initOnce() async {
  await _injectSrcScript(
    'https://cdn.jsdelivr.net/npm/@mediapipe/tasks-vision/vision_bundle.js',
    _windowVar,
  );

  final fs = await mp.FilesetResolver.forVisionTasks(
    'https://cdn.jsdelivr.net/npm/@mediapipe/tasks-vision@latest/wasm',
  ).toDart;

  final options = PoseLandmarkerOptions(
    baseOptions: BaseOptions(
      modelAssetPath:
          "packages/flutter_mediapipe_vision_platform_interface/assets/"
          "assets/models/pose_landmarker_lite.task",
    ),
    numPoses: 5,
    runningMode: "IMAGE",
  );

  _landmarker = await mp.PoseLandmarker.createFromOptions(fs, options).toDart;
}
The model file itself can be downloaded here, I've chosen the lite version:
https://ai.google.dev/edge/mediapipe/solutions/vision/pose_landmarker
Since the models are shared between the implementations, it's best to put them into a shared package. flutter_mediapipe_vision_platform_interface works best because all implementations already depend on it although technically it's not an interface stuff.
Anyway, when this function completes, we got the landmarker in the field variable _landmarker.
Detecting poses
This is the method that does the job:
  @override
  Future<PoseLandmarkerResult> detect(Uint8List bytes) async {
    final el = await _createImageFromBytes(bytes);
    // ...
  }
We start by creating an HTMLImageElement element from bytes because that's what the MediaPipe's detect function actually accepts. This is how we do it:
Future<web.HTMLImageElement> _createImageFromBytes(Uint8List bytes) async {
  final completer = Completer();

  final blob = web.Blob(
    [bytes.toJS].toJS,
    web.BlobPropertyBag(type: _detectImageFormat(bytes)),
  );
  final imageUrl = web.URL.createObjectURL(blob);
  final el = web.document.createElement('img') as web.HTMLImageElement;

  el.onload = () {
    web.URL.revokeObjectURL(imageUrl);
    completer.complete();
  }.toJS;
  el.onerror = () {
    web.URL.revokeObjectURL(imageUrl);
    completer.completeError('Cannot load the image.');
  }.toJS;

  el.src = imageUrl;
  await completer.future;
  return el;
}
The JavaScript Blob (binary long object) constructor takes a 2D array of bytes. So we first turn Uint8List into a JavaScript array by calling .toJS on it. Many Dart types have this getter to produce stuff that can be passed to JavaScript functions. We then wrap that array into another list and turn it to a JavaScript array too.
Then we determine the image type by reading the first bytes, I'll skip _detectImageFormat here.
Next, we need to produce some URL to set to our img object because that's the only way an image can be placed into an HTML element.
There's something called a blob URL. That's us telling the browser 'Hey, we need to show these bytes in this img. Please give us a virtual URL that will point to them.'
The browser then stashes those bytes into some internal table and generates a URL that looks like this:blob:http://localhost:40000/fd108f07-5e55-43d1-b5cd-691b973c03d6
It's private to this browser session and can be used to fetch the image. Interestingly, you can even open it in another tab:
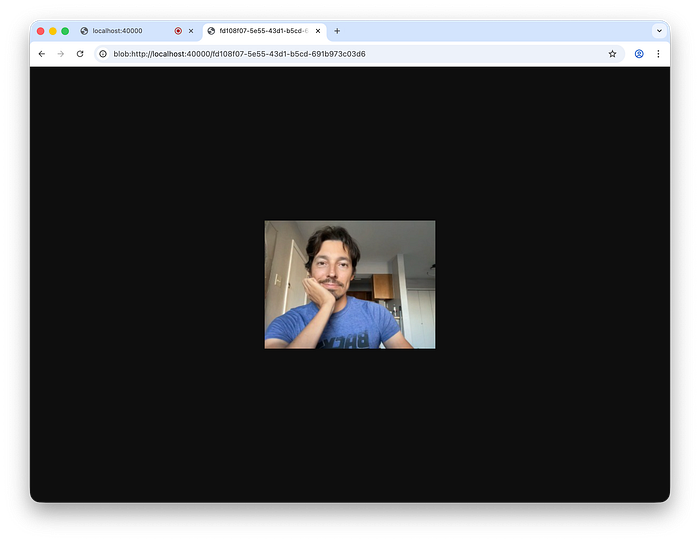
A blob URL created on one page can be opened in another tab.
Anyway, we create an img element and set its src to that URL. We now need to wait until it's loaded. For that, we need to set these listeners:
  el.onload = () {
    web.URL.revokeObjectURL(imageUrl);
    completer.complete();
  }.toJS;
  el.onerror = () {
    web.URL.revokeObjectURL(imageUrl);
    completer.completeError('Cannot load the image.');
  }.toJS;
Both of them complete the completer so the function can return the img element ready to use or break with an error. They also both dispose the URL so it doesn't waste the browser's memory. After all, we will be doing this on every frame.
Note that when we pass a Dart function to any JavaScript routine we need to turn it into a regular JavaScript function with toJS getter.
When we got the img element, we can continue with the detect function:
import 'src/interop/pose_landmarker_result.dart' as js_plr;

// ...

  @override
  Future<PoseLandmarkerResult> detect(Uint8List bytes) async {
    PoseLandmarkerResult r = PoseLandmarkerResult.empty();
    final el = await _createImageFromBytes(bytes);

    _landmarker!.detect(
      el,
      (js_plr.PoseLandmarkerResult? result) {
        r = result?.toDart ?? PoseLandmarkerResult.empty();
      }.toJS,
    );

    return r;
  }
Note that the JavaScript detect function does not return the result. Instead, it's passed a callback that will be invoked with the data. This allows this function to free the resources when the callback returns. It has a potential to improve garbage collection. In practice, I've noticed the object survives the callback, but this can't be relied on. We must convert the JavaScript result object into one we defined as a platform-independent one (earlier in the second package).
That's it with the code of the packages!
Tying the packages together
The web implementation package needs to declare in its pubspec.yaml that it has a plugin implementation so Flutter knows which method to call at the start to to swap this implementation in:
flutter:
  plugin:
    platforms:
      web:
        pluginClass: FlutterMediapipeVisionWeb
        fileName: flutter_mediapipe_vision_web.dart
The platform interface needs to declare its assets so they are packaged into the final build of the apps that use it:
flutter:
  assets:
    - assets/models/pose_landmarker_lite.task
And the user-facing package needs to officially endorse the plugin:
flutter:
  plugin:
    platforms:
      web:
        default_package: flutter_mediapipe_vision_web
The app
Showing the camera video
The first thing we need to do is to show the video from the camera on the screen. Let's create and initialize the camera controller and show CameraPreview widget:
import 'package:camera/camera.dart';
import 'package:flutter/material.dart';

late CameraController cameraController;

Future<void> main() async {
  WidgetsFlutterBinding.ensureInitialized();
  await FlutterMediapipeVision.ensureInitialized();

  cameraController = CameraController(
    (await availableCameras()).first,
    ResolutionPreset.low,
    enableAudio: false,
  );
  await cameraController.initialize();

  runApp(const MyApp());
}

class MyApp extends StatelessWidget {
  const MyApp({super.key});

  @override
  Widget build(BuildContext context) {
    return MaterialApp(
      home: Scaffold(
        appBar: AppBar(title: Text('MediaPipe demo')),
        body: Center(
          child: CameraPreview(cameraController),
        ),
      ),
    );
  }
}
This is the minimal app that shows video from the camera on a screen. It's not perfect because it blocks until it gets the permission to use the camera before it shows anything, and it doesn't retry if the access is denied. But it does the job:
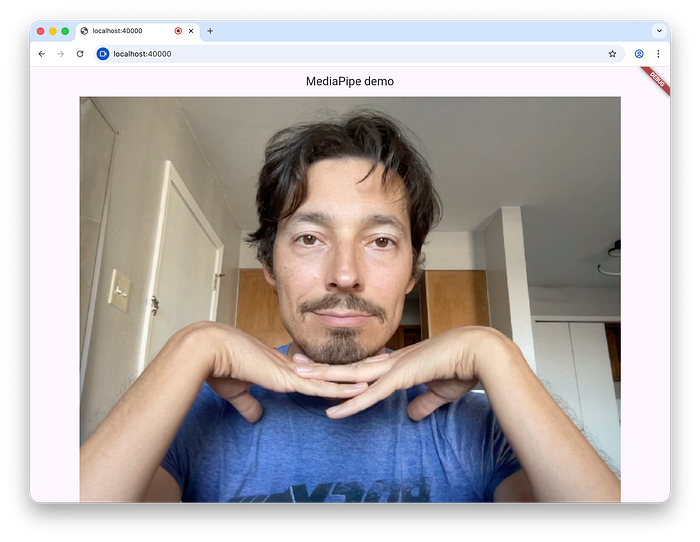
The minimal camera preview app.
Capturing and analyzing stills
Let's create a controller to do the recognition:
class InferenceController extends ChangeNotifier {
  final CameraController cameraController;

  PoseLandmarkerResult get lastResult => _lastResult;
  PoseLandmarkerResult _lastResult = PoseLandmarkerResult.empty();

  InferenceController({required this.cameraController});

  Future<void> start() async {
    while (true) {
      await _tick();
    }
  }

  Future<void> _tick() async {
    final file = await cameraController.takePicture();
    final bytes = await file.readAsBytes();

    _lastResult = await FlutterMediapipeVision.detect(bytes);
    notifyListeners();
  }
}
Once start() is called, it runs forever. It's not good for mobile devices where the app can be pushed out of memory, but it's fine for the minimal web version.
In the loop, we capture a frame with cameraController.takePicture(), then pass it as bytes to our plugin and get the analyzed result.
Let's create this controller in main():
late InferenceController inferenceController; // CHANGED

Future<void> main() async {
  WidgetsFlutterBinding.ensureInitialized();
  await FlutterMediapipeVision.ensureInitialized();

  final cameraController = CameraController(
    (await availableCameras()).first,
    ResolutionPreset.low,
    enableAudio: false,
  );
  await cameraController.initialize();

  // NEW:
  inferenceController = InferenceController(cameraController: cameraController);
  unawaited(inferenceController.start());

  runApp(const MyApp());
}
Showing the skeleton overlay
Let's make a CameraOverlayWidget to do this:
class CameraOverlayWidget extends StatelessWidget {
  final InferenceController inferenceController;

  const CameraOverlayWidget({required this.inferenceController});

  @override
  Widget build(BuildContext context) {
    return ListenableBuilder(
        listenable: inferenceController,
        child: CameraPreview(inferenceController.cameraController),
        builder: (context, child) {
          return CustomPaint(
            foregroundPainter: CameraOverlayPainter(
              inferenceController: inferenceController,
            ),
            willChange: true,
            child: child,
          );
        }
    );
  }
}
This widget listens to notifications from the controller and rebuilds every time they come. Note that we create CameraPreview widget outside of the builder function and pass it as a child to ListenableBuilder. This excludes CameraPreview from rebuild and makes things a bit faster.
CustomPaint widget applies foregroundPainter to paint stuff on an overlay over child.
Let's now create this CameraOverlayPainter:
class CameraOverlayPainter extends CustomPainter {
  final InferenceController inferenceController;

  static final _paint = Paint()
    ..color = Colors.white
    ..isAntiAlias = true
    ..style = PaintingStyle.fill
    ..strokeWidth = 5;
  static const _pointRadius = 5.0;

  CameraOverlayPainter({required this.inferenceController});

  @override
  void paint(Canvas canvas, Size size) {
    _paintPose(canvas, size);
  }

  void _paintPose(Canvas canvas, Size size) {
    final pose = inferenceController.lastResult.landmarks.firstOrNull;
    if (pose == null) {
      return;
    }

    final leftShoulder = pose[Points.leftShoulder].offset.timesSize(size);
    final rightShoulder = pose[Points.rightShoulder].offset.timesSize(size);
    // Same for every point.

    _paintLine(canvas, leftShoulder, rightShoulder);
    // Same for every line.

    _paintPoint(canvas, leftShoulder);
    _paintPoint(canvas, rightShoulder);
    // Same for every point.
  }

  void _paintPoint(Canvas canvas, Offset offset) {
    canvas.drawCircle(offset, _pointRadius, _paint);
  }

  void _paintLine(Canvas canvas, Offset pt1, Offset pt2) {
    canvas.drawLine(pt1, pt2, _paint);
  }

  @override
  bool shouldRepaint(covariant CustomPainter oldDelegate) {
    return true;
  }
}

extension on Offset {
  Offset timesSize(Size size) => Offset(dx * size.width, dy * size.height);
}

abstract final class Points {
  static const leftShoulder = 11;
  static const rightShoulder = 12;
  // Same for every point.
}
This class just picks all points of interest from the recognized result and connects the adjacent ones with lines. The coordinates are from 0 to 1, so it multiplies them by the size, the parameter that holds the current size of the widget. Since this overlay is of the same size as the camera preview, everything is just right.This finally gets us what we wanted:
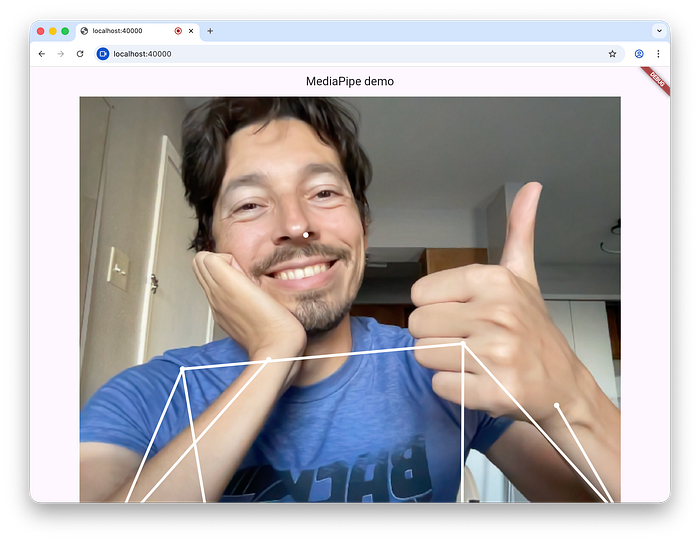
Skeleton is pained over the camera preview. Done.
Here is the deployed demo once again:
https://alexeyinkin.github.io/flutter-mediapipe/
Browser compatibility
This works well in Chrome.
In Firefox 144, it breaks on the camera package bug, which I will soon narrow down and file.
In Safari, it just doesn't work without any symptoms. If you know what's going on there, please let me know.