Python Telegram bot with Django Framework
Valerii Pavlikov
Hey everyone!
I’ve decided to create a telegram bot using Django. It’s not the usual way but I thought “why not” and created it. It’s not a deep-learning guide, I just want to answer for most important questions which I faced during development.
So this guide answers next questions:
- How to raise up Django project and configure it for working with Telegram?
- How to work locally?
- How to deploy it?
Stack
- Django Framework
- python-telegram-bot library
- ngrok
Pre-prepared steps
You need to do some steps before this guide:
- Create Telegram bot using BotFather
- Deploy a standard Django project locally
Configure Django project with python-telegram-bot library
Installation
We are going to use python-telegram-bot v13.x. It’s very important to see library has two different versions. What is the difference? You can use async starting from v20.x and you can’t before this version. Despite the fact that Django since version 4 supports working with async — in this case, we will work without async.
So you need to install the library for your Django project.
pip install python-telegram-bot~=13.14
Let’s create a new application called bot and we will conduct all our development there.
We’re going to use an example which is provided by python-telegram-bot library. This is an example of working with conversation.
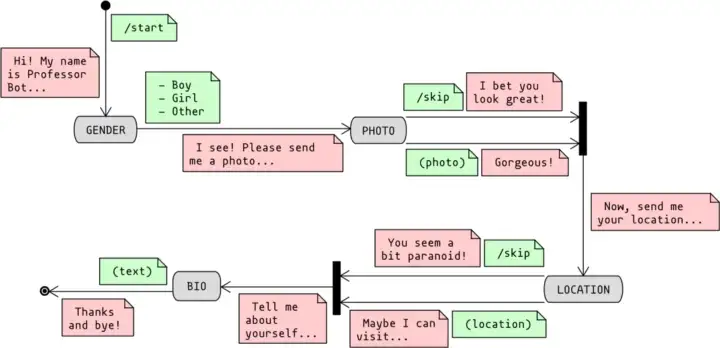
Let’s create a new file in bot application called handlers.py and put the code from an example there.
Webhooks
We’re going to use webhook in our application because we’re working with Django and need some URL which sends to us any update from Telegram.
To get more information about webhooks you can find it here.
We will use an alternative solution that is proposed from the documentation — without using threads.
So the most important point in our case is to configure work with the Dispatcher. In order to do this, we will create a new file in botapplication called tg_init.py .
from django.conf import settings
from telegram import Bot
from telegram.ext import Dispatcher

from bot.handlers import conv_handler


def telegram_bot():
    bot = Bot(settings.BOT_TOKEN)
    return bot


def telegram_dispatcher():
    bot = telegram_bot()
    dispatcher = Dispatcher(bot, None, workers=0)

    # Register handlers here
    dispatcher.add_handler(conv_handler)

    return dispatcher


BOT = telegram_bot()
DISPATCHER = telegram_dispatcher()
After we have set up work with Dispatcher, we need to create a controller that will be our webhook and to which updates will come from Telegram. Let’s go to views.py file and do it there.
import json

from django.http import JsonResponse
from django.views.decorators.csrf import csrf_exempt
from telegram import Update

from bot.tg_init import BOT, DISPATCHER


@csrf_exempt
def process(request):
    data = json.loads(request.body.decode())
    update = Update.de_json(data, BOT)
    DISPATCHER.process_update(update)

    return JsonResponse({})
It’s essential to add @csrf_exempt because we can’t control here CSRF protection and it won’t work without this decorator.
When we did the configuration of code for working with Telegram bot, we will need to set our webhook. First of all, we have to add URL to urls.py file.
from django.contrib import admin
from django.urls import path

from bot.views import process

urlpatterns = [
    path("admin/", admin.site.urls),
    path("process/", process, name="process"),
]
And finally, we need to set up webhook (make it clear to the Telegram API where to send updates). To do this, we will create a django management command. Of course, we could set up webhook through shell but using command is easier to work with in perspective. In any case, it’s up to you.
bot/
  management/
    commands/
      set_webhook.py
from django.conf import settings
from django.core.management.base import BaseCommand
from django.urls import reverse

from bot.tg_init import BOT


class Command(BaseCommand):

    def handle(self, *args, **options):
        url = "{}{}".format(settings.SERVER_DOMAIN, reverse("process"))
        is_appointed = BOT.set_webhook(url=url)
        if is_appointed:
            self.stdout.write(self.style.SUCCESS("Webhook was successfully appointed."))
        else:
            self.stdout.write(self.style.ERROR("Something went wrong."))
Ngrok
Since Telegram API only works with certified domains, we cannot use our standard domain locally http://127.0.0.1:8000 . We need something that provides https and ngrok will help us with that.
Do the installation and run it. We need to copy the URL address with https .
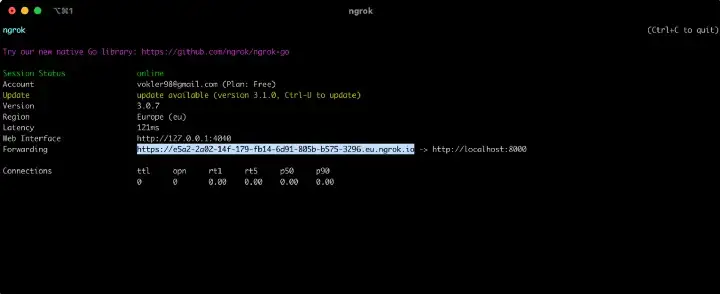
So add this URL to settings.py in SERVER_DOMAIN var and after that run django management command.
./manage.py set_webhook
Congrats! You can run your Telegram bot and check how it works!
Deploy Django project to production
I will not tell the whole process of deployment, delving into all aspects of nginx, gunicorn and so on. In this block, I will focus only on what will help you successfully launch the bot in production.
I use this guide for deploying Django project — so do it all step by step. If you didn't deploy before, firstly you could try to deploy just a simple Django project (without Telegram settings).
How To Set Up Django with Postgres, Nginx, and Gunicorn on Ubuntu 22.04
So, the most important thing during deploying Django project with Telegram settings is to make the correct configuration gunicorn.service file.
Please note that you need to install only a single worker instead of a multiplay.
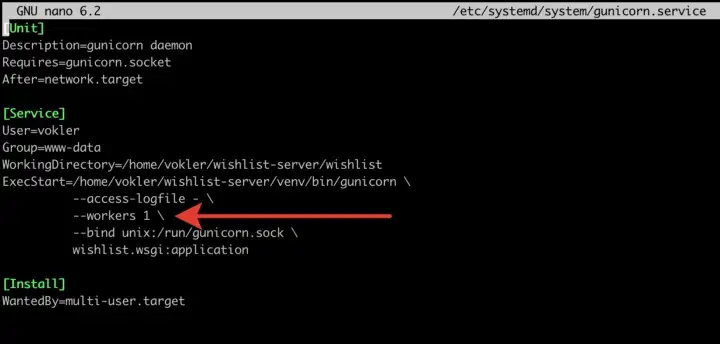
Also after deploying don’t forget to change SERVER_NAME to real production domain and run set_webhook command.
Conclusion
It’s my first experience with writing articles and guides but I hope it was helpful for you! If you found any mistakes please let me gently know.
Useful links and the resources used