Purchasing an NFT Guide
Steps to Register and Securely Purchase an NFT on the Liquid Mining website. 1. Open the TronLink Wallet App
Open your TronLink wallet app on your device,
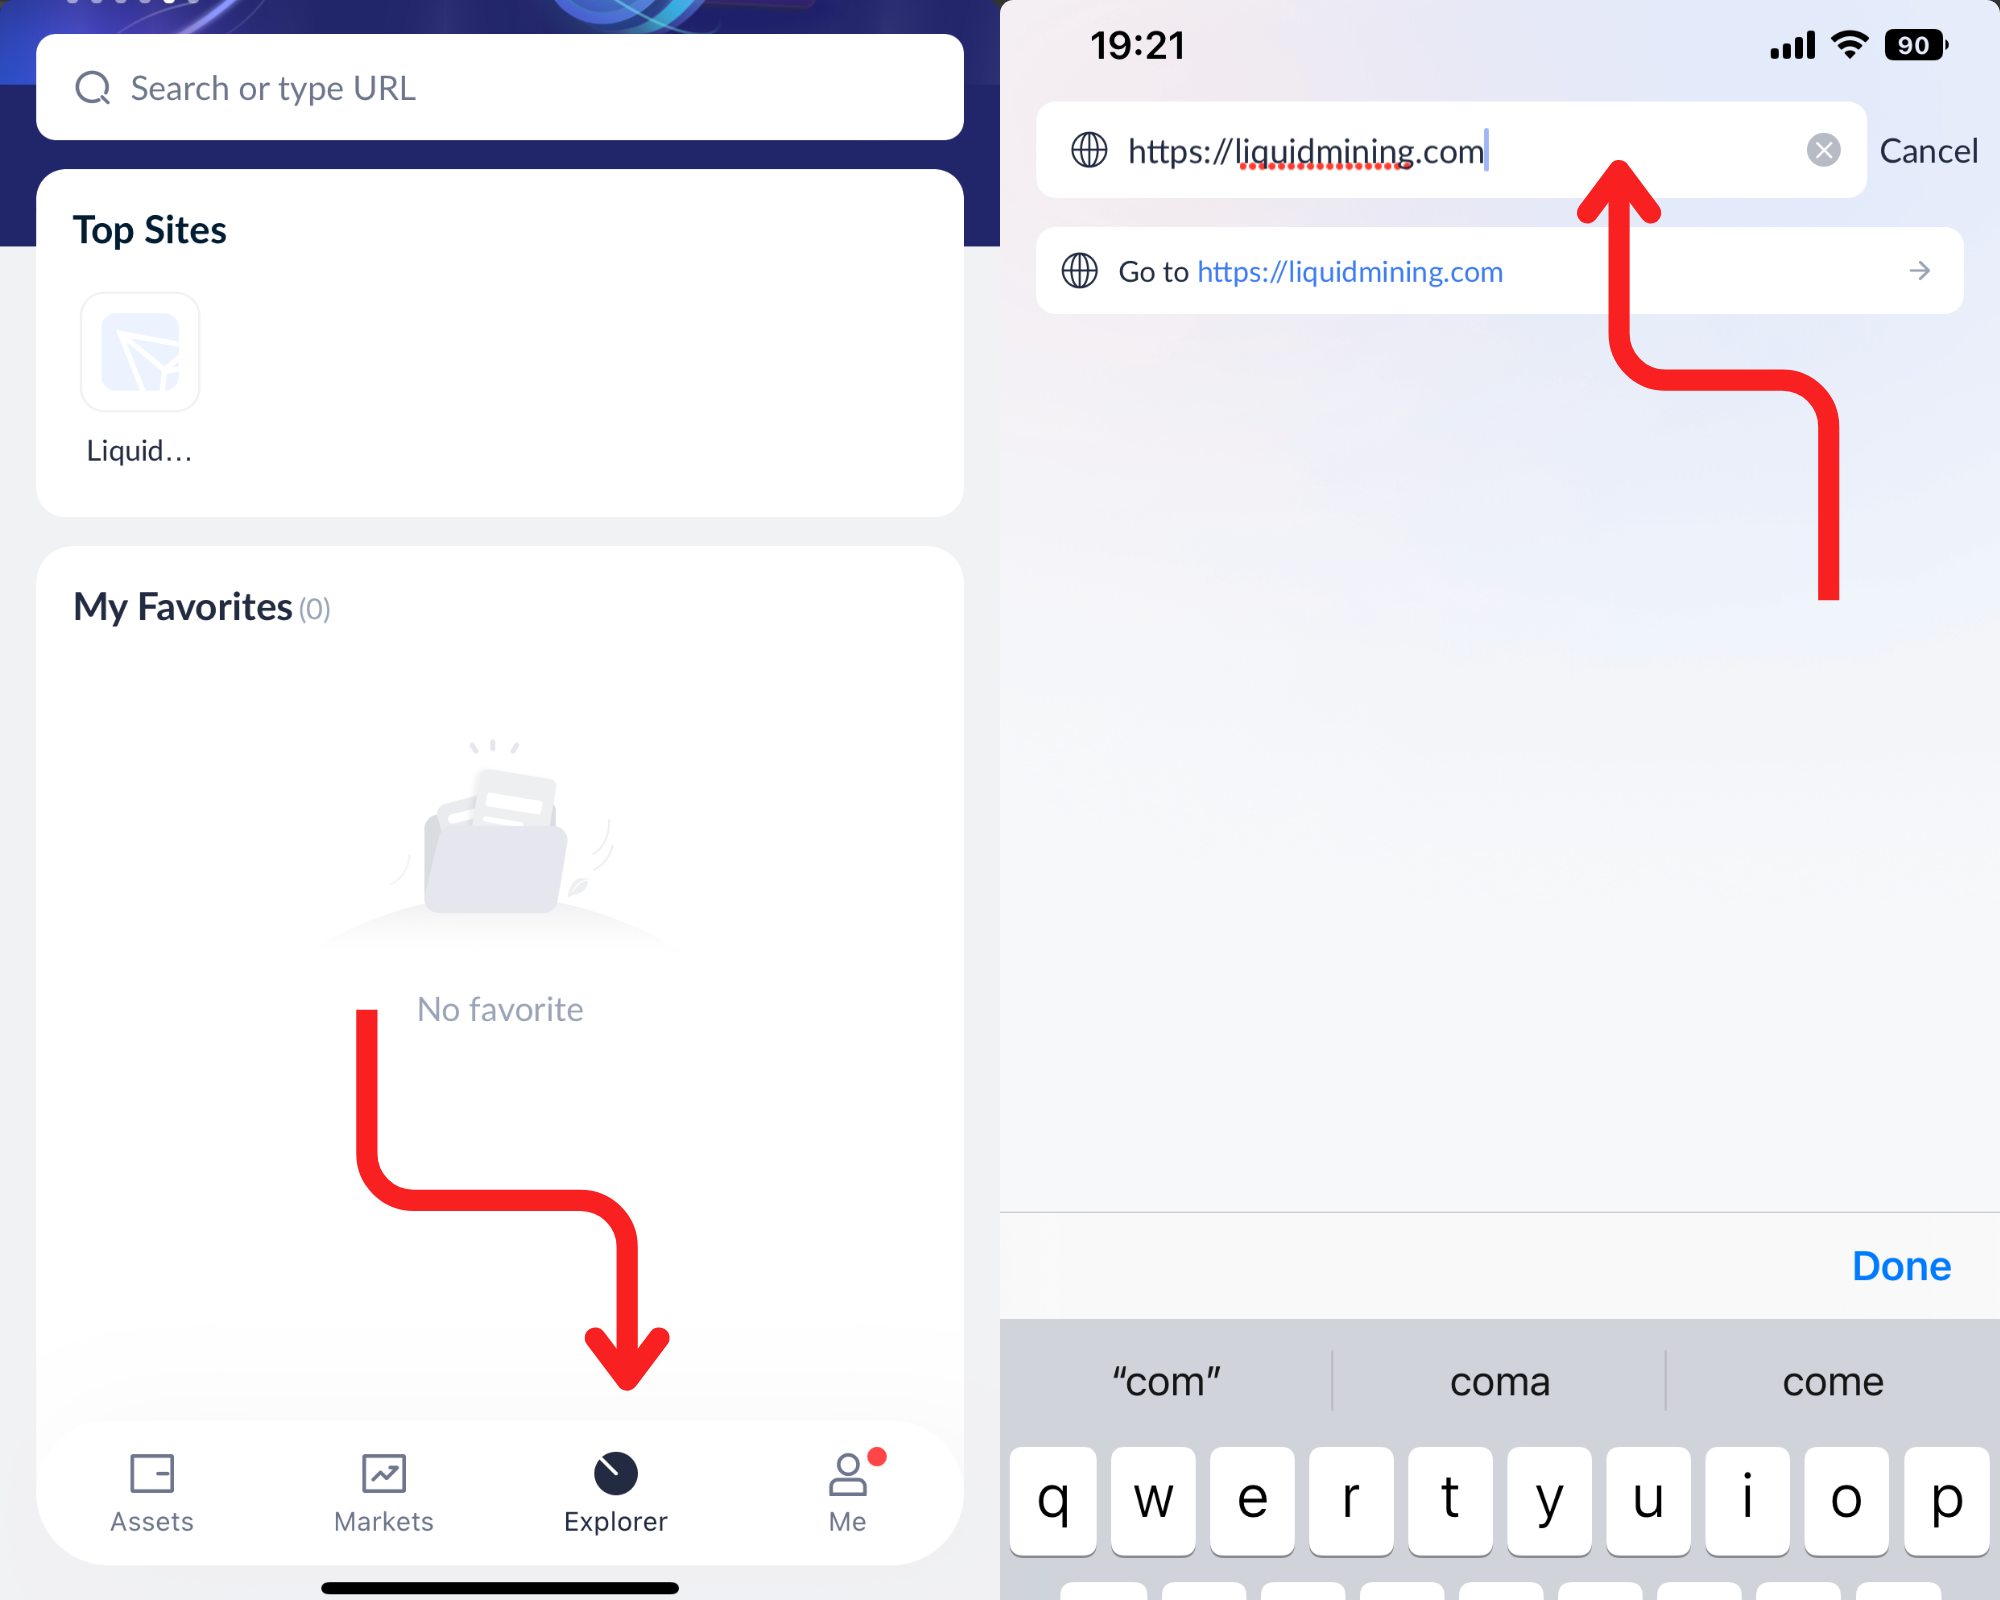
Next, click on the "Explorer" button which can be found at the bottom of the screen. The button resembles a timer.
Once you have opened the browser, navigate to the search bar and enter Liquid Mining website https://liquidmining.com/ .
2. Sign-in on the Liquid Mining Website, Head to the Marketplace
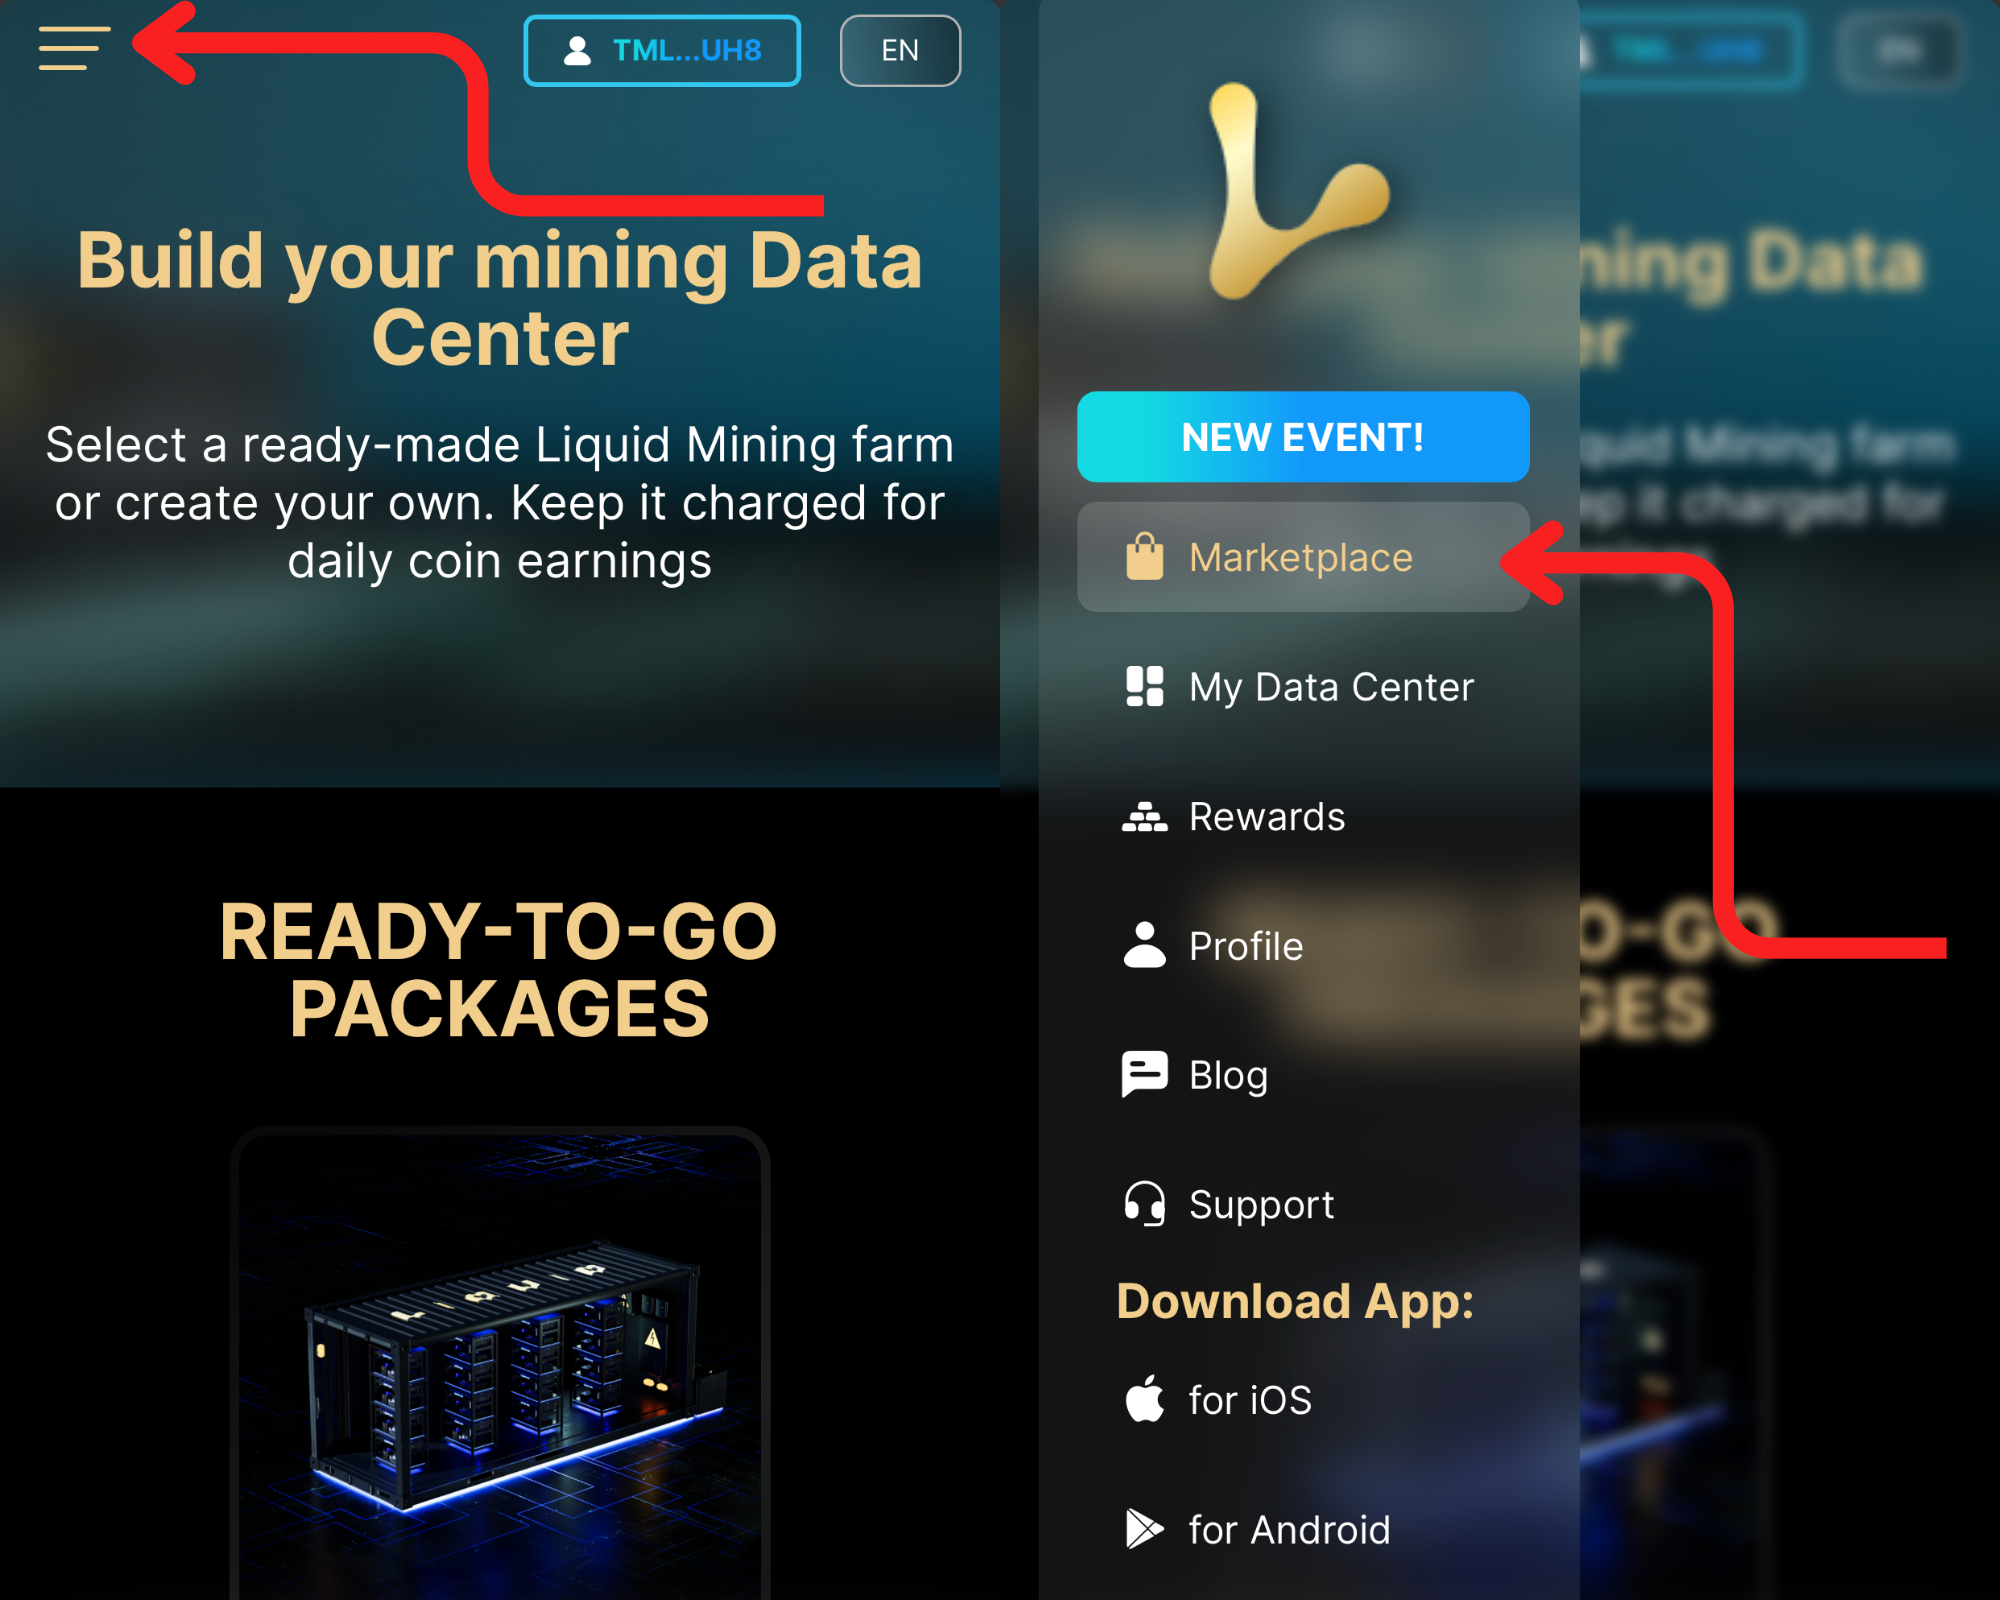
To access the Liquid Mining website, first sign in to your account.
If you've already connected your TronWallet to the website, it will be automatically connected, allowing you to access site features directly from your TronWallet app. If you have any difficulties connecting your TronWallet, check if it was used to create an account.
Once logged in, click on the "Marketplace" button on the website to visit the marketplace. Here, you can acquire different NFTs and engage in transactions related to these assets.
3. Navigate and choose an NFT
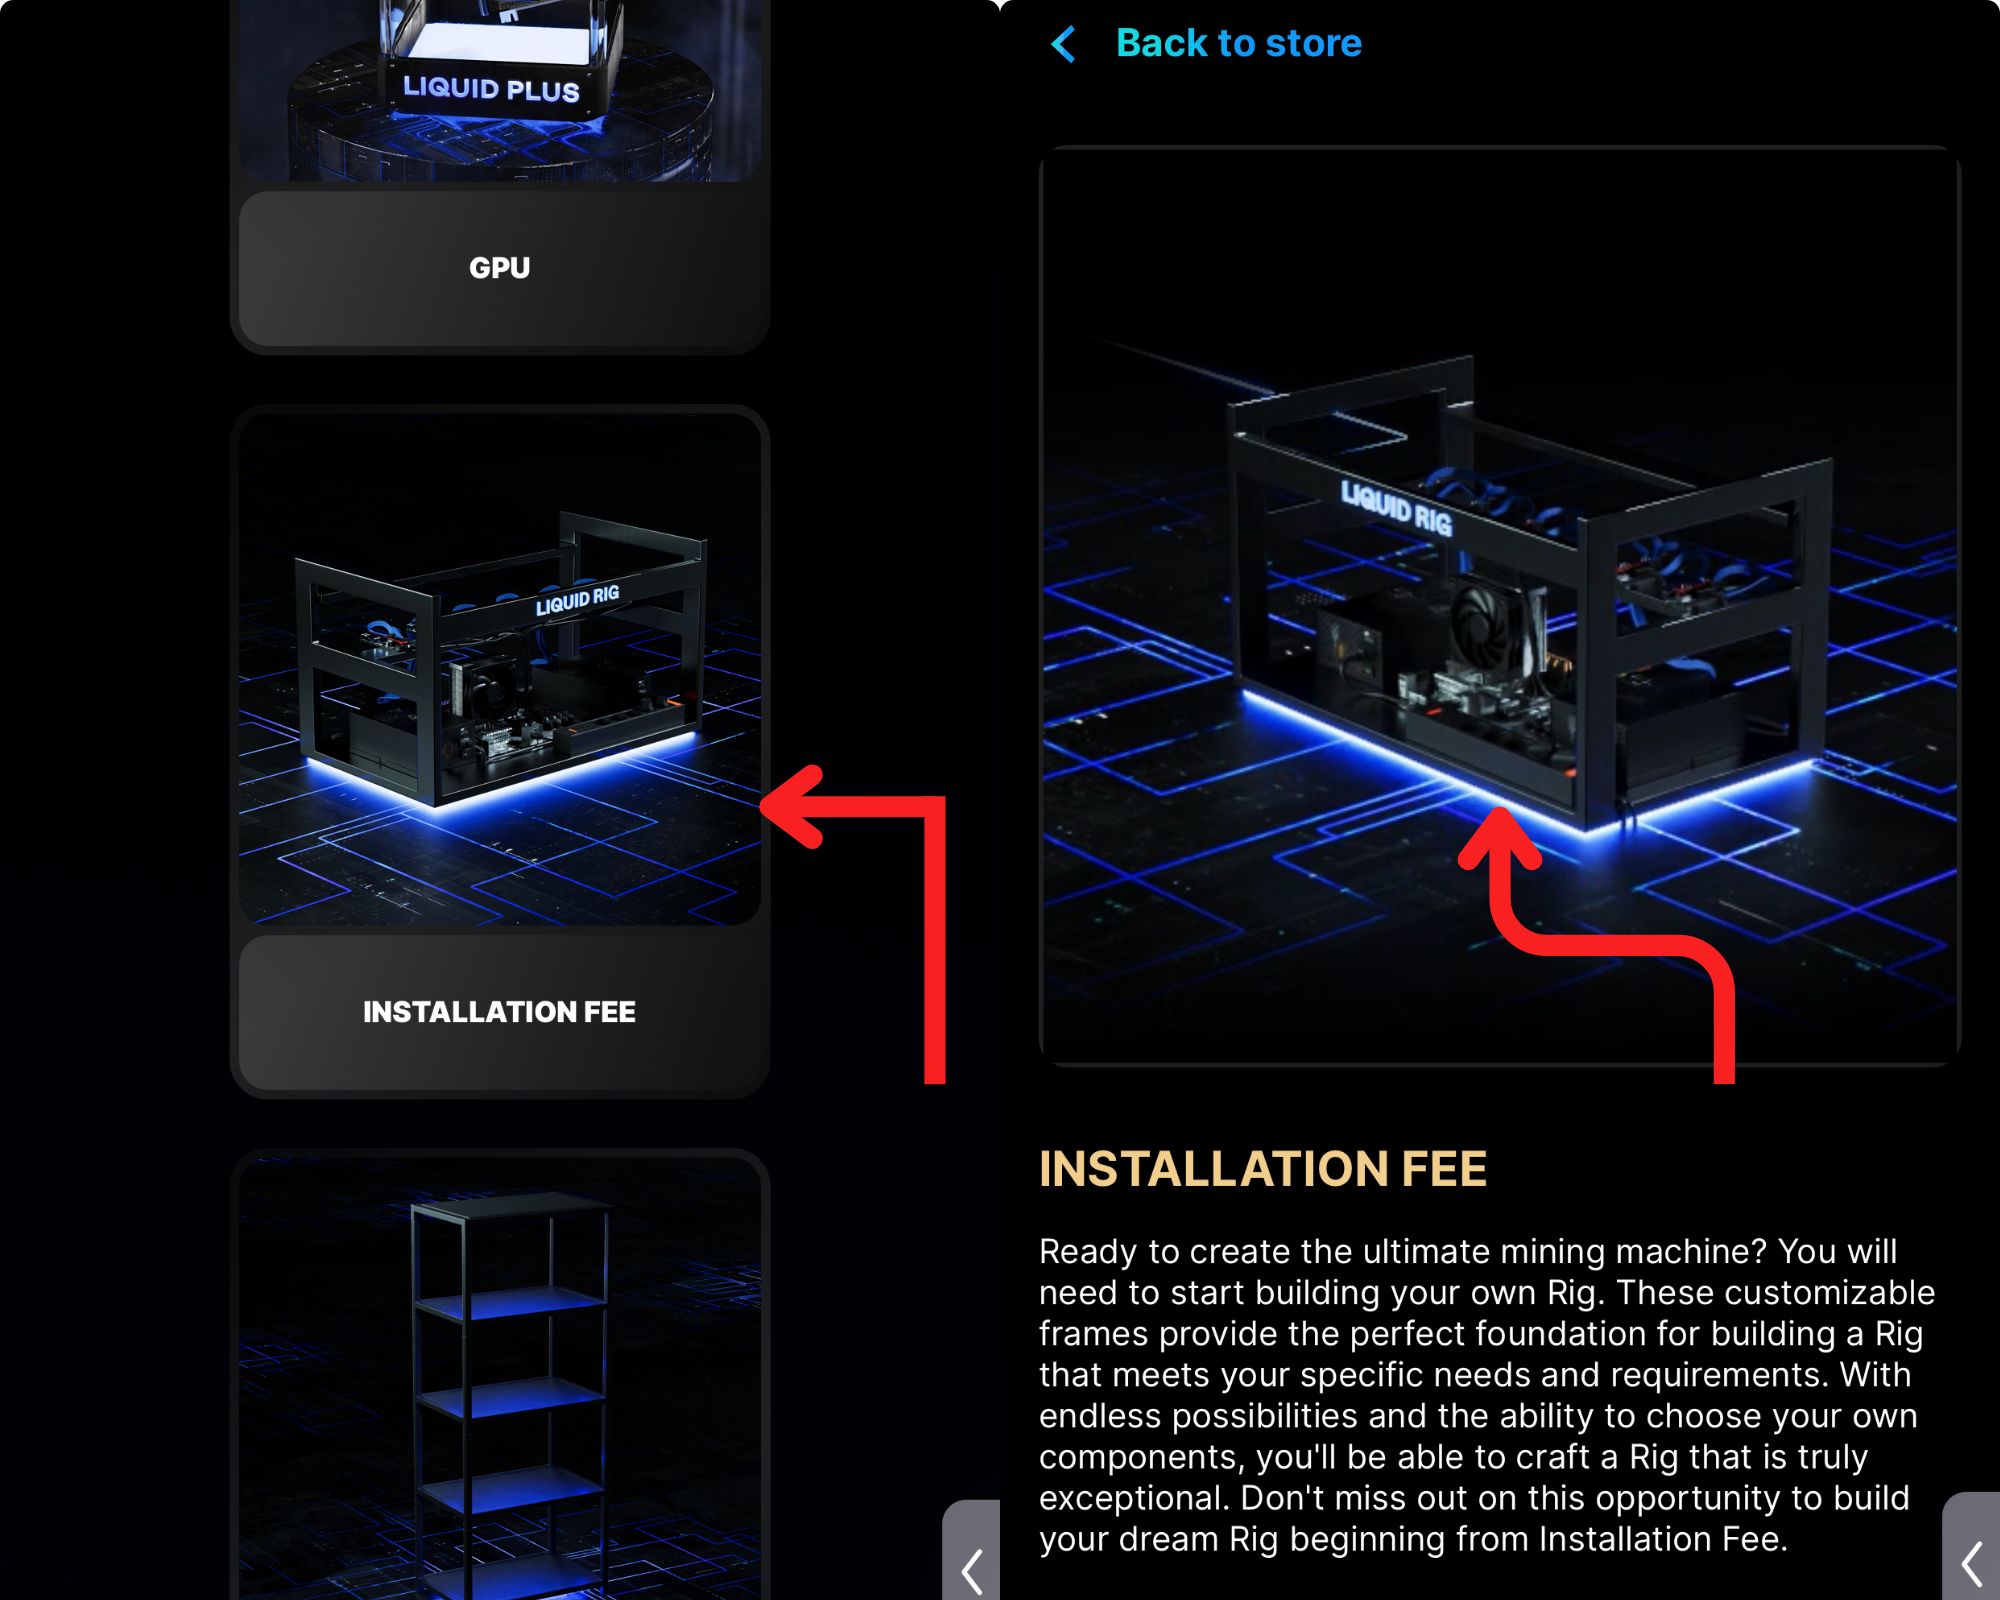
Browse through the NFTs available on the Marketplace, select the complete set you need in order to start mining.
Note:
When acquiring a Liquid Start GPU or a Liquid Plus GPU as a single entity, it is mandatory to purchase the Installation Fee. This fee is necessary to facilitate the installation of the NFTs mentioned above that you have purchased.
The Energy (Liquid Charger) constitutes a crucial element within the mining process. As mining necessitates a continuous supply of energy, it becomes imperative for us to procure this component to get our mining setups running.
The minimum setup to start mining includes,
GPU + Installation Fee + Energy(Liquid Charger)
ASIC + Energy(Liquid Charger)
For the purposes of this guide, we will be using the ‘Installation Fee’ as an example. Click on the NFTs to open its page and view its details.
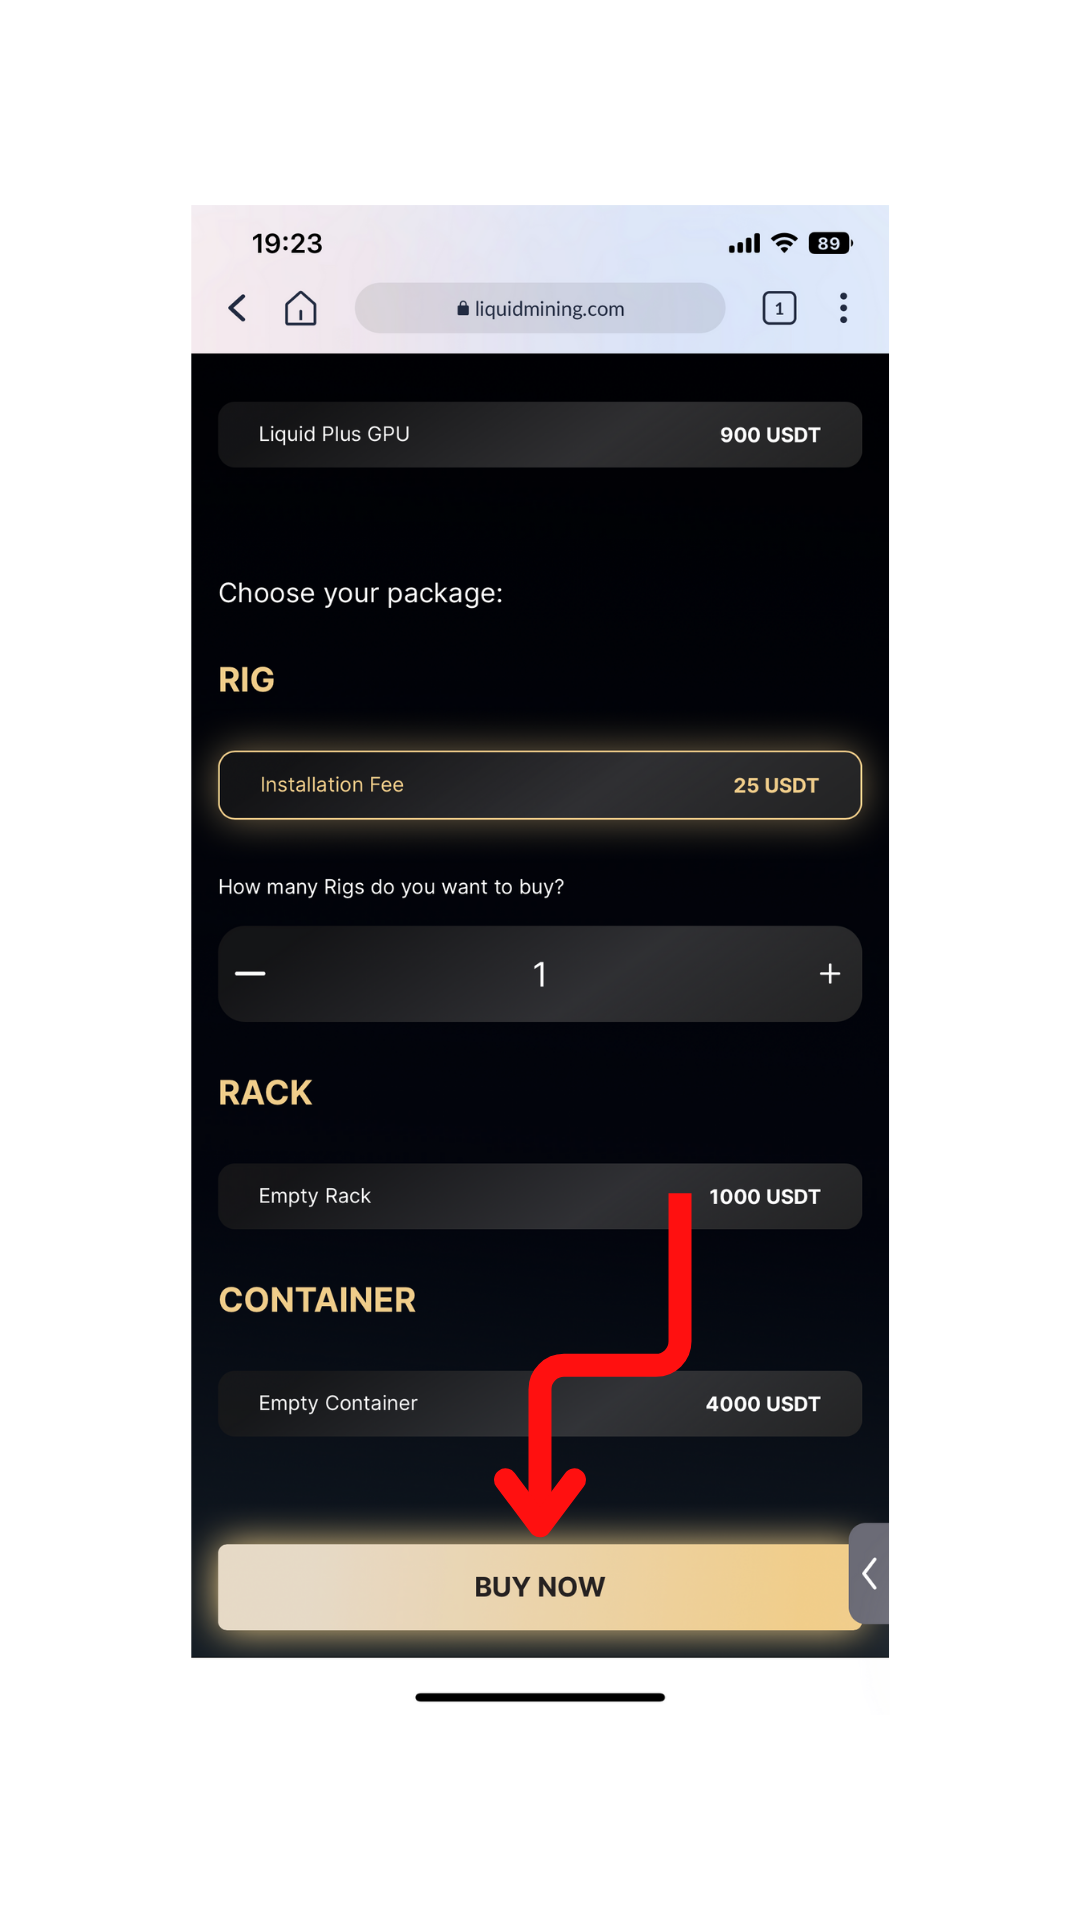
4. Click the "BUY NOW" Button
To purchase an NFT(s), make your selection(s) carefully before proceeding to the bottom of the page.
You can choose to purchase either a single or multiple NFT(s) in one transaction, then finalize the purchase by clicking the "Buy Now" button.
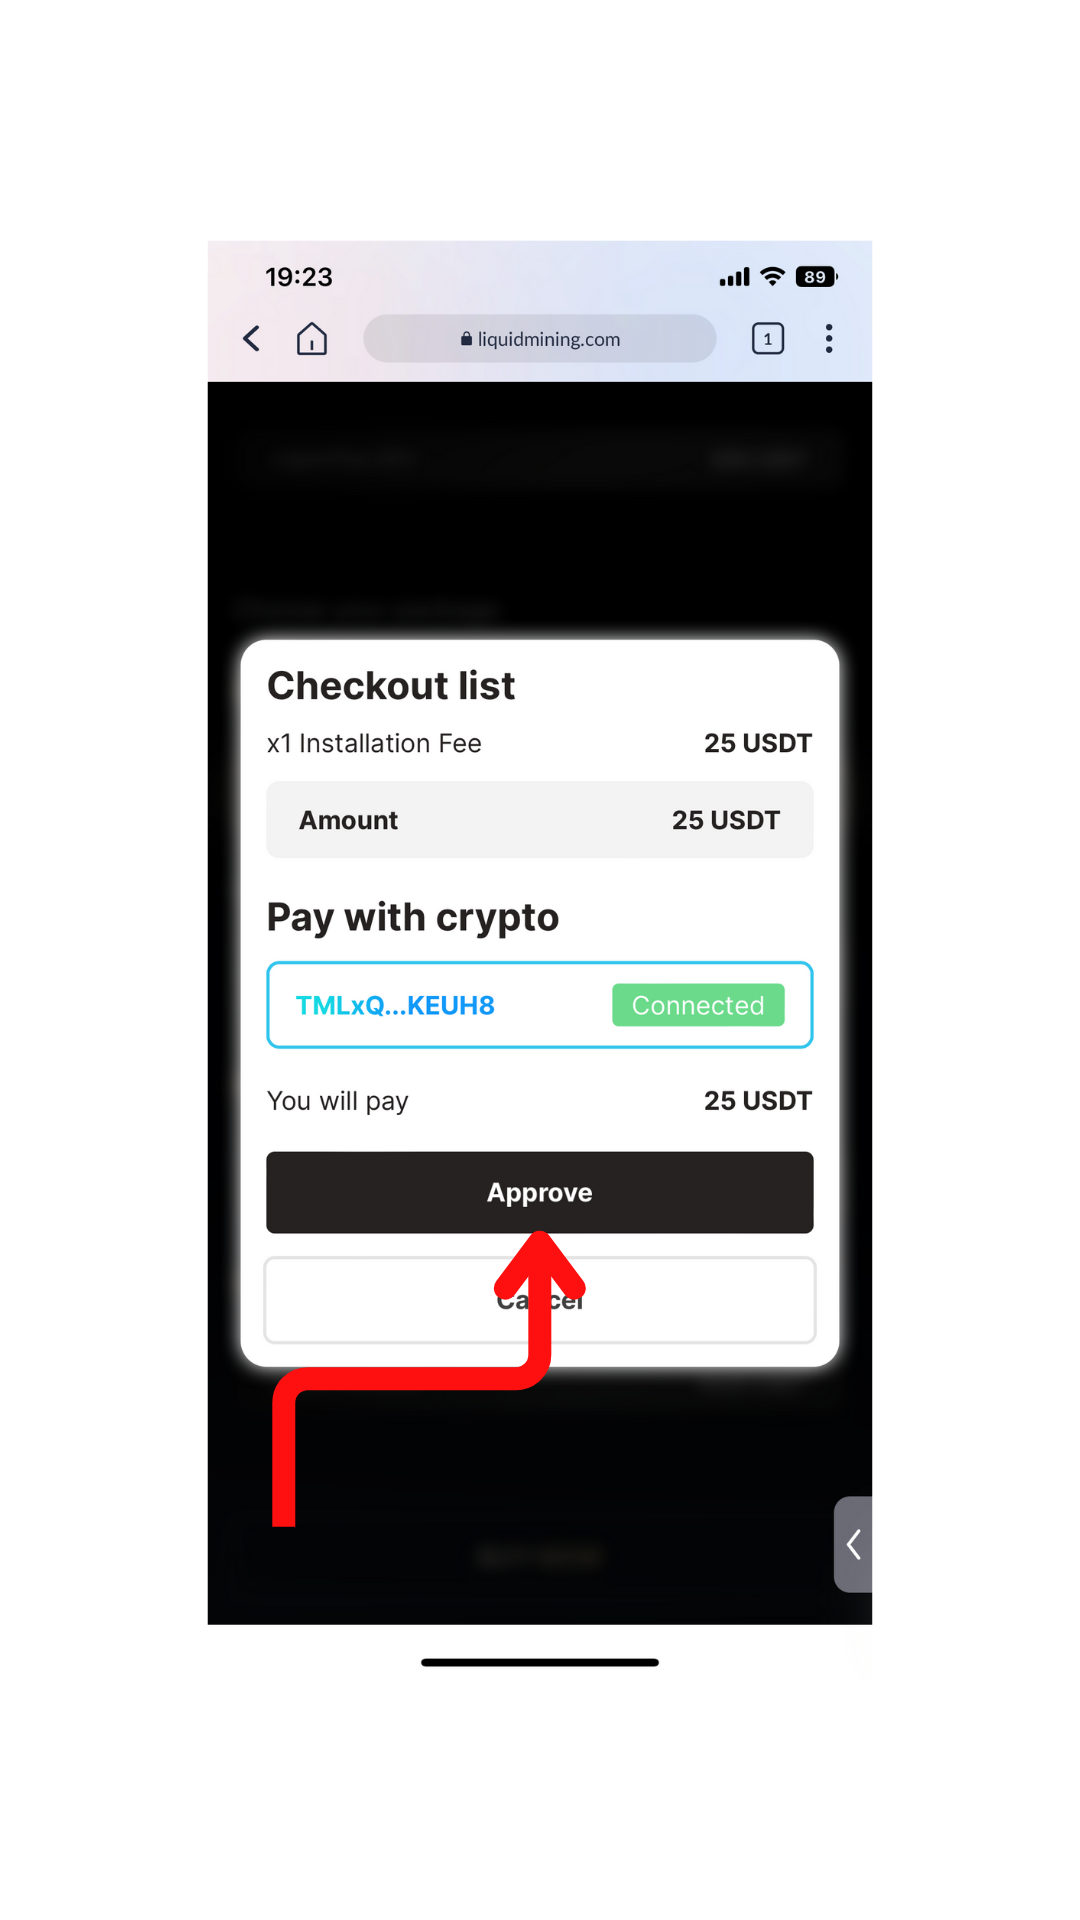
5. Click the "Approve" Button
To approve the transaction, click on the "Approve" button.
Note:
Ensure that you have enough USDT in your account before proceeding. If you have sufficient USDT, the transaction will be successfully processed.
Transactions on Tron require TRX as gas fees, See that you have sufficient TRX/gas fees for the transaction to be successful.
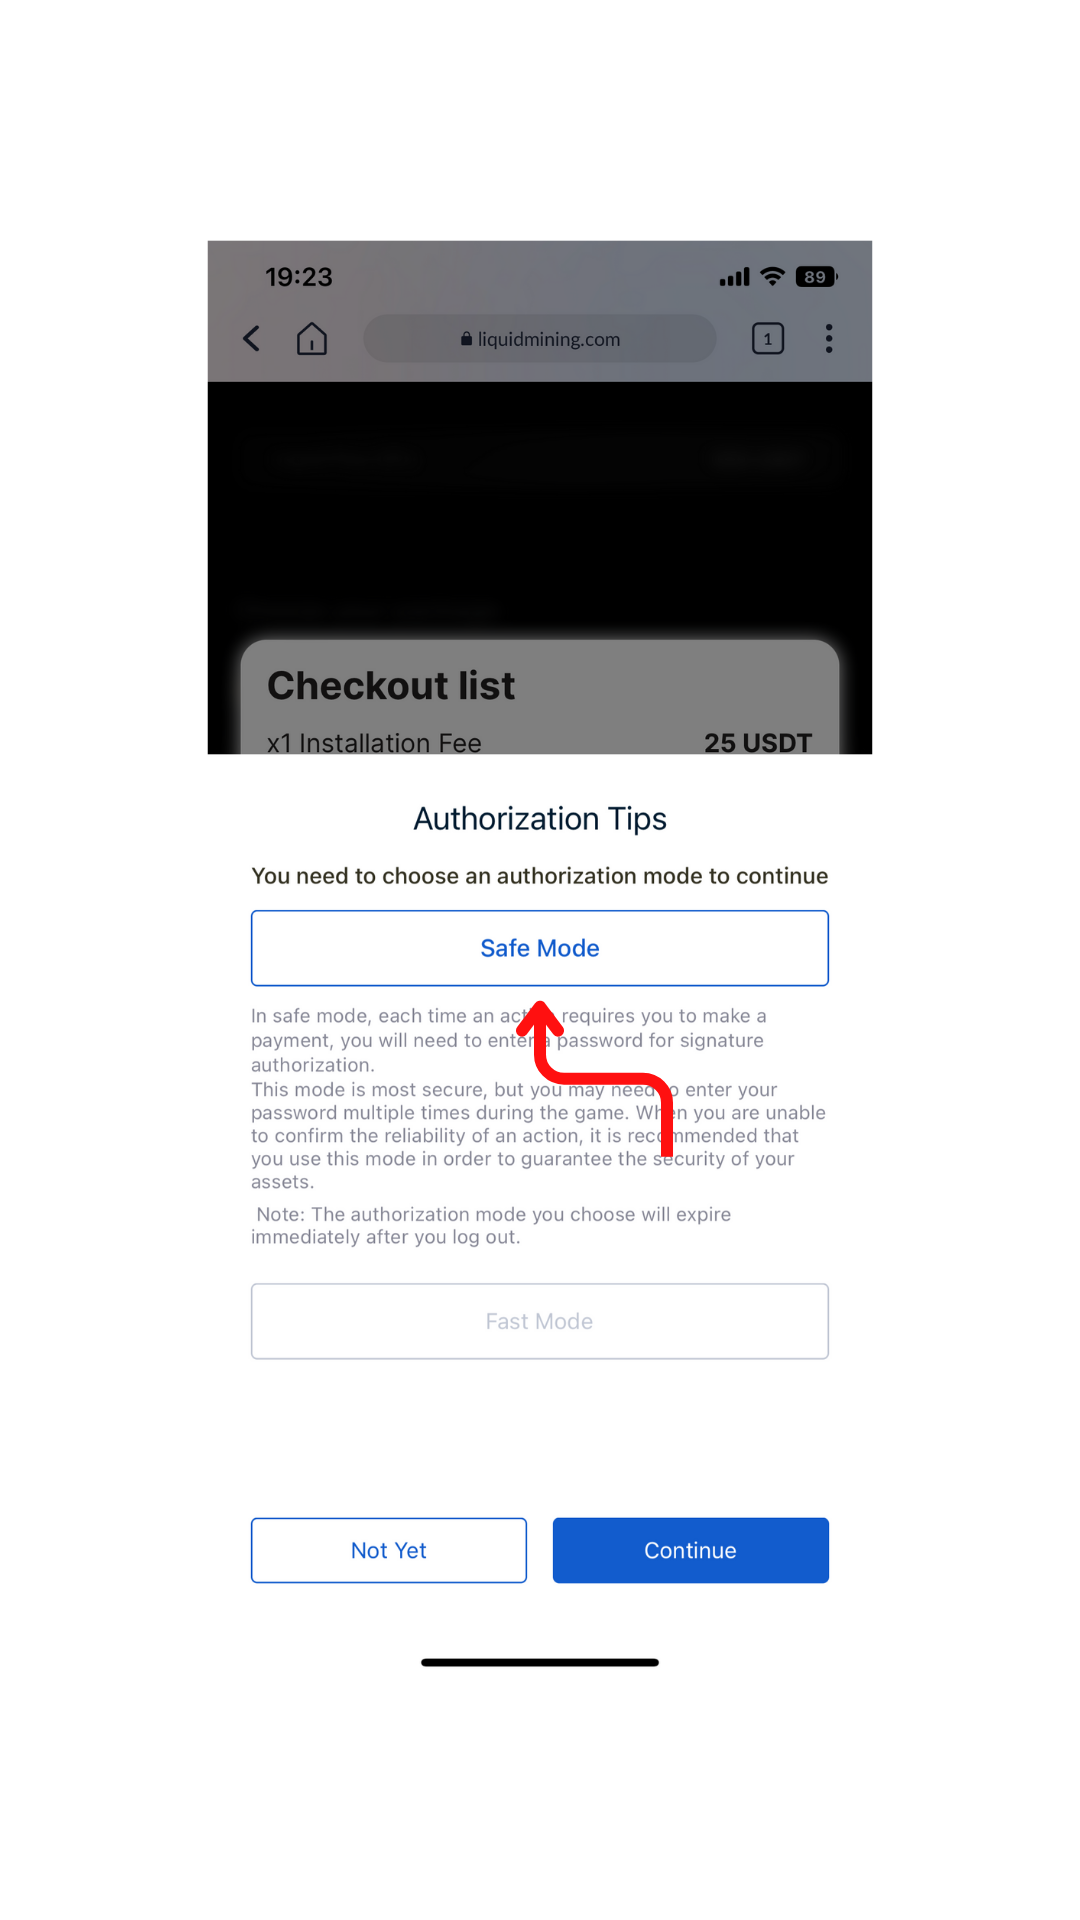
6. Authorization, Choose "Safe Mode"
There are two modes available for authorizing your transaction: Safe Mode and Fast Mode. In Safe Mode, you need to enter a password each time you are required to make a payment, making it more secure. This ensures that every action needing payment authorization requires an authoritative password to be entered. For the purpose of this guide, we will use Safe Mode as an example.
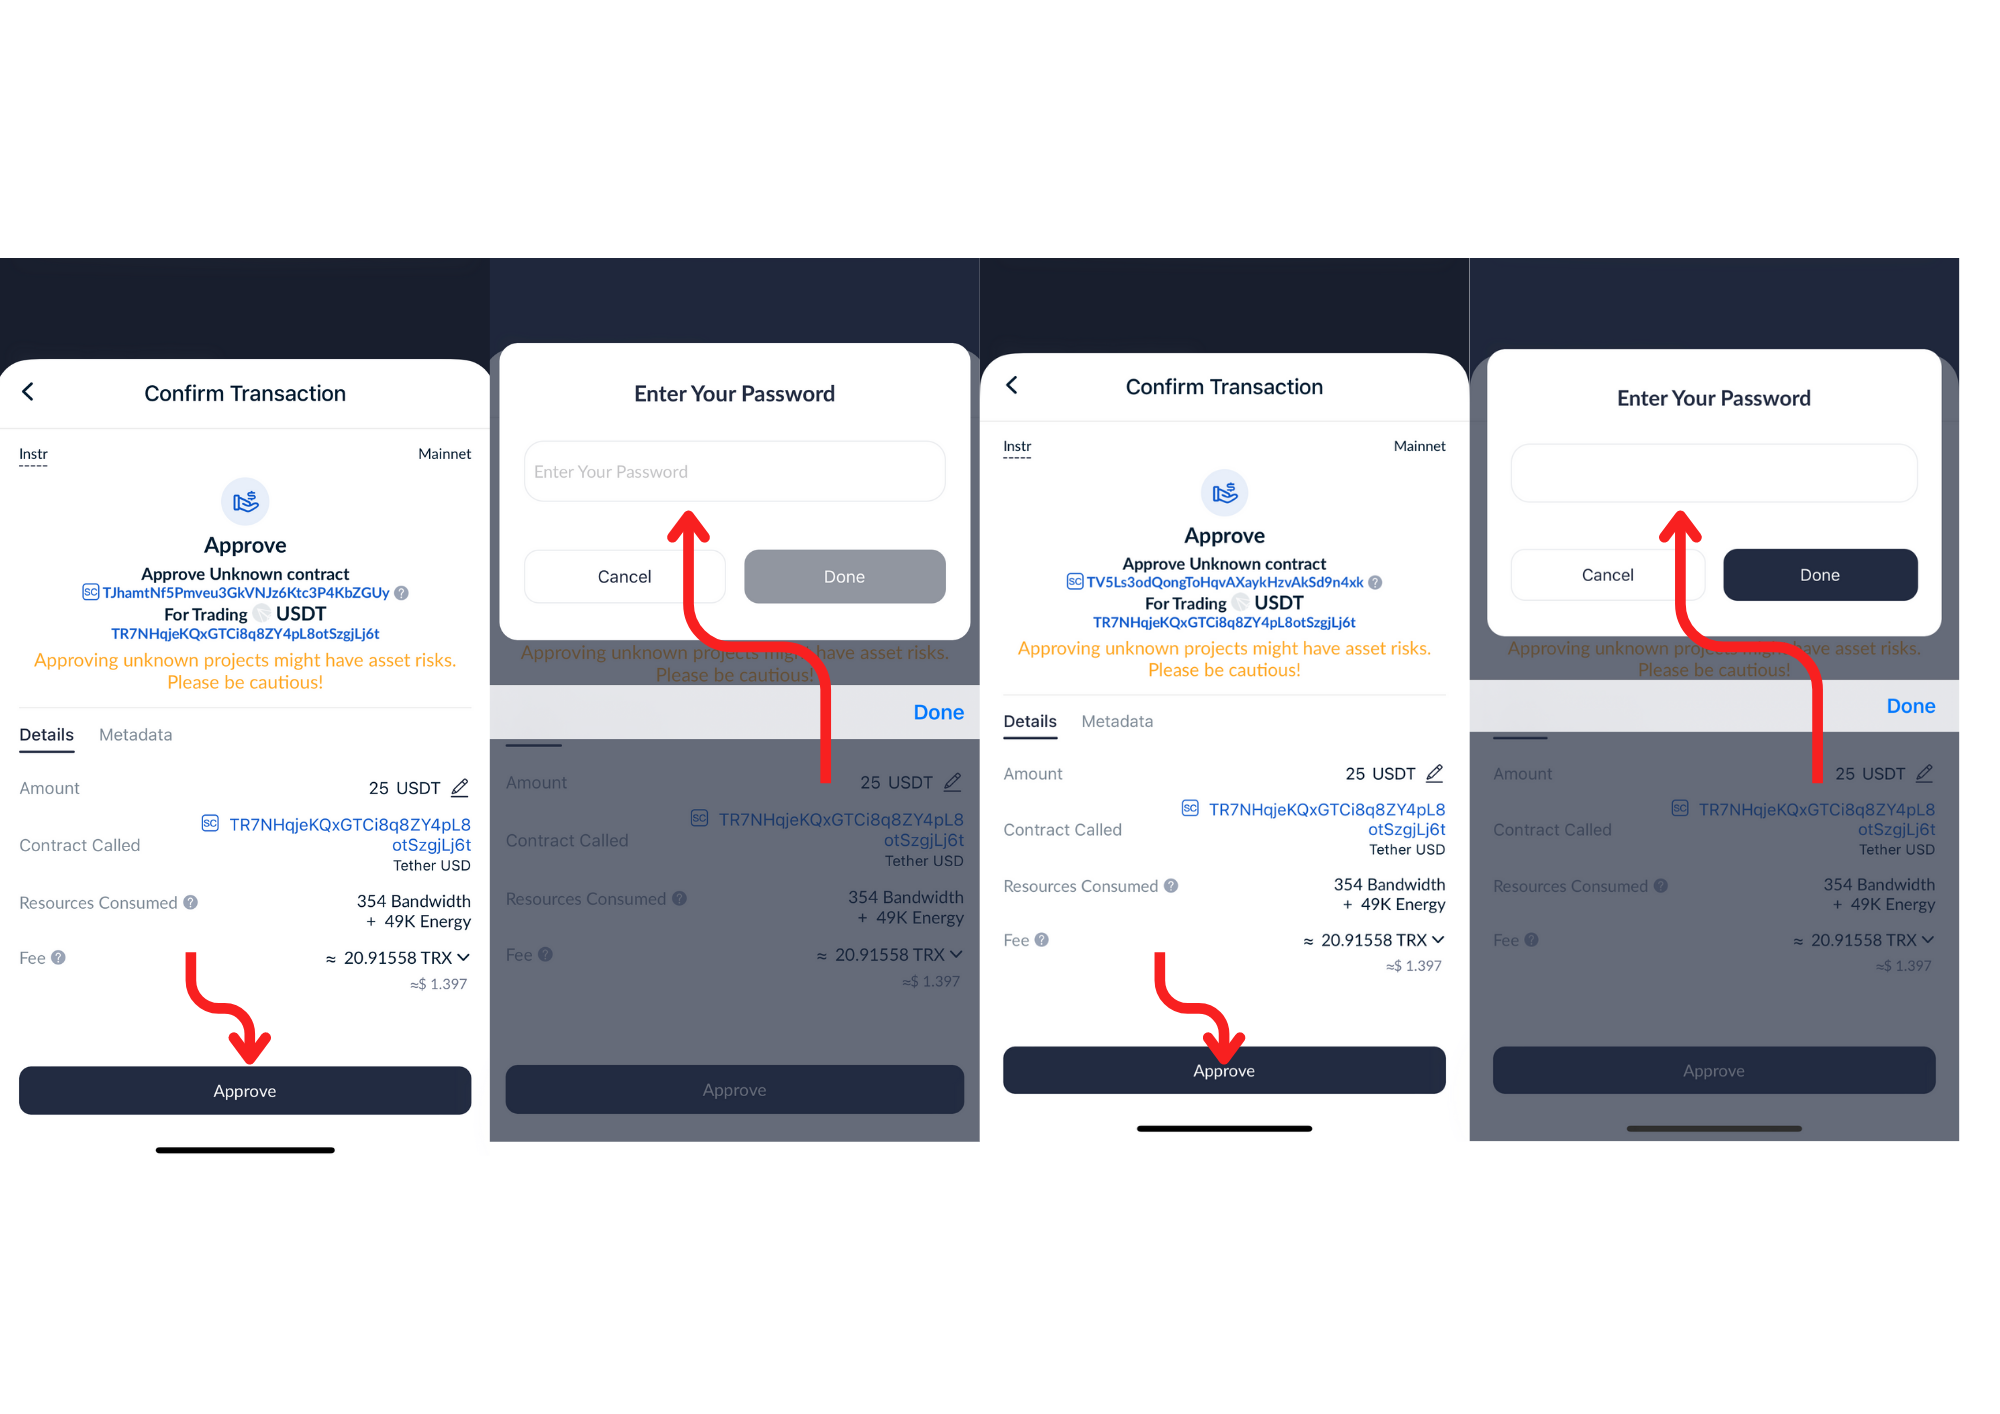
7. Approve and Enter Your Password
To complete the transaction, you will need to approve and enter your password twice. Ensure that you tap on the "Approve" button and enter your password correctly, and repeat this step to complete the transaction.
Note:
The password required is your wallet password, created when the wallet was created or imported.
It's important that the correct password is entered as without it a transaction can't be completed.
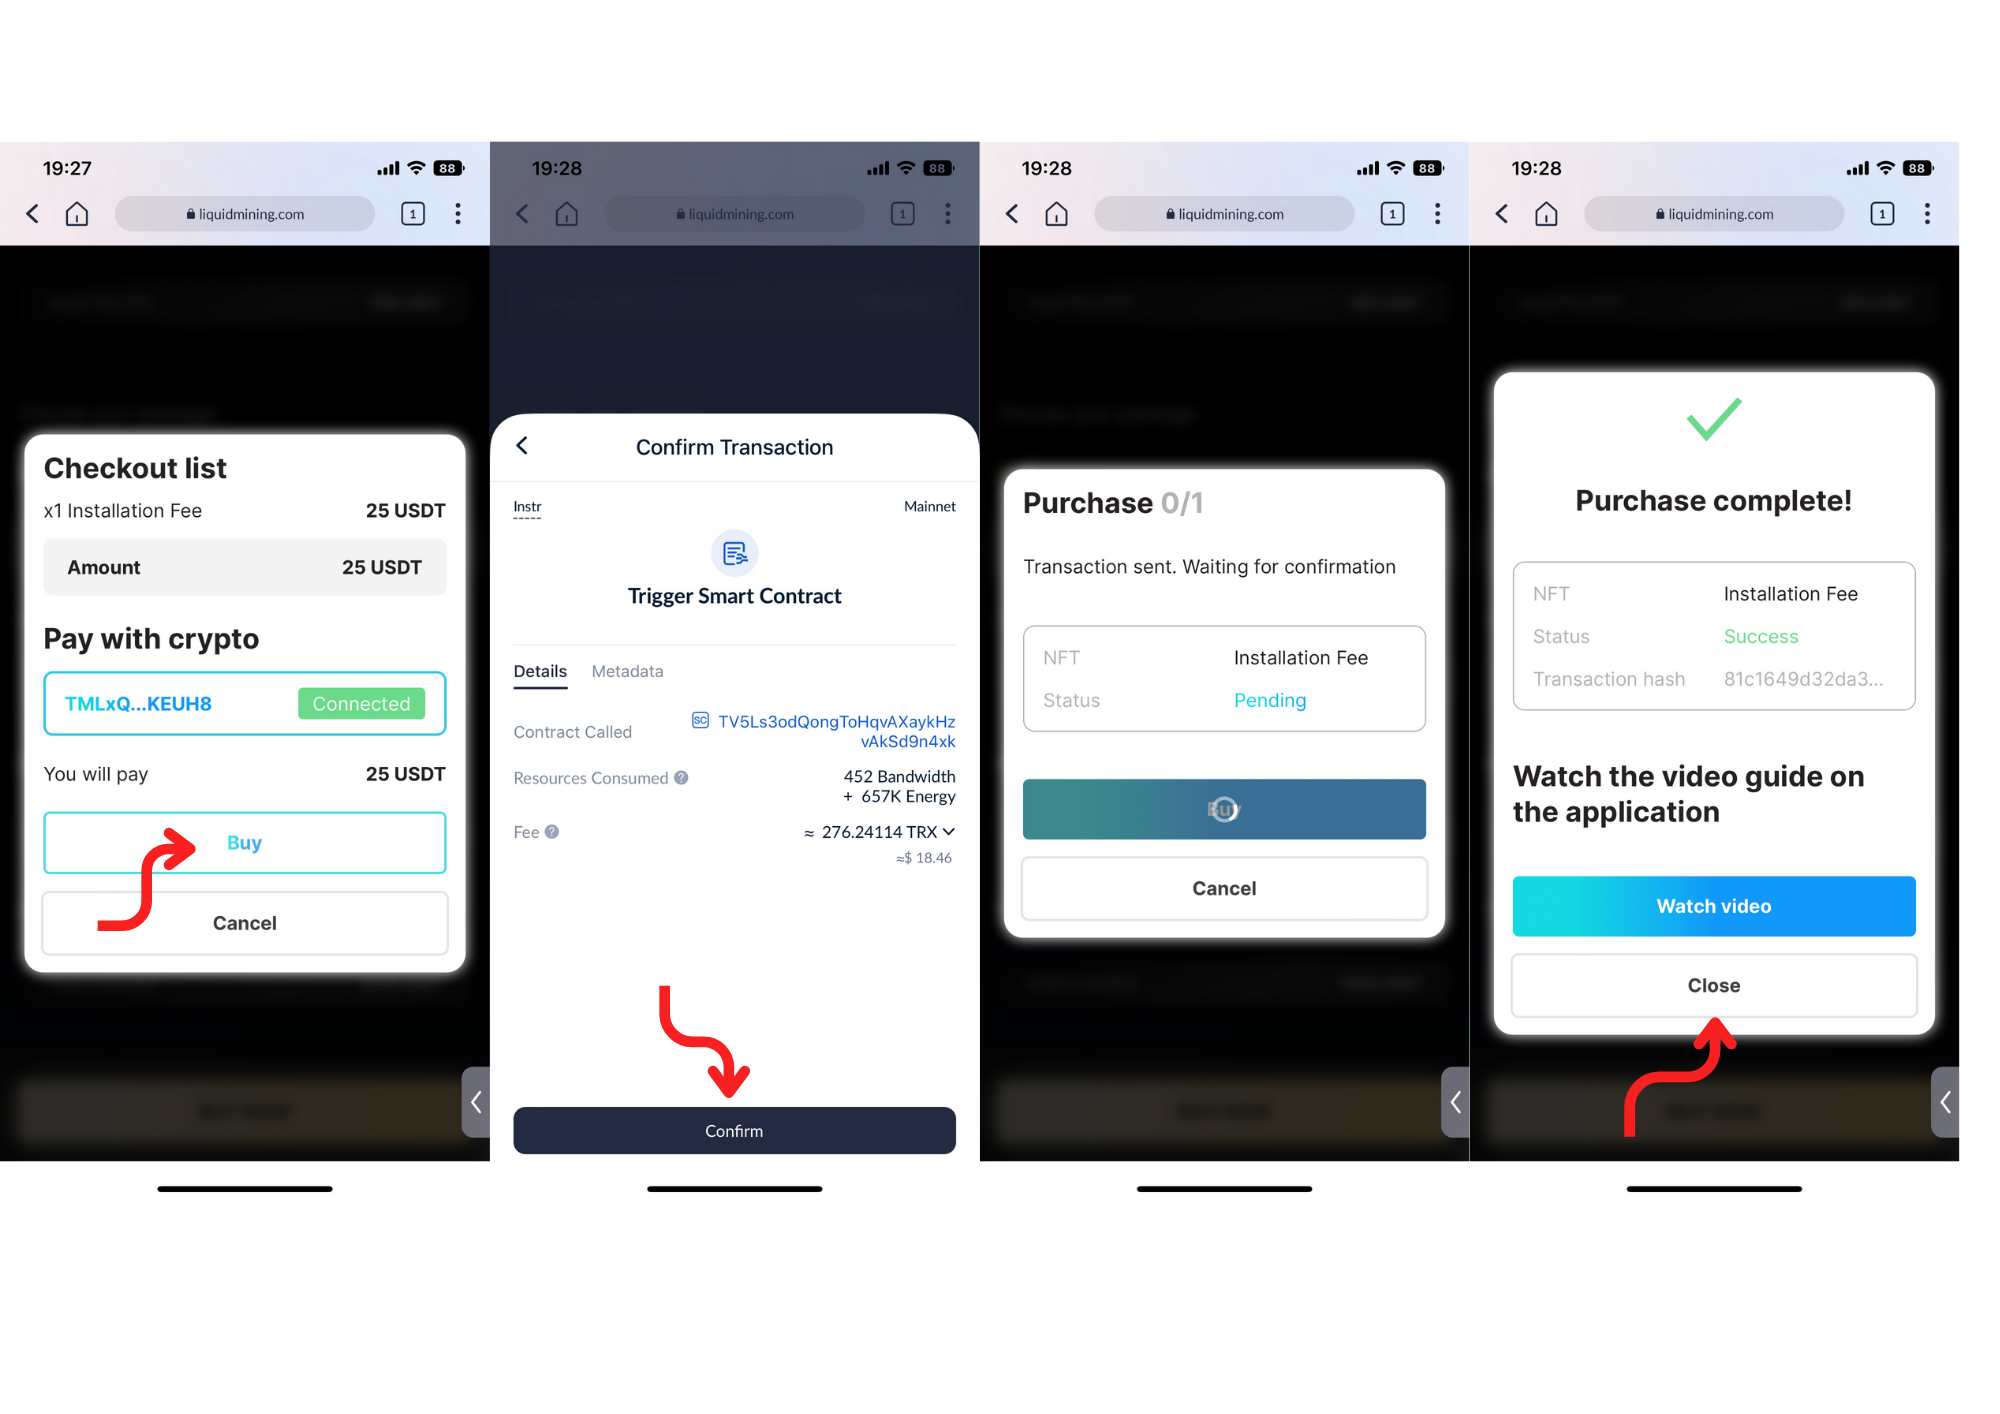
8. Click the "BUY" Button
To purchase the product or service, click on the "Buy" button, which will take you to the transaction confirmation page. On this page, you will need to press the "Confirm" button to proceed with the purchase.
Upon confirmation, you will see a pending transaction window - until it loads completely and shows the "Continue" button. Once the "Continue" button appears, your transaction status changes to "Success".
Click the "Continue" button to finalize the purchase. You will then see a pop-up window indicating that your purchase is complete. At this point, you can either watch a video tutorial on the Liquid Mining App or close the window to proceed with Installing your purchased NFT on the Liquid Mining App.
9. Confirmation
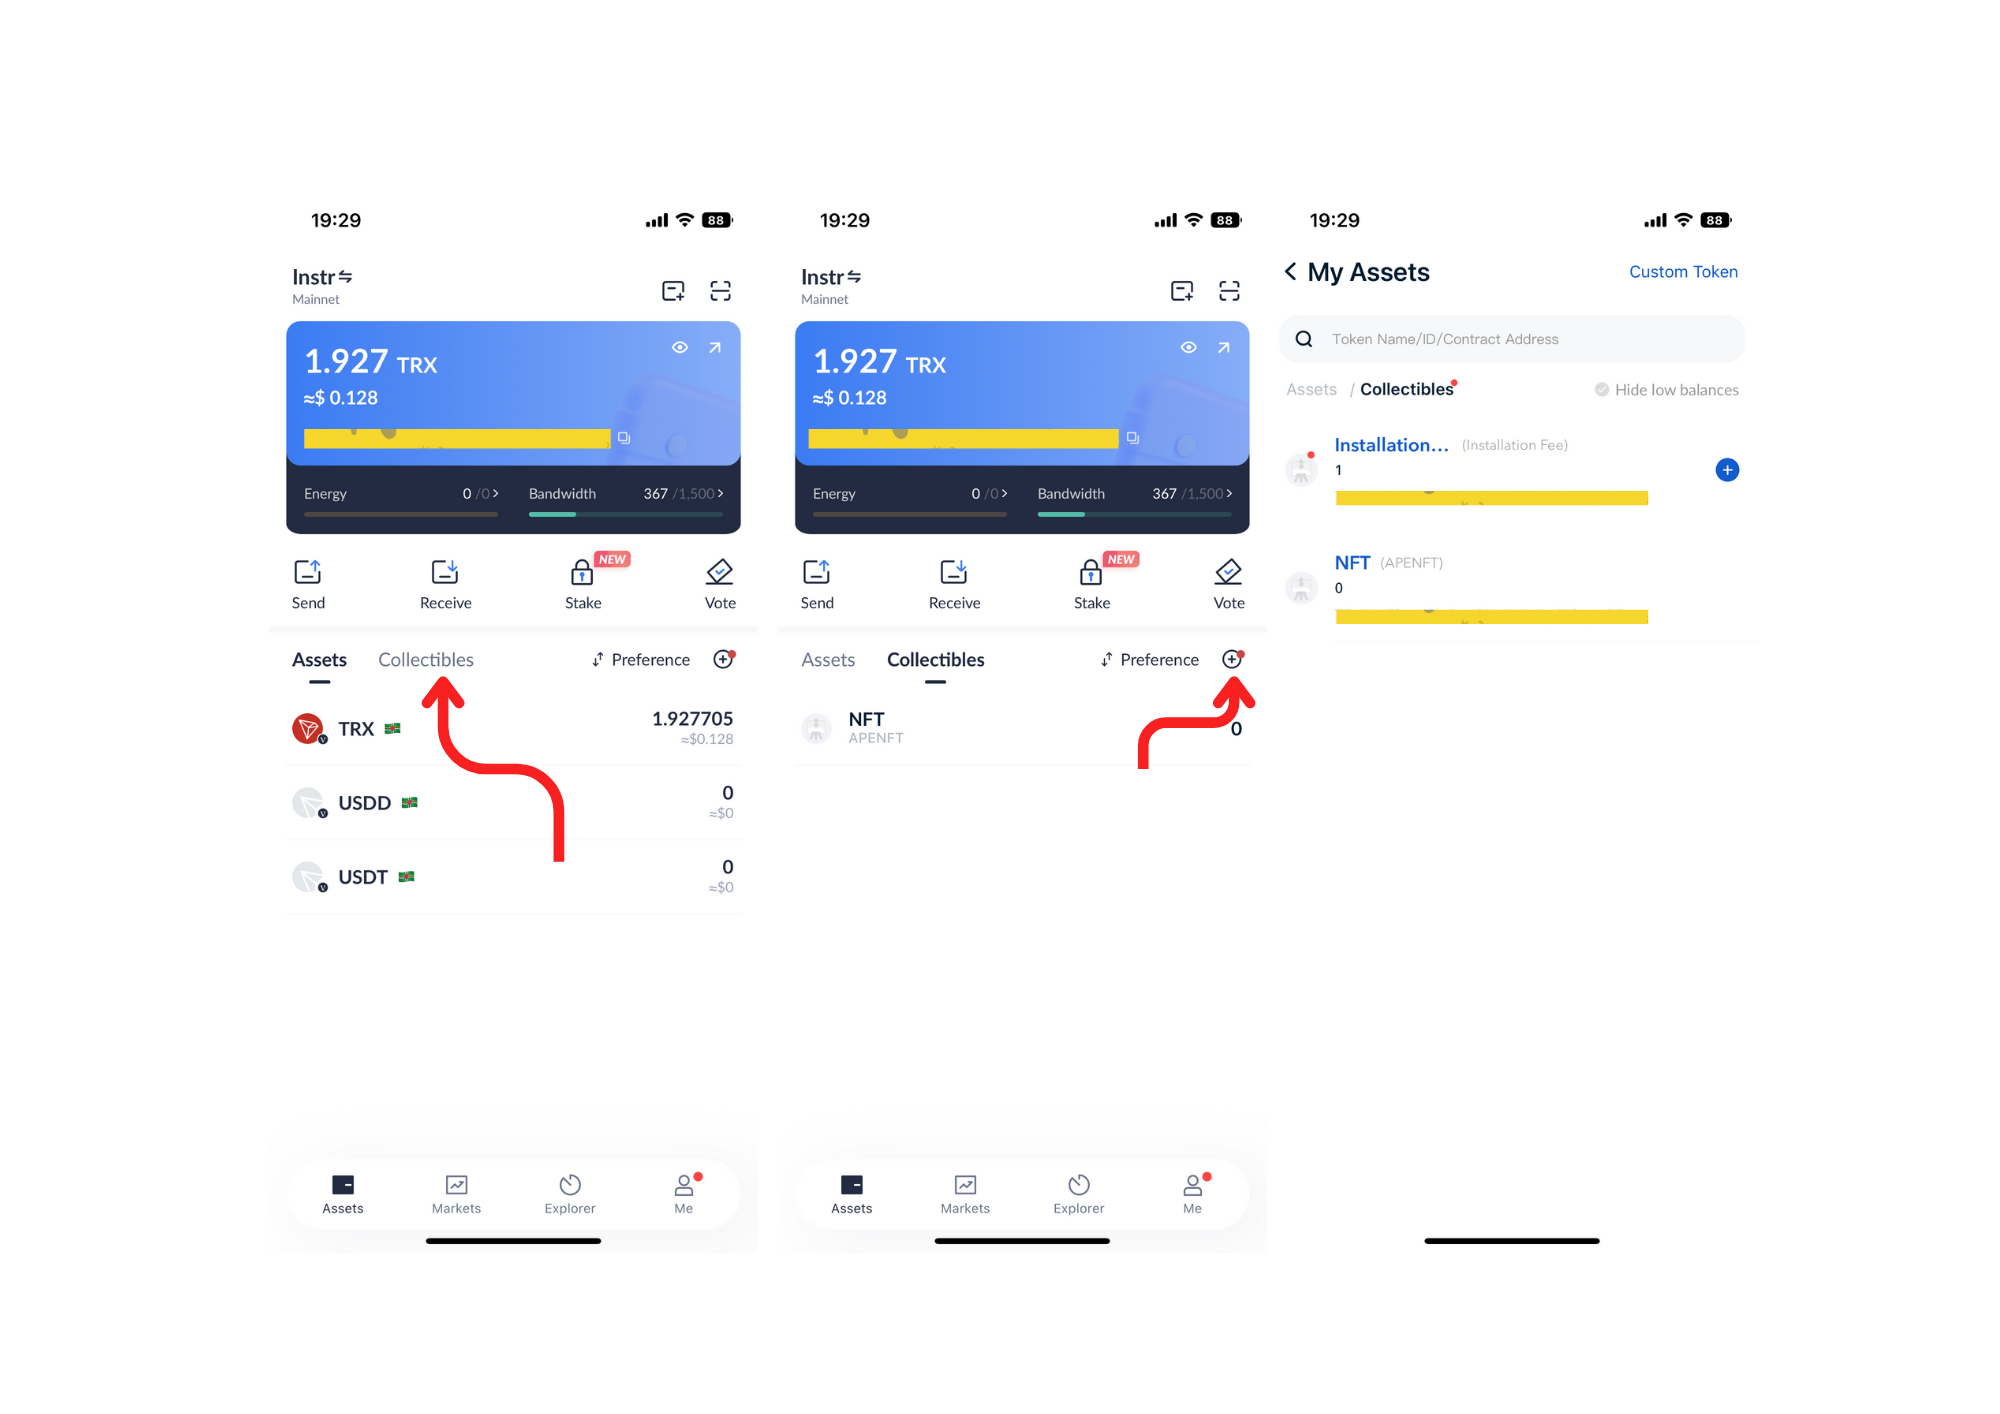
Once the USDT equivalent has been deducted, you can verify that the transaction is complete by checking your TronWallet account.
Simply return to your TronWallet homepage and click on the "Collectibles" icon, Click the "+" button beside the Preference sorting button. There, you can view the NFT(s) that you have purchased, along with the number of each item purchased. This will give you confirmation that the transaction was completed successfully.
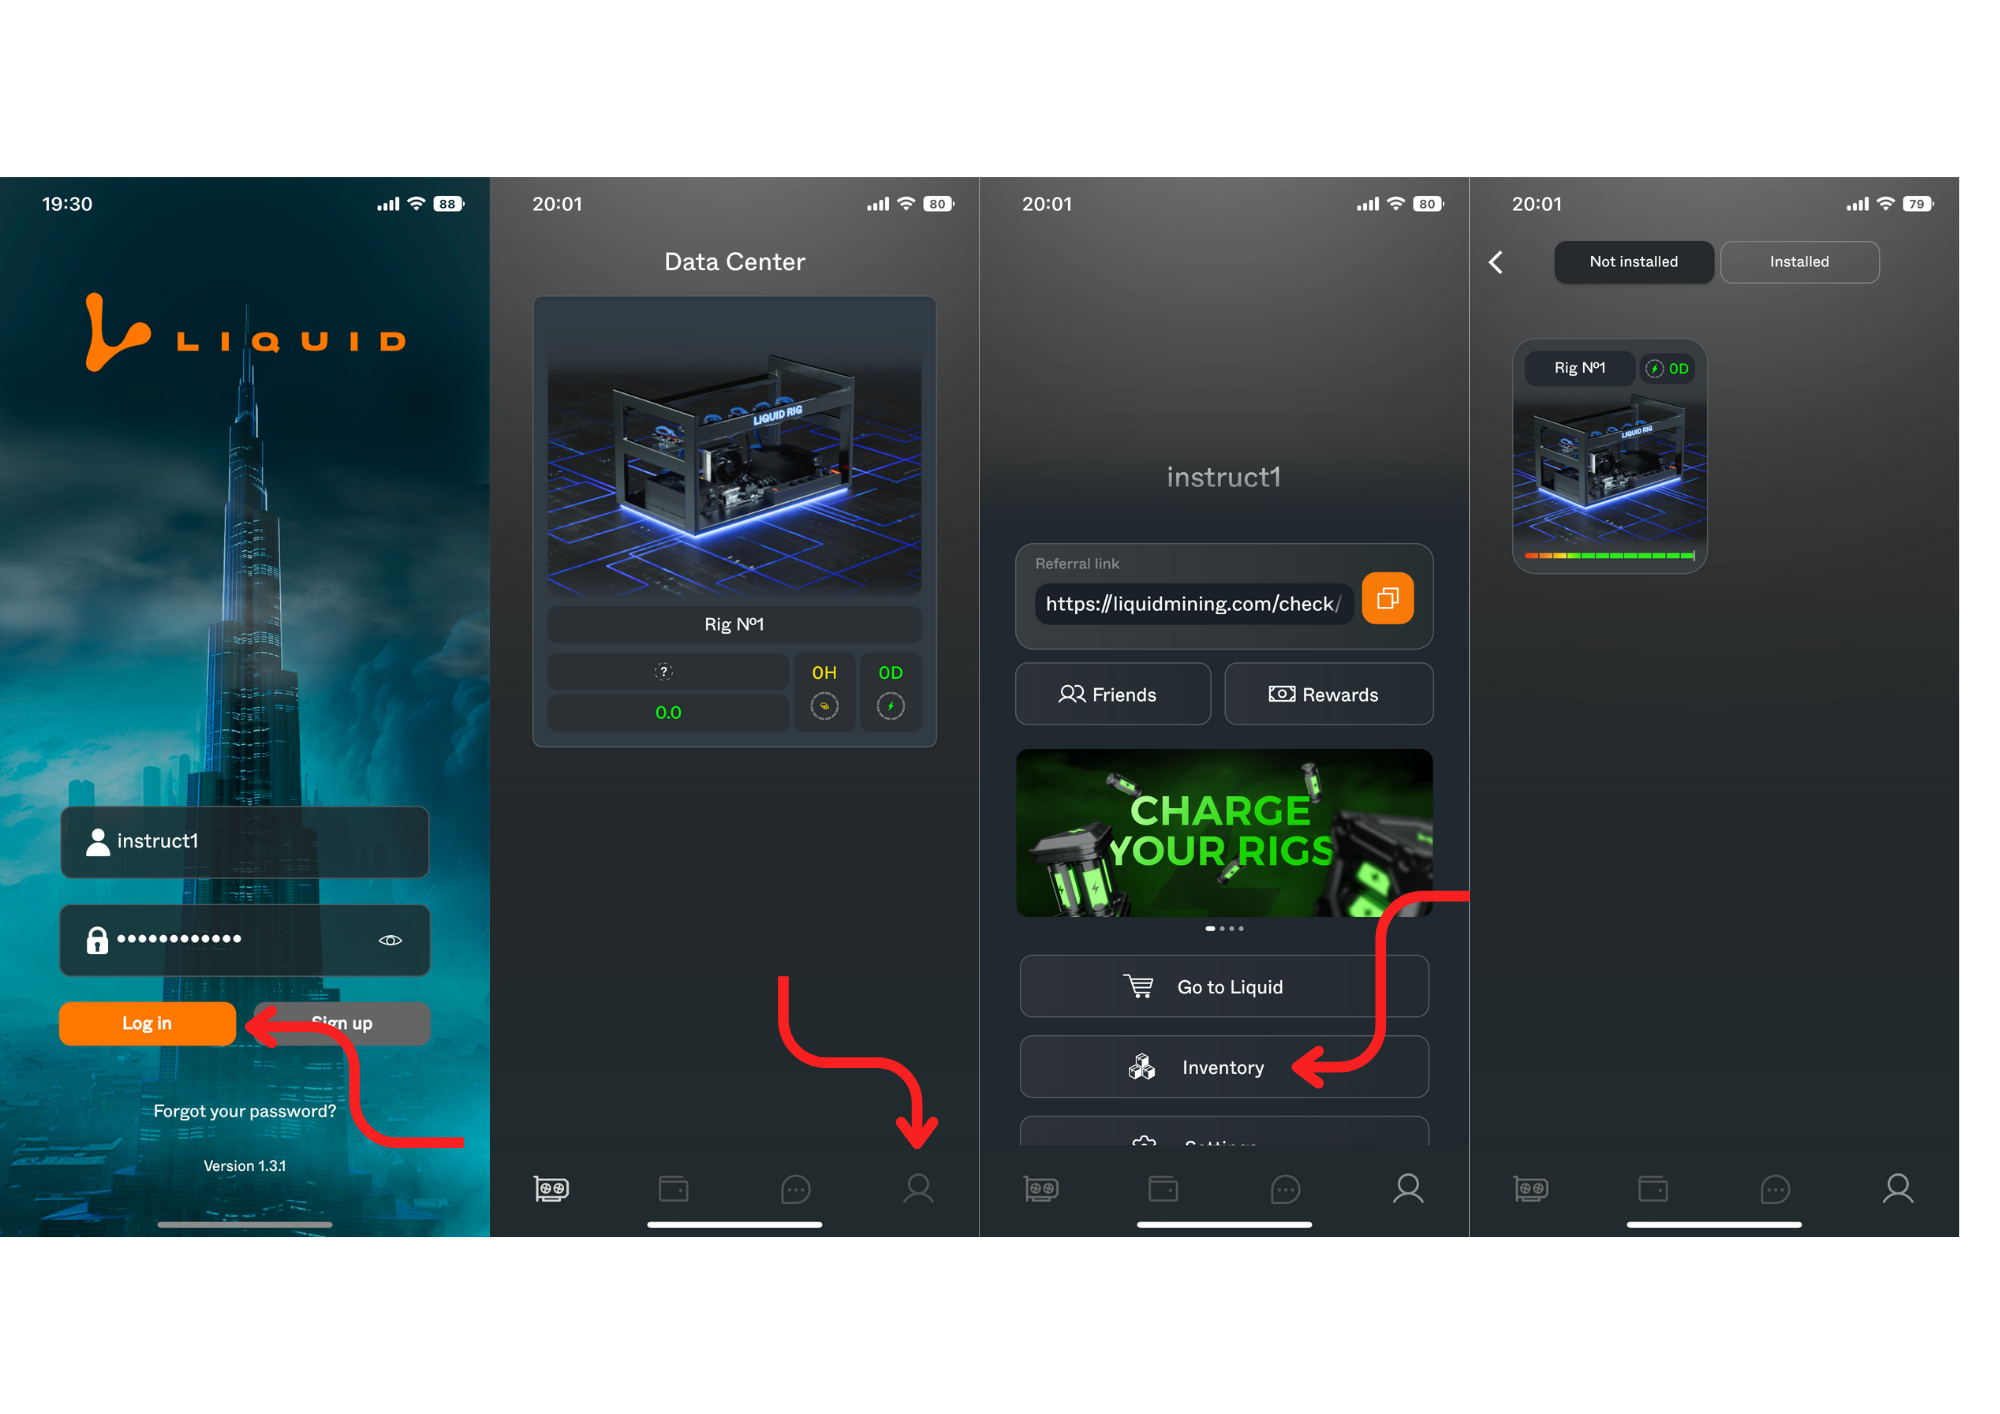
10. Open the Liquid Mining App
In order to install and manage your acquired NFTs, it is mandatory that your Liquid Mining App is up to date, Log in by entering your Username and password.
Upon logging in, you will be directed to the Data Center page where you can examine the empty or pre-filled equipment items that you have purchased. In case you have acquired a GPU or Liquid Chargers, then you will have to visit the 'Profile' section by clicking on the Profile Icon present in the lower menu.
After clicking the 'Inventory' button, all the procured NFTs, comprising GPUs and energy, can be assessed.
The Inventory section is divided into two distinct categories of installed and Not Installed NFTs for your equipment analysis.
In the case of where Installation Fee was purchased, an Empty Rig will be found in the Inventory.
Note:
An Empty Rig can take up to 6 GPU's.
You will have to Install the Empty Rig first, then Install the GPU in the Empty Rig.
Then finally install a Liquid Charger and start mining.
For any questions, concerns and queries, please contact Us using the links:
Discord: https://discord.gg/liquidmining
Telegram EN: https://t.me/nftliquid
Twitter: https://twitter.com/liquid__mining
Telegram RU: https://t.me/Liquid_Official_Ru
Telegram RU Chat: https://t.me/Liquid_Mining_Ru_Chat