Protein Cottage Cheese Brownies (Fudgy, Flourless)
There’s a particular kind of brownie people chase, and it isn’t the sugar-bomb that crumbles like cake. It’s dense, fudgy, sticky at the edges, glossy on top. Now add a pragmatist’s wishlist: plenty of protein, less sugar, and no flour in sight. That’s the brief. And yes, it can taste like a brownie rather than a compromise.
This is the version I make for busy weeks when the gym bag lives by the door and the snack window is five minutes between calls. The batter blends in one container, the pan is lined for an easy lift, and the texture resists dryness even when you reheat a square three days later. If you’ve been burned by “healthy brownies” that taste like diet penance, you’ll feel the difference in two bites.
What follows is the method I’d hand a friend who wants reliability, options for different protein powders, and clear troubleshooting for the usual traps: rubbery crumb, chalky finish, or a pan of undercooked sludge. We’ll keep the science in plain language, and we’ll use numbers that make home baking repeatable. You’ll see where to tweak sweetness, cocoa intensity, and macros without tanking structure.
The goal and the constraintProtein helps satiety, but it can also wreck a bake if you treat it like flour. Whey makes batters set quickly, casein thickens, collagen adds stickiness without structure, and plant blends absorb water like a sponge. That’s why so many high-protein desserts swing from gummy to gritty.
We sidestep the worst of it by using full-fat cottage cheese for moisture and protein in one hit, cocoa for structure and flavor, and eggs to set the custardy interior. No wheat flour, no almond flour. The texture lands squarely in “fudgy” territory because we keep free water bound in dairy solids and cocoa, not evaporated out in the oven.
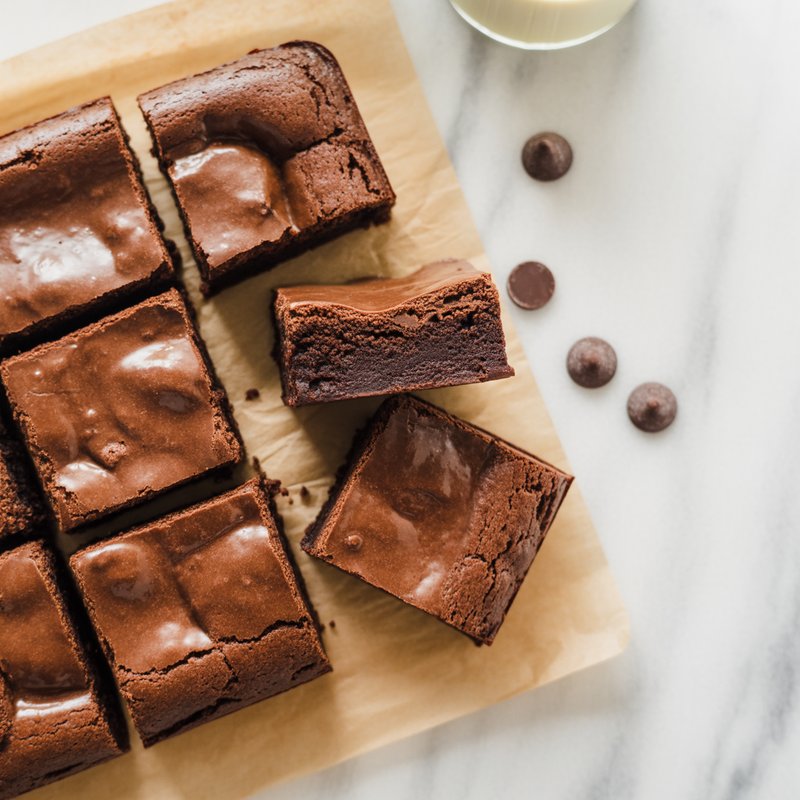
What these brownies taste likeChocolate-forward, not “protein-forward.” They’re sweeter than a dark chocolate bar but less sweet than a box mix brownie. The cottage cheese disappears into the batter once blended. The surface has that light puckering you get from cocoa-heavy batters, and the interior cuts cleanly if you chill before slicing. If you bite warm from the pan, expect more pudding-like softness by the center and a firm edge. Chilled squares are denser and closer to a truffle bar.
Ingredients that pull their weightI’ll give you a base formula, then show variations. Measure as written the first time, then adjust with intent, not hope.
Base batch for an 8 inch square pan:
300 g full-fat cottage cheese (about 1¼ cups, stirred) 2 large eggs, room temperature 75 g granulated sweetener of choice (about ⅓ cup; cane sugar or a 1:1 erythritol blend work) 60 g cocoa powder (about ¾ cup, sifted loosely) 45 g chocolate protein powder, unsweetened or lightly sweetened (about ½ cup, scoop weights vary) 60 g dark chocolate, chopped or chips (about ⅓ cup), optional but recommended 30 g neutral oil or melted butter (about 2 tablespoons) 45 g milk of choice (about 3 tablespoons) to adjust batter consistency 1 teaspoon vanilla extract ¼ teaspoon fine salt ½ teaspoon instant espresso powder, optional, to deepen chocolate flavorYou’ll notice there’s no leavening. That isn’t a mistake. We’re not trying to lift a cake. Baking powder can create a fragile, foamy structure that collapses and turns rubbery with high protein. The eggs provide enough lightness.
A note on protein powders: if yours is intensely sweetened or flavored, you may need to reduce the added sweetener by 10 to 20 g. If you only have whey isolate, use a smaller amount and add a spoonful more cocoa to keep structure. If you have a casein or whey-casein blend, that’s ideal, it thickens without turning bouncy. Plant protein blends can work, but they drink liquid aggressively, so you’ll add more milk and be careful not to overbake.

An immersion blender or regular blender matters here. You can whisk aggressively and still leave curds of cottage cheese that bake into savory speckles. Blend first, then stir in dry ingredients. A digital scale is your friend, especially for cocoa and protein powders where densities vary. If you only have cups, be gentle with cocoa, don’t pack it.
Line your 8 inch square pan with parchment so the paper overhangs two sides. That sling lets you lift the whole slab out for a clean cut.
The method that works across protein typesI’ll give the steps as a short list, then unpack the “why” right after.
Preheat to 325 F, line your pan, and lightly grease the parchment. Blend cottage cheese, eggs, sweetener, vanilla, espresso powder, oil or butter, and 30 g of the milk until silky and uniform. In a bowl, whisk cocoa, protein powder, and salt to break up clumps. Stir this dry mix into the wet base until you have a thick, glossy batter. Add the remaining milk gradually until it flows off a spoon like lava, not like cake batter. Fold in chocolate pieces if using. Rest the batter 5 minutes to let cocoa hydrate. Spread into the pan, smooth the top, and bake 20 to 26 minutes. Pull when the edges are set and the center jiggles slightly, like a soft cheesecake. A tester should emerge with moist crumbs, not wet liquid. Cool in the pan 20 minutes, then refrigerate at least 1 hour before slicing for clean edges.Why it works: blending turns cottage cheese from curds into a smooth dairy base, essentially a quick faux ricotta. Hydrating cocoa prevents dry pockets and reduces the chalky feel that some protein powders bring. Baking at 325 F slows set, which keeps moisture from fleeing to the edges and leaving the center soupy. The rest period before the oven also lets air bubbles rise out, so you don’t get a puffy, soufflé top that collapses.
If you only have whey isolateYou’ll get more elasticity and faster set. Use 30 to 35 g whey, not 45 g, keep cocoa at 60 g, and add 10 g cornstarch or 10 g additional cocoa to stabilize. Expect a slightly firmer edge. Pull on the earlier side of the bake window and lean into the chill to firm the center.
If you have casein or a whey-casein blendThis is the https://proteinmuffins.com/cottage-cheese-protein-muffins sweet spot. Keep the recipe as written. The batter will thicken after the 5 minute rest. If it becomes hard to spread, add a splash of milk and stir to return to that flowing lava consistency.
If you’re using a plant protein blendPea-based blends vary. Start with 35 to 40 g protein powder, then check the batter texture after adding milk. You may need up to 60 g milk total. Add 1 extra tablespoon of oil if the batter feels pasty, which helps the final mouthfeel. Bake closer to 22 minutes and test early, since plant proteins can go from fudgy to crumbly quickly as they lose surface moisture.
How sweet to aim forI’ve tested the base with 75 g cane sugar, 60 g erythritol monk fruit blends, and 80 g allulose. Cane sugar gives the most reliable structure and sheen. Erythritol runs cooler on the palate and can re-crystallize when chilled, giving a slight crunch at the edges on day two. Allulose browns faster and stays softer, sometimes almost too soft in the center. If you go fully sugar-free, add 10 g cocoa or a teaspoon of instant gelatin to compensate for the structural loss.
Sweetness is personal. If you prefer a darker profile, drop sweetener by 15 g and add 10 g more chocolate to the mix-in. Keep total dissolved solids roughly the same to avoid watery batter.
Cocoa, chocolate, and aromaUse natural cocoa or Dutch-processed, but know they behave differently. Dutch-processed is smoother and leans toward a low-acid, deep chocolate taste. Natural cocoa tastes brighter. Because we have no baking soda here, the acid-alkali balance isn’t critical. I prefer Dutch for this recipe, especially with the espresso powder bump.
The optional chocolate pieces melt into pockets that make a leaner batter feel indulgent. You can swap chips for chopped 70 percent bar chocolate. If you skip the mix-ins, consider adding 10 g extra oil for a softer bite.
On aroma, vanilla is not optional. Protein powders have scent notes that can read artificial once baked. Vanilla rounds the edges. Espresso powder doesn’t make the brownies taste like coffee, it amplifies chocolate the way salt does for sweets.
A real-world scenario and how to fix it in the momentYou’ve got exactly 45 minutes before you need to be out the door. Protein powder on the counter is a sweetened vanilla whey isolate. You like your brownies not too sweet, and your fridge is almost empty. What happens if you wing it?
First, reduce the added sweetener to 40 to 50 g to account for the sweetened protein. Use 30 g whey, not 45 g. Because you’re short on milk, add water and a teaspoon of oil as a stand-in. Blend the dairy base thoroughly. After mixing in dry ingredients, look at the batter. If it’s more like cookie dough, loosen with 1 to 2 tablespoons water until it flows. Bake 20 minutes, check jiggle, and accept that the edges will be a touch bouncy. Chill while you put on shoes. Take one square wrapped in parchment. It won’t be peak-perfect, but it will be chocolate, portable, and satisfying rather than a granola bar that vanishes in two bites.
Texture diagnosis: what went wrong and what to adjust next timeBrownies come with opinions, and protein adds variables. Here’s how I troubleshoot in practice.
Too rubbery: You likely used too much whey or overbaked. Cut whey by 10 g next time, or swap for a casein blend. Bake to a looser jiggle and rely on the chill to finish setting.
Too wet in the center after chilling: Either the oven runs cold or the batter was too loose. Use an oven thermometer. If the batter was soupy, reduce added milk by 15 g. Bake 2 to 4 minutes longer. If you’re mid-bake and see this happening, tent the pan with foil and extend the bake in 2 minute increments until the ring around the edge is fully set.
Grainy or sandy: This is often erythritol re-crystallization or unsifted cocoa clumps. Blend the base longer. Sift cocoa and protein together. If using erythritol, consider blending half with 15 g of allulose to reduce cooling effect and crystals.
Bland, with protein aftertaste: Increase cocoa by 10 g, add the espresso powder if you skipped it, and don’t skip vanilla. A pinch more salt helps more than you think.
Dull, matte top, no sheen: Sugar contributes to gloss. If you used allulose or purely non-nutritive sweeteners, this can happen. Melt the optional chocolate into the batter rather than folding chips to add sheen, or reserve a tablespoon of cane sugar for the base even if the rest is alternative sweetener.
Make it yours without breaking itThere’s room to personalize, but keep one rule: if you add something that dries, add something that wets. If you add something that soaks liquid, loosen somewhere else.
Nut butter swirl: Dollop 3 tablespoons warmed peanut or almond butter on top and swirl. Because nut butter thickens, add 10 g extra milk to the base.
Mint or orange: Add ¼ teaspoon peppermint extract or ½ teaspoon orange zest. Both intensify after chilling, so go easy.
Extra protein hit: You can add 10 g more protein powder, but only if you compensate with 15 g more milk and 5 g more oil. Beyond that, texture suffers.
Higher fat, silkier crumb: Replace the oil with 45 g melted butter and increase the chopped chocolate to 80 g. Bake on the longer end and chill for at least 2 hours. These eat like a flourless chocolate torte.
Lower sugar approach: Use 40 g allulose and 20 g erythritol monk fruit. Expect a softer set. Bake 2 minutes longer and don’t skip the chill.
Macros and expectationsExact numbers swing with brands. As a ballpark for the base version with cane sugar and casein blend, cut into 12 squares:
Calories: roughly 140 to 170 per square Protein: 9 to 12 g Fat: 7 to 9 g Carbs: 12 to 16 gSwap in more chocolate or more sugar alcohols and these move. If your goals are precise, plug your specific brands into a nutrition calculator. For cutting into 9 larger squares, scale the numbers accordingly.
Storage and servingThey keep covered in the fridge for up to 5 days. The texture firms over the first 24 hours, then stabilizes. For a softer bite, microwave a square for 10 to 12 seconds. For a clean slice, use a hot knife wiped between cuts. These freeze well. Wrap individual squares, then drop into a freezer bag. Thaw in the fridge or eat cold like a protein fudge bar.
With topping, restraint helps. A spoon of Greek yogurt sweetened with a drizzle of honey does more for contrast than a heavy frosting. A dusting of cocoa looks sharp and adds zero fuss.
Why cottage cheese, and what to buyFull-fat cottage cheese matters here. The curds bring casein, lactose, and fat in ratios that mimic what you’d get if you made a small custard. Low-fat works, but you’ll need more oil and the mouthfeel is thinner. Brands vary in salt and acidity. If your cheese tastes very tangy on a spoon, the brownies will lean that direction. Not bad, just less brownie-like. Blending to a smooth base is non-negotiable if you want the curd flavor to disappear.
I’ve tested with both small-curd and large-curd. The difference disappears once blended. If you cannot find full-fat, use 2 percent and increase oil by 10 g, and consider adding the chopped chocolate for richness.
Cocoa choices and a quick word on siftingCocoa clumps. Protein powders clump, too. When people tell me their batter had lumps that never baked out, they usually skipped the sieve. If you don’t own a sifter, push cocoa and protein through a fine mesh strainer with a spoon. Two minutes here saves a gritty pan later.
On brands, you don’t need a premium Dutch cocoa to get a solid result, but you do want consistent flow. If your cocoa smells flat, increase the espresso powder to ¾ teaspoon and the vanilla to 1½ teaspoons. That boosts perceived chocolate without oversweetening.
Small operational notes only a repeat bake revealsYou’ll be tempted to overbake because the center looks too fluid at 20 minutes. Trust the jiggle. You want the middle to quiver when you nudge the pan, not slosh. If you wait for a dry tester, you’ll have protein brick tomorrow.
Cutting warm smells amazing and gives a gooey center, but it also smears. If you’re baking for guests, chill, cut clean squares, then bring to room temperature. They won’t lose their fudgy bite.
If your pan is metal and dark, shave 2 minutes off the first check. If it’s glass, add 2 minutes. Convection can dry the top too quickly, so if your oven runs aggressive, reduce to 315 F and lengthen bake by a few minutes.
Greasing the parchment lightly stops the batter from tugging and creating fissures as it sets. Tiny detail, worth it.
A quick gluten-free noteThese are naturally gluten-free if your protein powder is certified GF and your cocoa isn’t processed in a facility with wheat. If cross-contact is a concern, check labels. There is no hidden flour here.
Scaling up for a 9 by 13 panMultiply all ingredients by 1.7 for a 9 by 13. Bake 24 to 30 minutes. The jiggle test still rules. If you’re doubling exactly for height, you’ll need to lower the temperature to 315 F and extend to 35 to 40 minutes to avoid a set edge and a raw core. Larger pans amplify heat gradients.
The clean, repeatable recipe cardFor an 8 inch pan, fudgy, flourless, protein-forward brownies:
Ingredients:
300 g full-fat cottage cheese 2 large eggs 75 g granulated sweetener 60 g cocoa powder 45 g chocolate protein powder, ideally whey-casein blend 60 g dark chocolate, optional 30 g neutral oil or melted butter 45 g milk of choice, divided 1 teaspoon vanilla extract ¼ teaspoon fine salt ½ teaspoon instant espresso powder, optionalMethod:
Heat oven to 325 F. Line and lightly grease an 8 inch square pan. Blend cottage cheese, eggs, sweetener, vanilla, espresso, oil, and 30 g milk until smooth. Whisk cocoa, protein powder, and salt. Stir into the wet base. Add remaining milk gradually until the batter flows in a thick ribbon. Fold in chocolate pieces if using. Rest 5 minutes. Spread in pan and bake 20 to 26 minutes. Pull when edges are set and center jiggles slightly. Cool 20 minutes in pan, then chill at least 1 hour before slicing.Store covered in the fridge up to 5 days. Freeze up to 2 months.
Where this goes wrong for people new to high-protein bakingThe most common mistake is treating protein powder like flour, by volume and by function. Flour builds gluten, holds gas, and sets differently. Protein powder isn’t a straight swap. Think of it like a strong tea that thickens when heated, not dough-building scaffolding. The second mistake is overcorrecting sweetness downwards because of fear of sugar. A little sugar isn’t just flavor, it’s structure and moisture retention. If you strip it out, you need an alternative plan, such as allulose, extra cocoa, or a bit of gelatin.
The third is impatience with the cool. Heat sets eggs, but time finishes the set and evens moisture. If you cut too soon and see a glossy, almost wet center, don’t panic. Put the slab back in the pan, chill 90 minutes, then reassess. The texture usually resolves.
Final encouragement from someone who has made the rubber brickThe first protein brownie I ever baked had the texture of a kitchen sponge. It looked fine on top and fought my knife on the cut. I’d added too much whey and chased “done” at a high oven temp. That pan taught me to trust lower heat, thicker cocoa, and the chill. When these are right, they’re the kind of square you can eat at 10 a.m. without a sugar crash, with a coffee or after a workout, and not feel you traded pleasure for macros. That’s the mark of a keeper recipe: it earns a place in your routine, not just your bookmarks.
Make the base version once. Taste it cold and warm. Then adjust one variable at a time. You’ll find your sweet spot fast, and once you do, you’ll stop buying those expensive protein treats that live near the checkout. These store better, taste better, and cost less per square. And yes, they’re unabashedly brownies.