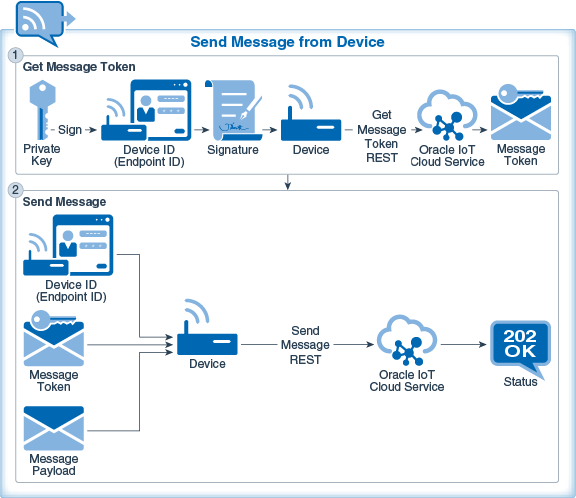
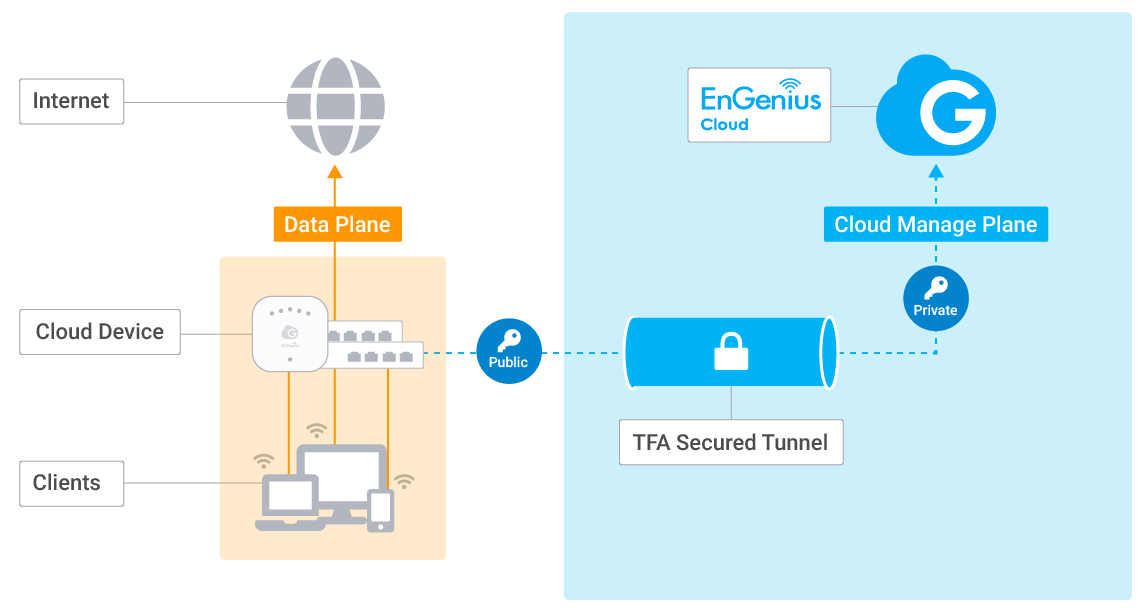
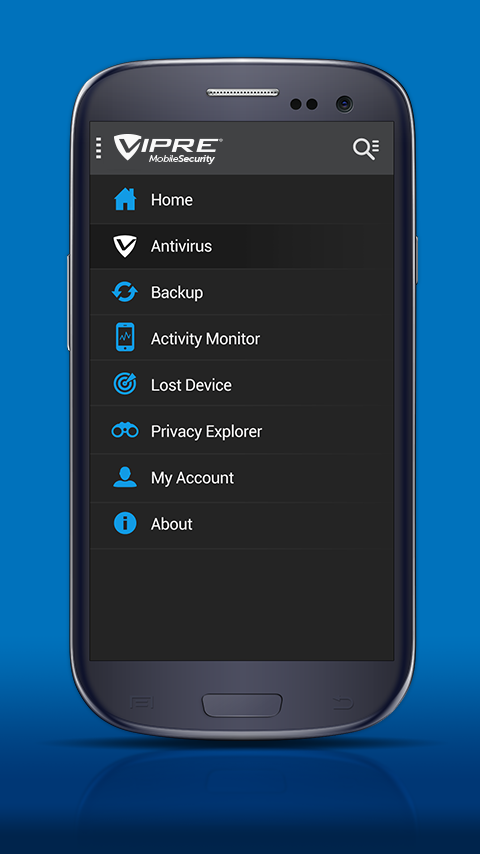
Private Device

⚡ ALL INFORMATION CLICK HERE 👈🏻👈🏻👈🏻
Private Device
C++
PHP
C#
Java
Go
C++
Python
JS
TS
Файл:
aupci.c
Проект:
ryo/netbsd-src
Файл:
flash.c
Проект:
goroutines/rumprun
/* ARGSUSED */
void
flash_attach ( device_t parent , device_t self , void * aux )
{
struct flash_softc * const sc = device_private ( self ) ;
struct flash_attach_args * const faa = aux ;
char pbuf [ 2 ] [ sizeof ( "9999 KB" ) ] ;
sc -> sc_dev = self ;
sc -> sc_parent_dev = parent ;
sc -> flash_if = faa -> flash_if ;
sc -> sc_partinfo = faa -> partinfo ;
sc -> hw_softc = device_private ( parent ) ;
format_bytes ( pbuf [ 0 ] , sizeof ( pbuf [ 0 ] ) , sc -> sc_partinfo . part_size ) ;
format_bytes ( pbuf [ 1 ] , sizeof ( pbuf [ 1 ] ) , sc -> flash_if -> erasesize ) ;
aprint_naive ( "\n" ) ;
switch ( sc -> flash_if -> type ) {
case FLASH_TYPE_NOR :
aprint_normal ( ": NOR flash partition size %s, offset %#jx" ,
pbuf [ 0 ] , ( uintmax_t ) sc -> sc_partinfo . part_offset ) ;
break ;
case FLASH_TYPE_NAND :
aprint_normal ( ": NAND flash partition size %s, offset %#jx" ,
pbuf [ 0 ] , ( uintmax_t ) sc -> sc_partinfo . part_offset ) ;
break ;
default :
aprint_normal ( ": %s unknown flash" , pbuf [ 0 ] ) ;
}
if ( sc -> sc_partinfo . part_flags & FLASH_PART_READONLY ) {
sc -> sc_readonly = true ;
aprint_normal ( ", read only" ) ;
} else {
sc -> sc_readonly = false ;
}
aprint_normal ( "\n" ) ;
if ( sc -> sc_partinfo . part_size == 0 ) {
aprint_error_dev ( self ,
"partition size must be larger than 0\n" ) ;
return ;
}
switch ( sc -> flash_if -> type ) {
case FLASH_TYPE_NOR :
aprint_normal_dev ( sc -> sc_dev ,
"erase size %s bytes, write size %d bytes\n" ,
pbuf [ 1 ] , sc -> flash_if -> writesize ) ;
break ;
case FLASH_TYPE_NAND :
default :
aprint_normal_dev ( sc -> sc_dev ,
"erase size %s, page size %d bytes, write size %d bytes\n" ,
pbuf [ 1 ] , sc -> flash_if -> page_size ,
sc -> flash_if -> writesize ) ;
break ;
}
if ( ! pmf_device_register1 ( sc -> sc_dev , NULL , NULL , flash_shutdown ) )
aprint_error_dev ( sc -> sc_dev ,
"couldn't establish power handler\n" ) ;
}
static void
sackbc_attach ( device_t parent , device_t self , void * aux )
{
struct sackbc_softc * sc = device_private ( self ) ;
struct sacc_softc * psc = device_private ( parent ) ;
struct sa1111_attach_args * aa = ( struct sa1111_attach_args * ) aux ;
device_t child ;
uint32_t tmp , clock_bit ;
int intr , slot ;
switch ( aa -> sa_addr ) {
case SACC_KBD0 : clock_bit = ( 1 << 6 ) ; intr = 21 ; break ;
case SACC_KBD1 : clock_bit = ( 1 << 5 ) ; intr = 18 ; break ;
default :
return ;
}
if ( aa -> sa_size <= 0 )
aa -> sa_size = SACCKBD_SIZE ;
if ( aa -> sa_intr == SACCCF_INTR_DEFAULT )
aa -> sa_intr = intr ;
sc -> dev = self ;
sc -> iot = psc -> sc_iot ;
if ( bus_space_subregion ( psc -> sc_iot , psc -> sc_ioh ,
aa -> sa_addr , aa -> sa_size , & sc -> ioh ) ) {
aprint_normal ( ": can't map subregion\n" ) ;
return ;
}
/* enable clock for PS/2 kbd or mouse */
tmp = bus_space_read_4 ( psc -> sc_iot , psc -> sc_ioh , SACCSC_SKPCR ) ;
bus_space_write_4 ( psc -> sc_iot , psc -> sc_ioh , SACCSC_SKPCR ,
tmp | clock_bit ) ;
sc -> ih_rx = NULL ;
sc -> intr = aa -> sa_intr ;
sc -> polling = 0 ;
tmp = bus_space_read_4 ( sc -> iot , sc -> ioh , SACCKBD_CR ) ;
bus_space_write_4 ( sc -> iot , sc -> ioh , SACCKBD_CR , tmp | KBDCR_ENA ) ;
/* XXX: this is necessary to get keyboard working. but I don't know why */
bus_space_write_4 ( sc -> iot , sc -> ioh , SACCKBD_CLKDIV , 2 ) ;
tmp = bus_space_read_4 ( sc -> iot , sc -> ioh , SACCKBD_STAT ) ;
if ( ( tmp & KBDSTAT_ENA ) == 0 ) {
printf ( "??? can't enable KBD controller\n" ) ;
return ;
}
printf ( "\n" ) ;
sc -> pt = pckbport_attach ( sc , & sackbc_ops ) ;
/*
* Although there is no such thing as SLOT for SA-1111 kbd
* controller, pckbd and pms drivers require it.
*/
for ( slot = PCKBPORT_KBD_SLOT ; slot <= PCKBPORT_AUX_SLOT ; ++ slot ) {
child = pckbport_attach_slot ( self , sc -> pt , slot ) ;
if ( child == NULL )
continue ;
sc -> slot = slot ;
rnd_attach_source ( & sc -> rnd_source , device_xname ( child ) ,
RND_TYPE_TTY , 0 ) ;
/* only one of KBD_SLOT or AUX_SLOT is used. */
break ;
}
}
Файл:
urio.c
Проект:
eyberg/rumpkernel-netbsd-src
Файл:
si_sebuf.c
Проект:
lacombar/netbsd-alc
Файл:
if_url.c
Проект:
eyberg/rumpkernel-netbsd-src
Файл:
ohci_pci.c
Проект:
eyberg/rumpkernel-netbsd-src
Файл:
if_sf_pci.c
Проект:
ryo/netbsd-src
Файл:
if_tap.c
Проект:
bigclouds/netbsd_dpdk_port
Файл:
atzsc.c
Проект:
krytarowski/netbsd-current-src-sys
Файл:
pci.c
Проект:
yazshel/netbsd-kernel
Файл:
pckbc_acpi.c
Проект:
lacombar/netbsd-alc
Файл:
pckbc_acpi.c
Проект:
lacombar/netbsd-alc
Файл:
wdc_buddha.c
Проект:
lacombar/netbsd-alc
Файл:
uninorth.c
Проект:
ryo/netbsd-src
Файл:
sony_acpi.c
Проект:
Tommmster/netbsd-avr32
Файл:
if_url.c
Проект:
eyberg/rumpkernel-netbsd-src
Файл:
acpi_cpu.c
Проект:
RyanLucchese/rumpkernel-netbsd-src
Файл:
if_tra_mca.c
Проект:
eyberg/rumpkernel-netbsd-src
Файл:
acpi_cpu.c
Проект:
RyanLucchese/rumpkernel-netbsd-src
Файл:
if_ndis_pci.c
Проект:
yazshel/netbsd-kernel
Файл:
acpi_cpu.c
Проект:
RyanLucchese/rumpkernel-netbsd-src
Файл:
ubsa.c
Проект:
eyberg/rumpkernel-netbsd-src
Файл:
if_il.c
Проект:
yazshel/netbsd-kernel
/*
* Initialization of interface; clear recorded pending
* operations, and reinitialize UNIBUS usage.
*/
int
ilinit ( struct ifnet * ifp )
{
struct il_softc * sc = ifp -> if_softc ;
int s ;
if ( sc -> sc_flags & ILF_RUNNING )
return 0 ;
if ( ( ifp -> if_flags & IFF_RUNNING ) == 0 ) {
if ( if_ubainit ( & sc -> sc_ifuba ,
device_private ( device_parent ( sc -> sc_dev ) ) ,
ETHER_MAX_LEN ) ) {
aprint_error_dev ( sc -> sc_dev , "can't initialize\n" ) ;
sc -> sc_if . if_flags &= ~ IFF_UP ;
return 0 ;
}
sc -> sc_ui . ui_size = sizeof ( sc -> sc_isu ) ;
sc -> sc_ui . ui_vaddr = ( void * ) & sc -> sc_isu ;
uballoc ( device_private ( device_parent ( sc -> sc_dev ) ) , & sc -> sc_ui , 0 ) ;
}
sc -> sc_scaninterval = ILWATCHINTERVAL ;
ifp -> if_timer = sc -> sc_scaninterval ;
/*
* Turn off source address insertion (it's faster this way),
* and set board online. Former doesn't work if board is
* already online (happens on ubareset), so we put it offline
* first.
*/
s = splnet ( ) ;
IL_WCSR ( IL_CSR , ILC_RESET ) ;
if ( ilwait ( sc , "hardware diag" ) ) {
sc -> sc_if . if_flags &= ~ IFF_UP ;
goto out ;
}
IL_WCSR ( IL_CSR , ILC_CISA ) ;
while ( ( IL_RCSR ( IL_CSR ) & IL_CDONE ) == 0 )
;
/*
* If we must reprogram this board's physical ethernet
* address (as for secondary XNS interfaces), we do so
* before putting it on line, and starting receive requests.
* If you try this on an older 1010 board, it will total
* wedge the board.
*/
if ( sc -> sc_flags & ILF_SETADDR ) {
memcpy ( & sc -> sc_isu , CLLADDR ( ifp -> if_sadl ) , ETHER_ADDR_LEN ) ;
IL_WCSR ( IL_BAR , LOWORD ( sc -> sc_ui . ui_baddr ) ) ;
IL_WCSR ( IL_BCR , ETHER_ADDR_LEN ) ;
IL_WCSR ( IL_CSR , ( ( sc -> sc_ui . ui_baddr >> 2 ) & IL_EUA ) | ILC_LDPA ) ;
if ( ilwait ( sc , "setaddr" ) )
goto out ;
IL_WCSR ( IL_BAR , LOWORD ( sc -> sc_ui . ui_baddr ) ) ;
IL_WCSR ( IL_BCR , sizeof ( struct il_stats ) ) ;
IL_WCSR ( IL_CSR , ( ( sc -> sc_ui . ui_baddr >> 2 ) & IL_EUA ) | ILC_STAT ) ;
if ( ilwait ( sc , "verifying setaddr" ) )
goto out ;
if ( memcmp ( sc -> sc_stats . ils_addr ,
CLLADDR ( ifp -> if_sadl ) , ETHER_ADDR_LEN ) != 0 ) {
aprint_error_dev ( sc -> sc_dev , "setaddr didn't work\n" ) ;
goto out ;
}
}
Файл:
imx6_usdhc.c
Проект:
ryo/netbsd-src
Файл:
isic_isa.c
Проект:
ryo/netbsd-src
Файл:
umass_scsipi.c
Проект:
ryoon/netbsd-xhci
Файл:
isic_isa.c
Проект:
ryo/netbsd-src
Файл:
if_kue.c
Проект:
ryoon/netbsd-xhci
PHP
| C# (CSharp)
| Java
| Golang
| C++ (Cpp)
| Python
| JavaScript
| TypeScript
EN
| RU
| DE
| FR
| ES
| PT
| IT
| JP
| ZH
iphone - Private unique device identifier in iOS - Stack Overflow
C++ (Cpp) device _ private примеры использования - HotExamples
SmartThings Developers | Documentation | device _info.json
Obtaining a Private Display Device Context - Win32 apps | Microsoft Docs
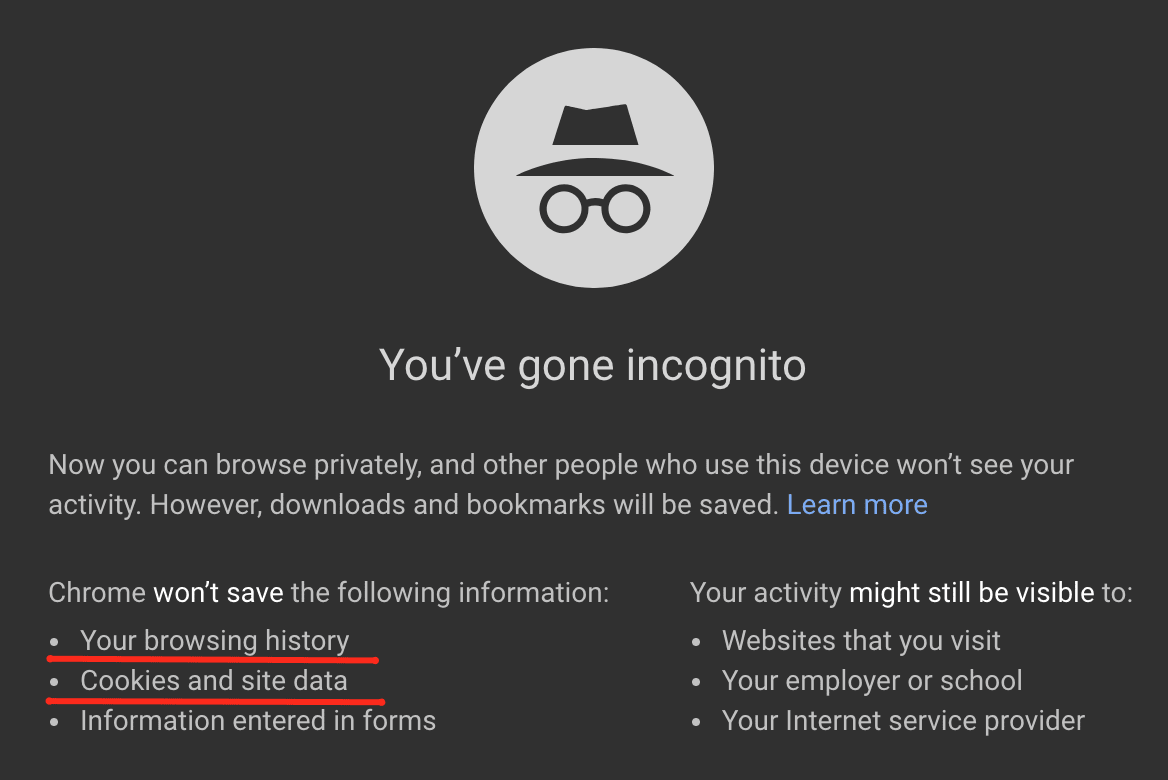
14 ways to stay private while using an Android device - ProtonMail Blog
Documentation
Distribution
Support
Blog
Sign Up
Log In
Log In
Search Open
Workspace
Develop a device app
Getting Started
Basics
Authorization
Devices
Basics
Cloud-connected device
SmartThings Schema connector
Quick start
Interaction types
Device handler types
SmartApp Connector
Quick start
Manage devices
Direct-connected devices
Overview
Setup environment
Register a device
Develop a device app
Publish a commercial device
Hub-connected device
Device profile
Capabilities
Custom Capabilities
Migrate from a DTH to a Custom Capability
Scenes
Voice control
Publishing
Basics
Request to publish
Shipment guidelines
Brands
Test lab
Health check
SmartApps
Basics
Automations
Quick start
Send device commands
Create device events
Hosting
WebHook endpoint
AWS Lambda
Registration
Lifecycles
Configuration
Subscriptions
Scheduling
Callback
Rules
Overview
Rules Breakdown
Glossary
Locations
Basics
Rooms
OAuth integrations
Rate limits
Testing
How to test
Developer mode
Self-test guidelines
Tools
Developer Workspace
SDKs
Samples
Tutorials
Basics
Reference
Capabilities
SmartThings API
SmartApp API
Glossary
FAQ
Changelog
Build new connections on SmartThings today.
Documentation
Getting Started
What's New
Basics
Tutorials
Devices
Testing
Publishing a Device
Developer Workspace
Samples
Reference
Glossary
FAQ
Distribution
Publish Your Device to SmartThings
Enroll in SmartThings Developers
Support
Ask for Support
Resources
SAMSUNG Developers
Bixby Developer
SmartThings GitHub
Language
English (United States)
Copyright © 2021 SAMSUNG. All rights reserved.
After setting up your programming environment and registering your device, you are ready to create a new device project and develop a device app.
We recommend getting started by branching off of one of the example projects provided in the References Git repository. In this example, we will use the "switch_example" application from the SDK reference directory. The full path of ESP8266 is displayed below:
Your IoT device needs two pieces of information when connecting to the SmartThings Platform. These json-formatted files should be passed to the SmartThings Device SDK as a parameter of st_conn_init() api.
This file can contain per-device specific information including firmware version, device private key, device public key and device serial number.
There are two types of formats for device_info.json .
device_info.json can include all information in json format. Our SmartThings Device SDK sample applications (e.g. light_example , switch_example ) use this method. This is the easiest and simplest way to contain security information for devices. However, having per-device specific information in json format may not be suitable for manufacturing. Therefore, this format is recommended for test devices for individual developers.
This file can be generated by stdk-keygen.py :
We can leave only the firmware version in device_info.json :
In this case, other security information including device private key, device public key and device serial number should be moved to a dedicated secure partition - referred to as SmartThings Non-Volatile (STNV) Partition - with the CONFIG_STDK_IOT_CORE_SUPPORT_STNV_PARTITION option enabled.
This is suitable for manufacturing because it can have a dedicated secure partition for immutable information. SmartThings Device SDK expects security information from STNV partition with the path name mentioned below.
The mapping between iot_nvd_t and the real storage path name can be found at iot_bsp_nv_data_XXX.c for each bsp's porting layer .
stdk-keygen.py also supports batch creation by reading csv-formatted series of device serial numbers.
If the CONFIG_STDK_IOT_CORE_SUPPORT_STNV_PARTITION option is enabled, SmartThings Device SDK ignores the privateKey , publicKey and serialNumber fields from device_info.json .
This file contains common project information and can be downloaded from the Developer Workspace project page. Our sample application (e.g. light_example , switch_example ) embeds it as an object blob. However, you have the flexibility to decide how to embed it as a part of the device firmware.
A device application is developed using the APIs provided by the IoT Core Device Library. We recommend reuse of the example device applications (e.g. switch_example , light_example ). This allows for rapid development as you begin to develop your new device. Major APIs are listed below:
Main function example for ESP8266 :
Navigate to the root directory of the SmartThings Device SDK Reference git repo and execute the build script build.py with the following parameter:
After compiling, the following results can be seen. Next, we must flash these results according to the binary download method for your chipset.
In the case of Espressif chipsets such as ESP8266 and ESP32, you can now run the following command to flash all binaries (app, bootloader, and init data bin) to the chipset.
The serial port needs to be matched to the computer environment for serial port flashing. For example, the settings for serial port flashing can be configured via the menuconfig option in Espressif. If the serial port setting does not match your environment, please execute the following:
The menuconfig option is only supported on the Espressif chipset. If you use a different chipset, please set it according to the selected original chipset guide.
You do not need to run python build.py appes/esp8266/switch_example before running python build.py appes/esp8266/switch_example flash ; this will automatically rebuild everything that needs to be built before flashing.
For more details about flashing and monitoring, please refer to the SmartThings Device SDK Reference README file.
The SmartThings App should be used to control an IoT device that is running on the SmartThings Platform. Visit your mobile device's app marketplace such as the Play Store, App Store, or Galaxy Store and download the SmartThings app.
Add your device In the SmartThings app, navigate to Add > Device and click My Testing Devices or Scan QR code and follow the onboarding process.
Control your device Verify your device functions as expected from the SmartThings app dash board and detailed device view.
Futa Overwatch Pov
Teen Casting Hard Fuck
Outdoor Gif
Mature Art
Guy Outdoor