Pod Detailed Explanation #2
https://medium.com/aws-in-plain-english/pod-detailed-explanation-dfca4eac18e5Creation and Termination
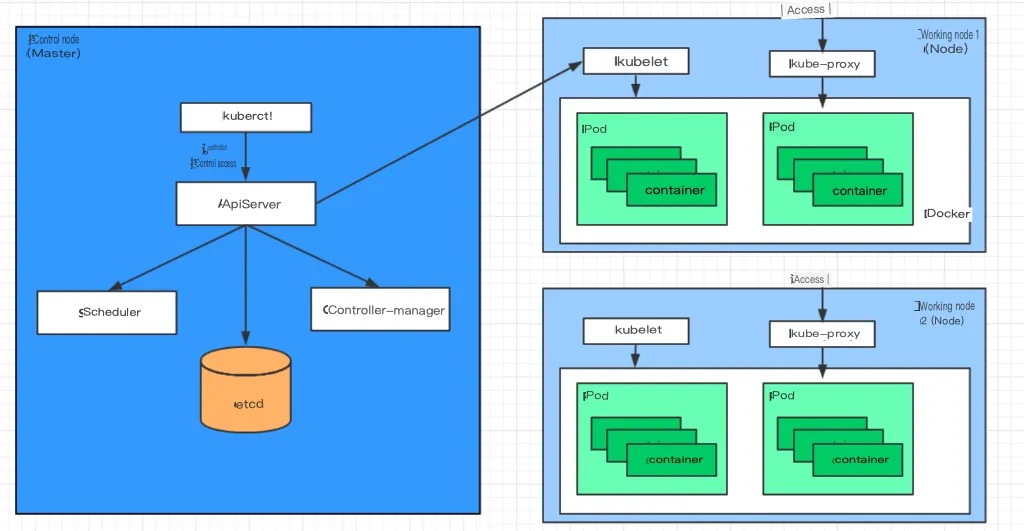
Pod Creation Process
- Users submit the information of the Pod that needs to be created to apiServer through kubectl or other API clients.
- apiServer begins to generate information about the Pod object, stores the information in etcd, and then returns a confirmation message to the client.
- apiServer begins to reflect the changes in the Pod object in etcd, and other components use the watch mechanism to track and check changes on apiServer.
- The scheduler discovers that a new Pod object needs to be created and begins to allocate a host for the Pod and update the result information to apiServer.
- The kubelet on the node detects the scheduled Pod, attempts to call docker to start the container, and sends the result back to apiServer.
- apiServer stores the received Pod status information in etcd.
Pod Termination Process
- Users send a command to apiServer to delete the pod object.
- The pod object information in apiServer will be updated over time, and during the grace period (default 30s), the pod is considered dead.
- Mark the pod as the terminating state.
- kubelet starts the pod shutdown process when it detects the pod object is in the terminating state.
- Endpoint controllers monitor the pod’s shutdown behavior and remove it from the endpoint list of all service resources that match this endpoint.
- If the current pod object defines a preStop hook handler, it will start executing synchronously after being marked as terminating.
- The container process in the pod object receives the stop signal.
- After the grace period, if there are still running processes in the pod, the pod object will receive an immediate termination signal.
- kubelet requests apiServer to set the grace period of this pod resource to 0 to complete the deletion operation. At this time, the pod is not visible to users.
Init Containers
Init Containers are containers that run before the main container in a pod, and they are used to perform certain setup or initialization tasks, such as initializing a database or waiting for a service to start. They have two main characteristics:
- Init Containers must complete successfully before the main container starts, and if an init container fails, Kubernetes will restart it until it succeeds.
- Init Containers are executed in a specific order, and each init container will only run after the previous one has completed successfully.
Init Containers have many use cases, but the most common ones are:
- Providing tools or custom code that is not included in the main container’s image.
- Delaying the startup of the main container until certain dependencies are met.
To demonstrate the use of Init Containers, we can create a pod that requires MySQL and Redis services to be available before the main container (nginx) starts. For testing purposes, we can assume that the MySQL server is at 192.168.109.201 and the Redis server is at 192.168.109.202.
We can create a YAML file named pod-initcontainer.yaml with the following content:
apiVersion: v1
kind: Pod
metadata:
  name: pod-initcontainer
  namespace: dev
spec:
  containers:
  - name: main-container
    image: nginx:1.17.1
    ports:
    - name: nginx-port
      containerPort: 80
  initContainers:
  - name: test-mysql
    image: busybox:1.30
    command: ['sh', '-c', 'until ping 192.168.109.201 -c 1 ; do echo waiting for mysql...; sleep 2; done;']
  - name: test-redis
    image: busybox:1.30
    command: ['sh', '-c', 'until ping 192.168.109.202 -c 1 ; do echo waiting for reids...; sleep 2; done;']
We can then create the pod with the following command:
#Create pod
[root@master ~]# kubectl create -f pod-initcontainer.yaml
pod/pod-initcontainer created

#Check pod status
#It was found that the pod was stuck in the process of starting the first init container, and the subsequent containers would not run
root@master ~]# kubectl describe pod pod-initcontainer -n dev
........
Events:
Type Reason Age From Message

Normal Scheduled 49s default-scheduler Successfully assigned dev/pod-initcontainer to node1
Normal Pulled 48s kubelet, node1 Container image "busybox:1.30" already present on machine
Normal Created 48s kubelet, node1 Created container test-mysql
Normal Started 48s kubelet, node1 Started container test-mysql

#View the pod dynamically
[root@master ~]# kubectl get pods pod-initcontainer -n dev -w
NAME READY STATUS RESTARTS AGE
pod-initcontainer 0/1 Init:0/2 0 15s
pod-initcontainer 0/1 Init:1/2 0 52s
pod-initcontainer 0/1 Init:1/2 0 53s
pod-initcontainer 0/1 PodInitializing 0 89s
pod-initcontainer 1/1 Running 0 90s

#Then open a new shell to add two IPs to the current server and observe the changes in the pod
[root@master ~]# ifconfig ens33:1 192.168.109.201 netmask 255.255.255.0 up
[root@master ~]# ifconfig ens33:2 192.168.109.202 netmask 255.255.255.0 up
Hook Functions
Hook functions can sense events in their own lifecycle and run user-specified program code when the corresponding event occurs.
Kubernetes provides two hook functions before and after the main container starts and stops:
- post start: executed after the container is created, if it fails, the container will be restarted
- pre stop: executed before the container is terminated. After completion, the container will be successfully terminated. Before it is completed, the operation to delete the container will be blocked.
Hook handlers support defining actions in the following three ways:
- Exec command: execute a command once in the container
……
  lifecycle:
    postStart:
      exec:
        command:
        - cat
        - /tmp/healthy
……
- TCPSocket: attempt to access the specified socket in the current container
……
  lifecycle:
    postStart:
      tcpSocket:
        port: 8080
……
- HTTPGet: send an HTTP request to a specific URL in the current container
……
  lifecycle:
    postStart:
      httpGet:
        path: / #URI address
        port: 80 #port number
        host: 192.168.109.100 #host address
        scheme: HTTP #supported protocol, http or https
……
Next, let’s take the example of using the exec method to demonstrate the use of hooks. Create a pod-hook-exec.yaml file with the following contents:
apiVersion: v1
kind: Pod
metadata:
  name: pod-hook-exec
  namespace: dev
spec:
  containers:
  - name: main-container
    image: nginx:1.17.1
    ports:
    - name: nginx-port
      containerPort: 80
    lifecycle:
      postStart:
        exec: # Execute a command to modify the default homepage content of nginx when the container starts
          command: ["/bin/sh", "-c", "echo postStart... > /usr/share/nginx/html/index.html"]
      preStop:
        exec: # Stop the nginx service before the container stops
          command: ["/usr/sbin/nginx","-s","quit"]
# Create the pod
[root@master ~]# kubectl create -f pod-hook-exec.yaml
pod/pod-hook-exec created

# Check the pod
[root@master ~]# kubectl get pods  pod-hook-exec -n dev -o wide
NAME           READY   STATUS     RESTARTS   AGE    IP            NODE
pod-hook-exec  1/1     Running    0          29s    10.244.2.48   node2

# Access the pod
[root@master ~]# curl 10.244.2.48
postStart...
Container Probes
Container probes are used to detect whether the application instance in a container is working properly. It is a traditional mechanism for ensuring business availability. If the instance’s status does not meet expectations after probing, Kubernetes “removes” the problematic instance and stops routing traffic to it. Kubernetes provides two types of probes for container probing:
- Liveness probes: used to check whether the application instance is currently in normal running state. If not, Kubernetes will restart the container.
- Readiness probes: used to check whether the application instance is ready to accept requests. If not, Kubernetes will not forward traffic.
The livenessProbe determines whether to restart the container, while the readinessProbe determines whether to forward requests to the container.
Both probes currently support three detection methods:
- Exec command: execute a command once in the container. If the exit code of the command is 0, the program is considered normal; otherwise, it is not.
- TCPSocket: attempt to access a user container port. If the connection can be established, the program is considered normal; otherwise, it is not.
- HTTPGet: call the URL of the web application in the container. If the returned status code is between 200 and 399, the program is considered normal; otherwise, it is not.
Here we will take liveness probes as an example to do some demonstrations:
Method 1: Exec
Create a file named pod-liveness-exec.yaml with the following content:
apiVersion: v1
kind: Pod
metadata:
  name: pod-liveness-exec
  namespace: dev
spec:
  containers:
  - name: nginx
    image: nginx:1.17.1
    ports:
    - name: nginx-port
      containerPort: 80
    livenessProbe:
      exec:
        command: ["/bin/cat","/tmp/hello.txt"] # Execute a command to view a file
Create a Pod and observe the effect:
# Create the Pod
[root@master ~]# kubectl create -f pod-liveness-exec.yaml
pod/pod-liveness-exec created

# Check the Pod details
[root@master ~]# kubectl describe pods pod-liveness-exec -n dev
......
  Normal   Created    20s (x2 over 50s)  kubelet, node1     Created container nginx
  Normal   Started    20s (x2 over 50s)  kubelet, node1     Started container nginx
  Normal   Killing    20s                kubelet, node1     Container nginx failed liveness probe, will be restarted
  Warning  Unhealthy  0s (x5 over 40s)   kubelet, node1     Liveness probe failed: cat: can't open '/tmp/hello11.txt': No such file or directory

# Observe that the nginx container performs health checks after starting
# After the check fails, the container is killed and then restarted (this is the effect of the restart strategy, which will be explained later)
# After waiting for a while, check the pod information again, and you can see that RESTARTS is no longer 0 but keeps increasing
[root@master ~]# kubectl get pods pod-liveness-exec -n dev
NAME                READY   STATUS             RESTARTS   AGE
pod-liveness-exec   0/1     CrashLoopBackOff   2          3m19s

# Of course, you can change it to an existing file, such as /tmp/hello.txt, and try again, and the result will be normal...
Method 2: TCPSocket
Create a file named pod-liveness-tcpsocket.yaml with the following content:
apiVersion: v1
kind: Pod
metadata:
  name: pod-liveness-tcpsocket
  namespace: dev
spec:
  containers:
  - name: nginx
    image: nginx:1.17.1
    ports:
    - name: nginx-port
      containerPort: 80
    livenessProbe:
      tcpSocket:
        port: 8080 # Attempt to access port 8080
Create the pod and observe the result:
# Create the pod
[root@master ~]# kubectl create -f pod-liveness-tcpsocket.yaml
pod/pod-liveness-tcpsocket created

# View the pod details
[root@master ~]# kubectl describe pods pod-liveness-tcpsocket -n dev
......
  Normal   Scheduled  31s                            default-scheduler  Successfully assigned dev/pod-liveness-tcpsocket to node2
  Normal   Pulled     <invalid>                      kubelet, node2     Container image "nginx:1.17.1" already present on machine
  Normal   Created    <invalid>                      kubelet, node2     Created container nginx
  Normal   Started    <invalid>                      kubelet, node2     Started container nginx
  Warning  Unhealthy  <invalid> (x2 over <invalid>)  kubelet, node2     Liveness probe failed: dial tcp 10.244.2.44:8080: connect: connection refused

# Observe that the probe attempted to access port 8080 but failed
# After waiting for a while, view the pod information again to see that RESTARTS has increased from 0 to a higher number
[root@master ~]# kubectl get pods pod-liveness-tcpsocket  -n dev
NAME                     READY   STATUS             RESTARTS   AGE
pod-liveness-tcpsocket   0/1     CrashLoopBackOff   2          3m19s

# Of course, you can change the port to a valid one, such as 80, and try again to see that the result is normal...
Method Three: HTTPGet
Create the pod-liveness-httpget.yaml file and apply it:
apiVersion: v1
kind: Pod
metadata:
  name: pod-liveness-httpget
  namespace: dev
spec:
  containers:
  - name: nginx
    image: nginx:1.17.1
    ports:
    - name: nginx-port
      containerPort: 80
    livenessProbe:
      httpGet:
        scheme: HTTP
        port: 80
        path: /hello
Creating the pod and observing the results
# Creating the pod
[root@master ~]# kubectl create -f pod-liveness-httpget.yaml
pod/pod-liveness-httpget created

# Checking the pod details
[root@master ~]# kubectl describe pod pod-liveness-httpget -n dev
.......
  Normal   Pulled     6s (x3 over 64s)  kubelet, node1     Container image "nginx:1.17.1" already present on machine
  Normal   Created    6s (x3 over 64s)  kubelet, node1     Created container nginx
  Normal   Started    6s (x3 over 63s)  kubelet, node1     Started container nginx
  Warning  Unhealthy  6s (x6 over 56s)  kubelet, node1     Liveness probe failed: HTTP probe failed with statuscode: 404
  Normal   Killing    6s (x2 over 36s)  kubelet, node1     Container nginx failed liveness probe, will be restarted

# The probe tries to access the specified path but fails due to a 404 error.
# After a while, the RESTARTS value keeps increasing instead of being 0
[root@master ~]# kubectl get pod pod-liveness-httpget -n dev
NAME                   READY   STATUS    RESTARTS   AGE
pod-liveness-httpget   1/1     Running   5          3m17s

# The pod can be fixed by changing the path to a valid one such as '/'
By exploring the livenessProbe sub-properties, we can see that there are additional configurations available beyond the three types of probes demonstrated above. These properties are described below:
FIELDS:
   exec <Object>
   tcpSocket    <Object>
   httpGet      <Object>
   initialDelaySeconds  <integer>  # The number of seconds after the container has started before the first probe is executed.
   timeoutSeconds       <integer>  # The probe timeout in seconds. Defaults to 1 second with a minimum of 1 second.
   periodSeconds        <integer>  # How often in seconds to perform the probe. Defaults to 10 seconds with a minimum of 1 second.
   failureThreshold     <integer>  # The number of times in a row that the probe must fail for the container to be considered failed. Defaults to 3 with a minimum of 1.
   successThreshold     <integer>  # The number of times in a row that the probe must succeed for the container to be considered successful. Defaults to 1.
Next, we will configure two more properties to demonstrate their effects:
[root@master ~]# more pod-liveness-httpget.yaml
apiVersion: v1
kind: Pod
metadata:
  name: pod-liveness-httpget
  namespace: dev
spec:
  containers:
  - name: nginx
    image: nginx:1.17.1
    ports:
    - name: nginx-port
      containerPort: 80
    livenessProbe:
      httpGet:
        scheme: HTTP
        port: 80
        path: /
      initialDelaySeconds: 30 # Delay time in seconds after the container starts before the first probe is executed.
      timeoutSeconds: 5 # Time in seconds after which the probe times out.
Restart Policy
In the previous section, once the container probe detected a problem, Kubernetes would restart the Pod where the container resides, and this is determined by the Pod’s restart policy. There are three restart policies for Pods, as follows:
- Always: Automatically restarts the container when it fails. This is the default value.
- OnFailure: Restarts the container when it terminates with a non-zero exit code.
- Never: Never restarts the container regardless of its state.
The restart policy applies to all containers in the Pod object. The first container that needs to be restarted will be restarted immediately when needed. The subsequent restarts will be delayed by the kubelet for a certain period of time, with increasing delays of 10s, 20s, 40s, 80s, 160s, and 300s, with 300s being the maximum delay.
Create a pod-restartpolicy.yaml:
apiVersion: v1
kind: Pod
metadata:
  name: pod-restartpolicy
  namespace: dev
spec:
  containers:
  - name: nginx
    image: nginx:1.17.1
    ports:
    - name: nginx-port
      containerPort: 80
    livenessProbe:
      httpGet:
        scheme: HTTP
        port: 80
        path: /hello
  restartPolicy: Never # set the restart policy to Never
Run the Pod for testing:
# Create the Pod
[root@master ~]# kubectl create -f pod-restartpolicy.yaml
pod/pod-restartpolicy created

# Check the Pod details and find that the nginx container has failed
[root@master ~]# kubectl describe pods pod-restartpolicy  -n dev
......
  Warning  Unhealthy  15s (x3 over 35s)  kubelet, node1     Liveness probe failed: HTTP probe failed with statuscode: 404
  Normal   Killing    15s                kubelet, node1     Container nginx failed liveness probe

# Wait for a while and observe the number of Pod restarts, which is always 0 and the container is never restarted.
[root@master ~]# kubectl  get pods pod-restartpolicy -n dev
NAME                   READY   STATUS    RESTARTS   AGE
pod-restartpolicy      0/1     Running   0          5min42s
Pod scheduling
By default, Kubernetes determines on which node a pod should run using a set of algorithms executed by the scheduler component. This process is not under human control. However, in practice, this is not always sufficient because there are many cases where we want to control which pod should run on which node. This requires an understanding of Kubernetes scheduling rules for pods. Kubernetes provides four types of scheduling:
- Automatic scheduling: The node on which the pod runs is entirely calculated by the scheduler using a series of algorithms.
- Directed scheduling: NodeName, NodeSelector.
- Affinity scheduling: NodeAffinity, PodAffinity, PodAntiAffinity.
- Taint (tolerance) scheduling: Taints, Tolerations.
Directed scheduling
Directed scheduling refers to the use of nodeName or nodeSelector declared on the pod to schedule the pod to the desired node. Note that this scheduling is forced, which means that even if the target node for scheduling does not exist, it will still be scheduled, and the pod will fail to run.
NodeName
NodeName is used to forcibly constrain the pod to be scheduled to a specified node name. In fact, this directly skips the scheduler’s scheduling logic and directly schedules the pod to the specified node name.
Next, let’s do an experiment: Create a file named pod-nodename.yaml
apiVersion: v1
kind: Pod
metadata:
  name: pod-nodename
  namespace: dev
spec:
  containers:
  - name: nginx
    image: nginx:1.17.1
  nodeName: node1 # Schedule to node1
# Create the pod
[root@master ~]# kubectl create -f pod-nodename.yaml
pod/pod-nodename created

# Check which node the pod is scheduled to run on
[root@master ~]# kubectl get pods pod-nodename -n dev -o wide
NAME           READY   STATUS    RESTARTS   AGE   IP            NODE      ......
pod-nodename   1/1     Running   0          56s   10.244.1.87   node1     ......

# Next, delete the pod and modify nodeName value to node3 (which doesn't exist)
[root@master ~]# kubectl delete -f pod-nodename.yaml
pod "pod-nodename" deleted
[root@master ~]# vim pod-nodename.yaml
[root@master ~]# kubectl create -f pod-nodename.yaml
pod/pod-nodename created

# Check again and see that it is scheduled towards node3, but as there is no node3, the pod is unable to run
[root@master ~]# kubectl get pods pod-nodename -n dev -o wide
NAME           READY   STATUS    RESTARTS   AGE   IP       NODE    ......
pod-nodename   0/1     Pending   0          6s    <none>   node3   ......
NodeSelector
NodeSelector is used to schedule pods to nodes that have specific labels. It is implemented through Kubernetes’ label-selector mechanism, which means that before a pod is created, the scheduler uses the MatchNodeSelector scheduling policy to match labels and find the target node. The pod is then scheduled to the target node, and this matching rule is enforced.
Next, let’s do an experiment:
- First, add labels to the node nodes respectively.
[root@master ~]# kubectl label nodes node1 nodeenv=pro
node/node2 labeled
[root@master ~]# kubectl label nodes node2 nodeenv=test
node/node2 labeled
2.Create a YAML file pod-nodeselector.yaml and use it to create a pod:
apiVersion: v1
kind: Pod
metadata:
  name: pod-nodeselector
  namespace: dev
spec:
  containers:
  - name: nginx
    image: nginx:1.17.1
  nodeSelector:
    nodeenv: pro # Schedule the pod on a node with the label 'nodeenv=pro'
# Create the pod
[root@master ~]# kubectl create -f pod-nodeselector.yaml
pod/pod-nodeselector created

# Check the node that the pod is scheduled on
[root@master ~]# kubectl get pods pod-nodeselector -n dev -o wide
NAME               READY   STATUS    RESTARTS   AGE     IP          NODE    ......
pod-nodeselector   1/1     Running   0          47s   10.244.1.87   node1   ......
3. Next, delete the pod and modify the nodeSelector value to a non-existent label, such as nodeenv: xxxx.
# Delete the pod and modify the YAML file
[root@master ~]# kubectl delete -f pod-nodeselector.yaml
pod "pod-nodeselector" deleted
[root@master ~]# vim pod-nodeselector.yaml

# Create the pod again
[root@master ~]# kubectl create -f pod-nodeselector.yaml
pod/pod-nodeselector created

# Check the pod status, and find that it cannot be scheduled on any node
[root@master ~]# kubectl get pods -n dev -o wide
NAME               READY   STATUS    RESTARTS   AGE     IP       NODE
pod-nodeselector   0/1     Pending   0          2m20s   <none>   <none>

# Check the detail and find that the node selector failed
[root@master ~]# kubectl describe pods pod-nodeselector -n dev
.......
Events:
  Type     Reason            Age        From               Message
  ----     ------            ----       ----               -------
  Warning  FailedScheduling  <unknown>  default-scheduler  0/3 nodes are available: 3 node(s) didn't match node selector.
  Warning  FailedScheduling  <unknown>  default-scheduler  0/3 nodes are available: 3 node(s) didn't match node selector.
Affinity Scheduling
In the previous section, we introduced two types of directed scheduling methods, which are convenient to use but have a certain limitation. If there is no node that meets the conditions, the Pod will not be scheduled even if there is still an available node list in the cluster. This limits its use cases.
To address this problem, Kubernetes provides another type of scheduling method called Affinity. Based on the NodeSelector, it can prioritize scheduling on nodes that meet the conditions and fall back to nodes that do not meet the conditions, making scheduling more flexible.
Affinity can be divided into three categories:
- NodeAffinity: targets nodes and determines which nodes a pod can be scheduled to
- PodAffinity: targets pods and determines which existing pods a pod can be scheduled within the same topology domain
- PodAntiAffinity: targets pods and determines which existing pods a pod cannot be scheduled within the same topology domain
Regarding the usage scenarios of Affinity/Anti-Affinity:
Affinity: If two applications frequently interact with each other, it is necessary to use Affinity to make the two applications as close as possible to reduce performance loss due to network communication.
Anti-Affinity: When an application is deployed with multiple replicas, it is necessary to use Anti-Affinity to distribute each application instance to different nodes, thereby improving the high availability of the service.
NodeAffinity
First, let’s take a look at the configurable options for NodeAffinity:
pod.spec.affinity.nodeAffinity
  requiredDuringSchedulingIgnoredDuringExecution  The node must meet all specified rules to be scheduled, which is equivalent to a hard limit.
    nodeSelectorTerms  Node selection list
      matchFields   A list of node selector requirements based on node fields
      matchExpressions   A list of node selector requirements based on node labels (recommended)
        key    Key
        values Values
        operator Operator, supports Exists, DoesNotExist, In, NotIn, Gt, Lt
  preferredDuringSchedulingIgnoredDuringExecution Schedule to nodes that meet the specified rules, which is equivalent to a soft limit (preference)
    preference   A node selector item associated with the corresponding weight
      matchFields   A list of node selector requirements based on node fields
      matchExpressions   A list of node selector requirements based on node labels (recommended)
        key    Key
        values Values
        operator Operator, supports In, NotIn, Exists, DoesNotExist, Gt, Lt
 weight  Preference weight, in the range of 1-100.
Explanation of operators:

- matchExpressions:
  - key: nodeenv              # Match nodes with a label key of 'nodeenv'
    operator: Exists
  - key: nodeenv              # Match nodes with a label key of 'nodeenv' and a value of 'xxx' or 'yyy'
    operator: In
    values: ["xxx","yyy"]
  - key: nodeenv              # Match nodes with a label key of 'nodeenv' and a value greater than 'xxx'
    operator: Gt
    values: "xxx"
Next, let’s demonstrate requiredDuringSchedulingIgnoredDuringExecution.
Create pod-nodeaffinity-required.yaml:
apiVersion: v1
kind: Pod
metadata:
  name: pod-nodeaffinity-required
  namespace: dev
spec:
  containers:
  - name: nginx
    image: nginx:1.17.1
  affinity:
    nodeAffinity:
      requiredDuringSchedulingIgnoredDuringExecution: # hard constraint
        nodeSelectorTerms:
        - matchExpressions: # match the value of "env" in ["xxx","yyy"]
          - key: nodeenv
            operator: In
            values: ["xxx","yyy"]
# create the pod
[root@master ~]# kubectl create -f pod-nodeaffinity-required.yaml
pod/pod-nodeaffinity-required created

# check the pod status (should be pending)
[root@master ~]# kubectl get pods pod-nodeaffinity-required -n dev -o wide
NAME                        READY   STATUS    RESTARTS   AGE   IP       NODE    ......
pod-nodeaffinity-required   0/1     Pending   0          16s   <none>   <none>  ......

# check the details of the pod
# it failed to schedule because node selection failed
[root@master ~]# kubectl describe pod pod-nodeaffinity-required -n dev
......
  Warning  FailedScheduling  <unknown>  default-scheduler  0/3 nodes are available: 3 node(s) didn't match node selector.
  Warning  FailedScheduling  <unknown>  default-scheduler  0/3 nodes are available: 3 node(s) didn't match node selector.

# stop the pod
[root@master ~]# kubectl delete -f pod-nodeaffinity-required.yaml
pod "pod-nodeaffinity-required" deleted

# modify the file, changing values: ["xxx","yyy"] to ["pro","yyy"]
[root@master ~]# vim pod-nodeaffinity-required.yaml

# start the pod again
[root@master ~]# kubectl create -f pod-nodeaffinity-required.yaml
pod/pod-nodeaffinity-required created

# check again and see that the pod has been scheduled to node1
[root@master ~]# kubectl get pods pod-nodeaffinity-required -n dev -o wide
NAME                        READY   STATUS    RESTARTS   AGE   IP            NODE  ......
pod-nodeaffinity-required   1/1     Running   0          11s   10.244.1.89   node1 ......
Next, let’s demonstrate preferredDuringSchedulingIgnoredDuringExecution for NodeAffinity.
Create a file called pod-nodeaffinity-preferred.yaml:
apiVersion: v1
kind: Pod
metadata:
  name: pod-nodeaffinity-preferred
  namespace: dev
spec:
  containers:
  - name: nginx
    image: nginx:1.17.1
  affinity: # Affinity settings
    nodeAffinity: # Node affinity settings
      preferredDuringSchedulingIgnoredDuringExecution: # Soft requirement
      - weight: 1
        preference:
          matchExpressions: # Match nodes with "nodeenv" value in ["xxx","yyy"] (which do not exist in the current environment)
          - key: nodeenv
            operator: In
            values: ["xxx","yyy"]
# Create the Pod
[root@master ~]# kubectl create -f pod-nodeaffinity-preferred.yaml
pod/pod-nodeaffinity-preferred created

# Check the status of the Pod (running successfully)
[root@master ~]# kubectl get pod pod-nodeaffinity-preferred -n dev
NAME                         READY   STATUS    RESTARTS   AGE
pod-nodeaffinity-preferred   1/1     Running   0          40s
Some notes on setting NodeAffinity rules:
  1. If both nodeSelector and nodeAffinity are defined, both conditions must be met for the Pod to run on the specified Node.
  2. If nodeAffinity specifies multiple nodeSelectorTerms, only one of them needs to be matched successfully.
  3. If a nodeSelectorTerms has multiple matchExpressions, a node must satisfy all of them to be successfully matched.
  4. If a Node on which a Pod is running no longer meets the node affinity requirements of the Pod during the Pod’s runtime due to a change in its labels, the system will not act upon this change.
PodAffinity
PodAffinity
PodAffinity is mainly used to ensure that new pods are scheduled in the same area as reference pods based on the running pods.
Here are the configurable items for PodAffinity:
pod.spec.affinity.podAffinity
  requiredDuringSchedulingIgnoredDuringExecution: Hard constraint
    namespaces: Specifies the namespace of the reference pod
    topologyKey: Specifies the scope of scheduling
    labelSelector: Label selector
      matchExpressions: A list of node selector requirements based on labels (recommended)
        key: Key
        values: Values
        operator: Relationship operator, supports In, NotIn, Exists, and DoesNotExist
      matchLabels: Multiple contents mapped by multiple matchExpressions
  preferredDuringSchedulingIgnoredDuringExecution: Soft constraint
    podAffinityTerm: Options
      namespaces:
      topologyKey:
      labelSelector:
        matchExpressions:
          key: Key
          values: Values
          operator: Relationship operator, supports In, NotIn, Exists, and DoesNotExist
        matchLabels:
    weight: A preference weight, ranging from 1-100
The topologyKey is used to specify the scope of scheduling, for example:
    If it is specified as kubernetes.io/hostname, the scope is based on Node nodes
    If it is specified as beta.kubernetes.io/os, the scope is based on the operating system type of Node nodes
Next, let’s demonstrate requiredDuringSchedulingIgnoredDuringExecution for PodAffinity:
1. First, create a target Pod, pod-podaffinity-target.yaml:
apiVersion: v1
kind: Pod
metadata:
  name: pod-podaffinity-target
  namespace: dev
  labels:
    podenv: pro # set label
spec:
  containers:
  - name: nginx
    image: nginx:1.17.1
  nodeName: node1 # specify the target pod to run on node1
# Start the target pod
[root@master ~]# kubectl create -f pod-podaffinity-target.yaml
pod/pod-podaffinity-target created

# Check the pod status
[root@master ~]# kubectl get pods  pod-podaffinity-target -n dev
NAME                     READY   STATUS    RESTARTS   AGE
pod-podaffinity-target   1/1     Running   0          4s
2. Create pod-podaffinity-required.yaml, with the following contents:
apiVersion: v1
kind: Pod
metadata:
  name: pod-podaffinity-required
  namespace: dev
spec:
  containers:
  - name: nginx
    image: nginx:1.17.1
  affinity:  # set pod affinity
    podAffinity: # set pod affinity
      requiredDuringSchedulingIgnoredDuringExecution: # hard restriction
      - labelSelector:
          matchExpressions: # match pods with podenv=xxx or podenv=yyy labels
          - key: podenv
            operator: In
            values: ["xxx","yyy"]
        topologyKey: kubernetes.io/hostname
The above configuration means that the new Pod must be on the same Node as a pod that has the label podenv=xxx or podenv=yyy. Obviously, there is no such pod right now. Let's run the test next.
# Start pod
[root@master ~]# kubectl create -f pod-podaffinity-required.yaml
pod/pod-podaffinity-required created

# Check pod status and found that it is not running
[root@master ~]# kubectl get pods pod-podaffinity-required -n dev
NAME                       READY   STATUS    RESTARTS   AGE
pod-podaffinity-required   0/1     Pending   0          9s

# Check the detailed information
[root@master ~]# kubectl describe pods pod-podaffinity-required  -n dev
......
Events:
  Type     Reason            Age        From               Message
  ----     ------            ----       ----               -------
  Warning  FailedScheduling  <unknown>  default-scheduler  0/3 nodes are available: 2 node(s) didn't match pod affinity rules, 1 node(s) had taints that the pod didn't tolerate.

# Then modify  values: ["xxx","yyy"]----->values:["pro","yyy"]
# Meaning: The new Pod must be on the same node as the pod with the label nodeenv=xxx or nodeenv=yyy.
[root@master ~]# vim pod-podaffinity-required.yaml

# Recreate the pod and check the results
[root@master ~]# kubectl delete -f  pod-podaffinity-required.yaml
pod "pod-podaffinity-required" deleted
[root@master ~]# kubectl create -f pod-podaffinity-required.yaml
pod/pod-podaffinity-required created

# The pod is running normally now
[root@master ~]# kubectl get pods pod-podaffinity-required -n dev
NAME                       READY   STATUS    RESTARTS   AGE   LABELS
pod-podaffinity-required   1/1     Running   0          6s    <none>
We won’t demonstrate preferredDuringSchedulingIgnoredDuringExecution for PodAffinity.
PodAntiAffinity
PodAntiAffinity is mainly used to ensure that the new Pod is not scheduled in the same zone as a reference Pod, where the reference Pod is already running.
The configuration options for PodAntiAffinity are the same as PodAffinity. Here is an example to demonstrate how it works:
- We will continue to use the target Pod from the previous example.
[root@master ~]# kubectl get pods -n dev -o wide --show-labels
NAME                     READY   STATUS    RESTARTS   AGE     IP            NODE    LABELS
pod-podaffinity-required 1/1     Running   0          3m29s   10.244.1.38   node1   <none>
pod-podaffinity-target   1/1     Running   0          9m25s   10.244.1.37   node1   podenv=pro
2. Create a YAML file named pod-podantiaffinity-required.yaml with the following content:
apiVersion: v1
kind: Pod
metadata:
  name: pod-podantiaffinity-required
  namespace: dev
spec:
  containers:
  - name: nginx
    image: nginx:1.17.1
  affinity:  # Set the affinity
    podAntiAffinity: # Set the PodAntiAffinity
      requiredDuringSchedulingIgnoredDuringExecution: # Hard constraint
      - labelSelector:
          matchExpressions: # Match the label podenv with value "pro"
          - key: podenv
            operator: In
            values: ["pro"]
        topologyKey: kubernetes.io/hostname
The above configuration means that the new Pod must not be scheduled on the same node as the Pod with the label nodeenv=pro. Let’s run a test:
# Create the Pod
[root@master ~]# kubectl create -f pod-podantiaffinity-required.yaml
pod/pod-podantiaffinity-required created

# Check the Pod status
# We can see that the Pod is scheduled to node2
[root@master ~]# kubectl get pods pod-podantiaffinity-required -n dev -o wide
NAME                           READY   STATUS    RESTARTS   AGE   IP            NODE   ..
pod-podantiaffinity-required   1/1     Running   0          30s   10.244.1.96   node2  ..
Taints and Tolerations
Taints
The previous scheduling methods are from the perspective of Pods. By adding properties to the Pods, we can determine whether the Pods should be scheduled to a specific node. However, we can also approach the scheduling from the perspective of the nodes, by adding taints to the nodes to determine whether Pods are allowed to be scheduled to them.
Once a node is tainted, there is a repelling relationship between the node and the Pod, which prevents the Pod from being scheduled on the node, or even evicts already existing Pods.
The format of a taint is key=value:effect, where key and value are the labels of the taint, and effect describes the effect of the taint, which supports the following options:
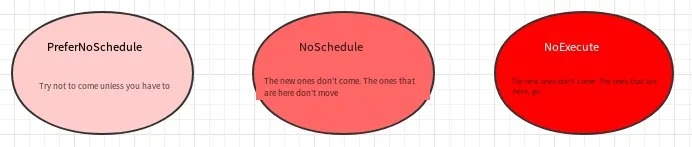
- PreferNoSchedule: Kubernetes will try to avoid scheduling Pods to nodes with this taint, unless there is no other node available for scheduling.
- NoSchedule: Kubernetes will not schedule Pods to nodes with this taint, but it will not affect already existing Pods on the node.
- NoExecute: Kubernetes will not schedule Pods to nodes with this taint, and will also evict already existing Pods on the node.
Commands to set and remove taints using kubectl are shown below:
# Set taint
kubectl taint nodes node1 key=value:effect

# Remove taint
kubectl taint nodes node1 key:effect-

# Remove all taints
kubectl taint nodes node1 key-
Next, let’s demonstrate the effect of taints:
- Prepare node1 (to make the effect more obvious, temporarily stop the node2 node)
- Set a taint for node1:
tag=heima:PreferNoSchedule; then create pod1 (pod1 can be scheduled) - Modify the taint for node1:
tag=heima:NoSchedule; then create pod2 (pod1 is normal, pod2 fails to be scheduled) - Modify the taint for node1:
tag=heima:NoExecute; then create pod3 (all three pods fail to be scheduled)
# Set taint for node1 (PreferNoSchedule)
[root@master ~]# kubectl taint nodes node1 tag=heima:PreferNoSchedule

# Create pod1
[root@master ~]# kubectl run taint1 --image=nginx:1.17.1 -n dev
[root@master ~]# kubectl get pods -n dev -o wide
NAME                      READY   STATUS    RESTARTS   AGE     IP           NODE
taint1-7665f7fd85-574h4   1/1     Running   0          2m24s   10.244.1.59   node1

# Modify taint for node1 (cancel PreferNoSchedule, set NoSchedule)
[root@master ~]# kubectl taint nodes node1 tag:PreferNoSchedule-
[root@master ~]# kubectl taint nodes node1 tag=heima:NoSchedule

# Create pod2
[root@master ~]# kubectl run taint2 --image=nginx:1.17.1 -n dev
[root@master ~]# kubectl get pods taint2 -n dev -o wide
NAME                      READY   STATUS    RESTARTS   AGE     IP            NODE
taint1-7665f7fd85-574h4   1/1     Running   0          2m24s   10.244.1.59   node1
taint2-544694789-6zmlf    0/1     Pending   0          21s     <none>        <none>

# Modify taint for node1 (cancel NoSchedule, set NoExecute)
[root@master ~]# kubectl taint nodes node1 tag:NoSchedule-
[root@master ~]# kubectl taint nodes node1 tag=heima:NoExecute

# Create pod3
[root@master ~]# kubectl run taint3 --image=nginx:1.17.1 -n dev
[root@master ~]# kubectl get pods -n dev -o wide
NAME                      READY   STATUS    RESTARTS   AGE   IP       NODE     NOMINATED
taint1-7665f7fd85-htkmp   0/1     Pending   0          35s   <none>   <none>   <none>
taint2-544694789-bn7wb    0/1     Pending   0          35s   <none>   <none>   <none>
taint3-6d78dbd749-tktkq   0/1     Pending   0          6s    <none>   <none>   <none>
Quick tip:
When using kubeadm to set up a cluster, the master node will be automatically marked with a taint, so pods will not be scheduled on the master node.
Toleration
We have learned about how Taints can be used to reject Pods from scheduling onto Nodes. However, sometimes we may want to schedule Pods onto Nodes with specific Taints. To achieve this, we can use Tolerations.
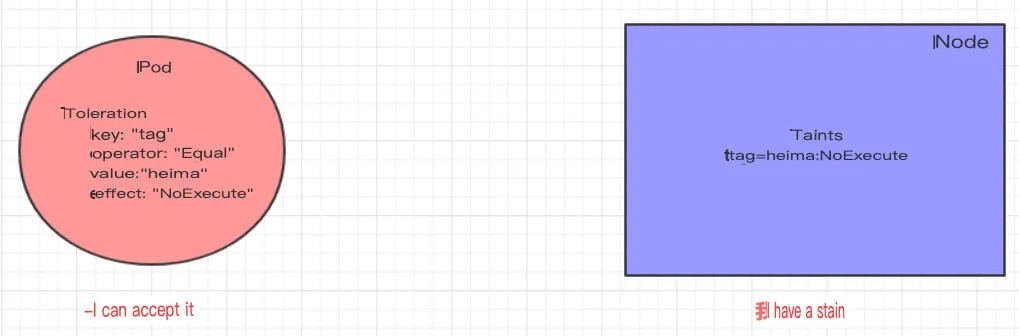
“Taints mean rejection and tolerations mean ignoring. Nodes reject pod scheduling with taints, while pods ignore rejection with tolerations.”
The following example illustrates the effects:
- In the previous section, a
NoExecutetaint was applied to thenode1node, so the pod cannot be scheduled on it. - In this section, the pod can be scheduled by adding a toleration to it.
Create a file named pod-toleration.yaml with the following contents:
apiVersion: v1
kind: Pod
metadata:
  name: pod-toleration
  namespace: dev
spec:
  containers:
  - name: nginx
    image: nginx:1.17.1
  tolerations:      # Add toleration
  - key: "tag"        # Key of the taint to tolerate
    operator: "Equal" # Operator
    value: "heima"    # Value of the taint to tolerate
    effect: "NoExecute"   # Tolerance rule, which must be the same as the taint rule
# Before adding toleration
[root@master ~]# kubectl get pods -n dev -o wide
NAME             READY   STATUS    RESTARTS   AGE   IP       NODE     NOMINATED
pod-toleration   0/1     Pending   0          3s    <none>   <none>   <none>

# After adding toleration
[root@master ~]# kubectl get pods -n dev -o wide
NAME             READY   STATUS    RESTARTS   AGE   IP            NODE    NOMINATED
pod-toleration   1/1     Running   0           3s    10.244.1.62   node1   <none>
Here is a detailed configuration of toleration:
[root@master ~]# kubectl explain pod.spec.tolerations
......
FIELDS:
   key       # The key of the taint to tolerate; an empty key means to match all keys
   value     # The value of the taint to tolerate
   operator  # The operator between key-value pairs; supports Equal and Exists (default)
   effect    # The effect of the taint to tolerate; an empty value means to match all effects
   tolerationSeconds   # Tolerance time; takes effect when the effect is NoExecute, indicating the