Pod Detailed Explanation #1
https://medium.com/aws-in-plain-english/pod-detailed-explanation-dfca4eac18e5Introduction to Pods
Pod Structure
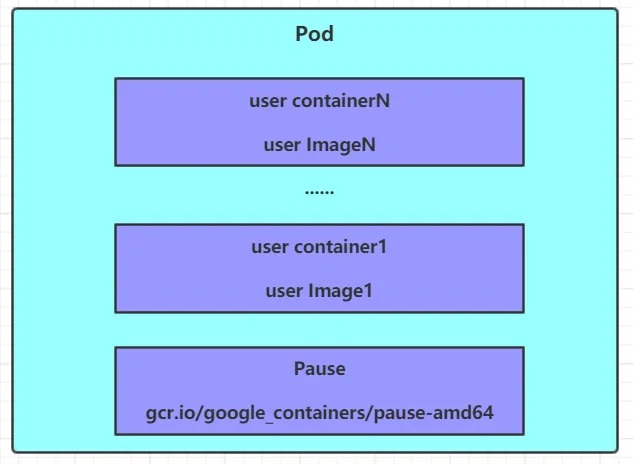
Each Pod can contain one or more containers, which can be divided into two categories:
- Containers that run the user application, can be few or many in number.
- The pause container is a root container that every Pod has. It serves two purposes:
- It can be used as a basis for evaluating the overall health of the Pod.
- It can set the IP address on the root container so other containers can communicate over the Pod network using this IP (Pod IP).
This is the communication within the Pod. The communication between Pods is implemented using virtual Layer 2 network technology, and we use Flannel in our current environment.
Pod Definition
The following is a list of resources for a Pod:
apiVersion: v1     # Required. Version number, such as v1.
kind: Pod          # Required. Resource type, such as Pod.
metadata:          # Required. Metadata
  name: string       # Required. Pod name
  namespace: string  # Pod namespace, default is "default"
  labels:            # Custom label list
    - name: string
spec:               # Required. Detailed definition of containers in Pod
  containers:       # Required. List of containers in Pod
  - name: string     # Required. Container name
    image: string    # Required. Container image name
    imagePullPolicy: [ Always | Never | IfNotPresent ]  # Image acquisition policy
    command: [string]   # List of container startup commands, if not specified, the startup command used when packaging is used
    args: [string]      # List of container startup command parameters
    workingDir: string  # Container working directory
    volumeMounts:       # Configuration of storage volumes mounted inside the container
    - name: string      # The name of the shared storage volume referenced by the Pod definition, which needs to be defined using the volumes[] section
      mountPath: string  # The absolute path on which the storage volume is mounted in the container should be less than 512 characters
      readOnly: boolean  # Whether to use read-only mode
    ports:              # List of port numbers to be exposed
    - name: string      # Name of the port
      containerPort: int # Port number the container needs to listen to
      hostPort: int      # Port number the host where the container is located needs to listen to, default is the same as Container
      protocol: string   # Protocol of the port, supporting TCP and UDP, default is TCP
    env:                # List of environment variables that need to be set before the container runs
    - name: string      # Environment variable name
      value: string     # Value of the environment variable
    resources:          # Resource limit and request settings
      limits:           # Resource limit setting
        cpu: string     # CPU limit, in units of core number, will be used for docker run --cpu-shares parameter
        memory: string  # Memory limit, unit can be Mib/Gib, will be used for docker run --memory parameter
      requests:         # Resource request setting
        cpu: string     # CPU request, initial available number when the container starts
        memory: string  # Memory request, initial available number when the container starts
    lifecycle: # Lifecycle hook
      postStart: # Hook that is immediately executed after the container starts. If execution fails, it will be restarted according to the restart policy
      preStop:   # Hook that is executed before the container is terminated. The container will be terminated regardless of the result
    livenessProbe: # Settings for health checks on containers within the Pod. The container will be automatically restarted after a few unsuccessful probes.
      exec:         # Set the Pod container check method to exec mode
        command: [string] # Command or script specified by the exec method
      httpGet:      # Set the health check method for each container in the Pod to HttpGet, and specify Path and port
        path: string
        port: number
        host: string
        scheme: string
        HttpHeaders:
        - name: string
          value: string
      tcpSocket:    # Set the Pod container check method to tcpSocket mode
         port: number
      initialDelaySeconds: 0 # The time after the container is started for the first probe, in seconds
     timeoutSeconds: 0     # The timeout period in seconds waiting for a response during the container health check probe. The default is 1 second
     periodSeconds: 0      # The period for the regular probe of container monitoring check, in seconds. The default is once every 10 seconds
     successThreshold: 0   # The number of successful probes required for the container to be considered healthy. The default is 1
     failureThreshold: 0   # The number of unsuccessful probes required for the container to be considered unhealthy. The default is 3
     securityContext:
       privileged: false
restartPolicy: [ Always | Never | OnFailure ] # Pod restart strategy
nodeName: <string> # Set NodeName to indicate that the Pod will be scheduled to the node node with the specified name
nodeSelector: obeject # Set NodeSelector to schedule the Pod to a node that contains this label
imagePullSecrets: # Secret name used when pulling images, specified in the format of key: secretkey

name: string
hostNetwork: false # Whether to use host network mode, the default is false, if set to true, it means using the host network
volumes: # List of shared storage volumes defined on this pod
name: string # Shared storage volume name (there are many types of volumes)
emptyDir: {} # Storage volume of type emtyDir, a temporary directory with the same lifecycle as Pod. Empty value
hostPath: string # Storage volume of type hostPath, which mounts the directory on the host where the Pod is located
path: string # Directory on the host where the Pod is located, which will be used for the directory mounted in the synchronization
secret:    # Storage volume of type secret, which mounts the secret object defined in the cluster to the container internally
secretname: string
items:
key: string
path: string
configMap: # Storage volume of type configMap, which mounts the predefined configMap object to the container internally
name: string
items:
key: string
path: string
#Tip:
#Here, you can use a command to view the configurable options for each type of resource:
#kubectl explain resource type View the primary attributes that can be configured for a certain resource
#kubectl explain resource type.attribute View the sub-attributes of the attribute
[root@master ~]# kubectl explain pod
KIND:     Pod
VERSION:  v1
FIELDS:
   apiVersion   <string>
   kind <string>
   metadata     <Object>
   spec <Object>
   status       <Object>

[root@master ~]# kubectl explain pod.metadata
KIND:     Pod
VERSION:  v1
RESOURCE: metadata <Object>
FIELDS:
   annotations  <map[string]string>
   clusterName  <string>
   creationTimestamp    <string>
   deletionGracePeriodSeconds   <integer>
   deletionTimestamp    <string>
   finalizers   <[]string>
   generateName <string>
   generation   <integer>
   labels       <map[string]string>
   managedFields        <[]Object>
   name <string>
   namespace    <string>
   ownerReferences      <[]Object>
   resourceVersion      <string>
   selfLink     <string>
   uid  <string>
In Kubernetes, the basic first-level properties of almost all resources are the same, including:
- apiVersion <string> The version, defined internally by Kubernetes, the version number must be queryable with
kubectl api-versions - kind <string> The type, defined internally by Kubernetes, the version number must be queryable with
kubectl api-resources - metadata <Object> Metadata, mainly used for resource identification and description, commonly used properties include
name,namespace,labels, etc. - spec <Object> Description, which is the most important part of the configuration, containing detailed descriptions of various resource configurations
- status <Object> Status information, the contents of which do not need to be defined and are automatically generated by Kubernetes.
Among these properties, spec is the focus of our study, let's look at some of its common sub-properties:
- containers <[]Object> The container list used to define detailed information about the container
- nodeName <String> Specifies the node name to which the pod will be scheduled
- nodeSelector <map[]> Specifies the label to select the Node to which the Pod will be scheduled
- hostNetwork <boolean> Whether to use host network mode, default is false, if set to true, it means using the host network
- volumes <[]Object> Storage volumes, used to define the storage information mounted on the Pod
- restartPolicy <string> Restart policy, indicating the handling strategy when the Pod encounters a failure.
Pod Configuration
In this section, we will focus on the pod.spec.containers attribute, which is the most critical configuration item in the pod configuration.
[root@master ~]# kubectl explain pod.spec.containers
KIND:     Pod
VERSION:  v1
RESOURCE: containers <[]Object>   # An array, representing multiple containers
FIELDS:
   name  <string>     # The name of the container
   image <string>     # The image address required by the container
   imagePullPolicy  <string> # The policy for pulling the image
   command  <[]string> # The list of startup commands for the container. If not specified, the startup command used when packaging is used
   args     <[]string> # The list of arguments required for the container's startup command
   env      <[]Object> # Configuration of the container environment variables
   ports    <[]Object>     # The list of port numbers that the container needs to expose
   resources <Object>      # Resource limit and request settings
Basic Configuration
Create a file named pod-base.yaml with the following content:
apiVersion: v1
kind: Pod
metadata:
  name: pod-base
  namespace: dev
  labels:
    user: heima
spec:
  containers:
  - name: nginx
    image: nginx:1.17.1
  - name: busybox
    image: busybox:1.30
The above YAML file defines a relatively simple Pod configuration that contains two containers:
- nginx: created with the nginx:1.17.1 image (nginx is a lightweight web container)
- busybox: created with the busybox:1.30 image (busybox is a small collection of Linux commands)
# Create the Pod
[root@master pod]# kubectl apply -f pod-base.yaml
pod/pod-base created

# Check the Pod status
# READY 1/2: indicates that there are 2 containers in the current Pod, with 1 of them ready and the other not ready
# RESTARTS: restart count, because one container is malfunctioning, the Pod keeps restarting to try to recover it
[root@master pod]# kubectl get pod -n dev
NAME       READY   STATUS    RESTARTS   AGE
pod-base   1/2     Running   4          95s

# You can use describe to view the internal details
# At this point, a basic Pod has already started, although it currently has issues
[root@master pod]# kubectl describe pod pod-base -n dev
Image Pull
Create a pod-imagepullpolicy.yaml file with the following content:
apiVersion: v1
kind: Pod
metadata:
  name: pod-imagepullpolicy
  namespace: dev
spec:
  containers:
  - name: nginx
    image: nginx:1.17.1
    imagePullPolicy: Always # Set the image pull policy
  - name: busybox
    image: busybox:1.30
imagePullPolicy is used to set the image pull policy. Kubernetes supports three image pull policies:
Always: Always pulls the image from the remote repository.IfNotPresent: Pulls the image from the remote repository only if it is not present locally.Never: Only uses the image that is present locally, never pulling from the remote repository.
Default policy:
If the tag of the image is a specific version number, the default policy is IfNotPresent.If the tag of the image islatest, the default policy isAlways.
# Create the Pod
[root@master pod]# kubectl create -f pod-imagepullpolicy.yaml
pod/pod-imagepullpolicy created

# View the Pod details
# It can be seen that there is a "Pulling image" step for the nginx image.
[root@master pod]# kubectl describe pod pod-imagepullpolicy -n dev
......
Events:
  Type     Reason     Age               From               Message
  ----     ------     ----              ----               -------
  Normal   Scheduled  <unknown>         default-scheduler  Successfully assigned dev/pod-imagePullPolicy to node1
  Normal   Pulling    32s               kubelet, node1     Pulling image "nginx:1.17.1"
  Normal   Pulled     26s               kubelet, node1     Successfully pulled image "nginx:1.17.1"
  Normal   Created    26s               kubelet, node1     Created container nginx
  Normal   Started    25s               kubelet, node1     Started container nginx
  Normal   Pulled     7s (x3 over 25s)  kubelet, node1     Container image "busybox:1.30" already present on machine
  Normal   Created    7s (x3 over 25s)  kubelet, node1     Created container busybox
  Normal   Started    7s (x3 over 25s)  kubelet, node1     Started container busybox
Startup command
In the previous examples, there was an issue that the busybox container didn’t run successfully. The reason is that busybox is not a program but a collection of tools. When the Kubernetes cluster starts managing it, it automatically shuts down. The solution is to keep it running, which is achieved by using the command configuration.
Create a pod-command.yaml file with the following content:
apiVersion: v1
kind: Pod
metadata:
  name: pod-command
  namespace: dev
spec:
  containers:
  - name: nginx
    image: nginx:1.17.1
  - name: busybox
    image: busybox:1.30
    command: ["/bin/sh","-c","touch /tmp/hello.txt;while true;do /bin/echo $(date +%T) >> /tmp/hello.txt; sleep 3; done;"]
command is used to run a command in the container after it is initialized in the pod.
Here’s a brief explanation of the command:
"/bin/sh","-c": Useshto execute the command.
touch /tmp/hello.txt: Create a/tmp/hello.txtfile.
while true;do /bin/echo $(date +%T) >> /tmp/hello.txt; sleep 3; done;: Write the current time to the file every 3 seconds.# Create the pod [root@master pod]# kubectl create -f pod-command.yaml pod/pod-command created # Check the pod status # At this point, both pods are running normally [root@master pod]# kubectl get pods pod-command -n dev NAME READY STATUS RESTARTS AGE pod-command 2/2 Runing 0 2s # Enter the busybox container in the pod and check the file content # Use the following command to enter the container and perform relevant operations: # kubectl exec pod-name -n namespace -it -c container-name /bin/sh # For example, you can check the content of the txt file [root@master pod]# kubectl exec pod-command -n dev -it -c busybox /bin/sh / # tail -f /tmp/hello.txt 13:35:35 13:35:38 13:35:41 Note: It appears that `command` can complete the functionality of starting a command and passing parameters. So why is the `args` option provided for passing parameters? This is actually related to Docker. In Kubernetes, `command` and `args` are used to override the functionality of `ENTRYPOINT` in Dockerfile. 1. If both `command` and `args` are not written, the configuration in Dockerfile will be used. 2. If `command` is written, but `args` is not, the default configuration in Dockerfile will be ignored, and the input `command` will be executed. 3. If `command` is not written, but `args` is written, the command specified by `ENTRYPOINT` in Dockerfile will be executed with the current `args` parameters. 4. If both `command` and `args` are written, the configuration in Dockerfile will be ignored, and the `command` will be executed with the `args` parameters appended.
Environment Variables
Create a file named pod-env.yaml with the following content:
apiVersion: v1
kind: Pod
metadata:
  name: pod-env
  namespace: dev
spec:
  containers:
  - name: busybox
    image: busybox:1.30
    command: ["/bin/sh","-c","while true;do /bin/echo $(date +%T);sleep 60; done;"]
    env: # Set the list of environment variables in the container
    - name: "username"
      value: "admin"
    - name: "password"
      value: "123456"
The env section is used to set environment variables in the container.
# Create Pod
[root@master ~]# kubectl create -f pod-env.yaml
pod/pod-env created

# Enter the container and output the environment variables
[root@master ~]# kubectl exec pod-env -n dev -c busybox -it /bin/sh
/ # echo $username
admin
/ # echo $password
123456
It is not recommended to use this method for managing configuration. Instead, it is recommended to store configuration in separate configuration files, which will be covered later.
Port Configuration
In this section, we will introduce the configuration of container ports, which is the ports option under containers.
First, let’s take a look at the sub-options supported by ports:
[root@master ~]# kubectl explain pod.spec.containers.ports
KIND:     Pod
VERSION:  v1
RESOURCE: ports <[]Object>
FIELDS:
   name         <string>  # The name of the port, must be unique within the pod if specified.
   containerPort<integer> # The port number that the container listens on (0 < x < 65536).
   hostPort     <integer> # The port on the host that is exposed by the container. If specified, only one container can run on the host (usually omitted).
   hostIP       <string>  # The host IP to bind the external port to (usually omitted).
   protocol     <string>  # The protocol for the port. Must be one of UDP, TCP, or SCTP. Defaults to "TCP".
Next, let’s create a test case by creating pod-ports.yaml.
apiVersion: v1
kind: Pod
metadata:
  name: pod-ports
  namespace: dev
spec:
  containers:
  - name: nginx
    image: nginx:1.17.1
    ports: # The list of exposed ports of the container.
    - name: nginx-port
      containerPort: 80
      protocol: TCP
# Create the pod.
[root@master ~]# kubectl create -f pod-ports.yaml
pod/pod-ports created

# Check the pod.
# In the output, we can clearly see the configuration information.
[root@master ~]# kubectl get pod pod-ports -n dev -o yaml
......
spec:
  containers:
  - image: nginx:1.17.1
    imagePullPolicy: IfNotPresent
    name: nginx
    ports:
    - containerPort: 80
      name: nginx-port
      protocol: TCP
......
To access the program in the container, we need to use podIp:containerPort.
Resource Quotas
When a program runs in a container, it definitely requires some resources such as CPU and memory. If we do not limit the resources used by a container, it may consume a large number of resources and prevent other containers from running. Kubernetes provides a mechanism to limit the resources used by a container for memory and CPU through the resources option, which has two sub-options:
limits: used to limit the maximum resources used by the container at runtime. If the container exceeds its resource limits, it will be terminated and restarted.requests: used to set the minimum resources required by the container. If the required resources are not available in the environment, the container will not start.
Resource limits can be set for CPU and memory using the above options.
Next, we’ll create a test case by creating the pod-resources.yaml file:
apiVersion: v1
kind: Pod
metadata:
  name: pod-resources
  namespace: dev
spec:
  containers:
  - name: nginx
    image: nginx:1.17.1
    resources:
      limits:
        cpu: "2"
        memory: "10Gi"
      requests:
        cpu: "1"
        memory: "10Mi"
Note the units for CPU and memory:
- CPU: core count, which can be a whole number or a decimal number.
- Memory: memory size, can be expressed in units such as Gi, Mi, G, and M.
After creating the pod-resources.yaml file, we can run the following commands:
# Create the Pod
kubectl create -f pod-resources.yaml

# Verify the Pod is running normally
kubectl get pod pod-resources -n dev

# Delete the Pod
kubectl delete -f pod-resources.yaml

# Modify the memory value for resources.requests.memory to 10Gi and start the Pod again
vim pod-resources.yaml
kubectl create -f pod-resources.yaml

# Check the Pod status and see that the Pod failed to start
kubectl get pod pod-resources -n dev -o wide
kubectl describe pod pod-resources -n dev
The error message in the pod details shows that there is insufficient memory available for the Pod to run.
Pod Lifecycle
The lifecycle of a pod object, from creation to termination, is generally referred to as the pod lifecycle. It mainly includes the following processes:
- Pod creation process
- Initialization container process
- Running the main container
- Post-start and pre-stop hooks of the container
- Liveness and readiness probes of the container
- Pod termination process
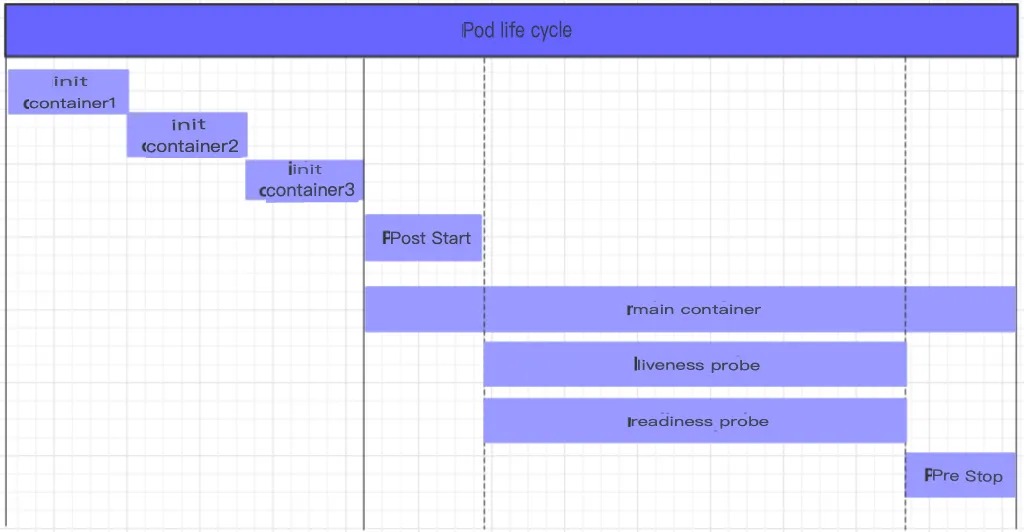
Throughout its lifecycle, a Pod can have 5 different statuses (or phases), as follows:
- Pending: The API server has created the Pod resource object, but it has not yet been scheduled or is still in the process of downloading images.
- Running: The Pod has been scheduled to a node and all containers have been created by kubelet.
- Succeeded: All containers in the Pod have terminated successfully and will not be restarted.
- Failed: All containers in the Pod have terminated and at least one container has failed, i.e., returned a non-zero exit status.
- Unknown: The API server is unable to retrieve the Pod’s status information, typically due to communication failure.