Paver Patio Ideas
5 Paver Patio Ideas That Look Great and Stay Within Budget
Mastering the Art of Patio Block Installation for a Flawless Outdoor Space
When it comes to enhancing your backyard, few projects are as rewarding as installing a patio. A well-built patio not only extends your living space but also adds value to your home while creating a perfect venue for family gatherings and outdoor barbecues. However, the process of installing patio blocks can seem daunting, especially for homeowners or DIY enthusiasts who may lack experience in masonry work. Understanding the steps involved and preparing adequately can turn a potentially overwhelming task into a satisfying DIY project.
Many homeowners find themselves faced with the challenge of creating an outdoor space that is both functional and aesthetically pleasing. With a myriad of materials available, from concrete pavers to natural stone, the options can be overwhelming. Moreover, achieving a level and stable surface requires careful planning and execution. The thought of making mistakes that could lead to costly repairs can deter even the most enthusiastic DIYers. This guide aims to break down the process of patio block installation into manageable steps, ensuring that you achieve clean, straight results without the stress.
One of the keys to a successful patio installation is understanding the foundational aspects of the project. From selecting the right materials to preparing the ground, every decision you make will affect the final outcome. This guide not only provides step-by-step instructions but also addresses common pitfalls and how to avoid them. By the end of this article, you will be equipped with the knowledge and confidence needed to tackle your patio project, transforming your backyard into an inviting oasis.
Understanding Patio Block Types and Their Benefits
Before starting your patio installation, it's crucial to familiarize yourself with the different types of patio blocks available. Each type has its unique characteristics, benefits, and aesthetic appeal. For instance, concrete pavers are immensely popular due to their durability and versatility. They come in various shapes, sizes, and colors, allowing you to create a personalized design that complements your home and landscape. In contrast, natural stone options, such as slate or flagstone, offer a more rustic look but may require more maintenance.
Another option worth considering is bricks, which provide a classic and timeless appearance. They are known for their strength and can withstand extreme weather conditions, making them an excellent choice for outdoor projects. Each type of block has its advantages, so it’s important to assess your specific needs, including budget, desired aesthetics, and maintenance requirements. Understanding these factors will help you make an informed choice that fits your project.
Moreover, the choice of blocks impacts not only the look of your patio but also its longevity and safety. For example, some materials might be more prone to cracking under pressure or may become slippery when wet. By selecting the right materials, you not only ensure a visually appealing patio but also a safe and durable one that can be enjoyed for years to come. As you explore your options, consider how each type of block will fit into your overall design and functionality goals.
Concrete Pavers: A Durable Choice
Concrete pavers are a favorite among homeowners for several reasons. Firstly, they are incredibly durable, capable of withstanding heavy foot traffic and harsh weather conditions. Unlike poured concrete, individual pavers can be replaced easily if damaged. This feature makes concrete pavers an attractive long-term investment for your patio. Additionally, they can be installed in various patterns, allowing for creativity in your design.
Another advantage of concrete pavers is their low maintenance needs. Regular cleaning with a broom and occasional power washing can keep them looking new for years. They also resist fading, which is a common issue with other materials. When properly sealed, they can withstand stains and spills, making them an ideal choice for outdoor entertaining. Their versatility, combined with ease of maintenance, positions concrete pavers as a leading option for patio installations.
Natural Stone: Aesthetic Appeal with Character
If you're looking for a more organic appearance, natural stone may be the perfect choice. Each stone has unique color variations and textures, which adds character to your patio. Materials like flagstone, slate, and granite create a stunning visual impact that enhances your outdoor space. However, it’s important to note that natural stone can be more expensive and may require more maintenance compared to concrete pavers.
Natural stone is generally durable, but some types may be more prone to chipping or cracking. Regular sealing is often necessary to protect the stone from moisture damage and staining. If you choose this route, make sure to select high-quality stone that suits your climate. Investing in natural stone can significantly elevate the aesthetics of your patio, making it a focal point of your outdoor area.
Brick: Classic and Timeless
Brick patios offer a classic look that never goes out of style. Known for their strength, brick blocks provide a sturdy surface that can handle both foot traffic and furniture. The traditional red or brown hues can complement various home designs and landscaping styles. Furthermore, bricks are less likely to crack under pressure compared to other materials, adding to their appeal.
However, installation can be labor-intensive, as bricks require careful alignment and spacing. It's also essential to properly prepare the base to avoid settling over time. Although bricks can be more costly upfront, their longevity and timeless aesthetic make them a worthwhile investment. With proper care, a brick patio can last a lifetime, becoming a cherished part of your home.
Preparation: The Key to a Successful Installation
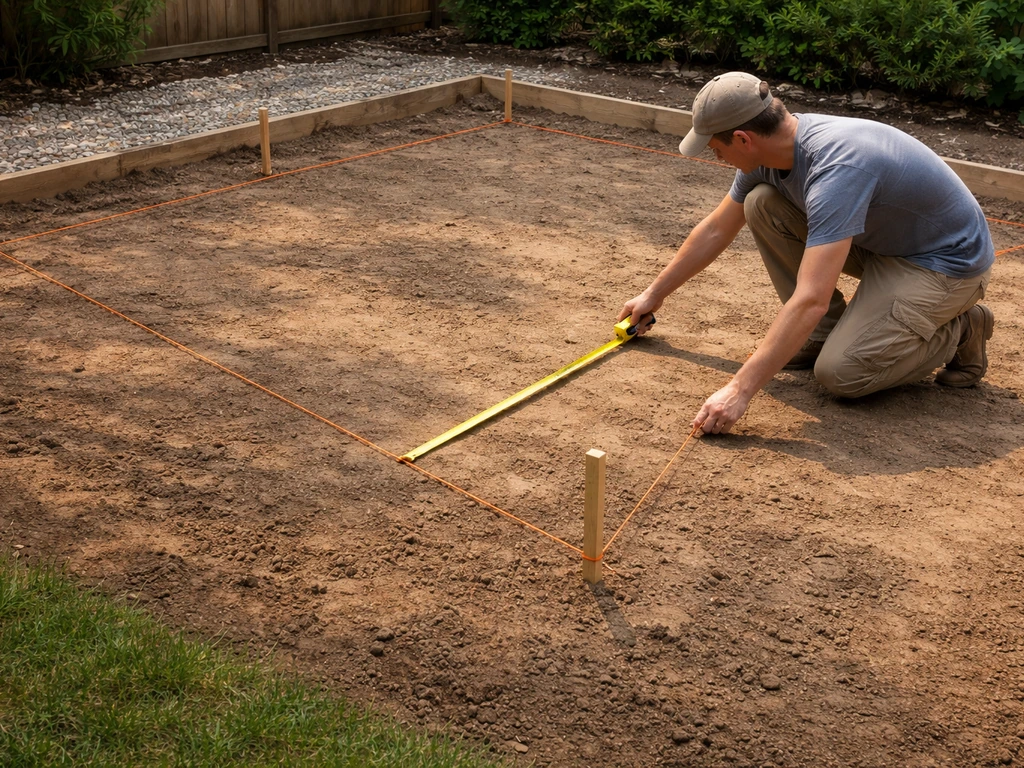
Preparing the site for your patio installation is perhaps the most crucial step in the process. Start by choosing the right location that receives adequate sunlight and isn't prone to flooding. Once you've identified the area, you will need to clear it of any vegetation, rocks, or debris. This step ensures that your foundation is solid and free from obstructions.
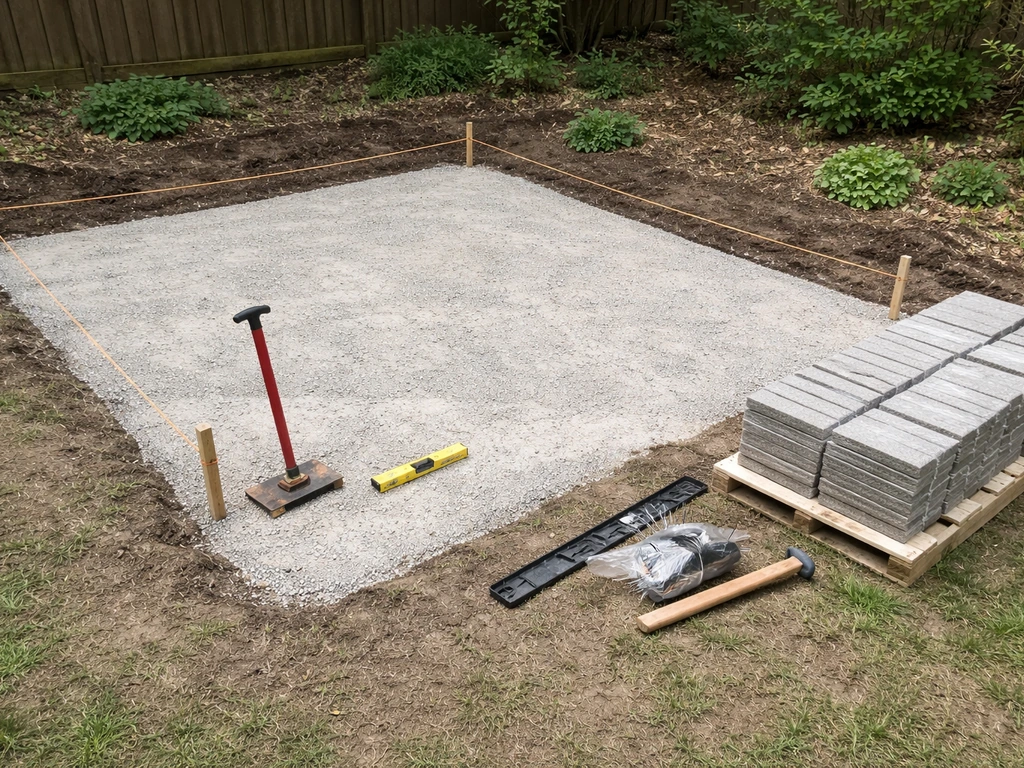
Next, you will need to mark the layout of your patio using stakes and string. This will help you visualize the space and ensure that you are working with straight lines. Consider using a level to guarantee that your marks are even. Once you are satisfied with the layout, it's time to begin excavating the area. Aim for a depth of about 6 to 8 inches, allowing for a solid base, sand, and the thickness of the patio blocks.
After excavation, it's essential to compact the soil to prevent settling. A plate compactor can be rented from most hardware stores and will help create a solid foundation. Following compaction, add a layer of gravel for drainage. This step is important as it prevents water from pooling on your patio, which can cause damage over time. Proper preparation sets the stage for a successful patio installation and ensures longevity.
Creating a Solid Base
A solid base is critical for a patio that will endure the test of time. After excavating and compacting the soil, add a layer of crushed stone or gravel. This layer should be about 4 inches thick, providing excellent drainage and a stable surface. Once you’ve spread the gravel, use the compactor again to ensure it is packed tightly. A well-compacted base will provide a solid foundation that can support the weight of the patio blocks.
Next, add a layer of sand on top of the gravel. This layer should be about 1 inch thick and will act as a leveling agent for your patio blocks. Use a screed board to level the sand, ensuring it is smooth and even. This preparation is crucial, as an uneven base can lead to shifting and cracking of the patio blocks over time. Take your time during this process to guarantee a level and stable foundation.
Planning the Layout
Planning the layout of your patio blocks is a creative yet systematic process. Before you start placing the blocks, take time to envision the design. Consider different patterns such as herringbone, basketweave, or a simple grid. Sketching out your design on paper can help visualize how the finished patio will look. Additionally, keep in mind the size and shape of the patio blocks, as this will affect your layout.
It's also crucial to think about the direction of the pattern. Laying the blocks in a diagonal pattern can create the illusion of a larger space, while a straight pattern may be more traditional and straightforward. As you plan, account for any edges and borders. Adding a border can enhance the overall look while also providing a defined edge that keeps the blocks in place. Proper planning will ultimately lead to a more cohesive and visually appealing patio.
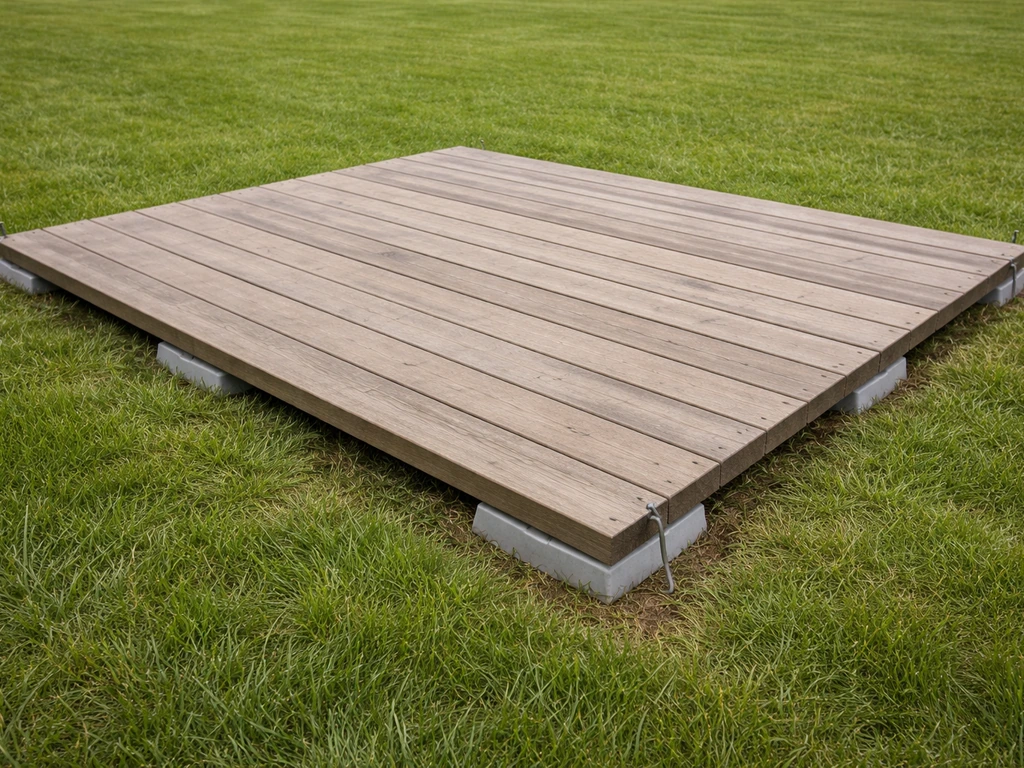
Installation Process: Step-by-Step Guide
Once you have adequately prepared the site and planned your layout, it's time to begin the installation process. Start by laying the first block in the corner of your designated area. Ensure it is level and aligned with the stakes or strings you set up earlier. As you lay each block, use a rubber mallet to gently tap it into place, ensuring it is snug against the adjacent blocks. This method helps prevent gaps and shifting.
Continue laying the blocks according to your planned pattern, taking care to maintain even spacing. Plastic spacers can be used between blocks to ensure consistent gaps. As you progress, periodically check the level of each block and adjust as necessary. It's common for slight adjustments to be needed, especially if you're working on an uneven surface. Patience during this step will pay off in the long run, resulting in a professional-looking patio.
Once all the blocks are laid, it's time to fill the gaps with sand. Sweep sand over the surface of the patio, allowing it to fill the spaces between the blocks. This step is crucial, as it locks the blocks into place and prevents shifting. Use a broom to ensure the sand is evenly distributed, then lightly mist the surface with water to help the sand settle. After the sand has settled, add more as needed to fill any gaps. This final touch will help secure your patio blocks effectively.
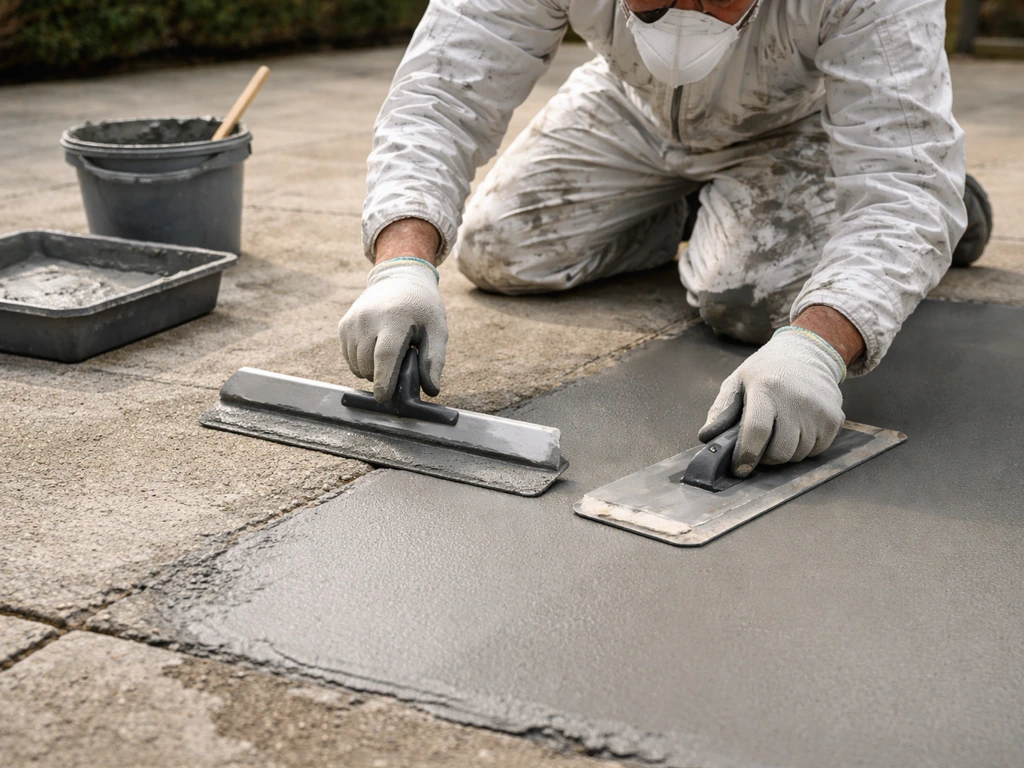
Sealing and Finishing Touches
After the installation is complete, consider applying a sealant to protect your patio from the elements. A quality sealant can help prevent stains and fading while making maintenance easier. Before sealing, ensure the surface is completely dry and free from debris. Follow the manufacturer's instructions for application, as different products may have varying requirements.
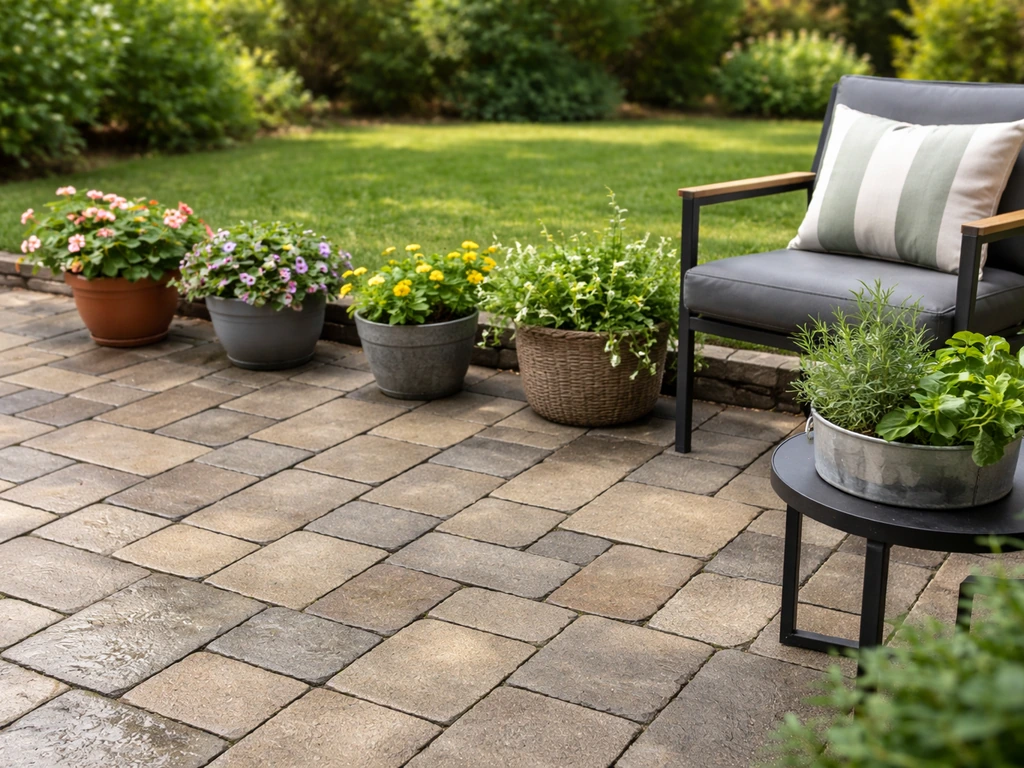
Additionally, don't forget to add finishing touches to enhance the look of your patio. Consider planting flowers or shrubs around the edges, or adding outdoor furniture to create a welcoming atmosphere. Decorative elements such as outdoor rugs or cushions can also bring warmth and style to your newly installed patio. These finishing touches will complete your outdoor space, making it a functional and beautiful extension of your home.
Maintenance: Keeping Your Patio in Top Shape
Once your patio is installed, regular maintenance will help keep it looking great for years to come. Start by regularly sweeping debris off the surface to prevent staining and damage. For deeper cleans, a pressure washer can be used, but be cautious to avoid damaging the joints between the blocks. If you notice any weeds sprouting through the cracks, promptly remove them to prevent root damage.
Additionally, inspect the patio for any shifting or settling. If you notice gaps or unevenness, it may be necessary to add more sand to the joints or adjust the blocks. Regular maintenance checks will help you catch problems early, ensuring that your patio remains in excellent condition. Keeping the surface sealed will also significantly reduce the amount of maintenance needed, as it will protect against stains and wear.
Seasonal Care Tips
Seasonal changes can affect your patio, so it’s vital to adjust your maintenance routine accordingly. In the fall, be diligent about removing leaves and debris that can trap moisture and lead to mold growth. In winter, if you live in an area with snow, avoid using salt on your patio as it can damage the blocks. Instead, use sand or a snow shovel to remove snow gently.
In spring, perform a thorough check for any winter damage and clean the surface thoroughly. You may also want to reapply sealant after a few years to maintain the integrity of your patio. During the summer, ensure the patio remains clear of dirt and grime, especially if you frequently entertain outdoors. Seasonal care will not only keep your patio looking its best but also extend its lifespan.
Pros and Cons of Patio Block Installation
- Pros:Durability: Properly installed patio blocks can withstand heavy use and harsh weather conditions, ensuring a long-lasting outdoor space.
- Design Flexibility: With various materials and patterns available, you can customize your patio to fit your style and preferences.
- Cost-Effective: DIY installation can save money on labor costs, making it an affordable option for homeowners.
- Low Maintenance: Once installed, patio blocks require minimal maintenance, allowing you to enjoy your outdoor space without extensive upkeep.
- Cons:Labor-Intensive: Preparing the site and installing the blocks can be physically demanding and time-consuming.
- Initial Costs: While DIY can save on labor, the cost of materials can be significant, depending on the type of blocks chosen.
- Potential for Mistakes: Without proper planning and execution, installation errors can lead to costly repairs down the line.
Evaluating the pros and cons of patio block installation can help you make a more informed decision. While the benefits often outweigh the drawbacks, it’s essential to understand the challenges involved. With careful planning and execution, you can create an outdoor space that enhances your home and provides years of enjoyment.
Frequently Asked Questions
- What tools do I need for patio block installation?To successfully install patio blocks, you will need tools such as a shovel, rake, plate compactor, rubber mallet, level, and a broom. Having the right tools ensures the process is efficient and reduces the risk of mistakes.
- How long does patio block installation take?The duration of the installation process can vary greatly depending on the size and complexity of the project. Typically, a small patio can be completed in one to two days, while larger spaces may take several days to finish. Weather conditions and your level of experience can also affect the timeline.
- Can I install patio blocks on my own?Yes, many homeowners successfully install patio blocks themselves. With the right tools and guidance, DIY installation is achievable for those willing to put in the time and effort. However, having some basic knowledge of construction and landscaping will be beneficial.
- How do I maintain my patio after installation?Regular maintenance includes sweeping debris, cleaning with a pressure washer, and checking for weeds. Additionally, consider sealing the patio every few years to protect against stains and damage. Seasonal care is also essential for keeping your patio in top condition.
- What should I do if my patio blocks shift?If you notice shifting blocks, check the sand joints and add more as needed. You may also need to adjust the blocks to ensure they are level. Regular inspections can help catch these issues early and prevent further damage.
Conclusion
Installing a patio with blocks can be a fulfilling project that enhances your outdoor living space. By understanding the different types of blocks available, preparing adequately, and following a systematic installation process, you can achieve a beautiful and functional patio. Remember to consider maintenance needs and seasonal care to ensure your investment lasts for years to come. With the right planning and execution, your patio can become a cherished part of your home, perfect for gatherings, relaxation, and enjoying the great outdoors.