Pathway Perfection: Denver Pathway Lighting Designs
Twilight along the Front Range has a particular clarity. The sun drops behind the foothills, the air dries out, and colors keep a surprising amount of saturation for those last fifteen minutes. Pathway lighting has to honor that light, then take over gracefully. In Denver, the trick is marrying form with function across altitude, snow, and the city’s active lifestyle. I have installed and maintained more than a hundred pathway systems from Highland neighborhoods to newer builds in Green Valley Ranch, and the projects that last all share a few habits. They put glare control above brightness. They pick materials that shrug off UV and freeze-thaw cycles. They use controls that work in January as well as June. And they treat the walkway not as a runway, but as a ribbon through a landscape.
What makes Denver differentDesign decisions that might slide in a coastal climate will not hold up at 5,280 feet. Ultraviolet exposure is stronger, which degrades plastics and cheaper powder coats. Day-to-night temperature swings can hit 30 degrees or more within hours, and the freeze-thaw cycle punishes thin metals and poorly sealed gaskets. Snow crews push heavy, wet piles onto the first foot of lawn, and that happens to be exactly where many pathway lights live. If you are planning denver pathway lighting, understand that IP ratings, gasket quality, and staking hardware matter as much as lumen counts.
Altitude also changes how eyes perceive brightness. On very clear nights, you can run lower lumen outputs and still get excellent visibility. I often spec 100 to 200 lumens per path head in Denver, then rely on beam control and placement for safety. Compare that to 300-lumen heads common in dense, humid climates, and you start to see the local advantage of restraint. Good denver outdoor illumination should reveal contrast and texture without flattening the space into a parking lot.
Start with purpose, not fixturesClients often begin with a catalog page in mind, usually a dome top or a sleek bollard. I always pull back to questions about use. Do you need a safe midnight route from garage to back door in February when the flagstone is slick? Do you host summer dinners where guests circulate from kitchen to patio to garden beds? Does a dog use the same route every morning at 6 am? These details adjust the lighting plan as much as the style of the house.
Safety and wayfinding come first. A path should read as a sequence of visual cues, not a series of spotlights. That means wider, softer beam spreads set off the travel edge and set to overlap. In denver landscape lighting, I test walkability at two speeds, a casual stroll and a purposeful stride, then tweak aim to eliminate dark voids at curves and intersections. For an eight-foot radius turn around a planter, staggering fixtures 6 to 8 feet apart with heads set 12 to 18 inches above grade usually delivers even coverage without scallops.
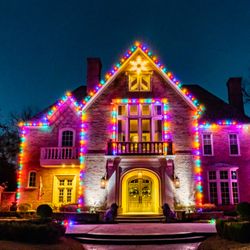
Aesthetics follow right behind. In cottage gardens in Congress Park, bronze fixtures with warm 2700 K light echo copper gutters and brick. On mid-century homes in Krisana Park, a matte black bollard with a shielded lateral lens fits the architecture and pushes a low, even band of light across decomposed granite. That band renders texture and keeps a modern profile. With denver garden lighting, I will often tuck a couple of narrow accent spots into grasses or evergreens to add vertical punctuation. You can do this without turning a pathway into a stage, as long as those accents dim down with the path circuit later at night.
Light quality you can feel at your feetColor temperature and color rendering get less attention than they deserve. Warmer white sources, typically 2700 K to 3000 K, flatter skin tones, wood, and brick. They also reduce attraction for insects compared to cool blue sources, which matters in Denver summers. High CRI, ideally 90 or better, helps with depth perception. On uneven flagstone or broom-finished concrete with stones peeking through, high CRI lets your eyes parse texture quickly. You can keep brightness modest if the spectral content is honest.
Glare is the enemy. When a client says their lighting feels harsh, nine times out of ten the culprit is a visible LED emitter in the sight line. Use fixtures with proper glare guards, frosted lenses, or true cutoff optics. In many denver exterior lighting retrofits, I swap old open-disc heads for sealed brass with stepped shrouds and the complaints vanish. Shielding does more for comfort than dimming alone, and it keeps neighbors happier in tighter urban lots.
Materials that resist altitude and weatherDenver’s dryness extends the life of metals, but the sun taxes finishes. Powder-coated aluminum can work if the coating is high quality and the casting thick. Where budgets allow, I lean toward solid brass or copper for pathway heads and risers. These patina rather than chip. For stakes, avoid thin, flimsy pressed metal. A 9 to 12 inch PVC or composite stake with lateral fins holds better in freeze-thaw cycles. When snow piles onto the bed edge, a stronger stake keeps the head upright instead of leaning like a tired sunflower.
Gasket quality determines whether spring irrigation sits inside your fixtures. Look for IP65 or better ratings and UL wet-location listings. Check that lens gaskets are continuous and compression-based, not thin foam that collapses in a season. On denver outdoor fixtures subjected to snowmelt and deicer, stainless hardware earns its keep. Tiny screws seize and strip easily after one winter if the alloy is cheap.
Power, wiring, and controls that survive winterPathway lighting in the metro area is almost always 12-volt low-voltage, which is safer near walkways and plantings. The transformer does the heavy lifting, and getting this right avoids early failures and dim runs. I size the transformer at 120 to 130 percent of calculated load to leave headroom for additions and to avoid thermal stress. A path with a dozen 3-watt heads draws 36 watts at nameplate. On paper, a 45-watt transformer works. In practice, I pick a 75-watt unit with multi-tap outputs to handle voltage drop across longer runs and winter line voltage fluctuation.
Voltage drop matters more than homeowners expect. Long daisy chains end with sad, dim fixtures. In landscape lighting denver projects, I prefer a hub-and-spoke method near the path center, or a few short runs from a closer secondary junction. Using 12-gauge cable for primary trunks and 14-gauge for short whips balances cost and performance. Aim for 10 percent or less voltage drop to the furthest head. If the distance to the last fixture is 120 feet and total load on that run is 18 watts, 12-gauge usually keeps you in range from a 14-volt tap.
Controls save frustration in a place with variable sunset times and frequent travel. Astronomical timers, which self-adjust for dawn and dusk, work better than photocells shaded by eaves or trees. I like to program two scenes: an early evening scene at full level for arrival and gathering, then a late-night scene that dims pathway circuits to 30 to 50 percent. Smart hubs integrate well with denver lighting solutions across the property, but choose ones that handle cold. Some Wi-Fi relays struggle below freezing. If a client insists on smart lamps, I keep them off metal that acts as a heat sink and avoid enclosed heads that trap heat in July.
The craft of placement and spacingSpacing depends on fixture height, beam width, and background reflectance. A simple rule of thumb is spacing at 4 to 6 times the mounting height, but that is only a starting point. On pale concrete, you can push spacing wider. On dark mulch or soil, bring fixtures closer because the surface absorbs light. Curves prefer staggered placement so the eyes pick up gentle rhythm. Straight runs can alternate sides to avoid a runway feel. outdoor lighting I place heads outside the walking line to minimize damage from feet, shovels, and snow blowers. In winter, that extra 6 inches saves multiple fixtures a season.
Elevation changes deserve special care. At steps or short risers, I often mix in integrated tread lights or small wall grazers to define edges clearly. For a Cherry Creek townhouse with a narrow side passage and three stone steps, two low-output brass step lights at 2700 K, combined with path heads before and after the rise, proved enough. Guests read the transition instantly. Overlighting steps makes them look theatrical and can wash out the tread, which is counterproductive on snowy nights.
Vegetation grows and moves. Grasses wave. Shrubs push into paths. Set fixtures far enough back that mature growth does not swallow heads or bounce glare into eyes. In denver yard lighting, I leave at least 12 inches between a path head and aggressive growers like Karl Foerster grass. For small boxwoods or dwarf spruces, I scout their five-year size before committing to a spot.
Efficiency that respects the grid and the starsDenver enjoys relatively low rates compared to some coasts, but wattage still adds up. A typical residential path scheme with 12 to 16 heads at 3 watts each consumes 36 to 48 watts. Run for 6 hours per night on average, that is roughly 6.5 to 8.8 kWh per month, or a dollar or two at common rates. That is a small draw, and it supports safety. The bigger question is sky glow and neighbor comfort. Warmer CCT LEDs, full-cutoff optics, and dimming after 10 pm reduce impact on migrating birds and pollinators while preserving wayfinding.
I have had good results aligning denver outdoor lighting with International Dark-Sky guidance. That does not mean no light. It means right light, at the right time, in the right place. Shielded optics and absence of uplight make the difference. If you already have denver outdoor lights on the house, consider trimming their output when the path circuit is active so you are not doubling up. Layering is the art here.
Budgeting with eyes openPathway lighting spans a wide range of cost depending on materials and site complexity. For professional outdoor lighting installations denver homeowners often pay:
$1,800 to $3,500 for a short front walk with 6 to 8 brass heads, a small transformer, and straightforward wiring. $3,500 to $7,500 for a front and side run with 10 to 16 fixtures, better controls, and hubs to manage voltage drop. $8,000 and up for large lots, complex hardscapes, or custom bollards.Those figures assume quality materials and pro labor, not big-box kits. DIY can cut costs, but the common misses, such as voltage drop and poor water sealing, show up within a year. If you do decide to DIY, spend where it counts: fixtures, wire gauge, and a real transformer with multi-tap outputs.
Mistakes I see, and how to avoid themTwo patterns repeat. First, overuse of bright, unshielded heads. These look good on a sales floor and bad in a front yard. Second, identical spacing on both sides of a straight path. This creates a tunnel effect and highlights any crookedness in masonry. Vary placement and break symmetry in small ways that feel organic.
Another common error is staking in disturbed soil without proper compaction. After irrigation cycles or a storm, fixtures tilt. Pack the hole, backfill in lifts, and water the soil in so it tightens around the stake. On steep sections, switch to surface-mount bollards on small concrete pads rather than fighting gravity with taller stakes.
Finally, watch for conflicting beams. If you are combining denver garden lighting with denver pathway lighting, ensure accent spots do not blast into path lenses. Cross-aim is a simple fix, as is lowering output on accent circuits.
A simple planning checklist Map actual travel patterns for two weeks, then place painter’s tape or flags where you naturally walk at night. Choose color temperature and CRI by testing two sample fixtures on site for three nights. Confirm transformer location with weather protection, a GFCI-protected receptacle, and code-compliant mounting height. Verify wire routing that avoids tree roots, utilities, and future planting beds, then call 811 before any digging. Decide control logic early, such as an astronomical timer with two scenes, to avoid rewiring later. Installation notes from winter jobsCold-ground installs taught me to preassemble as much as possible indoors. I terminate connectors, label runs, and set beam angles on a bench. On site, I avoid gel-filled pierce connectors in wet clay because they can wick water along the conductor jacket. Instead, I use silicone-filled, heat-shrink butt splices inside small junction wells with gravel bases. That setup has outlived vampire taps in every denver lighting project I have revisited after three winters.
Depth matters. Lay cable at least 6 inches down in planting beds and a foot where it crosses turf that sees aeration. In a Lowry backyard, a spring aerator nicked a shallow run and created a season of intermittent outages. We re-routed, added conduit at crossings, and the nuisance ended. Label runs at the hub and keep a basic as-built diagram. The future you, or the next homeowner, will thank you.
Snow is a reality even for well-sheltered walks. Where crews clear driveways with snow blowers, I set the first fixtures back an extra 8 to 12 inches and raise them slightly so the lens sits above common drift levels. In late storms, that small change keeps the path readable and fixtures intact.
Controls that fit human routinesSchedules work until they do not. Travel, daylight saving shifts, and weather can make a fixed time scheme feel off. Astronomical timers adjust, but I also like a manual override near common entries. A discreet switch by the garage or mudroom gives a quick boost to full brightness when someone heads out late. Late-night dim scenes around 30 percent keep sight lines safe for a pet run without waking neighbors.
On integrated systems, zoned control allows different scenes for front walk, side yard, and garden path. You might want the front to shine bright until 10 pm, the side yard to dim at 9, and the back garden to turn off unless you are entertaining. Modern outdoor lighting solutions denver integrators provide can tie these to presence sensors with long timeouts, which avoids strobing on windy nights.
Style and character without glareDecorative bollards can be stunning on contemporary projects, but many leak light horizontally into eyes. Look for designs with internal baffles or downward-facing apertures. In a Sloan’s Lake infill, a row of 36-inch perforated steel bollards looked great but felt like a row of small lighthouses. We swapped three for five shorter units with louvers and kept the artistic intent while eliminating glare. A few degrees of tilt and an internal shield transformed the experience.
Traditional mushroom heads still have their place. In Park Hill front gardens, their soft pools flatter historic facades. Choose versions with wider hats and deeper lips to hide the emitter. A matte finish reduces specular highlights and helps fixtures disappear by day, a small but meaningful detail in denver outdoor lighting where daytime aesthetics matter as much as night performance.
Coordination with other trades and elementsPathway lighting lives among irrigation, edging, and snow management. I coordinate nozzle throws to keep water off lenses. Over time, mineral spots reduce output and look sloppy. I also sit down with hardscape teams about edging materials. Steel edging close to a fixture can reflect enough light to create distracting bright lines. A subtle shift in placement or a shield solves that.
If you plan new hardscape, ask for conduit sleeves under walks and drives before concrete is poured. A simple 1-inch PVC with pull strings saves hours later and avoids saw cuts. In older denver outdoor lighting retrofits, we sometimes add a shallow channel under existing pavers to route cable cleanly. It is faster than pulling and resetting a full run.
Codes, permits, and practicalitiesMost low-voltage landscape lighting in Denver does not require a permit, but it still needs to meet electrical code. Use a listed transformer, mount it per manufacturer specs, and connect to a GFCI-protected outlet. Exterior junctions should be listed for wet locations. Keep fixtures and wiring clear of property lines where required by HOA covenants and respect sight lines at sidewalks. If your project touches the right-of-way, check city requirements. A quick call saves headaches later.
Wildlife and planting considerations round out the practical side. Warmer, shielded lights deter insects and protect pollinators. Avoid uplighting trees that serve as bird roosts during migration if you can meet your goals another way. In denver garden lighting, I often underlight boulders or low structure instead, which gives depth without the ecological cost.
Maintenance that keeps things crisp Rinse lenses gently each spring and fall to remove dust and mineral film, then check for moisture inside any housings. Re-aim heads after plant growth spurts, especially grasses and roses that can redirect beams into eyes. Test voltage at the furthest fixture once a year to catch emerging resistance issues before they show up as flicker. Tighten stakes and hardware after freeze-thaw cycles, then touch up finishes if chipped. Update timer scenes seasonally. Many astronomical timers have an offset feature you can nudge by 15 to 30 minutes to match lifestyle changes. When to mix in other layersPath lights do not have to do every job. In narrow spaces along a fence, low wall grazers may define the line better than heads that trip feet or mowers. Along pergolas or low retaining walls, integrated cap lights provide soft guidance and free up plant beds. Good denver lighting integrates path circuits with a few vertical accents and a gentle wash on focal shrubs or art. The layered result guides eyes naturally and lets each element work at a comfortable output.
In a Wash Park bungalow, we reduced path heads from twelve to eight, then added two low-output tree downlights that painted dappled moonlight onto the walk. The path felt lights brighter at lower wattage because shadows had texture. Guests walked confidently, and the homeowners stopped fighting mower damage to heads near turf.
Choosing a contractor, or choosing to DIYIf you hire out, look for firms that can show you photometric mockups or at least set up a live demo. Reputable outdoor lighting services denver providers often offer a temporary test night with sample fixtures. Stand on the path, not the curb. Glare only shows up in the walking position. Ask about transformer sizing, wiring method, and warranty on both fixtures and labor. In my practice, five-year labor on top of manufacturer warranties has paid back trust.
DIY can work for straightforward runs. Stick with brass or thick aluminum heads with sealed LEDs from reliable brands. Use a real multi-tap transformer, proper hubs, and heavy gauge cable. Plan routes that respect root zones and irrigation. If you hit hardpan or cobble layers common in parts of the city, do not force stakes. Pre-drill with a rebar rod and water the hole. Patience here avoids a leaning forest later.
The payoff on a good Denver pathA well-lit path changes how you use a property. Kids walk the dog without a flashlight. Guests find their way without scanning for house numbers. Snow nights feel safer because the edges read clearly. Good denver outdoor lighting systems denver homeowners adopt often start with a simple entry walk and grow outward as confidence builds. The key is to keep discipline as you expand; match color temperature, keep glare down, and extend control logic so the yard feels like one place.
Colorado outdoor lighting is at its best when it respects the sky and the neighbors, and when it gets the job done for feet on the ground. The mile-high air rewards warm tones and subtle layers. Copper and brass age well under that sun. Transformers do their quiet work in sheltered corners. Timers follow the arc of the seasons without fuss. When everything hums, the path disappears into the evening, and that is exactly the point.
Braga Outdoor Lighting
18172 E Arizona Ave UNIT B, Aurora, CO 80017
1.888.638.8937
https://bragaoutdoorlighting.com/