Overwatch Settings
🛑 👉🏻👉🏻👉🏻 INFORMATION AVAILABLE CLICK HERE👈🏻👈🏻👈🏻
CS:GO – Best Settings & Options Guide
Overwatch Best Monitor & Gear Guide
Overwatch Best Settings & Options Guide
Fortnite – Best Settings & Options Guide
VALORANT Pro Settings and Gear List
VALORANT – Best Settings and Options Guide
PUBG – Best Settings And Options Guide
Apex Legends – Best Settings and Options Guide
Best Keyboard For Rainbow Six Siege
Best Mousepad for Rainbow Six Siege
Rainbow Six Siege – Best Settings and Options Guide
Rocket League Pro Camera Settings and Controller List
Rocket League Camera Settings Guide
Call of Duty: Warzone Best Settings & Options Guide
League of Legends – Best Settings and Options Guide
Overwatch, as any game, has a bunch of settings that you can tweak to your heart’s desire in order to make the game look prettier, change your crosshair color, etc. In this guide we will analyze what the pros do with their settings in order to help you maximize the game’s performance and, as a consequence, your own performance.
We’ve been taking a look at the players in our Overwatch Pro Settings and Gear List as well as doing our own testing to come up with this complete article. Follow this guide and you’ll be competing like the pros in no time!
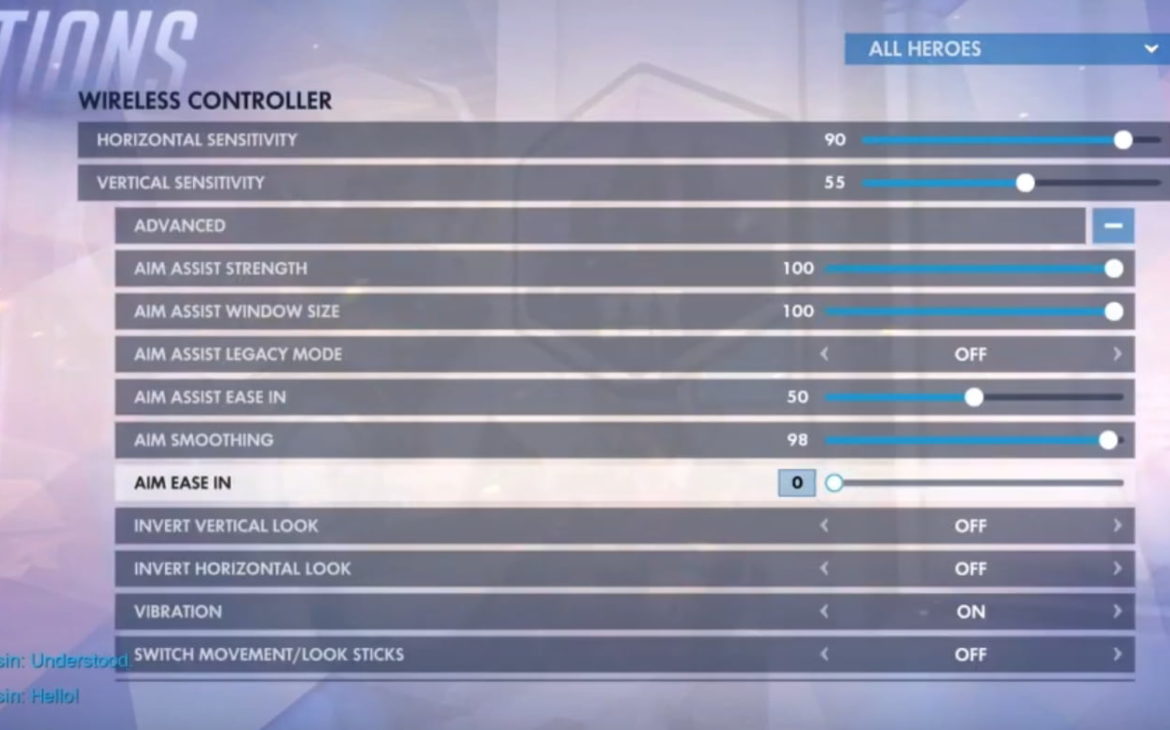
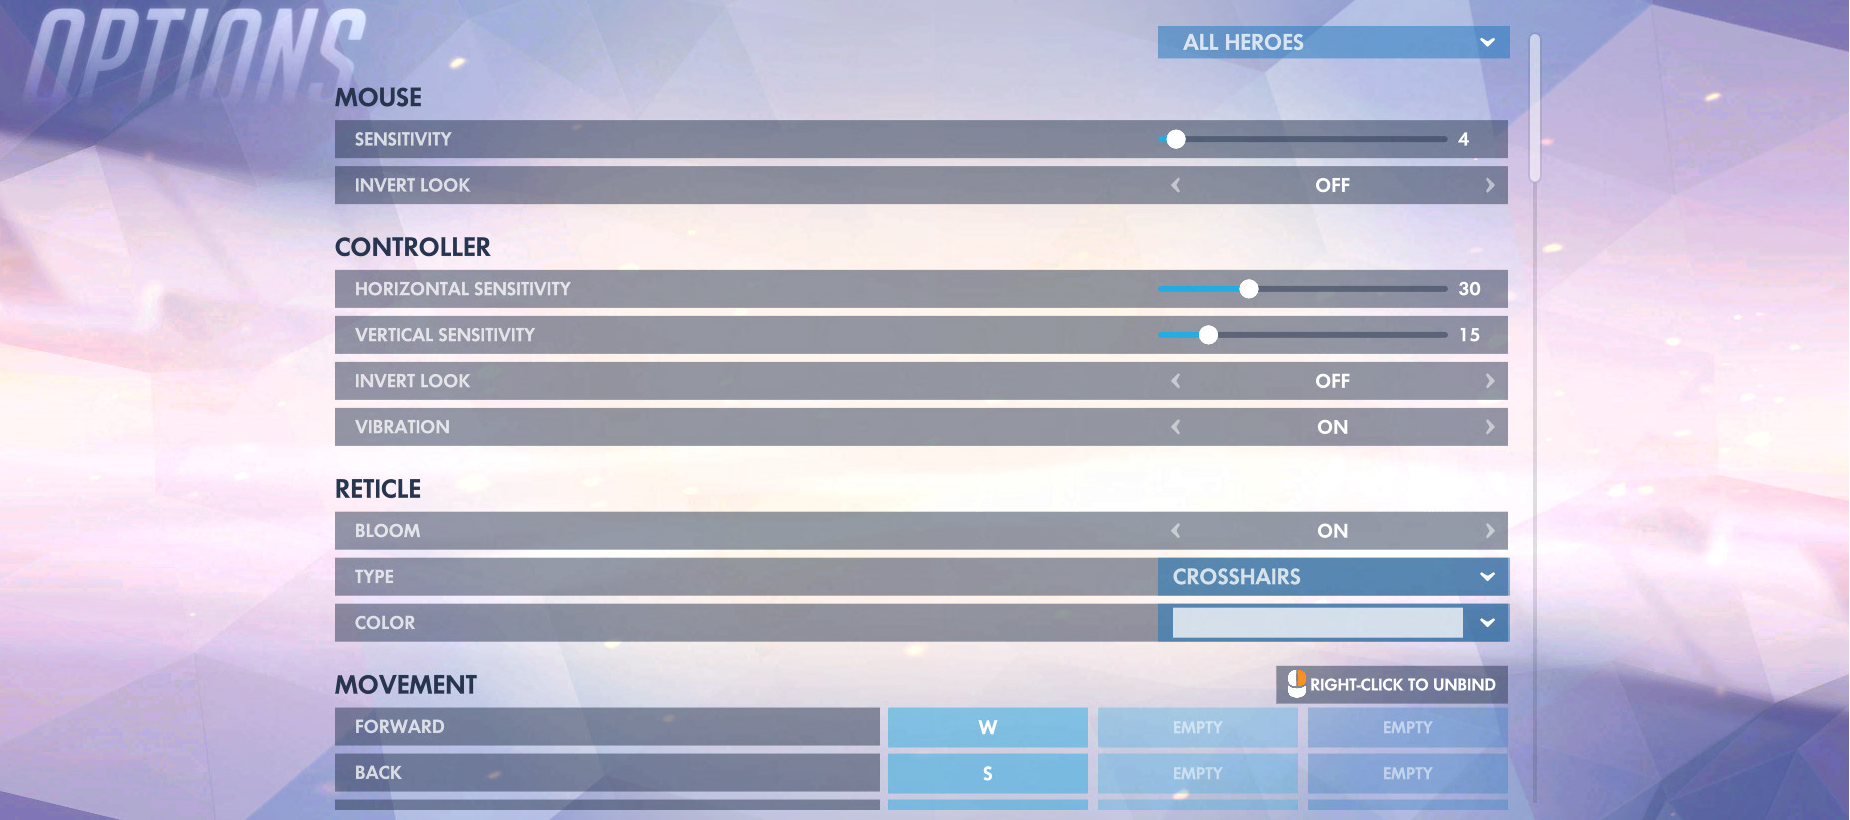
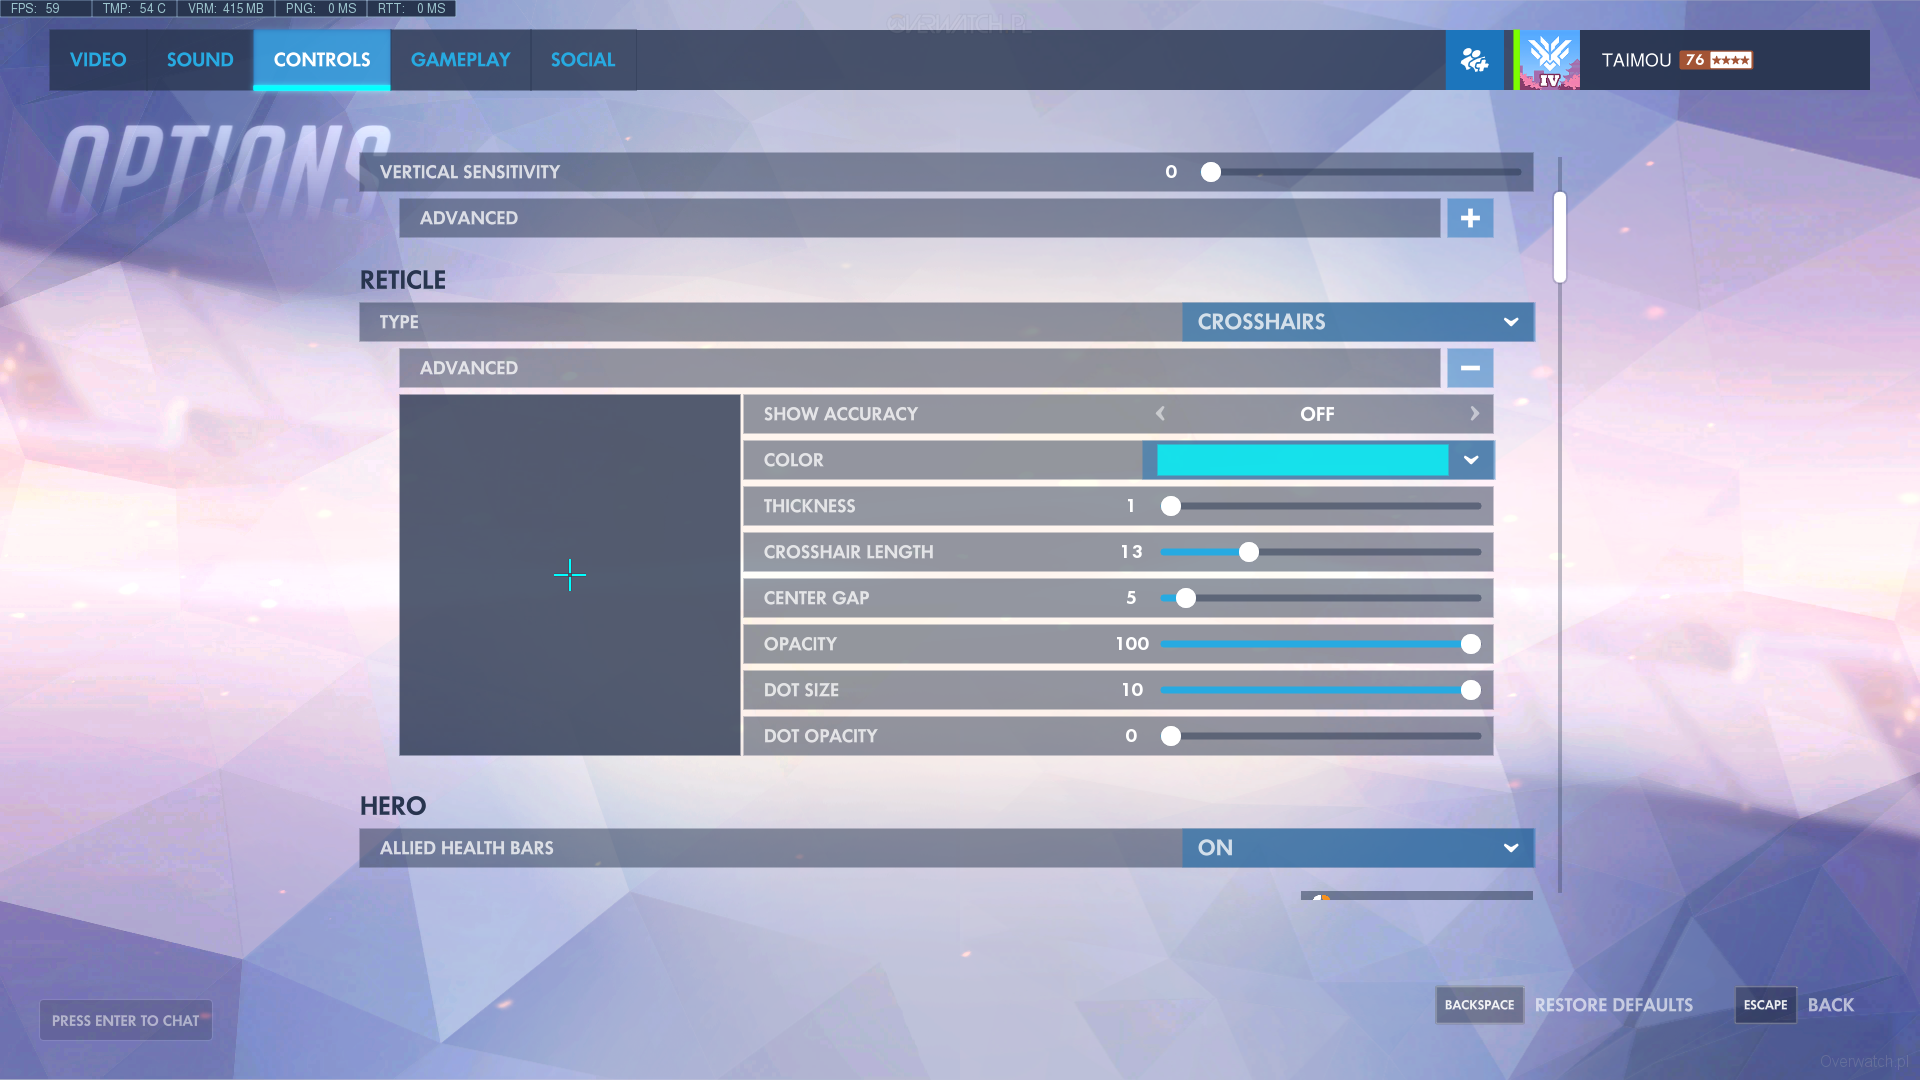
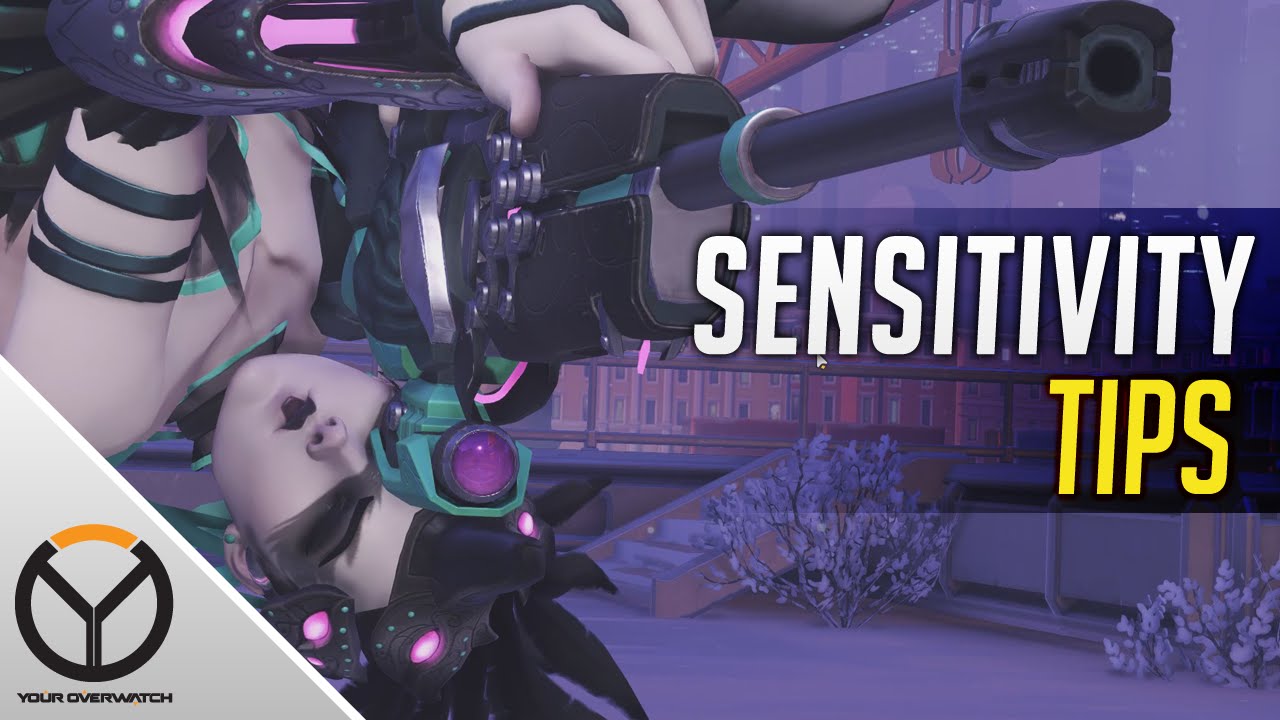
Once you’ve bought yourself a great gaming mouse it is important that you use it correctly. Turning your DPI and sensitivity all the way up can cause your crosshair to jump all over the place while choosing a low sensitivity might give you problems in situations where you have to be mobile and make split second adjustments. Overwatch is a very frantic and fast-paced game so in general you want your sensitivity and eDPI to be slightly higher than in other FPS games that we analyze.
‘The perfect settings’ are very subjective and personal but we can give you some directions. We’ve analyzed what the pros are doing as far as mouse settings go so you have a starting point to come up with your own settings. Of course no one should blindly copy what the pros are doing, but if all pros are within a certain range it’s probably not very wise to be much above (or below) their overall sensitivity. Adjusting to your new settings might take some time but we hope to set you on the right track for your personal best mouse settings for Overwatch.
There’s a reason most pro players use a relatively low sensitivity. It just makes your aim much more consistent and less jittery. With a very high sensitivity you won’t be able to make those crucial micro adjustments to your aim, causing you to miss shots, for example. Since lots of players use different settings regarding DPI and ingame sensitivity we will use the eDPI to calculate the ‘true sensitivity’ of players. As a quick frame of reference: the average Overwatch pro has to move their mouse ~28 centimeters to perform a 360 degree turn in the game.
eDPI stands for Effective Dots Per Inch and it’s the easiest way to compare sensitivities across the same game. eDPI takes two metrics (mouse DPI and ingame sensitivity) into account. This way you don’t end up with an endless amount of different settings which equate to the same sensitivity (for example 2 sens at 800 DPI is the same as 4 sens at 400 DPI) and you get an easy metric to compare true sensitivity.
Do take note that different games handle sensitivity in a different manner so we can’t use eDPI to compare true sensitivities across games. Doing that is a lot more complicated, but usually cm/360 is used for an easy comparison that doesn’t involve numerous calculations.
Aside from that we can definitely use eDPI to compare the true sensitivity of different players in the same game and that’s why we’re here. To calculate the eDPI you simply multiply your mouse sensitivity with the DPI of your mouse. Have a look at this example:
We don’t want to make any wild assumptions here but there seems to be a pattern.
Tank players use a substantially higher eDPI, probably because their heroes generally don’t rely on having precise aim, and having a higher eDPI allows them to scan the battlefield faster or react to threats a bit quicker. In the early days support players used to have a much higher average eDPI as well, but with the release of heroes like Ana and the increasing relevance of heroes such as Zenyatta and Lucio (when compared to the early stages of the game, where Mercy was by far the most used healing hero) steady aim has become a bit more important, so now the average support eDPI is even lower than that of DPS players, if only by a bit.
Obviously these are only averages. There’s a difference between a Widow expert who benefits from having a steady and precise eDPI setting and a Genji main who will probably want their eDPI to be higher to make those constant 180 turns easier to perform, for example. Take these settings for what they are: an average. You can use them as a guideline to find your own personal eDPI, but always make sure that you use something that you feel comfortable with.
DPI stands for Dots Per Inch. It measures how sensitive your mouse is. If you use 400 DPI your mouse moves 400 pixels for every 2.54cm or 1 inch your move your mouse. So in essence a higher DPI means a higher mouse sensitivity. You can change DPI settings in your mouse’s software program or on the mouse itself, depending on the manufacturer. As you can see, the preferred DPI varies wildly, so the wisest thing to do is just pick something that you’re comfortably with, or (if you have an older mouse) check what the native DPI of your mouse is and set it at that.
There’s no benefit to having a super high DPI (it can even lead to issues with registering movements) so there’s no need turn it all the way up.
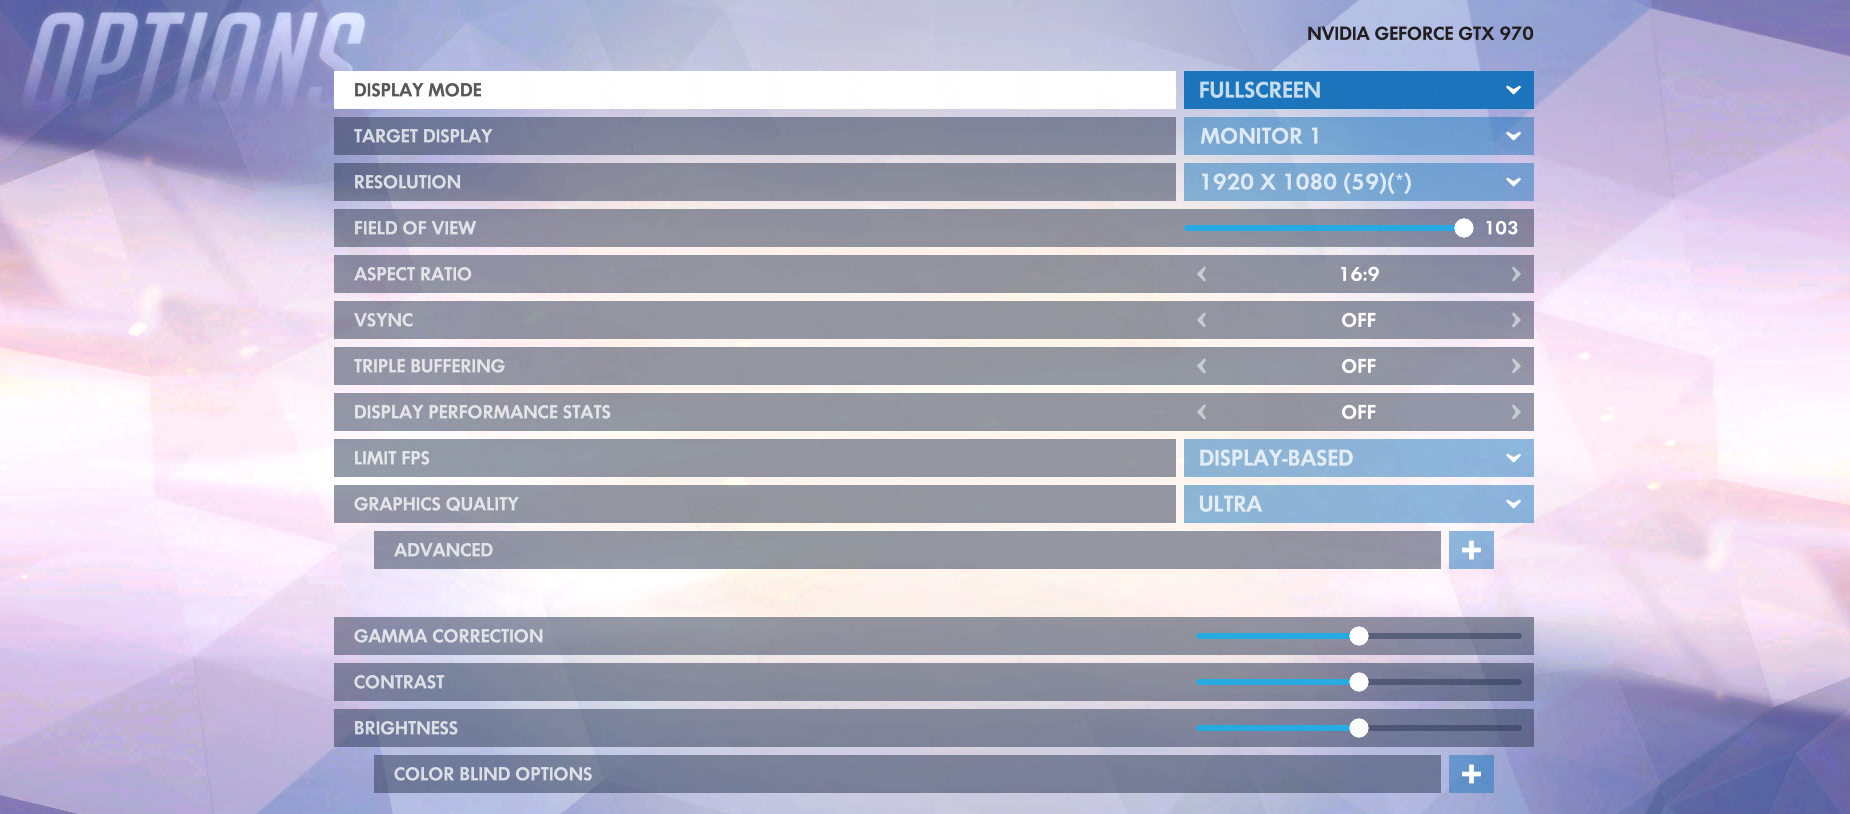
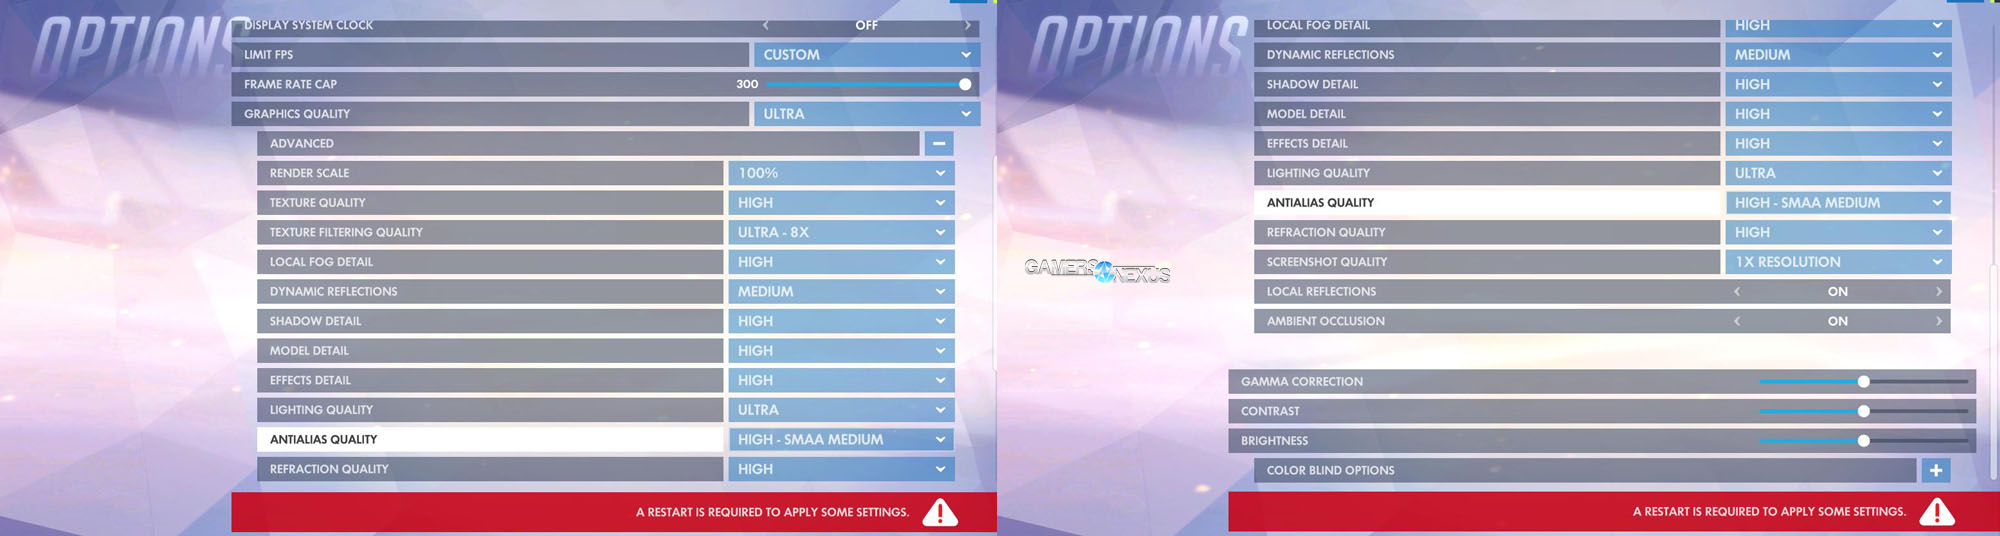
Overwatch on max graphics is a gorgeous game to look at, that’s for sure, but if you want to gain a competitive advantage you’ll want as many frames per second (FPS) as possible while also eliminating unnecessary eye candy from your screen. We did some research and some in game testing and have come up with an answer that maximizes your FPS and minimizes the amount of clutter on your screen while still making sure that the game doesn’t look horrendous.
Overwatch is an incredibly fast paced and hectic game. So it comes as no surprise that most pros use video settings that let you play at the highest FPS possible. With slight adjustments to your video settings you can get the most out of your gaming rig as well.
Reaching 60 FPS (if you game on a monitor that’s not capable of pushing over 60 frames per second) and 144 FPS is incredibly important, so please consider following our guide to decrease graphical fidelity and improve your chance to react and perform on the highest level.
Although we understand budget concerns and want to give tips on how to improve performance on lower-end computers, this guide is mostly to get the perfect settings for competitive performance. That’s why we’ve analyzed the pros. They are not making compromises.
Small tip: if you encounter sudden FPS issues, go to your settings, disable ‘reduce buffering’, click apply, and then enable it again (don’t forget to apply).
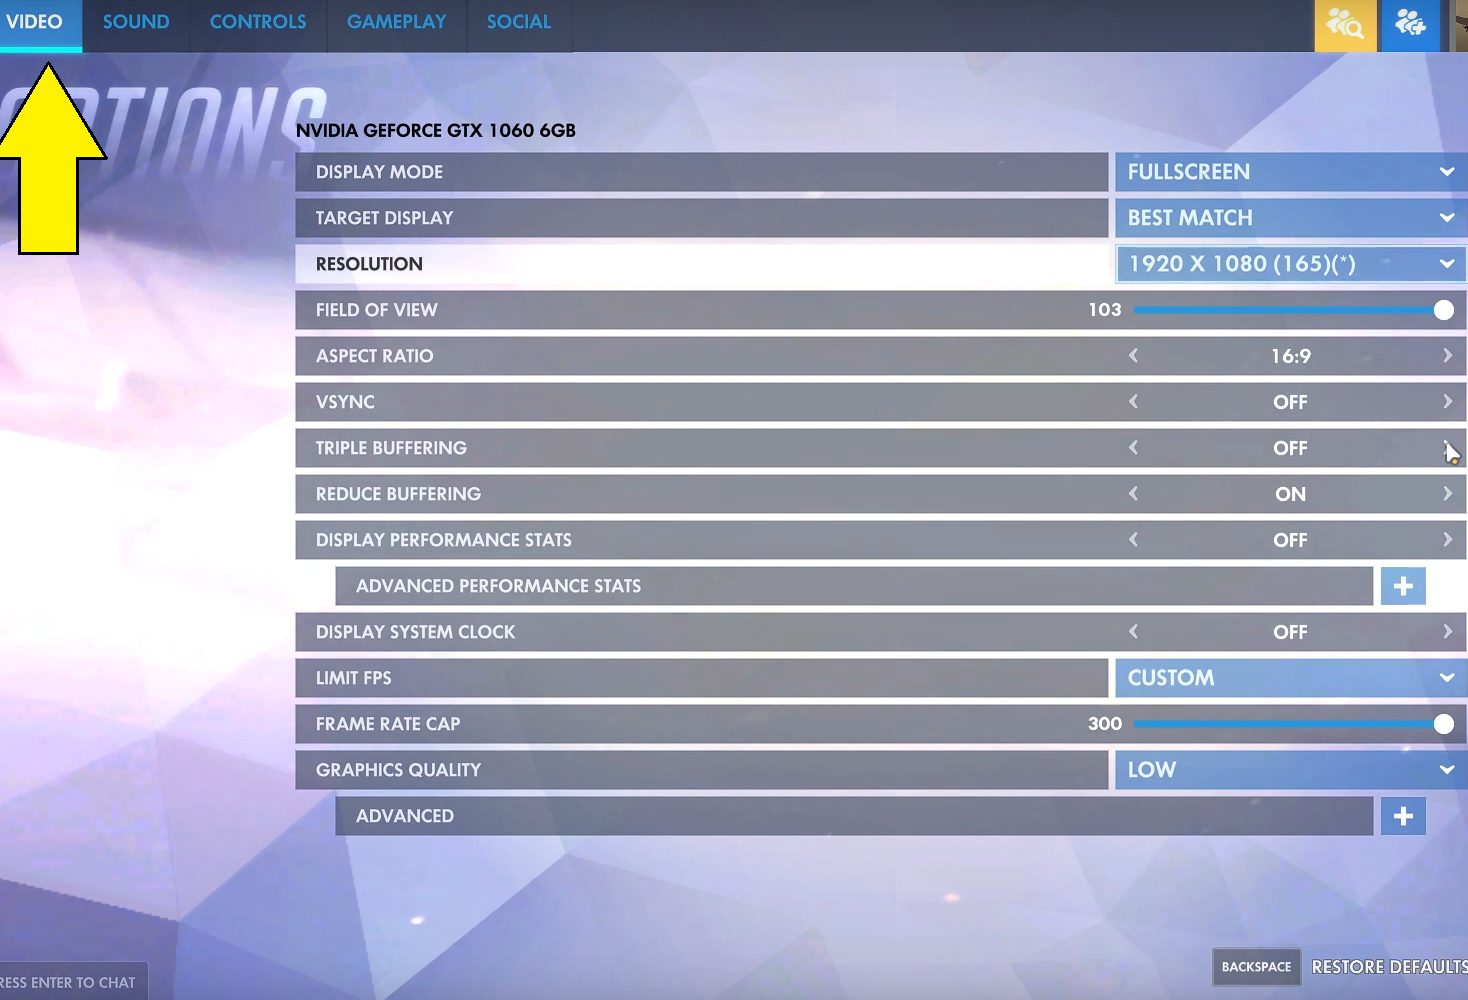
As opposed to CS:GO, most Overwatch players mainly use a 1920×1080 resolution, since lowering your resolution in Overwatch offers little to no visual benefits. So contrary to CS:GO (where resolution and aspect ratio is a cause for great debate), most pros want the cleanest visuals.
While not optimal, a reduction of your resolution to 1280×720 can give a tremendous boost to your gaming performance and frames per second. Please consider dropping to 720p if you are below the critical 60 frames mark.
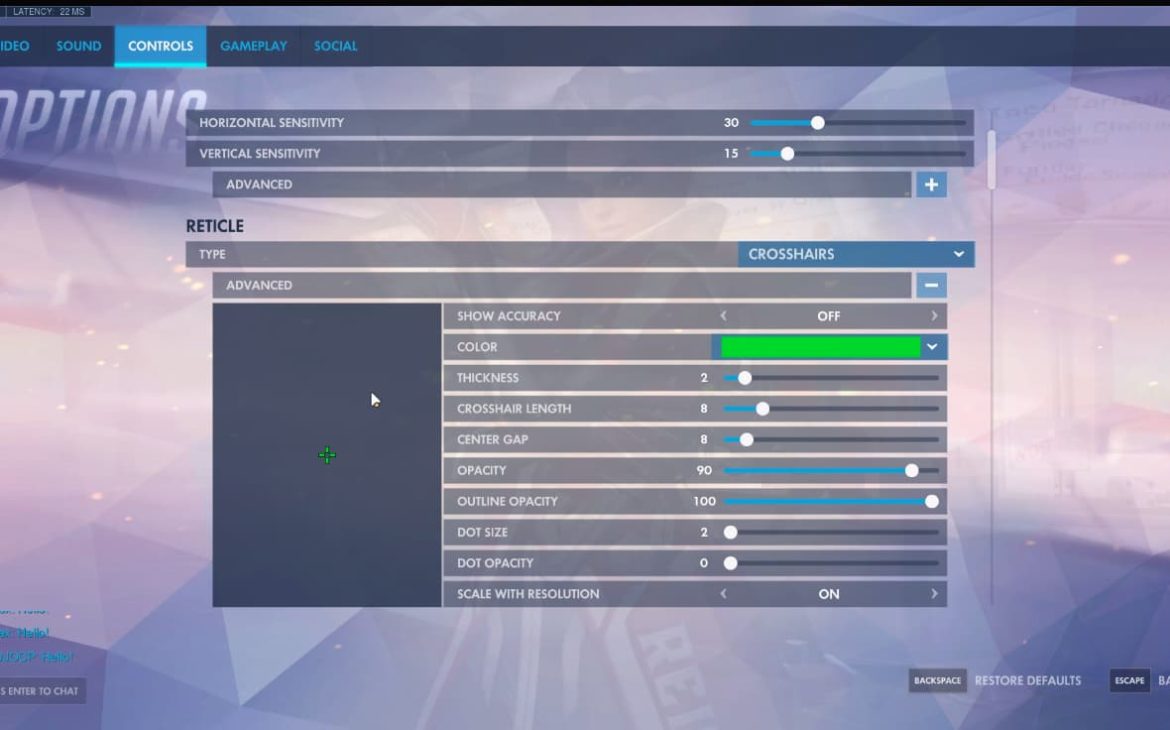
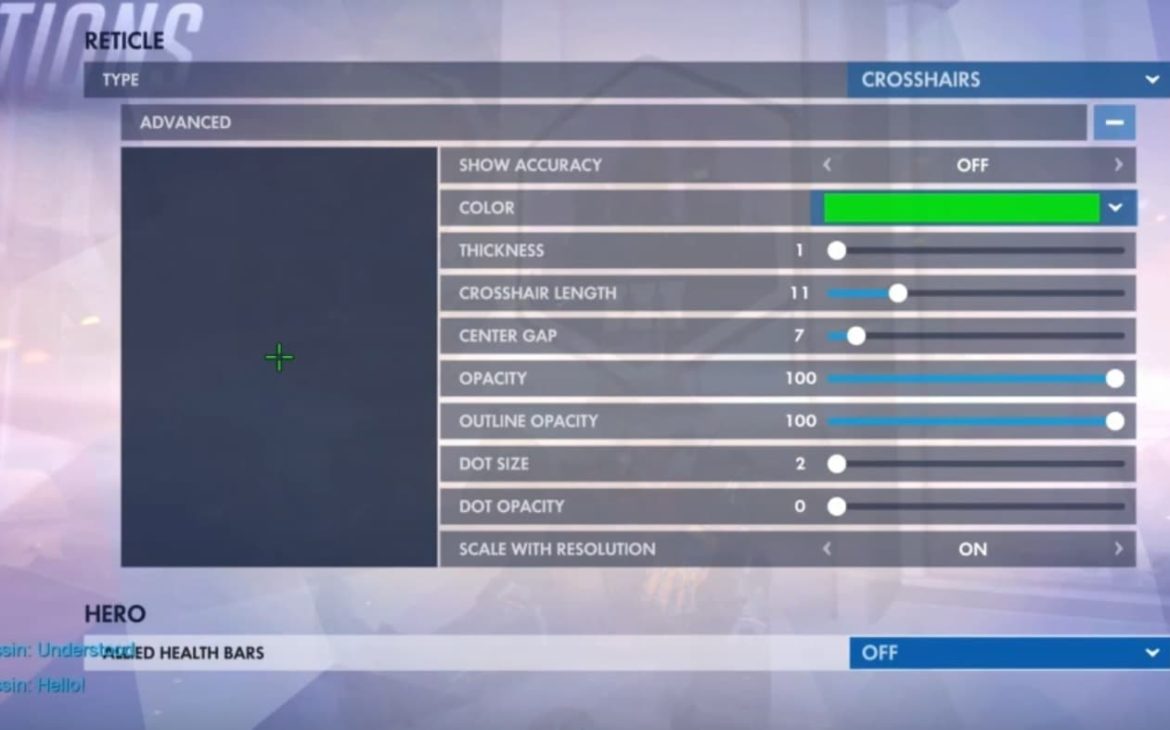
When it comes to FOV you just want to have it at the maximum setting. This allows you to see the most, and in a game as hectic as Overwatch it’s of critical importance to have a good overview of the action.
Overwatch is a fast paced game with a lot going on at any given time so it’s extremely important that you’re able to follow what’s going on in the game without any distractions. It’s for that reason that the vast majority of Overwatch professionals are on 240Hz monitors along with, of course, a PC that can deliver at least 240 frames per second.
As you may know, a moving image is made up out of a series of still images that are played in rapid succession. A regular 60Hz monitor gives you 60 of those images each second. Go to a 144Hz monitor and you’ve got 144 images per second. In short: with a 144Hz monitor the images come at you more than twice as fast as what you get with a 60Hz panel. Upgrade to 240Hz and you guessed it: you get 240 images (‘frames’) per second.
Having a faster monitor makes tracking fast moving objects (and you’ve got a a lot of those in Overwatch) a lot easier. A pesky Tracer, for example, is way more natural to track with a high refresh rate setup. An easy way to ‘see’ the difference is by moving your hand
But the advantages don’t end there: even leaving the whole visual aspect (which is huge) aside there are undeniable advantages with high framerates. A regular 60 FPS rig has an ‘input lag’ of between 55 and 75 milliseconds while a rig that’s running at 240 frames per second has an end to end latency of between 20 and 35 milliseconds. This means that the game won’t only look more responsive but also feel much more responsive.
To run games at higher refresh rates you need a decently powerful system with a dedicated graphics card, but luckily Overwatch isn’t the most difficult game to run. A card such as the RTX 2060 Super (which is one of our favorite cards at this point in time due to the price-performance ratio) can already give you more than enough frames to get the best out of a 240Hz monitor so there’s no real need to shell out the big bucks for the top cards unless you’ve got the budget for it. If you want to learn more you can check out our GPU guide as well.
Overwatch caps the amount of frames per second that it displays at 300, but if you’ve got a system that’s beefy enough you will want to enjoy all of the benefits that a higher refresh rate has to offer, so there’s a simple trick to raising that cap.
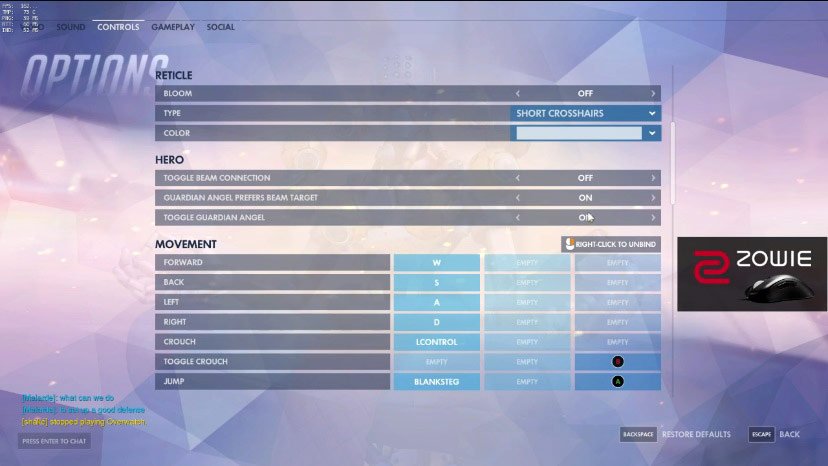
First, you’ll want to make sure that your ingame settings are in order. You’ll want to use these settings:
After that, click Apply and close your game. Then go to Documents > Overwatch > Settings and open Settings_v0.ini so that you can edit it. Find FrameRateCap=”300″ (it’s under [Render.13] and change it to be FrameRateCap=”400″. If it’s not there for some reason you can add it in. Then save the file and launch Overwatch.
Important: do not go into settings after uncapping the framerate or the game will revert back to the 300 FPS cap!
The higher your field of view is, the larger the cone of vision of your character will be. So simply put; the higher this number, the more you can see on screen. 99% of professional players have this put to 103 (the maximum in Overwatch) because there’s obviously an undeniable advantage to being able to see the most of the battlefield before you.
Use 16:9 since you will give up field of view on your right and left if you use 16:10. This has no effect on FPS either.
This reduces screen tearing, but it does create some input lag as a tradeoff. Only turn this on if the screen tearing is absolutely unbearable. You’ll want to minimize input lag as much as possible.
Turn on only in combination with Vsync and when you’re having problems with screen tearing and/or stuttering issues. This setting can cause control latency issues and/or input lag.
This setting was introduced after the release of the game in order to reduce input lag. Turn this on. However if your system is producing way more frames than what your monitor is capable of displaying this setting won’t do very much.
Turn this off, since you always want to have the highest FPS possible. It’s only worth setting this to display based if your FPS is fluctuating enormously.
Put this at 100% because everything below that will look grainy and pixellated. Only go lower if you really don’t have any other settings to tweak or you don’t mind the look of the much more pixellated models. Setting it to higher than 100% will decrease your FPS drastically and the difference isn’t really all that noticeable.
Turning this up all the way does not make a massive difference ingame and on top of that you’ll drop some FPS. Keeping this on medium will still have your textures looking decent and it won’t cost you much frames per second. Anything lower than medium will obviously gain you some extra FPS, but it will make the game look heavily pixellated.
The change in quality isn’t that noticeable. When you raise it up you get a 4% drop in FPS so it’s best to keep it at low (1x).
Do you want fog on your screen which takes some FPS away? Keep this one at low.
Turning these up gives you a 20% decrease in FPS. If this is enabled it gives you no gameplay advantage whatsoever so just disable it.
In Overwatch you cannot disable shadows altogether, but you can disable shadow detail. This will increase your FPS by roughly 30% so it’s well worth the less detailed shadows this gives you. It’s worth noting that shadows of enemies only start to show on low (and higher) so if you want the advantage of seeing your enemies coming around the corner (which you probably want) we recommend that you set this to low.
Effects will still be clearly visible at low settings, so you get free FPS without giving up crucial information if you turn this down.
Overwatch’s forced bloom is already really high, so if you increase the lighting quality the ‘blinding effect’ will only get worse when you come out of buildings and so on. Having realistic lighting can be beautiful and immersive in singleplayer games but it serves no purpose if you want to be competitive. Turning it to low will also boost your FPS.
We recommend FXAA, since you’ll only experience a 3% FPS loss when you turn that on. If you turn this off completely the edges in your game will look pretty bad, though you will get more FPS. Only turn it off if you really need the FPS boost.
Refraction quality refers to the quality of light when it bends as it passes through specific objects in the game world (such as glass and whatever). Because of Overwatch’s forced bloom though the light in this game is already pretty overwhelming so we suggest that you lower this as much as possible. That will also gain you a little bit of FPS.
Adds a certain ‘depth’ to shadows and lighting in general. Lessens FPS by roughly 15% when turned on. It’s worth turning it off so you get more FPS.
Compared to games such as CS:GO, Overwatch is a pretty ‘plain’ game in the sense that almost everyone uses the same resolution, there are no custom radar options or things like that, so there’s no need to spend hours upon hours tinkering with every possible setting to get your game just right. Just make sure to follow the basic guidelines (make sure your sensitivity isn’t outrageous, make sure you’re getting enough frames per second, …) and you’re good to go. Hopefully this guide has helped you maximize your game and settings so that you’re ready for that grind to Top 500.
PROSETTINGS.NET
As an Amazon Associate we earn from qualifying purchases. We also use targeted ads.
CS:GO – Best Settings & Options Guide
Overwatch Best Monitor & Gear Guide
Overwatch Best Settings & Options Guide
Fortnite – Best Settings & Options Guide
VALORANT Pro Settings and Gear List
VALORANT – Best Settings and Options Guide
PUBG – Best Settings And Options Guide
Apex Legends – Best Settings and Options Guide
Best Keyboard For Rainbow Six Siege
Best Mousepad for Rainbow Six Siege
Rainbow Six Siege – Best Settings and Options Guide
Rocket League Pro Camera Settings and Controller List
Rocket League Camera Settings Guide
Call of Duty: Warzone Best Settings & Options Guide
League of Legends – Best Settings and Options Guide
Overwatch Pro Settings and Gear List
Overwatch League's current season was a success on every front, and everyone is expecting the next to come out even stronger. While the teams have been busy preparing we've also been doing our work analyzing their gear. As usual, we researched the Overwatch settings like resolution, dpi and sensitivity for each individual pro. We also verified information on the monitors, mice and keyboards of these players as well.
We consider this our data-vault, our source to give you the Best Monitor and Gear for Overwatch. The best gear isn’t enough though. Tuning your Overwatch settings is what takes you to the next level. Our Overwatch Pro Settings Guide is a great place to start. We’ve updated the list to reflect the Overwatch League by Blizzard in addition to a host of free agents that are looking to break-through in the scene. This is for all players who want to add the perfect Overwatch settings to their arsenal.
In our articles we deliver an overview of what we consider to be the best Overwatch settings. Averages of eDPI for example can be a great guiding tool in deciding which Overwatch sensitivity you want to use. Instead of taking a data-driven approach, it might be that you want try out a favorite Overwatch pro’s settings like Seagull or Surefour. If that is the case, you can find the settings, resolution and sensitivity of the pros below.
The list is connected to our database which is continuously updated, as the scene evolves and new trends become standard. If we’ve made any mistakes, please feel free to join us in the comments to discuss these settings and their sources. If you have any further questions, you can refer to our FAQ as well.
In our list you will sometimes see a capitalized letter behind an organization. That is to indicate that the player in question isn't (currently) a pro player on the main roster but still part of the organization. We use the following abbreviations: coach (C), manager/organization entourage (M), content creator/streamer (S), benched/inactive (B).
Please note that all product links in the table above send you to Amazon and we receive a small commission for items sold. There is no additional cost to you. Thanks for reading.
Surefour is now on 2.5 sens for 900 dpi according to his twitch bot
Fixed Surefour’s sensitivity, thank you!
Philadelphia Fusion Heesu:
Mouse: Logitech G Pro Wireless
Keyboard: Leopold FC750R PD
Mousepad: SteelSeries QcK+ Heav
Cock Vids
Mature Porn Bukkake
Young Cute Girls Videos
Celebrity Pussy Reddit
Naked Showing Pussy
Overwatch Best Settings & Options Guide | ProSettings.net
Overwatch Pro Settings and Gear List | ProSettings.net
Overwatch Settings