OAuth 2.0 Authorization in Google API for Android without special libraries
This article has been translated from its original publication at https://habr.com/ru/articles/735982/
There are plenty of great articles written about OAuth 2.0, so I won't rewrite them. Instead, I'll share my experience of trying to implement authorization in Google API through simple requests.
I'm aware of the existence of libraries like Sign-In, AppAuth, and AccountManager, but what they don't provide is a clear understanding of how key exchange works and what they represent. I decided to obtain tokens from Google Books without using specialized libraries to understand how everything is structured. Maybe this information will be useful to some beginners, while experienced developers may find this reinventing the wheel uninteresting.
I won't delve into theoretical calculations and redraw diagrams from other posts. I'll leave links to the main sources:
- OAuth 2.0 for Mobile & Desktop Apps - Google's guide
- The OAuth 2.0 Authorization Framework - RFC6749 standard text, which describes the OAuth protocol
- Proof Key for Code Exchange by OAuth Public Clients - RFC7636 standard text for keys (tokens)
In short, the authorization algorithm looks as follows:
- Set up the project in the console and obtain a Client ID.
- Generate the code_verifier string.
- Generate the code_challenge string.
- Assemble the authorization URL and open the authorization screen.
- Obtain the code.
- Exchange the code for access_token and refresh_token.
- Address the issue of token storage.
Obtaining Client ID
Preparatory steps (detailed instructions from Google available here):
- Go to the Google Developer Console and create a project.
- Go to the OAuth consent screen and create an authorization screen:
For a regular application, select the External type.
- After filling out the form, add the necessary scopes for access. You can choose them from here. In my case, the scope for accessing the user's books is a string that looks like "https://www.googleapis.com/auth/books".
- Next, add test users - real accounts from which you will test the application. While the application status is "Testing," only users from the test list will be allowed.
- Go to Credentials - create an OAuth client ID -> select the Android application type. Here, you'll need to enter the package name, which should match the settings in your Gradle file's applicationId field.

You will also need to enter the SHA-1 certificate fingerprint (more details about App Signing). For debugging the application, you can use the debug key, which can be obtained from the terminal (the standard password for obtaining the key is "android"). Copy the SHA1 and paste it into the form. The typical path for Android Studio is:

Once the form is filled out, the coveted Client ID will be visible. Next, go to the API Library, select the desired API, and activate it.
And of course, add the permission to use the internet to the manifest. With this, the preparation is complete.

Verifier and challenge codes
Now that you have the Client ID, you can proceed to the actual requests.
code_verifier is a cryptographically secure random string with a length ranging from 43 to 128 characters. Refer to the standard - it is recommended to generate a 32-byte string and pass it through base64url encoding, which will result in 43 characters. Here is where I stumbled and tried to use regular base64 encoding, which differs by a couple of characters, but it was enough to break everything. Let's generate the code_verifier:

You should get a 43-character string like this:

code_challenge - according to the standard, this string is obtained from the previous one using BASE64URL-ENCODE(SHA256(ASCII(code_verifier))).

As they say, done: You'll end up with a string similar to the first one, also 43 characters long. Now everything is ready to redirect the user to the authorization screen.
Authorization Screen
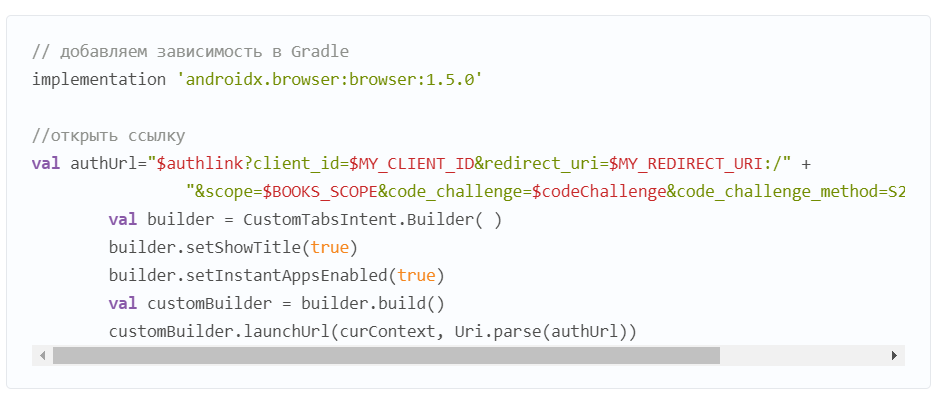
According to step 2 of the instructions, we assemble the URL for redirecting to the authorization screen:
https://accounts.google.com/o/oauth2/v2/auth
You need to add the following parameters:
- client_id - our client ID from the console
- redirect_uri - the link to return to the application after authorization. The documentation states that it must exactly match the link we specified in the project settings. It's not entirely clear here since we didn't specify anything other than the package name. So, let's use the applicationId as the link - the package name.
- response_type - for Android applications, it should be "code"
- scope - the selected scope from earlier
- code_challenge - the code_challenge string
- code_challenge_method - for SHA256, it should be "S256"
Assemble the URL:

And here I encountered a pitfall: the redirect_uri is considered incorrect until we add ":/" to the end of the applicationId. But these are minor details. Now we need to navigate to the link:
And then I received the "disallowed_useragent" error. That's how I learned that the use of WebView is prohibited for security reasons.
Web developers may encounter this error when an Android app opens a general web link in an embedded user-agent and a user navigates to Google's OAuth 2.0 authorization endpoint from your site. Developers should allow general links to open in the default link handler of the operating system, which includes both Android App Links handlers or the default browser app. The Android Custom Tabs library is also a supported option.
Since I was testing everything in an emulator and didn't have a regular browser, I checked it on actual devices and it worked. So, I installed Google Chrome on the emulator and continued.

Exchanging the Authorization Code for Tokens
After the user logs into their account, they will be redirected back to the application. To ensure that the application opens with the link, you need to add an intent-filter to the manifest:

To prevent the activity from being restarted each time, add the following to the manifest (in the activity):

In this case, when accessing an existing activity, it will not be recreated, and the onNewIntent(intent: Intent) method will be called. The intent.data field will contain the actual response. The response may contain the "code" in case of success or "error" if, for example, the user refused to log in to their account.

Now that we have the code, we need to exchange it for the coveted tokens. To do this, send a POST request to:
https://oauth2.googleapis.com/token
with the following parameters:
client_id - our client_id
code - the obtained code
code_verifier - the code_verifier string
grant_type=authorization_code
redirect_uri - our redirect_uri
In response to the POST request, a JSON will be returned:
{
"access_token": "ya25.a0AWY6Ckkl292RjoOMfhEtX8Ub_UPM-P3WHQSD1v5QSU_zfr5ig4KB_yMjXmmeIQXg8gRt4hmooGe2OyRFtLOxU2UHYvj40v9JS4kmhGhE2S3lIN5NxcWnOLJOqX9OhpZTzKVi9kofm9LwzFAXKY7B49wKMpiraCgYKARwSARISFQG1tDrpIMvYW4ruiJUUDUvQjlEapw0163",
 "expires_in": 3599,
 "refresh_token": "1//0c1f5N617z5JyCgYIARAAGAwSNwF-L9IrQnmw_Xx670pofbNnUtH5alJTHYoheRisu35RH_PWJzgIaQW6PdlRrxdzmJTEPnw9eCo",
 "scope": "https://www.googleapis.com/auth/books",
 "token_type": "Bearer"
 }
The only remaining question is how to store and update tokens. Storing tokens locally is insecure in any case, but you can come up with some encryption and store them in SharedPreferences. The token's expiration time is indicated in seconds with the "expires_in" field.
Token Refresh
To refresh the token, you need to send a POST request to:
https://oauth2.googleapis.com/token
with the parameters: client_id, refresh_token, grant_type=refresh_token
The response will contain a new access_token and its expiration time in a GSON format.
Revoking Authorization
To revoke the authorization, simply send a POST request to cancel the token's action:
https://oauth2.googleapis.com/revoke?token={token here}
Conclusion
In the end, we have an application with a single Activity that opens the Google authorization screen using Custom Tabs, retrieves access tokens, and is not tied to any specific accounts on the device, which may not even exist. It's evident that this is a rough version, but it provides an understanding of the algorithm. If necessary, this algorithm can be refined for non-standard APIs or applied when modifying existing libraries.
Link to Github: The application logs all requests and responses to Logcat.