Karing
First publishing in Russan @Пупкин Вася, @renixa_tg June 06, 2024. Translated in English @Пупкин ВасяCurrent edition 08/04/2024 v 2.0.15 Инструкция на русском
This text is distributed under a Creative Commons license.
Karing is a free, open-source, multi-platform program that provides a powerful and simple set of proxy tools. Official page (English / Chinese).
There is a brief description of the program on GitHub in English / Chinese / Russian / Farsi.

The software is primarily intended for use with VPN subscriptions or "aeroports" - a list of servers that are dynamically updated via a special link. It supports subscription formats such as Clash, V2ray (with support package), Stash, Karing, Sing-box, Shadowsocks, Sub, and Github.
Karing can also be configured to work with your self-built proxy servers.
It built-in with a modified sing-box core, supports all modern protocols including VMess, Vless, Trojan, and Shadowsocks, as well as others like ShadowsocksR, TUIC, Socks, Http, Hysteria, Hysteria2, WireGuard, and more.
The interface is multilingual, supporting English, Chinese, Russian, and Persian. The menu help is primarily in Chinese, with some sections in English.
Compatibility: Android version 8 and above, Windows version 10 64-bit and above, iOS version 15 and above, MacOS version 12 and above.
Download for Android or Windows from GitHub
In development: for TvOS, Linux
Current version of Karing 1.0.27.353 (latest) (12.08.24)
Pre-release Karing 1.0.28.365 (27.08.24) - It is recommended to install this one.
Screenshots correspond to ver 1.0.26.321
Content
1. Quick start
4. Diversions
A practical example of applying ad blocking rules
Branched chains (according to the rules)
5. Additional service functions
Quick start
Install the program. When you run it for the first time, information about data collection is displayed:

We agree, and then we get to the second screen for selecting the interface language:

The next screen is to select a country for automatic application of rules. It is very important to set your country correctly, as this determines which connections will go through the proxy and which directly. In particular, when you select your country code, all blocked sites will go through the proxy and will be unblocked, and unblocked sites will bypass the proxy.
In the future, this program setting can be changed through Settings – Diversion Rules, or by clicking the Diversion Rules icon on the main screen (see Screen 9) when the connection is turned off.

The next screen involves adding a profile. Karing suggests using profiles, also you can “Custom” with individual servers or keys. Each profile can contain one or multiple servers, or be a subscription or a “aeroport” (a changing list of servers or keys downloaded via a special link). Within the profile, you can disable individual servers and enable automatic server selection, which is very convenient. You can create multiple profiles. It claims that "A set of routing rules applied to multiple subscription sources automatically selects efficient nodes".
However, you also can delete an individual server by long-pressing on the server name to open an additional submenu for editing and deletion. Therefore, it is recommended to create a profile with all necessary servers from the start. If a profile is created incorrectly, it can be deleted. For example, if you receive a list of keys in a bot:

This message can be copied in its entirety to the clipboard, without paying attention to any extraneous text - Karing will automatically discard what is unnecessary and paste all the keys separately. Another option is that you can insert the keys yourself, for example, into a post created in Telegram, and, without sending it, copy the entire contents to the buffer (of course, you can copy one key).

When you click "Import from Clipboard", the program will show you what is on the clipboard. If everything is correct, give the profile a name in the Note box, and then click the plus sign in the upper right corner - this will add the profile to the program

After adding the profile, you will receive a success message and clicking on the < sign in the upper left corner will take you back to the main program window:

Control icons in the top line from left to right: Settings, Profiles, Add profile, DNS, Diversions, Net Check (Network diagnostics), Speed test, and Design options. (Red dot on the Settings icon - an update is recommended for the program. Betas can be updated manually). The display of unwanted icons can be disabled in the future in Settings - Home screen.
The slider in the center is enabling. When you turn it on for the first time, a request to access VPN appears - you should allow:

Turn it on and use it!

More about settings
Despite its simple “one-button” appearance, Karing is a powerful tool with numerous settings and templates. The implementation on different platforms may vary due to the specific characteristics of each platform. For example, when installed on Windows, an additional slider for enabling the system proxy appears on the main screen. On Android, it is possible to enable individual applications through VPN connections by selecting them, but this feature is not available on iOS or MacOS. However, most settings are similar across platforms, and any specific differences will be indicated. This guide will be expanded and updated regularly.
It is not necessary to immediately reconfigure the program for you - it works well with the default settings. However, there are great opportunities to optimize specifically for your tasks - this increases speed, convenience and saves battery consumption and traffic.
Installation
During installation on Windows, the OS protection may prohibit the action. Click on "Show details" and then "Run anyway" to proceed with the installation of the program. Please note that there is a limitation on Windows 7 where the program may be installed but does not start properly.
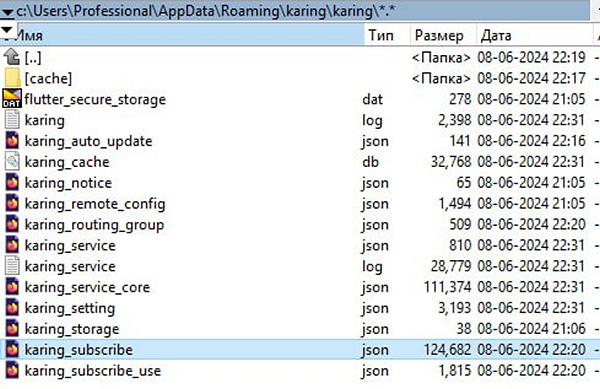
On Windows, all subscriptions are stored here:
Settings - All configurations should be made when the connection is turned off.

The list of possible settings spans three screens. Some of the settings will be briefly described.


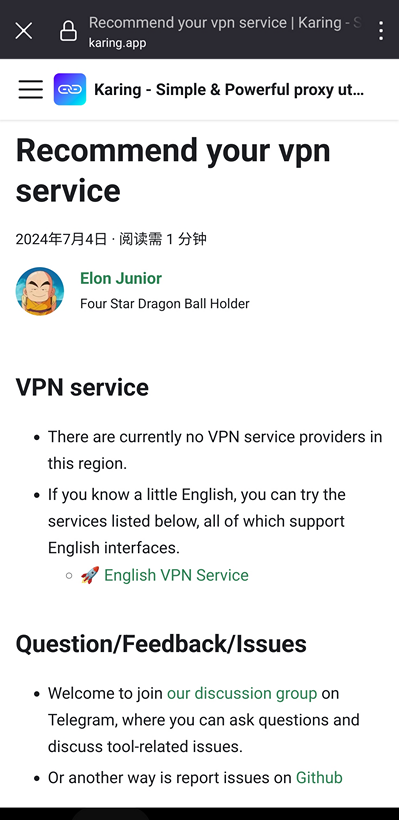
(Screen 12) Get traffic - this involves promoting “aeroprts” tailored to your country. For example, as shown below:
Frequently asked questions - in Chinese and English.
Switching to English in this menu item on the phone may not be very obvious. To do so, open the Frequently Asked Questions section, which may initially open in Chinese. From the drop-down menu (three lines at the top left), select and click the top left arrow line. Then, under the Blog section, click the next line with the right arrow. Finally, below, you will see the option for English - this is how you switch the language :D
Commonly Used Rule sets - Link to the corresponding GitHub page for creating and configuring your own rules in English language.
Add Profile and Profiles - obviously. Adding new lists and customizing the use of existing ones. Please note, that the profile can be displayed either collapsed or expanded.
When you click the three dots at the top right, an additional menu pops up.

Icons in the submenu from top to bottom - Sync subscription (if the profile is a subscription), Reorder, Profiles merge (highlighted), Add profile.
Reorder - select the desired profile with a long tap and drag-and-drop it higher or lower. Profiles (and Diversion Rules) are processed by the program from top to bottom.
From the Profiles page you can change or study each specific key in detail - to do this, long tap on the key and select “Edit” from the pop-up menu. You can add a key manually (icon +). You can also remove an unnecessary key from your profile (but not from your subscription!)
Profiles merging - is the ability to transfer data from one profile to another. When clicking from the list of profiles, first select the one to which you want to add data from another, and the next step is the one from which you want to add. To confirm the merger, click the checkmark at the top right edge of the screen. This operation cannot be canceled once confirmed.

Second settings screen (Screen 13)
DNS is an important and useful setting point.
DNS is a system of servers, that allows you to turn a symbolic name, such as google.com, into its current IP address, for example 108.177.14.138. It will be use by programs to establish communications. Initially, all requests to DNS servers were sent in unencrypted form. This was used in the early days to censor requests as well as surveillance. So, if you use regular DNS servers kindly provided to you by your ISP, the ISP can see from these requests which sites you go to. Fortunately, there are public (public) DNS servers that support encrypted requests using DoH and DoT technologies, and information about the sites you visit becomes inaccessible to the provider.
Accordingly, at this setup point you can select the appropriate servers with encryption for yourself. Possible server options with different technologies are offered on 5 screens. Naturally, you can add your own preferred DNS server.

Please note - the DNS server from the first line is used only to determine the IP of your VPN server and is not involved in further work. It should be chosen unencrypted, like udp://...
It is advisable to choose the rest encrypted. In the case of DNS, local means a DNS server known to the system - this can be the provider’s unencrypted server, as in Windows, or 8.8.8.8, as in Android. To make the final choice of DNS for each individual line, it is advisable to conduct latency and availability testing on the DNS server.
The quality of the settings in this location can be checked using the built-in DNS leak Detection - there should not be any. Recommendations on settings and DNS selection can be read on the Internet. If you get confused with the DNS settings and get an ineffective configuration, use the Reboot item. This will reset the settings to default.
TUN – Allows Apps to Bypass VPN - Per-App Proxy - this is the next extremely important point of customization.
Here you can and should select those applications on the device (primarily browsers, as well as Instagram, Facebook and the like). Selected applications (White List mode) will go through a proxy (you can call it a VPN), and unmarked ones (recommended for instant messengers and utilities) will go directly. At a minimum, this setup will save you VPN traffic and increase the speed and stability of instant messengers.

The above setting is only applicable for Android. There is no such feature on iOS and MacOS. It doesn't exist on Windows either.
Automatic server selection

Karing tries to help you by automatically selecting the best server with the lowest latency from all servers in all active profiles. If the server is selected, manually or automatically, and connected, then by clicking on the delay value on the main page, you will force it to be retested and see the current value.
However, auto-selection is not always convenient. Then you configure the behavior you need manually. To do this, tap on the main screen (with the connection on!) on the bar that says Auto Select.

Here you can control the behavior of servers and profiles. A long tap on the server line allows you to prohibit its use - it will be highlighted in gray after a corresponding warning. A short tap on the server will designate it as being used and disable Auto Select. The server will be highlighted in blue, and the contents of the bottom line on the main screen will also change:

On the main screen you can see that Auto Select is disabled and a specific server is assigned to the connection.

Diversions
This is a very important and useful place. The idea is that you can very finely configure for yourself what to block (for example, advertising), what to send directly, and what to send through which proxy. Exactly the way you want it.
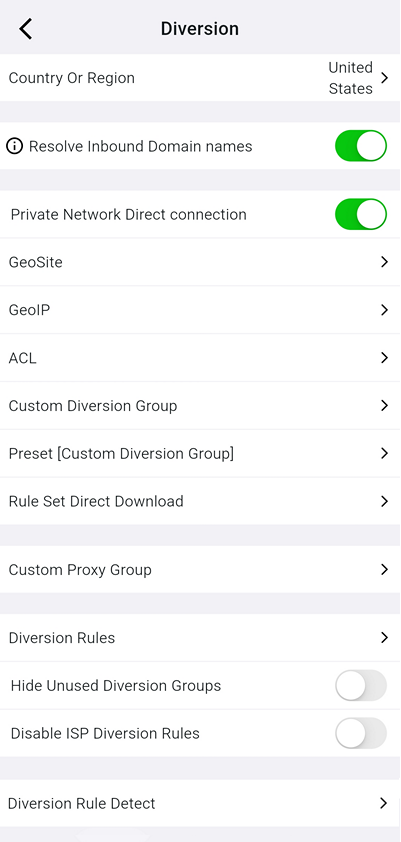
You don't have to type or figure out all the relevant addresses, for example, but can use special names, each of which can combine thousands of domain names. This is made possible by the creation of dynamic address lists provided by domain-list-community, distributed as geosite.srs files, included in the program and updated. When you select a country during the initial setup of Karing, you enable the determination of the GeoIP zone as code of your country. Don’t think that these are just all domains ending with .[code] - everything is much more cunning. When this definition is enabled, all non-prohibited sites go directly, which speeds up the work, and all prohibited sites go through a proxy, which ensures their availability. In this case, all domains that do not ending with .[code] zone go through a proxy. As a minimum setting, this is enough. However, it can be endlessly improved and improved by setting personal rules - both based on the names provided by the program and based on site names. For example, the name amazon specifies all the names used by Amazon. You can decide for yourself what to do with them. For example, let it in directly, or block it. There are such name sheets for advertising services, which allows you to effectively block ads. You can write your own Diversions, for example, so that all calls to known neural networks go through a proxy, and so on. In general, rules are needed to divide requests and traffic according to some criteria, and to process these parts differently. If you want to clarify each rule, here is the original JSON file
The program has three collections of reserved names for building rules - GeoIP, GeoSite and ACL.


Creating Custom Diversion (own, or personal rules):

(The “synthetic” screenshot shows all the ways you can create the rule you need).
To learn how to work with rules, or to use ready-made rules, the Preset [Custom Diversion Group] (Templates) function is useful:

Here it’s easy to create one or more of the predefined rules, and also see what’s inside there:

After creating the rules, you should go to the Diversion Rules section, and configure the application of new rules there (will be shown below).
The topic with the rules is not easy, and you will have to read more about it on the Internet - but it’s worth it. For example, you can configure access to different services you need through different access servers. On the main page there is a Rule - Global switch, which allows you to temporarily disable the use of rules, returning to the default settings.
A practical example of applying ad blocking rules
First, to block, select the appropriate rule from those offered in GeoSite:

(The name used is category-ads-all, this is a sheet containing many individual rules related to advertising).
Let's add a Custom Diversion rule - for guarantee. To do this, you need to give it a name, which cannot be changed later. Let's call it Ad blocking:

(This is a link that also leads to a set of ad blocking rules).
And add a rule that blocks Google analytics:

The order in which personal rules are applied can be changed by drag-and-drop in the Custom Diversion Group window:

After creating these rules, you need to configure their redirection - what to do with addresses that match the created rules. Click in the Diversion Rules settings:

In the screenshot you can see Diversion rules (redirection, or routing) already configured.
For each rule, you can select the desired mode by tapping where Block is currently written on the screen. You will see several possible options for each rule - skip directly, turn to a specific proxy, and we need to Block. The rules are applied from top to bottom, and if the address matches the prescribed rule, the specified action is performed on it, and the address is not further processed by subsequent rules. The rules apply to those profiles that you have not disabled.
For the ad blocking rule we created manually, it is also useful to enable direct downloading in Rule Set - Direct Download:

Setting up ad blocking according to rules in Karing will block ads not only in your browsers, but also in applications with built-in advertising! If you let them through Karing. Although this may require additional configuration of these rules.
Complex Diversion
Proxy chain
The idea of building a proxy chain is this. Let's say I have a key to connect to country A. But the server itself is unavailable from me, for one reason or another. But the server of country B is accessible, from which the server of country A is accessible.
Then, using the Front Proxy (Settings), I build the following chain:
Request -> front proxy server of country B -> proxy server of country A –> target server (for example, website of country A)
To do this, I specify a connection to the server of country B as the front proxy. As a server for the connection, let's choose a connection to the server of country A. If everything went correctly, then on the main page, when you turn it on, we see a connection to country A, and a certain number in the line delays. You can access the target server (site) of country A.
Of course, there are certain difficulties. We have to select the server and protocol of country B experimentally. The protocol must be different from the protocol for connecting to the server in country A - for example, B runs on Trojan, and A on Shadowsocks. After assigning a front proxy, it makes sense to retest the existing keys on the Profiles page - and you will see that most of them will be inaccessible. If you are a little lucky, then the server of country A, on the contrary, will become available.
Branched chains (according to the rules)
It is possible, using Diversion rules and personal rules of the redirect, to build branched chains. For example, you want to access YouTube via Finland, and access neural networks via the USA. And also directly to State Services :D of your country. All this without switching at the same time.
This is how it is resolved. We create two personal rules - Youtube, for which we use the proposed template:

To communicate with neural networks, we create a personal ChatGPT rule. We use the domain suffixes window, entering, for example, the following list:
.chatgpt.com
.openai.com
oaistatic.com
oaiusercontent.com
gemmi.google.com
(combined by the logical operation OR)

Now you need to configure the Diversion rules of flows allocated by these rules.
To do this, in the Diversion rules window, select the connection to Finland for the first rule, and the connection to the USA for the second (see Screen 35).
Now, connecting to a server from, say, the Netherlands on the Home page, access to YouTube will go from the Finnish server, and to ChatGPT from the US server, that is, the Netherlands server will play the role of a front proxy.
There is no need to worry about State Services separately - according to the GeoIp:[code of your country] rule, the request will go directly, and all blocked sites will go through the Netherlands server, according to the last rule - Final -> Current server.
To check how your redirection rules work, from the Diversion page, run the Diversion Rule Detect. By entering a test address in the window and clicking Detect, you will see where your request will actually be redirected and according to what rule.

Additional service functions
- From the main screen, accessible through the icons at the top – Net Check:

- Measuring the current connection speed. The program has 4 built-in links to tests. In the settings, you can change this test to your own by adding the desired address.
- On the main screen when working (see Screen 24) there is an icon in the form of a green monitor above the word speed - by clicking on it, you will see your current connections.
- There is a DNS Leak Detection test in the Settings menu.
- Through the Settings menu you can convert text to a QR code.
- Settings – Online panel – built-in local site with dynamic summary data on the settings and operation of the program. English language.

- From the Diversion submenu there is an item Diversion Rule Detect - you can see how the configured redirection rules specifically work.
- Also available from the menu are backup functions (saving settings) and synchronization of settings with other devices.
