J# User Manual
It was just about time to create a manual on how to properly use J# EA and here it goes with a clear and detailed explanation of strategy and configuration parameters.
The Strategy
The strategy of the J# is relatively simple. It is based around lookup and tradable pairs. So for each pair traded, there are two lookup pairs to search for an entry signal. The lookup pairs might have forward and backward correlation and the relationship between them is illustrated in the table below:
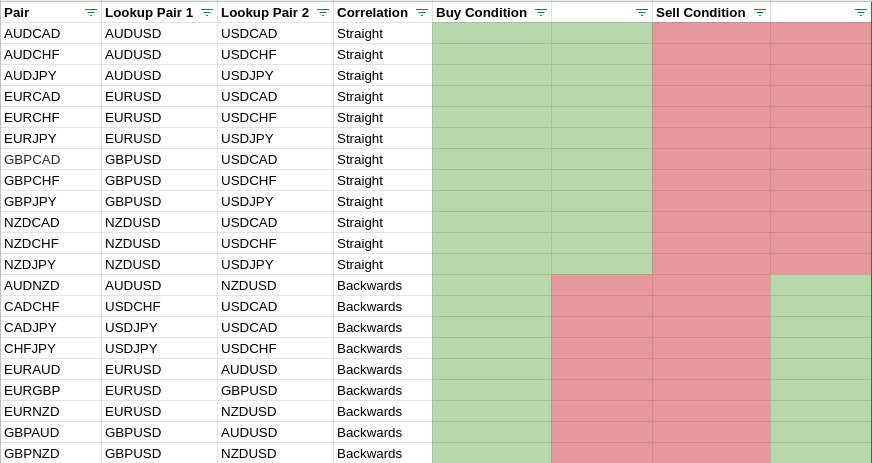
Please note that even though J# supports all the pairs listed it's highly advisable to run proper optimizations based on your broker data because some pairs showed poor performance while producing the default sets and therefore are not recommended.
The reading of the table is pretty straightforward. Let's take AUDCAD as an example. If both underlying lookup pairs (AUDUSD and USDCAD) moved by X or more points in the upwards direction we're going to buy AUDCAD, in case the opposite happened and two underlying lookup pairs went down by X or more points we're selling AUDCAD. The lookup is happening on every new candle t based on the previous candles for lookup pairs t-1. This is strictly looked after because lookup pairs might have their t-1 candles closed at a different time than the traded pair, therefore the EA always waits for the lookup pair candles to close.
So as you can see from the description the strategy is pretty simple to grasp.
The Configuration
Let's dive a little bit deeper into the EA configuration (as of v. 20.121)
Money Management and Risk Settings
There's a number of configurations available here.
- Use Money Management is a parameter that makes the J# either use a fixed lot for each and every trade or use a dynamic calculation based on further configuration
- Risk (%) - this parameter controls the lot calculation logic. Each increment of 1 will tell J# to use an additional 0.01 lot for every 1000 of the balance. For example, if you have a balance of 1700$ and set the risk set to 2 - this will result in the following lot size: ((Lot Calculation Base*Allocation Portion/100)*Risk/100)/1000 -> (1700$*2/100)/1000=0.034~0.03 lots.
- Lot Calculation Base - two choices here. Either current equity or current balance is used as a base amount to calculate a lot from.
- Allocation Portion (%) - an amount in % you want to use out of the Lot Calculation Base. A simple example: you have such a money management strategy that has a rule that 50% of all profit should remain untouched and not being used in future trading. Then you have to set the allocation portion to 50 to achieve this. Say you have picked your Balance as the lot calculation base with the allocation portion set to 50%. Your balance is still 1700$. Based on the formula above your resulting lot will be calculated as follows: ((1700$*50/100)*2/100)/1000 = 0.017 ~0.02 lots. Let us assume that the first entry brought you a profit of 100$ so that your balance is now 1800$. The lot for the next entry will also take half (50%) of the balance and make the calculation based on that amount so the final lot will be: ((1800$*50/100)*2/100)/1000 = 0.018~0.02. This feature is handy when you want to make sure that half of your profits is always stashed instead of used in the lot calculation straight away lowering your risk and exposure.
- Fixed Lot Size - should you opt for not using Use Money Management=false - this is the place to set the fixed lot size you want to trade with.
- Close All Trades on Drawdown (%) - This setting controls the drawdown level of the current (and only current pair) causes and the level at which J# should close all your trades. Say if AUDCAD is in the recovery mode with multiple grids open and it already causes 15% drawdown (while your maximum tolerance is set to 15%) - J# will immediately close of open trades in the loss.
Trade Settings
- Take Profit (pips) - desired take-profit level in pips (not points)
- Stop Loss (pips) - desired stop-loss level in pips (not points)
- Use Hedging - allow the J# to trade both directions simultaneously. (Perhaps not the best naming, might be changed in the future).
- Maximum Applicable Spread - the maximum amount of the traded pair spread J# is allowed to execute a trade in points.
- Minimum Trigger (points) - this parameter is crucial for the J# behavior as it's responsible for evaluating the buy/sell condition on both lookup pairs. An example here will be based on AUDCAD. Once t-1 candles on both pairs are in the same direction (bullish AUDUSD and bullish USDCAD, or bearish AUDUSD and bearish USDCAD) as well as both candles are equal or more than the Minimum Trigger Candle parameter then the trade is executed in the direction of the candles. This main decision point is also logged in the Expert logs and look like the following:
2020.12.18 19:00:00.299 JSharp (AUDCAD,H1) [INFO] [GetTradeOperation]AUDUSD summary: {Candle Time: 19:00, Point value: 0.00001, Pair Open Price: 0.76136, Pair Close Price: 0.76158, Candle Size: 22.00, Candle Type: Bullish}
2020.12.18 19:00:00.299 JSharp (AUDCAD,H1) [INFO] [GetTradeOperation]USDCAD summary: {Candle Time: 19:00, Point value: 0.00001, Pair Open Price: 1.27757, Pair Close Price: 1.27882, Candle Size: 125.00, Candle Type: Bullish}
2020.12.18 19:00:00.299 JSharp (AUDCAD,H1) [INFO] IsStraightCorrelation Symbol: AUDCAD has straight correlation.
2020.12.18 19:00:00.299 JSharp (AUDCAD,H1) [INFO] [GetTradeOperation] Operation for this condition is OPERATION_BUY
General Grid Settings
- Grid Close Condition (money) - grid close condition in the account currency. It is recommended that this condition be 0 (zero) at all times to make sure that the recovery is happening down to break-even. The close condition takes into account all swaps and commissions that are associated with the trade operation.
- Grid Level on the Same Bar - whether or not open a grid level within the same bar. It's recommended to keep this setting to false to avoid opening the same bar grid levels during unpredictable market moves. It might result in slower grid closure but will make sure you're not prematurely stopped out due to those unpredictable market moves.
For recovery purposes, you have an option to have 2 grid levels with the settings described below.
First Level Grid Setting
- Use 1-st Level Grid - whether to not a 1-st level grid is going to be in use.
- 1-st Level Grid Step Distance (pips) -1-st grid-level grid step. Pay attention it's set in pips, and not points
- 1-st Level Grid Maximum Levels - maximum levels of the 1-st level grid.
- 1-st Level Grid Multiplier - 1-st level grid multiplier.
Second Level Grid Settings
Note: second level grid will be not activated if the "Use 1-st Level Grid" is set to false.
- Use 2-nd Level Grid - whether to not a 2-nd level grid is going to be in use.
- 2-nd Level Grid Step Distance (pips) - 2-nd grid-level grid step. Pay attention it's set in pips, and not points
- 2-nd Level Grid Maximum Levels - maximum levels of the 2-nd level grid.
- 2-nd Level Grid Multiplier - 2-nd level grid multiplier.
Usage example: say you have a recovery strategy defined that you want to implement like following. You want to have 3 levels of the grid to be opened with the step 50 pips and then wait before opening another 2 levels of the grid with the step of 130 pips from the latest grid level. For that - you need to configure the 1-st level grid to start setting up the grid with step 50 pips from the initial trade and the desired multiplier. The second level grid should be enabled as well with the grid step set to 130 pips and the desired multiplier (let's take 1.1 for this particular example for both 1-st and 2-nd levels).
Let's assume the initial buy trade for AUDCAD happened at 0.95000 with lot 1.0. In the worst-case scenario when the price is going against you - there will be 5 levels of grid as following:
0 - Lot: 1.0 Entry: 0.95000
1 - Lot 1.10 Entry: 0.94500 (Step: 50, Multiplier: 1.1)
2 - Lot: 1.21 Entry: 0.9400 (Step: 50, Multiplier: 1.1)
3 - Lot: 1.33 Entry: 0.93500 (Step: 50, Multiplier: 1.1)
4 - Lot: 1.46 Entry: 0.92200 (Step: 130, Multiplier: 1.1)
5 - Lot: 1.60 Entry: 0.90900 (Step: 130, Multiplier: 1.1)
Filtering Settings
For filtering out counter-trend trades J# is using MA with all the settings available for this embedded indicator.
- Use MA Filter - whether or not use the Moving average filter.
- MA Filter Time Frame - timeframe of the Moving average (M5, H2, etc, anything available on MT5).
- MA Filter Period - Moving average Period.
- MA Filter Method - Moving average type (SMA, EMA, etc, anything available on MT5).
- MA Filter Applied Price - Moving average applied price (Oper, Close, etc, anything available on MT5)
Time Filter Settings
Time filter settings allow setting specific trade hours for the J#. The settings are not offset-aware so you should keep that in mind while settings them. The filter uses server time.
- Use Time Filter - whether or not use a time filter.
- Start Time - allowed trade hours start time.
- End Time - allowed trade hours end time.
- Close All Trade on Friday - whether or not close all trades on Friday.
- Close All Trade Hour - in case the previous parameter is set to true what hour of the day J# should close the trade.
Other Settings
- Magic Number - J# magic number. It is used to pick up the existing trades in the case of terminal shutdown or reload of the expert. The Magic number is also used to compose the baskets for the basket protection feature. See below.
Do not change the magic number if you have running positions on a particular pair. Should a need for that arise - use the Soft Exit setting to let the J# finzlize running trades and safely change the magic number afterward.
- Comment - a comment added to the orders.
- Pairs Prefix (e.g. pre.EURAUD -> pre.) - should your broker utilize prefix (e.g. pro.AUDCAD) this is the place to specify it. The parameter expects only the ".pro" part.
- Pairs Postfix (e.g. EURAUD.pos -> .pos) - should your broker utilize suffix in the symbol names (e.g. AUDCAD.pro) this is the place to specify it. The parameter expects only the "pro." part.
- Logging Level - the level of logging that J# outputs in the Experts logging tab of the terminal. The possible values are TRACE, DEBUG, INFO, WARN, ERROR, and CRITICAL. Where the TRACE is the most verbose one and outputs a lot of information (use it with caution, as it consumes disk space quickly) and the CRITICAL is the most silent printing only critical errors. The default recommended level is INFO. It gives sufficient information on the trade decisions and can be already used for cross-checks and simple debugging.
Soft Exit Settings
- Use Soft Exit - whether or not J# is operating in safe exit mode. Once enabled - J# will finalize all running trades and will open no more trades until the parameter is disabled again.
Basket Protection Settings
J# also includes a feature to deal with the basket. The basket may include a complete set of all supported pairs or can be divided into different baskets by specifying different Magic Number.
- Use Account Drawdown Basket Protection - whether or not use the drawdown basket protection feature.
- Total Account Drawdown to Activate Basket Protection (%) - total % of the drawdown across the basket to the balance where the J# instances that belong to the basket are not allowed to take new trades until the drawdown falls under the configured number.
- Use Grid Basket Protection - whether or not use the grid basket protection feature.
- Number of Pairs Running Grid - the number of pairs in the basket that currently run in the grid and fall under the secondary condition of the Number of levels on Pairs running Grid.
- Number of levels on Pairs running Grid - number of levels for the pairs in the grid when the pair is counted towards the total amount set in Number of Pairs Running Grid.
The Grid Basket Protection needs some clarification. Let's assume that Number of Pairs Running in Grid is set to 2 and the Number of levels on Pairs running Grid is set to 5.
Let's take an example of 3 pairs traded at a time. Let's say they are all running 3 levels of the grid.
As per our configuration, none of them is counted towards the total amount of the pairs that breach the threshold, so that if a new trade signal within a basket occurs - J# will execute it as usual.
At a later stage, the market moved against us and now we have 4 pairs. 1 trade is running normally, 1 trade is already at 5 levels of the grid and 2 of them have 4 levels. The total amount of the pairs that are counted against the threshold is So that the next trade signal will be still executed as expected.
A bit more later we have 5 pairs running. 1 as normal, 2 trades are already at 5 levels of the grid and the rest are still 3 levels. In this case, the threshold has been reached as we have 2 pairs running 5 level grid. Now new trade signals will be ignored and no more trades will be allowed until the threshold is back to under the configured values.
Conclusion
The configuration is relatively simple when you put some time into studying it. In addition to this manual, a support group is there and you can ask questions or drop your ideas on further EA development: J# Support