Interfacing with the Arduino
@n3m31d4Закончила курс, делюсь полезным.
https://www.coursera.org/learn/interface-with-arduino/
Week 1.
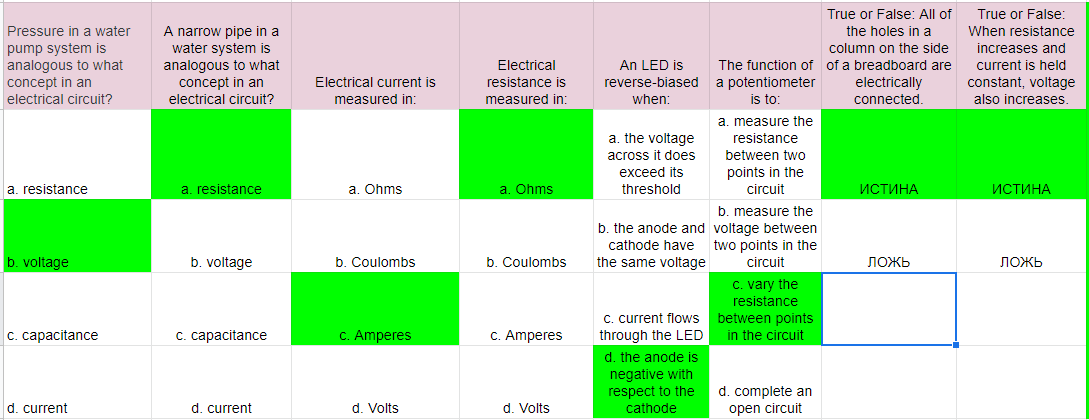
Тест.
Задача.
Build a circuit that contains two push buttons, an LED, and any other basic components you think you need. The LED should turn on when either the first button or the second button is pressed. Only use your Arduino for power and ground.

Ссылки.
Reading a schematic https://learn.sparkfun.com/tutorials/how-to-read-a-schematic
Using a breadboard https://learn.sparkfun.com/tutorials/how-to-use-a-breadboard
Resistors https://learn.sparkfun.com/tutorials/resistors
Diodes https://learn.sparkfun.com/tutorials/diodes
LEDs https://learn.sparkfun.com/tutorials/light-emitting-diodes-leds
Week 2.
Тест.

Задача.
Build a circuit that lights an LED when it is sufficiently dark in a room. Demonstrate the circuit by covering the photoresistor to simulate darkness.

Ссылки.
Sensor Types http://www.sensorwiki.org/doku.php/tutorials/basic_sensor_interfacing_techniques
Pulse Width Modulation https://www.arduino.cc/en/Tutorial/PWM
analogWrite https://www.arduino.cc/en/Reference/AnalogWrite
Answers https://github.com/lastralab/ArduinoFirstSteps
Week 3.
Тест.

Задача.
Write a sketch that allows a user to access data in EEPROM using the serial monitor. In the serial monitor the user should be able to type one of two commands: “read” and “write. "Read" takes one argument, an EEPROM address. "Write" takes two arguments, an EEPROM address and a value. For example, if the user types “read 3” then the contents of EEPROM address 3 should be printed to the serial monitor. If the user types “write 3 10” then the value 10 should be written into address 3 of the EEPROM.

Ссылки.
EEPROM Library https://www.arduino.cc/en/Reference/EEPROM
Wire Library https://www.arduino.cc/en/Reference/Wire
SPI Library https://www.arduino.cc/en/Reference/SPI
Servo Library https://www.arduino.cc/en/Reference/Servo
Week 4.
Тест.

Задача.
Write about the design of a system that you might build for your home which uses an Arduino with a wifi shield. The system must use the wifi connection for a useful purpose in the system. The Arduino should be wired to sensors and/or actuators which help it to perform some useful task in your home. Be sure to clearly describe the need for the wifi connection in your system.
Ссылки.
About Arduino Shields https://learn.sparkfun.com/tutorials/arduino-shields
Arduino Shield List http://playground.arduino.cc/Main/SimilarBoards
Ethernet Shield https://www.arduino.cc/en/Main/ArduinoEthernetShield
WiFi Shield https://www.arduino.cc/en/pmwiki.php?n=Main/ArduinoWiFiShield
--------------------------------------------------------------------------------------------------------------