In-depth Explanation of Pod Controllers
https://medium.com/aws-in-plain-english/in-depth-explanation-of-pod-controllers-bcc749c77d5b
Introduction to Pod Controllers
A Pod is the smallest management unit in Kubernetes. There are two types of Pods in Kubernetes, based on how they are created:
- Static Pods: Pods that are created directly by Kubernetes. These Pods are not recreated once they are deleted.
- Controller-managed Pods: Pods that are created by Kubernetes through controllers. These Pods are automatically recreated if they are deleted.
What is a Pod ControllerA Pod controller is an intermediate layer that manages Pods. With a Pod controller, you only need to tell it how many and what kind of Pods you want, and it will create Pods that meet the criteria and ensure that each Pod resource is in the desired state. If a Pod resource experiences a failure while running, the controller will rearrange the Pods based on a specified strategy.
In Kubernetes, there are many types of Pod controllers, each suitable for different scenarios. The most common ones are:
- ReplicationController: An older Pod controller that has been deprecated and replaced by ReplicaSet.
- ReplicaSet: Ensures that the number of replicas is always maintained at the expected value and supports scaling up or down the number of Pods and upgrading image versions.
- Deployment: Controls Pods through ReplicaSets and supports rolling upgrades and version rollbacks.
- Horizontal Pod Autoscaler: Automatically adjusts the number of Pods based on cluster load, implementing peak shaving and valley filling.
- DaemonSet: Runs only one replica on a designated Node in the cluster and is generally used for daemon tasks.
- Job: Creates Pods that complete tasks and immediately exit, without the need for restarting or rebuilding. Used for one-time tasks.
- CronJob: Creates Pods that are responsible for periodic task control, without the need for continuous background operation.
- StatefulSet: Manages stateful applications.
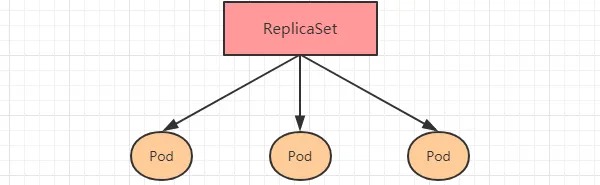
ReplicaSet (RS)
The main function of a ReplicaSet is to ensure that a certain number of Pods are running correctly. It continuously monitors the running status of these Pods, and if a Pod fails, it will be restarted or rebuilt. Additionally, it supports scaling the number of Pods up or down and upgrading or downgrading image versions.
ReplicaSet Resource Manifest File:
apiVersion: apps/v1 # API version
kind: ReplicaSet # Resource type
metadata: # Metadata
  name: # Name of the ReplicaSet
  namespace: # Namespace it belongs to
  labels: # Labels for identification
    controller: rs
spec: # Detailed description of the ReplicaSet
  replicas: 3 # Number of replicas
  selector: # Selector that specifies which Pods the controller manages
    matchLabels: # Labels matching rules
      app: nginx-pod
    matchExpressions: # Expressions matching rules
      - {key: app, operator: In, values: [nginx-pod]}
  template: # Template for creating Pod replicas when there are not enough replicas
    metadata:
      labels:
        app: nginx-pod
    spec:
      containers:
      - name: nginx
        image: nginx:1.17.1
        ports:
        - containerPort: 80
In this manifest file, the key options to note under spec are:
replicas: Specifies the number of replicas, i.e., the number of Pods that the ReplicaSet creates. By default, it is set to 1.selector: Specifies the selector used to establish the relationship between the Pod controller and the Pods. It uses the Label Selector mechanism.- By defining labels in the Pod template and a selector in the controller, you can specify which Pods the controller can manage.
template: The template used to create the Pods is managed by the controller. It is essentially the same as the Pod definition we learned in the previous chapter.
Creating a ReplicaSet
Create a file named pc-replicaset.yaml with the following contents:
apiVersion: apps/v1
kind: ReplicaSet
metadata:
  name: pc-replicaset
  namespace: dev
spec:
  replicas: 3
  selector:
    matchLabels:
      app: nginx-pod
  template:
    metadata:
      labels:
        app: nginx-pod
    spec:
      containers:
      - name: nginx
        image: nginx:1.17.1
# Creating a ReplicaSet
[root@master ~]# kubectl create -f pc-replicaset.yaml
replicaset.apps/pc-replicaset created

# Checking the ReplicaSet
# DESIRED: Desired number of replicas
# CURRENT: Current number of replicas
# READY: Number of ready replicas
[root@master ~]# kubectl get rs pc-replicaset -n dev -o wide
NAME          DESIRED   CURRENT READY AGE   CONTAINERS   IMAGES             SELECTOR
pc-replicaset 3         3       3     22s   nginx        nginx:1.17.1       app=nginx-pod

# Checking the Pods created by the controller
# Here, we can see that the name of the Pods created by the controller is the name of the controller followed by a random string of characters (-xxxxx)
[root@master ~]# kubectl get pod -n dev
NAME                          READY   STATUS    RESTARTS   AGE
pc-replicaset-6vmvt   1/1     Running   0          54s
pc-replicaset-fmb8f   1/1     Running   0          54s
pc-replicaset-snrk2   1/1     Running   0          54s
Scaling the number of replicas
# Editing the number of replicas in the ReplicaSet by modifying the 'spec: replicas' to 6
[root@master ~]# kubectl edit rs pc-replicaset -n dev
replicaset.apps/pc-replicaset edited

# Checking the Pods
[root@master ~]# kubectl get pods -n dev
NAME                          READY   STATUS    RESTARTS   AGE
pc-replicaset-6vmvt   1/1     Running   0          114m
pc-replicaset-cftnp   1/1     Running   0          10s
pc-replicaset-fjlm6   1/1     Running   0          10s
pc-replicaset-fmb8f   1/1     Running   0          114m
pc-replicaset-s2whj   1/1     Running   0          10s
pc-replicaset-snrk2   1/1     Running   0          114m

# Alternatively, we can use the `scale` command to scale the number of replicas
# We can directly specify the desired number of replicas using the `--replicas=n` flag
[root@master ~]# kubectl scale rs pc-replicaset --replicas=2 -n dev
replicaset.apps/pc-replicaset scaled

# After running the command, check the Pods and notice that 4 of them are terminating
[root@master ~]# kubectl get pods -n dev
NAME                       READY   STATUS        RESTARTS   AGE
pc-replicaset-6vmvt   0/1     Terminating   0          118m
pc-replicaset-cftnp   0/1     Terminating   0          4m17s
pc-replicaset-fjlm6   0/1     Terminating   0          4m17s
pc-replicaset-fmb8f   1/1     Running       0          118m
pc-replicaset-s2whj   0/1     Terminating   0          4m17s
pc-replicaset-snrk2   1/1     Running       0          118m

# Wait for a moment and then only 2 Pods will be left
[root@master ~]# kubectl get pods -n dev
NAME                       READY   STATUS    RESTARTS   AGE
pc-replicaset-fmb8f   1/1     Running   0          119m
pc-replicaset-snrk2   1/1     Running   0          119m
Upgrading the container image version
# Editing the container image version in the ReplicaSet by modifying the 'spec: template: spec: containers: image' to nginx:1.17.2
[root@master ~]# kubectl edit rs pc-replicaset -n dev
replicaset.apps/pc-replicaset edited

# Checking the ReplicaSet and noticing that the container image version has been updated
[root@master ~]# kubectl get rs -n dev -o wide
NAME                DESIRED  CURRENT   READY   AGE    CONTAINERS   IMAGES        ...
pc-replicaset       2        2         2       140m   nginx         nginx:1.17.2  ...

# We can also use the following command to update the container image version
# kubectl set image rs ReplicaSetName container=image:version -n namespace
[root@master ~]# kubectl set image rs pc-replicaset nginx=nginx:1.17.1  -n dev
replicaset.apps/pc-replicaset image updated

# Checking the ReplicaSet and noticing that the container image version has been updated again
[root@master ~]# kubectl get rs -n dev -o wide
NAME                 DESIRED  CURRENT   READY   AGE    CONTAINERS   IMAGES            ...
pc-replicaset        2        2         2       145m   nginx        nginx:1.17.1 ...
Deleting a ReplicaSet
# Using the kubectl delete command will delete this RS and the Pods it manages
# Before deleting the RS in Kubernetes, the RS's replica is set to 0, waiting for all Pods to be deleted before the RS object is deleted
[root@master ~]# kubectl delete rs pc-replicaset -n dev
replicaset.apps "pc-replicaset" deleted
[root@master ~]# kubectl get pod -n dev -o wide
No resources found in dev namespace.

# If you only want to delete the RS object (keep the Pods), you can add the --cascade=false option when using the kubectl delete command (not recommended).
[root@master ~]# kubectl delete rs pc-replicaset -n dev --cascade=false
replicaset.apps "pc-replicaset" deleted
[root@master ~]# kubectl get pods -n dev
NAME                  READY   STATUS    RESTARTS   AGE
pc-replicaset-cl82j   1/1     Running   0          75s
pc-replicaset-dslhb   1/1     Running   0          75s

# Alternatively, you can also delete the RS using the YAML file (recommended)
[root@master ~]# kubectl delete -f pc-replicaset.yaml
replicaset.apps "pc-replicaset" deleted
Introduction to Deployment (Deploy)
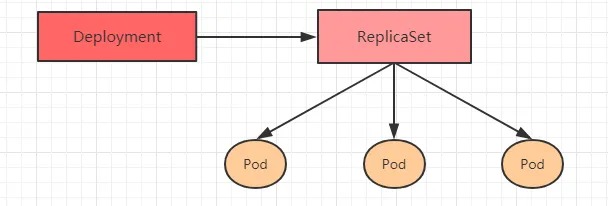
Starting from version 1.2, Kubernetes introduced the Deployment controller to better solve the problem of service orchestration. It is worth mentioning that this controller does not directly manage pods, but instead manages pods indirectly by managing ReplicaSets, i.e., Deployment manages ReplicaSet, and ReplicaSet manages pods. Therefore, Deployment is more powerful than ReplicaSet in terms of functionality.
Deployment has the following main functions:
- Supports all features of ReplicaSet
- Supports pausing and resuming deployment
- Supports rolling updates and rollbacks
The resource manifest file for Deployment is as follows:
apiVersion: apps/v1 # API version
kind: Deployment # Resource type
metadata: # Metadata
  name: # Deployment name
  namespace: # Namespace where Deployment is created
  labels: # Labels
    controller: deploy
spec: # Deployment specification
  replicas: 3 # Number of replicas
  revisionHistoryLimit: 3 # Number of old revisions to keep
  paused: false # Whether the deployment is paused or not, default is false
  progressDeadlineSeconds: 600 # Time in seconds allowed for deployment, default is 600
  strategy: # Update strategy
    type: RollingUpdate # Update strategy type
    rollingUpdate: # Rolling update configuration
      maxSurge: 30% # Maximum number of additional replicas allowed during update, can be a percentage or an integer
      maxUnavailable: 30% # Maximum number of unavailable Pods allowed during update, can be a percentage or an integer
  selector: # Selector used to match Pods with the Deployment controller
    matchLabels: # Label selector rules
      app: nginx-pod
    matchExpressions: # Expression selector rules
      - {key: app, operator: In, values: [nginx-pod]}
  template: # Pod template used to create new Pods when replicas are needed
    metadata:
      labels:
        app: nginx-pod
    spec:
      containers:
      - name: nginx
        image: nginx:1.17.1
        ports:
        - containerPort: 80
Creating a deployment
Create a file named pc-deployment.yaml with the following contents:
apiVersion: apps/v1
kind: Deployment
metadata:
  name: pc-deployment
  namespace: dev
spec:
  replicas: 3
  selector:
    matchLabels:
      app: nginx-pod
  template:
    metadata:
      labels:
        app: nginx-pod
    spec:
      containers:
      - name: nginx
        image: nginx:1.17.1
Then run the following commands:
# Create the deployment
[root@master ~]# kubectl create -f pc-deployment.yaml --record=true
deployment.apps/pc-deployment created

# Check the deployment
# UP-TO-DATE: the number of the latest version of pods
# AVAILABLE: the number of currently available pods
[root@master ~]# kubectl get deploy pc-deployment -n dev
NAME            READY   UP-TO-DATE   AVAILABLE   AGE
pc-deployment   3/3     3            3           15s

# Check the replica set
# The name of the replica set has a random string of 10 digits added to the end of the original deployment name
[root@master ~]# kubectl get rs -n dev
NAME                       DESIRED   CURRENT   READY   AGE
pc-deployment-6696798b78   3         3         3       23s

# Check the pods
[root@master ~]# kubectl get pods -n dev
NAME                             READY   STATUS    RESTARTS   AGE
pc-deployment-6696798b78-d2c8n   1/1     Running   0          107s
pc-deployment-6696798b78-smpvp   1/1     Running   0          107s
pc-deployment-6696798b78-wvjd8   1/1     Running   0          107s
Scaling
# Change the number of replicas to 5
[root@master ~]# kubectl scale deploy pc-deployment --replicas=5 -n dev
deployment.apps/pc-deployment scaled

# Check the deployment
[root@master ~]# kubectl get deploy pc-deployment -n dev
NAME            READY   UP-TO-DATE   AVAILABLE   AGE
pc-deployment   5/5     5            5           2m

# Check the pods
[root@master ~]# kubectl get pods -n dev
NAME                             READY   STATUS    RESTARTS   AGE
pc-deployment-6696798b78-d2c8n   1/1     Running   0          4m19s
pc-deployment-6696798b78-jxmdq   1/1     Running   0          94s
pc-deployment-6696798b78-mktqv   1/1     Running   0          93s
pc-deployment-6696798b78-smpvp   1/1     Running   0          4m19s
pc-deployment-6696798b78-wvjd8   1/1     Running   0          4m19s

# Edit the deployment and change the number of replicas to 4 in spec:replicas:
[root@master ~]# kubectl edit deploy pc-deployment -n dev
deployment.apps/pc-deployment edited

# Check the pods again
[root@master ~]# kubectl get pods -n dev
NAME                             READY   STATUS    RESTARTS   AGE
pc-deployment-6696798b78-d2c8n   1/1     Running   0          5m23s
pc-deployment-6696798b78-jxmdq   1/1     Running   0          2m38s
pc-deployment-6696798b78-smpvp   1/1     Running   0          5m23s
pc-deployment-6696798b78-wvjd8   1/1     Running   0          5m23s
Updating Images
Deployment supports two update strategies: Recreate and RollingUpdate, which can be specified through the strategy field. The strategy the field has two properties:
strategy: Specifies the strategy for replacing old Pods with new ones. It has two properties:
type: Specifies the strategy type and supports two strategies:
Recreate: Kills all existing Pods before creating new ones.
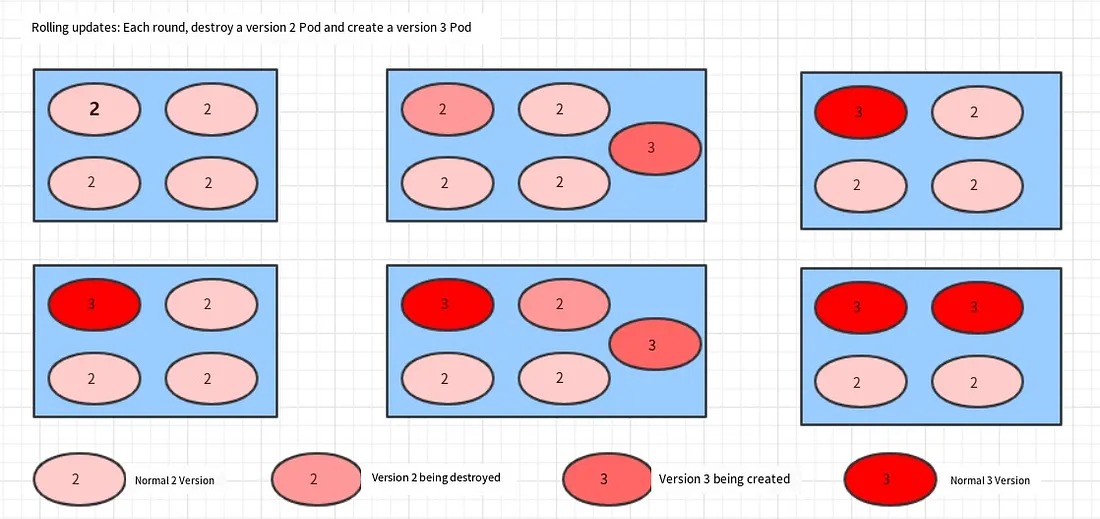
RollingUpdate: Uses a rolling update strategy. It kills a portion of the old Pods and starts an equivalent number of new ones, and there will be two versions of Pods during the update process.
rollingUpdate: Used for setting parameters for RollingUpdate. It has two properties:
maxUnavailable: Specifies the maximum number of unavailable Pods during the update process. The default value is 25%.
maxSurge: Specifies the maximum number of Pods that can exceed the expected number of Pods during the update process. The default value is 25%.
Recreate
- Edit pc-deployment.yaml and add the update strategy under the
specfield:
spec:
  strategy:
    type: Recreate
2. Create a deployment to verify:
# Update the image
[root@master ~]# kubectl set image deployment pc-deployment nginx=nginx:1.17.3 -n dev
deployment.apps/pc-deployment image updated

# Observe the upgrade process
[root@master ~]# kubectl get pods -n dev -w
NAME                           READY   STATUS    RESTARTS   AGE
pc-deployment-c848d767-8rbzt   1/1     Running   0          31m
pc-deployment-c848d767-h4p68   1/1     Running   0          31m
pc-deployment-c848d767-hlmz4   1/1     Running   0          31m
pc-deployment-c848d767-rrqcn   1/1     Running   0          31m

pc-deployment-966bf7f44-226rx   0/1     Pending             0          0s
pc-deployment-966bf7f44-226rx   0/1     ContainerCreating   0          0s
pc-deployment-966bf7f44-226rx   1/1     Running             0          1s
pc-deployment-c848d767-h4p68    0/1     Terminating         0          34m

pc-deployment-966bf7f44-cnd44   0/1     Pending             0          0s
pc-deployment-966bf7f44-cnd44   0/1     ContainerCreating   0          0s
pc-deployment-966bf7f44-cnd44   1/1     Running             0          2s
pc-deployment-c848d767-hlmz4    0/1     Terminating         0          34m

pc-deployment-966bf7f44-px48p   0/1     Pending             0          0s
pc-deployment-966bf7f44-px48p   0/1     ContainerCreating   0          0s
pc-deployment-966bf7f44-px48p   1/1     Running             0          0s
pc-deployment-c848d767-8rbzt    0/1     Terminating         0          34m

pc-deployment-966bf7f44-dkmqp   0/1     Pending             0          0s
pc-deployment-966bf7f44-dkmqp   0/1     ContainerCreating   0          0s
pc-deployment-966bf7f44-dkmqp   1/1     Running             0          2s
pc-deployment-c848d767-rrqcn    0/1     Terminating         0          34m

# At this point, the new version of the pod is created and the old version of the pod is destroyed.
# The process is rolling, which means that it is being destroyed and created simultaneously.
During the update process, the new Pods will be created after the old Pods are terminated.
Rolling Update:
- Edit pc-deployment.yaml, add update strategy under spec:
spec:
  strategy:
    type: RollingUpdate
    rollingUpdate:
      maxSurge: 25%
      maxUnavailable: 25%
2.Create the deployment for validation:
# Change the image
[root@master ~]# kubectl set image deployment pc-deployment nginx=nginx:1.17.3 -n dev
deployment.apps/pc-deployment image updated

# Observe the upgrade process
[root@master ~]# kubectl get pods -n dev -w
NAME                           READY   STATUS    RESTARTS   AGE
pc-deployment-c848d767-8rbzt   1/1     Running   0          31m
pc-deployment-c848d767-h4p68   1/1     Running   0          31m
pc-deployment-c848d767-hlmz4   1/1     Running   0          31m
pc-deployment-c848d767-rrqcn   1/1     Running   0          31m

pc-deployment-966bf7f44-226rx   0/1     Pending             0          0s
pc-deployment-966bf7f44-226rx   0/1     ContainerCreating   0          0s
pc-deployment-966bf7f44-226rx   1/1     Running             0          1s
pc-deployment-c848d767-h4p68    0/1     Terminating         0          34m

pc-deployment-966bf7f44-cnd44   0/1     Pending             0          0s
pc-deployment-966bf7f44-cnd44   0/1     ContainerCreating   0          0s
pc-deployment-966bf7f44-cnd44   1/1     Running             0          2s
pc-deployment-c848d767-hlmz4    0/1     Terminating         0          34m

pc-deployment-966bf7f44-px48p   0/1     Pending             0          0s
pc-deployment-966bf7f44-px48p   0/1     ContainerCreating   0          0s
pc-deployment-966bf7f44-px48p   1/1     Running             0          0s
pc-deployment-c848d767-8rbzt    0/1     Terminating         0          34m

pc-deployment-966bf7f44-dkmqp   0/1     Pending             0          0s
pc-deployment-966bf7f44-dkmqp   0/1     ContainerCreating   0          0s
pc-deployment-966bf7f44-dkmqp   1/1     Running             0          2s
pc-deployment-c848d767-rrqcn    0/1     Terminating         0          34m

# The new version of the pods is created, and the old version of the pods is destroyed.
# The process is rolling, meaning it is being destroyed and created simultaneously.
The process of rolling update:
The changes in ReplicaSets during the image update:
# Check the ReplicaSets, and it is found that the old ReplicaSet still exists, but the number of pods becomes 0, and a new ReplicaSet is generated with 4 pods.
# In fact, this is the magic of deployment for version rollback, which will be explained in detail later.
[root@master ~]# kubectl get rs -n dev
NAME                       DESIRED   CURRENT   READY   AGE
pc-deployment-6696798b78   0         0         0       7m37s
pc-deployment-6696798b11   0         0         0       5m37s
pc-deployment-c848d76789   4         4         4       72s
Rollback Version
Deployment supports many functions during the version upgrade processes, such as pause, resume, and rollback. Let’s take a closer look.
kubectl rollout: version upgrade-related functions with the following options:
- status: display the current upgrade status
- history: display the upgrade history
- pause: pause the version upgrade process
- resume: continue a paused version upgrade process
- restart: restart the version upgrade process
- undo: rollback to the previous version (can use — to-revision to rollback to a specific version)
# Check the current upgrade status
[root@master ~]# kubectl rollout status deploy pc-deployment -n dev
deployment "pc-deployment" successfully rolled out

# Check the upgrade history
[root@master ~]# kubectl rollout history deploy pc-deployment -n dev
deployment.apps/pc-deployment
REVISION  CHANGE-CAUSE
1         kubectl create --filename=pc-deployment.yaml --record=true
2         kubectl create --filename=pc-deployment.yaml --record=true
3         kubectl create --filename=pc-deployment.yaml --record=true
# It can be seen that there are three version records, indicating that the upgrade has been completed twice

# Rollback to the previous version
# Here we directly use --to-revision=1 to rollback to version 1. If this option is omitted, it will rollback to the previous version, which is version 2
[root@master ~]# kubectl rollout undo deployment pc-deployment --to-revision=1 -n dev
deployment.apps/pc-deployment rolled back

# Check and find that the first version is displayed through the nginx image version
[root@master ~]# kubectl get deploy -n dev -o wide
NAME            READY   UP-TO-DATE   AVAILABLE   AGE   CONTAINERS   IMAGES
pc-deployment   4/4     4            4           74m   nginx        nginx:1.17.1

# Check the rs, and it is found that the first rs still has four pods running, while the pods in the rs of the last two versions are not running
# In fact, the reason why deployment can achieve version rollback is that it records the historical rs.
# Once you want to rollback to a certain version, you just need to reduce the number of pods of the current version to 0, and then promote the pods of the rollback version to the target quantity.
[root@master ~]# kubectl get rs -n dev
NAME                       DESIRED   CURRENT   READY   AGE
pc-deployment-6696798b78   4         4         4       78m
pc-deployment-966bf7f44    0         0         0       37m
pc-deployment-c848d767     0         0         0       71m
Canary Release
The Deployment controller supports controlling updates during the update process, such as “pause” or “resume” the update operation.
For example, after a batch of new Pod resources is created, the update process is immediately paused, and only a portion of the new version of the application exists, with the majority still using the old version. Then, a small portion of user requests is routed to the new version of the Pod application to continue observing whether it can run stably as expected. Once it is confirmed to be stable, the remaining Pod resources are updated, otherwise, the update operation is immediately rolled back. This is called a Canary Release.
# Update the deployment version and configure deployment pause
[root@master ~]# kubectl set image deploy pc-deployment nginx=nginx:1.17.4 -n dev && kubectl rollout pause deployment pc-deployment  -n dev
deployment.apps/pc-deployment image updated
deployment.apps/pc-deployment paused

# Observe the update status
[root@master ~]# kubectl rollout status deploy pc-deployment -n dev
Waiting for deployment "pc-deployment" rollout to finish: 2 out of 4 new replicas have been updated...

# Monitor the update process, you can see that a new resource has been added, but an old resource has not been deleted as expected, because the pause command has been used

[root@master ~]# kubectl get rs -n dev -o wide
NAME                       DESIRED   CURRENT   READY   AGE     CONTAINERS   IMAGES
pc-deployment-5d89bdfbf9   3         3         3       19m     nginx        nginx:1.17.1
pc-deployment-675d469f8b   0         0         0       14m     nginx        nginx:1.17.2
pc-deployment-6c9f56fcfb   2         2         2       3m16s   nginx        nginx:1.17.4
[root@master ~]# kubectl get pods -n dev
NAME                             READY   STATUS    RESTARTS   AGE
pc-deployment-5d89bdfbf9-rj8sq   1/1     Running   0          7m33s
pc-deployment-5d89bdfbf9-ttwgg   1/1     Running   0          7m35s
pc-deployment-5d89bdfbf9-v4wvc   1/1     Running   0          7m34s
pc-deployment-6c9f56fcfb-996rt   1/1     Running   0          3m31s
pc-deployment-6c9f56fcfb-j2gtj   1/1     Running   0          3m31s

# Ensure that the updated pods are running properly and continue the update
[root@master ~]# kubectl rollout resume deploy pc-deployment -n dev
deployment.apps/pc-deployment resumed

# Check the final update status
[root@master ~]# kubectl get rs -n dev -o wide
NAME                       DESIRED   CURRENT   READY   AGE     CONTAINERS   IMAGES
pc-deployment-5d89bdfbf9   0         0         0       21m     nginx        nginx:1.17.1
pc-deployment-675d469f8b   0         0         0       16m     nginx        nginx:1.17.2
pc-deployment-6c9f56fcfb   4         4         4       5m11s   nginx        nginx:1.17.4


[root@master ~]# kubectl get pods -n dev
NAME                             READY   STATUS    RESTARTS   AGE
pc-deployment-6c9f56fcfb-7bfwh   1/1     Running   0          37s
pc-deployment-6c9f56fcfb-996rt   1/1     Running   0          5m27s
pc-deployment-6c9f56fcfb-j2gtj   1/1     Running   0          5m27s
pc-deployment-6c9f56fcfb-rf84v   1/1     Running   0          37s
# Deleting a deployment will also delete its associated ReplicaSets and Pods
[root@master ~]# kubectl delete -f pc-deployment.yaml
deployment.apps "pc-deployment" deleted
Deleting Deployment
# Deleting a deployment will also delete its associated ReplicaSets and Pods
[root@master ~]# kubectl delete -f pc-deployment.yaml
deployment.apps "pc-deployment" deleted
Horizontal Pod Autoscaler (HPA)
In previous lessons, we have been able to scale Pods up or down manually using the kubectl scale command, but this obviously does not meet Kubernetes' goal of automation and intelligence. Kubernetes expects to automatically adjust the number of Pods by monitoring their usage, and thus the Horizontal Pod Autoscaler (HPA) controller is created.
HPA can obtain the utilization of each Pod, compare it with the metrics defined in HPA, calculate the specific value to be scaled, and finally adjust the number of Pods. Like Deployment, HPA is also a Kubernetes resource object, which tracks and analyzes the load changes of all target Pods controlled by RC to determine whether to adjust the number of target Pod replicas. This is the implementation principle of HPA.

Next, we will do an experiment.
Step 1: Install Metrics Server
Metrics Server is used to collect resource usage information in the cluster.
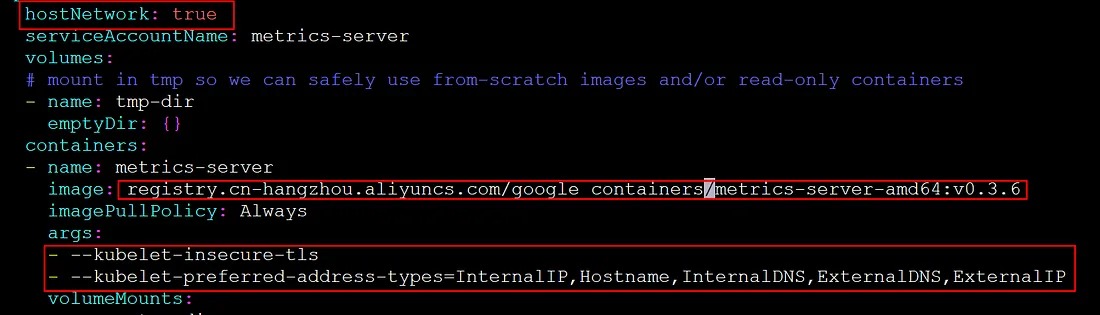
# Install git
[root@master ~]# yum install git -y

# Get metrics-server (version specified)
[root@master ~]# git clone -b v0.3.6 https://github.com/kubernetes-incubator/metrics-server

# Modify the deployment file (image and initialization parameters)
[root@master ~]# cd /root/metrics-server/deploy/1.8+/
[root@master 1.8+]# vim metrics-server-deployment.yaml
Add the following options as shown in the figure:
hostNetwork: true
image: registry.cn-hangzhou.aliyuncs.com/google_containers/metrics-server-amd64:v0.3.6
args:
- --kubelet-insecure-tls
- --kubelet-preferred-address-types=InternalIP,Hostname,InternalDNS,ExternalDNS,ExternalIP
# Install metrics-server
[root@master 1.8+]# kubectl apply -f ./

# Check pod status
[root@master 1.8+]# kubectl get pod -n kube-system
metrics-server-6b976979db-2xwbj   1/1     Running   0          90s

# Use kubectl top node to view resource usage
[root@master 1.8+]# kubectl top node
NAME     CPU(cores)   CPU%   MEMORY(bytes)   MEMORY%
master   98m          4%     1067Mi          62%
node1    27m          1%     727Mi           42%
node2    34m          1%     800Mi           46%
[root@master 1.8+]# kubectl top pod -n kube-system
NAME                              CPU(cores)   MEMORY(bytes)
coredns-6955765f44-7ptsb          3m           9Mi
coredns-6955765f44-vcwr5          3m           8Mi
etcd-master                       14m          145Mi
...
# The installation of metrics-server is completed
2. Prepare Deployment and Service
To simplify the operation, we will use commands directly.
# Create deployment
[root@master 1.8+]# kubectl run nginx --image=nginx:latest --requests=cpu=100m -n dev

# Create service
[root@master 1.8+]# kubectl expose deployment nginx --type=NodePort --port=80 -n dev

# Check
[root@master 1.8+]# kubectl get deployment,pod,svc -n dev
NAME                    READY   UP-TO-DATE   AVAILABLE   AGE
deployment.apps/nginx   1/1     1            1           47s

NAME                         READY   STATUS    RESTARTS   AGE
pod/nginx-7df9756ccc-bh8dr   1/1     Running   0          47s

NAME            TYPE       CLUSTER-IP      EXTERNAL-IP   PORT(S)        AGE
service/nginx   NodePort   10.109.57.248   <none>        80:31136/TCP   35s
3 Deploy HPA
Create pc-hpa.yaml file:
apiVersion: autoscaling/v1
kind: HorizontalPodAutoscaler
metadata:
  name: pc-hpa
  namespace: dev
spec:
  minReplicas: 1  # minimum number of pods
  maxReplicas: 10 # maximum number of pods
  targetCPUUtilizationPercentage: 3 # CPU utilization percentage target
  scaleTargetRef:   # specify the nginx information to control
    apiVersion: apps/v1
    kind: Deployment
    name: nginx
Run the following command to create HPA:
[root@master 1.8+]# kubectl create -f pc-hpa.yaml
horizontalpodautoscaler.autoscaling/pc-hpa created

# Check the HPA
[root@master 1.8+]# kubectl get hpa -n dev
NAME     REFERENCE          TARGETS   MINPODS   MAXPODS   REPLICAS   AGE
pc-hpa   Deployment/nginx   0%/3%     1         10        1          62s
4 Testing
Use the load testing tool to test the service address 192.168.109.100:31136, and then check the changes in HPA and Pods through the console.
HPA changes
[root@master ~]# kubectl get hpa -n dev -w
NAME     REFERENCE          TARGETS   MINPODS   MAXPODS   REPLICAS   AGE
pc-hpa   Deployment/nginx   0%/3%     1         10        1          4m11s
pc-hpa   Deployment/nginx   0%/3%     1         10        1          5m19s
pc-hpa   Deployment/nginx   22%/3%    1         10        1          6m50s
pc-hpa   Deployment/nginx   22%/3%    1         10        4          7m5s
pc-hpa   Deployment/nginx   22%/3%    1         10        8          7m21s
pc-hpa   Deployment/nginx   6%/3%     1         10        8          7m51s
pc-hpa   Deployment/nginx   0%/3%     1         10        8          9m6s
pc-hpa   Deployment/nginx   0%/3%     1         10        8          13m
pc-hpa   Deployment/nginx   0%/3%     1         10        1          14m
Deployment changes
[root@master ~]# kubectl get deployment -n dev -w
NAME    READY   UP-TO-DATE   AVAILABLE   AGE
nginx   1/1     1            1           11m
nginx   1/4     1            1           13m
nginx   1/4     1            1           13m
nginx   1/4     1            1           13m
nginx   1/4     4            1           13m
nginx   1/8     4            1           14m
nginx   1/8     4            1           14m
nginx   1/8     4            1           14m
nginx   1/8     8            1           14m
nginx   2/8     8            2           14m
nginx   3/8     8            3           14m
nginx   4/8     8            4           14m
nginx   5/8     8            5           14m
nginx   6/8     8            6           14m
nginx   7/8     8            7           14m
nginx   8/8     8            8           15m
nginx   8/1     8            8           20m
nginx   8/1     8            8           20m
nginx   1/1     1            1           20m
pod changes
[root@master ~]# kubectl get pods -n dev -w
NAME                     READY   STATUS    RESTARTS   AGE
nginx-7df9756ccc-bh8dr   1/1     Running   0          11m
nginx-7df9756ccc-cpgrv   0/1     Pending   0          0s
nginx-7df9756ccc-8zhwk   0/1     Pending   0          0s
nginx-7df9756ccc-rr9bn   0/1     Pending   0          0s
nginx-7df9756ccc-cpgrv   0/1     ContainerCreating   0          0s
nginx-7df9756ccc-8zhwk   0/1     ContainerCreating   0          0s
nginx-7df9756ccc-rr9bn   0/1     ContainerCreating   0          0s
nginx-7df9756ccc-m9gsj   0/1     Pending             0          0s
nginx-7df9756ccc-g56qb   0/1     Pending             0          0s
nginx-7df9756ccc-sl9c6   0/1     Pending             0          0s
nginx-7df9756ccc-fgst7   0/1     Pending             0          0s
nginx-7df9756ccc-g56qb   0/1     ContainerCreating   0          0s
nginx-7df9756ccc-m9gsj   0/1     ContainerCreating   0          0s
nginx-7df9756ccc-sl9c6   0/1     ContainerCreating   0          0s
nginx-7df9756ccc-fgst7   0/1     ContainerCreating   0          0s
nginx-7df9756ccc-8zhwk   1/1     Running             0          19s
nginx-7df9756ccc-rr9bn   1/1     Running             0          30s
nginx-7df9756ccc-m9gsj   1/1     Running             0          21s
nginx-7df9756ccc-cpgrv   1/1     Running             0          47s
nginx-7df9756ccc-sl9c6   1/1     Running             0          33s
nginx-7df9756ccc-g56qb   1/1     Running             0          48s
nginx-7df9756ccc-fgst7   1/1     Running             0          66s
nginx-7df9756ccc-fgst7   1/1     Terminating         0          6m50s
nginx-7df9756ccc-8zhwk   1/1     Terminating         0          7m5s
nginx-7df9756ccc-cpgrv   1/1     Terminating         0          7m5s
nginx-7df9756ccc-g56qb   1/1     Terminating         0          6m50s
nginx-7df9756ccc-rr9bn   1/1     Terminating         0          7m5s
nginx-7df9756ccc-m9gsj   1
DaemonSet(DS)
DaemonSet controllers can ensure that there is one replica running on each (or specified) node in the cluster. They are generally used for scenarios such as log collection and node monitoring. In other words, if a Pod provides a node-level function (needed and only needed on each node), such Pods are suitable for being created using the DaemonSet controller.
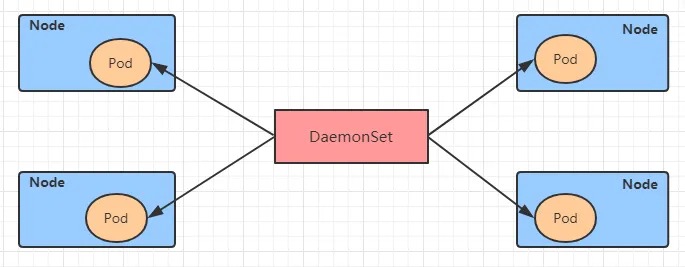
DaemonSet controllers have the following characteristics:
- Whenever a node is added to the cluster, the specified number of Pod replicas will be added to the node
- When a node is removed from the cluster, the corresponding Pods are also garbage collected
Now let’s take a look at the resource manifest file for DaemonSet:
apiVersion: apps/v1 # version number
kind: DaemonSet # resource type
metadata: # metadata
  name: # rs name
  namespace: # namespace
  labels: # labels
    controller: daemonset
spec: # resource details
  revisionHistoryLimit: 3 # maximum number of revisions to retain
  updateStrategy: # update strategy
    type: RollingUpdate # rolling update strategy
    rollingUpdate: # rolling update
      maxUnavailable: 1 # maximum number of Pods that can be unavailable during update, can be a percentage or an integer
  selector: # selector, used to specify which Pods are managed by this controller
    matchLabels:      # match by labels
      app: nginx-pod
    matchExpressions: # match by expressions
      - {key: app, operator: In, values: [nginx-pod]}
  template: # pod template, used to create new replicas when needed
    metadata:
      labels:
        app: nginx-pod
    spec:
      containers:
      - name: nginx
        image: nginx:1.17.1
        ports:
        - containerPort: 80
Create a file named pc-daemonset.yaml with the following content:
apiVersion: apps/v1
kind: DaemonSet
metadata:
  name: pc-daemonset
  namespace: dev
spec:
  selector:
    matchLabels:
      app: nginx-pod
  template:
    metadata:
      labels:
        app: nginx-pod
    spec:
      containers:
      - name: nginx
        image: nginx:1.17.1
Then execute the following commands in the terminal:
# Create the DaemonSet
[root@master ~]# kubectl create -f  pc-daemonset.yaml
daemonset.apps/pc-daemonset created

# Check the DaemonSet
[root@master ~]#  kubectl get ds -n dev -o wide
NAME           DESIRED  CURRENT  READY  UP-TO-DATE  AVAILABLE   AGE   CONTAINERS   IMAGES
pc-daemonset   2        2        2      2           2        24s   nginx        nginx:1.17.1

# Check the Pods, and you will find a pod running on each Node
[root@master ~]#  kubectl get pods -n dev -o wide
NAME                 READY   STATUS    RESTARTS   AGE   IP            NODE
pc-daemonset-9bck8   1/1     Running   0          37s   10.244.1.43   node1
pc-daemonset-k224w   1/1     Running   0          37s   10.244.2.74   node2

# Delete the DaemonSet
[root@master ~]# kubectl delete -f pc-daemonset.yaml
daemonset.apps "pc-daemonset" deleted
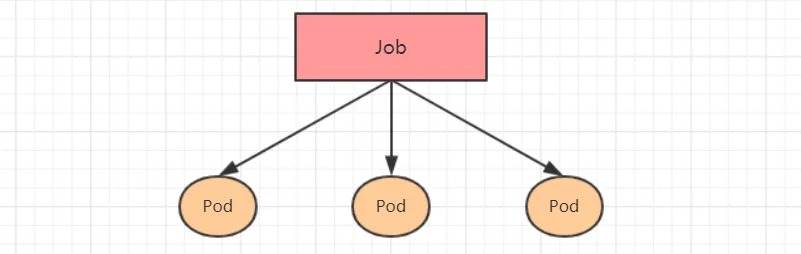
Job
A Job is mainly responsible for batch processing a specified number of tasks in one go for short-lived one-time tasks (each task runs only once). The characteristics of a Job are as follows:
- When a pod created by the Job ends successfully, the Job records the number of successfully ended pods.
- When the number of successfully ended pods reaches the specified number, the Job completes its execution.
Job
Here is an example of a Job resource manifest:
apiVersion: batch/v1
kind: Job
metadata:
  name: my-job
spec:
  completions: 1 # The number of successful pod completions required to mark the job as done. Default is 1.
  parallelism: 1 # The maximum number of pods to run concurrently. Default is 1.
  activeDeadlineSeconds: 30 # The time limit in seconds for the job to run. The system will try to terminate it if it exceeds this limit.
  backoffLimit: 6 # The maximum number of retries for a failed pod. Default is 6.
  manualSelector: true # Whether to use a selector to choose pods. Default is false.
  selector:
    matchLabels:
      app: my-app
    matchExpressions:
      - {key: app, operator: In, values: [my-app]}
  template:
    metadata:
      labels:
        app: my-app
    spec:
      restartPolicy: Never # The restart policy for the pod. Can be set to "Never" or "OnFailure".
      containers:
      - name: my-container
        image: busybox:1.30
        command: ["bin/sh", "-c", "for i in 9 8 7 6 5 4 3 2 1; do echo $i; sleep 2; done"]
Note on restart policy:
- If set to “OnFailure”, the Job will restart a container if it fails, but won’t recreate the pod. The “failed” count doesn’t reset.
- If set to “Never”, the Job will create a new pod if one fails, and the failed pod won’t disappear or restart. The “failed” count increments.
- If set to “Always”, the Job will keep restarting indefinitely, which is not desirable for a job meant to be executed once.
Create a file named “pc-job.yaml” with the following content:
apiVersion: batch/v1
kind: Job
metadata:
  name: pc-job
  namespace: dev
spec:
  manualSelector: true
  selector:
    matchLabels:
      app: counter-pod
  template:
    metadata:
      labels:
        app: counter-pod
    spec:
      restartPolicy: Never
      containers:
      - name: counter
        image: busybox:1.30
        command: ["bin/sh","-c","for i in 9 8 7 6 5 4 3 2 1; do echo $i;sleep 3;done"]
# Create the job
[root@master ~]# kubectl create -f pc-job.yaml
job.batch/pc-job created

# Check the job
[root@master ~]# kubectl get job -n dev -o wide  -w
NAME     COMPLETIONS   DURATION   AGE   CONTAINERS   IMAGES         SELECTOR
pc-job   0/1           21s        21s   counter      busybox:1.30   app=counter-pod
pc-job   1/1           31s        79s   counter      busybox:1.30   app=counter-pod

# Observe that after the pod completes the job, it will enter the Completed status
[root@master ~]# kubectl get pods -n dev -w
NAME           READY   STATUS     RESTARTS      AGE
pc-job-rxg96   1/1     Running     0            29s
pc-job-rxg96   0/1     Completed   0            33s

# Adjust the total number of pods and parallelism that the pod runs. That is, set the following two options under spec:
#   completions: 6 # Specifies the number of times the job needs to run pods successfully, which is 6 by default.
#   parallelism: 3 # Specifies the number of pods that the job should run concurrently, which is 3 by default.
#   Then run the job again and observe the effect. At this point, it will be found that the job will run 3 pods each time, and a total of 6 pods will be executed.
[root@master ~]# kubectl get pods -n dev -w
NAME           READY   STATUS    RESTARTS   AGE
pc-job-684ft   1/1     Running   0          5s
pc-job-jhj49   1/1     Running   0          5s
pc-job-pfcvh   1/1     Running   0          5s
pc-job-684ft   0/1     Completed   0          11s
pc-job-v7rhr   0/1     Pending     0          0s
pc-job-v7rhr   0/1     Pending     0          0s
pc-job-v7rhr   0/1     ContainerCreating   0          0s
pc-job-jhj49   0/1     Completed           0          11s
pc-job-fhwf7   0/1     Pending             0          0s
pc-job-fhwf7   0/1     Pending             0          0s
pc-job-pfcvh   0/1     Completed           0          11s
pc-job-5vg2j   0/1     Pending             0          0s
pc-job-fhwf7   0/1     ContainerCreating   0          0s
pc-job-5vg2j   0/1     Pending             0          0s
pc-job-5vg2j   0/1     ContainerCreating   0          0s
pc-job-fhwf7   1/1     Running             0          2s
pc-job-v7rhr   1/1     Running             0          2s
pc-job-5vg2j   1/1     Running             0          3s
pc-job-fhwf7   0/1     Completed           0          12s
pc-job-v7rhr   0/1     Completed           0          12s
pc-job-5vg2j   0/1     Completed           0          12s

# delete job
[root@master ~]# kubectl delete -f pc-job.yaml
job.batch "pc-job" deleted
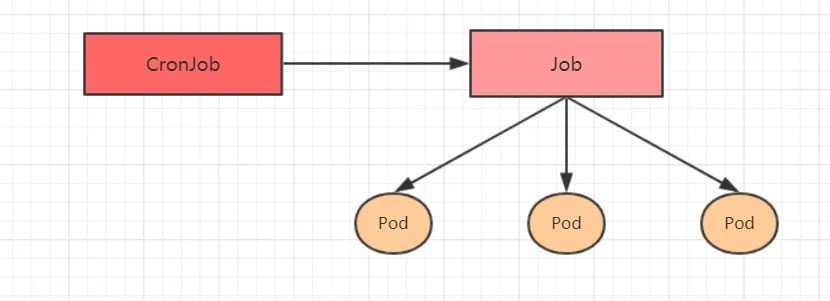
CronJob(CJ)
The CronJob controller uses the Job controller resource as its managed object and manages pod resources through it. Unlike Job controllers, which execute job tasks immediately after creating their controller resources, CronJob can control the timing and repeated running of its operation in a manner similar to the periodic task job scheduling in Linux. In other words, CronJob can run job tasks at specific time points (repeatedly).
CronJob resource manifest file:
apiVersion: batch/v1beta1 # API version
kind: CronJob # Type
metadata: # Metadata
  name: # Resource name
  namespace: # Namespace that the resource belongs to
  labels: # Labels for the resource
    controller: cronjob
spec: # Resource specification
  schedule: # The cron-formatted schedule for the job to run at specific times and/or intervals
  concurrencyPolicy: # The concurrency policy to use when running a job, to determine whether to allow or forbid concurrent runs
  failedJobHistoryLimit: # The number of failed job executions to retain, defaults to 1
  successfulJobHistoryLimit: # The number of successful job executions to retain, defaults to 3
  startingDeadlineSeconds: # The amount of time to allow for a job to start
  jobTemplate: # The job template to use for creating jobs by the CronJob controller
    metadata:
    spec:
      completions: 1
      parallelism: 1
      activeDeadlineSeconds: 30
      backoffLimit: 6
      manualSelector: true
      selector:
        matchLabels:
          app: counter-pod
        matchExpressions: # Match expressions to filter the pods that the job controller manages
          - {key: app, operator: In, values: [counter-pod]}
      template:
        metadata:
          labels:
            app: counter-pod
        spec:
          restartPolicy: Never
          containers:
          - name: counter
            image: busybox:1.30
            command: ["bin/sh","-c","for i in 9 8 7 6 5 4 3 2 1; do echo $i;sleep 20;done"]
Some important options:
schedule: The cron expression that specifies when the job should run
 */1    *      *    *     *
 <Minute> <Hour> <Day> <Month> <Weekday>

    Minute: 0-59.
    Hour: 0-23.
    Day: 1-31.
    Month: 1-12.
    Weekday: 0-6, where 0 represents Sunday
    Multiple values can be separated by commas; ranges can be given with a hyphen; * can be used as a wildcard; / represents every...
concurrencyPolicy:
 Allow:   Allows concurrent runs of jobs (default)
 Forbid:  Forbids concurrent runs, skips next run if the previous one hasn't completed
 Replace: Replaces the currently running job with a new one
Create the pc-cronjob.yaml file with the following contents:
apiVersion: batch/v1beta1
kind: CronJob
metadata:
  name: pc-cronjob
  namespace: dev
  labels:
    controller: cronjob
spec:
  schedule: "*/1 * * * *"
  jobTemplate:
    metadata:
    spec:
      template:
        spec:
          restartPolicy: Never
          containers:
          - name: counter
            image: busybox:1.30
            command: ["bin/sh","-c","for i in 9 8 7 6 5 4 3 2 1; do echo $i;sleep 3;done"]
# Create the cronjob
[root@master ~]# kubectl create -f pc-cronjob.yaml
cronjob.batch/pc-cronjob created

# View the cronjob
[root@master ~]# kubectl get cronjobs -n dev
NAME         SCHEDULE      SUSPEND   ACTIVE   LAST SCHEDULE   AGE
pc-cronjob   */1 * * * *   False     0        <none>          6s

# View the job
[root@master ~]# kubectl get jobs -n dev
NAME                    COMPLETIONS   DURATION   AGE
pc-cronjob-1592587800   1/1           28s        3m26s
pc-cronjob-1592587860   1/1           28s        2m26s
pc-cronjob-1592587920   1/1           28s        86s

# View the pod
[root@master ~]# kubectl get pods -n dev
pc-cronjob-1592587800-x4tsm   0/1     Completed   0          2m24s
pc-cronjob-1592587860-r5gv4   0/1     Completed   0          84s
pc-cronjob-1592587920-9dxxq   1/1     Running     0          24s


# Delete the cronjob
[root@master ~]# kubectl  delete -f pc-cronjob.yaml
cronjob.batch "pc-cronjob" deleted