How to become a worker?
Eris
<<< Back to main Page 📚
Requirements:
💪 GPU:
— Recommended: Any Nvidia Card from GTX 1060 6 GB or better. Also valid for analogue Quadro/Tesla cards. RTX cards are much faster, than GTX. Recommended VRAM is 6GB+
— Minimum: 1060 3GB with additional start parameters for Automatic1111 to work with low VRAM. Check optimisations page for more info
— AMD: currently not really compatible. AMD fork of Automatic1111 will be tested and noted here on a later date.
For now you can try following that optimisation guide for RX 6***+ cards, but its not very stable as of yet.
👀 Obligations:
You are not obligated to run it 24/7. Just enable script when you can to help the community. Most workers just leave it running when they are out for work or sleep.
Also usually worker don't eat all of your system's resources and you can still do basic tasks like browsing and playing lightweight games while worker is still running.
🖥️ Operating System
Linux or Windows 10+
❇️ CPU:
— Any 4 Core CPU should work. CPU isn't that utilized by the AI.
📝 RAM:
— 16GB or more. It is used as cache for models.
🫙 Storage:
— 64GB or more. Only holds models, lora, embeddings and such. Generated images are not saved.
— SSD storage highly recommended for way faster model loading
👷 Setting it up:
1. Install Automatic1111 stable-diffusion-webui
If you on Win 10+ use method named "Installation on Windows 10/11 with NVidia-GPUs using release package"
GitHub: Automatic1111 Intallation guide
2. Register in ngrok
We use ngrok as an easy solution to connect workers and send jobs for them.
Skip this step if you have a white IP/DDNS service or any other way of getting your SD reachable from outside of the world. If you need help setting up it this way - ask in admin chat.
Register on ngrok.com.
Get in dashboard, there should be alert with "Claim your free static subdomain!".
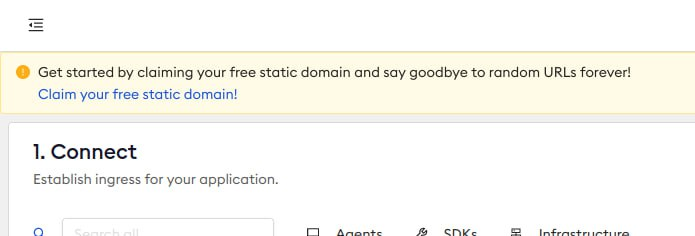
Click on it, click "create domain".
3. Edit your launch script parameters
Open webui-user.bat/webui-user.sh as a text file (.bat for windows, .sh for linux) and set it to example lower. You need to change ngrok parameters how discribed lower.
@echo off

set PYTHON=
set GIT=
set VENV_DIR=
set COMMANDLINE_ARGS=--no-download-sd-model --api --xformers --ngrok your_auth_token_here --ngrok-options '{"basic_auth":"username:password", "domain": "your-free-domain-from.ngrok-free.app"}'

call webui.bat
Where:
your_auth_token_here is a string of numbers and letters that you should copy from here on ngrok dashboard.
username:password is present only in that file and can be literally anything. Set any login you like to and a hard password. Its used for basic authentication as described here: Ngrok Authentication
your-free-domain-from.ngrok-free.app edit it to your static domain that you created in ngrok.
--no-download-sd-model is used to skip basic stable diffusion model from loading.
--api is for Eris to send you jobs.
--xformers accelerates image generation.
Dont forget to save your settings.
You can see if they work in first output when launching your SD:
"Launching Web UI with arguments:"

4. Try it!
Download simple model called YiffyMix v35 and put it in this folder: %Automatic1111 Installation Folder%\models\Stable-diffusion
Launch your Automatic1111 stable-diffusion-webui.
Go to your ngrok domain and sign in with username and password you set up before in configuration file.
Try to generate a picture to see if it works.
5. Install Syncthing
It is used to sync folders between workers, so every worker uses the same models, LoRas and embeddings:
Firstly clear any contents inside of following Automatic1111 folders:
%Automatic1111 Installation Folder%\embeddings
%Automatic1111 Installation Folder%\models\Lora
%Automatic1111 Installation Folder%\models\Stable-diffusion
Get and install Syncthing here
Delete the default Syncthing folder and don't create any folders by yourself.
Ask other's device IDs in our admin chat - to join, write to @Hitmare about your set up process and your GPU⚙️.
Then use this link and leave your application.
Add a couple of "High bandwidth connection" workers from ID list. You can find it in group description of admin chat.
All new members of network needs to be approved. Mention the host of that worker in Admin Chat and also add your device name from top left of the Syncthing window for them to accept you.
Go into sharing tab on adding dialogue and checkmark all folders. (models, embeddings, loras)
You will have the messages offering you to add our folders. Click add on one of them.
Initial setting opens for each folder, point it to paths below. (Be very careful, it is easy to make errors at this step).
Don't click "Add" until you check all settings.
Paths for each
Eris Embeddings:
%Automatic1111 Installation Folder%\embeddings\
Eris Lora:
%Automatic1111 Installation Folder%\models\Lora\
Eris Models:
%Automatic1111 Installation Folder%\models\Stable-diffusion\
Open advanced setting for each folder and set "Folder Type" to "Receive Only".
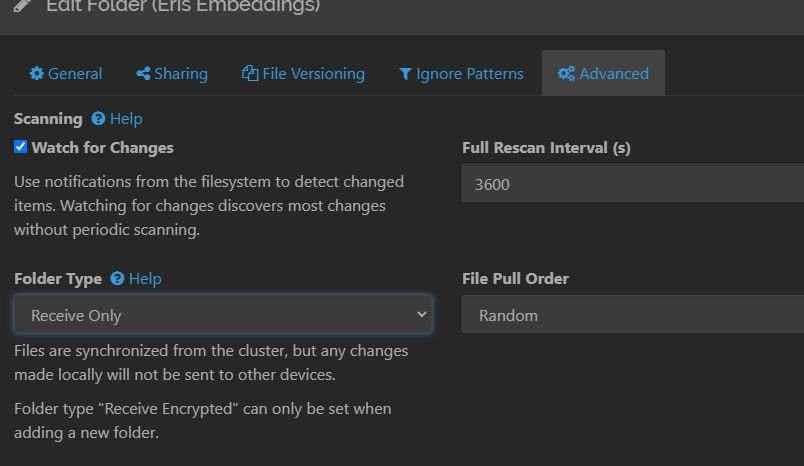
Now you can click "Add".
Wait it to sync.
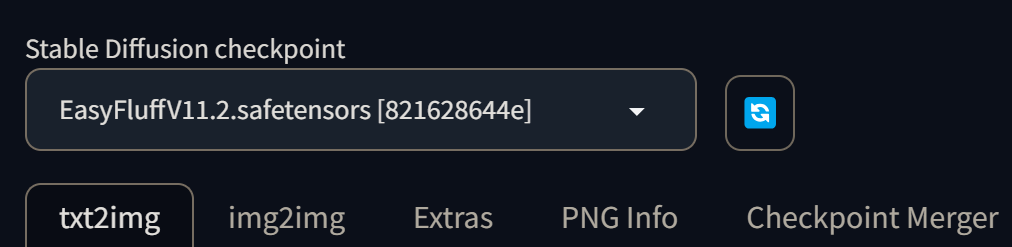
6. Set your model to EasyFluff
Ensure that the correct model is selected. Open your WebUI using ngrok link, your local adress, or, most likely with this localhost link which is used by default:
7. Give username, password, your domain, desired worker name and flag to Fenrir784
Example for worker name: BirdOvO PC 🇬🇧
You mostly ready to go! We will add you as worker and you can monitor your worker here on Eris WebUI.
Possible tweaks:
Autolaunch on startup (Windows):
Windows + R > shell:startup > Folder opens > Put here a shortcut to run.bat file.