How to: Stake Agoric Mainnet
Validatrium.comHello Agoric community, Validatrium created a step-by-step tutorial on Staking process at Agoric Mainnet.
Important note: as we are dealing with Mainnet, please go through the entire tutorial and make sure that you understand each step! Also read Additional information section.

Here are the steps:
- Add Keplr extension & register Agoric native wallet
- Transfer Agoric Mainnet tokens from Coinlist to Keplr wallet
- Stake Agoric Mainnet tokens
- Check / Claim your Agoric Mainnet rewards
- Additional information
Add Keplr extension & register Agoric native wallet
Add Keplr extension to your google chrome (pic 1)

press 1. to open Keplr extension, 2. to open settings menu and 3. to create new account (pic 2 & pic 3)


you will be redirected to new tab, pick "create new account" (pic 4)

1. copy mnemonic seed (12/24 words) and store them in a safe place, 2. enter account name and 3. press "next" button (pic 5)
IMPORTANT NOTE: never provide your mnemonic seed to anyone, as it will expose access to your wallet.

1. insert mnemonic seed in the exact same order provided in the previous screen and 2. press "Register" button (pic 6)

1. open Keplr extension, 2. navigate to "network settings" and pick "Agoric" network (pic 7)

1. open Keplr extension, 2. make sure that you are on Agoric network and 3. copy your Agoric mainnet address (pic 8)
NOTE: Make sure your address starts with "agoric.....", save this address, you will need it for the following step.

Transfer Agoric Mainnet tokens from Coinlist to Keplr wallet
1. navigate to Coinlist.co and login to your account where you previously participated in Agoric sale, 2. progress to Wallet section, 3. insert "BLD" in search by asset field and 4. press Withdraw button (pic 9)

1. check your available Agoric token balance, 2. insert Keplr Agoric address you have previously copied in pic 8, 3. insert desired BLD withdraw amount and 4. press "review" button (pic 10)
NOTE: double check your Keplr Agoric address, it must be the same as you have in Keplr extension

1. open Keplr extension, 2. make sure that you are on Agoric network and 3. check your available Agoric balance (pic 11)

Stake Agoric Mainnet tokens
1. open Keplr extension, 2. make sure that you are on Agoric network and 3. check your available Agoric balance and 4. press "Stake" button (pic 12)

1. after previous step you will be redirected to wallet.keplr.app/chains/agoric, 2. check available balance, 3. insert name of your trusted validator and 4. press manage button (pic 13)
NOTE: it is strongly recommended to make your own research and carefully pick validator with high uptime, quick response rate and strong presence across the Cosmos Ecosystem.

1. in pop-up window check if you have chosen the correct validator and 2. press "delegate" button (pic 14)

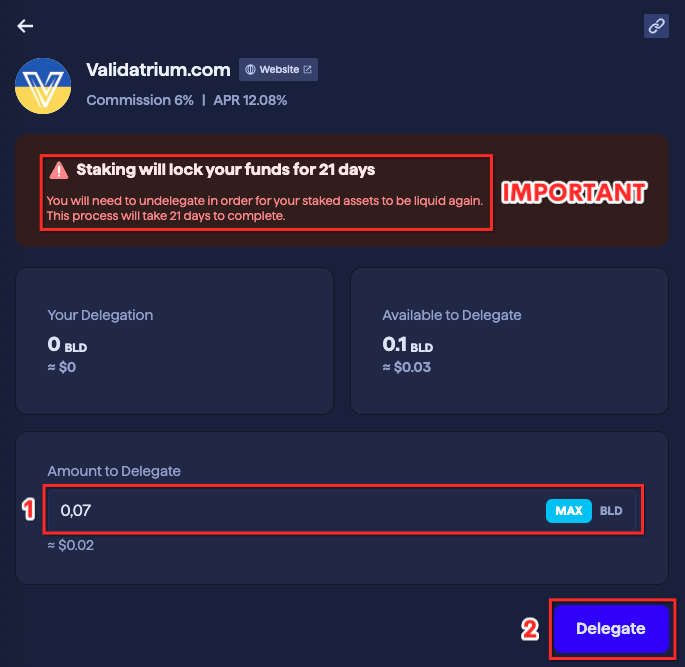
1. insert desired BLD amount you would like to delegate and 2. press "delegate" button again (pic 15)
IMPORTANT: upon staking your funds will be locked for 21 days, in order to be liquid again you will need to "undelegate" your stake.
1. in Keplr pop-up window check transaction fee price and 2. press "Approve" button (pic 16)

on the top right side of your browser you will spot "Transaction successful" notification (pic 17)

Congratulations, you have successfully delegated your Agoric tokens to trusted validator!
Check / Claim your Agoric Mainnet rewards
1. open Keplr extension, 2. make sure that you are on Agoric network and 3. check your available&staked Agoric balance and 4. press "Stake" button (pic 18)

To claim rewards, 1. press "Claim All" button, approve transaction in Keplr pop-up window.
Once rewards claimed, reload current page and 2. check "available balance" field (rewards must be transferred from "claimable rewards" field)
You may delegate your rewards to validator to increase amount of your future gains by 3. pressing "manage" button and going the same steps you completed in "Stake Agoric Mainnet tokens" section.
Once staked, 4. check your Total Staked tokens (pic 19)

Additional information
Un-bonding period (Stake lock period): 21 days
Check Agoric token price: Coinmarketcap
Check Validator detailed performance: Explorer
Check Agoric network detailed stats: Explorer
________________________________
Tutorial created by Validatrium.com
For additional info feel free to join official Agoric community channels:
Telegram
Discord
Twitter