How to Implement Swipe Actions in Flutter with Slidable
FlutterPulseThis article was translated specially for the channel FlutterPulseYou'll find lots of interesting things related to Flutter on this channel. Don't hesitate to subscribe!🚀

Learn how to implement swipe actions in Flutter using the Slidable widget. This guide covers adding static swipe gestures for editing,…
Hey Readers, After a very long time. Yeah !!
Actually busy building my app and polishing out to extreme so that my user won't feel and glitch or anything like that. If anyone wanna checkout how our flutter app is performing in market have a look.
Struggling to Build Habits? Meet Habithook- The Best Habit Tracker AppWe all struggle with habit consistency. The problem isn’t you, it’s the system you’re using.
medium.com
Let's start with today's topic.
Basically, I'd implemented flutter slidable in my app as well for a very important use case i.e.
- If user swipes left then they can view analytics.
- If user swipes right then they can view edit and delete options.
I tried to provide a cool method of viewing their progress. Seems Nice …
What is SlideActions?
SlideActions in Flutter allow users to interact with list items through smooth swipe gestures, revealing hidden options like edit, delete, or quick actions.
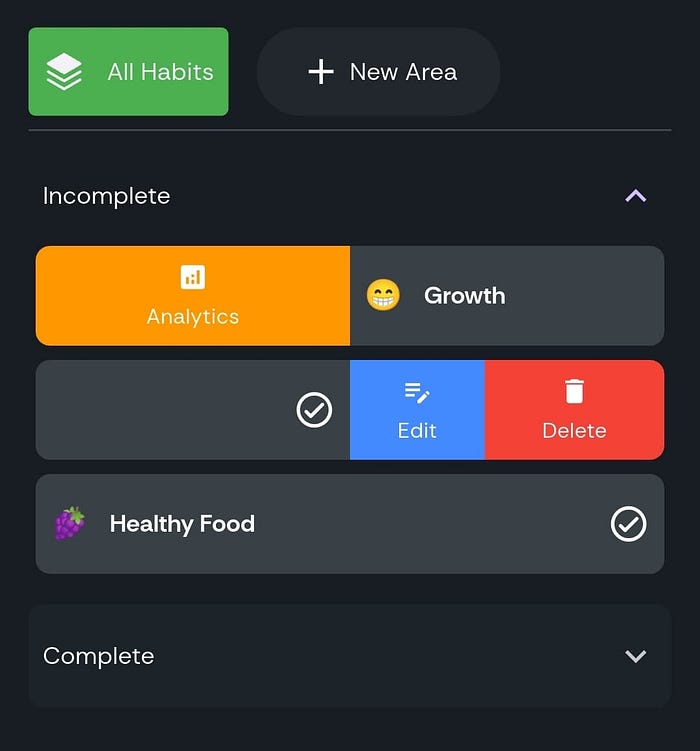
In the image, SlideActions bring a dynamic feel to habit tracking — swipe right to check off a task, or left to reveal the vibrant "Edit" and "Delete" buttons.
It's like a secret drawer of productivity tools hidden beneath each habit, making interactions effortless and engaging!
The Secret Sauce The Code
I know you'll are waiting for that thing only.. But If you're loving our this or previous article why not to help me grow ??
Hemant Kumar Prajapati - MediumRead writing from Hemant Kumar Prajapati on Medium. Firstly Use My App Habithook - A Next Gen Habit or Routine Planner…
medium.com
Let's set up Flutter Slidable and learn how to use it step-by-step.
Add the dependency
In your pubspec.yaml:
dependencies:
  flutter_slidable: ^4.0.0
Run:
flutter pub get
Let's see the code.. We'll be following some step :-
1. Creating a Basic UI Structure
Now, let's create a simple Flutter screen with an AppBar and a ListView.
class StaticSlidableExample extends StatelessWidget {
  const StaticSlidableExample({super.key});

  @override
  Widget build(BuildContext context) {
    return Scaffold(
      appBar: AppBar(title: const Text('Static Slidable Example')),
      body: ListView(
        children: List.generate(5, (index) {
          return buildSlidableItem(context);
        }),
      ),
    );
  }
📌 Breakdown:
Scaffold: Provides the main UI structure.AppBar: Displays a title.ListView: Generates five staticSlidableitems usingList.generate().buildSlidableItem(context): A helper method to keep things modular.
2. Handling Swipe Actions (Start & End Panels)
Each item will have two swipe actions:
- Left Swipe (Start Action Pane) → "Analytics"
- Right Swipe (End Action Pane) → "Edit" & "Delete"
Let's define the buildSlidableItem() function:
Widget buildSlidableItem(BuildContext context) {
  return Slidable(
    startActionPane: ActionPane(
      motion: const ScrollMotion(),
      children: [
        SlidableAction(
          onPressed: viewAnalytics,
          backgroundColor: Colors.orange,
          foregroundColor: Colors.white,
          icon: Icons.analytics,
          label: 'Analytics',
        ),
      ],
    ),
    endActionPane: ActionPane(
      motion: const ScrollMotion(),
      children: [
        SlidableAction(
          onPressed: editHabit,
          backgroundColor: Colors.blueAccent,
          foregroundColor: Colors.white,
          icon: Icons.edit_note,
          label: 'Edit',
        ),
        SlidableAction(
          onPressed: deleteHabit,
          backgroundColor: Colors.red,
          foregroundColor: Colors.white,
          icon: Icons.delete,
          label: 'Delete',
        ),
      ],
    ),
    child: const ListTile(
      title: Text("Habit Name"),
      subtitle: Text("Swipe left or right"),
    ),
  );
}
📌 Breakdown:
Slidable: Wraps theListTileto enable swipe gestures.startActionPane: Defines the left swipe action.endActionPane: Defines the right swipe actions.SlidableAction: Each button has anonPressedcallback, an icon, label, and color.
3. Defining Action Callbacks
I now define functions that trigger when actions are tapped:
void viewAnalytics(BuildContext context) {
  ScaffoldMessenger.of(context).showSnackBar(
    const SnackBar(content: Text("Viewing Analytics")),
  );
}

void editHabit(BuildContext context) {
  ScaffoldMessenger.of(context).showSnackBar(
    const SnackBar(content: Text("Editing Habit")),
  );
}

void deleteHabit(BuildContext context) {
  ScaffoldMessenger.of(context).showSnackBar(
    const SnackBar(content: Text("Deleting Habit")),
  );
}
📌 Breakdown:
- Each function takes
BuildContextas a parameter. ScaffoldMessenger.of(context).showSnackBar(): Displays a small message when an action is tapped.
4. Final Code (Everything Together)
Now that I've broken it into sections, here's the complete code:

I know this seems awesome..
BTW above shown is the final result.
| 🌟 Enjoyed this tutorial?
For more tips, tutorials, and insights into Flutter, be sure to follow my Medium blog! Stay connected, and let's continue building amazing things together.
Ping me on other platforms… too….
👉 Follow me:
- Medium:- Hemant Kumar Prajapati🧐
- Github💻:- Hemantpra389🧐
- LinkedIn :- Hemant Prajapati🧐
Happy coding! 🎉 !! Happy Flutter !!
💬 Comment Section is Open!
Share your thoughts or ask questions below.
👏 Applaud if you enjoyed this!
Your claps help others find this content.
➕ Follow for more!
Stay updated with more tips and tutorials.
🌿 Thank you for reading! If you liked this post and want to support me, you can buy me a coffee here 👇
Hemant Prajapati▁▂▃▅▆▇ Professional Flutter Freelancer 🚀 | @SDE1 TechSaga Corporation | Helping Startups build MVPs 💼 |…bu
buymeacoffee.com
Thank you for being a part of the community
Before you go:
- Be sure to clap and follow the writer ️👏️️
- Follow us: X | LinkedIn | YouTube | Newsletter | Podcast | Differ | Twitch
- Check out CoFeed, the smart way to stay up-to-date with the latest in tech🧪
- Start your own free AI-powered blog on Differ 🚀
- Join our content creators community on Discord 🧑🏻💻
- For more content, visit plainenglish.io + stackademic.com