How to Add Images to FCM Push Notifications on iOS with Flutter (Step-by-Step Guide)
FlutterPulseThis article was translated specially for the channel FlutterPulseYou'll find lots of interesting things related to Flutter on this channel. Don't hesitate to subscribe!🚀

Before reading this article, I assume that you have already set up push notifications and know how to send them through the Firebase console or via the API.
Recently, my task was to implement the ability to add an image to push notifications on iOS. I expected to finish it very quickly, but I ran into a number of non-obvious details that took more time than I thought. So I decided to write this article — primarily for myself, to use in the future. Hopefully, it will also be useful to someone else and save them some time.
General Logic: How It Works on iOS
When creating a push notification, we include a link to an image. For this image to appear inside the notification, iOS must download it first (which, of course, requires an active internet connection). This download is handled by a special component called a Notification Service Extension, which is not added to your project by default.
The extension "intercepts" the incoming push notification and allows you to modify it however you want. You can update the title, implement custom logic to download an image, and much more — all of this must be configured at the native iOS level.
Here is the official Apple documentation describing the process: https://developer.apple.com/library/archive/documentation/NetworkingInternet/Conceptual/RemoteNotificationsPG/ModifyingNotifications.html
A Step-by-Step Guide to Setting It Up
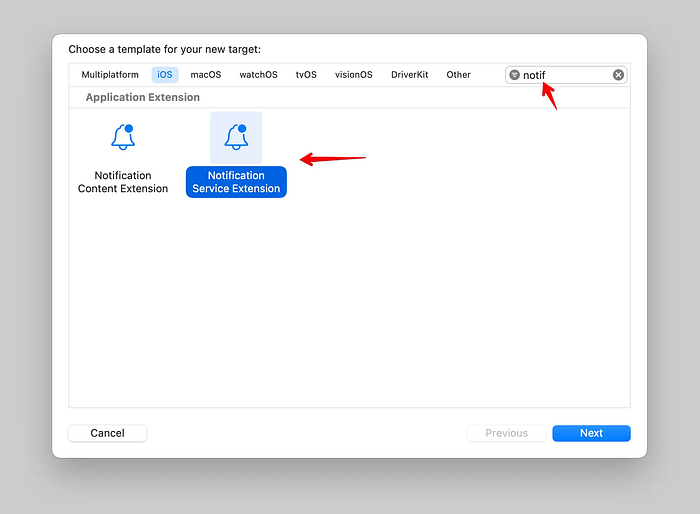
- Open your project in Xcode and navigate to the section for adding a new target

2. Select Notification Service Extension
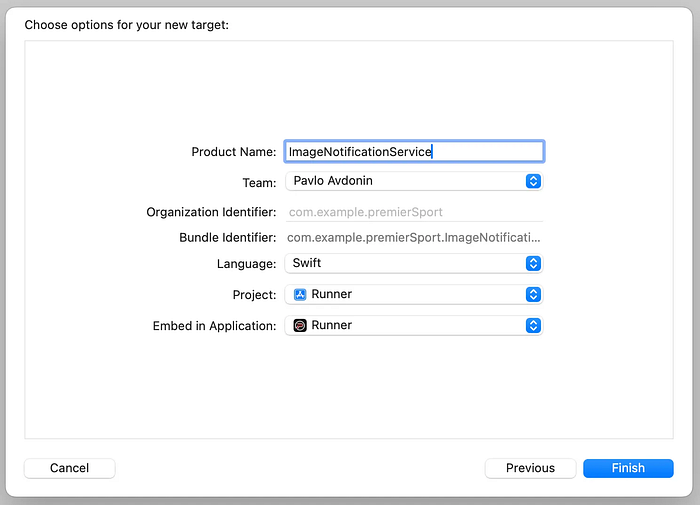
3. Give your new target a name. The Bundle Identifier will update automatically based on the name you provide.
4. When Xcode prompts you to activate the scheme, click "Don't Activate."
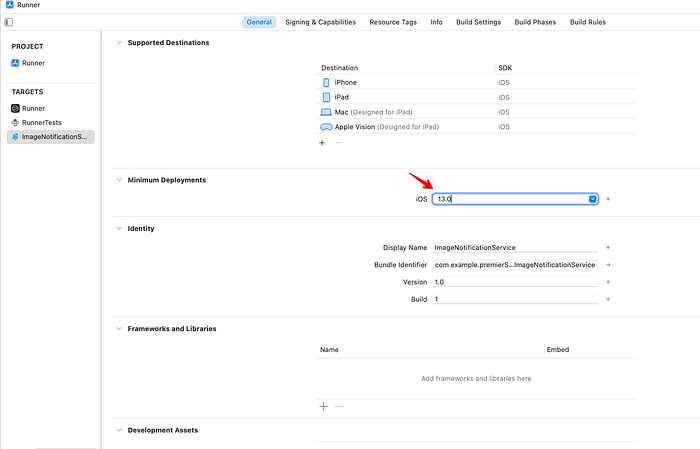
5. Go to the newly created target and set the minimum iOS version to match the one used in Runner.
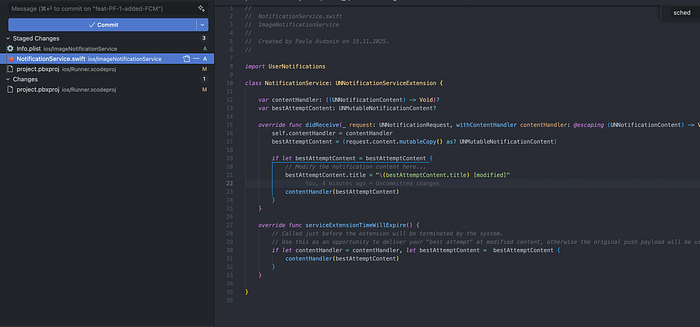
6. After creating the target, two new files with default settings will appear. In the code, you can see that the extension is currently set to modify the notification title (by adding [modified]). Leave it as is for now — we'll need this behavior for testing.
7. Next, go to https://developer.apple.com/account to add a new identifier.
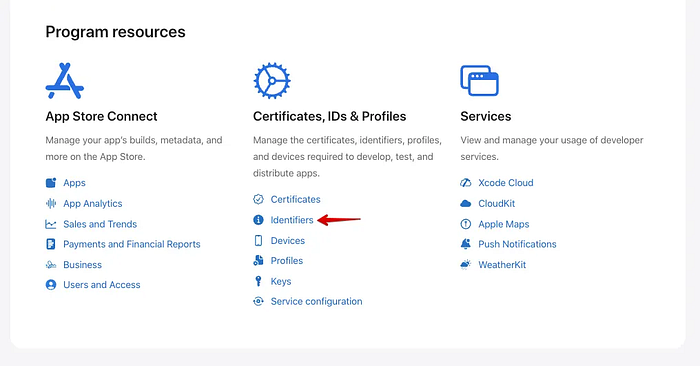
7.1 Press add button.

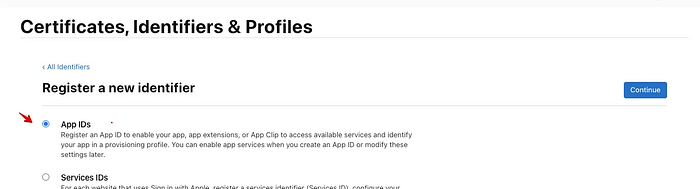
7.2 Add AppIDs
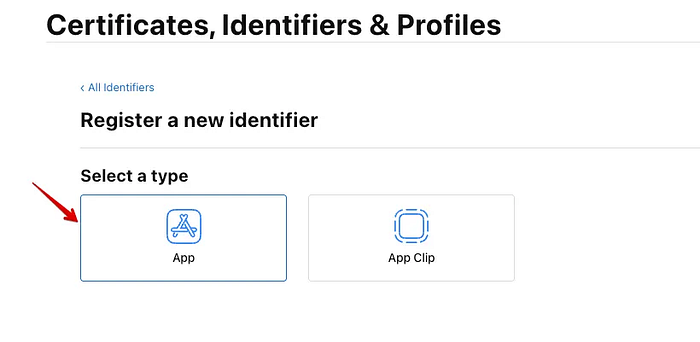
7.3 Choose App type
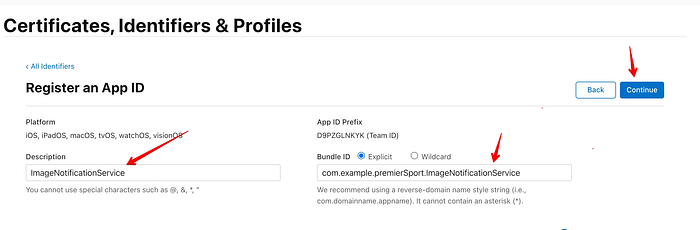
7.3 Fill Description and App Id Prefix
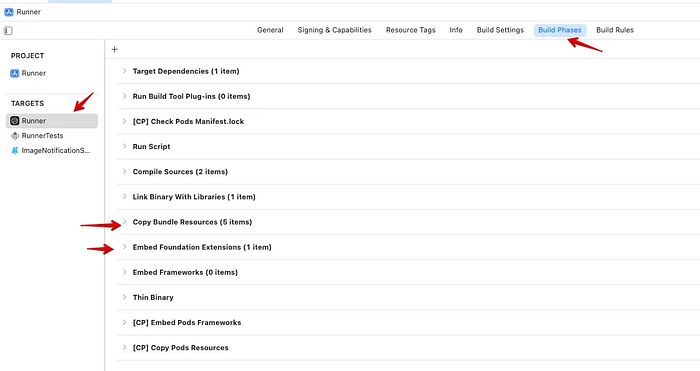
8. After adding the new identifier, you can try running your application — but most likely, you will encounter an error.
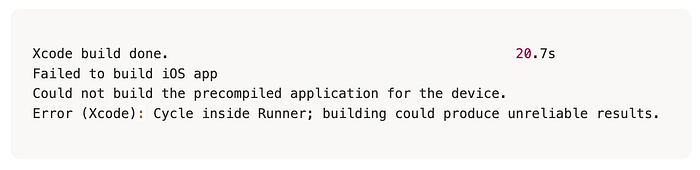
I found the solution here: https://stackoverflow.com/questions/77138968/handling-cycle-inside-runner-building-could-produce-unreliable-results-after-up
To fix it, simply move the Embed Foundation Extensions phase below Copy Bundle Resources in the Build Phases tab.
9. Build your app and send push. If you see that the title arrives with "modified", it means everything is working correctly and your new extension has been triggered.

Important!
I want to highlight an important parameter in the push payload that is responsible for triggering the extension — "mutable-content": 1. When you send notifications from the Firebase console, this parameter is added automatically. But if you're sending pushes via the API, you must include it yourself.
Apple's documentation also mentions that you need to include an additional alert field. However, I didn't add it in my case, and everything worked on two different projects without it.
Documentation link: https://developer.apple.com/library/archive/documentation/NetworkingInternet/Conceptual/RemoteNotificationsPG/ModifyingNotifications.html
10. Now let's add image handling. To do this, replace the code in NotificationService.swift with the following:
//
//  NotificationService.swift
//  ImageNotificationExtension
//

import UserNotifications
import FirebaseMessaging

class NotificationService: UNNotificationServiceExtension {

    var contentHandler: ((UNNotificationContent) -> Void)?
    var bestAttemptContent: UNMutableNotificationContent?

    override func didReceive(
        _ request: UNNotificationRequest,
        withContentHandler contentHandler: @escaping (UNNotificationContent) -> Void
    ) {
        self.contentHandler = contentHandler
        self.bestAttemptContent = request.content.mutableCopy() as? UNMutableNotificationContent

        guard let bestAttemptContent = bestAttemptContent else {
            return contentHandler(request.content)
        }

        Messaging.serviceExtension()
            .populateNotificationContent(bestAttemptContent, withContentHandler: contentHandler)
    }

    override func serviceExtensionTimeWillExpire() {
        if let contentHandler = contentHandler,
           let bestAttemptContent = bestAttemptContent {
            contentHandler(bestAttemptContent)
        }
    }
}
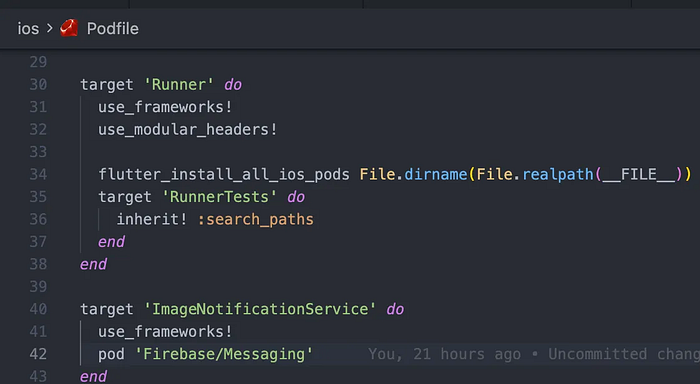
11. In the ios/Podfile add the following code right after Runner created target.
target 'ImageNotificationService' do
  use_frameworks!
  pod 'Firebase/Messaging'
end
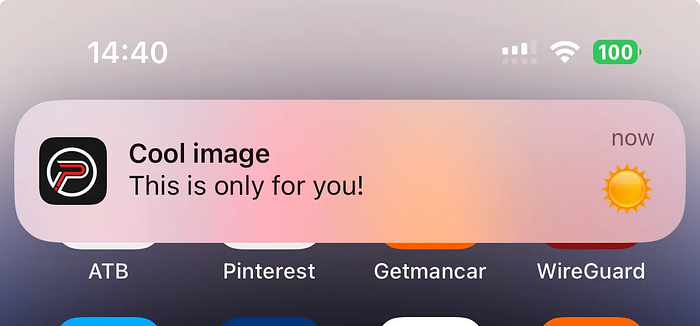
12. Rebuild the project and try sending a test push notification with an image.

If everything was done correctly, you should see the image in the notification.
Possible additional Issues:
- If the build fails with the error
Multiple commands produce GoogleUtilities
you can find the solution here: https://github.com/CocoaPods/CocoaPods/issues/8206#issuecomment-696754566
2. If you are using CI, don't forget to do additional configuration there as well.
It's all 🙂
And please, if you encounter any other issues while adding images to push notifications, I'd appreciate it if you could describe them in the comments. I'll review them and update this article accordingly.
Thank you!