Heroku Deployment Using Workflow
Heroku Deployment
October 04, 2021
- Upload your token.pickle to your Index or any way to get link of your token.pickle and put your token.pickle link to
TOKEN_PICKLE_URL(NOTE: If you don't upload token.pickle uploading to google drive will not work). - Go to Repository
Settings->Secrets
Add the below-Required Variables one by one by clicking New Repository Secret every time.
HEROKU_EMAIL: Heroku Account Email Id in which the above app will be deployedHEROKU_API_KEY: Your Heroku API key, get it from https://dashboard.heroku.com/accountHEROKU_APP_NAME: Your Heroku app name, Name Must be uniqueCONFIG_FILE_URL: (Optional , Follow This Method Or Add Config.env To Repo Directly )Fill This in any text editor. Remove the_____REMOVE_THIS_LINE_____=Trueline and fill in the variables.- For details about config, you can see Here. Go to https://gist.github.com and paste your config data. Rename the file to
config.envthen create secret gist. Click on Raw, copy the link. This will be yourCONFIG_FILE_URL. Refer to the below images for clarity.
- NOTE: Remove commit id from raw link to be able to change variables without updating the
CONFIG_FILE_URLin secrets. should be in this form: https://gist.githubusercontent.com/username/gist-id/raw/config.env - Before: https://gist.githubusercontent.com/anasty17/8cce4a4b4e7f4ea47e948b2d058e52ac/raw/19ba5ab5eb43016422193319f28bc3c7dfb60f25/config.env
- After: https://gist.githubusercontent.com/anasty17/8cce4a4b4e7f4ea47e948b2d058e52ac/raw/config.env
- You only need to restart your bot after editing
config.envGist secret.
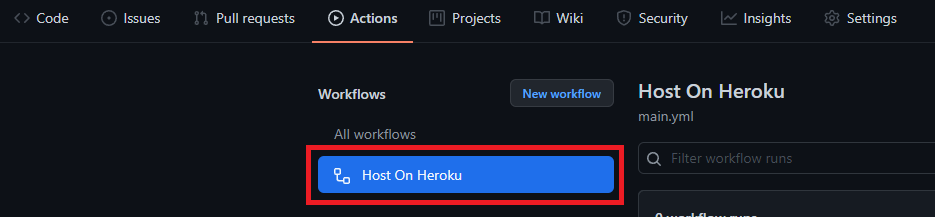
After adding all the above Required Variables go to Github Actions tab in your repository.
Select Manually Deploy to Heroku workflow as shown below:
Then click on Run workflow
Done! your bot will be deployed now.
Turn on dyno using website.
NOTE
- Don't change/edit variables from Heroku if you want to change/edit do it in
config.envfrom your gist, after it just restart your Heroku app.