Google Drive Ultimate Index
Alpha Folker AKA Leelu Pradhan
THIS PROJECT IS ONLY FOR PERSONAL USE TO SHARE CONTENT WITH FAMILY AND FRIENDS, DO NOT USE FOR COMMERCIAL PURPOSE!
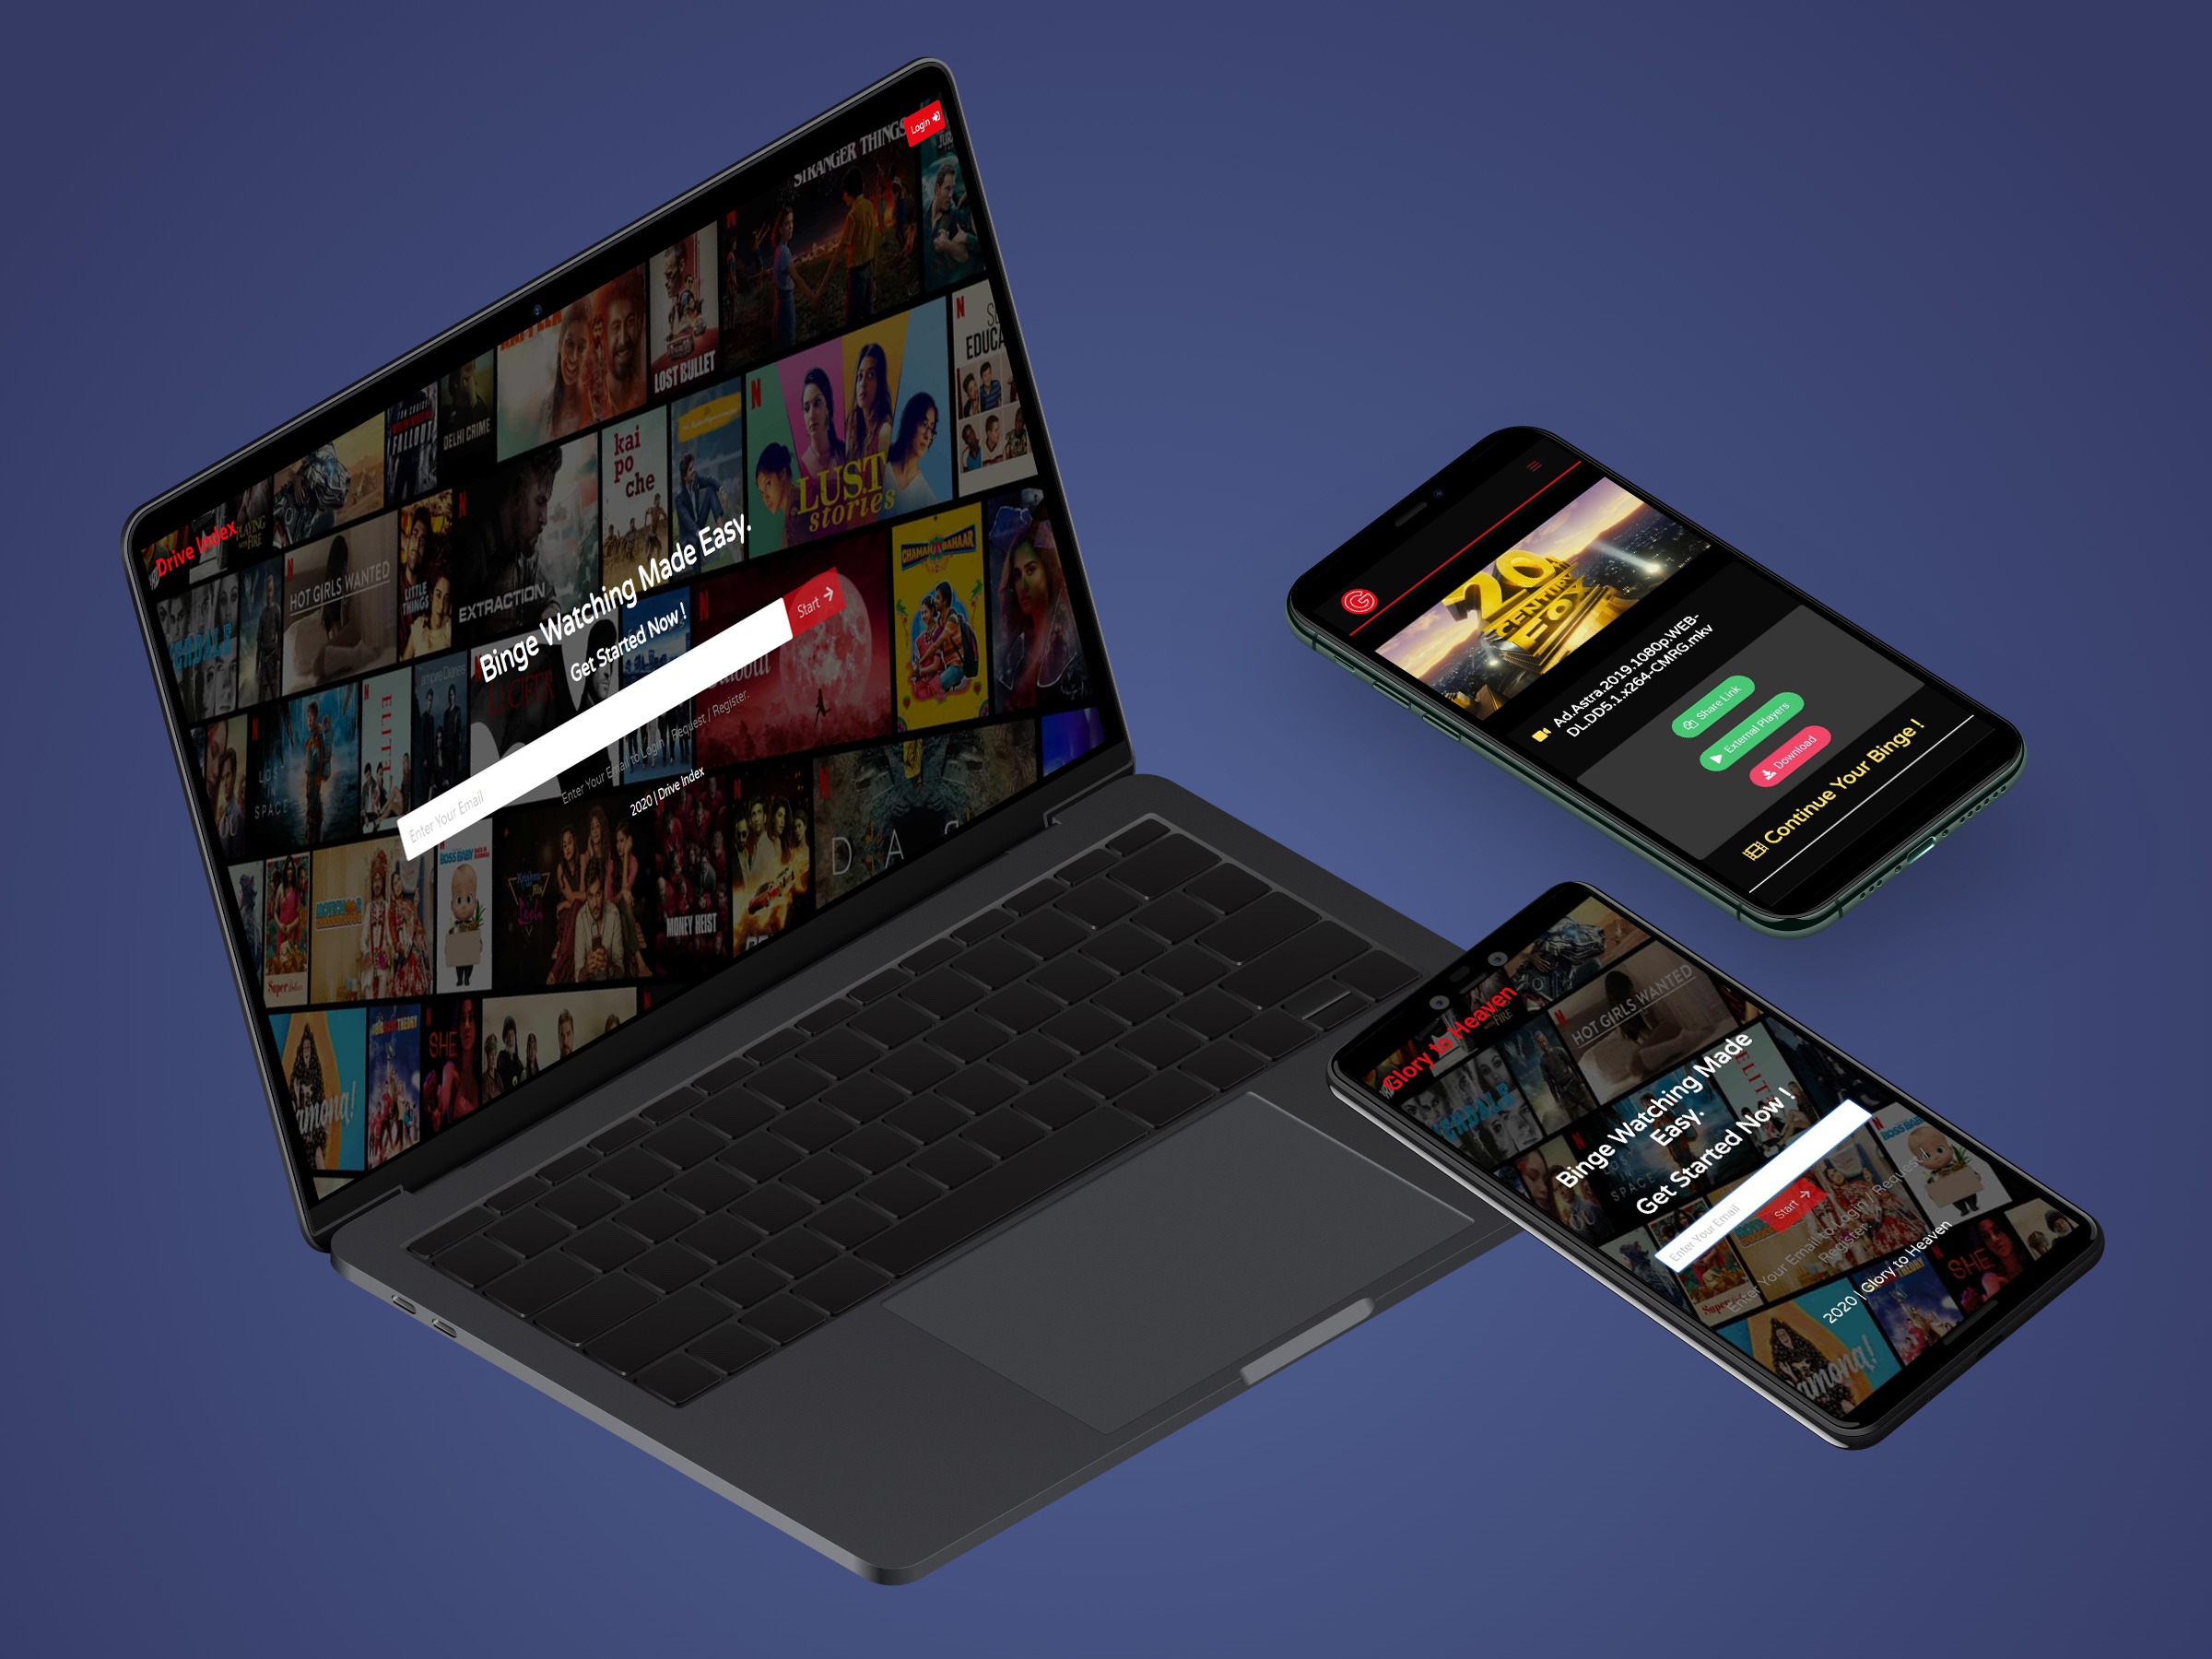
What is Google Drive Ultimate Index?
Over killed version of Google drive index available right now on internet. It is a serverless Google Drive directory indexing program that can be deployed on Cloudflare Workers and backend deployed on heroku. It can list Google Drive files in the form of a directory and can be downloaded through a straight chain. Since traffic is transferred through Cloudflare, it can be used freely even in a restricted network environment. This tutorial explains the deployment process of google drive ultimate index using a custom API, which is theoretically safer and faster to download. With backend integration and automated OTP generation it is now more safer and you get a seamless experience with knowledge of users.
What are the features?
- This GIndex is Not Like Basic GIndex which Depends on Basic Auth Headers to Authenticate the Users. Rather this has its Own Backend Through Which Users will be Authenticated.
- Automated Email Verification with OTP.
- Uses Custom Video Player - Plyr to Stream Videos.
- Uses Custom Audio Player - Plyr
- Complete Dark theme.
- User Role Based Authentication.
- No Public can Access Site's Content Without Logging in.
- Uses JWT to Verify User's Login on Each Route.
- JWT is Valid for a Week. After Expiry the User will get Automatically Logged out.
- Also User's JWT Token is Stored in LocalStorage as AES 256 Encrypted Key . This will be Decrypted on Demand. So that No One Can Access the User Details even if they have the Key.
- Fully Material Redesign of all Pages. (Under Progress).
- Has 3 Roles - User, Admins, SuperadminsUsers - Can Only View Content.
- Admins - Can Accept Users based on their Request
- Superadmins - Can Accept Admin Requests.
- Uses MongoDB for User Database.
- Full Access Control of Backend from Frontend Based on User's Role.
How it works?
Integration of cloudflare workers and heroku backend makes complete package, this guide will be divided in 3 parts: BACKEND, FRONTEND and NO BACKEND. Frontend is hosted on cloudflare workers and backend is hosted on heroku.
BACKEND
Big thanks to Sudharshan TK, he simplified the task by adding deploy to heroku (PS: signup on heroku already) option
So visit https://github.com/tks18/gindex-backend and press deploy to heroku, or just simply click here and you will taken here:
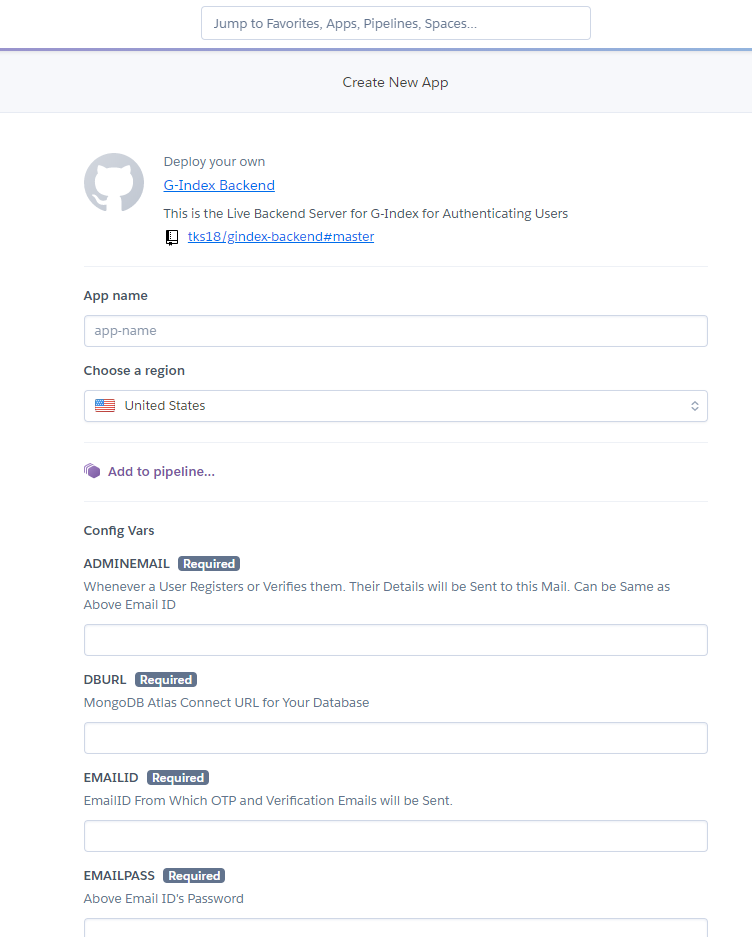
Enter a unique app name. This will come before herokuapp.com, Example: https://sample.herokuapp.com
Now comes the Config vars, follow each step carefully:
1. ADMINEMAIL:
Here we have multi-options and is based on your availability and speed requirement:
OP tested on yandex and was working fine for him, but in my case I have to settle on yahoo
Create an account on https://mail.yahoo.com and once you make an account go on this link and go to Manage app passwords and choose other app and enter custom name and note down or copy password it will be useful in later steps.
PS: You can use any email service other than google (authentication causes errors) or just use yahoo (It is bit slow, 1-2 minute gap in automated mails).
PS: Many users are facing problem in yahoo, please hit and try different mail providers!
Your input should look like this:

2. DBURL:
Here we have to make account on MongoDB atlas for creating database which will keep the records of users.
Visit here to make an account on mongodb
After sign in create a new cluster in Atlas with default settings.
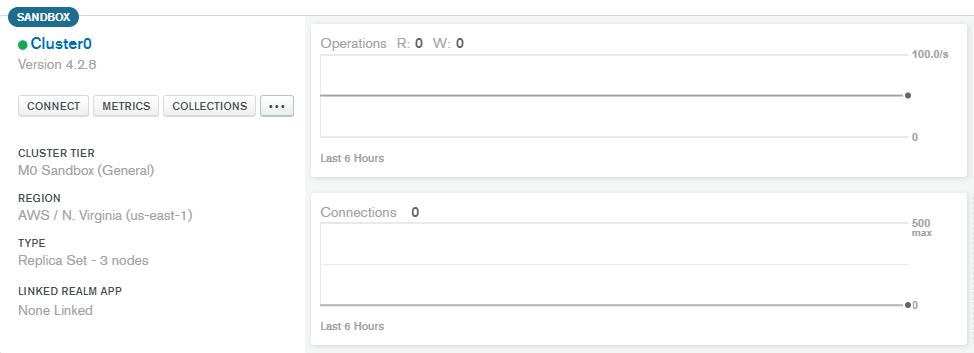
Click on connect.
Put 0.0.0.0 in IP and create a admin user and remember the password it will be used in next step.
On next step, choose Connect your application and then following screen will come:
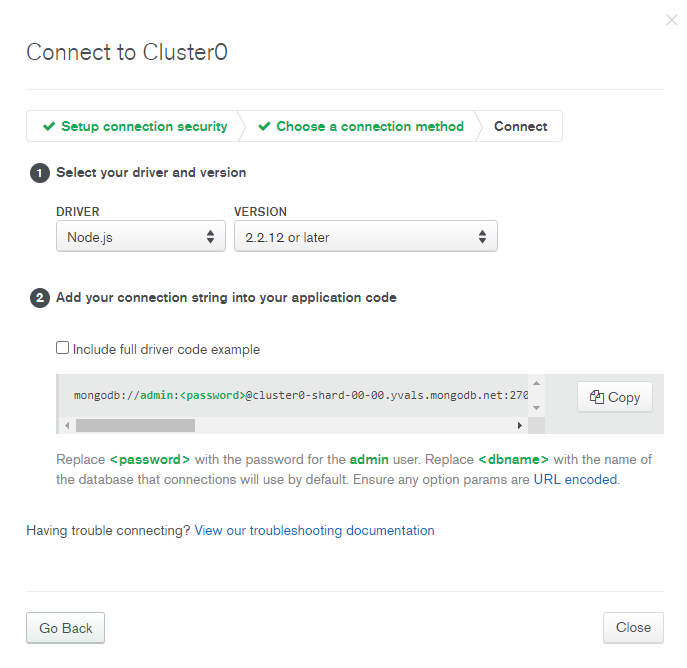
Here node.js version can be any and hence in my case I selected 2.2.12 or later as it was working smooth on local setup.
Copy the connection string:
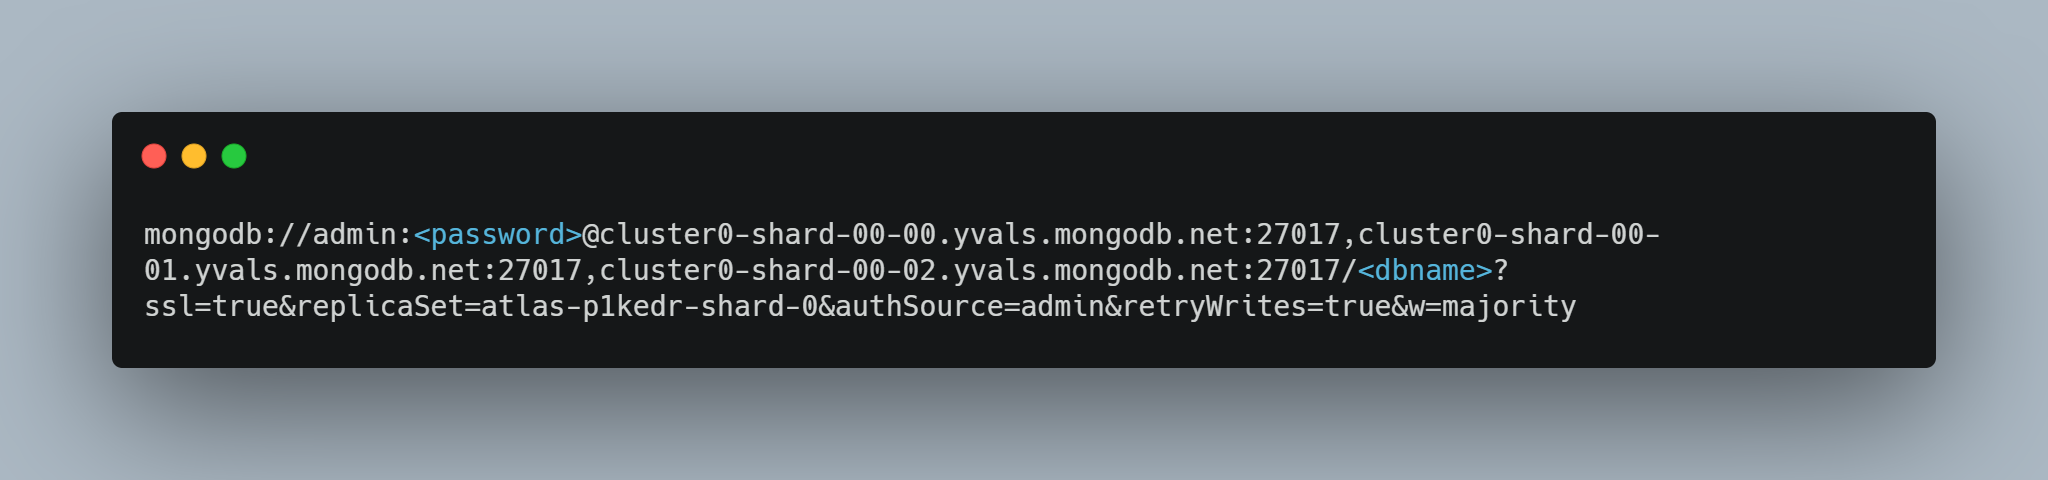
Change 2 parameters here, <password> with the password you entered in previous step and <dbname> with any name you like for example myusers
PS: remove <> and replace all the stuff with your input.
Your input should like this:

PS: Do not use special characters in dbname!
3. EMAILID:
To keep things simplified use same email id as entered in step 1. (Or follow as per your mail provider)
Your input should look like this:

4. EMAILPASS:
Copy the password we generated in step 1. (Or follow as per your mail provider)
Your input should look like this:

5. EMAILPORT:
In case of yahoo it is 465 (Or follow as per your mail provider)
Your input should look like this:

6. EMAILSERVICE:
In case of yahoo it is Yahoo (Or follow as per your mail provider)
Your input should look like this:

7. EMAILSMTP:
In case of yahoo it is smtp.mail.yahoo.com (Or follow as per your mail provider)
Your input should look like this:

8. FRONTENDSITENAME:
Name it anything as per your choice for example: MyIndex
PS: This will show in automated e-mail templates.
Your input should look like this:

9. FRONTENDURL:
This will be front end URL, if you wish you can GA domain or just stuck with workers domain, You can visit here to create a worker on cloudflare and get a free .ga domain!
Your input should look like this:

PS: this should be exactly same otherwise authentication will fail and will give errors!
10. REPLYTOMAIL:
To keep it simple use email id created in step 1.
Your Input should look like this:

11. SITE:
This is your heroku backend site address, which is set before step 1.
Your input should look like this:

12. SITESECRET:
This will be used when setting up root/superadmin user in backend to verify its you.
Your input should look like this:

13. TOKENSECRET:
It can be anything randomly generated. This will be Used to Issue JSON Web Tokens and Verify it. Recommended to Have Minimum 20 Characters. That will be Safe.
Use https://passwordsgenerator.net for generating long string.
Your input should look like this:

14. EMAILGIF:
This will be used to enter a photo on top of emails.
Enter a JPG/PNG/GIF and maintain ratio otherwise it will land in spam!
Example:
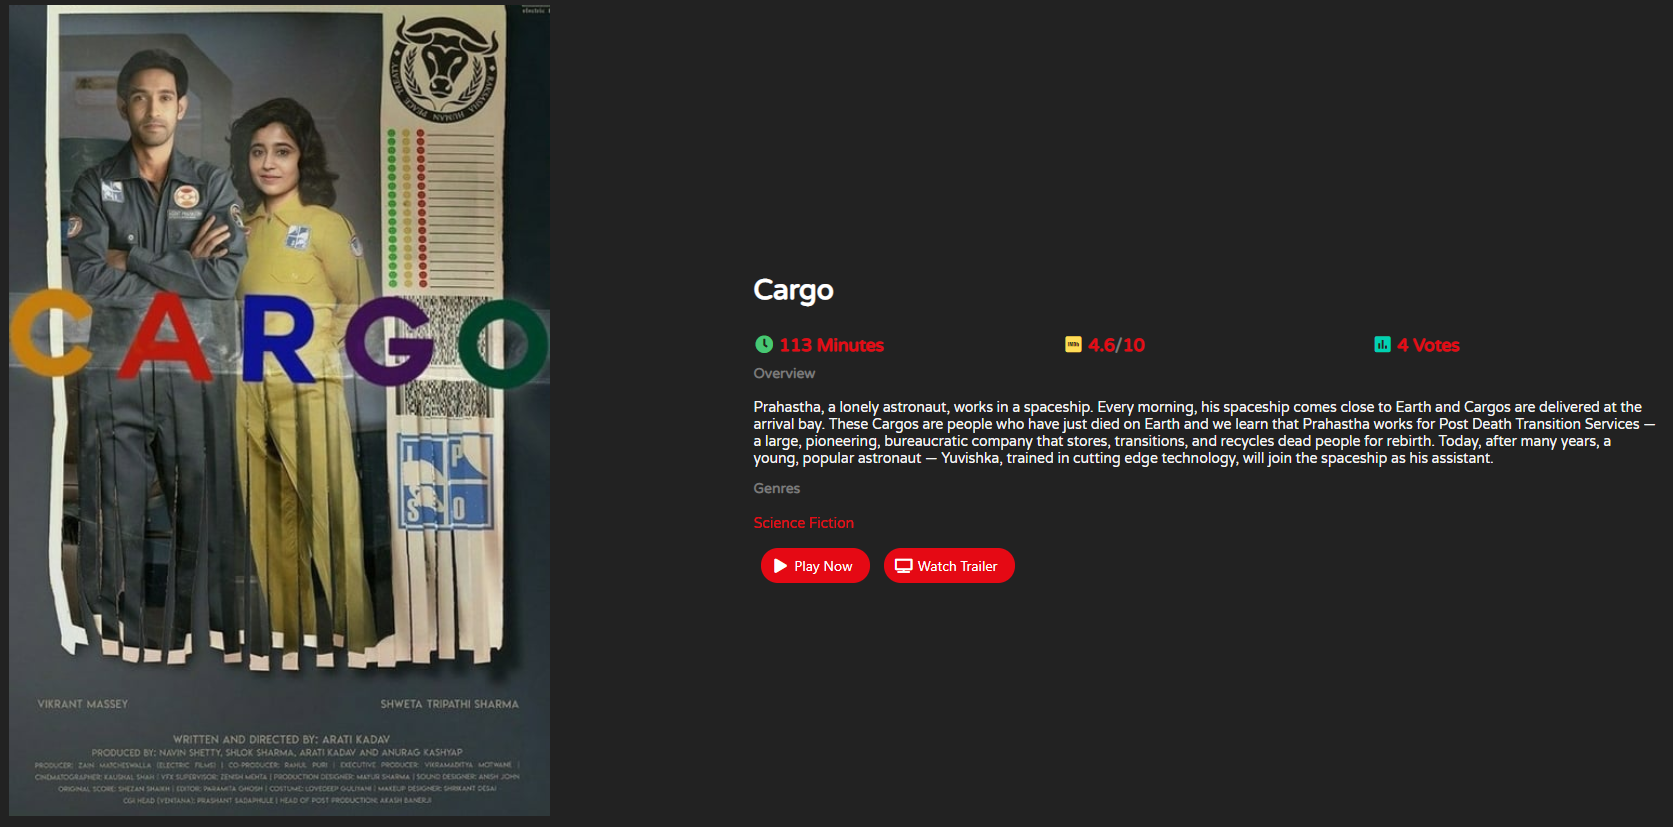
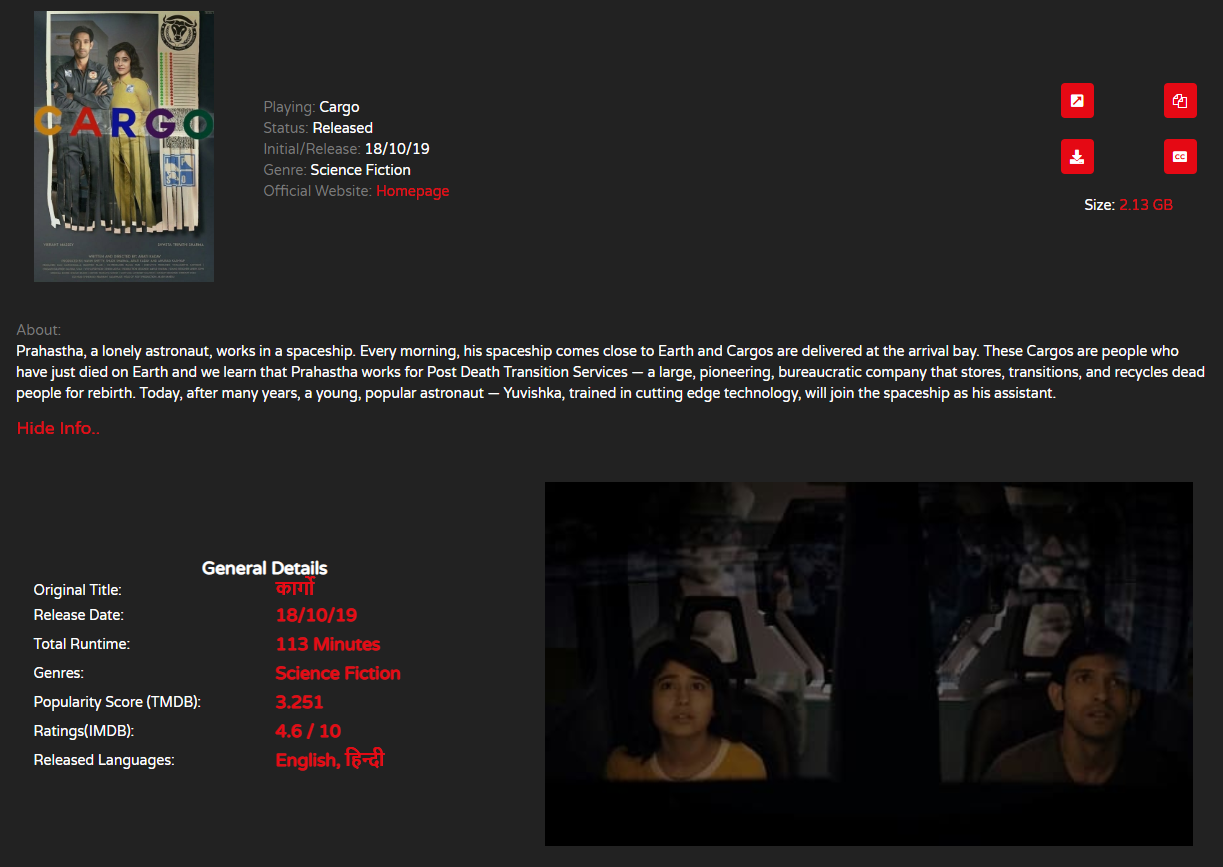
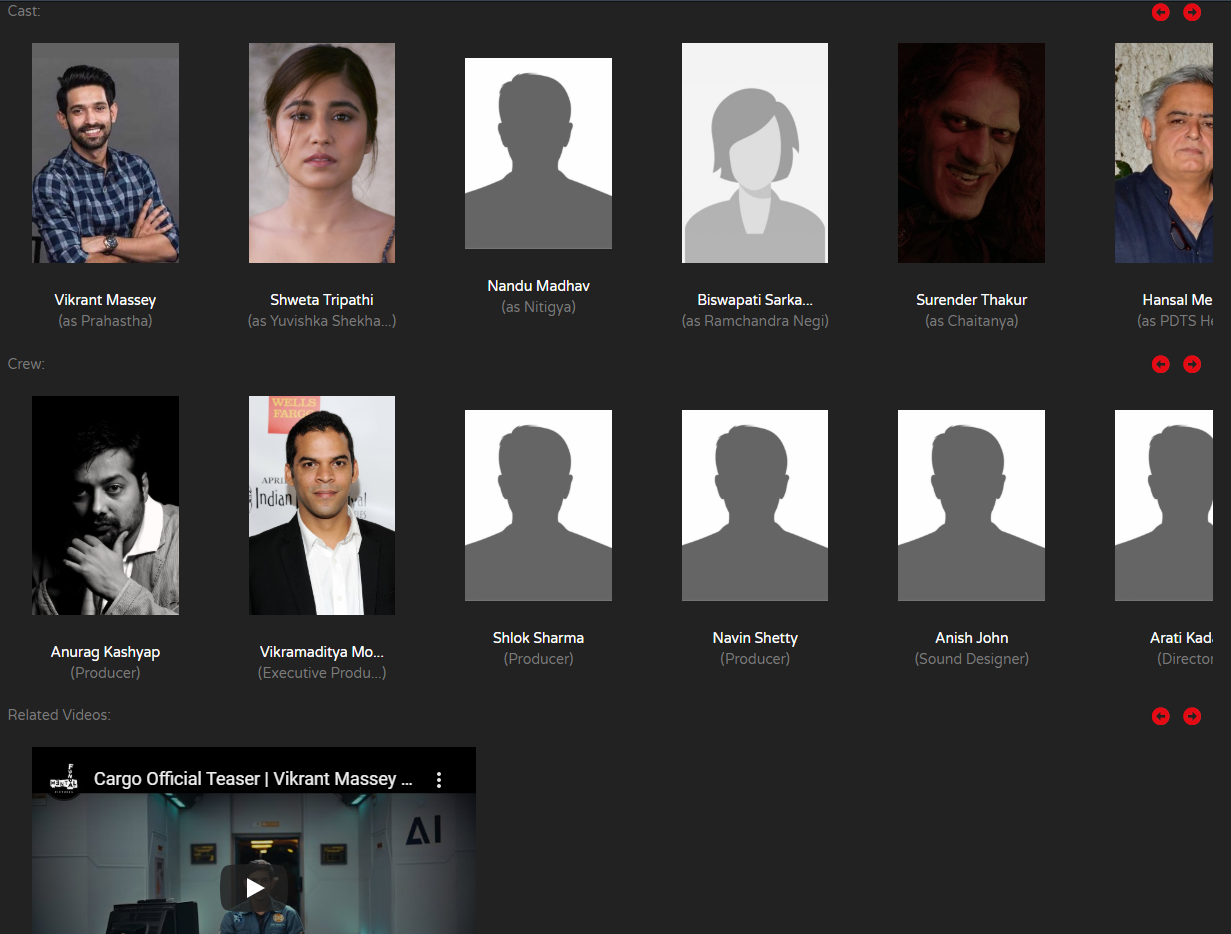
15. TMDBAPI:
This will be used to render Movies/TV Series posters and information which will look like this:
How to get TMDB api?
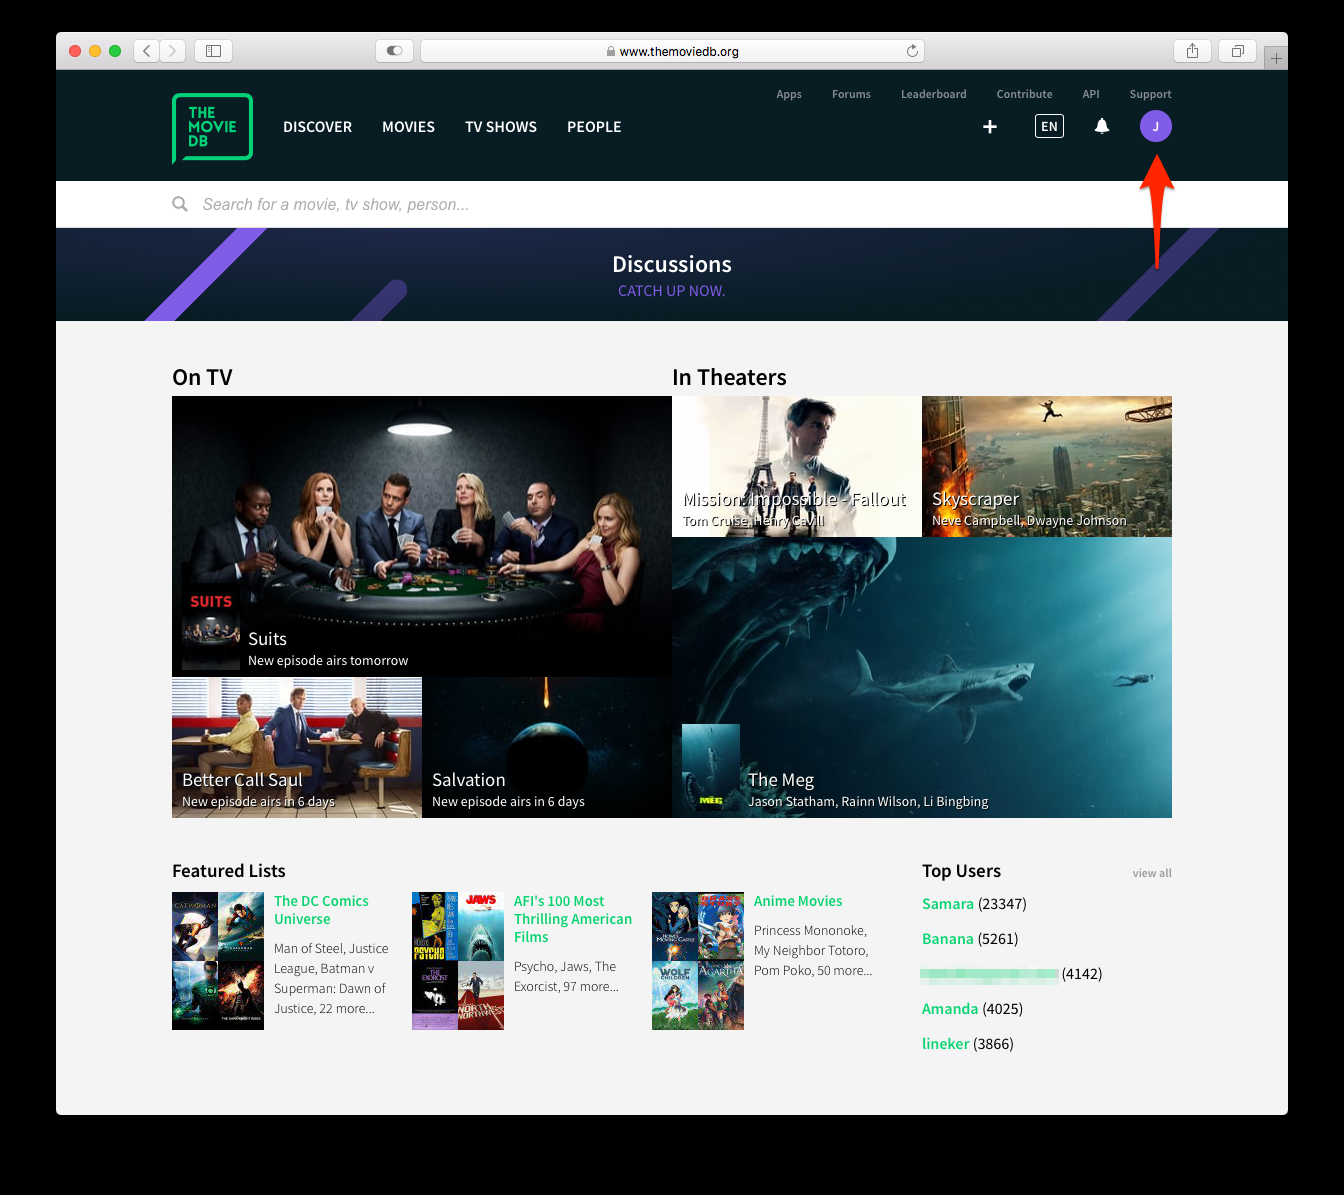
- Make account on TMDB - https://www.themoviedb.org/signup
- Click on your avatar or initials in the main navigation:
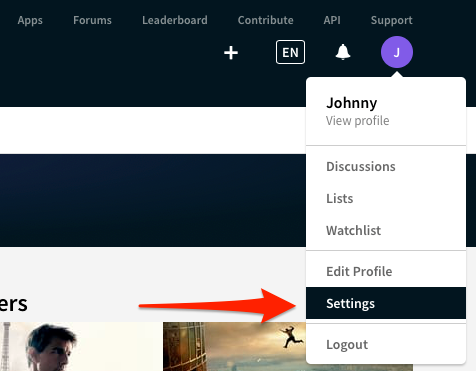
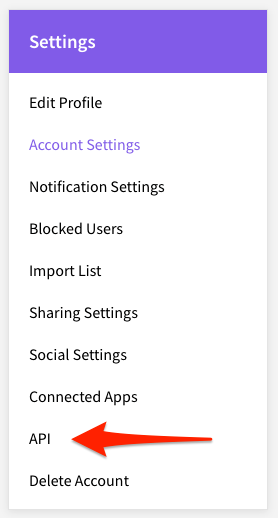
3. Click the "Settings" link :
4. Click the "API" link in the left sidebar :
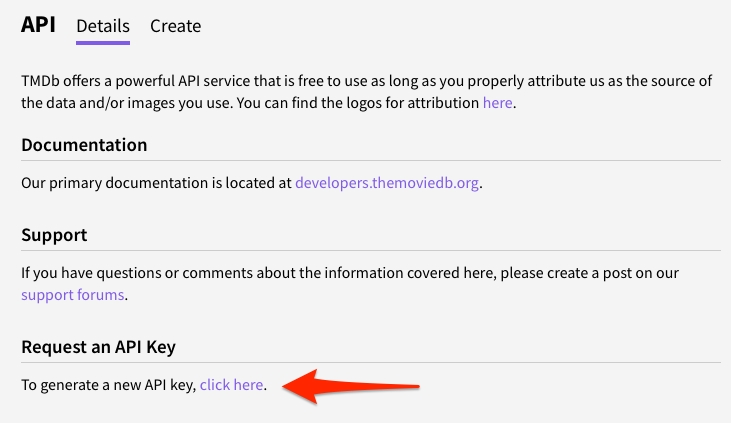
5. Click "Create" or "click here" on the API page
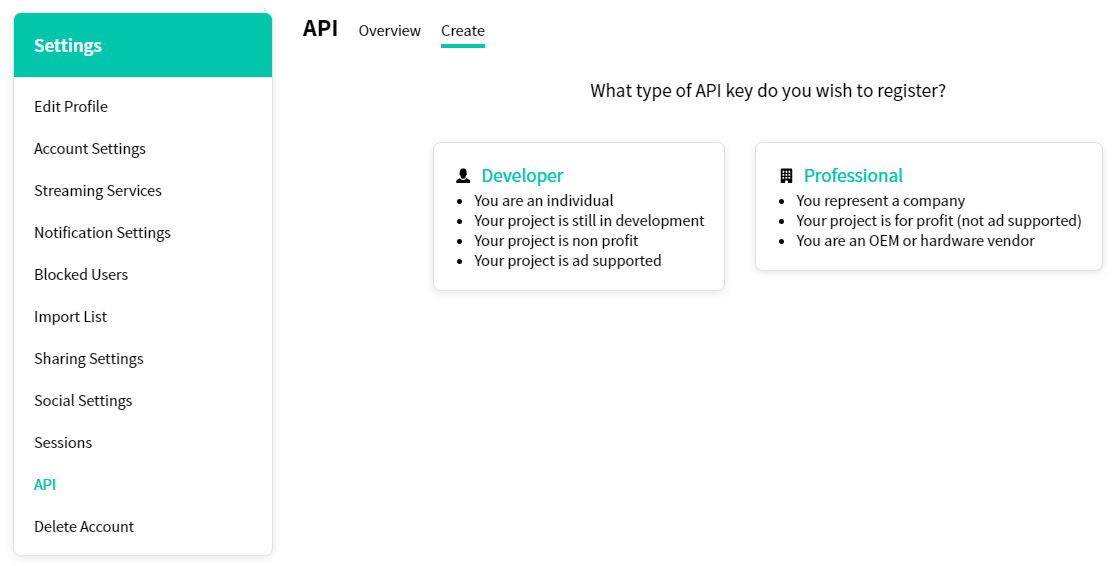
6. Select Developer
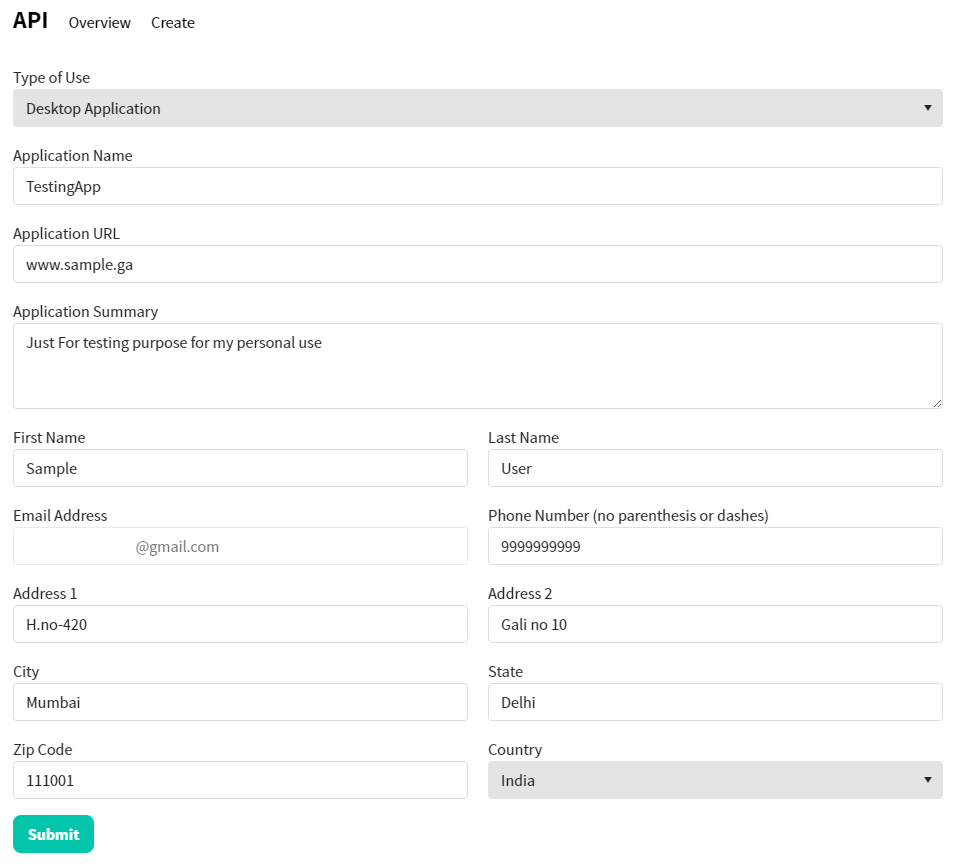
7. Accept :

8. Fill out details like this:
9. Copy API key (v3 auth)
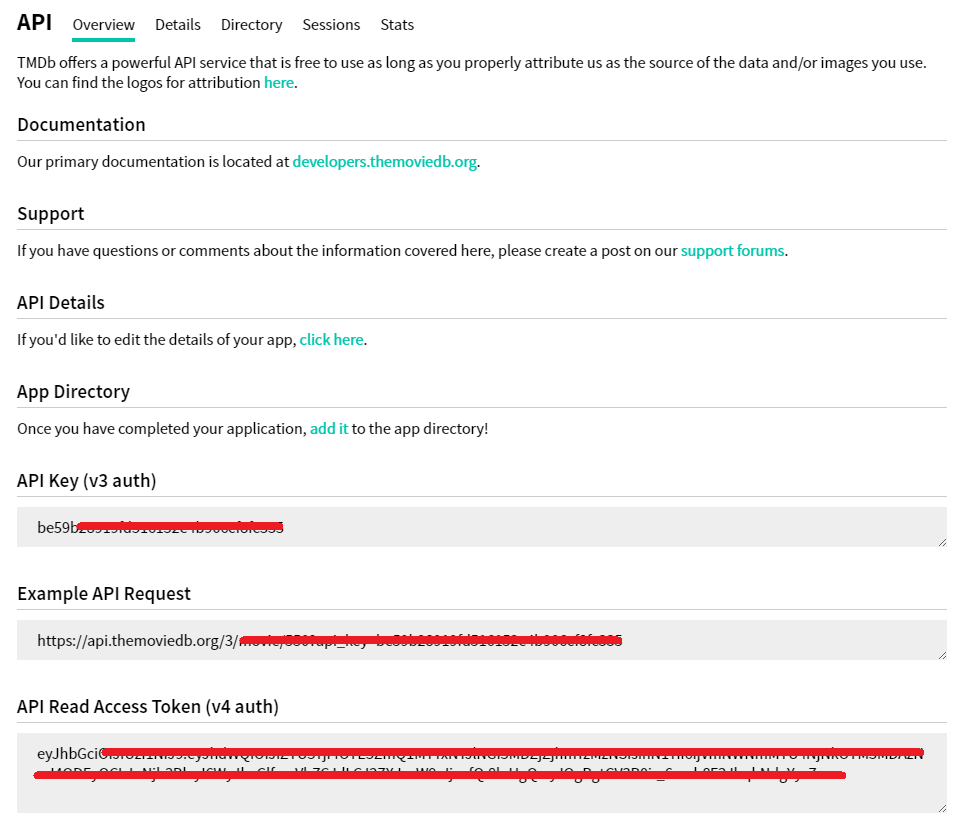
now enter TMDBAPI and done :)
16. MAXSESSIONS
This is used to restrict usage of account on desired number of login on different devices/browsers.
For example: if you enter 2 maxsessions then you can login in 2 devices/browsers at one time and if you login in 3rd device then 1st one will get logged out
PS: Enter numeric value only!
Everything is set! If you are facing any problem with these inputs make sure to google search for solutions!
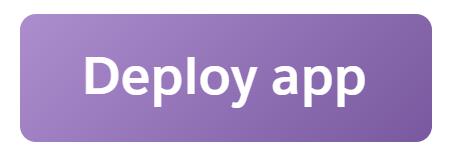
Now click on Deploy app!
Once app is deployed, visit your app backend on address as mentioned in step 11.
It will load like this:
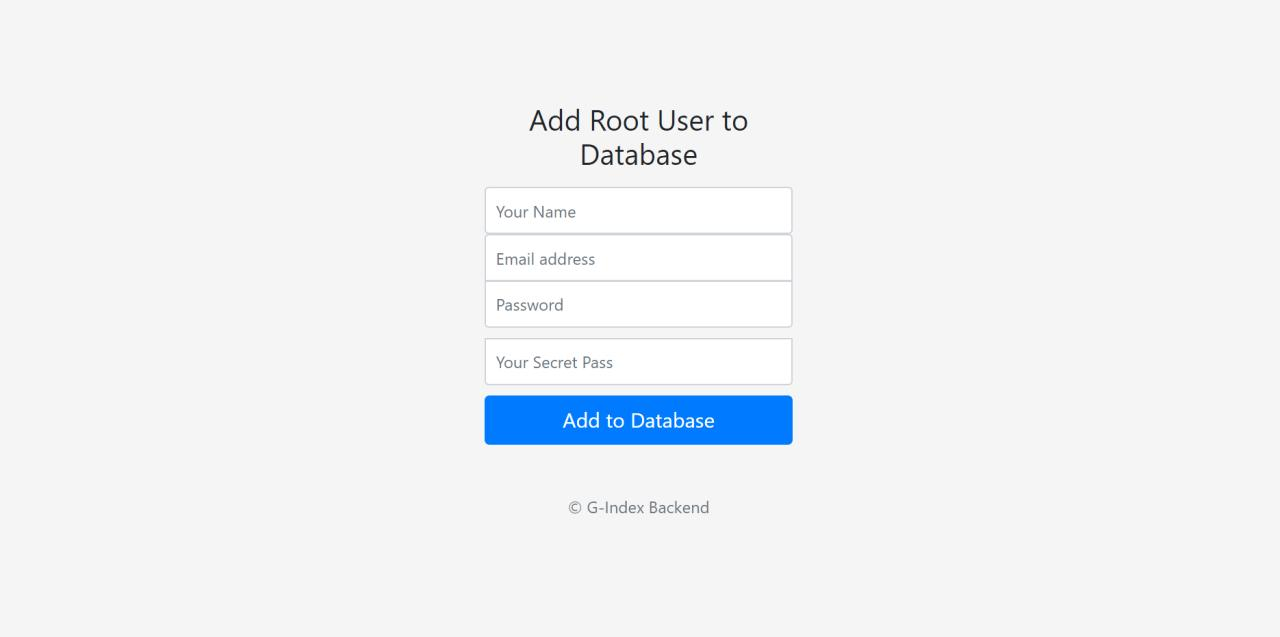
Here enter your name, email address, password and secret pass which we entered in step 12.
It will save a database as superadmin/rootuser
Backend is set now we can set frontend!
Hurray!
FRONTEND
Pre-requirements:
Copy this code and make following changes:
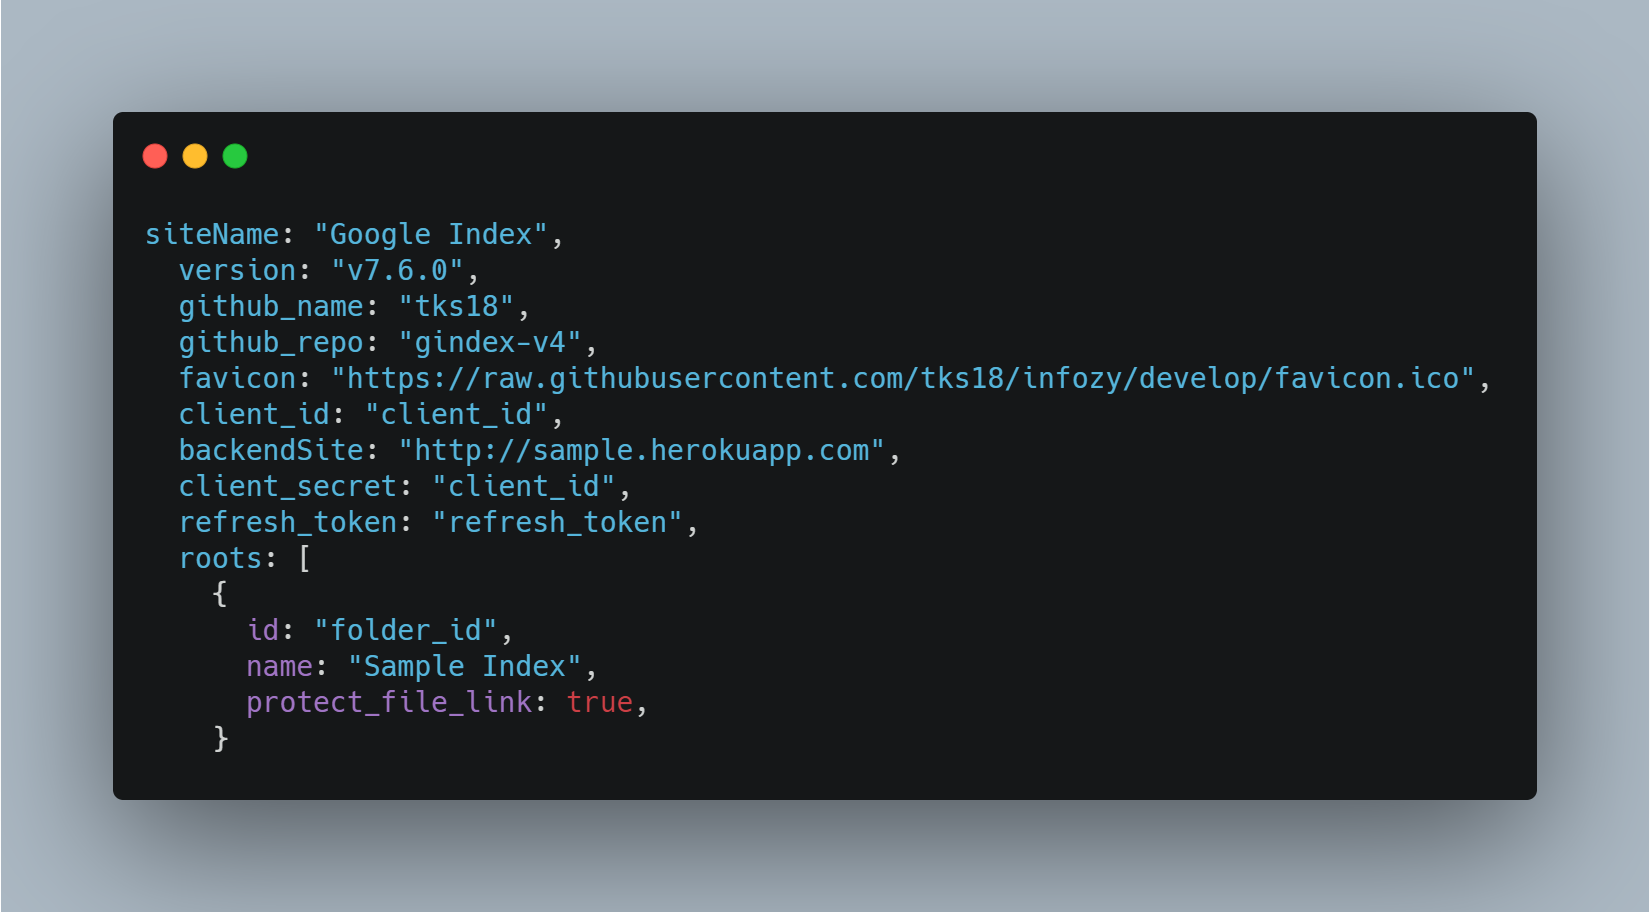
Here you can set you own favicon and set version to latest version.
Enter your client_id, client_secret and refresh_token as retrieved from following my previous guide.
In backendSite enter your heroku site as obtained in step 11.
PS: make sure you do not have / in heroku site and should look like this:
https://sample.herokuapp.com ✔️
https://sample.herokuapp.com/ ❌
You can use multiple roots, enter as per your requirement.
Other Theme options:
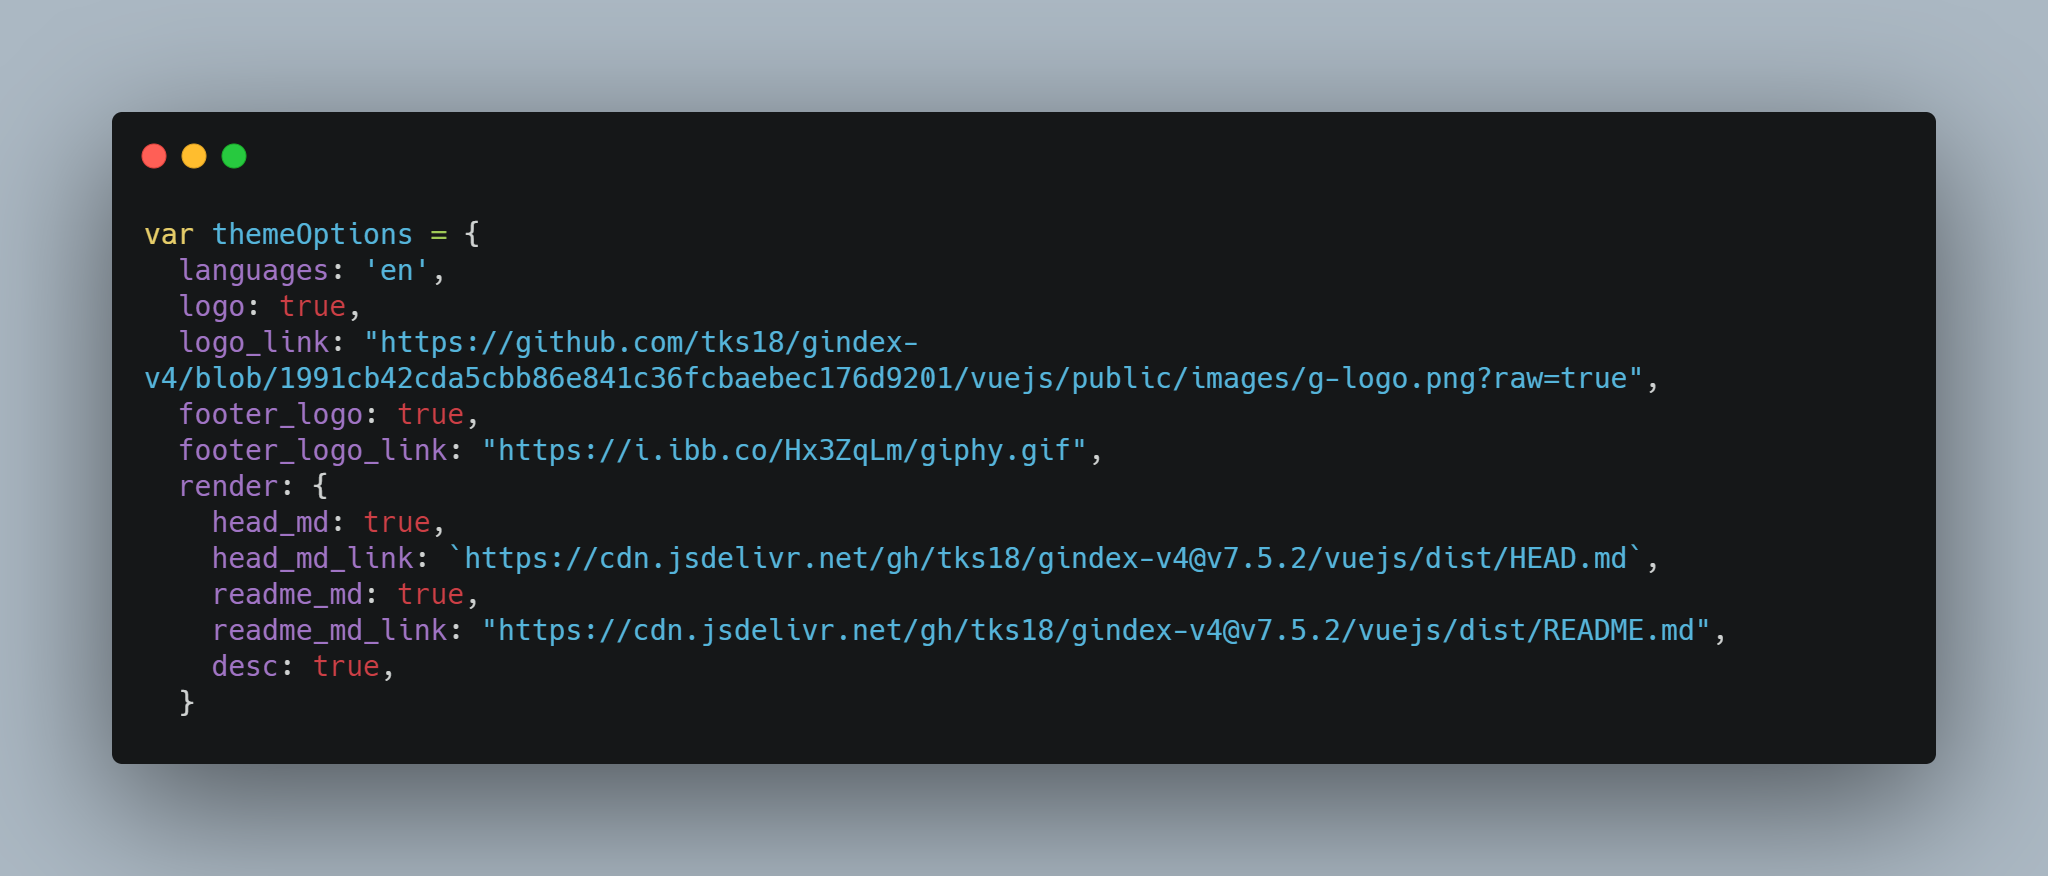
These are optional changes you can change according to your taste.
Gradient themes:
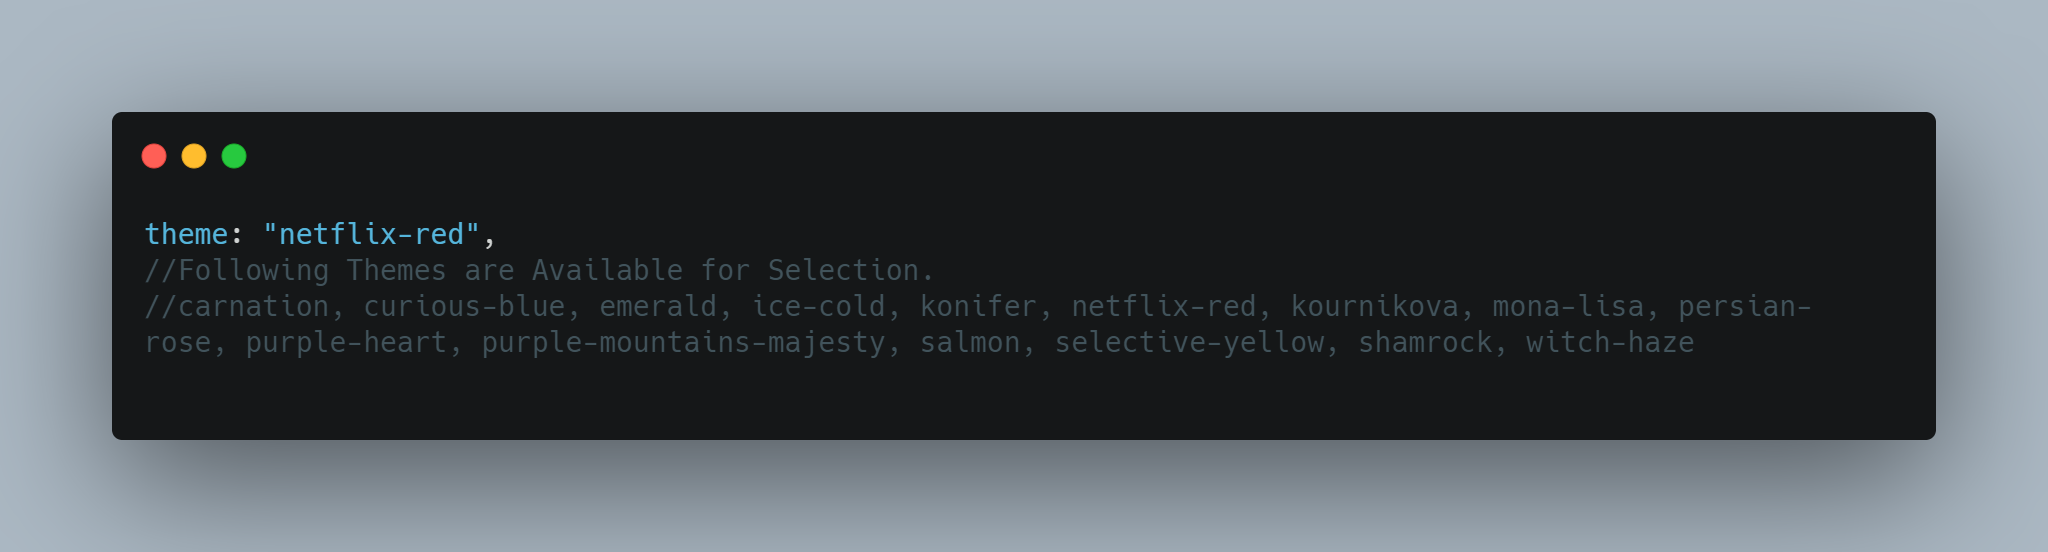
Following colors are complimentary for gradients, try and enjoy according to your taste!
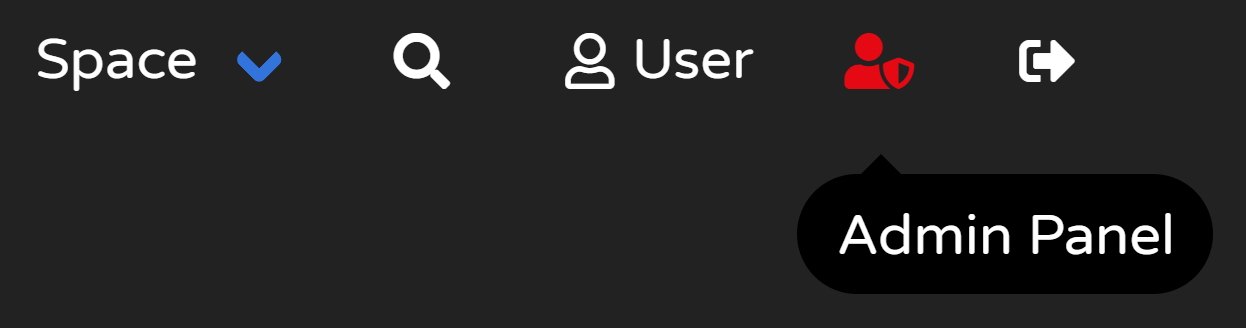
Changing QUICKLINKS, TRENDING, CATEGORIES and Hero Posters:
Go to admin panel:
Go to Manage Posteriors:

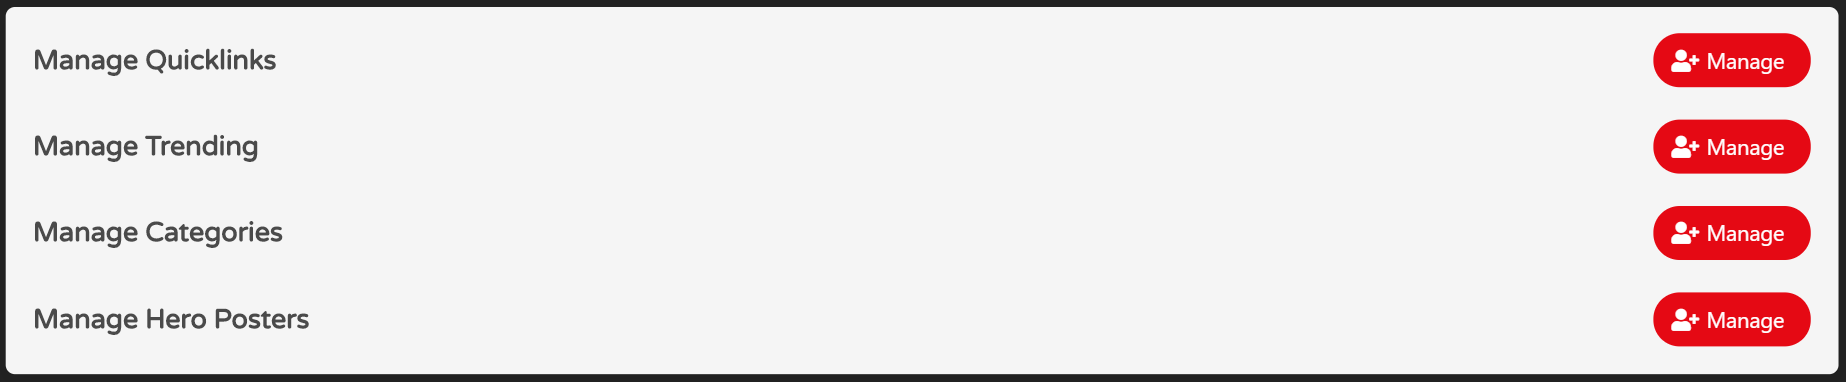
Here you can set every one of them:
- Quick Links:

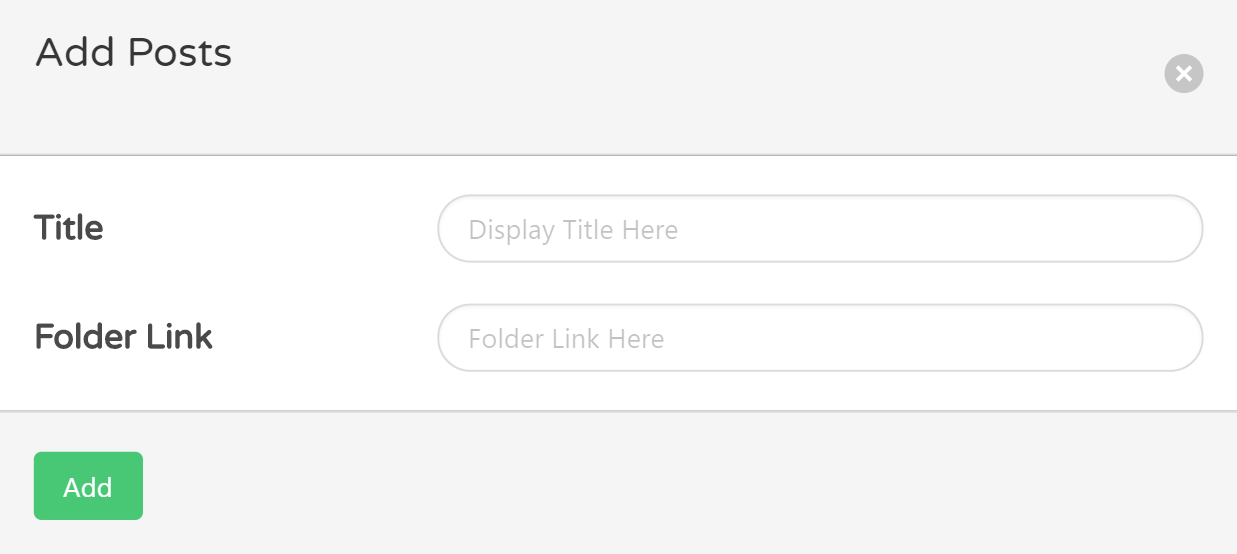
Here title as you want, and folder link will be location of folder in your drive, for example if movies folder is in media folder then it will be media/movies
2. Trending:
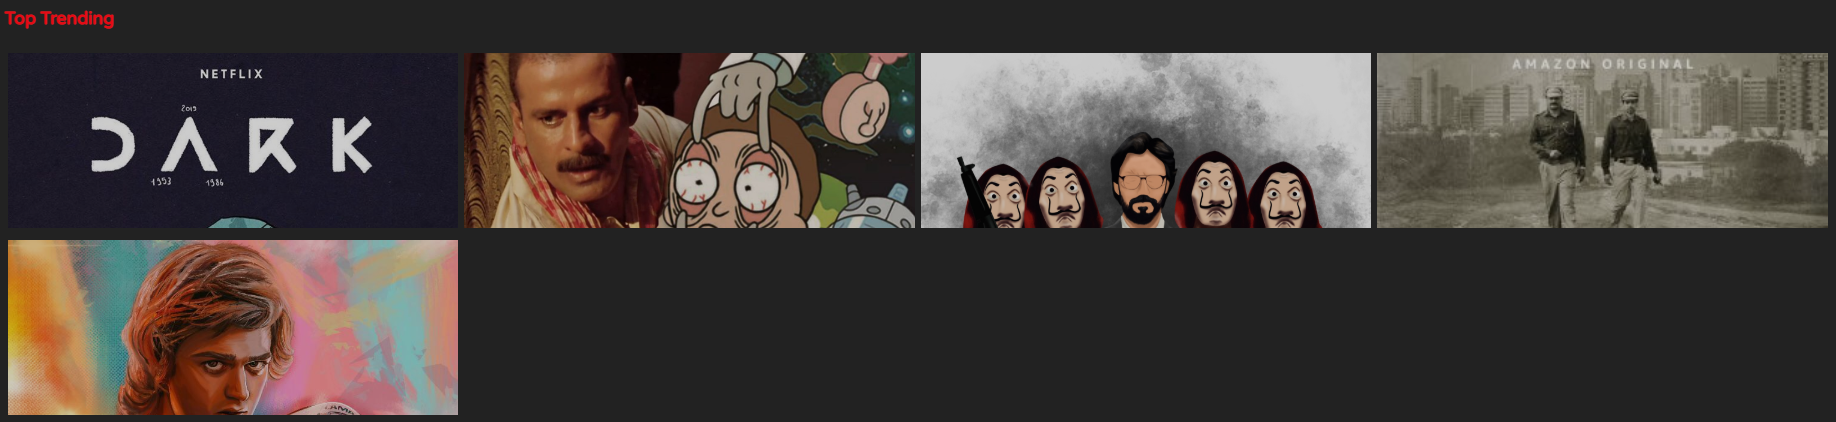
Here poster link is image link, title as you want and folder link same pattern as quick links
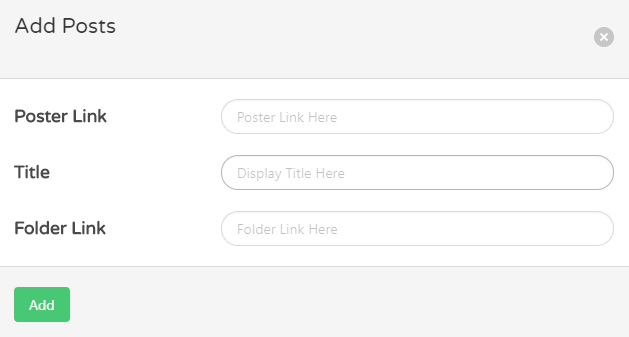
3. Categories:

Poster link, title, folder link same as quick links
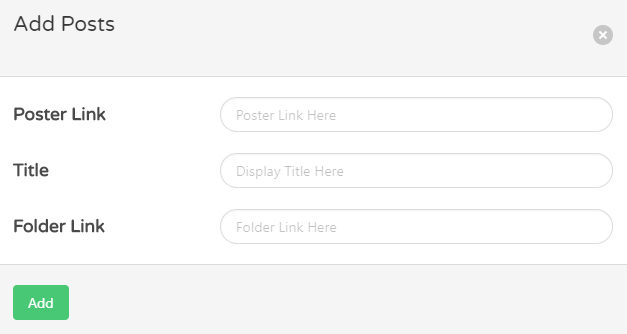
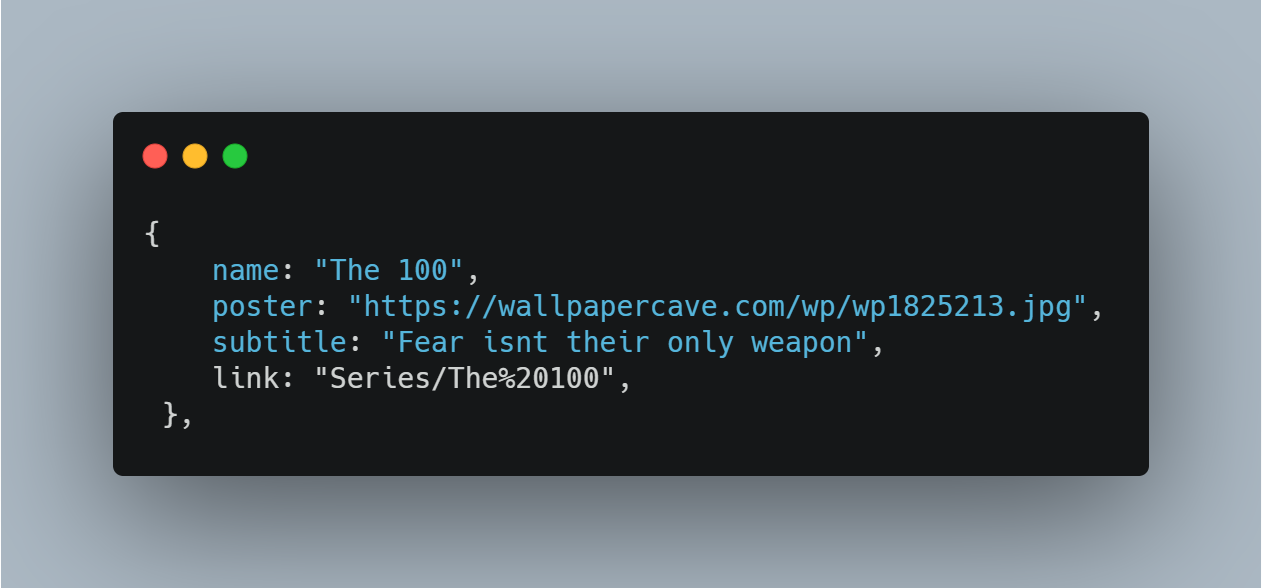
4. Hero Posters:
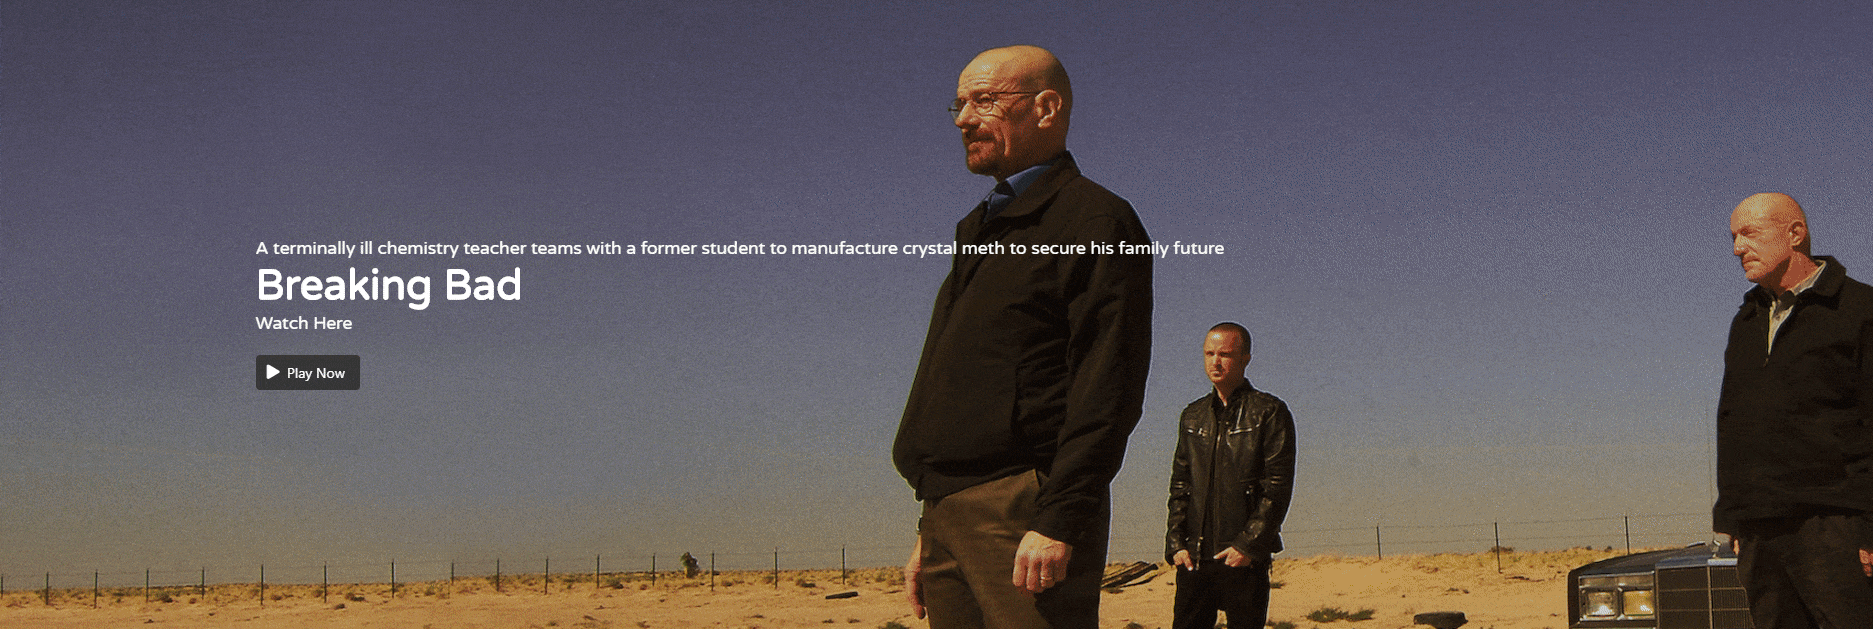
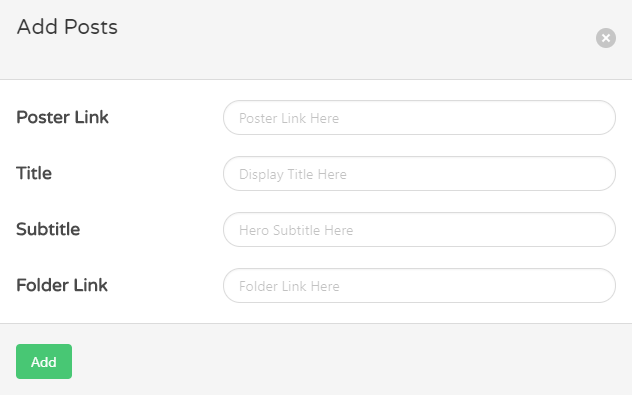
Poster link, title and folder link is same as quick links; Subtitle is description of movie/tv series
PS: DO NOT USE SPECIAL CHARACTERS IN SUBTITLE example: ;'.]\]-=)(*
It is advised to use your own client id, and client secret.
Get client_id and client_secret
NOTICE: Some education mailboxes may not be able to open the API. This is because the administrator does not have open permissions. You can use your own account to create the API.
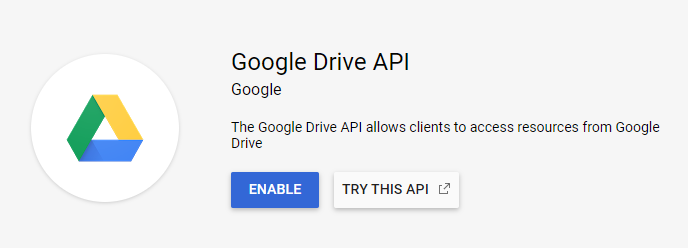
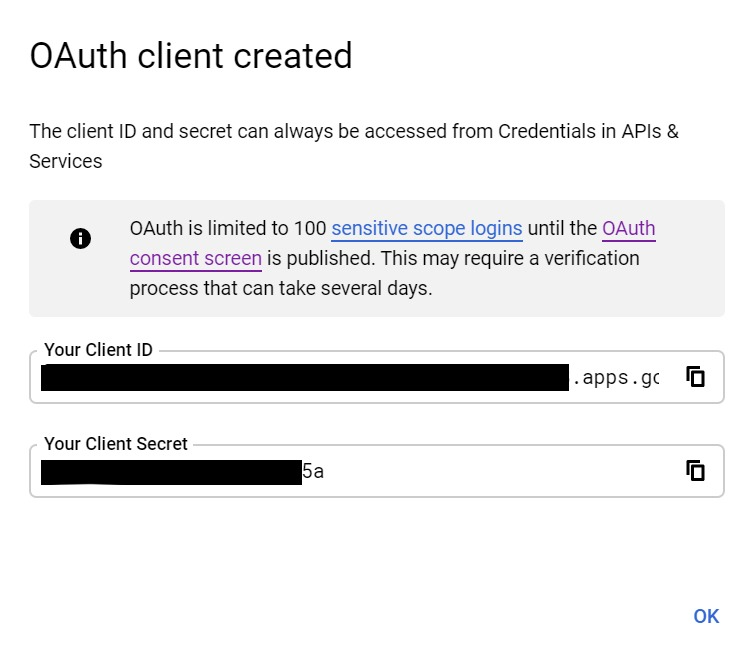
- Create an OAuth client ID . The first creation will allow you to configure the consent screen, fill in the application name and save it directly.
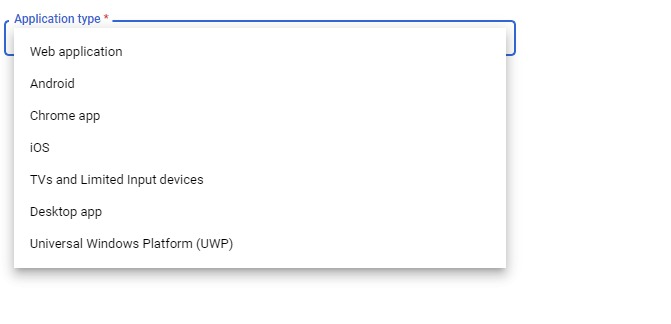
Select Desktop app (It may change when you visit here, please hit and try!)
- Then you can see the client ID (client_id) and client secret (client_secret), copy and save it.
Get refresh_token
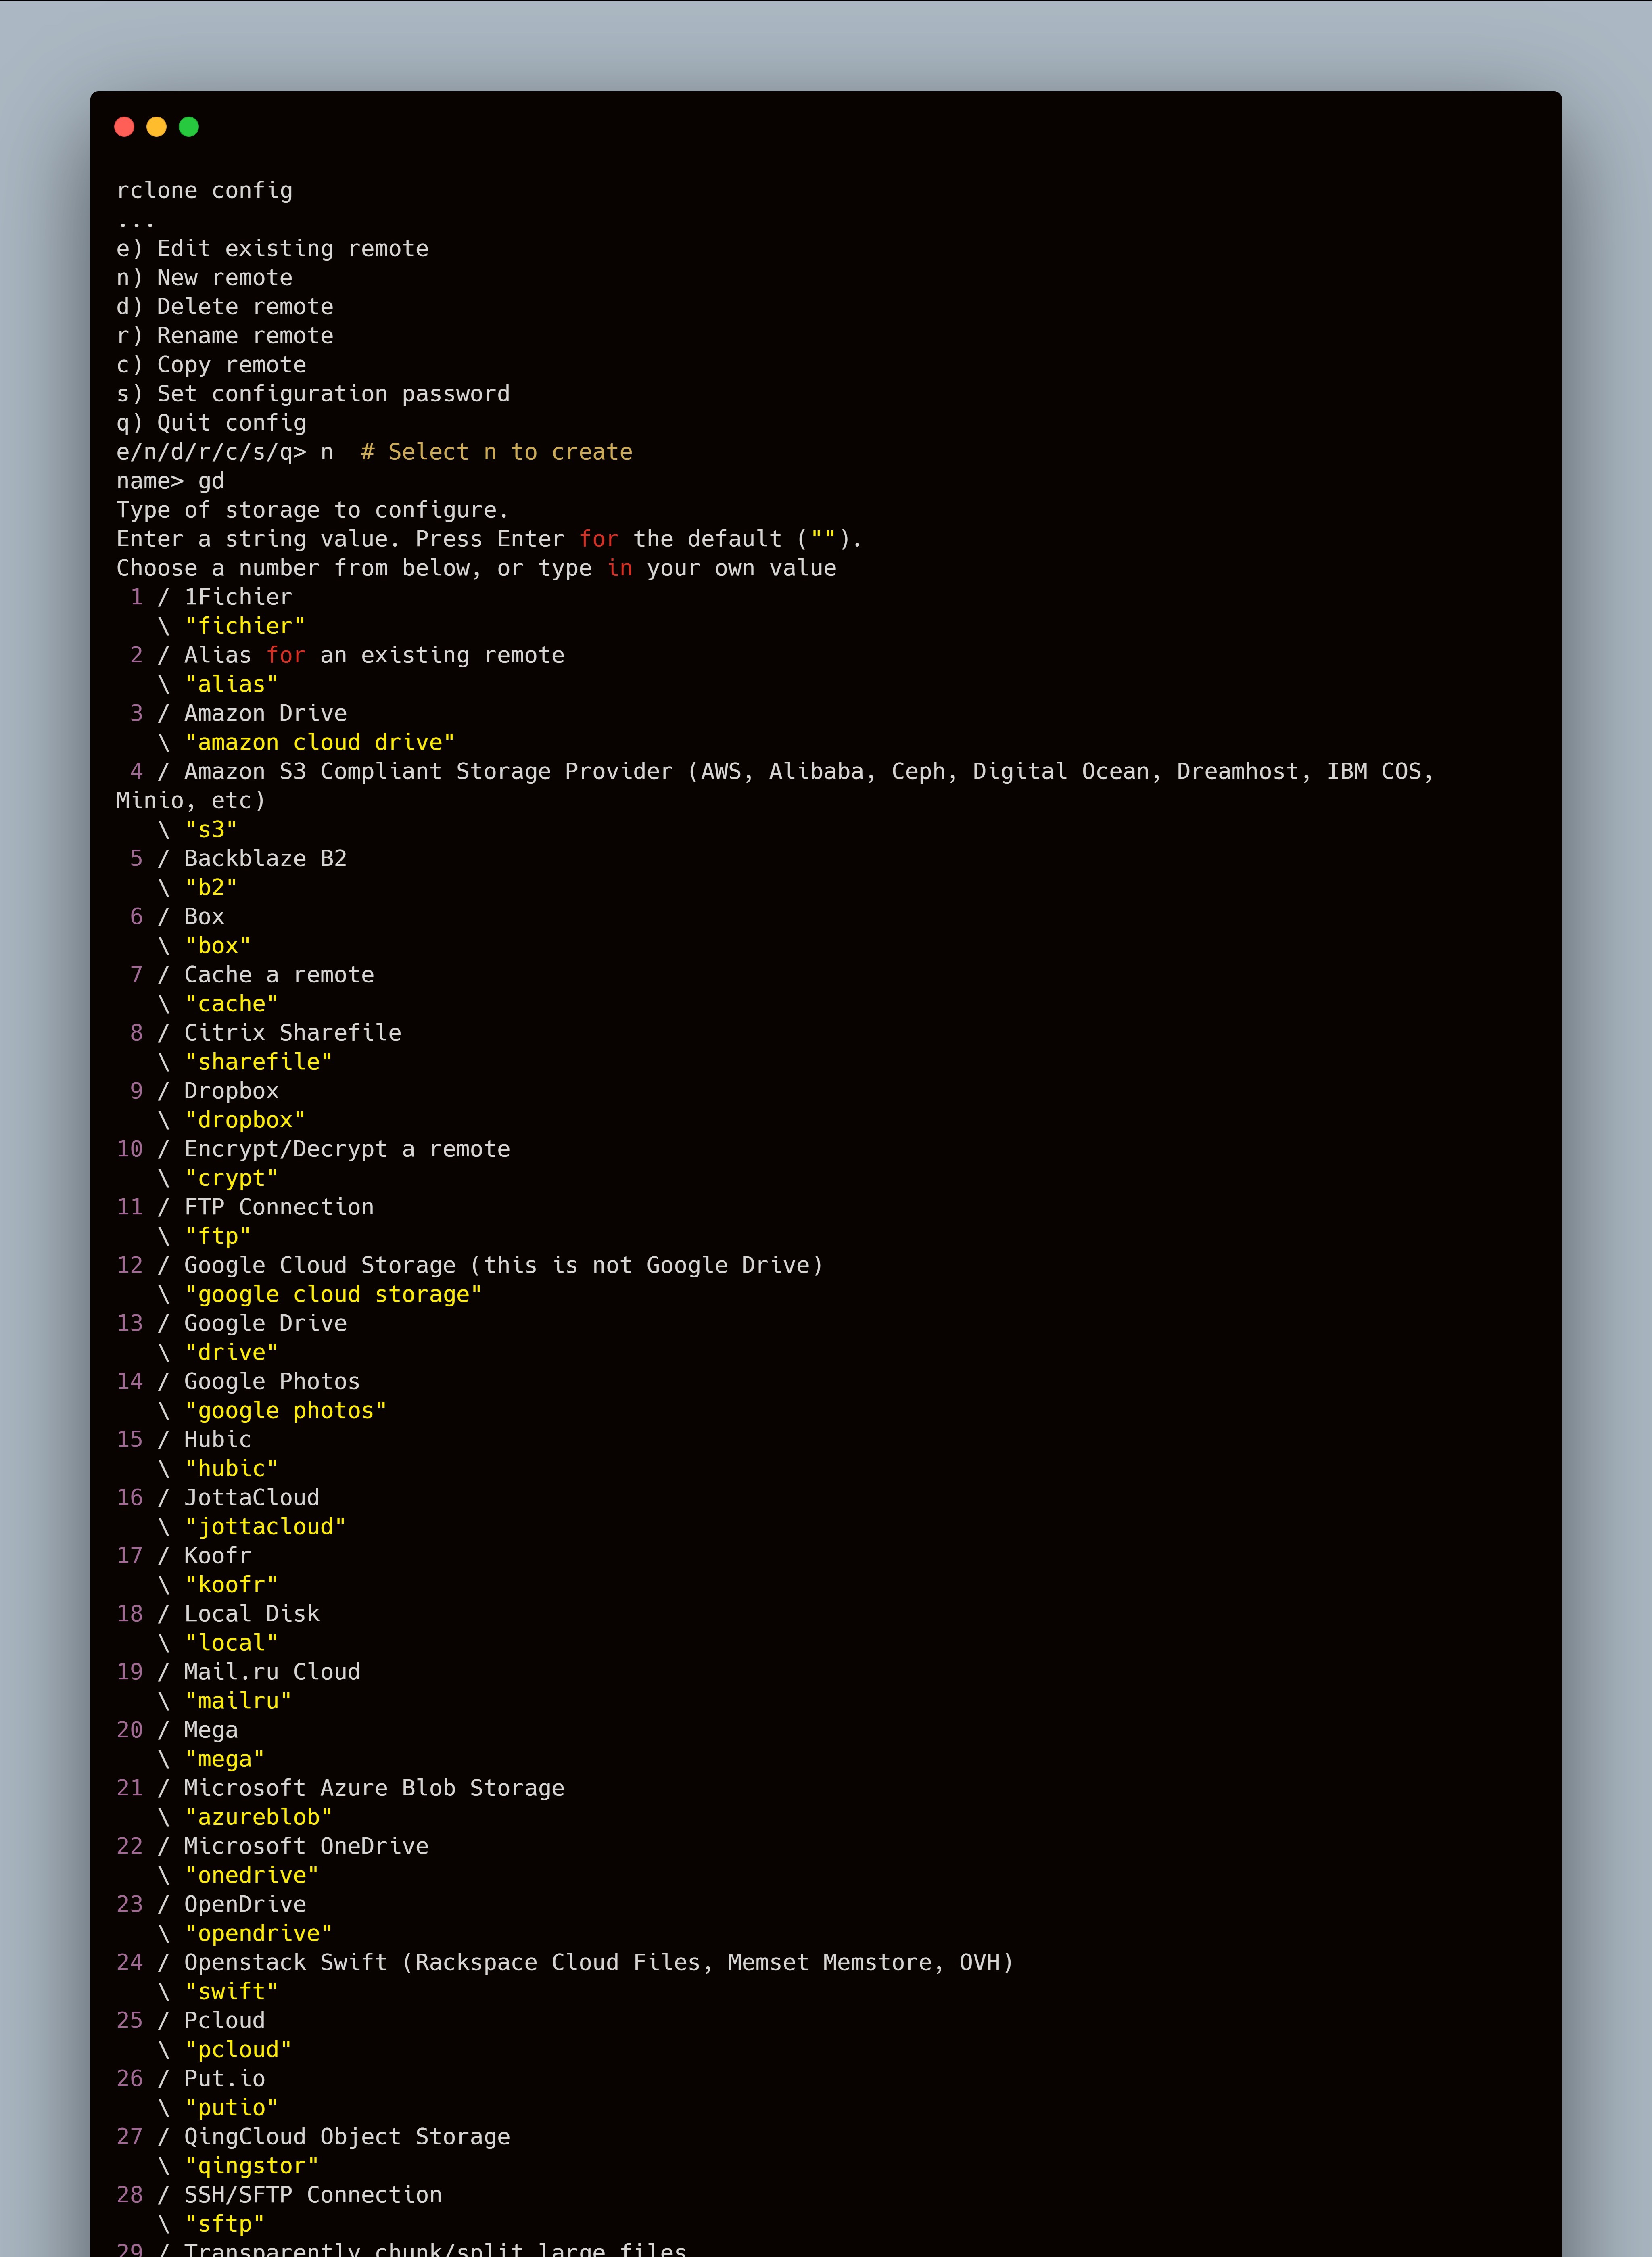
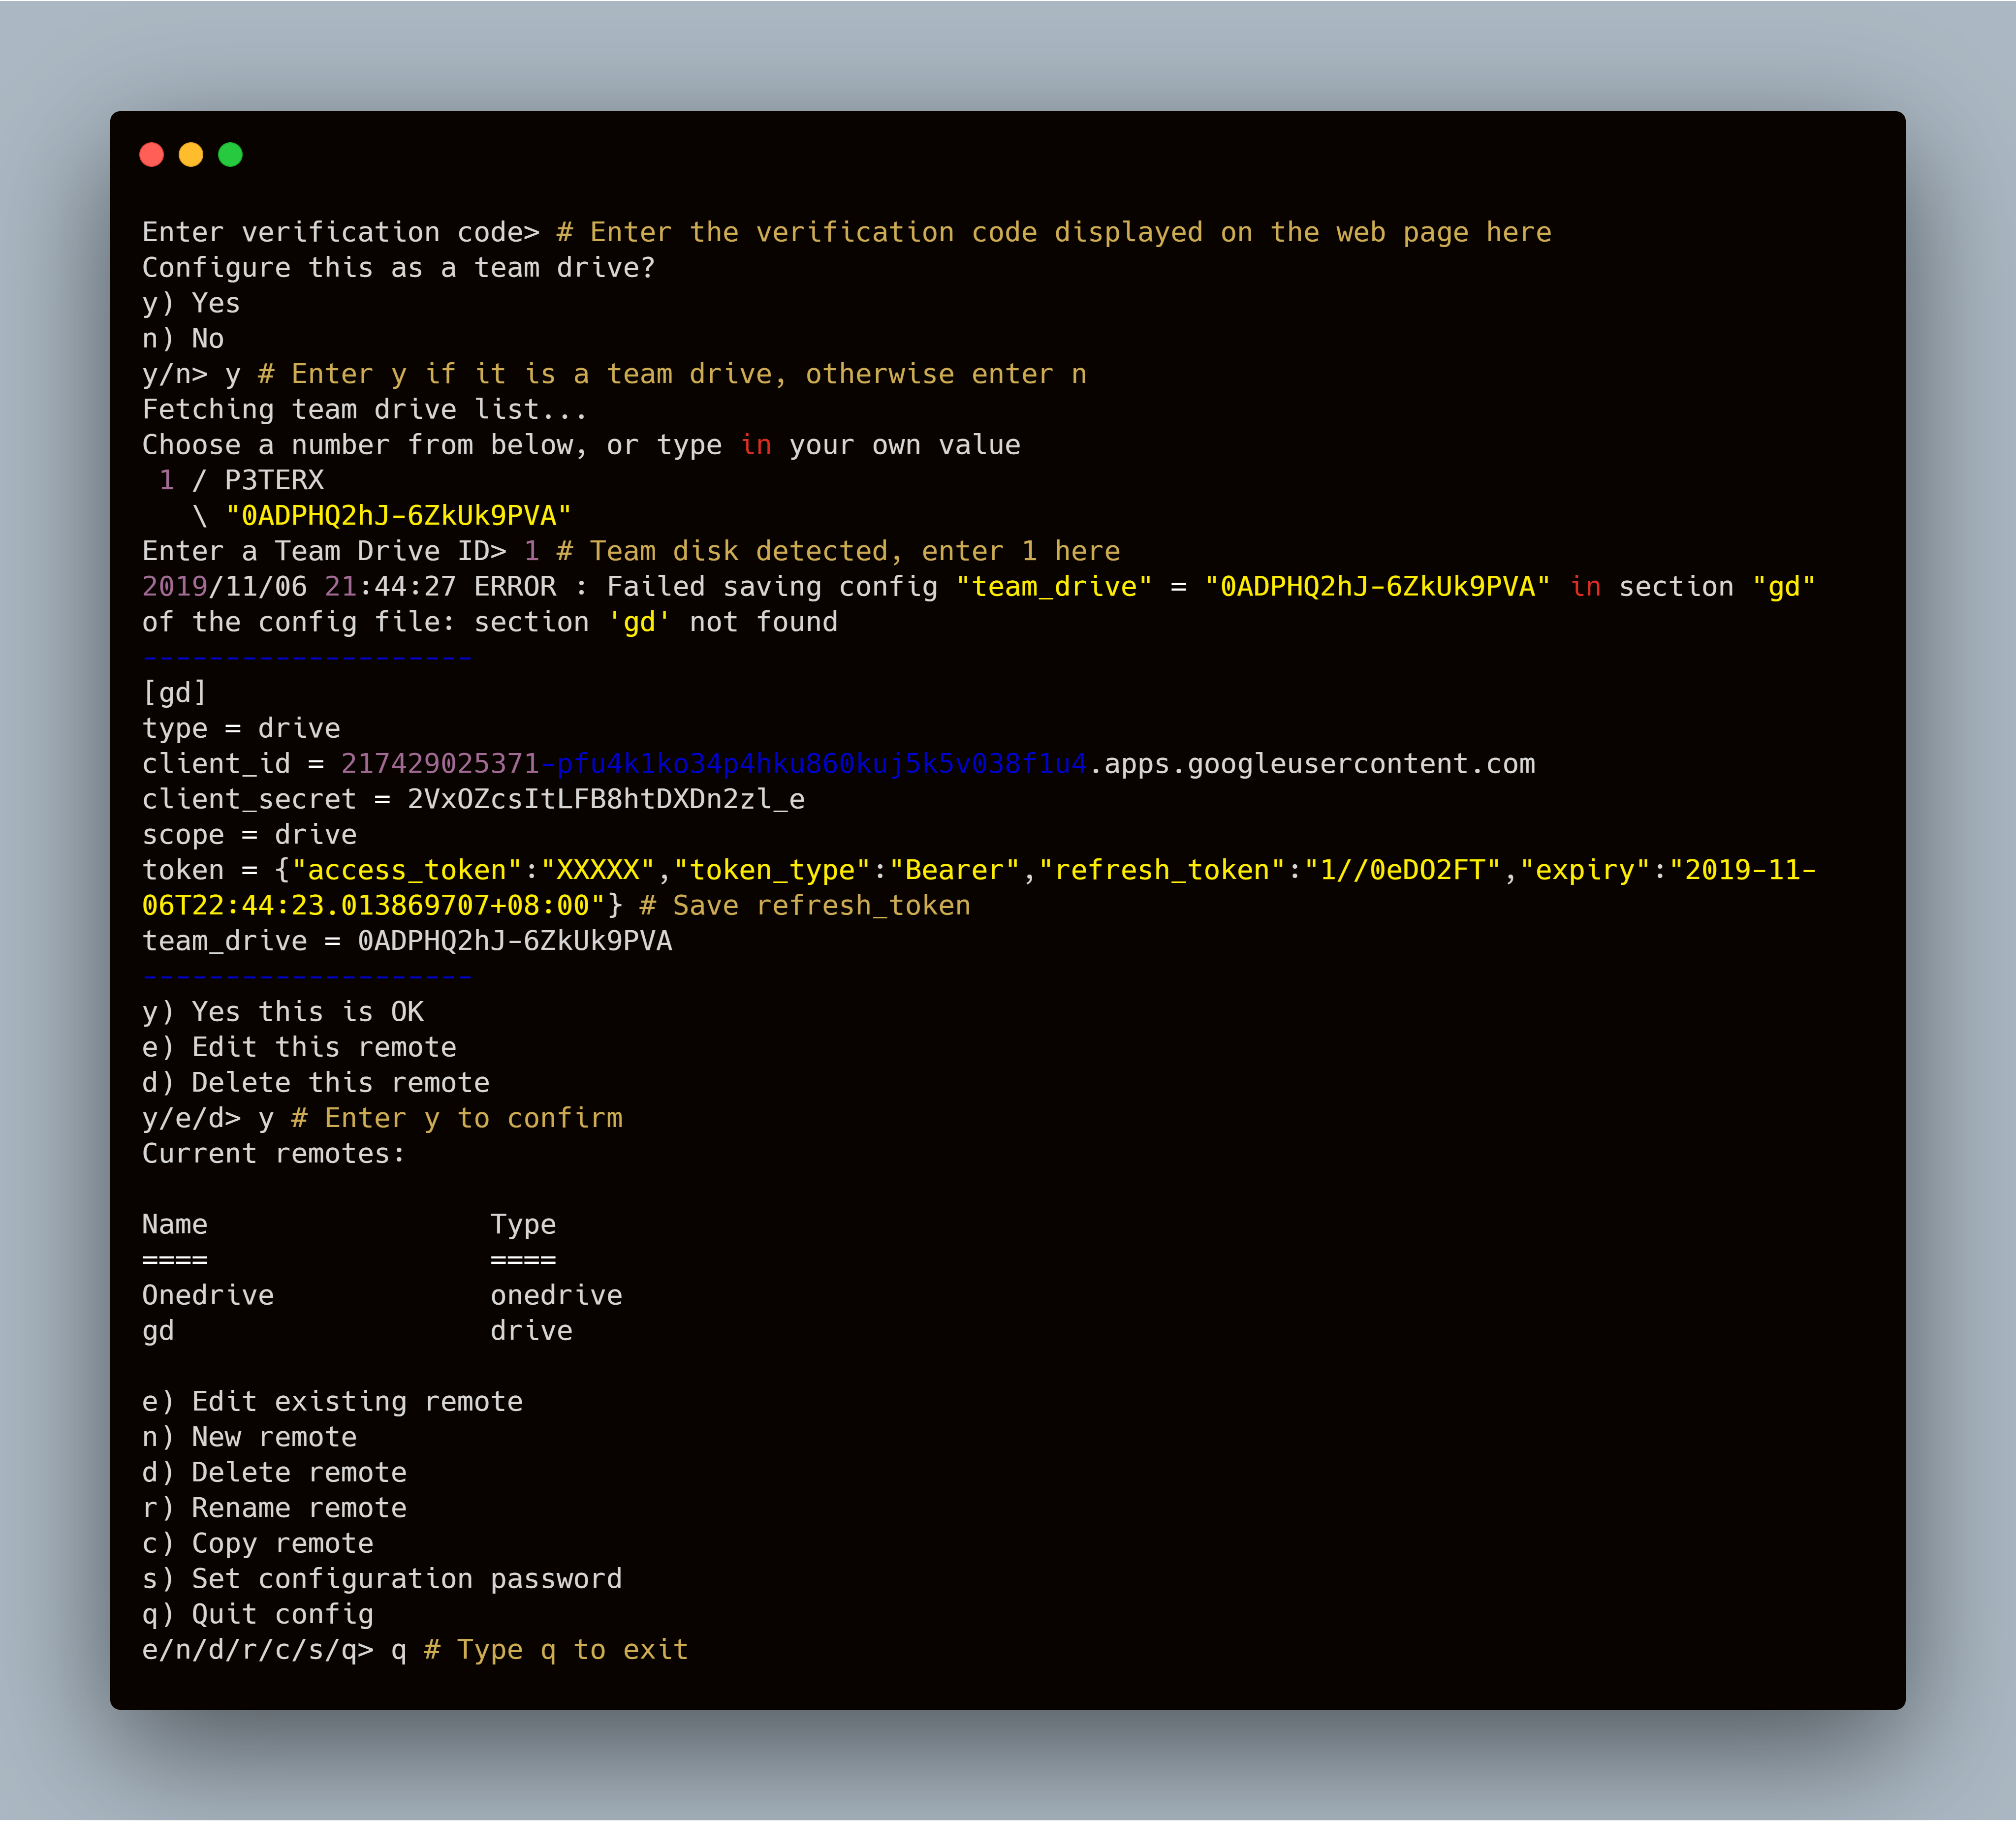
- Install Rclone
- Enter the
rclone configcommand, the following message will appear, please follow as shown.
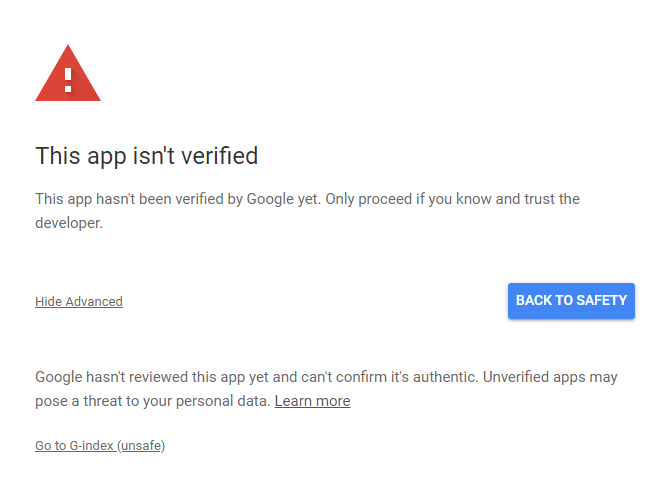
In the browser, you may encounter the prompt in the figure below, this is because the API was created by us and has not been verified by Google.
Get root directory ID (root)
The root directory here refers to the root directory displayed by G-Index, which can be any directory in your network disk. Open the network disk to locate a directory or shared directory, the code at the end of the URL in the address bar is the directory ID. If the personal network disk parameter is left blank, it is the root directory of the network disk.
Example: https://drive.google.com/drive/u/1/folders/###########XYZ
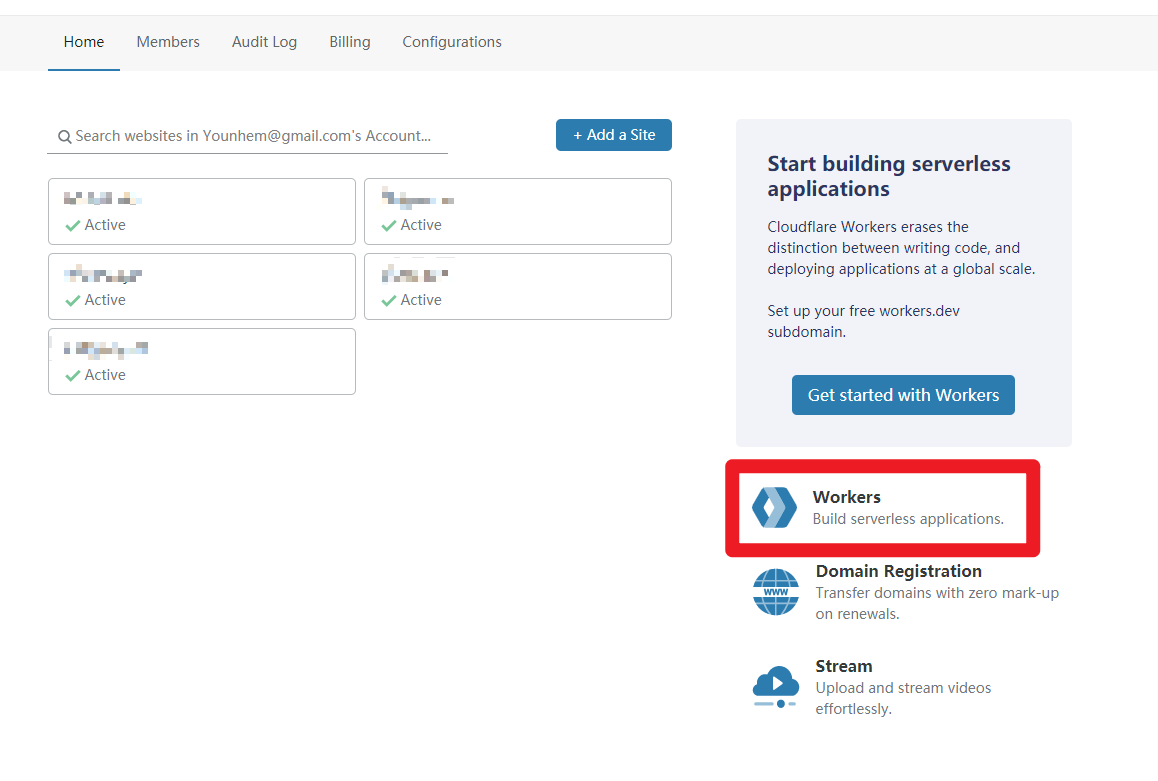
Create Workers
- Log in to Cloudflare and click Workers on the right.
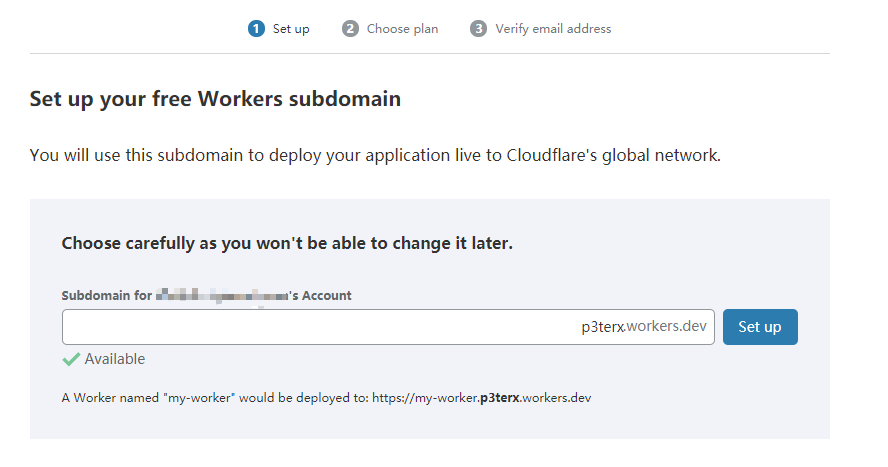
- Create a new Workers subdomain.
TIP: It cannot be changed in the future, so don't fill in randomly.
- Click to
Create a Workercreate a new worker
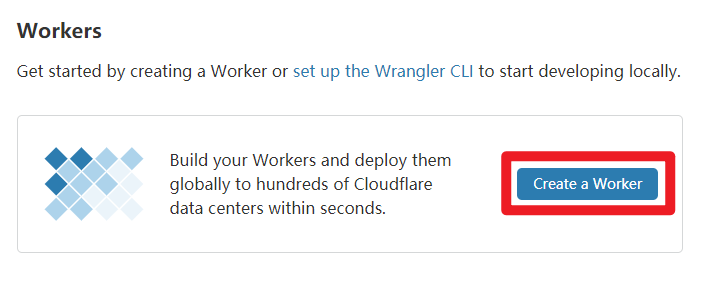
- Clear the content in the input box, paste the modified G-Index code, and then you can double-click the domain name to modify in the upper left corner, and then click
Save and Deploy.
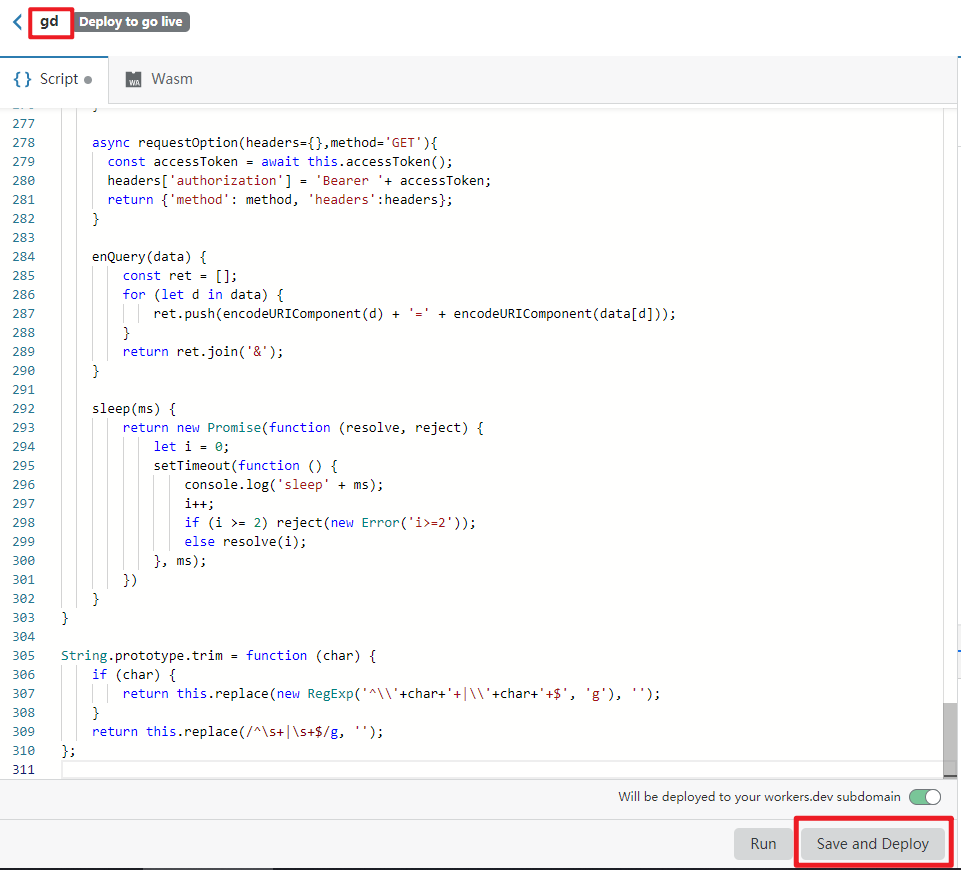
- The last
****.workers.devthing you get is your G-Index address, example https://g-d.rive.workers.dev
Custom domain name
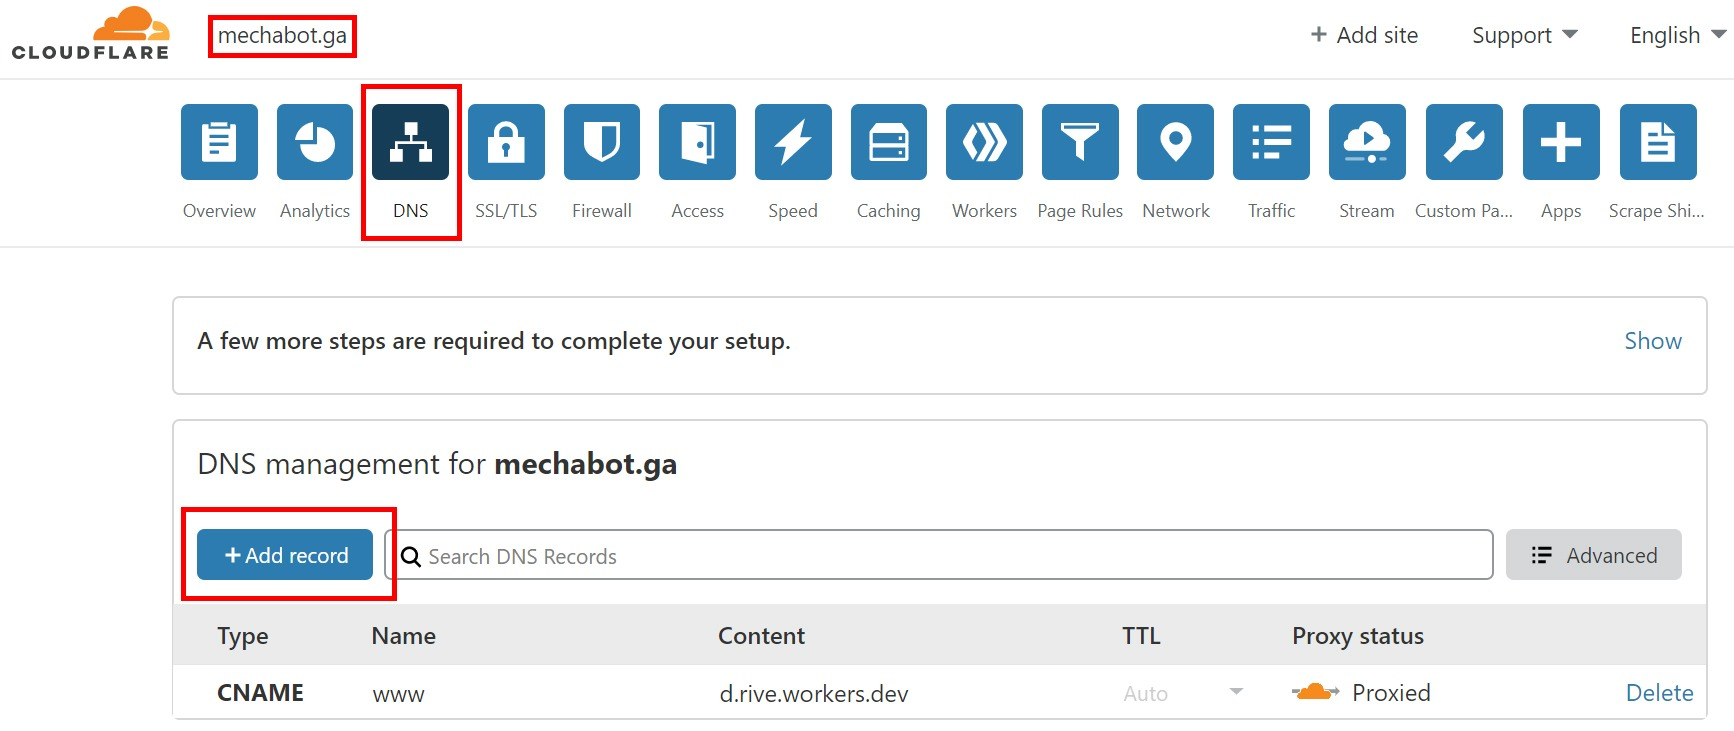
- Get a free .ga domain (http://www.my.ga/en/index.html?lang=en) by following on screeen instructions
- Add a CNAME record to the address previously obtained.
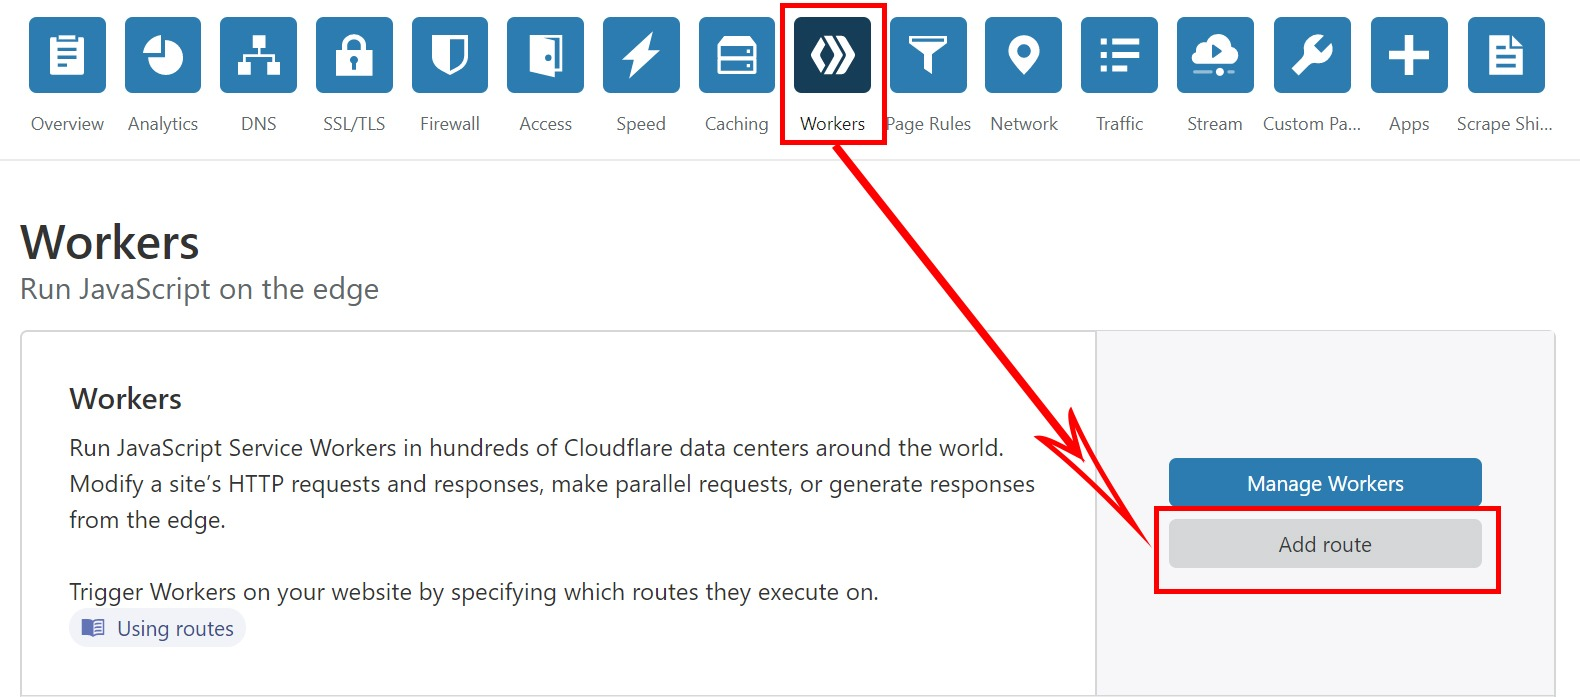
- Then go to Workers and click
ADD route
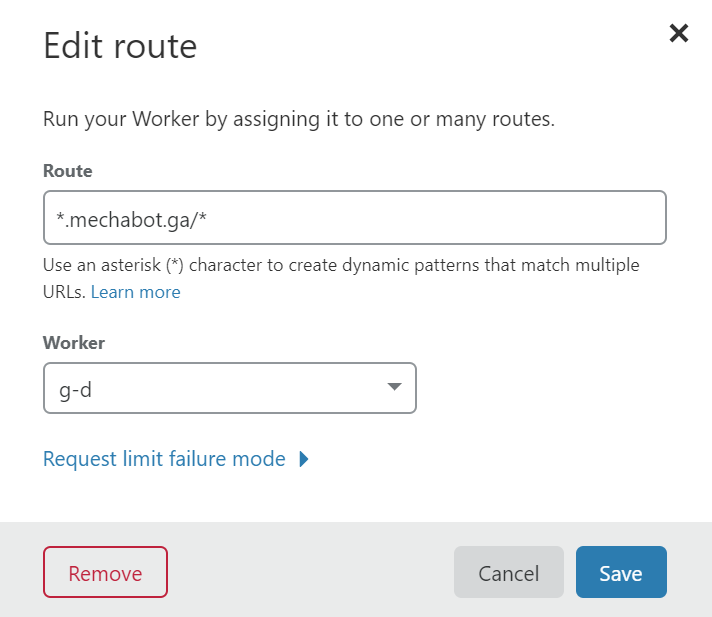
- Enter the custom domain name, you need to pay attention to add it later
/*, for example, example *.sample.ga/*, the following workers select the project created before.
- If you want http to automatically jump to https, you need to enable it
Always Use HTTPS:
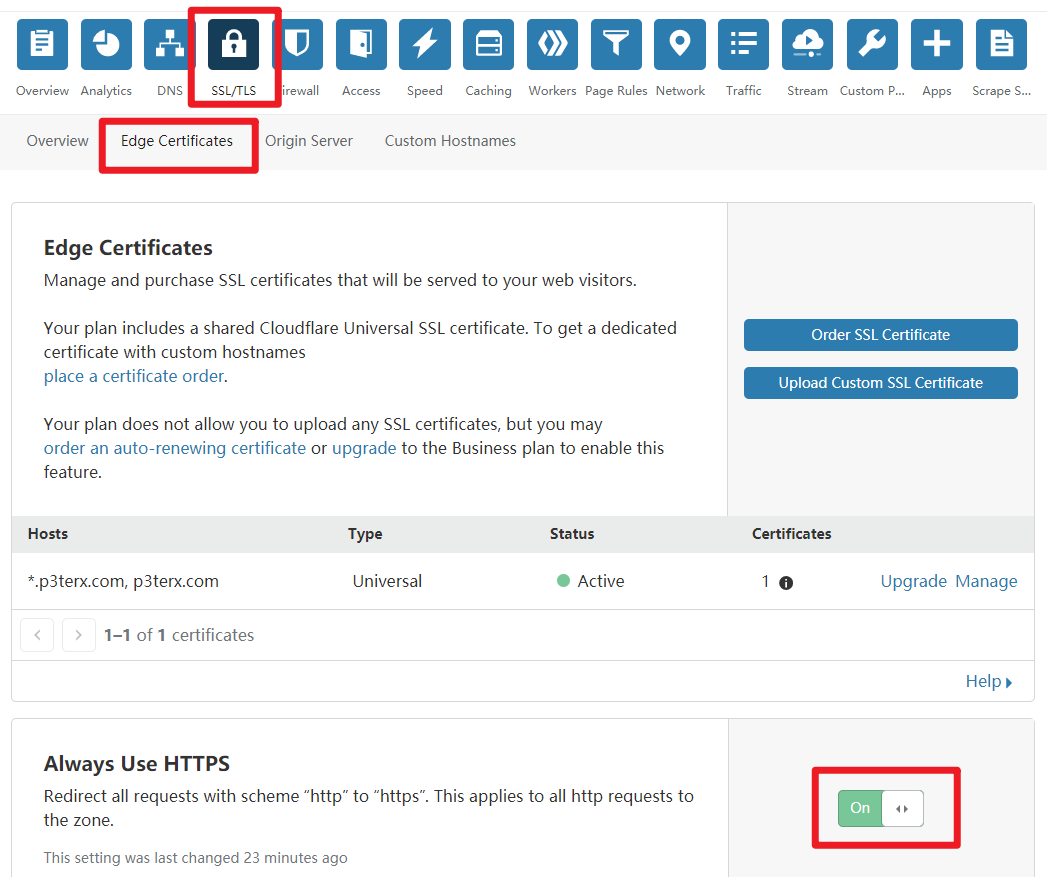
- Create a record in DNS MANAGEMENT for .ga domain

- Enjoy your Google Drive Index with custom domain!
PS: Please visit both backend and frontend repos to update to latest version to ensure smooth working!
Everything is done now!
Save and deploy!
How to update to latest versions?
Frontend:
Visit frontend repo and look for version number on right side:
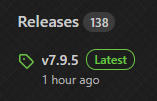
If there is change in worker code then please do full copy paste and change version manually to latest release version number.
It is recommended to copy-paste full code!
PS: Clear browser cache before logging in.
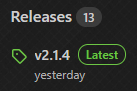
Backend:
Its recommended to use latest backend for smooth user experience.
Visit backend repo and look for version number on right side:
Now clone using git clone in your local computer:
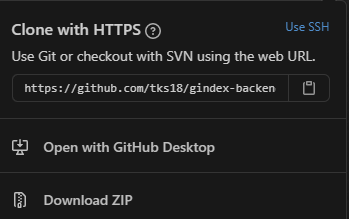
And follow following commands:
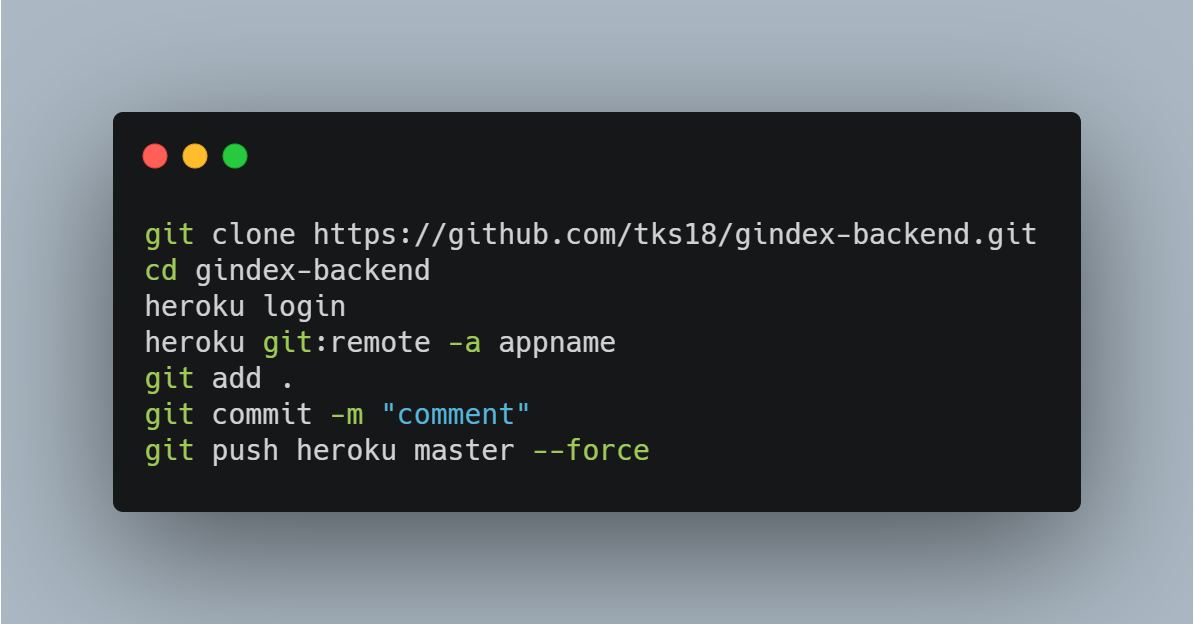
Now your backend should be updated!
FAQs
Q. My backend is giving error.
A. Please double check variables you have entered especially mongo-db URL and dont use special characters in it, use HTTPS instead of HTTP and carefully follow guide steps.
Q. My backend is okay, but frontend is blank.
A. Please use new credentials for this project or at least create a new refresh token and make sure you are not using any special character in poster description like , . / ; ' and should be plain text like this:
Q. My front-end is blank or just loading spinning up
A. Please update to latest frontend and backend and make sure you manually change version number in frontend to latest one.
Q. All videos are not playing / Video is blank only audio coming.
A. Use Edge browser to enjoy almost all video codecs including x265 encoded videos!
Q. Its loading forever, or frontend says spam user.
A. Please double check your front-end URL and make sure there is no / at the end of the URL
Example: https://sample.ga ✔️
Q. My issues are not solved by anything / I cant deploy it / I want to give feedback.
A. Please join telegram group for further information/support/query -
! GROUP LINK IS DOWN !
Recent Changes:
Introduce TMDB for Index.
Fix Forgot Password not working.
Added Lazy Loading of TMDB Images.
Enabled the Overlay Screen only When the User Visits for the First Time.
More Responsive Cast and Crew Loading.
Added Scrollers for Cast, Crew, Etc.
Fixed Error Generating Token which lead to Authentication Pop up. Maybe try after this Update.
Fixed Player Event Errors.
Fixed Player Auto-play Errors.
Tweaks to Order of Events in Video Page
Fixed Every Issue Related to PDF.
Added Rendering of all Pages in PDF at Once.
Fixed Token Issues Related to Copy Link.
More Faster Operations.
Fixed PDF Worker Version.
Fixed Home Page CSS.
Fixed Table CSS on Hover.
Fixed Copy Link Error.
More Lazy Loading of I-frames in Video Page.
Fixed TD Dropdown Menu Error - Can't Select More than 20 Drives - Now Fixed.
Added a Download option for PDF.
Some Final Optimizations.
Added Option to Enable and Disable TMDB from Frontend.
Added Options to Filter and Sort Files.
Fixed Some Videos Stuck at Loading.
Added Various Actions in the File Tab.
Now Filter your Files with based on File name, Size or Time, either Ascending or Descending. Click on the Caret Icons to Do that.
Fix CSS Relating to File Filter Search Box.
Fix CSS in Video Page Relating to File names when TMDB data is Not Available
INDEX MAKER COMING SOON!
THIS PROJECT IS ONLY FOR PERSONAL USE TO SHARE CONTENT WITH FAMILY AND FRIENDS, DO NOT USE FOR COMMERCIAL PURPOSE!
ENJOY :)
