Georgia, DFP-34X-2C2 and SilkNet
Vladimir StoliarovGuide about replacing stock ONU with more reilable hardware
Reasons to replace:
- Lack of 5Ghz Wi-Fi and 100Mbit/s ethernet ports - less throughput than tariff limits
- Lack of features: VPN clients, etc.
- Probably more, but it's enough for me
ODI DFP-34X-2C2 - GPON SFP module. There are a lot of similar devices (RTL960x chips based). But this module firmeare comes with bunch of hacks and knobs that makes it suitable for nearly all ISPs.
Buying hardware
- Stick (GPON module) itself: https://www.aliexpress.com/item/1005003515662920.html (choose "XPON")
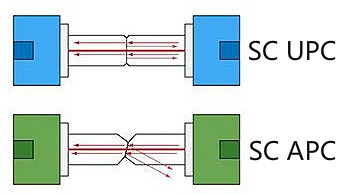
- Optionally: APC-UPC converter if your fiber cable has "green" (APC) connector because module has "blue" (UPC) port: https://www.aliexpress.com/item/4000935308811.html (choose "0DB APC TO UPC"). My cable has UPC connector, but it still may be useful i.e. when you decide to change ISP.
- Device with SFP port. There are two ways:
- Buy mediaconverter like this https://aliexpress.com/item/33020903298.html (choose "no sfp module") and connect it to your PC or router's WAN port.
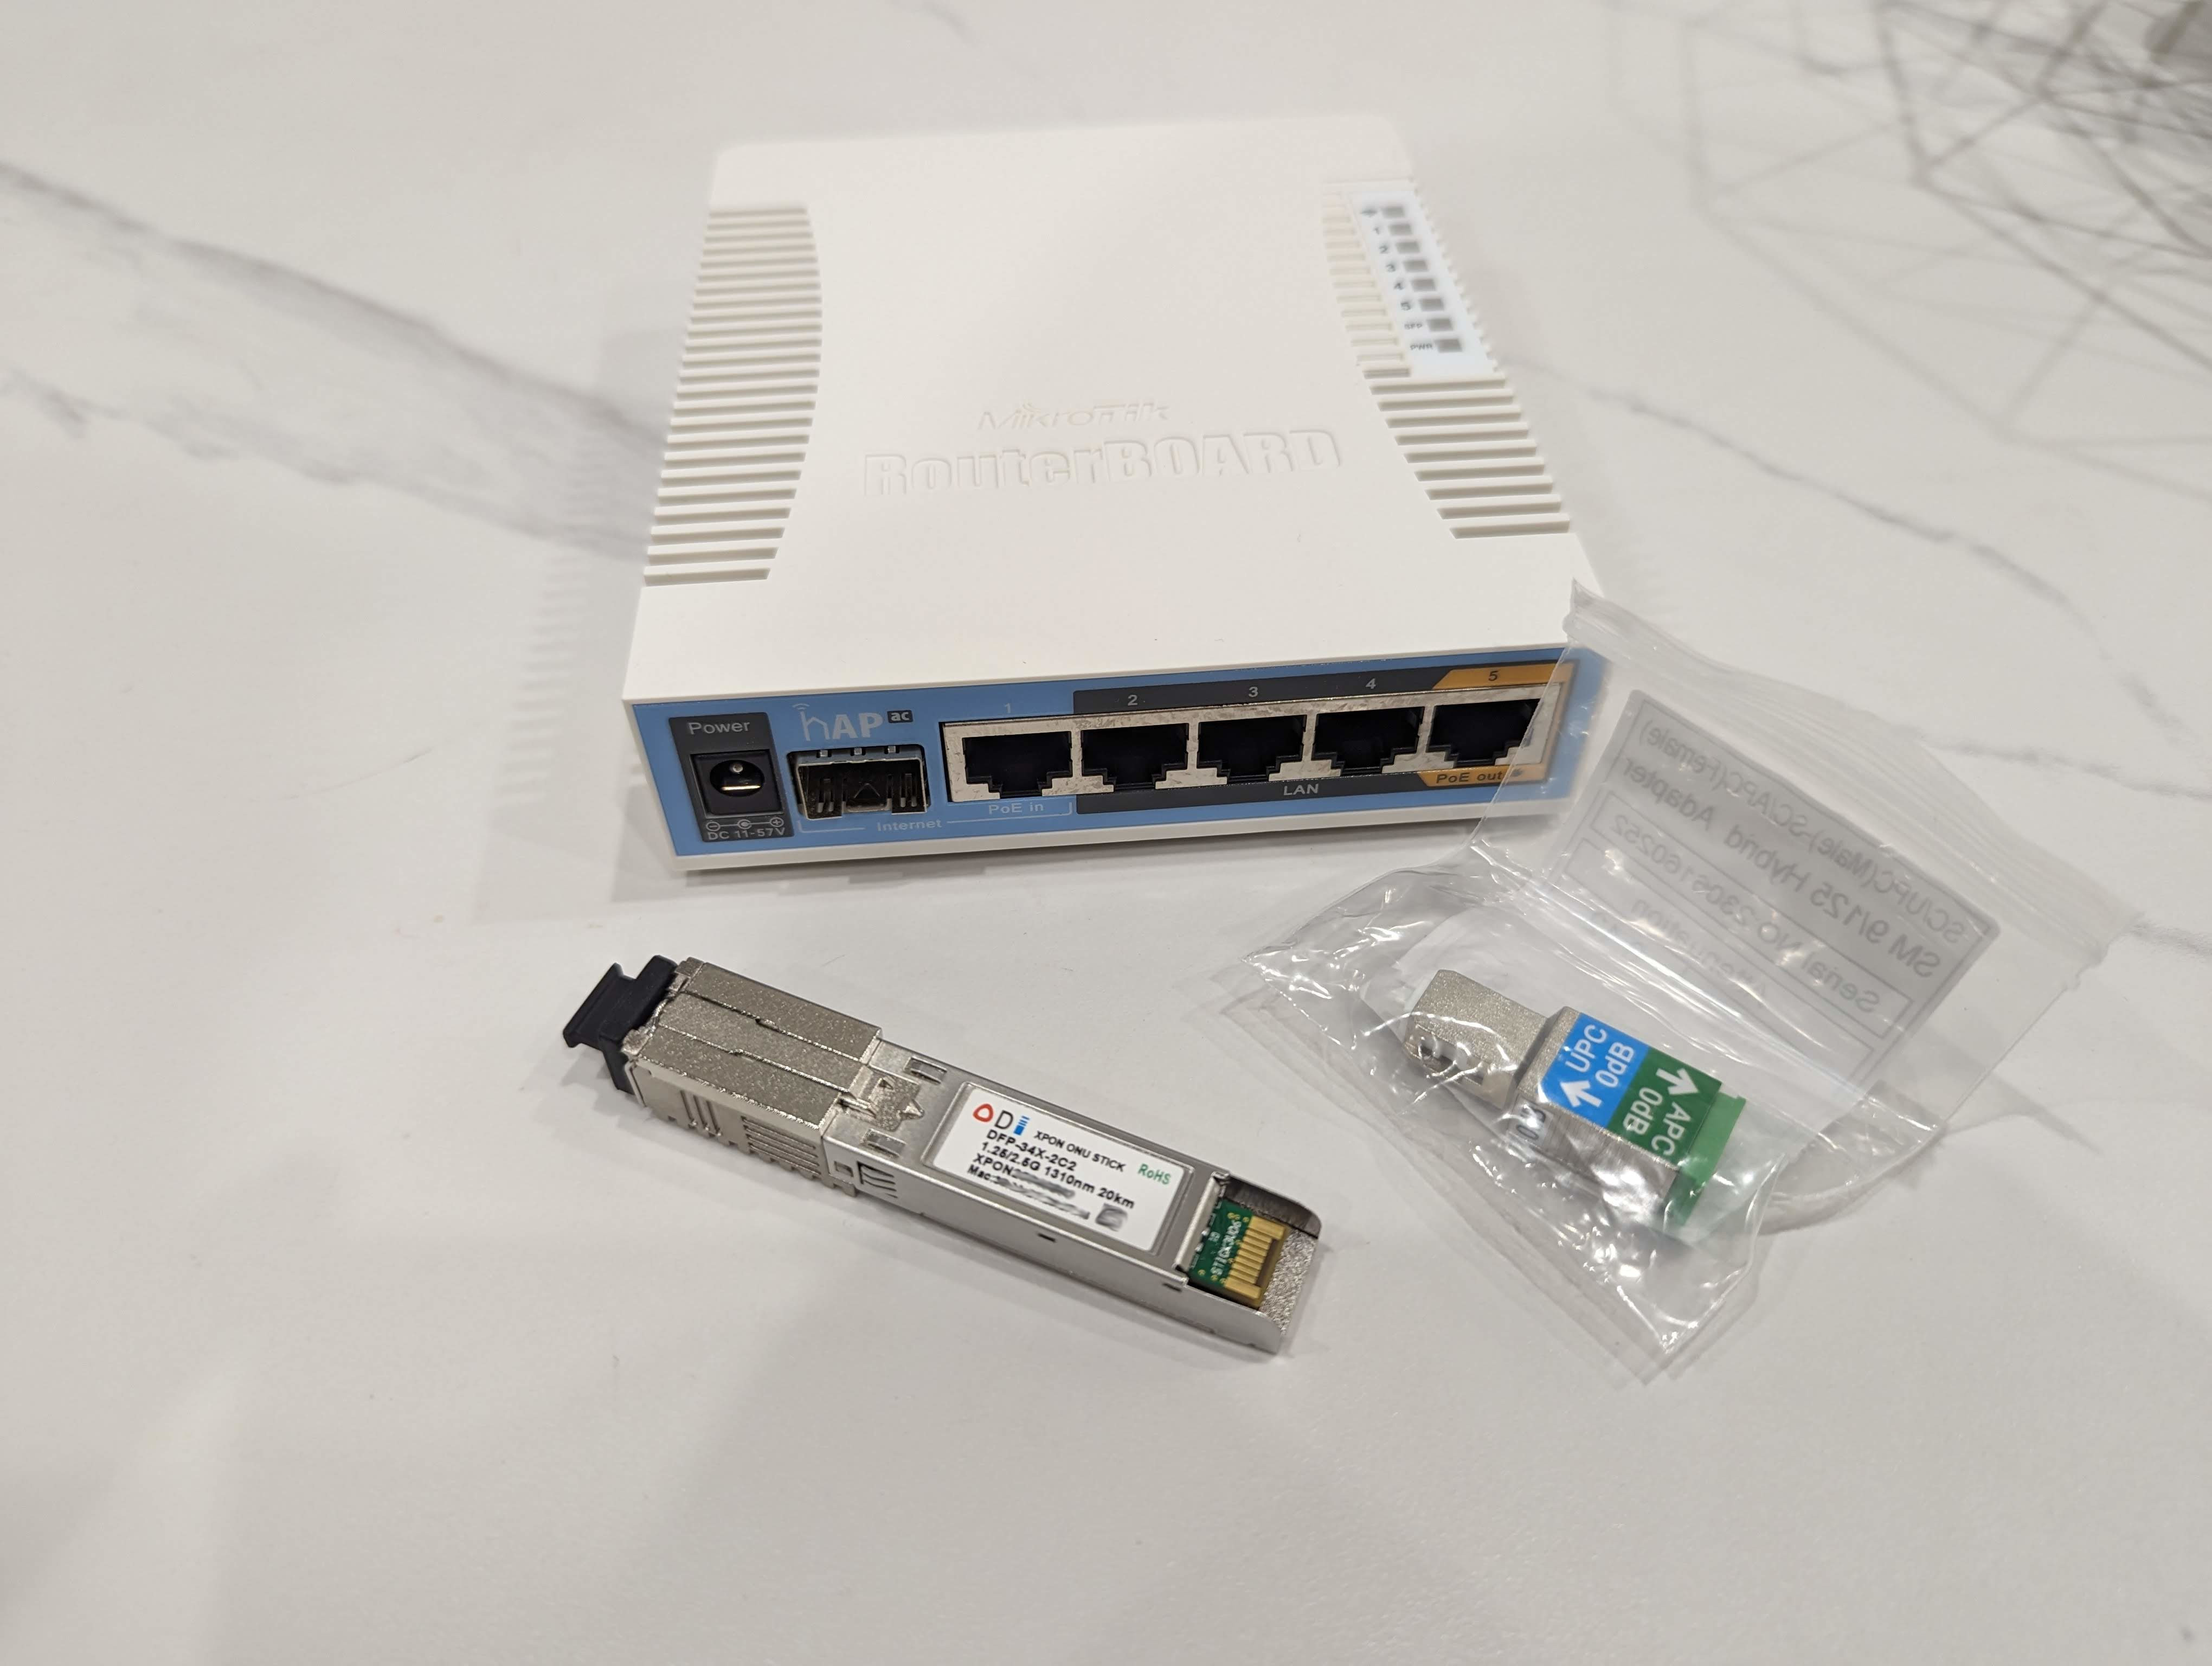
- Buy router with SFP port. I will use Mikrotik hAP AC (don't mess with "hAP AC lite" or "hAP AC 2", they doesn't have SFP port). It's a bit obsolete (i.e. has no WPA3 and Wi-Fi 6), but compact. Probably something like Banana Pi BPI-R3 (available on Amazon) will be better (more powerful CPU, Wi-Fi 6 onboard) but has more complicated setup.
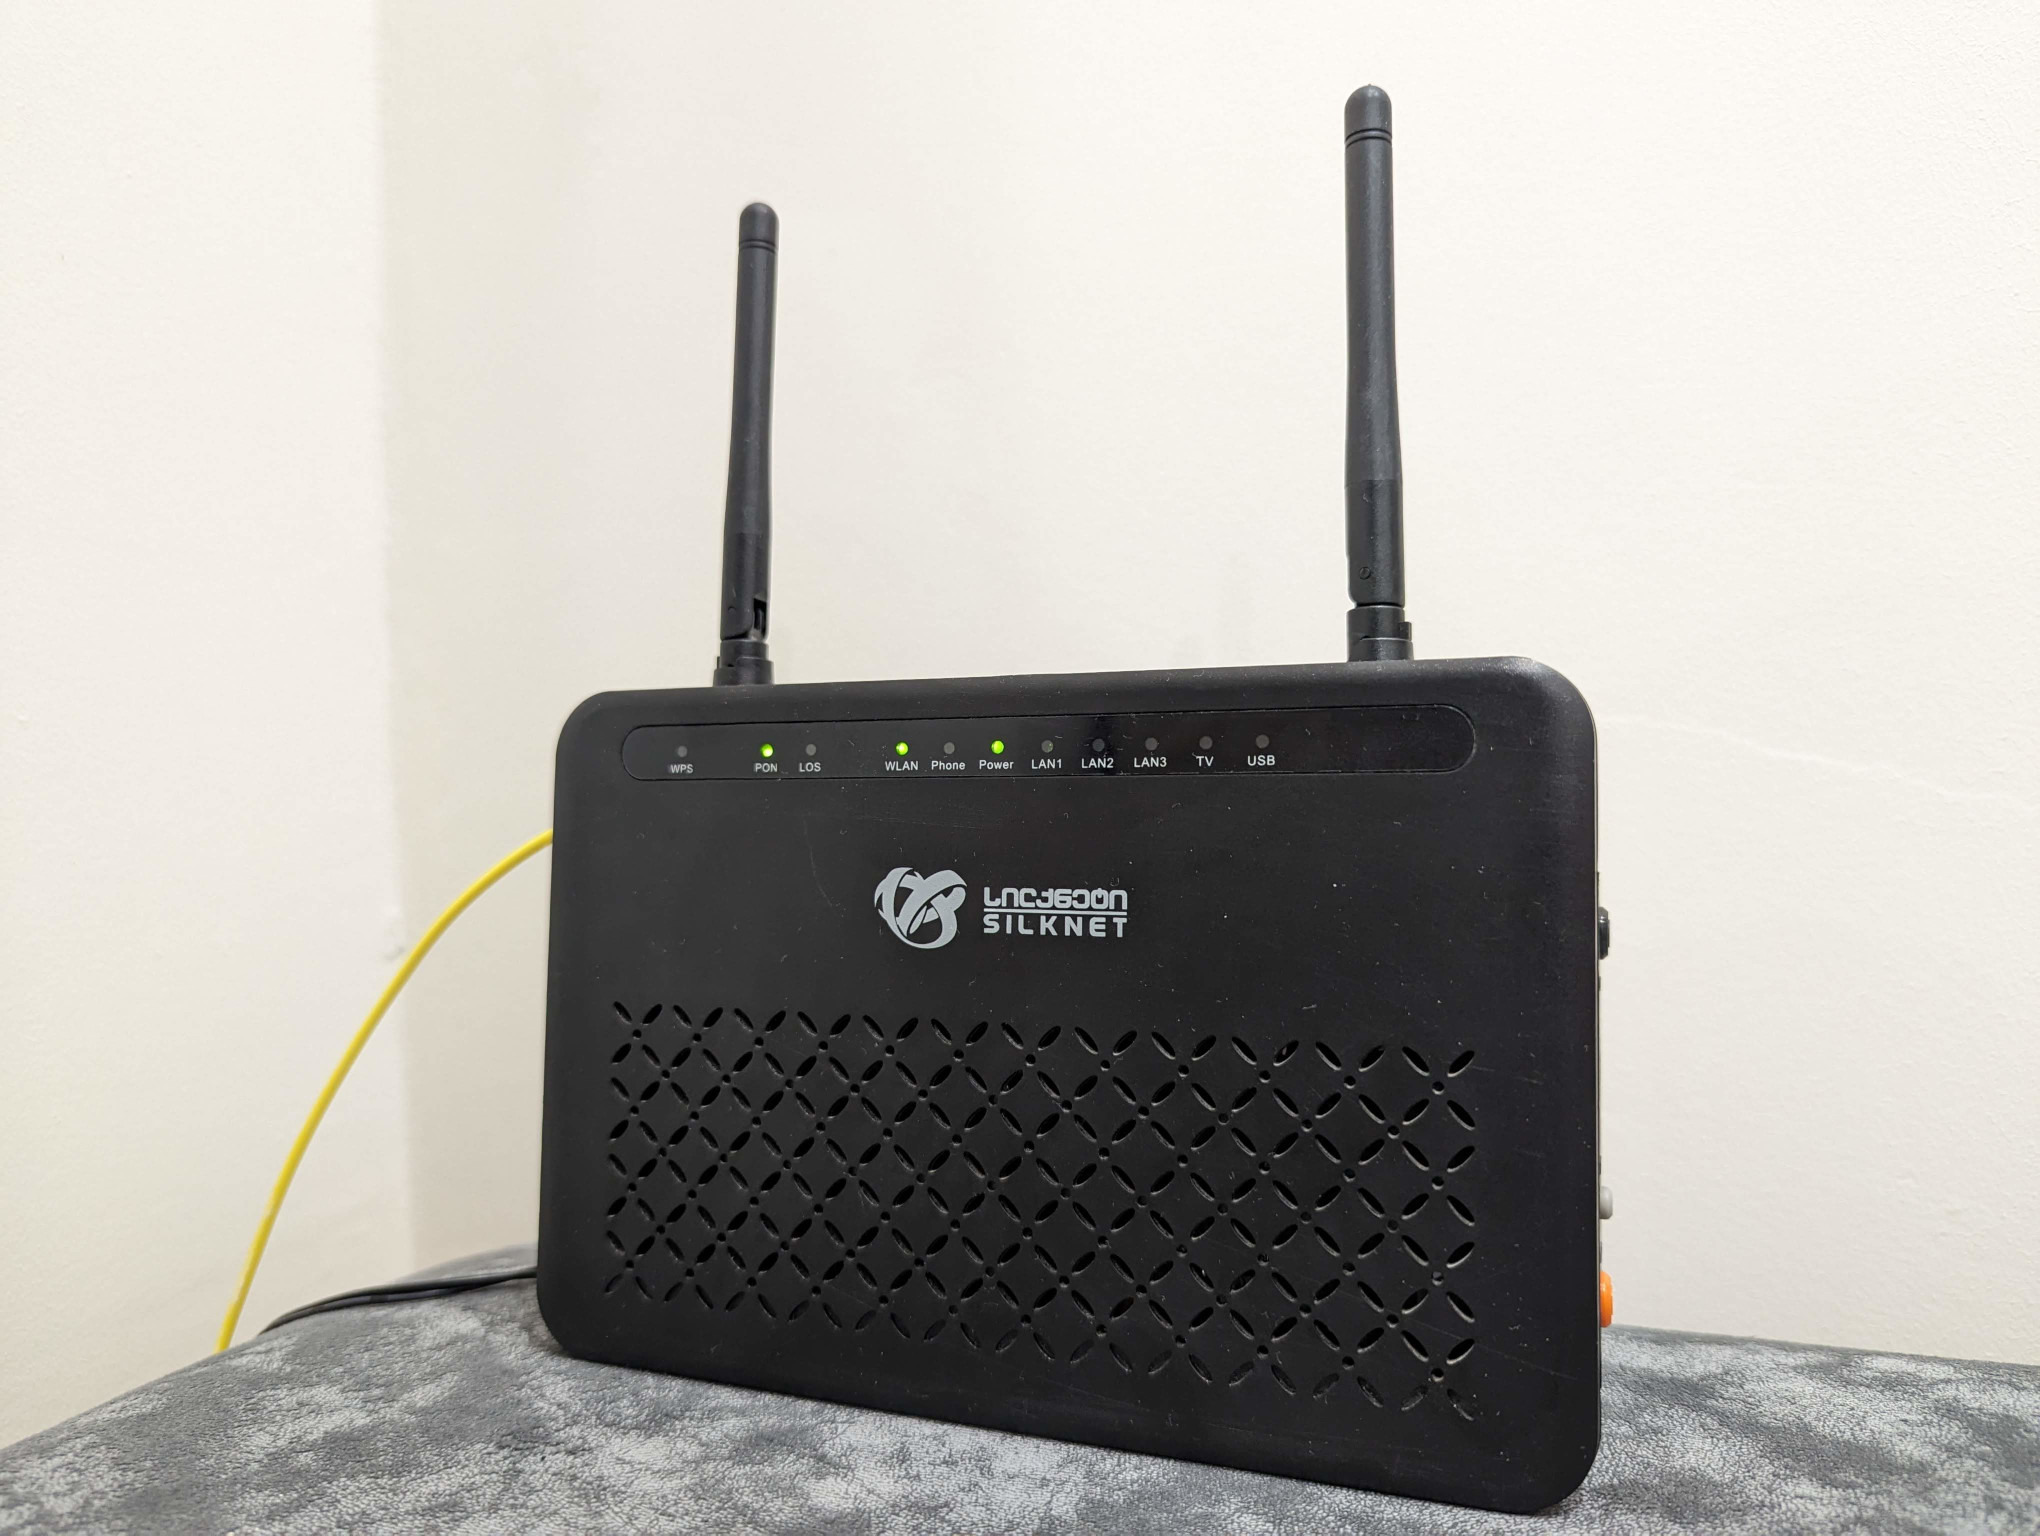
Backup stock ONU config
Go to http://192.168.100.1 with following credentials:
username: Silknet
password: Silknet@dmin
Save following information from status page: Firmware Version, Hardware Version, MAC Address, Product Class
Go to "Interface setup" and save "VLAN ID" in "802.1q" section.
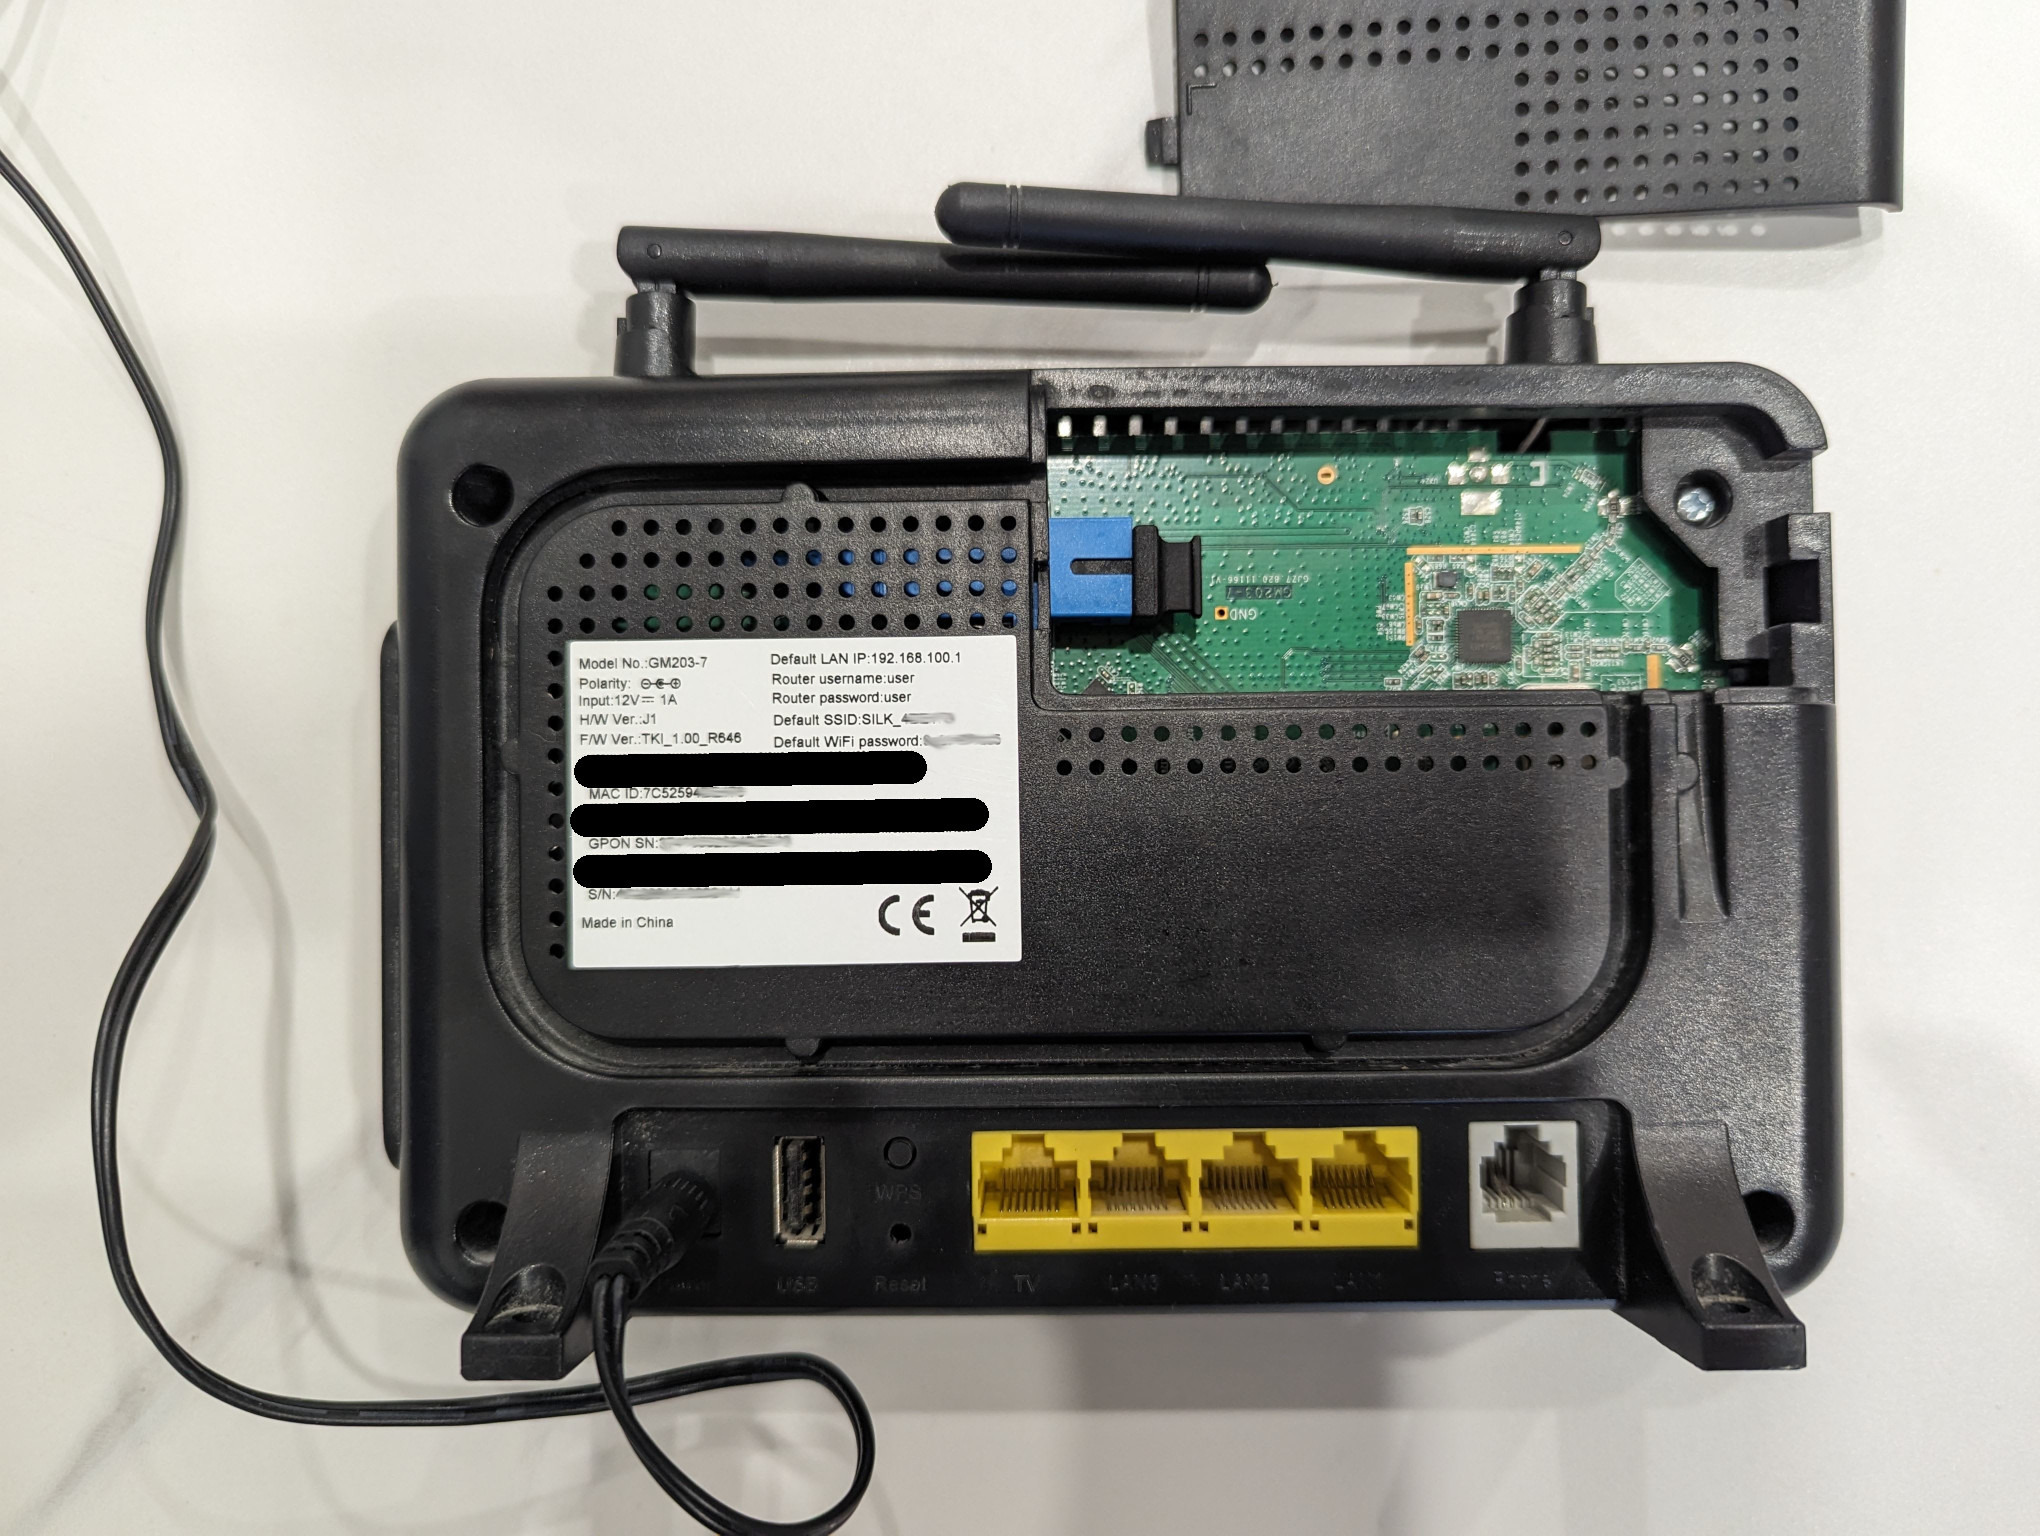
Go to "Maintainance" -> "Firmware" and click "ROMFILE BACKUP". This is actually config file in xml format. Find "VendorId" attribute in "GPON" -> "ONU". Mine is "HWTC". This file contains a lot of information that may be used later.
Download necessary files
- New firmware for GPON module: https://github.com/Anime4000/RTL960x/blob/7dbe251734b497c7221e55212dda06443c84e744/Firmware/DFP-34X-2C2/M110_sfp_ODI_220923.tar (my module already had this out of the box)
- New firmware for Mikrotik if bought: https://mikrotik.com/product/RB962UiGS-5HacT2HnT#fndtn-downloads (choose "RouterOS current release")
- Python script to generate
MAC_KEY: https://gist.github.com/rajkosto/29c513b96ea6262d2fb1f965a52ce16f. Not required but more convenient than manual calculation withmd5sum
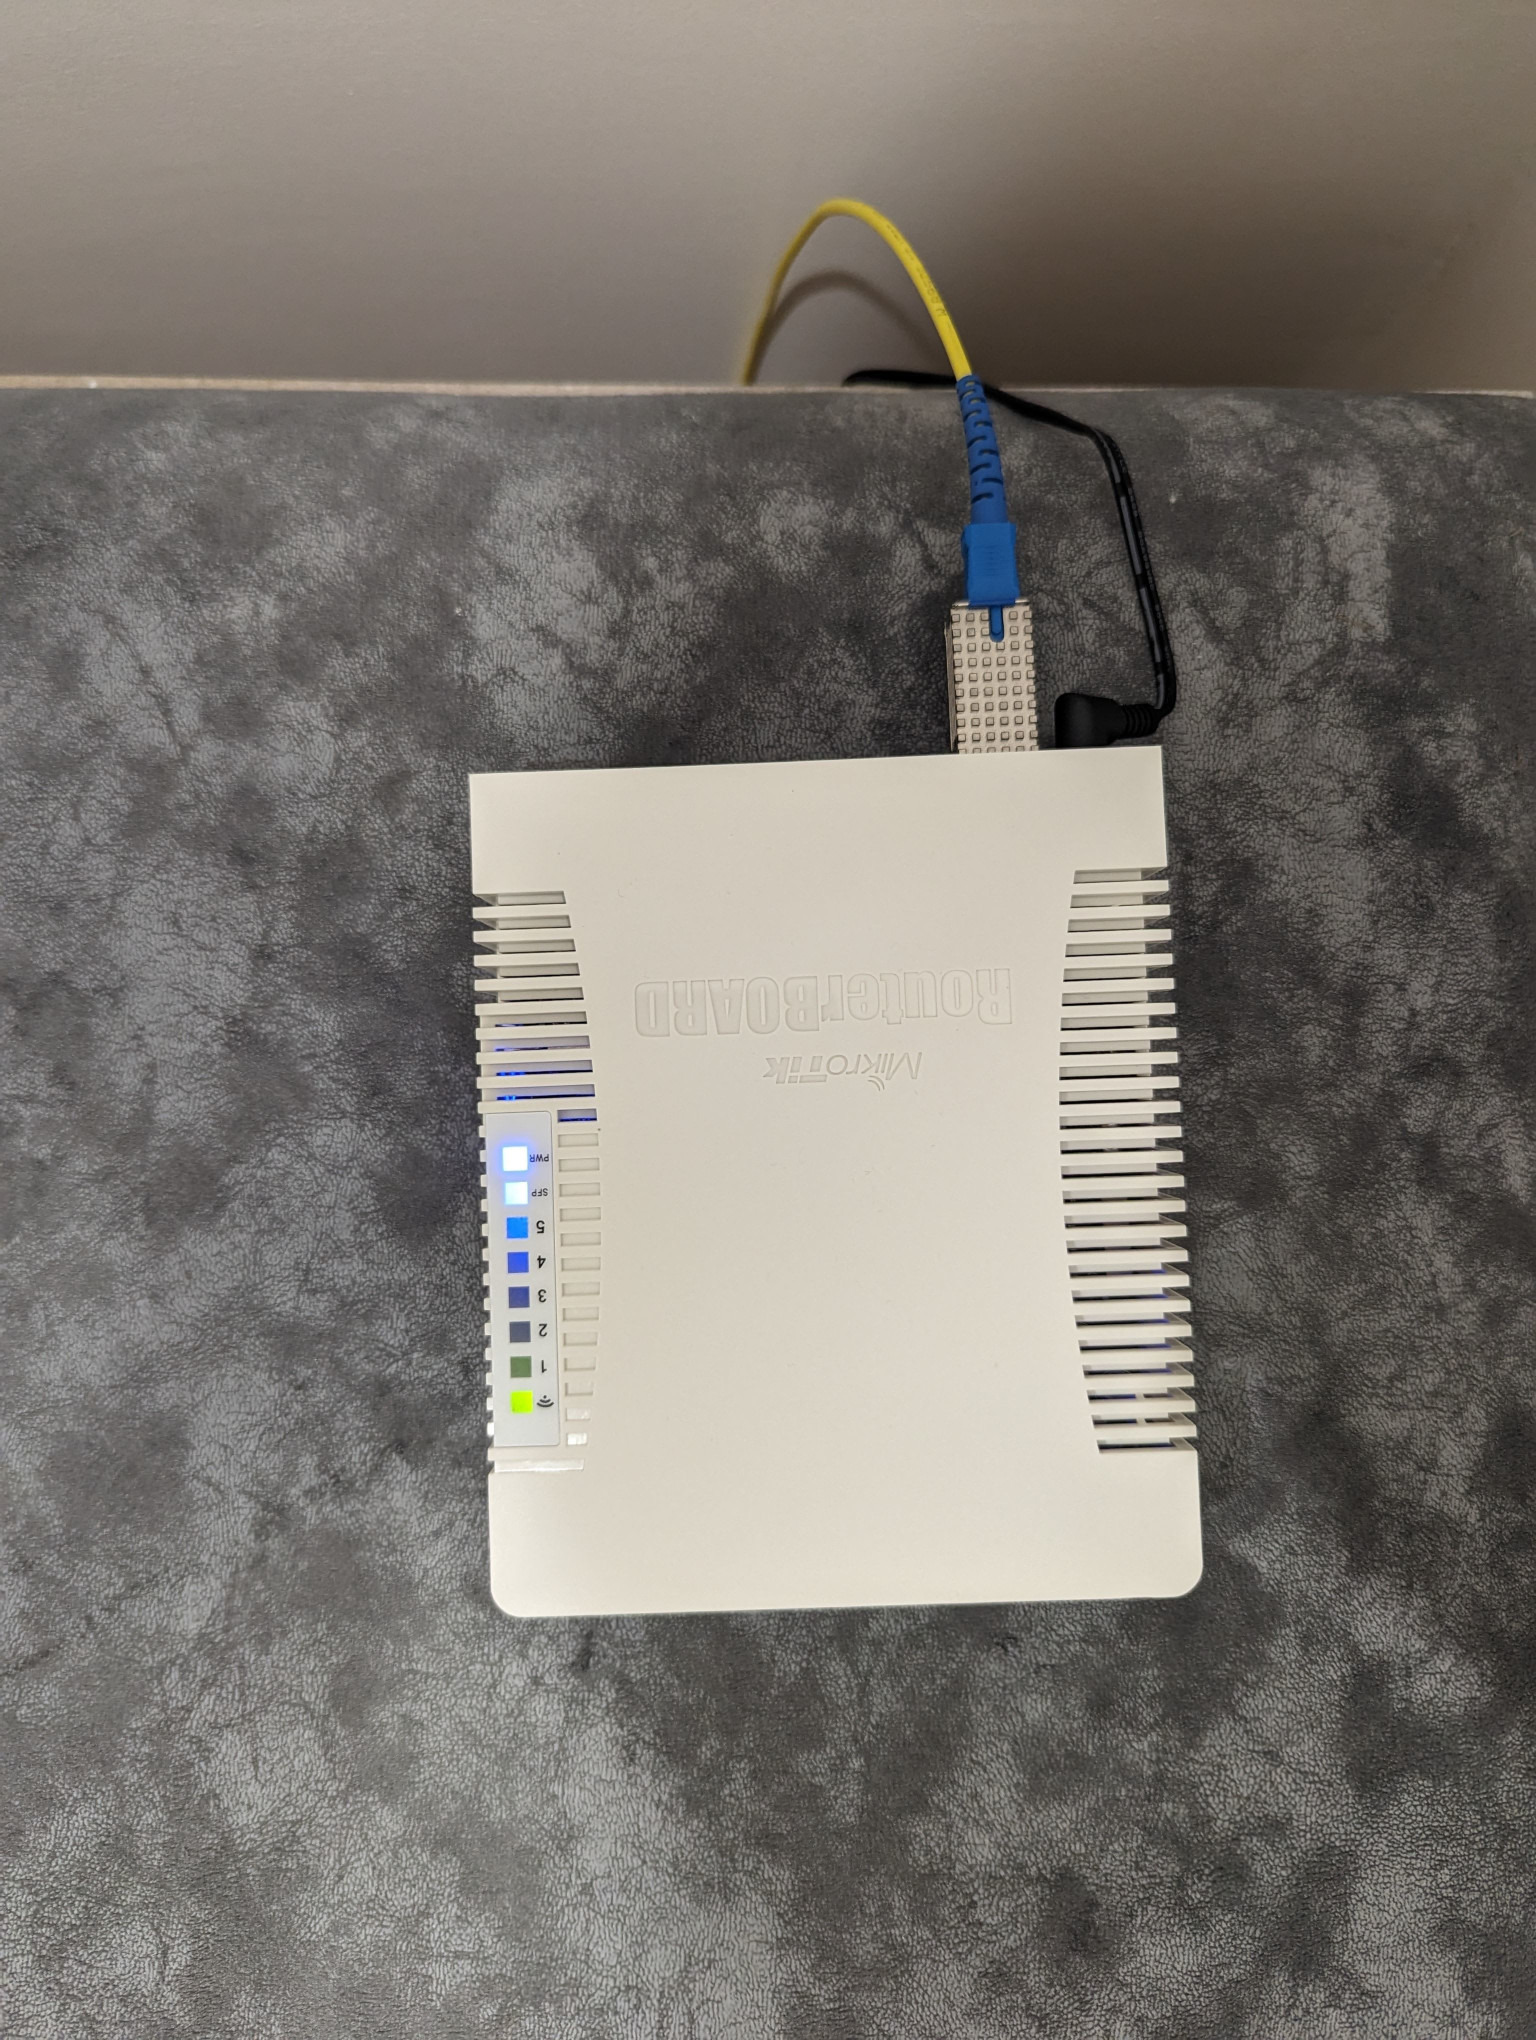
Connecting all together
It's imprortant to do this before setting up because GPON module won't work without fiber cable plugged in.
- Plug GPON module into SFP port
- Unplug stock ONU's power supply
- Remove protection cover from stock ONU to get access to connector
- Remove rubber cap from GPON module
- Unplug fiber cable from stock ONU and plug it into GPON module
- Put rubber cap into stock ONU's optical port to protect it from dust, etc.
- Put stock ONU's protection cover back
Setting up Mikrotik
This part can be skipped if you use mediaconverter. In this case just connect it to your PC and manually assign IP like 192.168.1.65 with subnet 255.255.255.0 and gateway 192.168.1.1 to ethernet interface.
After powering up router will beep. Wait until "PWR" led stops blinking, "SFP" led lights up and default Wi-Fi networks appear.
Connect to one of these networks and go to http://192.168.88.1. Login/password - admin/ admin
Upgrade firmware:
- Go to "WebFig" (top right corner) -> "Files" (left menu) and upload firmware file (.npk)
- Reboot router ("System" -> "Reboot")
- Wait for start, firmware will be upgraded automatically
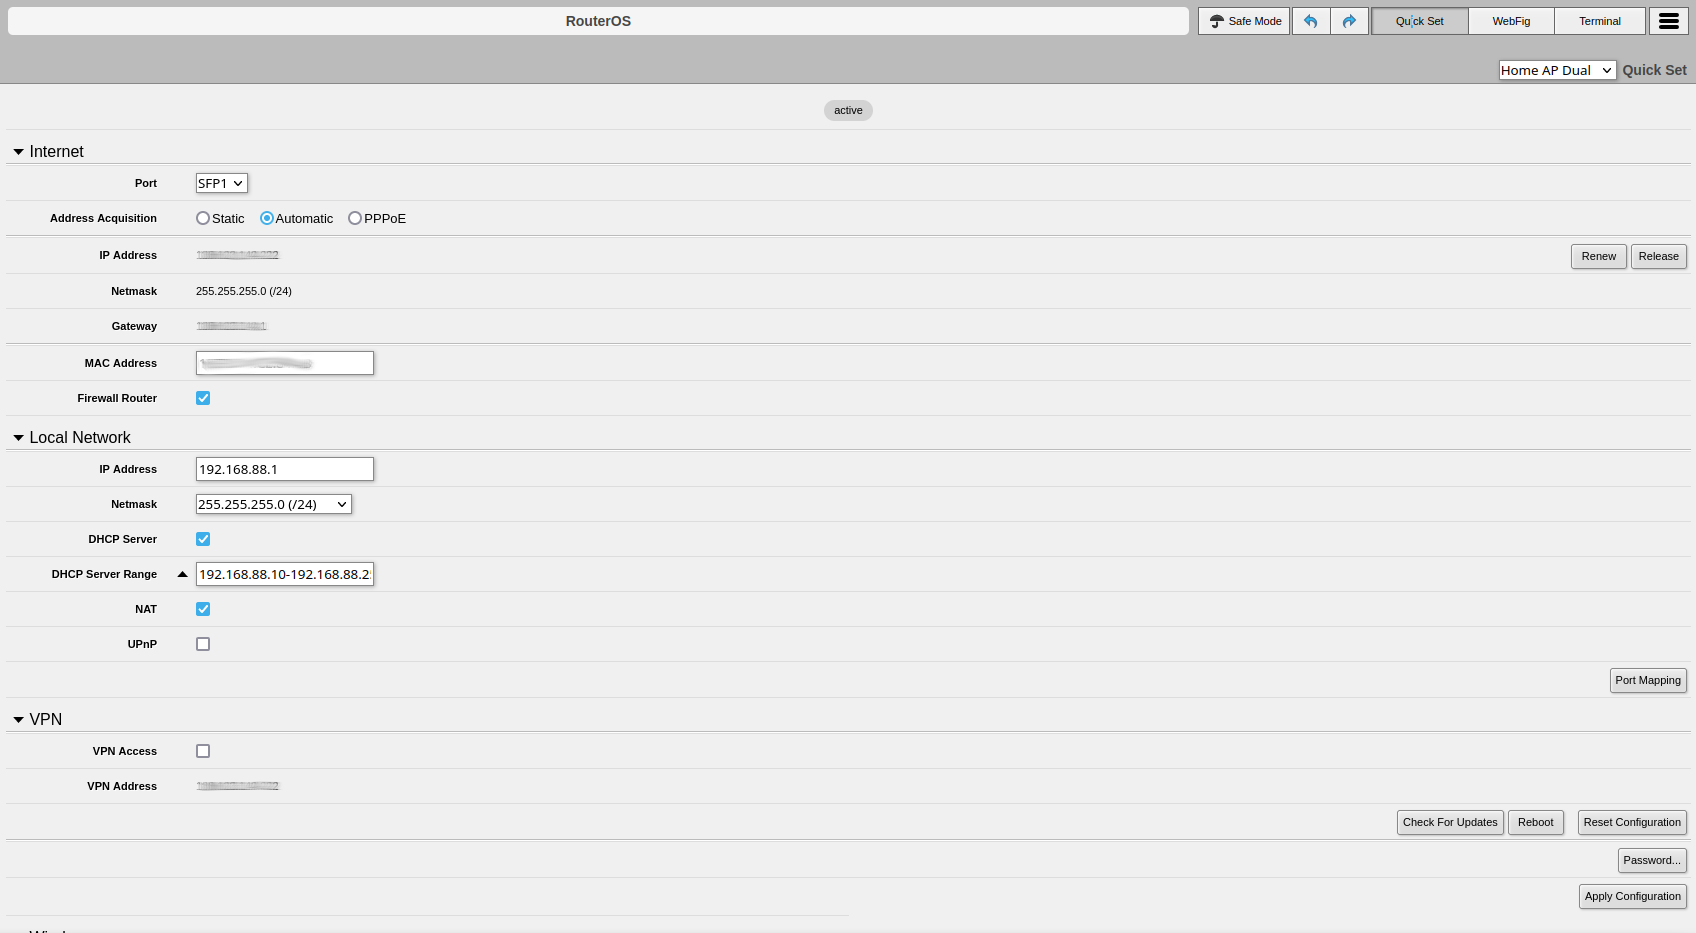
Perform basic settings to make GPON module's web interface accessible:
- In "QuickFig" (first page after login) choose "sfp1" instead of "ether1" as internet interface
- Optionally check "Bridge all ethernet interfaces". This makes first port (WAN) part of local network.
- Rename Wi-Fi networks, choose "2GHZ-only-N" for 2.4Ghz network and "5Ghz-only-AC" for 5Ghz network to achieve maximum speed and set up network passwords
- Change admin password
- Click "Apply", connect to one of new protected Wi-Fi network and login to router's web-interface again.
- In "WebFig" -> "IP" -> "Addresses" click "Add New", select "sfp1" interface, enter
192.168.1.65/32as "Address" and192.168.1.1as "Network"

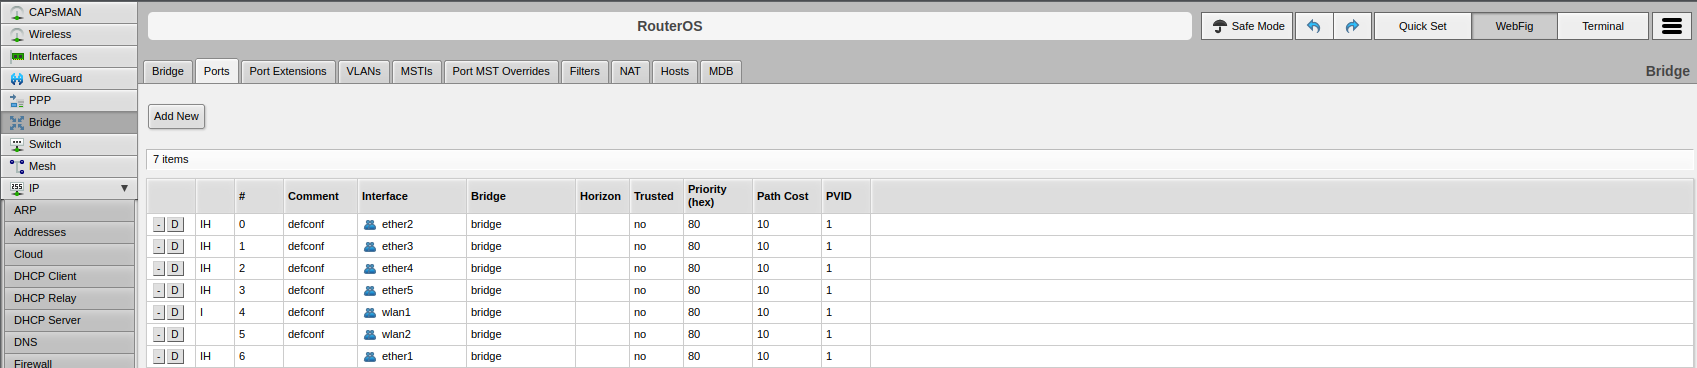
Also verify that "sfp1" is in "WAN" list in "WebFig" -> "Interfaces" -> "Interface lists" and not in "WebFig" -> "Bridge" -> "Ports". Without this GPON module will be inaccessible.

Here is the list of CLI commands. Use telnet of "Terminal" tab in web interface and run one-by-one because some of them requires parameters from output of previous command (anything after # is a comment):
# make "sfp1" WAN port
/interface bridge port remove [find bridge=bridge interface=ether1]
/interface list member add list=WAN interface=sfp1
# make "wan" port local
/interface bridge port add bridge=bridge interface=ether1
/interface list member remove [find list=WAN interface=ether1]
# assign ip to "sfp1" to access GPON module
/ip address add interface=sfp1 address=192.168.1.65/32 network=192.168.1.1
# change admin password
/password old-password="admin" new-password="<new password>" confirm-new-password="<new password>"
# rename, secure Wi-Fi (note that after each command you may need to reconnect to network)
/interface wireless security-profiles set 0 authentication-types=wpa2-psk wpa2-pre-shared-key="<wi-fi password>"
/interface wireless set wlan1 ssid="<2ghz ssid>" band=2ghz-onlyn channel-width=20/40mhz-XX
/interface wireless set wlan2 ssid="<5ghz ssid>" band=5ghz-onlyac channel-width=20/40/80mhz-XXXX
Setting up GPON module
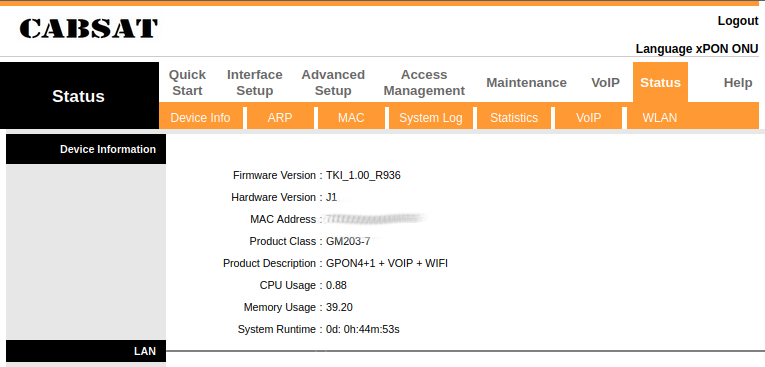
Go to http://192.168.1.1. Login/password - admin/ admin
Verify that you have firmware version at least 220923 on "Firmware upgrade" page. If it's older - upgrade it.
Upgrade procedure: go to "Firmware Upgrade" page, select previously downloaded firmware (.tar) and press "Upgrade".
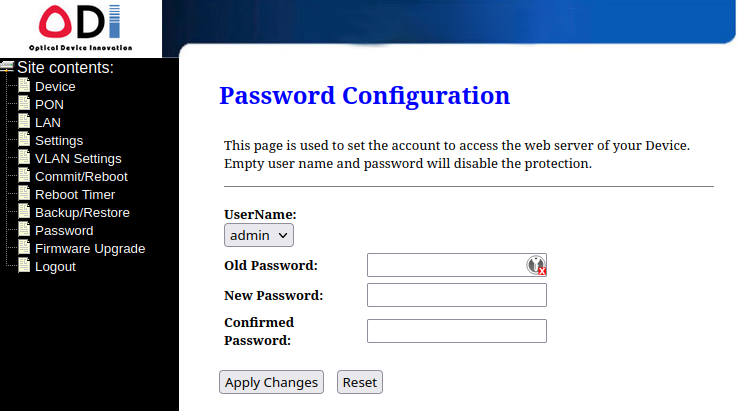
Go to "Password" page and change admin password.
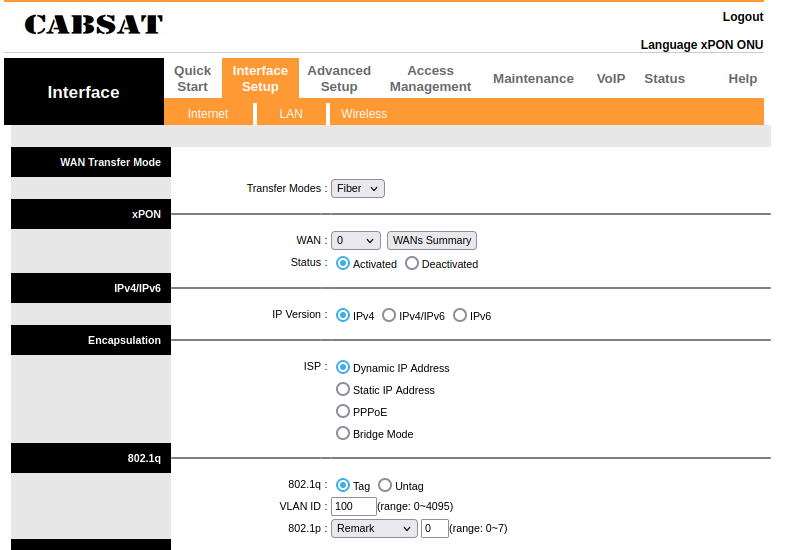
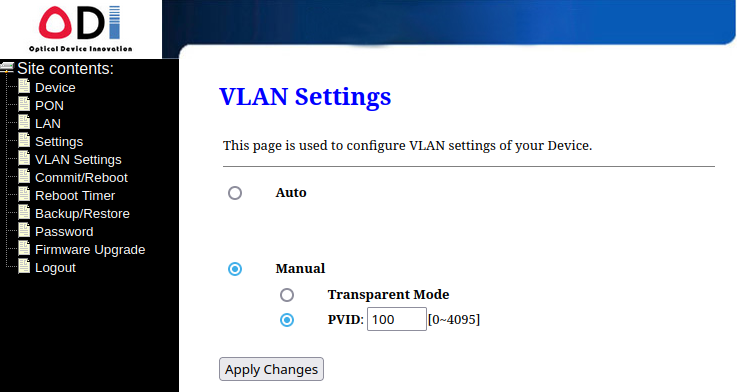
Go to "VLAN Settings", select "Manual" -> "PVID" and enter previously recorded VLAN ID. Do not forget to "Apply Changes"
Go to "Settings" and enter data as shown

Notes:
- PLOAM Password is
00000000000000000000(20x "zero"). Another ones will also result in successful authorization but unstable connection. - Do not forget to "Apply Changes" after entering "PLOAM Password" and "GPON SN"
- "GPON SN" from stock ONU is not used
- We're using VLAN untagging at GPON module. It's also possible to untag VLAN on router side. And this is required if you want to use IPTV and VoIP which served through different VLAN IDs (200 and 300 in my case). But this setup will be much more complicated so I don't cover it.
Before applying changes for "Vendor ID" an lower fields you need to recalculate "MACKEY" by using Python script downloaded earlier or manually:
echo -n "hsgq1.9aFFFFFF000000" | md5sum
Where FFFFFF000000 is a "MAC ID", letters in upper case.
After all, go to "Commit and Reboot" page and click "Commit and Reboot".
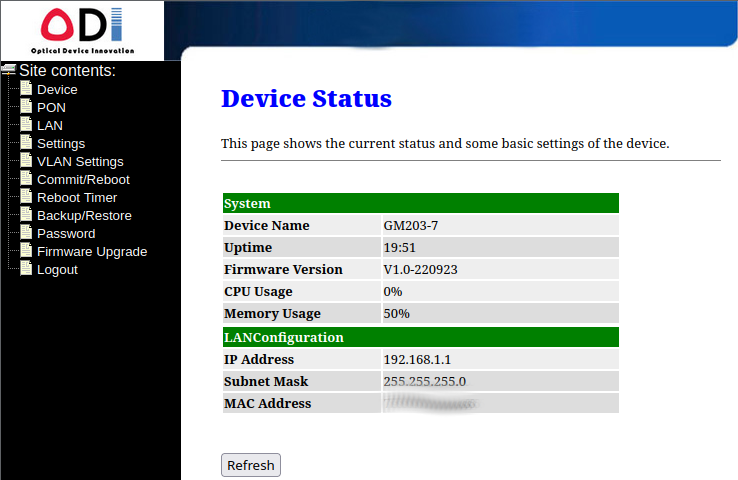
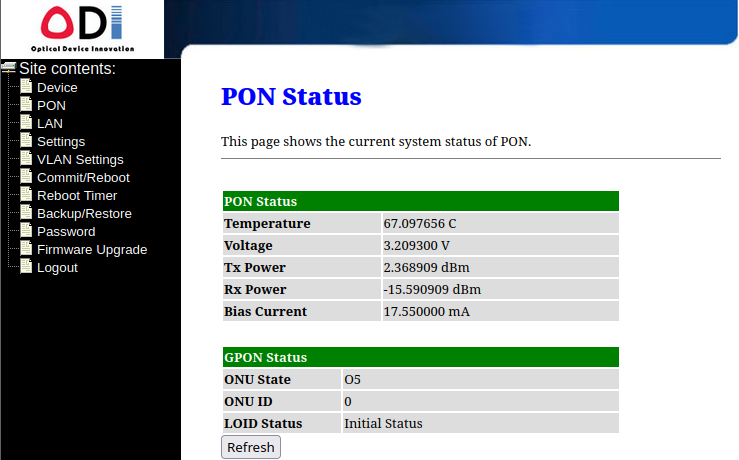
If everything is OK you will see "O5" status in "PON" page after module reboot.
Also this module can be set up using CLI (all extra hacks available only from CLI). Telnet to module address, login and enter following (text after # is comment):
flash set SUSER_PASSWORD "<new admin password>"
flash set VLAN_CFG_TYPE 1
flash set VLAN_MANU_MODE 1
flash set VLAN_MANU_TAG_VID 100 # VLAN ID from stock ONU
flash set GPON_PLOAM_FORMAT 0
flash set GPON_PLOAM_PASSWD 00000000000000000000
flash set GPON_SN "<MAC ID from stock ONU>"
flash set PON_VENDOR_ID "HWTC"
flash set OMCI_SW_VER1 "TKI_1.00_R936" # software version from stock ONU status page
flash set OMCI_SW_VER2 "TKI_1.00_R936" # software version from stock ONU status page
flash set GPON_ONU_MODEL "GM203-7" # "Model No" from stock ONU
flash set HW_HWVER "J1" # "H/W Ver." from stock ONU
flash set OUI "7c5259" # first 6 chars of "MAC ID" of stock ONU
flash set ELAN_MAC_ADDR "<MAC ID from stock ONU>"
flash set MAC_KEY "<MAC KEY calculated from MAC ID>"
flash set HW_SERIAL_NO "<S/N from stock ONU>"
reboot
Setting up Mikrotik (again)
This part can be skipped if you use mediaconverter. In this case just switch to automatic address assignment via DHCP or connect it to router's WAN port.
Now we only have to set up DHCP client for "sfp1" port.
In "WebFig" -> "IP" -> "DHCP client" select "defconf" config (should be only one).
Change "Interface" to "sfp1" and click "Apply".
If everything is OK you should have internet access.
CLI command:
/ip dhcp-client set 0 interface=sfp1
Summary
Is replacement worth it? I made measurements via SpeedTest. First one - with stock ONU. Second one - after replacement.
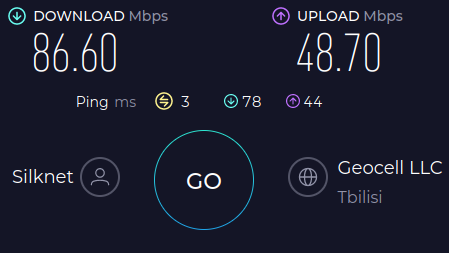
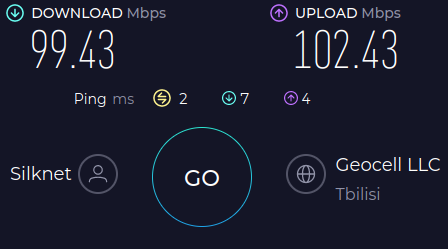
As you can see upload speed increased dramatically. Download speed now matches tariff limits. Latencies during upload and download also dramatically decreased.
So my opinion - such replacement worth it. And due to "universality" of GPON module it can be easily used with another ISP.
Useful links
- https://hack-gpon.org - resource about PON technology and devices hacking
- https://github.com/Anime4000/RTL960x - repository with results of researches and hacking of RTL960x-based PON devices