Frequently Asked Questions, FAQ
Artem KorotkevichClones of all GCAM versions HERE!
Frequently Asked Questions:
1. Installation GUIDE for installing latest Google Camera version with the buffer workaround. ONLY ANDROID 9.0(PIE)
1) Unlocked bootloader is required! You can find unlocking guide HERE!
2) Download latest Google Camera MGC_6.1.013_MI8_V0 and install it.
3) To install buffer workaround you'll need TWRP Recovery, installation guides for Mi8, POCO, Mi Mix 2S. If you can't see your device in this list, means that your device IS NOT eligible.
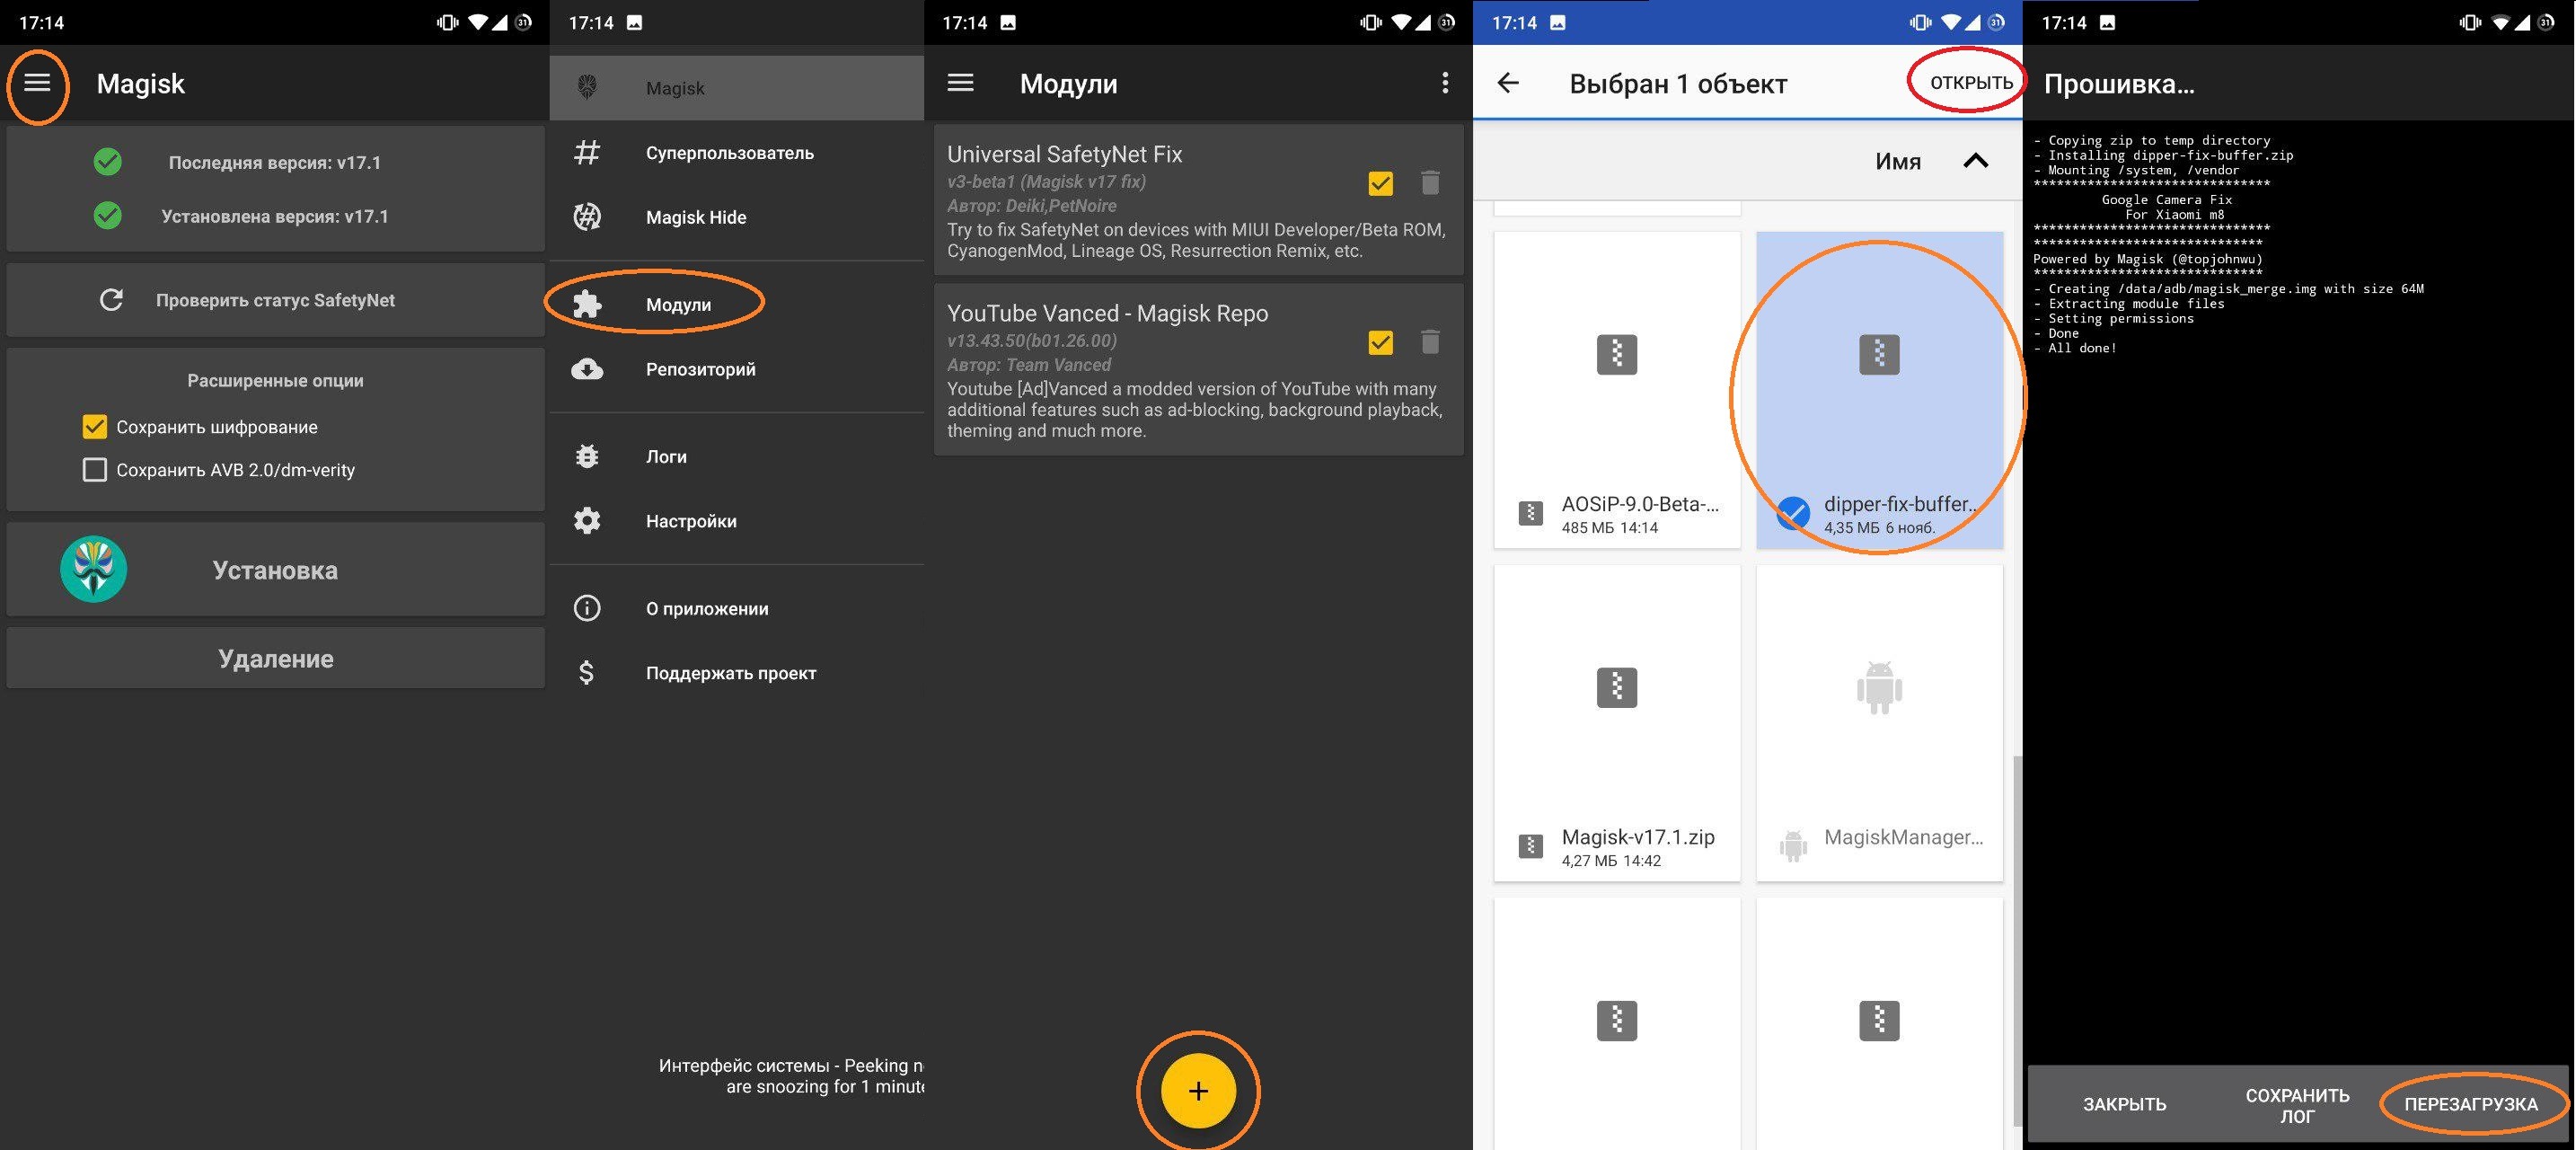
Also you can use Magisk, you can see the installation below in screenshots.

If you can't see Magisk icon on home screen (App Drawer), then you need to install MagiskManager. Install it as a regular app.
4) Buffer workaround installation. Fix for TWRP, MAGISK!!!!
4.1) Magisk way: Open Magisk Manager, then go to Modules section, tap "Add" icon, select the workaround file and install it.
4.2) TWRP way: Reboot into recovery, tap Install and select workaround .zip package.

Installation done now. Now just check if everything works.
NOTE: WORKAROUND WORKS ONLY ANDROID 9 (PIE). On Android Oreo (8.x) it won't work.
NOTENOTE: If you installed 8.11.6 or 8.11.7, then flashing a workaround is UNNECESSARY
NOTENOTENOTE: Version Gcam 5.3 stops working with this fix!
2. What are the optimal settings for the version MGC_6.1.013_MI8_FINAL_V1b.apk?
We will consider 3 types of settings: high (for great shots), medium (for faster shots), low (the fastest shots).
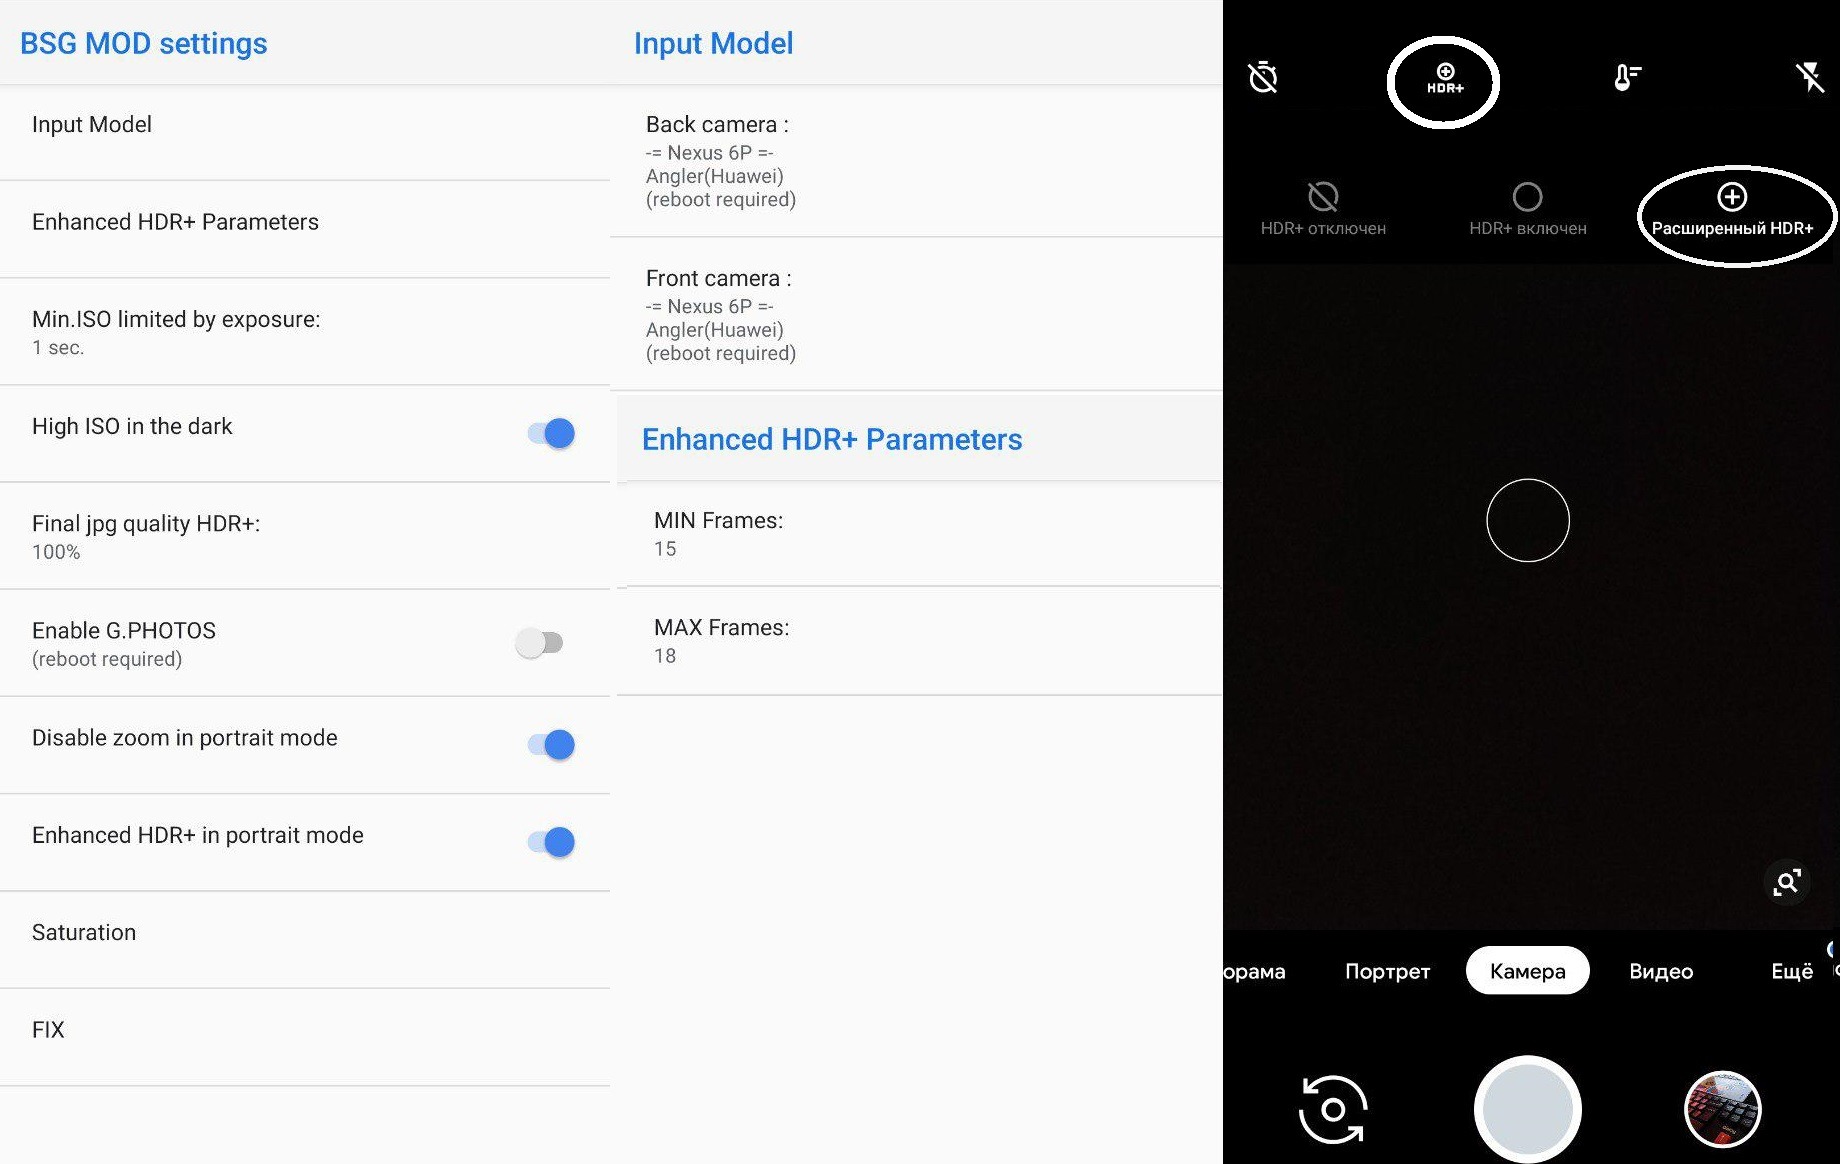
GCam high settings:
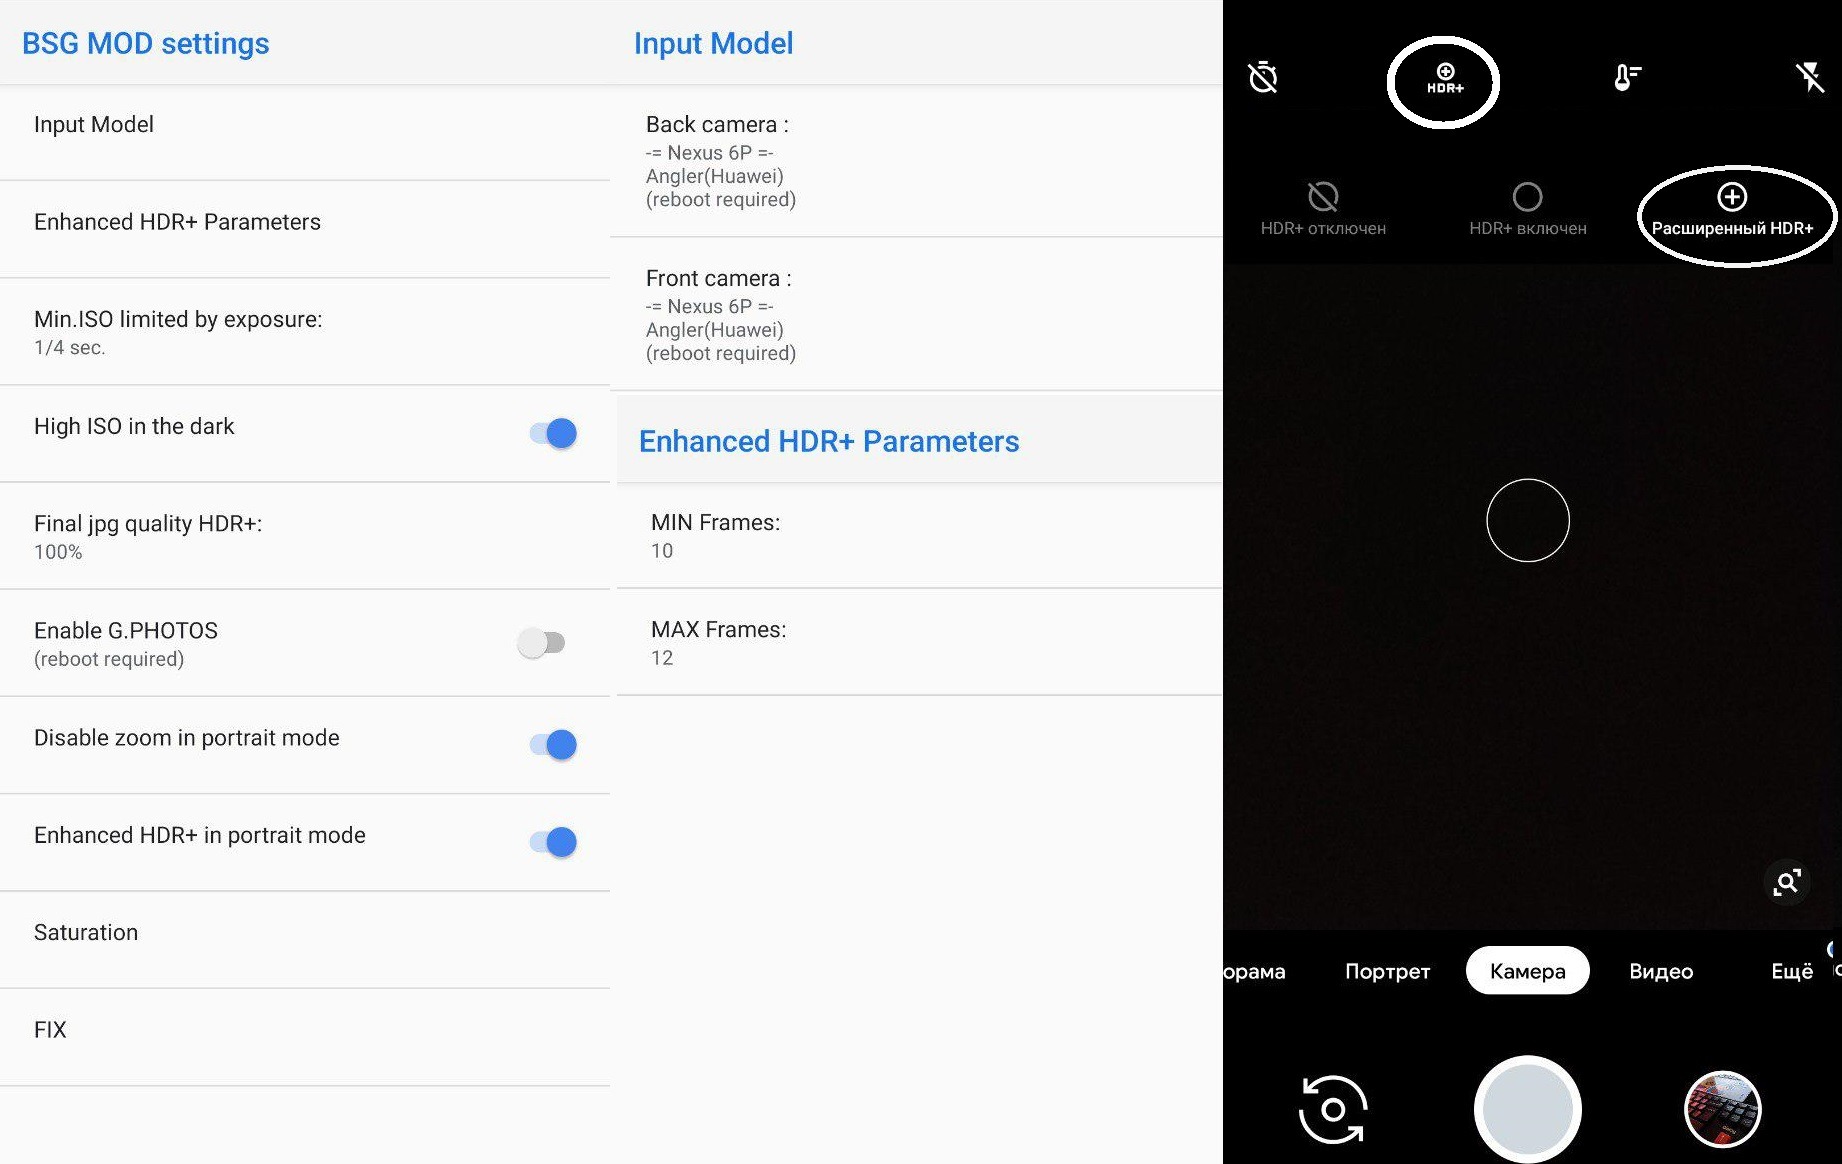
GCam average settings:
Low settings GCam (no matter what the settings, the main thing is to put Auto HDR +):

Why precisely chosen such "Input Model"? Everyone has different views and you can pick up your model. Sample photos of all "Input Model" are HERE! These images were taken at shutter speed: 1/4 and 1/8, the number of frames for hdr is 12 and 15, respectively. In modes: enhanced HDR +, Auto HDR + and Night mode. Photos with good lighting should appear in the near future. There is no point in reviewing the front camera, because in libs there is only 5 megapixels.
3. Will it work on Oreo? It won't work on Oreo because new libraries are not supported in Android 8.1.0
Will it work without fix? It will work without fix, when you get MIUI Beta 8.11.7+. If you see the Night mode in MIUI Camera, then you are fine, install Google Camera. What devices will get this update? Mi 8 and MIX 2S will be first, then POCO F1 and other Xiaomi sdm845 devices.
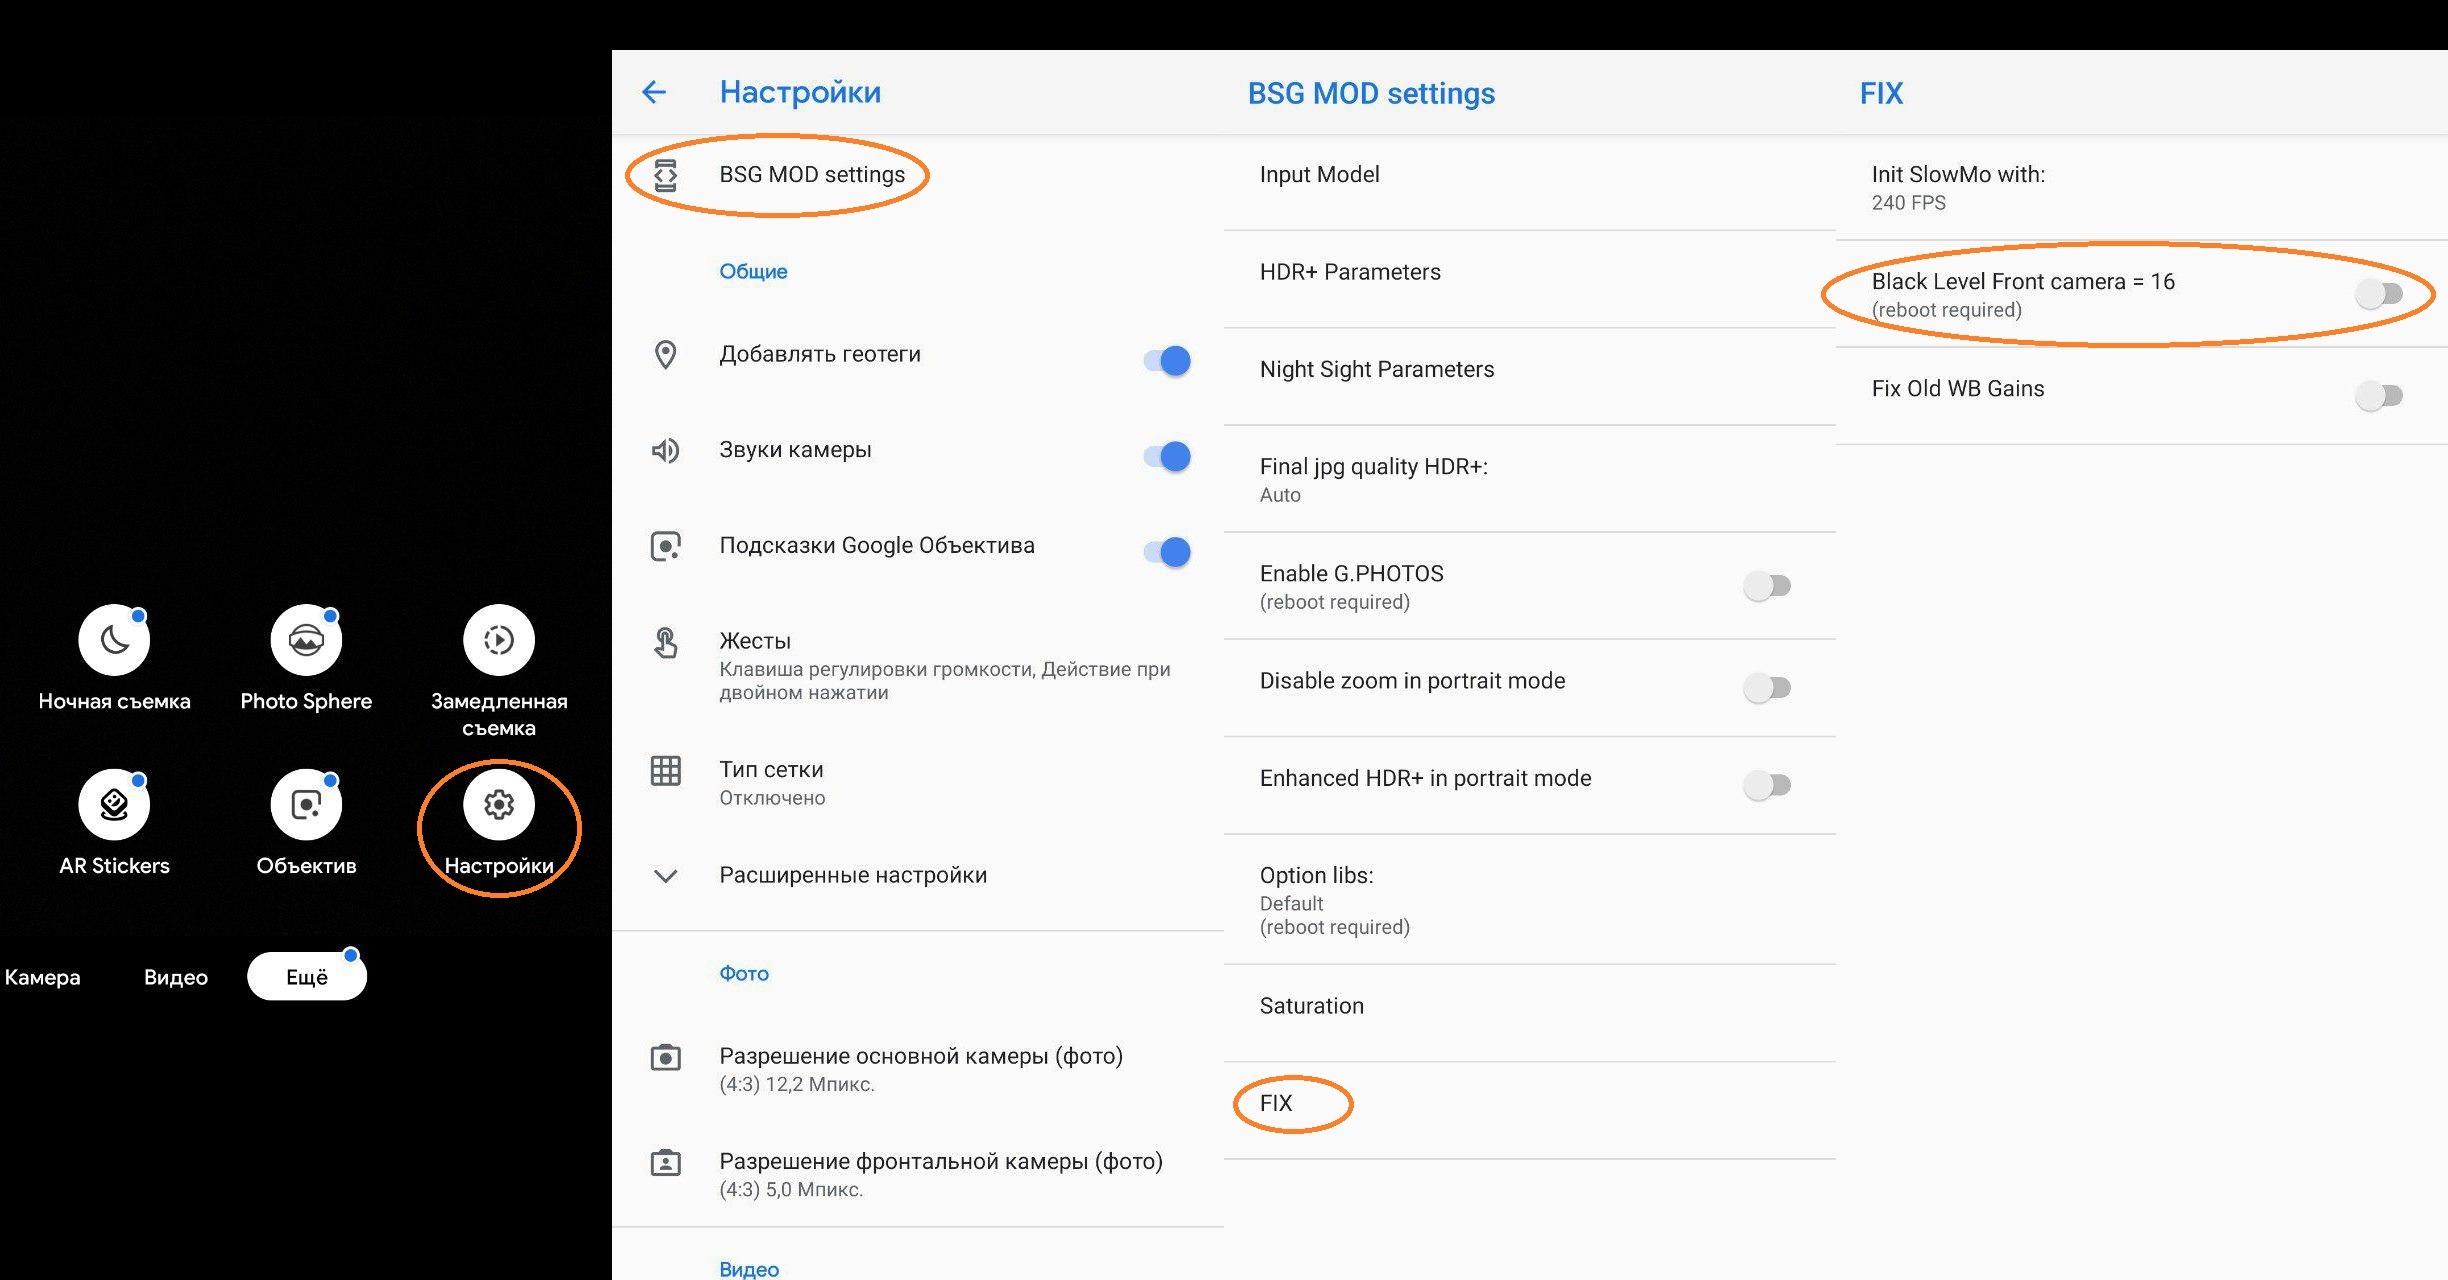
4. Why do I have photos on the front camera turn pink / purple?
Because you have turned on the mode for black level adjustment of the black color (black level front camera) in the photos. To disable it, do the following:
5. Why do I have problems with focus when shooting a video? And what can be done to avoid it?
Right now it is an actual problem and it is not because of the GCs, but the problem comes from the libraries. We hope that Xiaomi will correct it in the next updates.
To avoid problems with the focus, you need to switch to the front camera and back to the back, the focus will return to its previous state.
6. What is HDR+ and what is it for?
High Dynamic Range Imaging or HDR, as its name implies, is a method that aims to add more "dynamic range" to photographs, where dynamic range is the ratio of light to dark in a photograph. Instead of just taking one photo, HDR uses three photos, taken at different exposures. You can then use image editing software to put those three images together and highlight the best parts of each photo. In the case of HDR on smartphones, your phone does all the work for you—just snap your picture and it'll spit out one regular photo and one HDR photo. The result is something that should look more like what your eyes see, rather than what your camera sees.
7. How to enable HDR+ on the latest camera version?
It is always on. All you can turn on is the HDR + icon in the settings. Settings - Advanced Settings - Enable the slider on "HDR + Icon".

8. Why do my photos turn out faded and the colors are not saturated?
Because you have not set saturation settings. You can do it in step 8 !!!

9. Why does it take so long shoot?
Thus, several frames with different iso are shot to get more detail in highlights and shadows.

10. What are the best settings for HDR +?
For each, they are different, everyone sees the ideal saturation settings in their own way. Therefore, in this case, you better sit down in front of the landscape and set the settings for you. The optimal settings: Highlight Saturation (light level) - 2.0 and Shadow Saturation (shadow level) - 2.2, but choose it yourself.
11. Why is there only 5 megapixels for the front camera in the camera settings?
Because only 5 megapixels are used programmatically, and not 20 as in a stock camera. Whether the 20 megapixels will be realized is not known, ask our esteemed B-S-G.
12. What is RAW and what is it for?
RAW is a set of pure signals received directly from the camera's matrix. This means that a file of this format, strictly speaking, is not a photo. This is a kind of negative, which you then need to “show” - set its parameters (exposure, brightness, contrast, white balance, sharpness, saturation) and convert it into a final JPEG file (or better TIFF), which can already be viewed, edited and type.
That is, in essence, even a simple amateur camera “soap box”, producing a picture by our team, initially stores in its internal memory precisely these most raw data (having undergone only automatic calibration processing), but then immediately processes them according to a predetermined algorithm ( in accordance with the set shooting program), saves and displays on the screen a preview of the finished picture in JPEG or TIFF.
What is it for? The answer is obvious - the photographer will be able to achieve a much larger quality of the final image and will receive a significantly wider field for creative experiments if he converts RAW manually using certain programs.
This FAQ is written for the GCam version (MGC_5.1.018_MI8_V1b.apk)! DOWNLOAD!
13. INSTRUCTION. Why do my photos turn out faded even when the saturation settings are set?
This problem is seen on the firmware with the 9th android. This problem occurs in curved libraries in which there is a file (either a jerk, or a normal one) and because of this, GCam cannot work with them correctly. There is one way to solve the problem (root-rights are not required).
1) We need an unlocked bootloader (THIS IS REQUIRED!!!). Instructions for unlocking the bootloader HERE!
2) You need to install TWRP, instructions for Mi8, POCO, Mi Mix 2S.
3) Make a backup copy (backup) of the your files, which we will later replace. Boot into TWRP (volume button (+) and power button). The file is in vendor / lib / camera and we find com.qti.tuned.semco_imx363.bin there. Backup can be done in TWRP by copying it via FileManager. See screenshots ↓↓↓
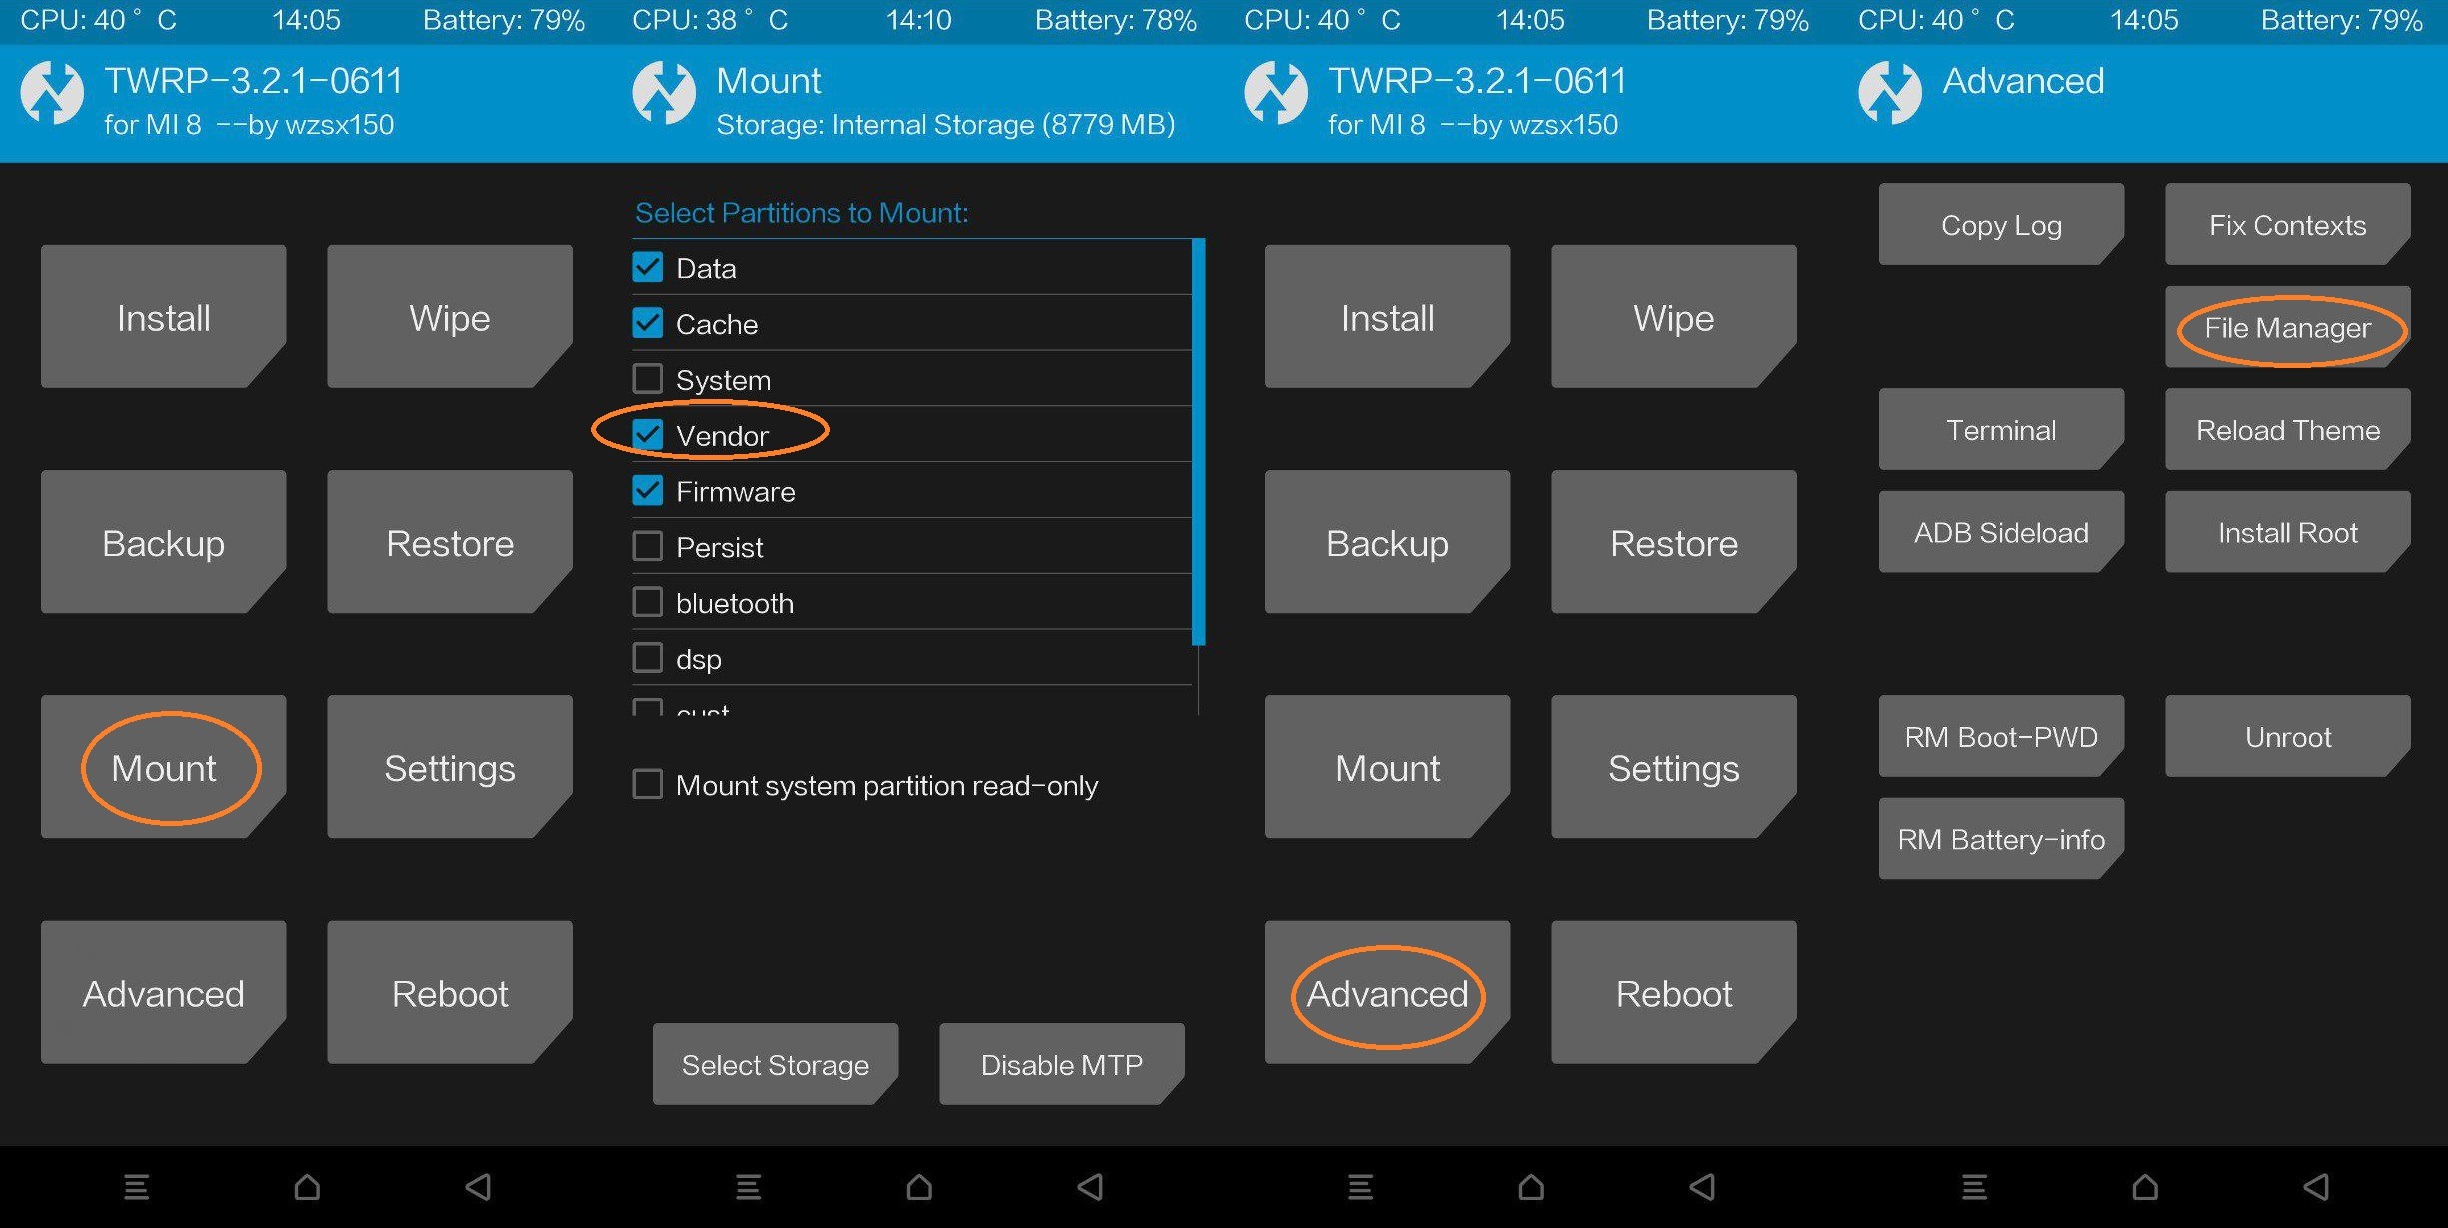

4) Next, download the file for installation via TWRP, dump it into the device directory and install, the instruction below ↓↓↓

Reboot into the system and check! After installation, you need to go to the Google camera and set the default saturation settings of 1.0 and 1.6. Done!
Thanks for the instruction to Nikolai Vladimirovich @Nikolay_Telegram and B-S-G @BSG19071979 in helping to create a script. You can tell me thanks for the script @artem_korotkevich
14. What are the optimal settings for MGC_5.3.015_MI8_V1a?
Optimal settings by the creator of the mod B-S-G ↓↓↓
Settings to get the highest quality photos.
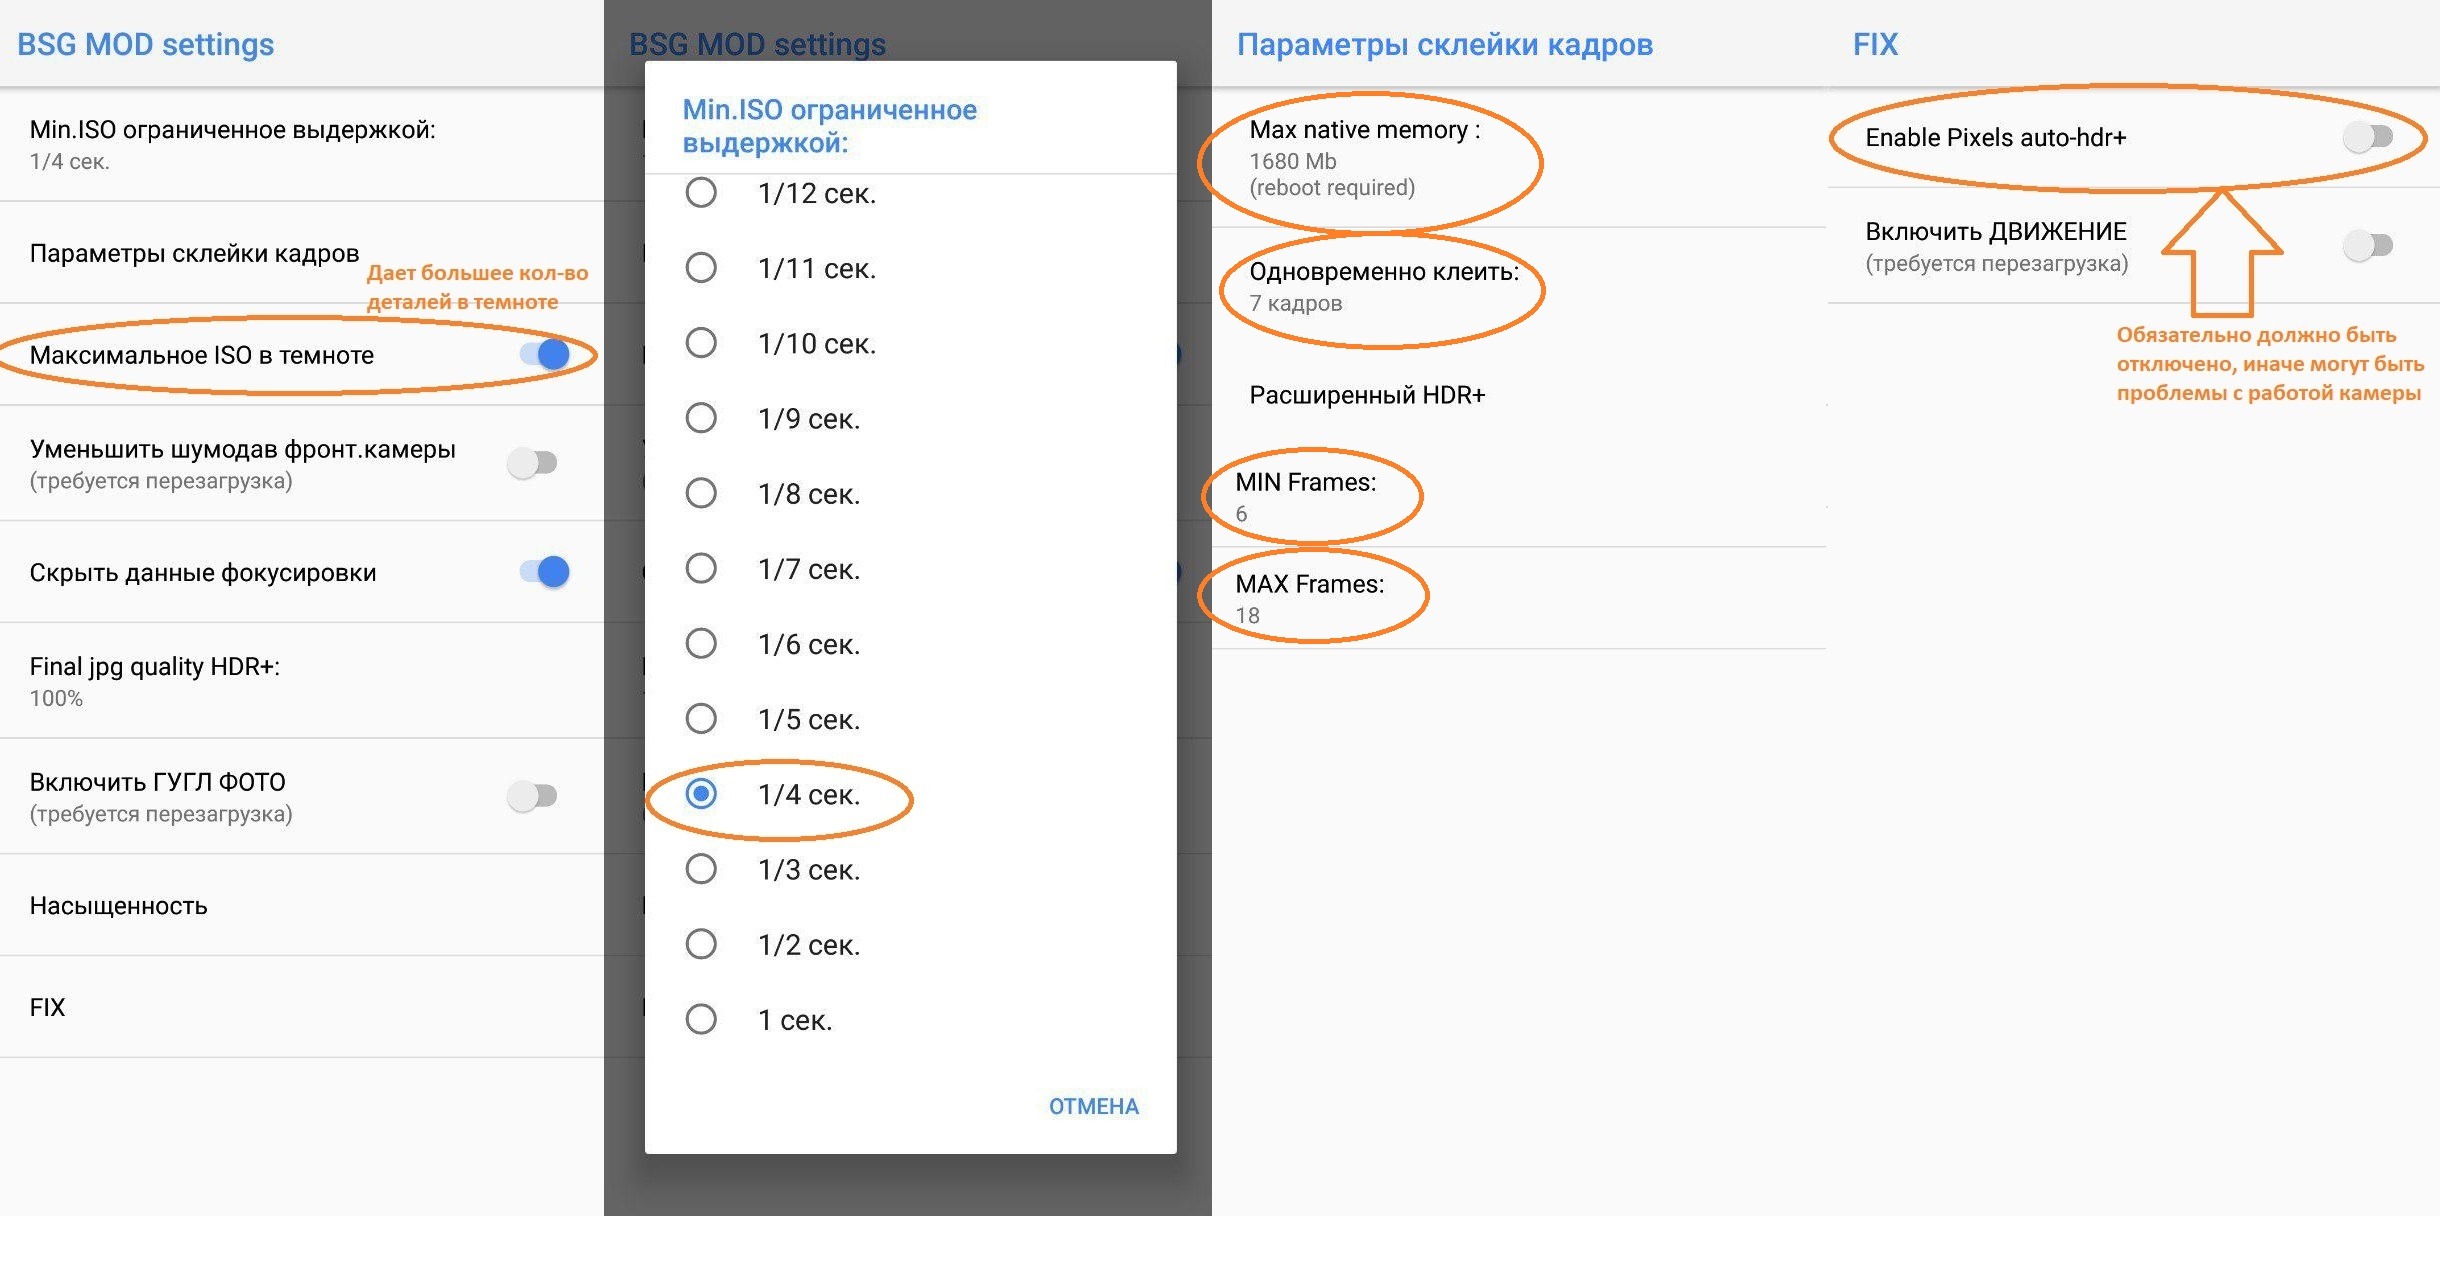
Each person has his or her maximum, depending on trembling your hands. In general, the most maximum: photo exposure 1s, min \ max frames 20, number of frames for hdr = 9, maximum iso in the dark = on, compression quality = 100, model N6P, memory 2.5gb. ↓↓↓

P.S. These settings may vary for each user in different ways. By selection and tests. The taste and color markers are different!
15. Will it work on my device? (Not Mi8, Mi Mix 2S, Pocophone)
No one knows how it will work on your device, because this application was developed for Mi8, Mi Mix 2S, Pocophone. What binds them? SoC Qualcomm Snapdragon 845, the application is written for the 845 dragon, as it will work for you, you will not answer, download, check, test. If any problems are on your device that are not included in this list (Mi8, Mi Mix 2S, Pocophone), then no one will fix it. The application was made only for Mi8, Mi Mix 2S, Pocophone. You can tell me about the performance of your device @artem_korotkevich (telegram) and I will make a list of the performances. The latest version of MGC_5.3.015_MI8_V1a !!!
16. How to make AR stickers for our GCam?
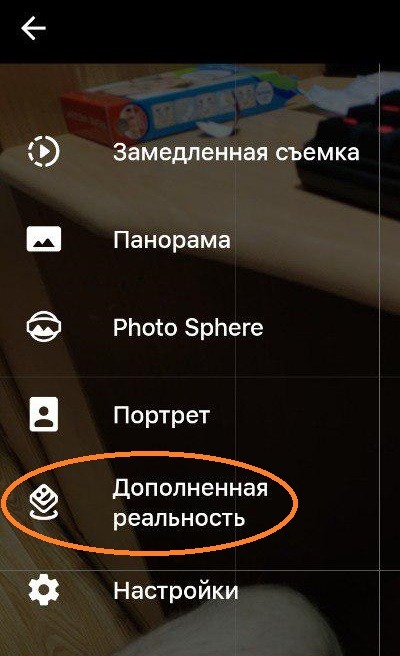
Go and download AR-stickers. Then install as a normal application. After that we go into GCam and in the mode selection we will see "Augmented reality". And then just play.
If it is still do not work and this item simply does not appear, then you need to download any AR-application. I tested only on THIS application. You need to install it, and after the item appears in the camera, you can delete it.
Thanks for the file to Dmitry Mikhailov @llopdolent.
17. Why doesn't it save the photo to the gallery on the version MGC_6.1.009_MI8_V1a.apk?
This problem is easily solved. You need to change the Input Model. The main thing that you did not stand Nexus 6. You can choose any other model.
