🚀 Forget Shimmer Widgets: Skeletonizer is the Smarter Way for Loading UI in Flutter
FlutterPulseThis article was translated specially for the channel FlutterPulseYou'll find lots of interesting things related to Flutter on this channel. Don't hesitate to subscribe!🚀

When building Flutter apps, one thing is certain: users hate blank screens. That's why we often use loading indicators like progress…
When building Flutter apps, one thing is certain: users hate blank screens. That's why we often use loading indicators like progress spinners or the famous shimmer effect.
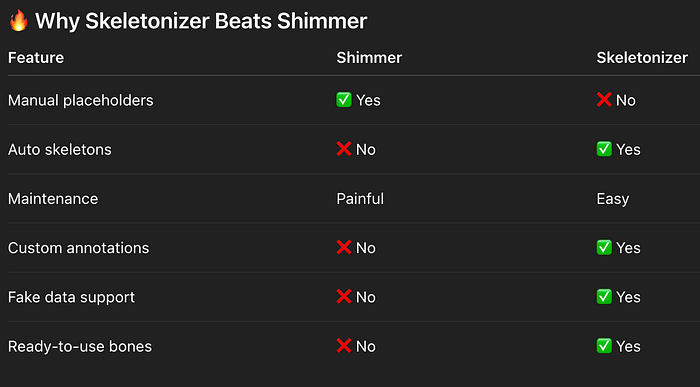
Shimmer looks cool, but as Flutter developers we know the pain — writing custom shimmer widgets for every screen is repetitive, time-consuming, and hard to maintain.
That's where Skeletonizer comes in. Instead of writing placeholders manually, Skeletonizer automatically turns your existing UI into skeleton loaders with zero extra effort.
🧩 What Are Skeleton Loaders?
Skeleton loaders are temporary placeholders that mimic the structure of your UI while real content is being fetched.
Instead of showing a boring spinner, users see a greyed-out version of the screen, often with a shimmer animation. This gives the illusion of instant loading and makes the app feel smoother.
❌ The Problem with Shimmer Widgets
Using the popular shimmer package requires creating fake placeholder layouts for every screen.
- You end up duplicating your UI structure.
- If you change the real UI, you also need to update the shimmer UI.
- Lots of boilerplate code.
This gets boring and messy very quickly.
✅ Enter Skeletonizer
Skeletonizer solves this problem by reusing your real layout and automatically converting it into skeleton placeholders.
👉 No more duplicate skeleton UIs.
👉 No more painful maintenance.
👉 Just wrap your widget tree with Skeletonizer and you're done.
⚡ Basic Usage
Skeletonizer(
  enabled: true,
  child: ListView.builder(
    itemCount: 7,
    itemBuilder: (context, index) {
      return Card(
        child: ListTile(
          title: Text('Item number $index as title'),
          subtitle: const Text('Subtitle here'),
          trailing: const Icon(Icons.ac_unit),
        ),
      );
    },
  ),
)
- When
enabledistrue, Skeletonizer automatically creates skeletons. - When
enabledisfalse, your actual data is displayed.
You can also use SliverSkeletonizer for slivers.
🏗️ The Need for Fake Data
Here's the catch: Skeletonizer works by converting real layouts. If your layout needs data (like users list), you'll need to provide fake data while loading.
Example:
if (_loading) {
  final fakeUsers = List.filled(
    7,
    User(name: 'User name', jobTitle: 'Developer', avatar: ''),
  );
  return Skeletonizer(
    child: UserList(users: fakeUsers),
  );
} else {
  return UserList(users: realUsers);
}
Alternatively, use the enabled flag with mock data:
final users = _loading
    ? List.filled(7, const User(name: 'User', jobTitle: 'Developer', avatar: ''))
    : realUsers;
return Skeletonizer(
  enabled: _loading,
  child: UserList(users: users),
);
🛠️ Handling Special Cases (Annotations)
Sometimes, skeletonizing everything doesn't make sense. Skeletonizer provides annotations to control behavior:
Skeleton.ignore→ Exclude a widget from skeletonizing.Skeleton.leaf→ Mark a widget as a "leaf" bone.Skeleton.keep→ Keep widget as-is (not skeletonized).Skeleton.shade→ Apply only a shader mask.Skeleton.replace→ Replace widgets (useful for images).Skeleton.unite→ Group multiple small bones into one.Skeleton.ignorePointers→ Ignore pointer events during loading.
Example for replacing an image:
ListTile(
  title: Text(users[index].name),
  subtitle: Text(users[index].jobTitle),
  leading: Skeleton.replace(
    width: 48,
    height: 48,
    child: CircleAvatar(
      radius: 24,
      backgroundImage: NetworkImage(users[index].avatar),
    ),
  ),
);
🎨 Custom Skeletons with Bone Widgets
Don't want to rely on fake data? You can create skeletons manually with Bone widgets:
Skeletonizer.zone(
  child: Card(
    child: ListTile(
      leading: Bone.circle(size: 48),
      title: Bone.text(words: 2),
      subtitle: Bone.text(),
      trailing: Bone.icon(),
    ),
  ),
);
Available helpers:
Bone.text()→ Skeleton textBone.multiText(lines: 3)→ Multi-line textBone.circle(size)→ Circle shapeBone.square(size)→ Square shapeBone.icon()/Bone.button()→ Icon & button skeletons
This is perfect when you want full control over your skeleton layout.
🎨 Customization Options
Skeletonizer supports multiple effects, including:
- ShimmerEffect (classic shimmer)
- SolidEffect (static placeholders)
- PulseEffect (pulsating skeletons)
Example with shimmer config:
Skeletonizer(
  effect: const ShimmerEffect(
    baseColor: Colors.grey,
    highlightColor: Colors.white,
    duration: Duration(seconds: 1),
  ),
  child: ...
)
You can also:
- Animate transitions with
enableSwitchAnimation - Configure text skeletons with
textBoneBorderRadius - Apply global config via
SkeletonizerConfigData
Skeletonizer doesn't just replicate shimmer — it evolves it.
🎯 Conclusion
If you're still handcrafting shimmer placeholders, you're wasting time. Skeletonizer is the smarter, faster, and cleaner way to build loading states in Flutter.
- ✅ No boilerplate
- ✅ Auto-generated skeletons
- ✅ Highly customizable
- ✅ Works across all platforms (Android, iOS, Web, Desktop)
Next time you're tempted to copy-paste shimmer widgets, just use:
dependencies:
  skeletonizer: ^2.1.0+1
👉 Try it out today: Skeletonizer on pub.dev