Flutter Flavors Tutorial: Setup Dev, Staging, and Production Environments (Step-by-Step Guide)
FlutterPulseThis article was translated specially for the channel FlutterPulseYou'll find lots of interesting things related to Flutter on this channel. Don't hesitate to subscribe!🚀
If you've ever built a Flutter app that needs separate versions — say development, staging, and production — you've probably run into the…
If you've ever built a Flutter app that needs separate versions — say development, staging, and production — you've probably run into the hassle of juggling multiple builds. Manually changing app names, bundle IDs, or API URLs can quickly become messy.
That's where Flutter flavors come in.
Think of flavors as different identities for the same app. Each flavor can have its own app name, icon, bundle ID, and even API endpoints, while sharing the same codebase. This is a must-have setup for professional Flutter projects.
In this tutorial, I'll walk you through:
- Set up Android flavors
- Configure iOS schemes
- Use a FlavorConfig model to manage environment values in Dart
- Run and build apps for dev, staging, and prod
- Access a working GitHub example repo
Why Use Flutter Flavors?
- Separate environments: Keep dev, staging, and prod builds isolated.
- Unique bundle IDs: Avoid conflicts when installing multiple builds on the same device.
- Custom configurations: API URLs, feature toggles, analytics keys, etc.
- Professional workflow: Makes QA, release, and debugging much cleaner.
Step 1: Define Flavors in Android
Open your android/app/build.gradle and add a productFlavors block inside android {}:
android {
    // ...
flavorDimensions "default"
    productFlavors {
        dev {
            dimension "default"
            applicationId "com.example.myapp.dev"
            versionNameSuffix "-dev"
        }
        staging {
            dimension "default"
            applicationId "com.example.myapp.staging"
            versionNameSuffix "-staging"
        }
        prod {
            dimension "default"
            applicationId "com.example.myapp"
        }
    }
}
Now you have three flavors: dev, staging, and prod.
Step 2: Define Schemes in iOS
For iOS, flavors are managed using schemes and build configurations.
Create Schemes
- Open your project in Xcode.
- Go to Product → Scheme → Manage Schemes.
- Duplicate the existing scheme and rename them (e.g.,
dev,staging,prod).

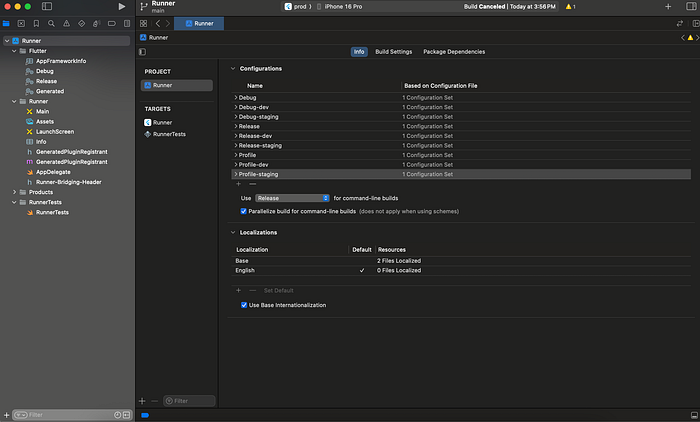
Create Build Configurations
- In Xcode's sidebar, select your project (Runner).
- Under the Info tab → Configurations.
- Duplicate
DebugandReleaseconfigs → rename them (Debug-dev,Release-dev,Debug-staging, etc.). - Assign these configurations to your schemes (Edit scheme → Build → choose config).
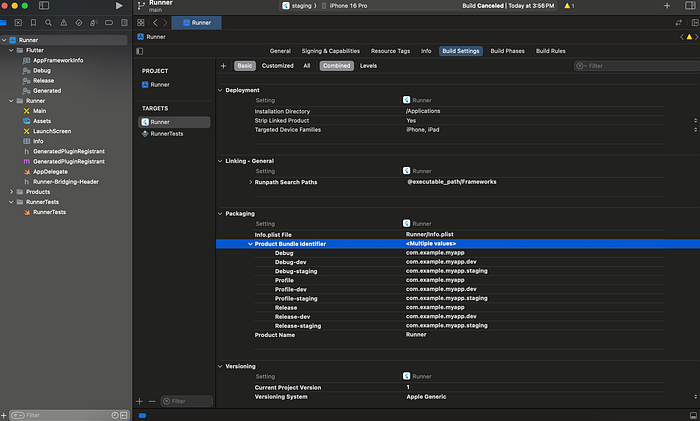
Set Bundle Identifiers
Each environment needs a unique bundle ID:
- Select your Runner target in Xcode.
- Go to Build Settings → Packaging → Product Bundle Identifier.
- Switch the active scheme at the top (dev, staging, prod).
- For each configuration, set a unique bundle ID, e.g.:
com.example.myapp.dev
com.example.myapp.staging
com.example.myapp (prod)
💡 Once configured, switching schemes in Xcode automatically applies the right bundle ID. No more manual edits.
Step 3: Managing API URLs & Environment Values in Dart
The cleanest way to handle environment-specific data is through a FlavorConfig model.
Instead of sprinkling if (flavor == "dev") checks across your app, keep all environment values in one place.
flavor_config.dart
enum AppFlavor { dev, staging, production }

class FlavorConfig {
  FlavorConfig({
    required this.baseUrl,
    required this.flavor,
    // Add other env-specific fields
  });

  final String baseUrl;
  final AppFlavor flavor;
  static late FlavorConfig shared;

  factory FlavorConfig.dev() {
    return FlavorConfig.shared = FlavorConfig(
      baseUrl: "https://dev-api.example.com",
      flavor: AppFlavor.dev,
    );
  }

  factory FlavorConfig.staging() {
    return FlavorConfig.shared = FlavorConfig(
      baseUrl: "https://staging-api.example.com",
      flavor: AppFlavor.staging,
    );
  }

  factory FlavorConfig.prod() {
    return FlavorConfig.shared = FlavorConfig(
      baseUrl: "https://api.example.com",
      flavor: AppFlavor.production,
    );
  }
}
Entry files for each environment
Each environment gets its own entry point:
main_dev.dart
import 'package:flutter/material.dart';
import 'package:flutter_flavors_example/flavor_config.dart';

void main() {
  FlavorConfig.dev(); // initialize dev config
  runApp(MyApp());
}
main_staging.dart
import 'package:flutter/material.dart';
import 'package:flutter_flavors_example/flavor_config.dart';

void main() {
  FlavorConfig.staging(); // initialize staging config
  runApp(MyApp());
}
main.dart (Production)
import 'package:flutter/material.dart';
import 'package:flutter_flavors_example/flavor_config.dart';

void main() {
  FlavorConfig.prod(); // initialize production config
  runApp(MyApp());
}
Using it anywhere in the app
final apiUrl = FlavorConfig.shared.baseUrl;

if (FlavorConfig.shared.flavor == AppFlavor.dev) {
  debugPrint("Running in DEV mode with $apiUrl");
}
👉 This ensures your app always uses the right API URL, keys, or toggles depending on the active flavor.
Step 4: Build Release APKs/Apps
When you're ready to build:
Android APKs
# Android APKs
flutter build apk --flavor dev -t lib/main_dev.dart
flutter build apk --flavor staging -t lib/main_staging.dart
flutter build apk --flavor prod -t lib/main.dart
iOS IPA
# iOS IPA
flutter build ios --flavor prod -t lib/main.dart
GitHub Repository
To save you time, I've created a working example with Android productFlavors, iOS schemes, and the FlavorConfig model.
GitHub - ahmedawwan/flutter_flavors_example: Example Flutter project demonstrating App Flavors…Example Flutter project demonstrating App Flavors (Dev, Staging, Prod) with Android productFlavors, iOS schemes, and a…
github.com
Wrapping Up
Flutter flavors make it easy to manage multiple environments without duplicating code. Whether it's a dev build with debug tools, a staging build for QA, or a production-ready release, flavors keep everything organized.
You now know how to:
- Configure Android productFlavors
- Set up iOS schemes & bundle IDs
- Centralize config with a FlavorConfig model
- Run and build environment-specific apps
👉 Have you set up flavors in your Flutter project yet? What challenges did you face?
Drop a comment below — and don't forget to ⭐ the GitHub repo if this helped you!