Digitech Jamman Solo

🛑 ALL INFORMATION CLICK HERE 👈🏻👈🏻👈🏻
Digitech Jamman Solo
Add to my manuals
Add
Bookmark this page
Add
Manual will be automatically added to "My Manuals"
page
of
72
Go
page 1 page 2 page 3 page 4 page 5 - Declaration of conformity page 6 page 7 - Table of Contents page 8 - INTRODUCTION page 9 - FEATURES page 10 - USER INTERFACE & CONNECTORS page 11 page 12 page 13 page 14 page 15 - CONNECTION DIAGRAMS page 16 - Multi-Pedal/Single-Player Using JamSync page 17 - Multi-Pedal/Multi-Player Using JamSync page 18 - QUICK START page 19 - OPERATION page 20 - Free-Form vs Auto Quantized Looping page 21 - Recording a Loop (Free-Form) page 22 - Recording a Loop Using Auto Record page 23 - Recording a Loop (Auto Quantize) page 24 - Recording a Loop Using Pedal Tempo (Auto... page 25 - Recording a Loop Using the AUX IN Jack page 26 - Multiple Loop Playback (Cueing Loops) page 27 - Recording Overdubs page 28 page 29 - Undo, Redo, & Clear page 30 page 31 - Time Stretching a Phrase page 32 - Storing a Loop page 33 - Copying a Loop page 34 - Deleting a Loop page 35 - Erasing All Loops (Internal Memory) page 36 - Erasing All Loops (External Memory Card) page 37 - USING JAMSYNC page 38 page 39 page 40 page 41 - Recording Loops One at a Time Using JamS... page 42 page 43 - Recording Loops Sequentially Using JamSy... page 44 page 45 - Playing Back Loops Using JamSync page 46 - SETUP page 47 - Playback Type page 48 page 49 - Tempo page 50 - Time Signature page 51 - Rhythm Type page 52 page 53 - Stop Modes page 54 - Reverse page 55 - Auto Record page 56 - Pedal Tempo page 57 - Record Sequence page 58 - EXTERNAL MICRO SD/SDHC MEMORY CARDS page 59 - Formatting Memory Cards page 60 page 61 - JAMMANAGER XT LIBRARIAN SOFTWARE page 62 - OPTIONAL FS3X FOOTSWITCH page 63 - Multiple Loop Playback with FS3X page 64 page 65 - FACTORY RESTORE page 66 - SPECIFICATIONS page 67 page 68 - Power requirements page 69 page 70 page 71 page 72
/
72
1
2
3
4
5
Multi-modeling recording guitar workstation (132 pages)
Page 1
Owner’s Manual...
Page 2
WARNING FOR YOUR PROTECTION READ THE FOLLOWING: KEEP THESE INSTRUCTIONS HEED ALL WARNINGS FOLLOW ALL INSTRUCTIONS THE APPARATUS SHALL NOT bE ExPOSED TO DRIPPING OR SPLASHING LIqUID AND NO ObjECT FILLED WITH LIqUID, SUCH AS vASES, SHALL bE PLACED ON THE APPARATUS CLEAN ONLY WITH A DRY CLOTH.
Page 3
EXTREME (RF) RADIO FREQUENCY ENVIRONMENTS ELECTROMAGNETIC COMPATIBILITY The JamMan Solo XT may experience audio dropout if exposed to an Extreme RF Environment. Such RF This device complies with part 15 of the FCC Rules and Environments may be found in very close proximity to strong radio transmitters. If the audio is lost due to...
Page 4
The symbols shown above are internationally accepted symbols that warn of potential hazards with electrical products. The lightning flash with arrowpoint in an equilateral triangle means that there are dangerous voltages present within the unit. The exclamation point in an equilateral triangle indicates that it is necessary for the user to refer to the owner’s manual.
Page 5: Declaration Of Conformity
8760 S. Sandy Parkway EN 55024:1998 Sandy, Utah 84070, USA FCC Part 15 Date: October 24, 2012 European Contact: Your local DigiTech Sales and Service Office or Harman Music Group 8760 South Sandy Parkway Sandy, Utah 84070 USA Ph: (801) 566-8800...
Page 6
6. The consumer forfeits the benefits of this warranty if the product’s main assembly is opened and tampered with by anyone other than a certified DigiTech technician or, if the product is used with AC voltages outside of the range suggested by the manufacturer.
Page 7: Table Of Contents
Table of Contents INTRODUCTION ............2 Erasing All Loops (Internal Memory) ......29 Erasing All Loops (External Memory Card) .... 30 FEATURES ..............3 USING JAMSYNC ............31 INCLUDED ITEMS ............3 Recording Loops One at a Time Using JamSync ..35 USER INTERFACE &...
Page 8: Introduction
200 memory locations which can store over 32 hours of loops! The JamMan Solo XT has all the same great features which made up the original JamMan Solo and adds stereo looping, Micro SD/SDHC compatible memory card support, Auto Record, selectable Stop Modes, as well as the exciting new JamSync feature which allows for syncing of multiple JamSync compatible devices.
Page 9: Features
Features • Single Phrase & Loop Playback • 9 Built-In Rhythm Guide Patterns • JamMan JamSync Supports Syncing of • Auto Record Sensing ® multiple JamMan Solo XTs for Multi- • Auto Quantization Track Looping • Time Stretching • Stereo 44.1 kHz 16-Bit .wav File •...
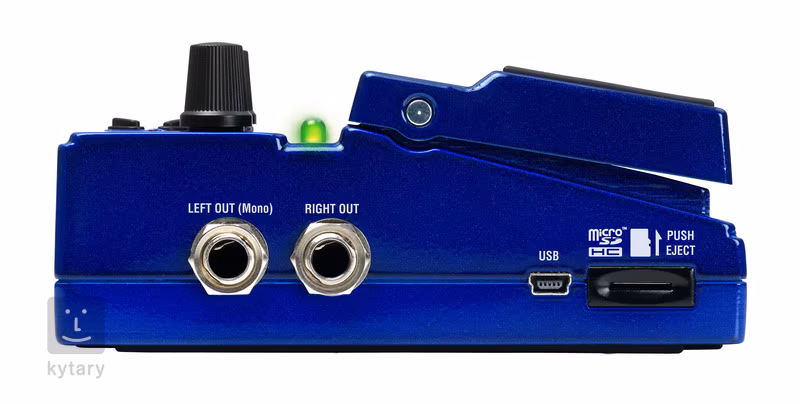
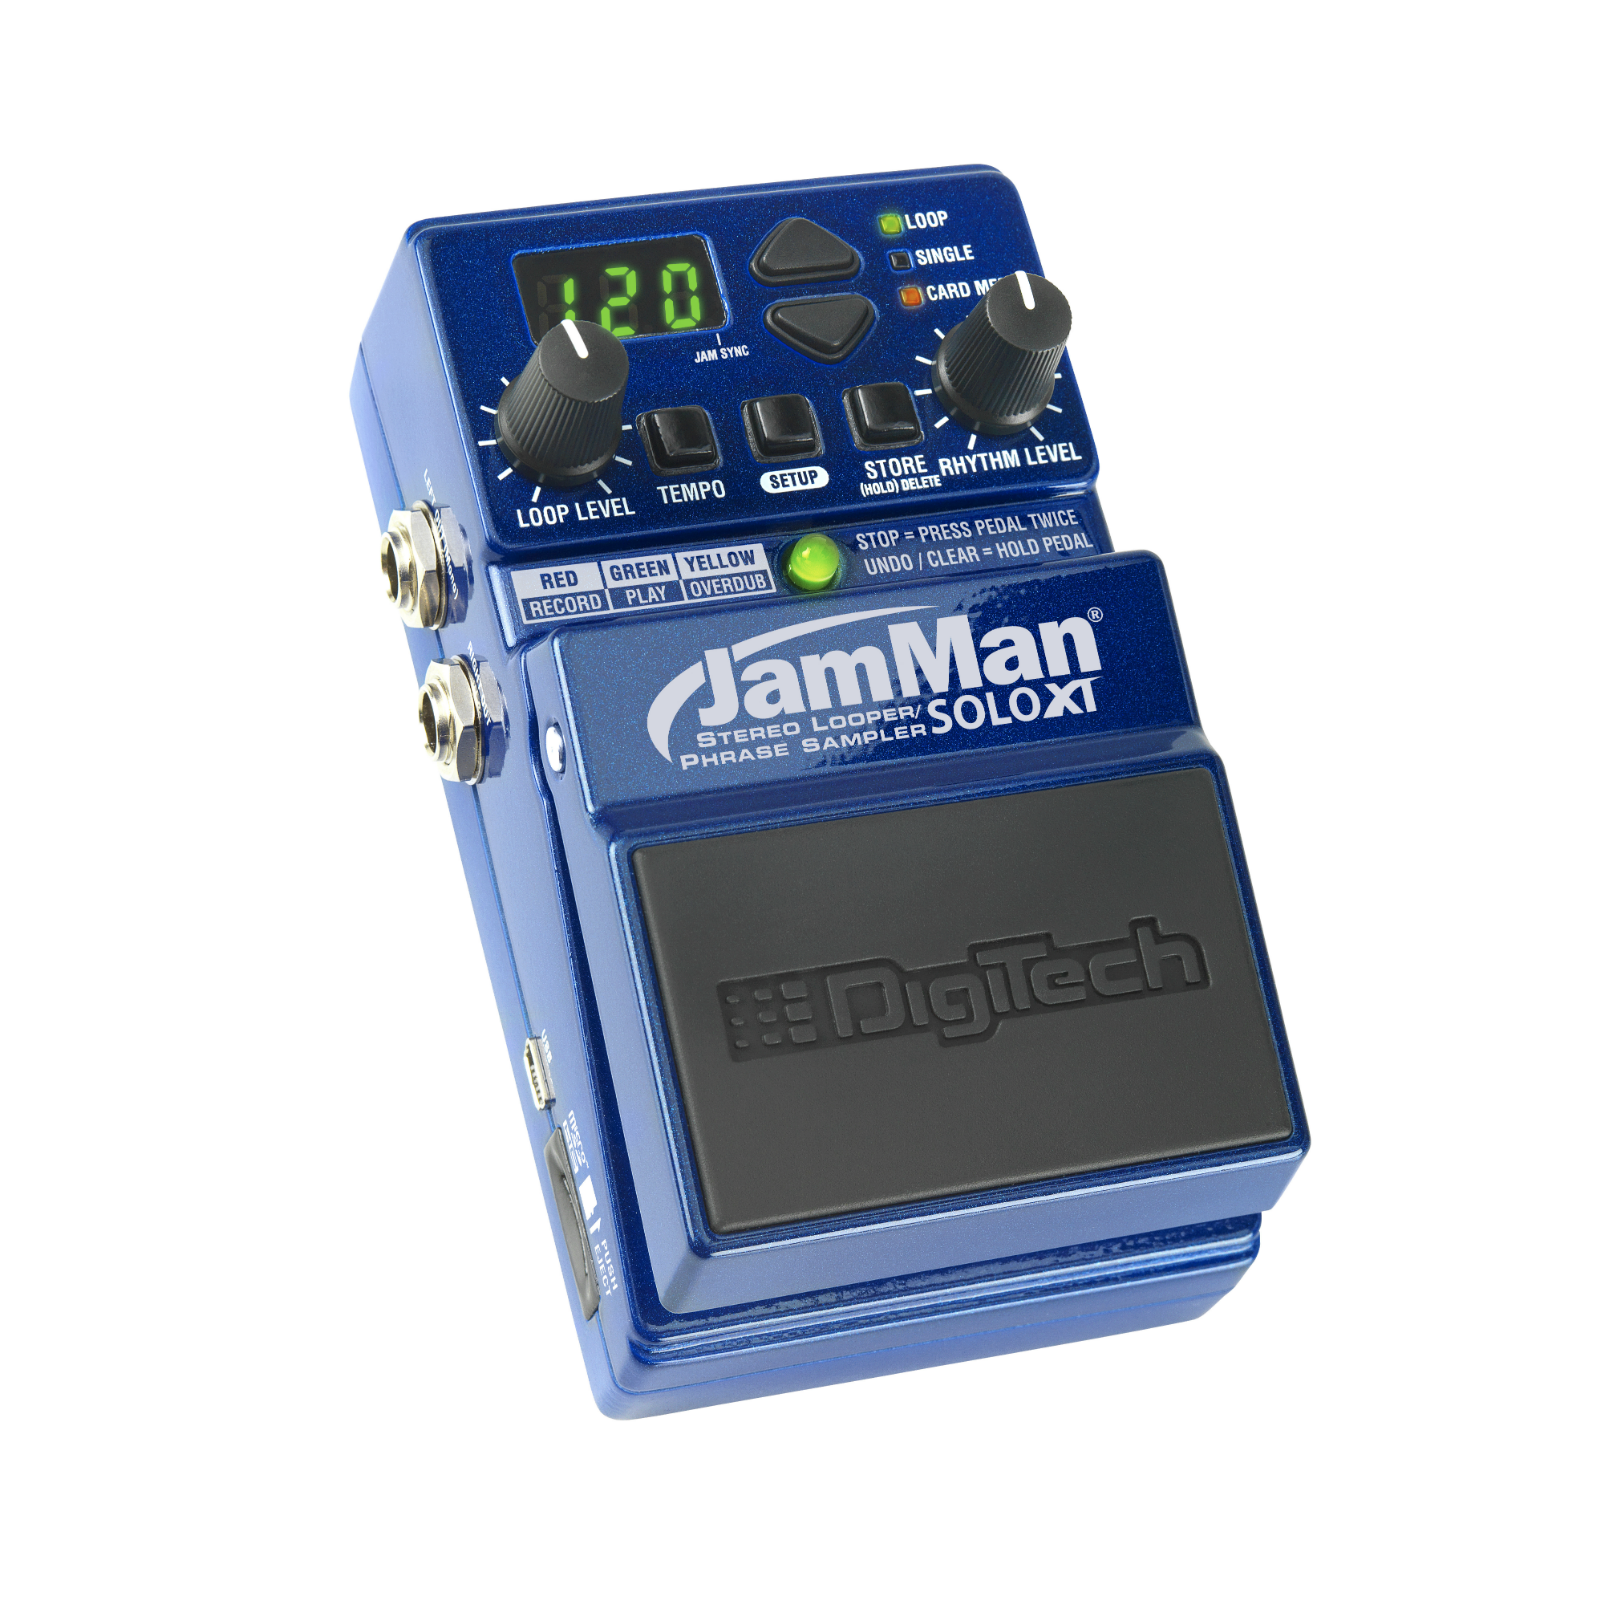
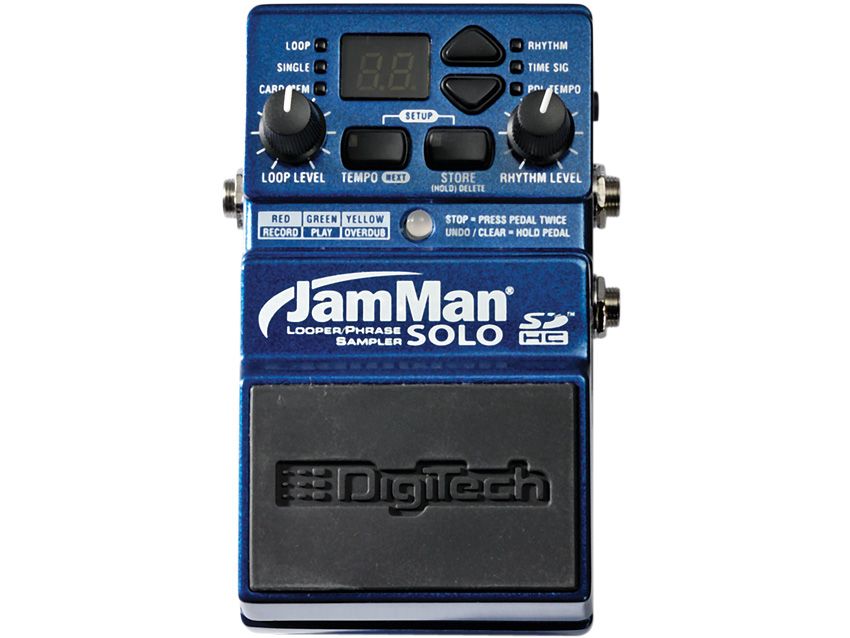
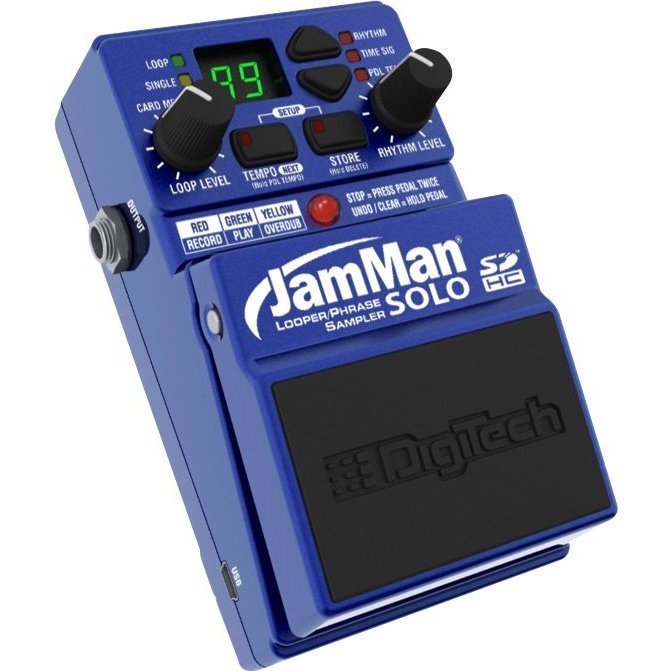
Page 10: User Interface & Connectors
User Interface & Connectors undoing and redoing the last overdub. Pressing the Pedal Switch two times quickly stops loop playback. This switch is also used for exiting the Setup menu and aborting the store JAMSYNC function. 2. STATUS LED This LED indicates status during record, playback, and overdub, as described below.
Page 11
SD/SDHC memory card. When this LED is off, loops are being selected 6. LOOP LED This green LED indicates the from the JamMan Solo XT’s internal currently selected memory location memory. is set to playback continuously when 9. RHYTHM LEVEL CONTROL play is initiated.
Page 12
beats of the measure. If the tempo of 10 11 12 a stored loop is changed, the loop plays back at the new tempo without any change of pitch. Pressing and holding this button will reset any JAMSYNC tempo change applied to a loop (back to its original tempo) as long as the tempo change has not been stored to memory.
Page 13
13. POWER JACK Connect the included power supply 16. FOOTSWITCH JACK to this jack. The JamMan Solo XT can This jack accommodates the FS3X only be powered using the external footswitch for remotely selecting power supply.
Page 14
PC or Mac computer stereo source, such as audio from a for transferring loop files to and portable music player. from the JamMan Solo XT using the JamManager XT loop librarian software. 23. MICRO SD/SDHC CARD SLOT...
Page 15: Connection Diagrams
JamMan Solo XT Out 2 In 2 (optional). Out 1 (Mono) In 1 (Mono) Connect optional FS3X to the JamMan Solo XT’s FOOT- Connect the RIGHT OUT jack to a SWITCH input for hands-free second amp’s input (optional). control.
Page 16: Multi-Pedal/Single-Player Using Jamsync
Multi-Pedal/Single-Player Using JamSync Connect the JamMan™ Solo Connect the master’s JAMSYNC OUT jack Connect a music player or some XT’s LEFT OUT jack to the to the slave’s JAMSYNC IN jack. other audio source to the AUX amp’s input. IN jack (optional). Connect your guitar/bass to the LEFT INPUT.
Page 17: Multi-Pedal/Multi-Player Using Jamsync
Multi-Pedal/Multi-Player Using JamSync MASTER JAMSYNC SLAVE SLAVE JAMSYNC JAMSYNC...
Page 18: Quick Start
and play along with the loop (the Connect the included power adapter LED will light yellow). STATUS to the JamMan Solo XT. Press the again Select an empty memory location to stop overdubbing and playback will...
Page 19: Operation
Operation Selecting a Loop in Memory To select loops, press the buttons. As you press these buttons the LED display will update, showing the currently selected memory location number. You can also press and hold these buttons to scroll through all the loop memories. When Loop 200 is reached, pressing the button will cause the loop memories ...
Page 20: Free-Form Vs Auto Quantized Looping
Free-Form vs Auto Quantized Looping There are two ways you can record loops using the JamMan Solo XT, Free-Form looping or Auto Quantize looping. Free-Form Looping Free-Form looping is the standard way loopers have been used since their inception. You initiate recording of the phrase and then set the loop end point when you reach the end of your passage.
Page 21: Recording A Loop (Free-Form)
If your timing was a little early or late, not to worry, the JamMan Solo XT automatically adjusts the loop length to the measure length set by the Tempo and Time Signature. The JamMan Solo XT can record and playback loops up to 10 minutes long. NOTE: Recording a Loop (Free-Form)
Page 22: Recording A Loop Using Auto Record
Recording a Loop Using Auto Record See “ ” for information on enabling the Auto Record feature. Setup > Auto Record Select an empty memory location ”). Signature using the buttons Press the to arm LEDs will be off). LOOP SINGLE recording, indicated by a flashing red...
Page 23: Recording A Loop (Auto Quantize)
Recording a Loop (Auto Quantize) Pedal Tempo Off (Default)/Auto Record Off (Default) Select an empty memory location Press the using the buttons initiate recording and begin playing. LEDs will be off). You will receive a one measure count LOOP SINGLE in, indicated by a flashing red and...
Page 24: Recording A Loop Using Pedal Tempo (Auto Quantize)
Recording a Loop Using Pedal Tempo (Auto Quantize) See “ ” for information on enabling the Pedal Tempo feature. Setup > Pedal Tempo Select an empty memory location hold the until using the buttons button LED repeatedly TEMPO LEDs will be off).
Page 25: Recording A Loop Using The Aux In Jack
Recording a Loop Using the AUX IN Jack The JamMan Solo XT can record stereo loops using the AUX IN 1/8” mini jack. This jack can be connected to portable music players for practicing or learning new songs. Recording loops from the AUX IN jack is the same as recording your instrument loops using the 1/4”...
Page 26: Multiple Loop Playback (Cueing Loops)
NOTE: of a playing loop, the JamMan Solo XT will not have enough time to cue up the next loop and the current loop will continue to play one more time. You can also use the optional FS3X footswitch for...
Page 27: Recording Overdubs
Recording Overdubs Once a loop has been recorded, the JamMan Solo XT allows you to record multiple overdubs on top of the loop. Overdub recording is only possible with Loops. Single Phrases do not allow for overdub recording. If you do wish to add overdubs to a Single Phrase, you can always convert it to a Loop as described in “...
Page 28
To record an overdub: Press the To add additional overdubs, repeat initiate playback of the loop, indicated steps 2 and 3. by a solid green LED. STATUS Quickly press the Press the again twice to stop loop playback. ...
Page 29: Undo, Redo, & Clear
Undo, Redo, & Clear Undo The Undo feature allows you to delete the last overdub which you recorded. You can only undo your last overdub, and only if it has not been stored to memory. If you begin recording another overdub, the previously recorded overdub becomes merged with the original loop.
Page 30
To Undo/Redo/Clear a recorded overdub: Select an existing loop in memory overdub, ensure the loop is still playing using the buttons or and press and hold the < PEDAL load an empty memory location and again until the SWITCH> STATUS record and store a new loop.
Page 31: Time Stretching A Phrase
Time Stretching a Phrase You can speed up or slow down the tempo of a stored loop or single phrase without changing its pitch. There are two ways to time stretch a phrase: set the exact tempo using the Tempo option in the Setup menu, or tap in the tempo using the ...
Page 32: Storing A Loop
If dF appears in the display, this indicates the internal or external memory is full. Loops NOTE: should be archived using the JamManager XT librarian and then deleted from the JamMan Solo XT to free up memory.
Page 33: Copying A Loop
LEDs will be off). LOOP SINGLE If dF appears in the display, this indicates the internal or external memory is full. Loops NOTE: should be archived using the JamManager XT librarian and then deleted from the JamMan Solo XT to free up memory.
Page 34: Deleting A Loop
Deleting a Loop The JamMan Solo XT uses both internal memory and optional external Micro SD/ SDHC memory cards for the storage of loop files. Loops can be deleted one at a time to make room for other loops. You can delete loops from both internal memory and external memory.
Page 35: Erasing All Loops (Internal Memory)
Erasing All Loops (Internal Memory) The JamMan Solo XT allows you to quickly erase all loops from internal memory. Erasure of all loops cannot be undone! You should backup any loops you wish to keep, WarNINg! using the JamManager XT loop librarian management software, before erasing all loops.
Page 36: Erasing All Loops (External Memory Card)
Erasing All Loops (External Memory Card) The JamMan Solo XT allows you to quickly erase all loops from external memory. The erase procedure only erases JamMan Solo XT loop data. All other data and files on the card are left untouched.
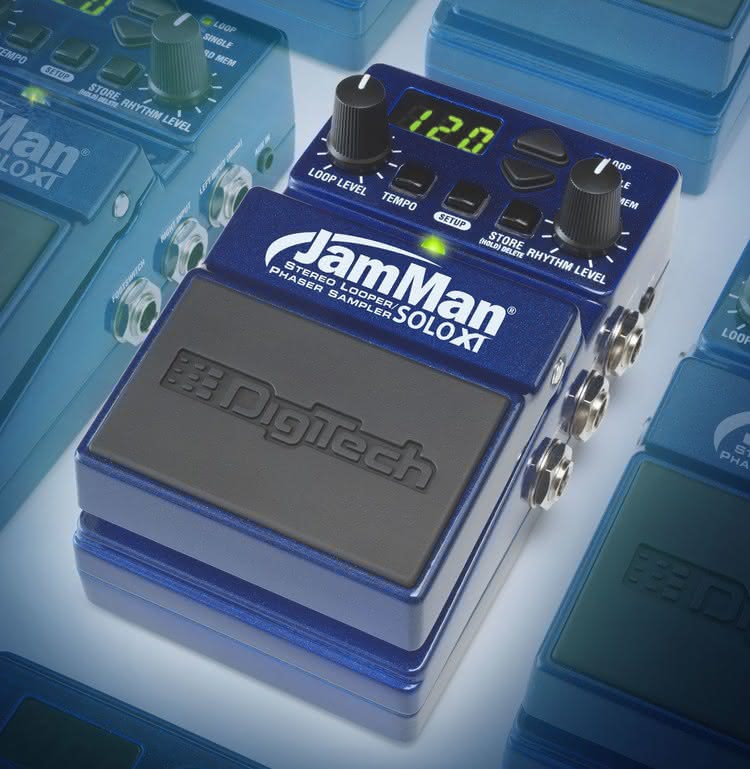
Page 37: Using Jamsync
To use JamSync, connect the master JAMSYNC JamMan Solo XT’s jack JAMSYNC OUT to the jack of the first slave JAMSYNC IN device.
Page 38
When JamMan Solo XTs are initially connected via the JAMSYNC Slave is synced jacks, will appear in the slave’s display, indicating JamSync connection is established. The indicator will also be displayed 20 . when initially powering up devices which are slaved to a master. Properly connected slaves will also be indicated by a decimal JAMSYNC segment which will light in the display, as shown to the left.
Page 39
For information on verifying or changing the settings in the previous table, see “ ”. Setup When recording to multiple JamSync compatible devices, there are two methods for recording: Record to the Master, set playback on the Master, then arm and record to the Slave. Sequentially record on the Master then the Slave by arming the Slave for record first then begin recording on the Master (using this method, loop recording will begin on the slave device as soon as the loop end point is set on the master device).
Page 40
When cascading multiple JamMan Solo Jam Sync XTs in series and using JamSync, you will need to make the last JamMan Solo XT device in the chain the master. The master will provide the Rhythm Guide Track. JAMSYNC JAMSYNC Therefore, you can turn the ...
Page 42
When recording to multiple JamMan Solo XTs as described above, you can also add HINT: overdubs to any recorded loops just as you can when using a single JamMan Solo XT.
Page 43: Recording Loops Sequentially Using Jamsync
Recording Loops Sequentially Using JamSync To record loops to a master and slave sequentially using JamSync: Select an empty memory location in LED. STATUS each JamMan Solo XT device using Press the on the buttons ( LOOP master device to initiate recording LEDs will be off).
Page 44
When recording to multiple JamMan Solo XTs as described above, you can also add HINT: overdubs to any recorded loops just as you can when using a single JamMan Solo XT.
Page 45: Playing Back Loops Using Jamsync
Playing Back Loops Using JamSync To initiate playback on synced JamSync devices: Press the on any To stop loop playback of a slave slave device which you want to arm device, quickly press the ...
Page 47: Playback Type
Playback Type All phrases in the JamMan Solo XT are recorded as loops by default but they can be changed to a Single phrase if desired. A Single phrase plays the recorded phrase once and then stops. Slow repeated presses of the will restart Single ...
Page 48
To change between Loop and Single Phrase Playback Types: Stop Loop playback if it is playing. Use the buttons to change between SINGLE LOOP Select a stored Loop phrase ( LOOP options for phrase playback. The LED is lit) using the ...
Page 49: Tempo
Tempo The Tempo setup menu displays the loop tempo in BPMs (beats per minute) and allows you to manually adjust the tempo setting. You can first set a tempo by using button and then adjust it further in this menu. An empty loop has no ...
Page 50: Time Signature
Time Signature The JamMan Solo XT allows you to set a time signature before recording a loop. The default time signature for empty loops is 4 beats per measure. Each time signature setting represents how many beats are in the measure (i.e. a setting of 2 would contain 2 beats per measure, a setting of 6 would contain 6 beats per measure, etc.).
Page 51: Rhythm Type
Rhythm Type The JamMan Solo XT has a built in Rhythm Guide Track with 9 Rhythm Guide Patterns to choose from, ranging from a simple click metronome to drum samples. This built-in Rhythm Guide Track can be used as a metronome to help you stay in time when recording loops.
Page 52
To select a Rhythm Type: Select the desired memory location using the buttons. Turn the control to the 9 o’clock position. Press the button at the rate you want the phrase tempo to be. This will set the tempo. The TEMPO button LED will now be flashing to the beat of the tempo.
Page 53: Stop Modes
Stop Modes The JamMan Solo XT has 3 different loop Stop Modes to choose from, they are: Fade, Finish, and Instant. The below table describes each of these Stop Mode options. OPTION STOP MODE DESCRIPTION Fade Performs a 10 second fade out then stops.
Page 54: Reverse
Reverse The Reverse feature lets you playback a recorded loop file in reverse. Changes to the Reverse parameter must be stored to memory if you wish to retain the changes. To Reverse a loop: Press the button six times or until appears in the display.
Page 55: Auto Record
Auto Record The Auto Record feature is off by default. This feature allows the JamMan Solo XT to be armed for recording, but not actually begin recording until a signal is detected at one of the JamMan Solo XT’s inputs.
Page 56: Pedal Tempo
Pedal Tempo The Pedal Tempo feature is off by default. This feature provides tap tempo using the . This allows you to set the tempo of a loop hands-free, before you PEDAL SWITCH begin recording. To turn Pedal Tempo on or off: Press the button eight ...
Page 57: Record Sequence
Record Sequence The Record Sequence feature determines the order in which recording, overdubbing, and playback occurs. The available Record Sequence options are: OPTION RECORD SEQUENCE DESCRIPTION Record » Dub » Play Enables overdubbing immediately after record. Record » Play » Dub Enables Play immediately after record.
Page 58: External Micro Sd/Sdhc Memory Cards
SD/SDHC compatible memory card into the card slot found on the left side of the JamMan Solo XT’s chassis. The JamMan Solo XT is compatible with card sizes up to 32GB, for over 32...
Page 59: Formatting Memory Cards
Formatting Memory Cards If a memory card is inserted into the JamMan Solo XT that does not have a valid format, the JamMan Solo XT will not recognize it and the display will read . The card must be formatted before the JamMan Solo XT can use it.
Page 60
To format or reformat a Micro SD/SDHC card: Press and hold the button for six seconds. The display will show (Format Card) and the button will begin flashing. Press the button again. The display will read ? (Format ?) and the button will continue to flash.
Page 61: Jammanager Xt Librarian Software
JamManager XT Librarian Software The JamManager XT loop librarian management software is available as a free download from the DigiTech website. This application runs on both Windows and Mac computer systems and lets you archive and transfer loops between the JamMan Solo XT and your computer.
Page 62: Optional Fs3X Footswitch
Optional FS3X Footswitch The optional FS3X Footswitch gives you hands-free control over the following functions: loop selection, tempo, play, stop, and clear. Up Switch Down Switch Mode Switch This footswitch selects the This footswitch selects the When the selected loop next higher memory next lower memory location.
Page 63: Multiple Loop Playback With Fs3X
Multiple Loop Playback with FS3X Another great feature of the JamMan Solo XT is its ability to play different loops back to back during performance using the optional FS3X Footswitch. This lets you play a verse > chorus > verse > bridge progression seamlessly using three different loops.
Page 64
If either the or footswitch on the FS3X is pressed less than two seconds NOTE: before the end of a playing loop, the JamMan Solo XT will not have enough time to cue up the next loop and the current loop will continue to play one more time. If any overdubs were recorded during this type of performance, they will be lost when the next loop is selected and begins playing back.
Page 65: Factory Restore
Factory restore The Factory Restore procedure will return the JamMan Solo XT back to its original factory state by: • Setting all Setup menu parameters back • Restoring the original 15 loops that to their factory default state shipped with the JamMan Solo XT •...
Page 66: Specifications
Specifications DIgITaL A/D/A Conversion: 24-bit Sampling Frequency: 44.1 kHz Loop File Format: 44.1 kHz, 16-bit (stereo), uncompressed WAV file USB: 2.0 High Speed (USB 1.1 compatible) Connector Type: 5-Pin Mini B Max. Individual Loop Time: 10 minutes (stereo) Internal Memory Capacity: Over 35 minutes total loop time (up to 200 loops total) External Memory Type:...
Page 67
1 MΩ Maximum Input Level: +4 dBu DFS Aux In Audio Path: Maintains analog dry path FOOTSWITCH INpUT Connector Type: 1/4” Stereo (Tip-Ring-Sleeve), compatible with optional DigiTech FS3X 3-button ® footswitch LEFT(MONO)/rIgHT OUTpUTS Connector Type: 1/4” Unbalanced (Tip-Sleeve)/Balanced (Tip-Ring- Sleeve) Output Impedance: 100 Ω...
Page 68: Power Requirements
pOWEr rEQUIrEMENTS Consumption: < 9 Watts Current Draw: < 200 mA pOWEr aDapTEr Model: PS0920DC-01 Input: 100 VAC-240 VAC 50/60Hz Output: 9 VDC 2.0 A Polarity: Barrel Connector Size: 5.5 mm x 2.5 mm DIMENSIONS/WEIgHT Dimensions: 5” (L) x 3-1/8” (W) x 2-1/4” (H) 127 mm (L) x 79.4 mm (W) x 57.2 mm (H) Product Weight: 0.75 lb, 0.34 kg...
Page 69
This page intentionally left blank.
Page 70
This page intentionally left blank.
Page 71
This page intentionally left blank.
Page 72
DigiTech® 8760 South Sandy Parkway Sandy, Utah 84070 PH (801) 566-8800 FAX (801) 566-7005 www.digitech.com JamMan Solo XT Owner’s Manual 5022947V-B Printed in China DigiTech and JamMan are registered trademarks of Harman ® ® ©2012 Harman. All rights reserved...
×
Rename the bookmark
Cancel
Delete
Cancel
Delete
Our app is now available on Google Play
Brands
Our partner tr-ex.me
JamMan Solo (discontinued) | Looping Station
DIGITECH JAMMAN SOLO XT OWNER'S MANUAL Pdf Download | ManualsLib
DigiTech JamMan Solo - YouTube
digitech jamman solo in Effects Pedals | eBay
DigiTech JamMan Solo XT Looper Guitar Effect Pedal for sale online | eBay
Подождите немного. Если воспроизведение так и не начнется, перезагрузите устройство.
Ролики, которые вы посмотрите, могут быть добавлены в историю просмотра на телевизоре, что скажется на рекомендациях. Чтобы этого избежать, выберите "Отмена" и войдите в аккаунт на компьютере.
Прокрутите экран вниз, чтобы посмотреть подробную информацию


 c_limit" width="550" alt="Digitech Jamman Solo" title="Digitech Jamman Solo">e_unsharp_mask:80" width="550" alt="Digitech Jamman Solo" title="Digitech Jamman Solo">f_auto" width="550" alt="Digitech Jamman Solo" title="Digitech Jamman Solo">fl_progressive" width="550" alt="Digitech Jamman Solo" title="Digitech Jamman Solo">g_south" width="550" alt="Digitech Jamman Solo" title="Digitech Jamman Solo">h_1600" width="550" alt="Digitech Jamman Solo" title="Digitech Jamman Solo">q_80" width="550" alt="Digitech Jamman Solo" title="Digitech Jamman Solo">w_1600/v1469132662/vl6mghi2hlutegyhr2qx.jpg" width="550" alt="Digitech Jamman Solo" title="Digitech Jamman Solo">


 t_supersize/v1555021070/zmirpik5jes9nkdxd9dd.jpg" width="550" alt="Digitech Jamman Solo" title="Digitech Jamman Solo">
 c_limit" width="550" alt="Digitech Jamman Solo" title="Digitech Jamman Solo">e_unsharp_mask:80" width="550" alt="Digitech Jamman Solo" title="Digitech Jamman Solo">f_auto" width="550" alt="Digitech Jamman Solo" title="Digitech Jamman Solo">fl_progressive" width="550" alt="Digitech Jamman Solo" title="Digitech Jamman Solo">g_south" width="550" alt="Digitech Jamman Solo" title="Digitech Jamman Solo">h_620" width="550" alt="Digitech Jamman Solo" title="Digitech Jamman Solo">q_90" width="550" alt="Digitech Jamman Solo" title="Digitech Jamman Solo">w_620/v1398447170/qa1obugdmqom9ldi5m2a.jpg" width="550" alt="Digitech Jamman Solo" title="Digitech Jamman Solo">


 500_.jpg" width="550" alt="Digitech Jamman Solo" title="Digitech Jamman Solo">