Dichroic glass in Corona Renderer (EN)
@marchik3d
Salute!
Today, in text format, we'll talk about dichroic glass and how to simulate it in our photorealistic renderings without too much headache (well, maybe a little).
Sooner or later, almost all visualizers are faced with the need to create such materials, such glass is often used in the design of modern offices, it is also used to make stained-glass windows, decor and installations for interiors.
In the course of my little "research" I tried all sorts of options for creating such a shader, trying to implement various scenarios from references. In this article, I will not cover all my attempts, I will focus only on what really worked for me (even if it may not seem very logical to you) and what I myself will use in the future when solving similar tasks.
A piece of theory
To recreate - you need to understand.
To begin with, let's deal with the very concept of dichroism.
Dichroism is the various absorption of light by an anisotropic substance depending on its polarization (absorption anisotropy). Since absorption also depends on the wavelength, dichroic substances turn out to be differently colored when observed in different directions, hence the name (from the Greek δίχροος - two-color)
In simple terms, the substance changes color in response to lighting conditions / the position of the observer.
Technically, this is either glass with a multi-layer coating of metal oxides, where each layer has its own precisely calculated IOR and thickness, or glass covered with a special semi-mirror film, which gives the desired effect.
The specific type of production does not matter to us, since we will not be able to completely physically recreate (in a form suitable for production) any of them. Corona Renderer simply doesn't have the proper shaders to mimic the nuances of thin-film optics.
And since we cannot use a reliable model, we will imitate obvious properties, because our viewers will perceive the result empirically.
With this approach, it is very important to have at hand as many references as possible of what we need to recreate, so when you work with an object with such elements, be sure to request references for a specific type of coating (film name, manufacturer's website, etc.).
Reference analysis
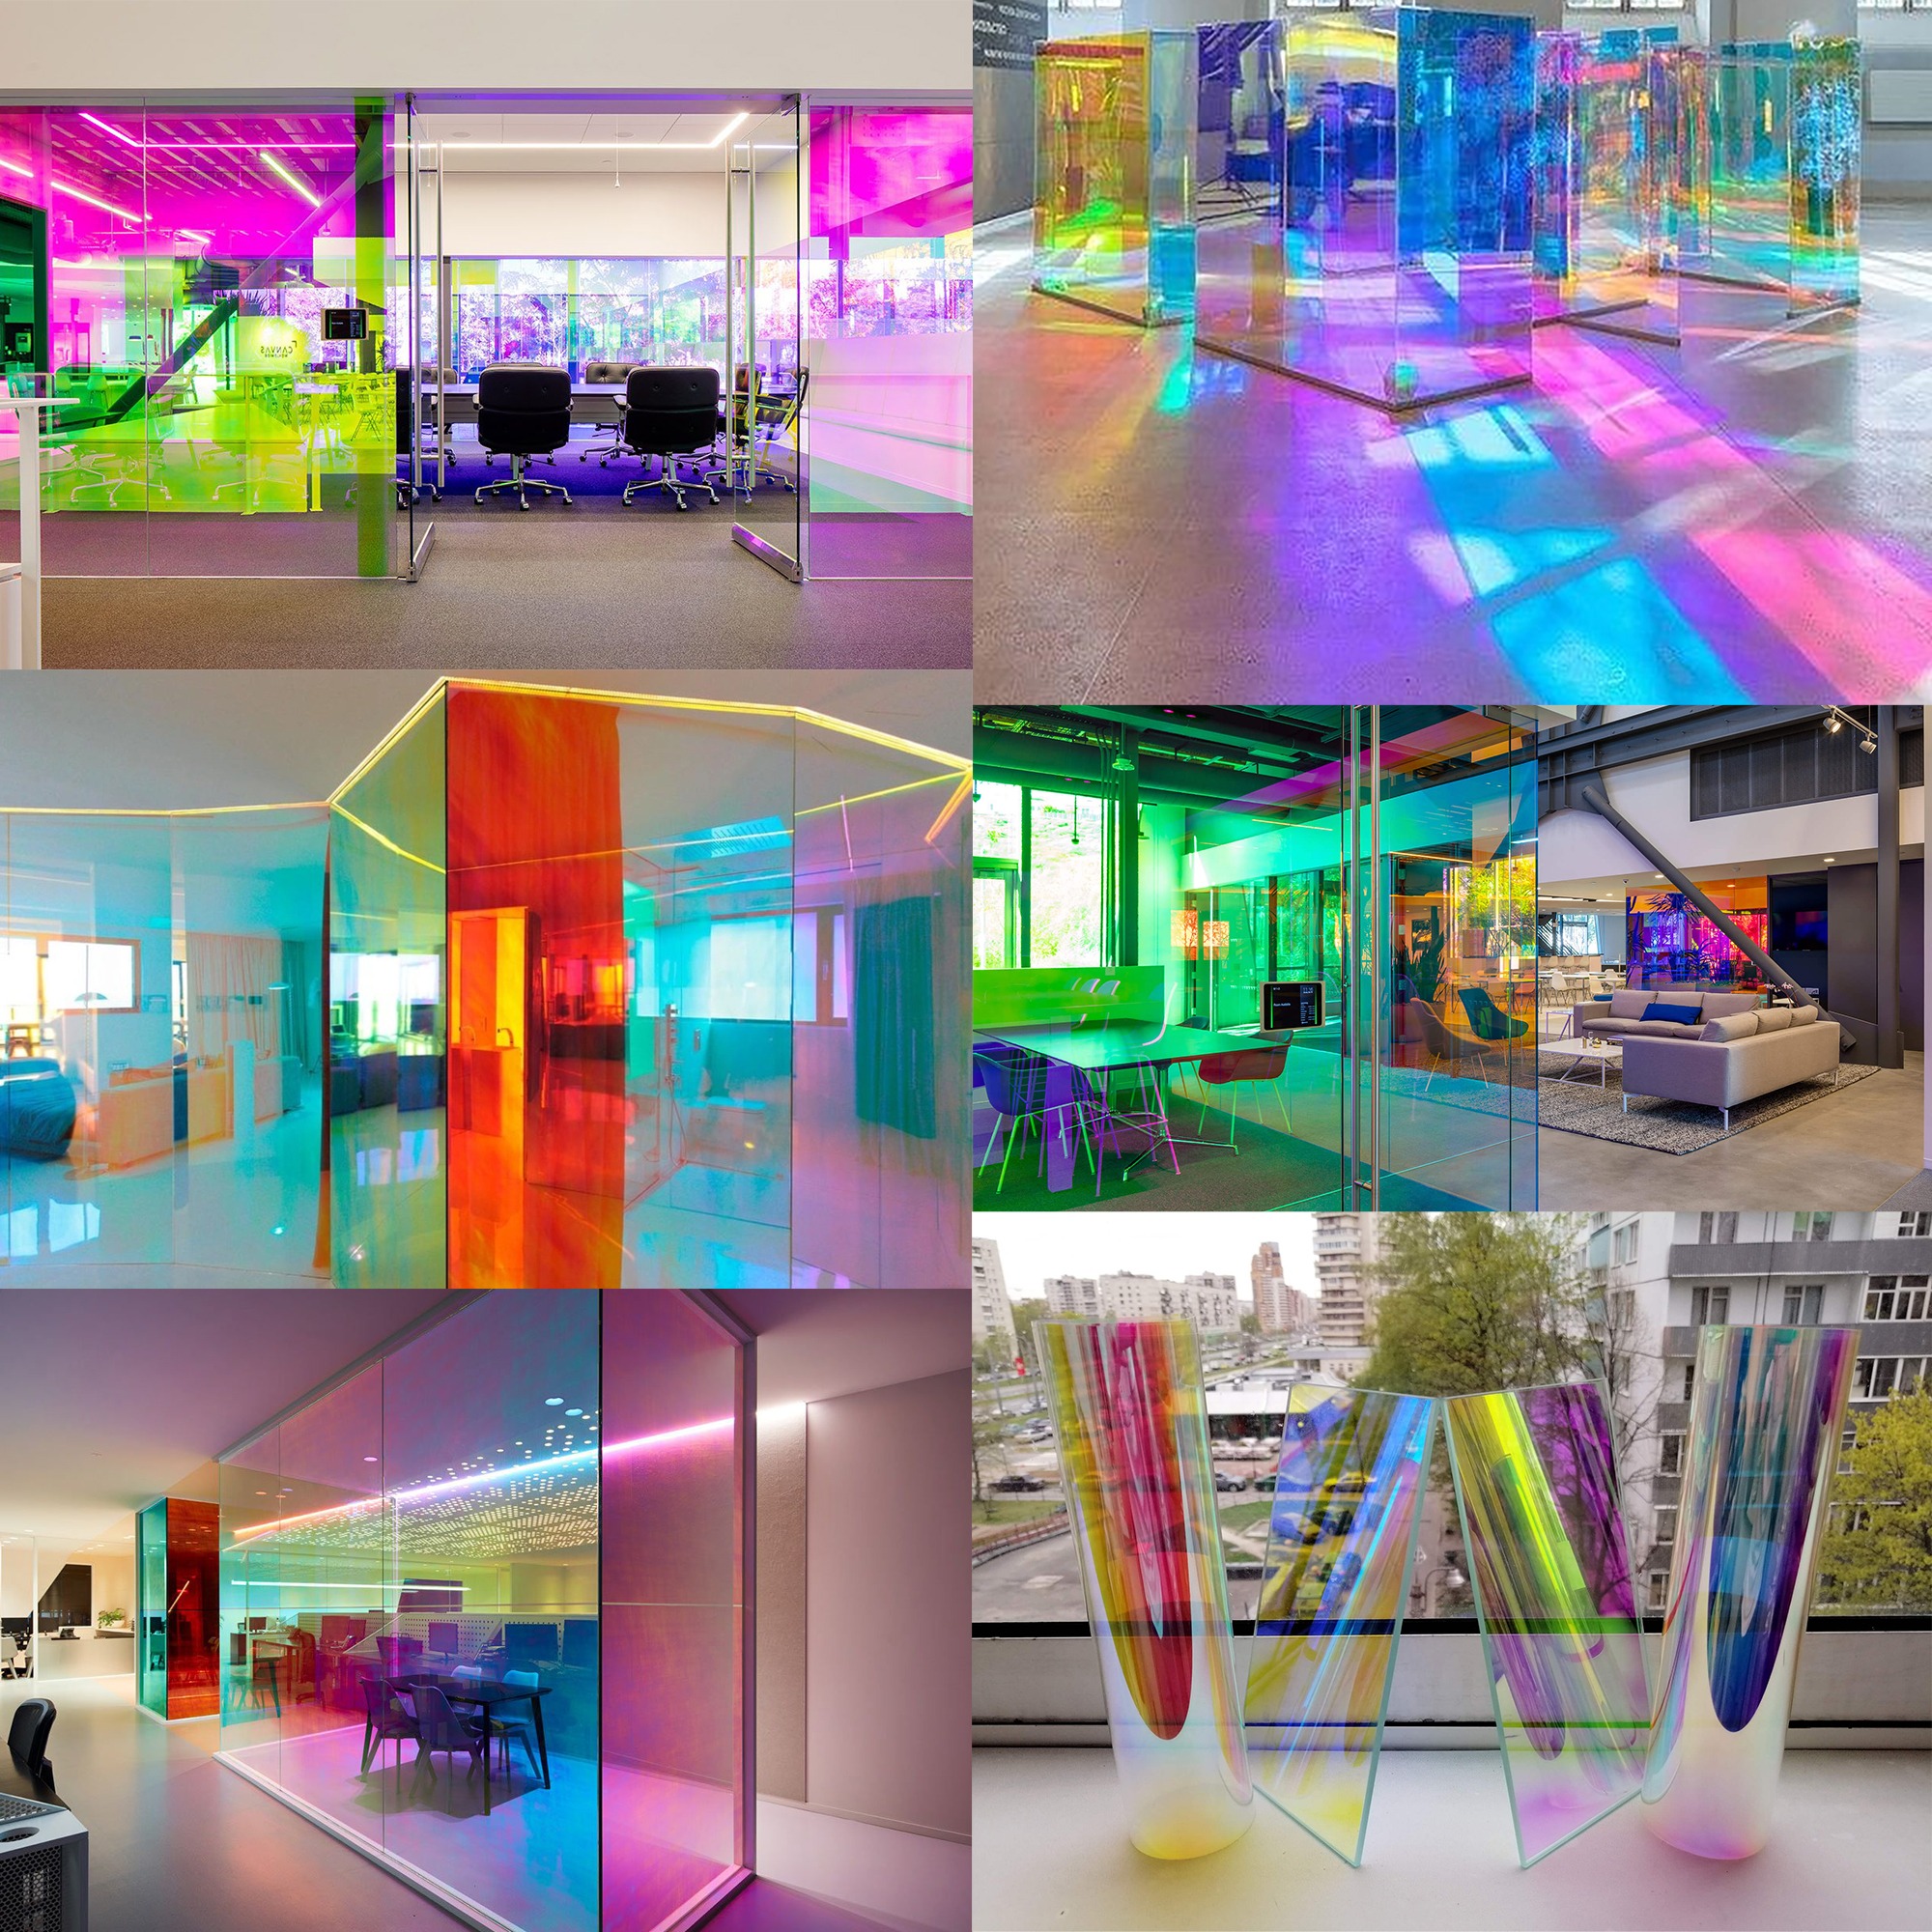
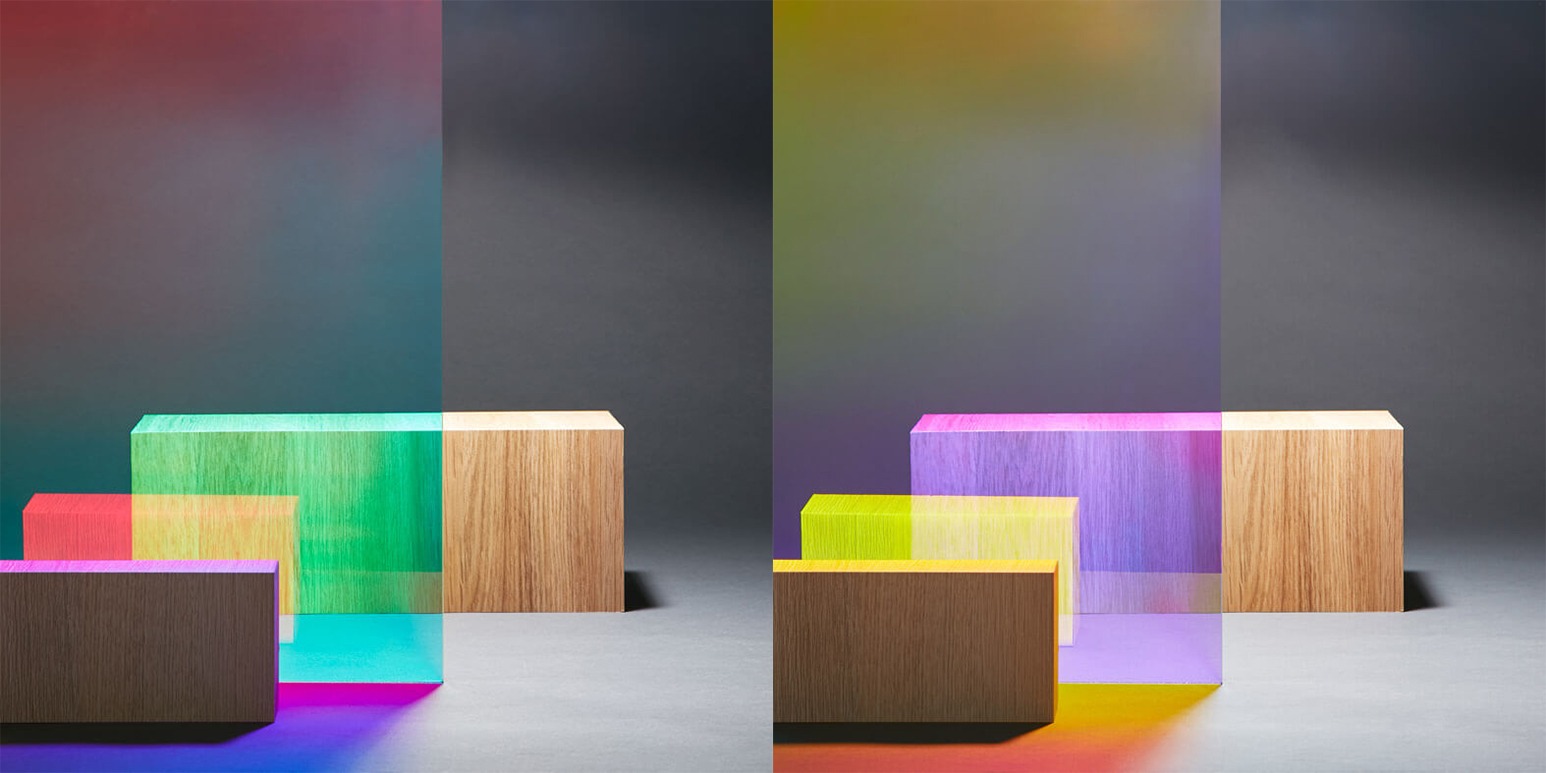
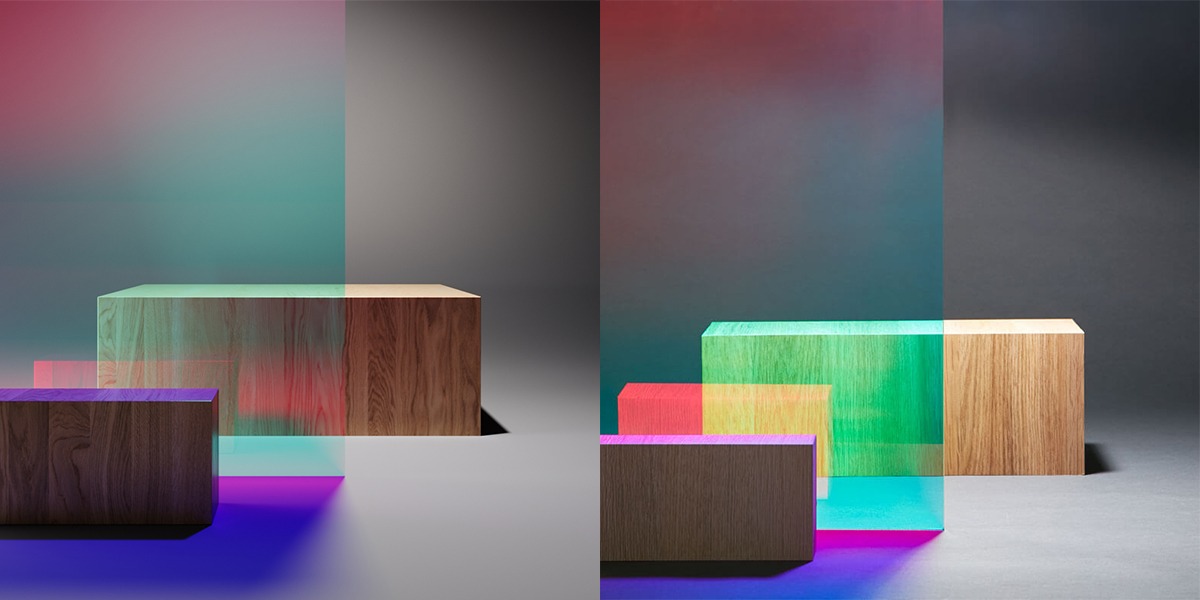
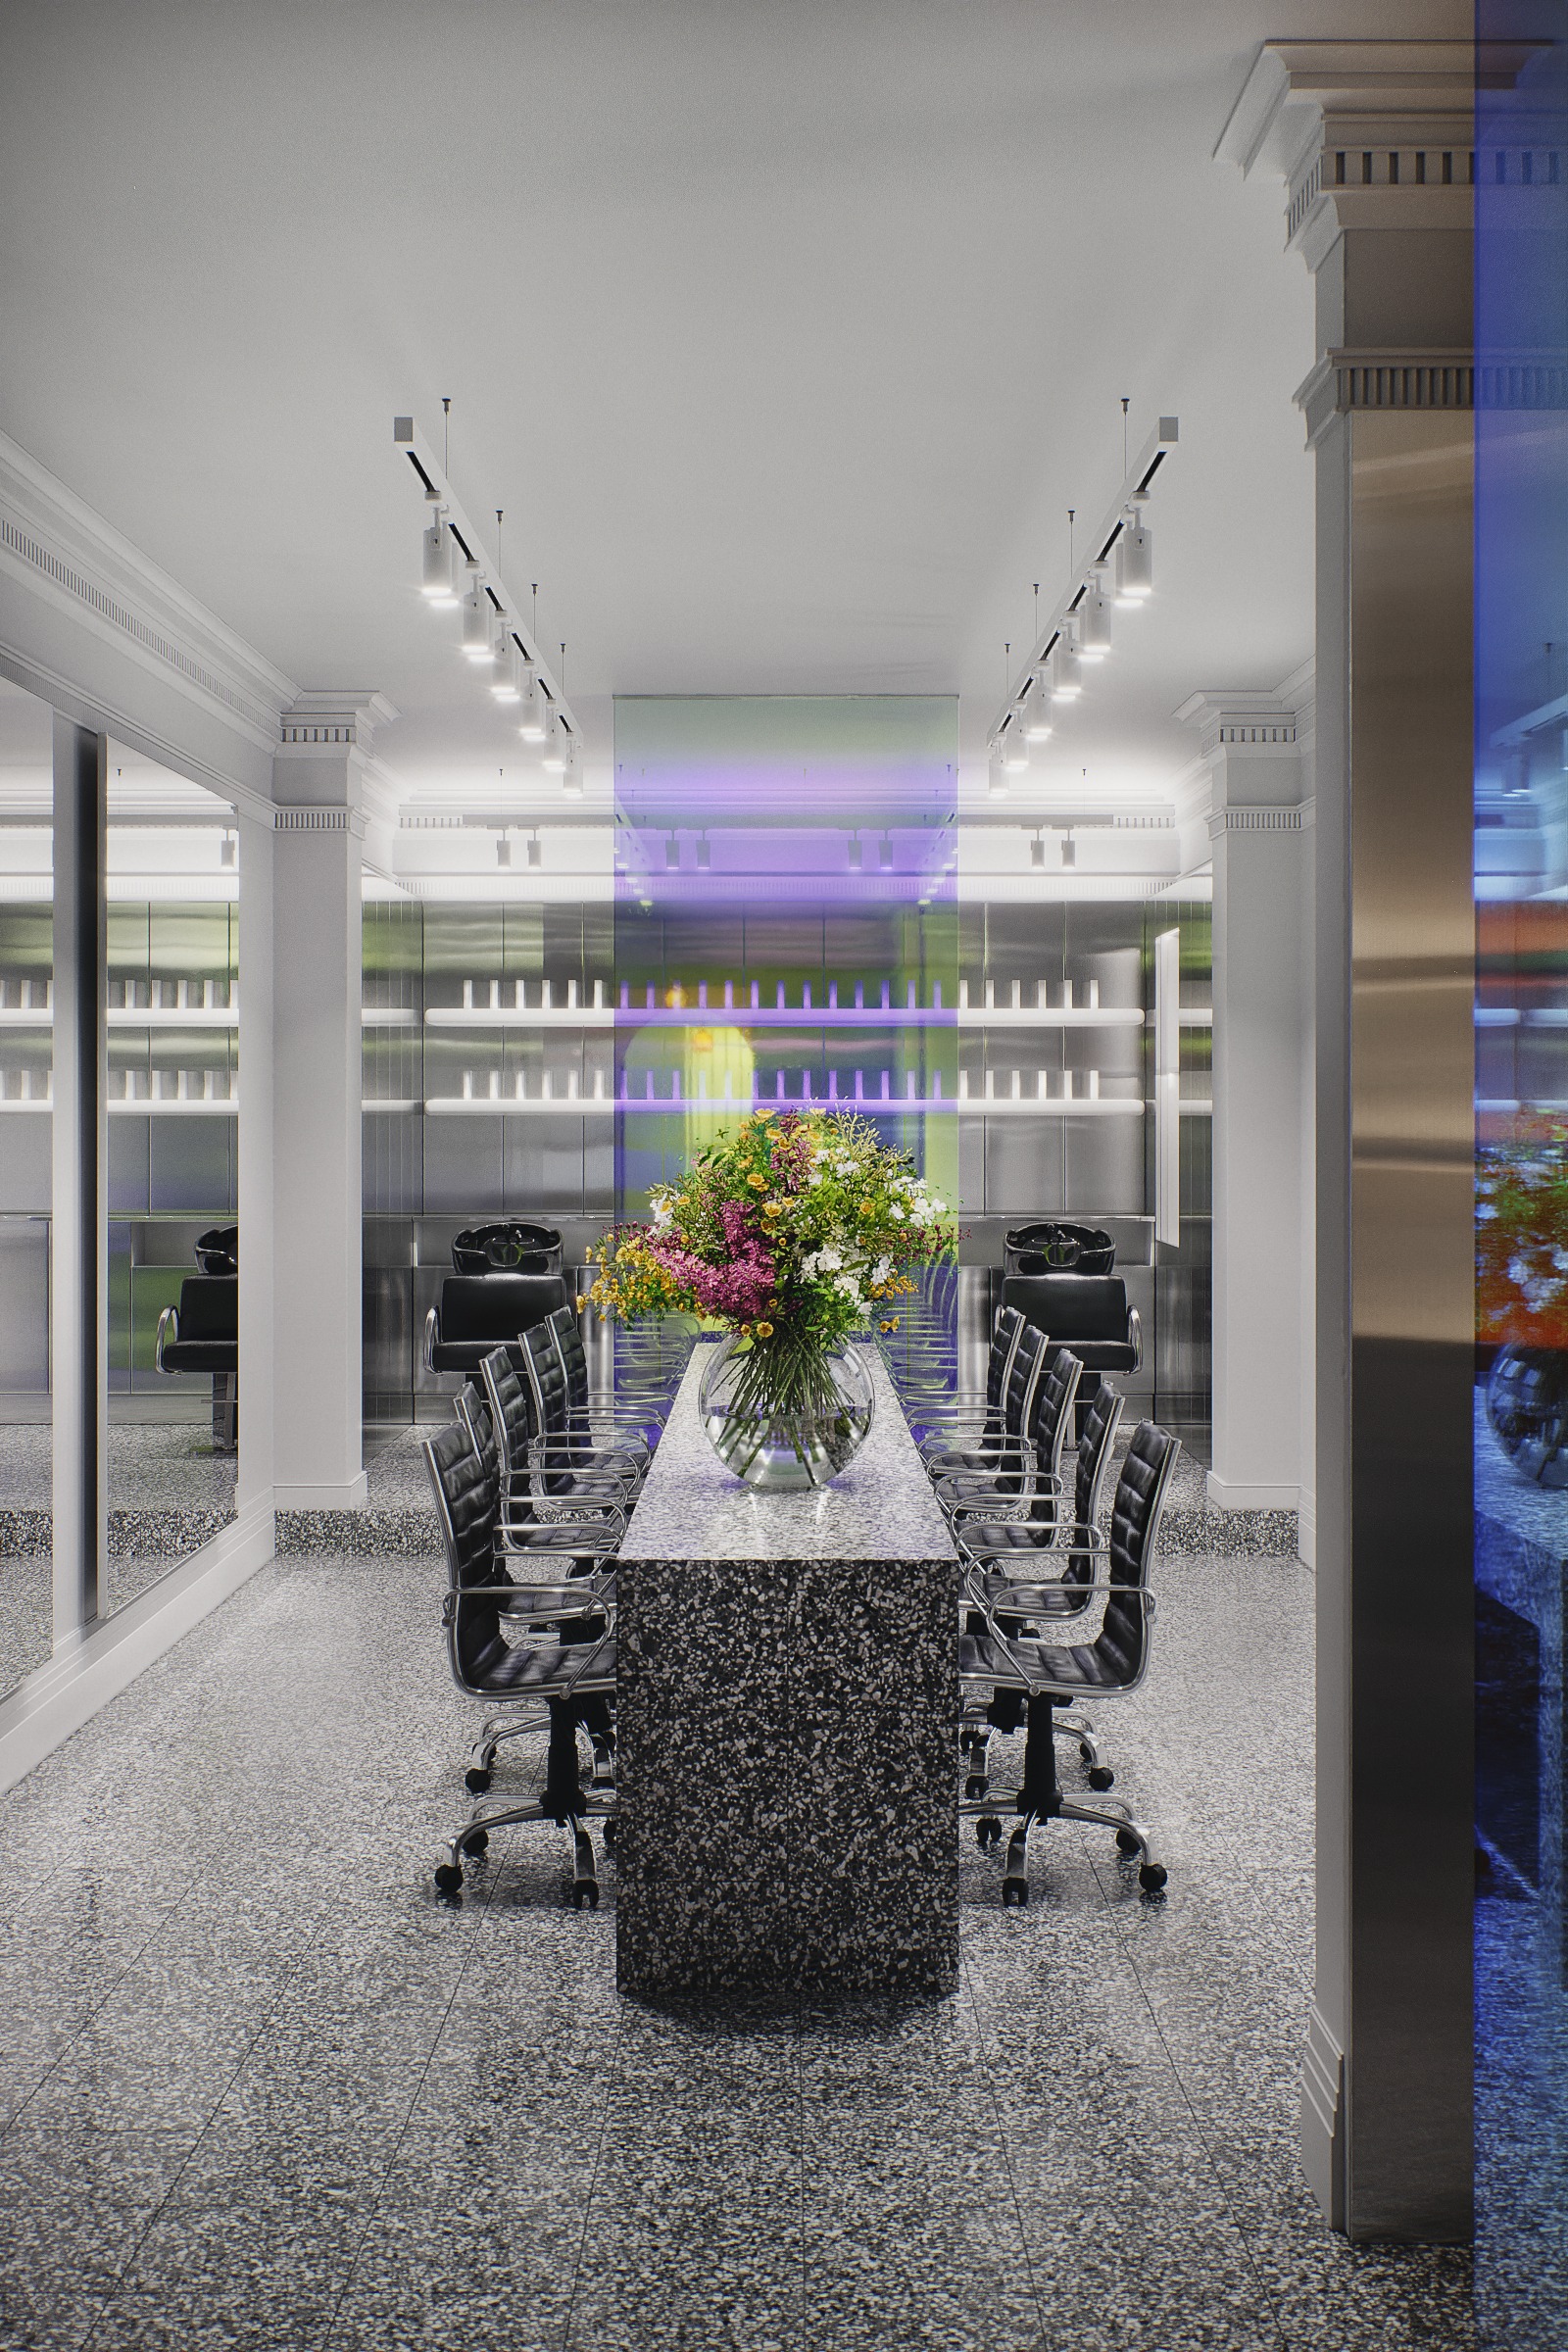
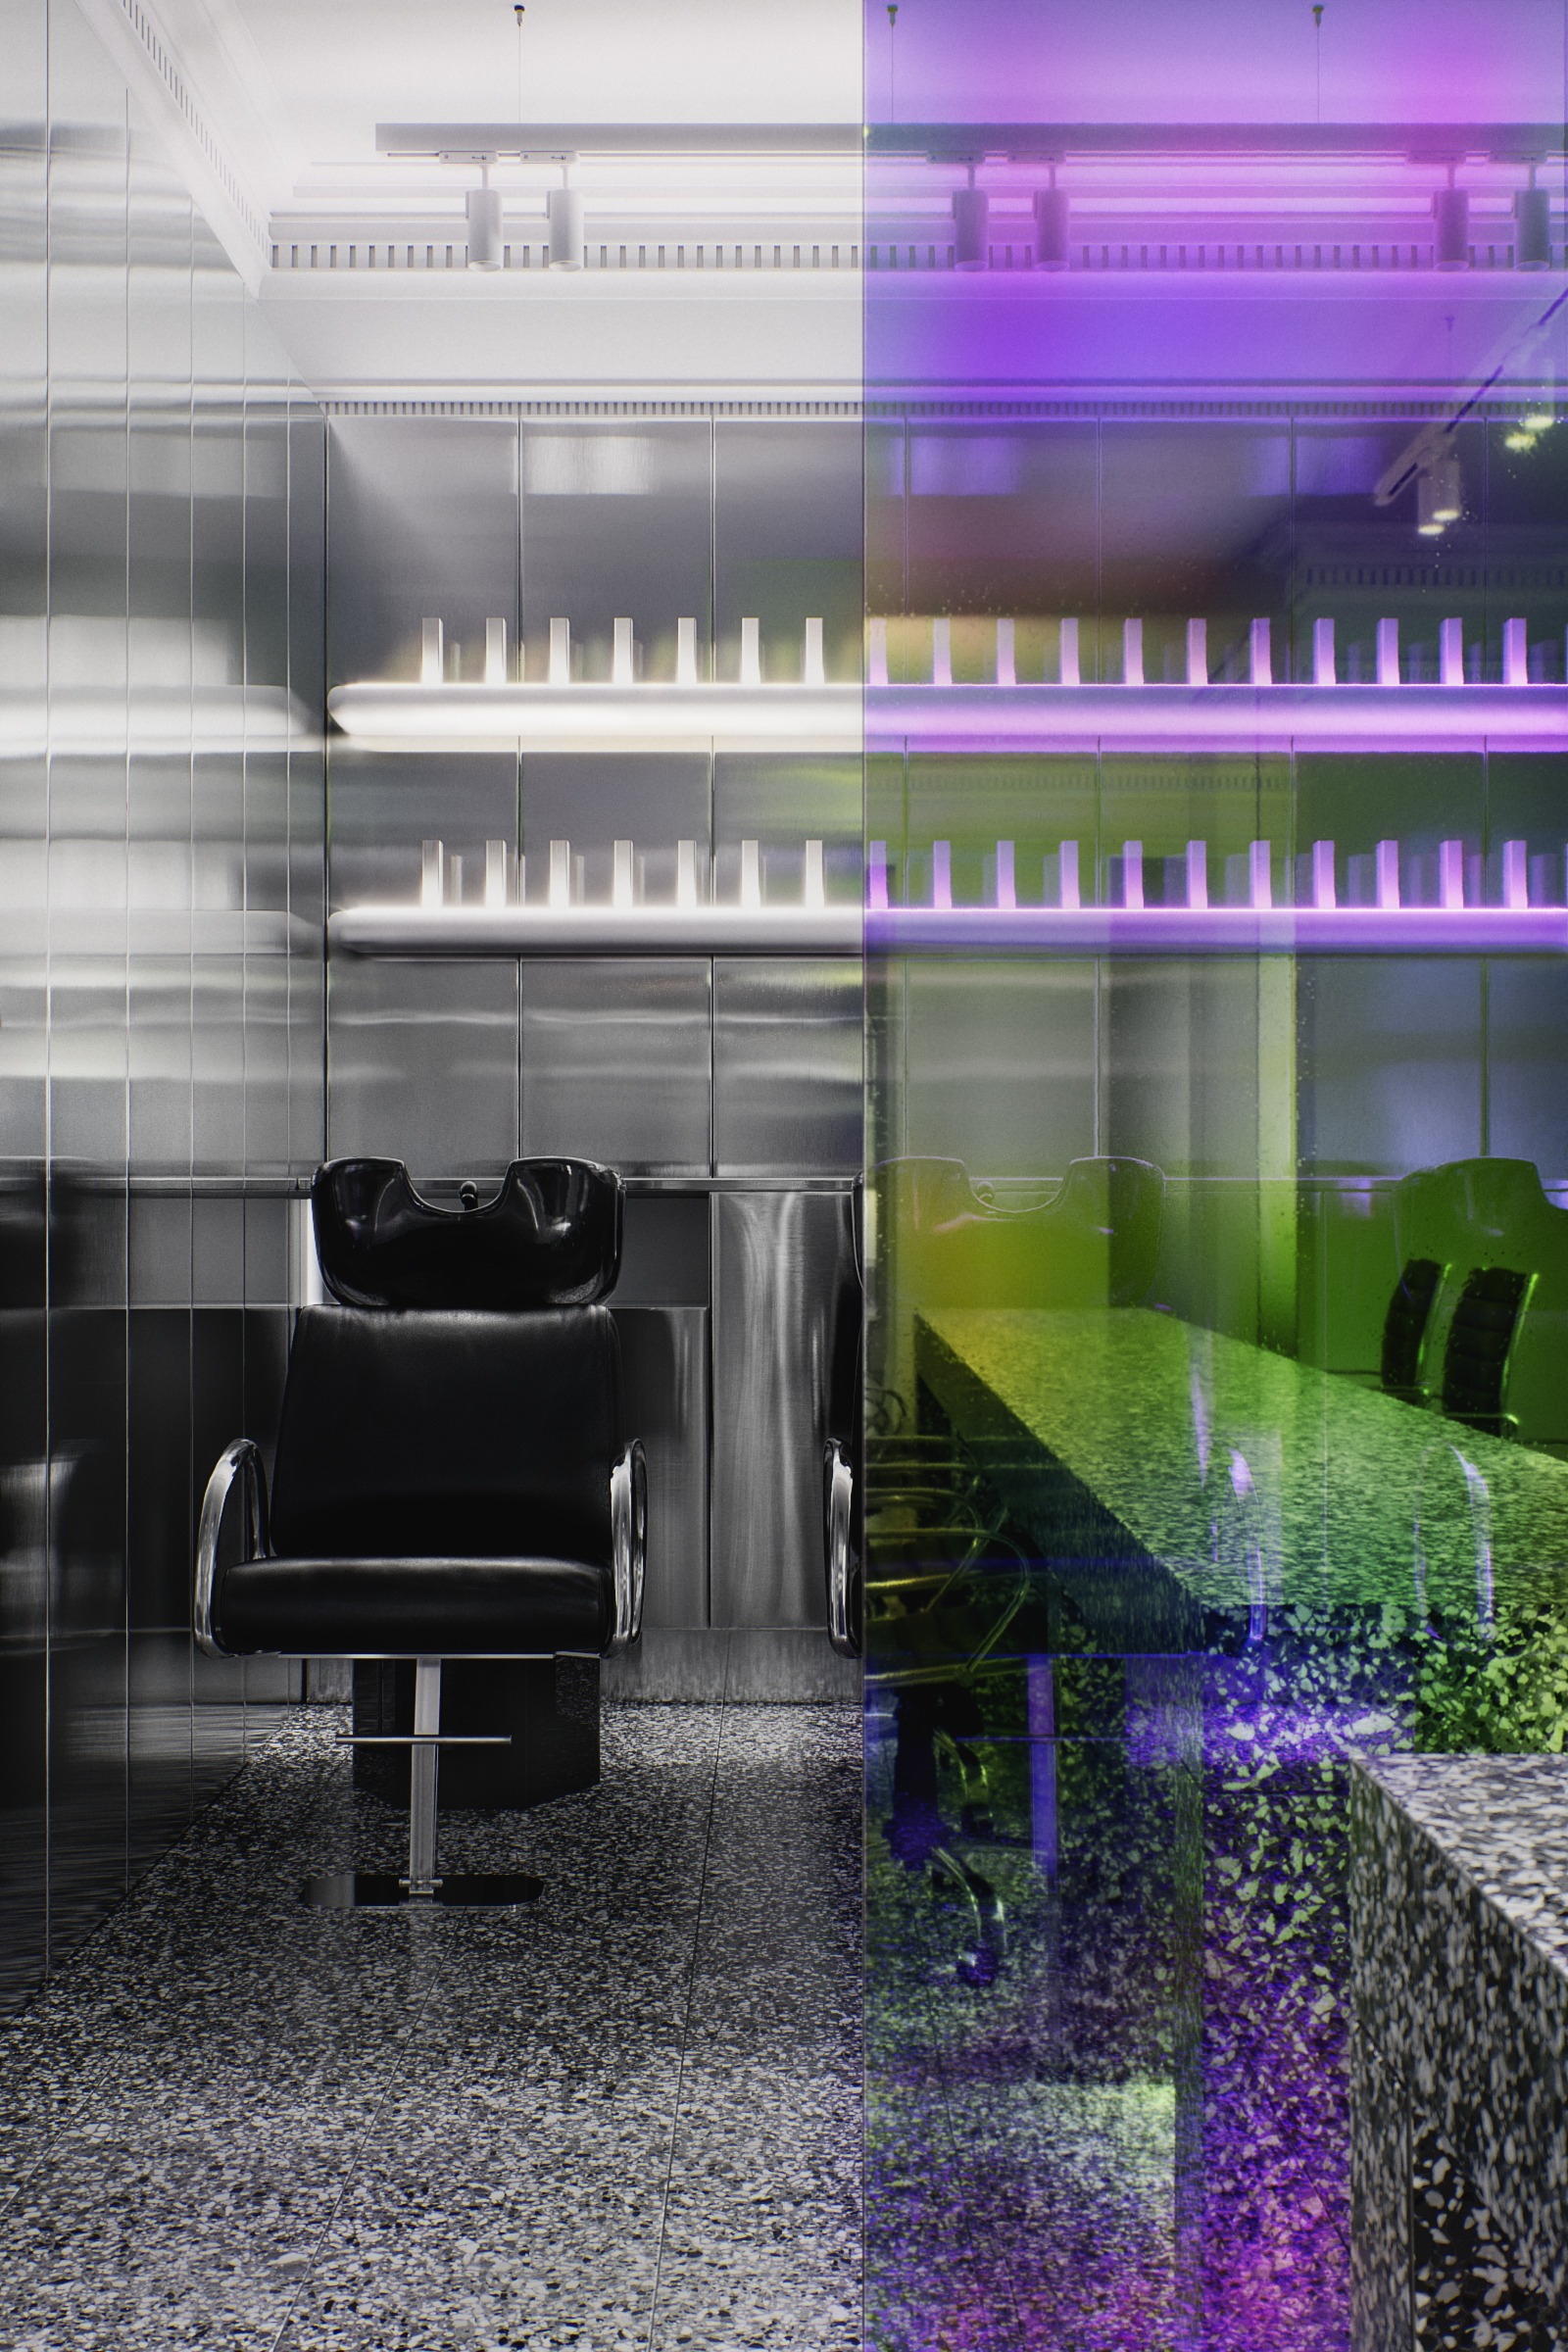
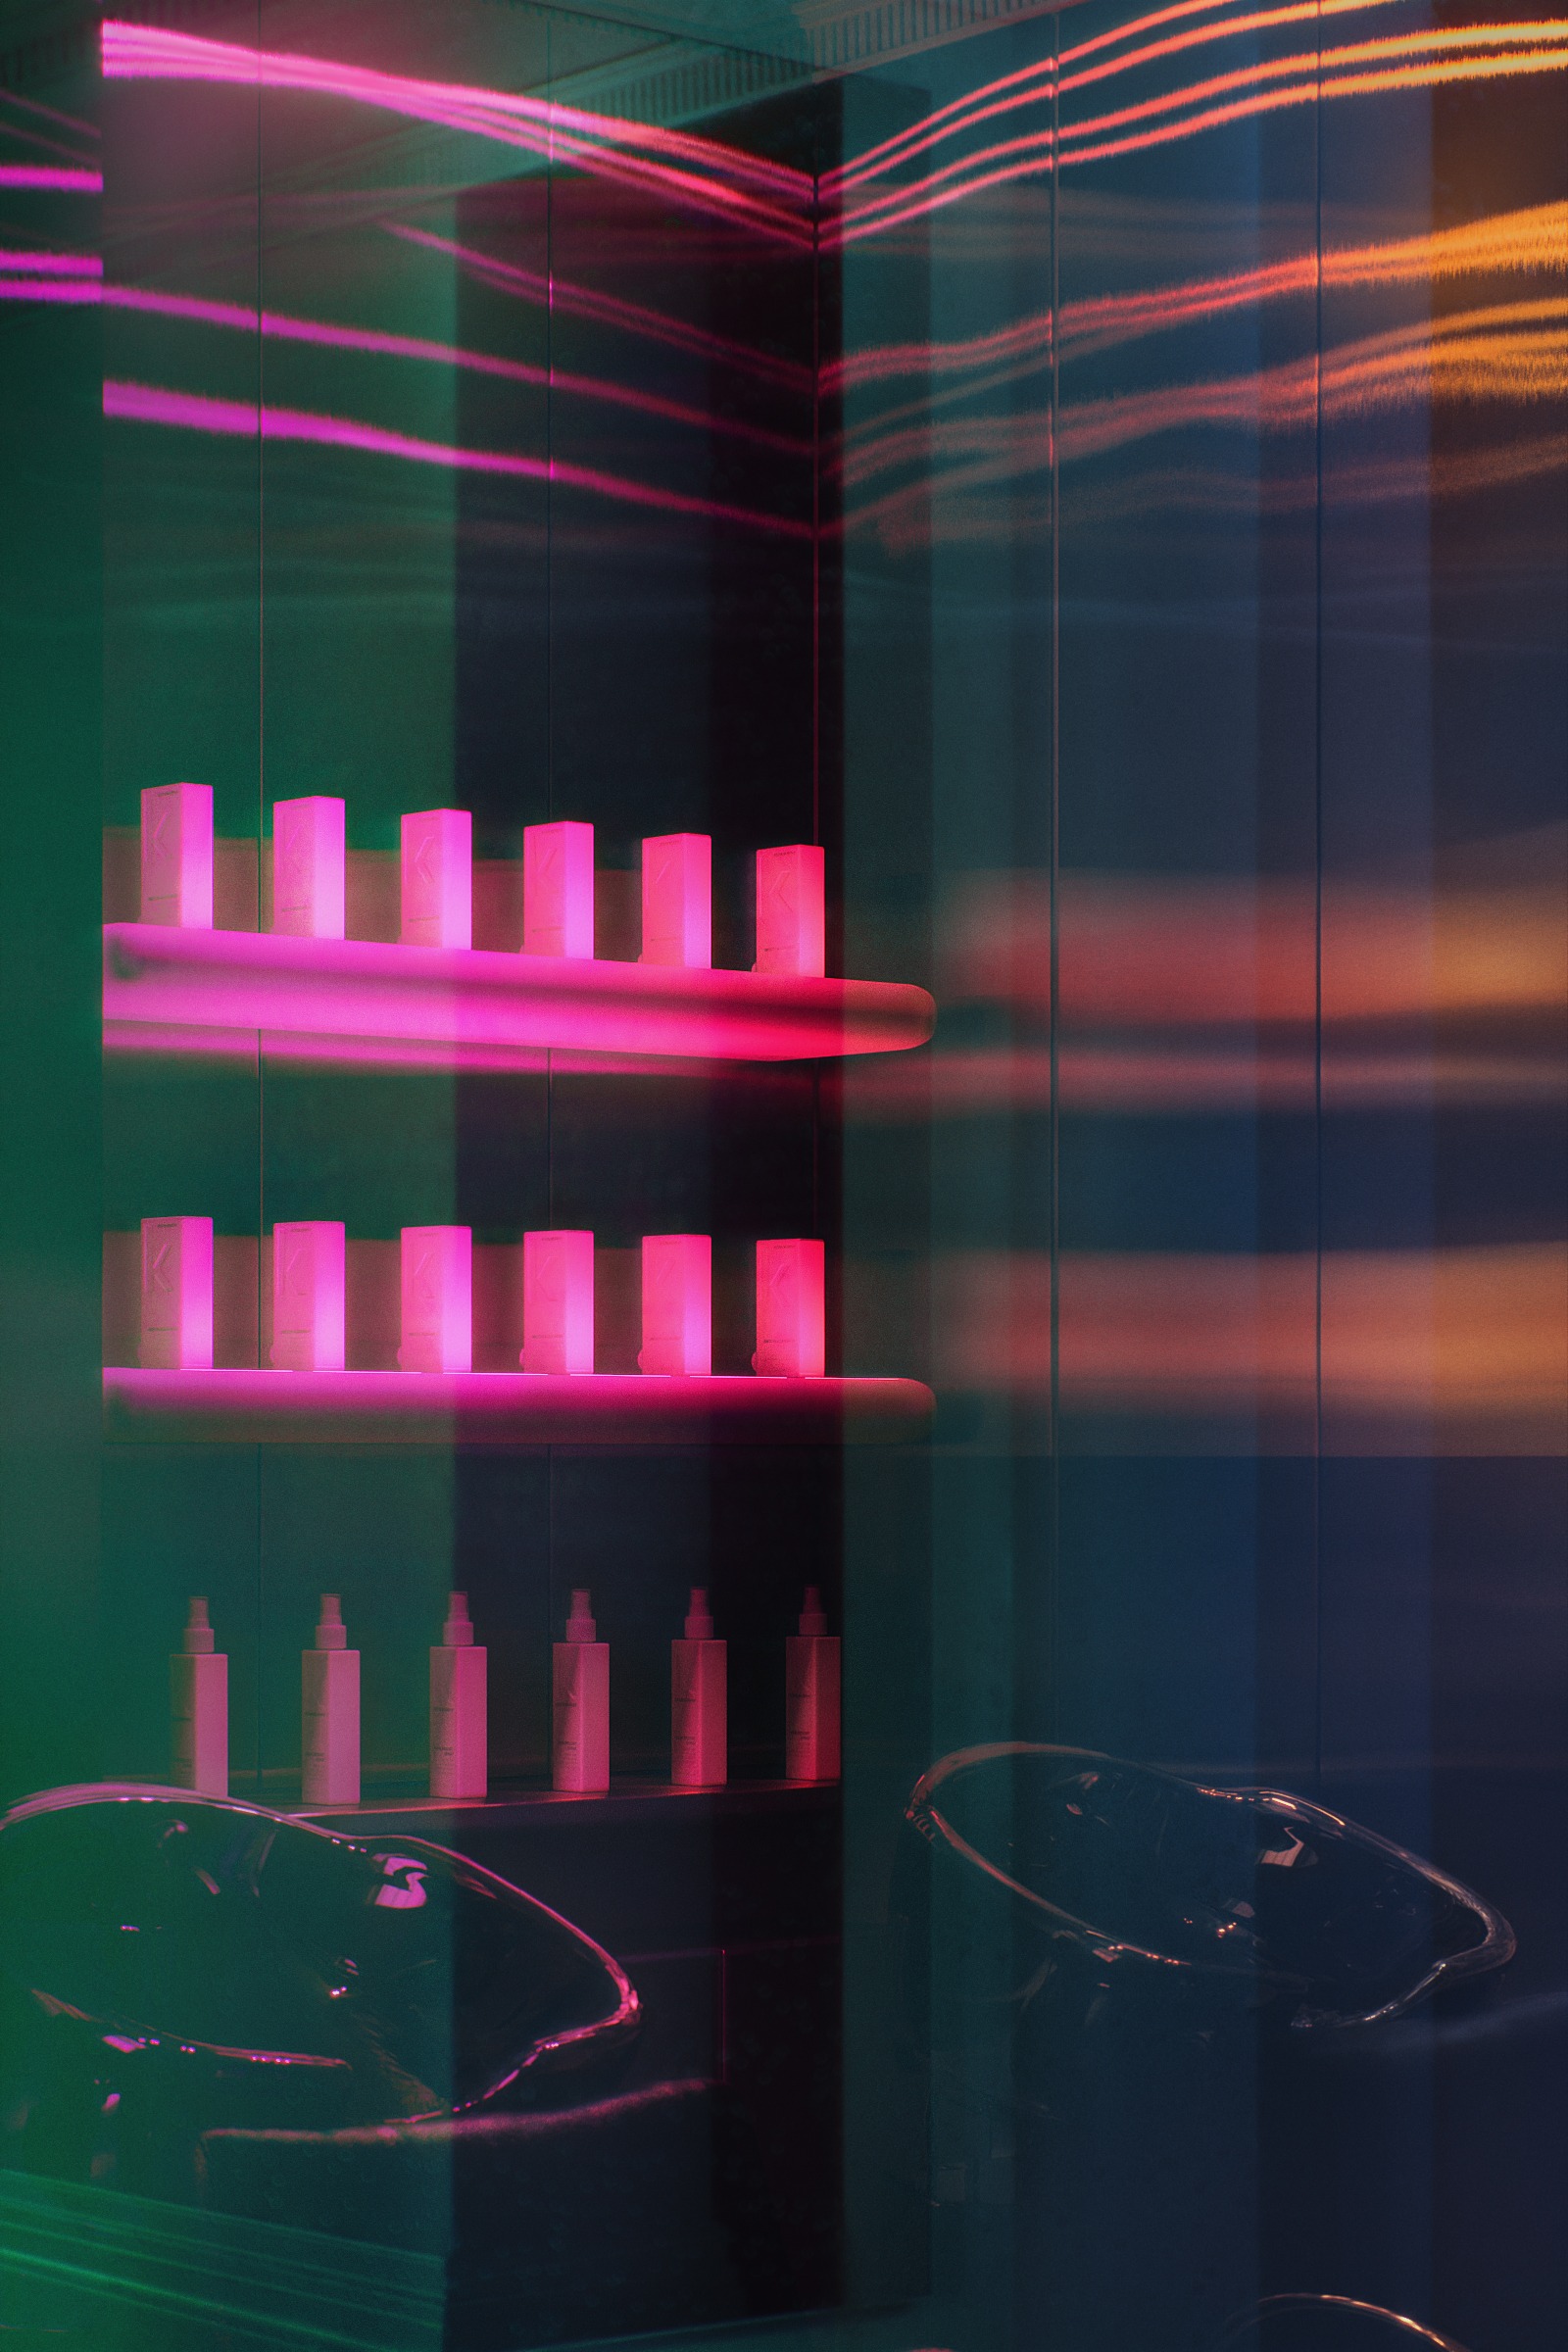
Analyzing the references above, we can note that there are only 4 main observable properties that are typical for most examples:
1) Objects in glass reflection have a color tint.
2) Objects behind glass have a different tint than the first one.
3) In intense light, the "shadow" from the glass is colored in the third tint.
4) When changing the viewing angle, the glass exhibits iridescence, that is, the glass changes color / shimmers.
By imitating each of these properties in turn, we can achieve the desired result.
In the process of studying the issue, I recreated various samples of dichroic films and some of them are set literally by one parameter, others have very specific properties that do not fit into simple patterns, creating such a shader every time will be a creative and not a fast process that includes active faking, adjusting shaders to the angle/lighting conditions and the lack of sleeping.
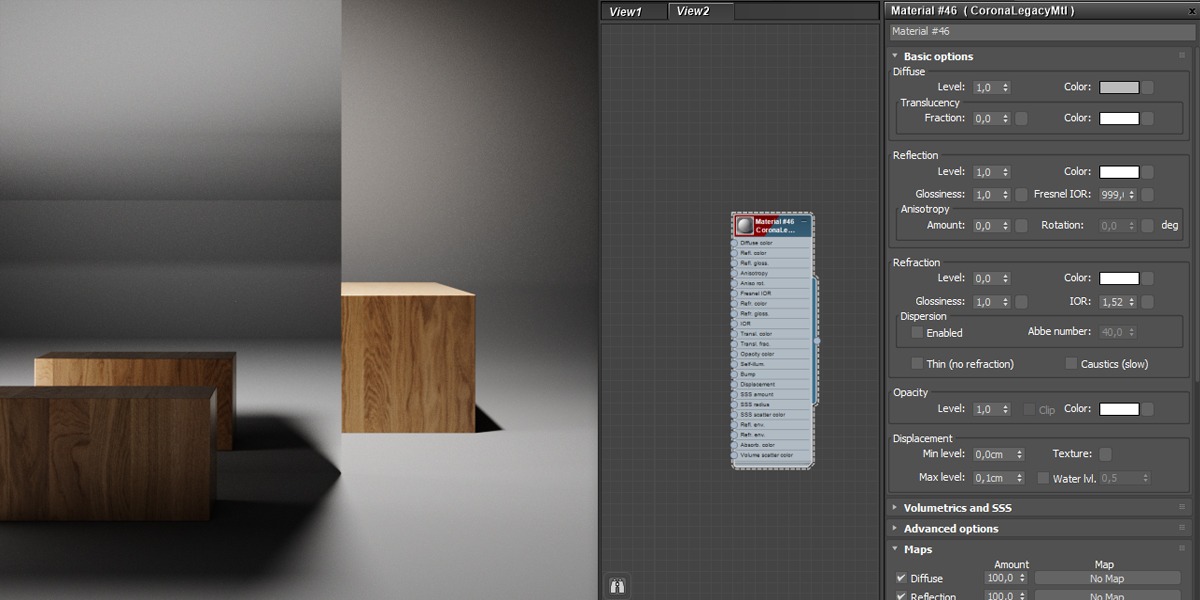
Tools
I will highlight the main tools that can be of help to us.
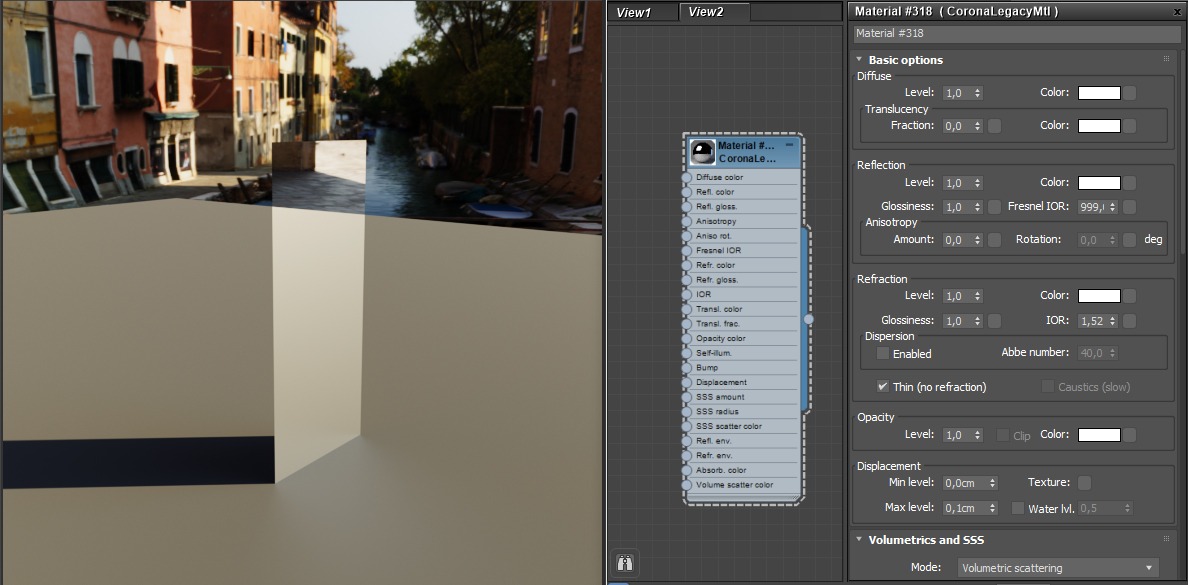
CoronaLegacyMtl material - unlike CoronaPhysicalMtl, it allows you to fake more freely by setting different parameters for the Reflection and Refraction components independently.
Thin checkbox in the Refraction section of the CoronaLegacyMtl material removes refractions as such, making a film out of our glass, in some cases it greatly helps the result.
RaySwitchMtl in some cases will help us achieve the desired tint for the "shadow" of our glass.
Falloff will allow us to set the color dependence on the viewing angle (+ it has a very interesting bug that we can use to our advantage)
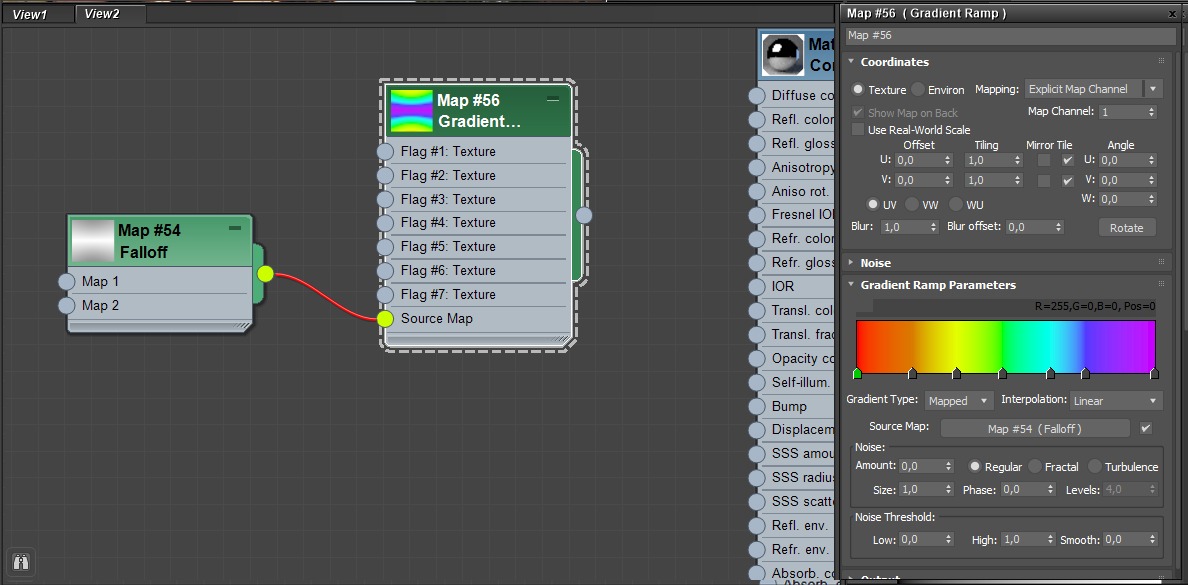
Gradient Ramp will allow us to control the color of certain areas of our glass, it can also be used to "remap" another map, such as Noise or Falloff.
Sigertexmaps ThinFilm shader from Siger Studio - it was actually created to simulate thin-film optics, but in the end, I did not use it in any of the examples, although in some cases it can come in handy.
Enable checkbox in the Caustics Solver section in the Performance tab in the render settings - in some cases it will allow you to very accurately simulate the reference by adding caustics of reflections from our glass to surrounding objects.
Photoshop or any other post-processing tool will allow you to locally correct the hue, in some very specific cases it will be simply necessary, especially considering the fact that most of the references you find will be notably processed by the photographer.
Пример 1
So let's get started.
To begin with, let's recreate approximately the scene with similar lighting conditions and camera angle, this moment is very important, since the appearance of the glass will directly depend on these two parameters.


And here comes the magic:
And voila! We get an effect very similar to the reference image.
This behavior of the shader is a kind of bug (and in our case, a very useful feature).
As far as my understanding is enough, CoronaLegacyMtl consists of 5 layers, with priority in descending order: Reflection, Refraction, Translucency, Volumetric, Diffuse, each of which overlaps each other + we have the Energy conservation principle working.
In simple words, 100% of the light hits the object with the applied material, and all of them, to the last percent, are distributed between our five layers (depending on their settings), there will be no more light at the output and it will not dissolve into the "warp" without a trace.
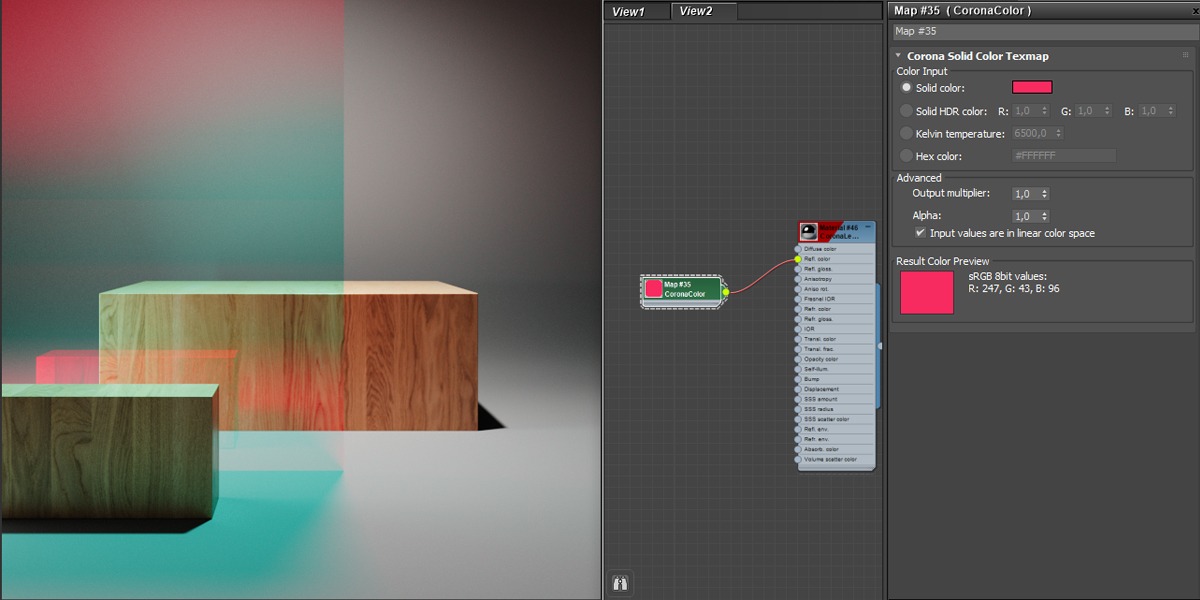
The reflection layer has the highest priority, so when we turn off the Fresnel , nothing remains on the Refraction layer, the object looks like an opaque mirror.
But as soon as we add a CoronaColor map, not all 100% of the light will be reflected, but only that part of the spectrum that we set, everything else will go to the next active layer in the list, that is, Refraction.
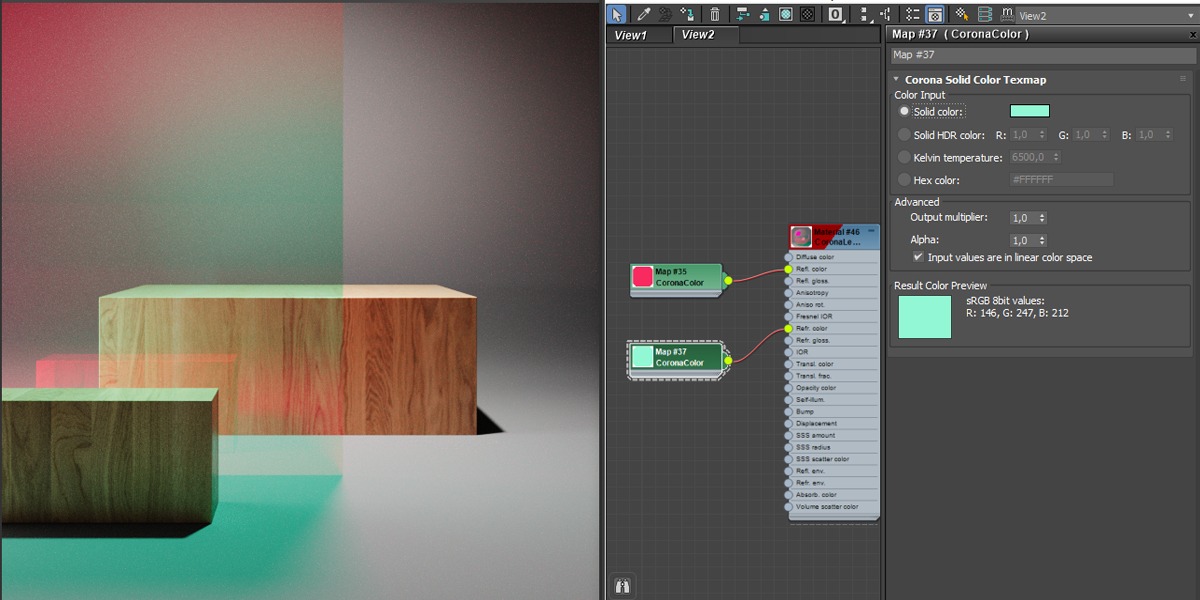
Thus, we have recreated 3 of the 4 properties we need (1,2 and 4), which are observed in the reference. It remains only to change the shade for the "shadow" of the glass.
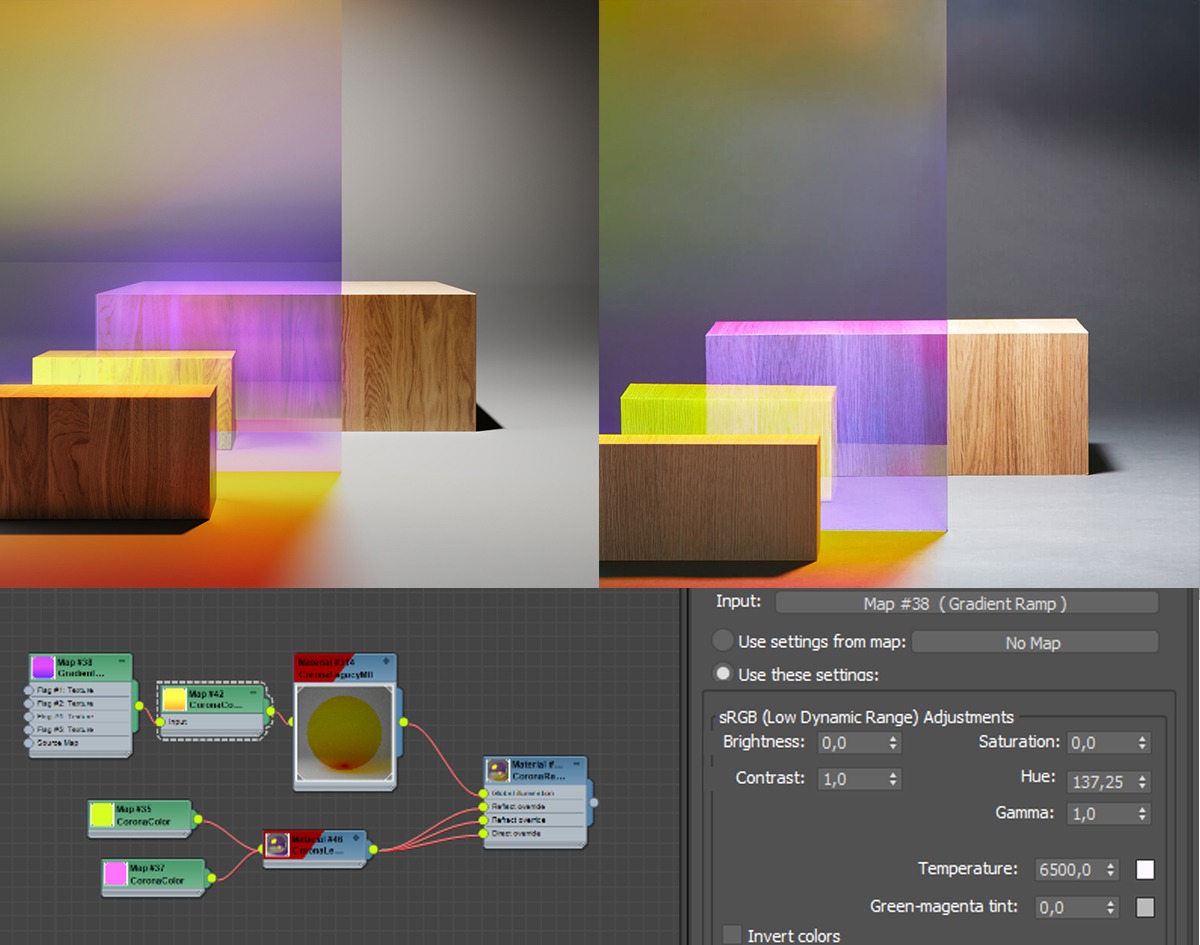
This can be done using CoronaRaySwitchMtl, with which we will replace the material that will participate in the formation of GI, and therefore be responsible for our shadows.
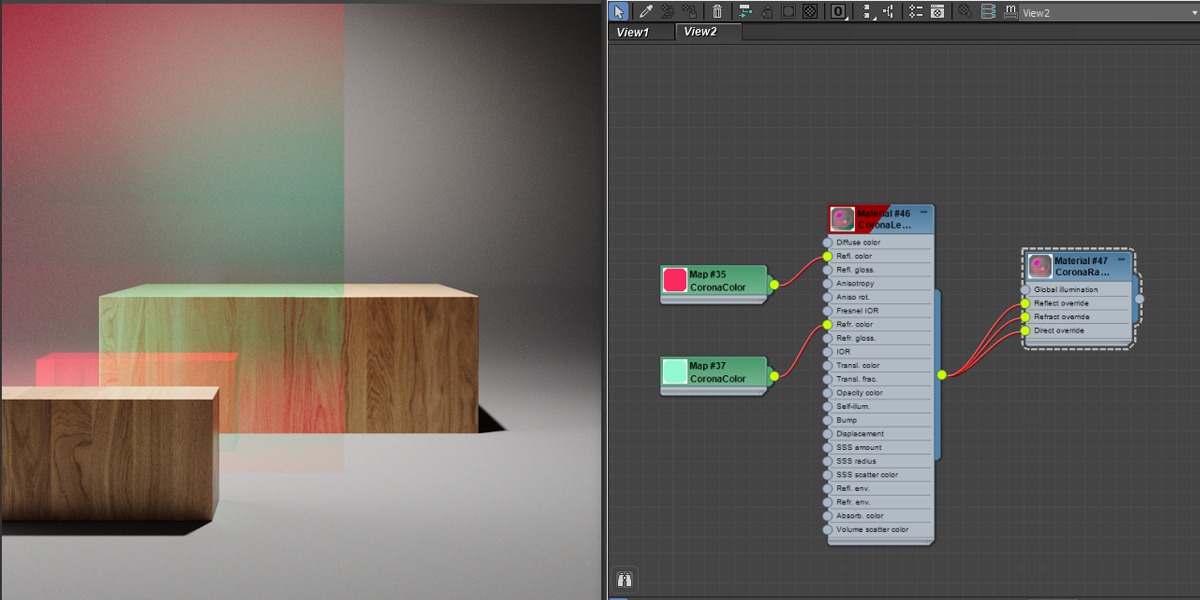
We can see that in the reference our shadow has a purple to blue color gradient and the top of the foreground box is colored pink, we can achieve this by replacing our CoronaColor with a GradientRamp, keeping in mind the correct texture coordinates for our glass model.

At this stage, we have implemented all 4 properties that we see on the reference, the fine-tuning remains.
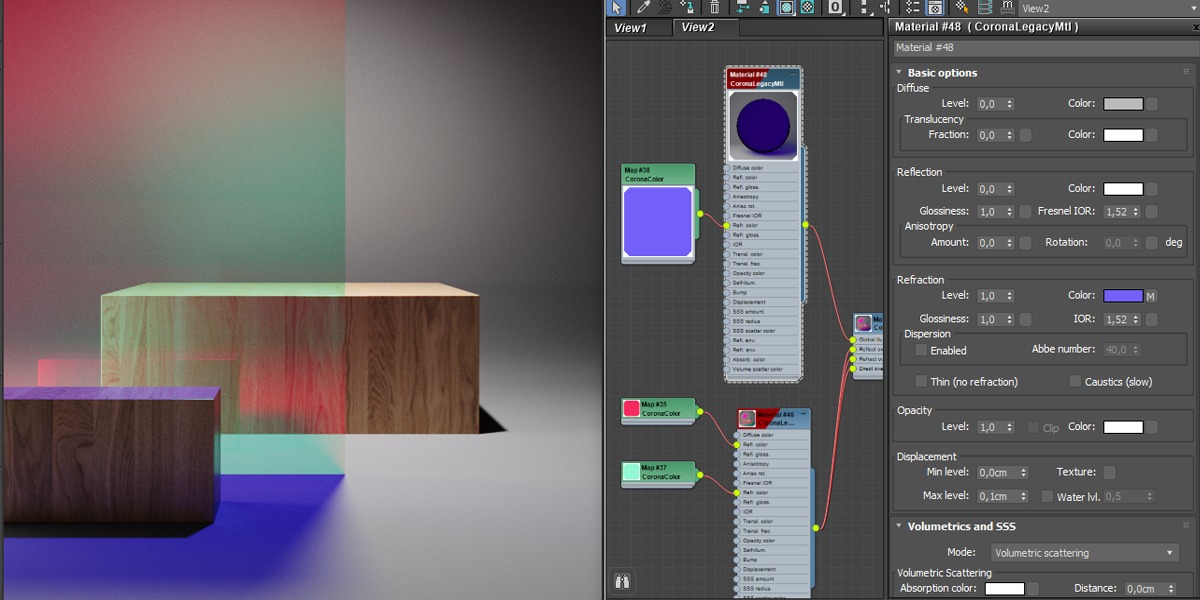
The final result can also be influenced by the parameters of the Diffuse layer and the Translucency layer, since according to the scheme that I explained above, from the total 100% of the light that hit the material, we cut off part of the "tinted" reflection, part of the "tinted" refraction, and the rest of the light from refraction seeps into diffuse, and when transluence is activated, also onto it:
At this stage, in comparison with the reference, our glass looks like this:
If our task is to repeat the appearance of the reference, then we open Photoshop and finalize the render.
In a completely similar way, replacing the colors, we get the yellow-violet variation of our film:
Example 2
Let's consider another example in which we will touch on the iridescent (rainbow) effect and the presence of several glasses in the frame at different angles.
First, I create a dark gray floor plane, and for the background I load a random outdoor HDRI map from polyhaven.com and switch it to the Dome projection mode for clarity, attaching the position to the dummy object.
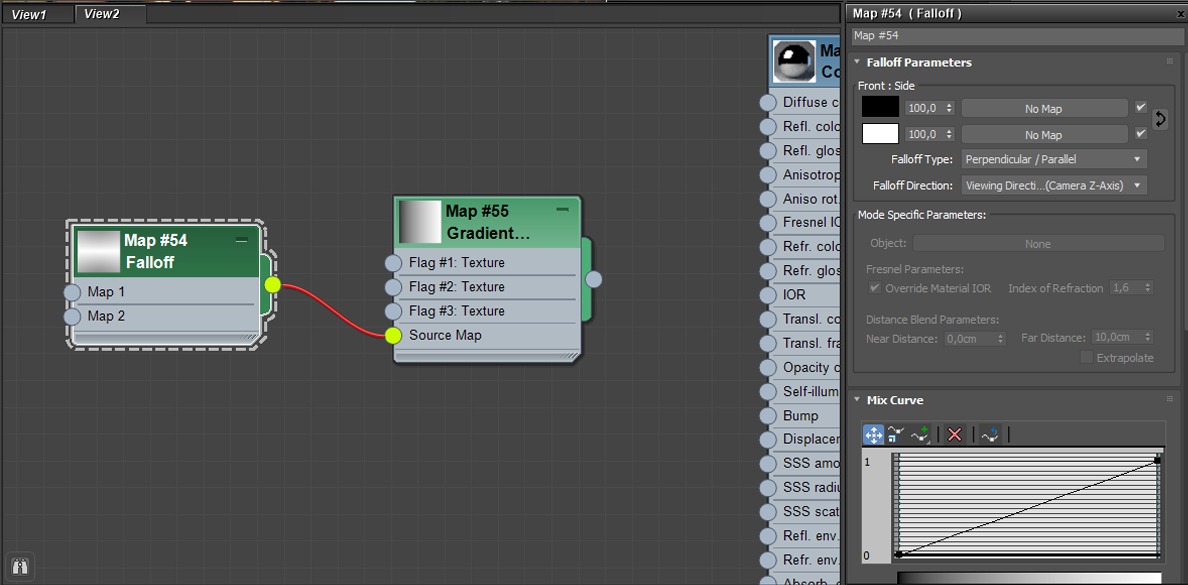
Thus, we have created a map that changes color along the entire visible spectrum depending on the angle of the object in relation to the camera.
And now I'll tell you about the "useful bug" with the built-in Falloff map, which I mentioned at the beginning, and which I discovered in the course of experiments.
As you can see, as you rotate the camera, the color of the glass shadow does not change, although it is obvious that the angle between the Z-axis of the camera and the object changes along with the color of reflections and refractions.
That is, the current behavior of our material is quite physically correct, its properties depend on the position of the light source in relation to the object, and not just the observer, although from the point of view of the shader, such behavior should not be traced.
I never found out the reason for such a "profitable" bug, I also did not check the behavior of the map in other engines, so if you work with other render engines that support the standard one, or have their own proprietary falloff maps, I will be glad to see the results of the experiments in the comments under rhe article.
So, let's return our native "broken" Falloff map and continue.
The near-mirror surface of the glass will give a fast and crisp reflection caustics that will look great and interact with shadows from other glass, especially in outdoor scenes or when there are bright directional lights.
If you wish, instead of our gradient, you can use the ThinFilm shader from Siger Studio, but I don’t see any particular advantages in it, if we don’t have strictly specified thicknesses for the film, you still have to select the right shades by eye.
Epilogue
Using this approach in creating a shader as a base, we can modify the "glass sandwich" itself to a more realistic state by adding a layer of ordinary architectural glass with a thickness, getting an honest refraction, chamfered ends, imperfections in the glossiness/roughness channel, bumps in the bump, and so on.
Below are a few renderings that I've done using the principles described above. Photographs by Timothy Kaye were used as references.
In some cases, with the help of post-processing, I locally corrected color shades to more closely match the references, but in the vast majority of tasks, I'm sure you can do without it.
As a bonus, I can advise you to pay special attention to the reflections in your glass, and accordingly, to the content of the scene, which will be responsible for them. It is reflections, forming a color contrast with refractions, that distinguish dichroic glass from simply colored glass.

The presented method is not positioned as the ultimate truth, it is rather the results of my experiments, which I am glad to share with you, and I will also read your thoughts and comments under this article with great pleasure.
I’ll end with a banal one - don’t be afraid to experiment and probe the boundaries of the engine, and one day a masterpiece will be born from your pampering. Don't forget to subscribe to my Telegram channel, there will be even more useful features and tips ahead. I hope you learned something new today.
Sample scene (max 2019+) + pdf