Deploy Your Facebook Messenger Bot with Python
https://t.me/JuicyDataA step-by-step guide to easily deploying a Facebook Messenger chatbot with Python, using Flask, requests and ngrok.
When done right, interacting with a computer through human language is incredibly powerful and also quite fun. Messaging and Voice-Controlled devices are the next big platforms, and conversational computing has a big role to play in creating engaging augmented and virtual reality experiences. There are a number of unique challenges to building these kinds of programs, such as: how can I make my chatbot available to the outside world?
In this tutorial, you'll go through the steps required to deploy a chatbot on Facebook Messenger, which has over 1 Billion active users. You can reach an enormous audience with just a few lines of code.
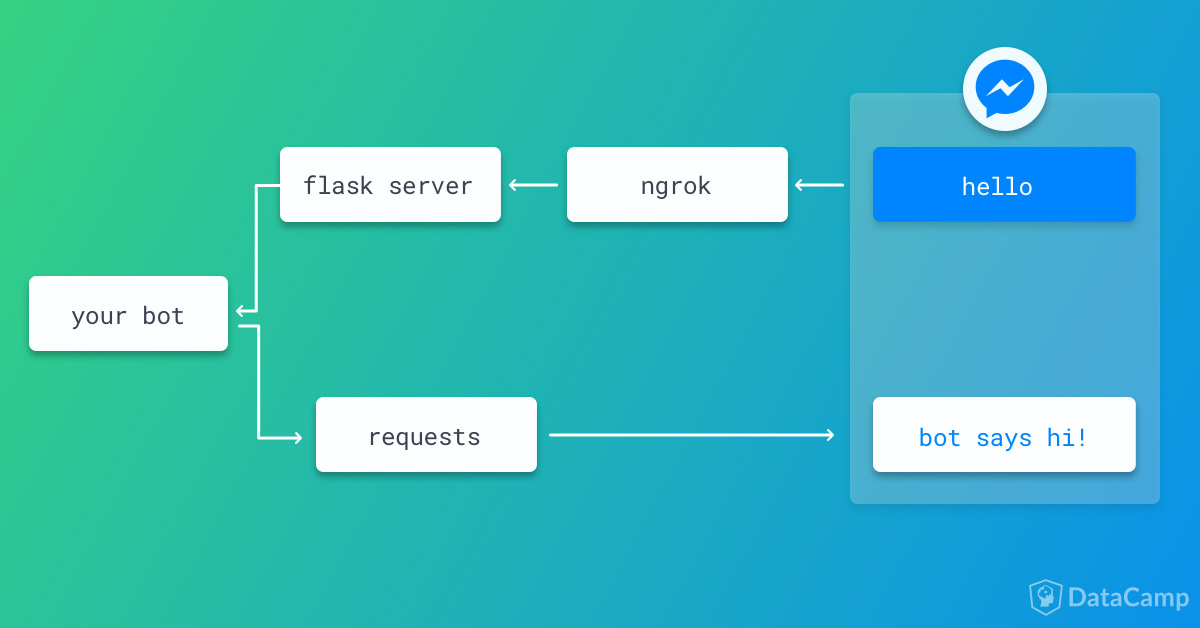
There are 3 main steps to get this done. You need to:
- create a server which listens to messages from Facebook (using
flask) - define a function for sending messages back to users (using
requests) - forward a
httpsconnection to your local machine (usingngrok)
If you want to know more on how to turn human language into machine instructions, check out the Building Chatbots in Python DataCamp course.
Note that what you won't cover in this post is how to your bot can understand what people are saying and respond appropriately. To learn more about that you should have a look at Rasa NLU, Rasa Core, and the DataCamp course that was just mentioned.
Wrap Your Chatbot in a httpServer
The first step is to create a http server which listens to messages sent by Facebook, gets a response to that message, and eventually sends the response back to the user on Facebook. We will use flask to create this server. The basic idea is the following:
- Create a
flaskapp that listens for messages sent tolocalhost:5000/webhook. When messages are sent on Facebook they will arrive ashttprequests to this URL. - The
listen()function handles thesehttprequests and checks that they contain a valid Facebook message - If the message is valid, the
get_bot_response()function is called and the response is sent back to Facebook Messenger
In addition, you will create a function called verify_webhook() that handles the initial authentication between Facebook and your app.
The final script looks like this (save it under server.py):
from flask import Flask, request

app = Flask(__name__)

FB_API_URL = 'https://graph.facebook.com/v2.6/me/messages'
VERIFY_TOKEN = ''# <paste your verify token here>
PAGE_ACCESS_TOKEN = ''# paste your page access token here>"


def get_bot_response(message):
    """This is just a dummy function, returning a variation of what
    the user said. Replace this function with one connected to chatbot."""
    return "This is a dummy response to '{}'".format(message)


def verify_webhook(req):
    if req.args.get("hub.verify_token") == VERIFY_TOKEN:
        return req.args.get("hub.challenge")
    else:
        return "incorrect"

def respond(sender, message):
    """Formulate a response to the user and
    pass it on to a function that sends it."""
    response = get_bot_response(message)
    send_message(sender, response)


def is_user_message(message):
    """Check if the message is a message from the user"""
    return (message.get('message') and
            message['message'].get('text') and
            not message['message'].get("is_echo"))


@app.route("/webhook")
def listen():
    """This is the main function flask uses to
    listen at the `/webhook` endpoint"""
    if request.method == 'GET':
        return verify_webhook(request)

    if request.method == 'POST':
        payload = request.json
        event = payload['entry'][0]['messaging']
        for x in event:
            if is_user_message(x):
                text = x['message']['text']
                sender_id = x['sender']['id']
                respond(sender_id, text)

        return "ok"
In the above script the VERIFY_TOKEN and PAGE_ACCESS_TOKEN variables aren't defined yet - so you will have to set these. The VERIFY_TOKEN can be any string, it is used as a kind of password to let facebook know that this server wants to receive messages. It is a good idea to use a long random string. You can do this quickly by running openssl rand -base64 32in your terminal.
Don't worry about the PAGE_ACCESS_TOKEN just yet - you will see how to get it below!
Send Messages Back to Users
Next, you will write a function that that sends a response back to Facebook Messenger using a python library called requests. In particular, you use the post() method, which creates a HTTP POST request. A POST request is the typical way to send information to a server.
Your function should look like this:
import requests

def send_message(recipient_id, text):
    """Send a response to Facebook"""
    payload = {
        'message': {
            'text': text
        },
        'recipient': {
            'id': recipient_id
        },
        'notification_type': 'regular'
    }

    auth = {
        'access_token': PAGE_ACCESS_TOKEN
    }

    response = requests.post(
        FB_API_URL,
        params=auth,
        json=payload
    )

    return response.json()
Expose a https Endpoint and Connect a Facebook Page
The url localhost:5000 only works for requests created on the same computer as the running server. So you need to let facebook know how to reach your flask server. To do this, first install ngrok.
Go to this page and install the version for your operating system. If you're on Mac and have homebrew, the quickest way to install ngrok is with brew cask install ngrok.
Start the ngrok server in your terminal with ngrok http 5000. This will set up a httpsendpoint to get forwarded to your machine on port 5000, for examplehttps://51b6b3fa.ngrok.io.
Note that if you quit ngrok and restart, this URL will change.
Create a Facebook App and Page
The next step is to create an app and a page on Facebook. There is good documentation available from Facebook but you'll walk through the main steps here.
To create the app go here and
- click on My Apps -> Add a New App and enter a name
- you will be redirected to the dashboard for the app
- under Products, find Add a Product and click on Messenger -> Set Up
To create the page, you have to:
- go the settings for Messenger, scroll down to Token Generation and click on the link to create a new page for your app
Once you have created a page, go back to the Token Generation settings and select this page from the drop-down menu. Copy the Page Access Token into the placeholder for PAGE_ACCESS_TOKEN in server.py above.
Start your bot server
Now that you have everything set up, it's time to start your chatbot server! In a separate terminal tab, run
FLASK_APP=server.py flask run
Set up the webhook
Finally, you need to register your webhook on the Facebook developers page.
- Go to the Messenger tab in Products again and scroll down to Webhooks, click on Setup Webhooks
- Under the Callback URL enter in your ngrok URL, for example,
https://51b6b3fa.ngrok.io/webhook. It is important that yourflaskapp is running at this point, because theverify_token()will be called on the next step - In the Verify Token field, you put the value you specified in your
server.pyfile - In Subscription Fields make sure
messagesandmessaging_postbacksare ticked Click Verify and Save to perform the authentication
Important: Go back to Products -> Messenger, and under Select a page to subscribe your webhook to the page events select your page and click Subscribe.
You're done!
Your bot is now ready to send and receive messages via Facebook Messenger. Right now, your get_bot_response() function is still pretty simple, and doesn't feel like a real chatbot yet! To learn all about building chatbots, check out the Building Chatbots in Python DataCamp course, as well as the Rasa NLU and Rasa Corepython libraries.