Create Telegram Mirror Leech Bot by Deploying App with Heroku Branch using Github Workflow
By wiszkyDISCLAIMER : This tutorial is for educational purposes only, I'm not responsible to any abuse regarding this.
This is very basic tutorial for newbie or noob only who doesn't know at all about create bot, NOT SUITABLE for advanced users.
CREDITS :
- THANKS to github.com/anasty17/mirror-leech-telegram-bot and all contributors for Mirror Bot Repository and Readme Tutorials.
- THANKS to [AFK] ↑🄺🄰🅃🄰🅁🄸🄽🄰↓ for "Google Cloud Console Tutorial"
- THANKS to SpeedX [AFK] for "Add Google Group to Shared Drive Tutorial"
# Requirements
- Telegram Account
- Heroku Account
- Github Account
- Install Python on Windows 10 (from CMD)
- Google Drive Account (connected to Shared Drive / Team Drive)
# Create Telegram API ID and HASH
- Open my.telegram.org (register with your number connected to telegram account
- Fill with your number , Choose Desktop, Fill App title and Short name to any name you want.

the values will be
-- App api_id:
-- App api_hash :
# Create Heroku Account
- Heroku Account
- Go to Account Settings > Scroll down .. see API Key then "Reveal"
- Save HEROKU API Key
# Create Telegram NEW BOT
- Open @BotFather
- save Bot Token
- Create /Newbot (edit bot pic, about)
- Copy Paste Command from MLTB Repository github.com/anasty17/mirror-leech-telegram-bot#extras
# Download MLTB Repository to your local PC Storage
- open your github account
- github.com/anasty17/mirror-leech-telegram-bot Download ZIP then extract to your PC folder
# Create credentials.JSON in Google Cloud Console
- Open console.developers.google.com/apis/credentials (see in Video how to create it)
- renamed to credentials.json the save to "Bot credentials" folder
# ENABLE Required API
- Go to console.cloud.google.com/apis/library
--- ENABLE Google Drive API
--- ENABLE Identity and Access Management (IAM) API
### Create Token.Pickle + Token_sa.Pickle + Service Accounts JSON Files from Windows CMD
# Install Python in Windows 10 System (FOLLOW this)
- RUN CMD then type Phyton
- Install it from Microsoft Store
- Close CMD
- Open CMD from mltb folder
curl https://bootstrap.pypa.io/get-pip.py -o get-pip.py
python get-pip.py
pip -V (to confirm it's properly installed)
# Generate Token.pickle
- copy paste credentials.json from "Bot credentials" folder to mltb folder
pip install google-api-python-client google-auth-httplib2 google-auth-oauthlib
python3 generate_drive_token.py
- save token.pickle to "Bot credentials" folder
#ALTERNATIVE COMMAND
in case python3 command not working / not installed properly in your windows system. you can use python only command without 3 at the end
example below :
python generate_drive_token.py
# Generate Token_sa.pickle + SA Accounts folder
python -m pip install progress
python3 gen_sa_accounts.py --quick-setup 1 --new-only
- save SAs (service accounts) folder and token_sa.pickle to "Bot credentials" folder
#ALTERNATIVE COMMAND
in case python3 command not working / not installed properly in your windows system. you can use python only command without 3 at the end
example below :
python gen_sa_accounts.py --quick-setup 1 --new-only
# Add Service Account to SHARED DRIVE / TEAM DRIVE
- Open POWERSHELL from windows Accounts folder
- Copy Paste this command
$emails = Get-ChildItem .\**.json |Get-Content -Raw |ConvertFrom-Json |Select -ExpandProperty client_email >>emails.txt
- Go to groups.google.com
- create a new group (DON'T add SA in the 3rd step while creating group)
- open your group, go to members tab and press 'Add Members'
- Copy all mails from \accounts\emails.txt and paste in 'Group members' field, then press 'Add Members'
- open your SHARED DRIVE and add this google group (it will be something like blahblah@googlegroups.com) as 'Content Manager'. Done!
- Don't forget delete emails.txt in your local drive
#Alternative
add all the service accounts to your team drive by running this:
python3 add_to_team_drive.py -d YourSharedDriveID
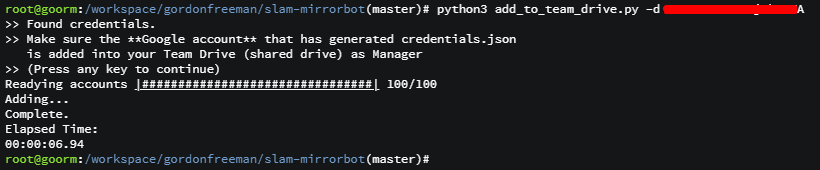
• You may check your team drive in order to see whether the service accounts are added or not. If it's added by 100 people, then it works. You can check the members too.
# Make Index Listing with Bhadoo
gitlab.com/ParveenBhadooOfficial/Google-Drive-Index
- Go to dash.cloudflare.com
- Create Index Workers
- Copy Paste Index Code.txt
- combined all SAs (Service Account) Credential in one note.txt by copy paste
-- Open CMD from accounts folder then Copy Paste this-->
copy 0.json + 1.json + 2.json + 3.json + 4.json + 5.json + 6.json + 7.json + 8.json + 9.json + 10.json + 11.json + 12.json + 13.json + 14.json + 15.json + 16.json + 17.json + 18.json + 19.json + 20.json + 21.json + 22.json + 23.json + 24.json + 25.json + 26.json + 27.json + 28.json + 29.json + 30.json + 31.json + 32.json + 33.json + 34.json + 35.json + 36.json + 37.json + 38.json + 39.json + 40.json + 41.json + 42.json + 43.json + 44.json + 45.json + 46.json + 47.json + 48.json + 49.json + 50.json + 51.json + 52.json + 53.json + 54.json + 55.json + 56.json + 57.json + 58.json + 59.json + 60.json + 61.json + 62.json + 63.json + 64.json + 65.json + 66.json + 67.json + 68.json + 69.json + 70.json + 71.json + 72.json + 73.json + 74.json + 75.json + 76.json + 77.json + 78.json + 79.json + 80.json + 81.json + 82.json + 83.json + 84.json + 85.json + 86.json + 87.json + 88.json + 89.json + 90.json + 91.json + 92.json + 93.json + 94.json + 95.json + 96.json + 97.json + 98.json + 99.json combined.txt
- in notepad: ctrl + F , Replace "}" with "}, " <-- after coma , with [space]
- copy paste SA credentialsn replace to {}
- Save INDEX URL
# Setting Github Secret
- Go to Github.com Settings > secrets
fill below values
HEROKU_EMAIL
value: (your heroku email registered on heroku)
HEROKU_API_KEY
value: (login to your heroku account then go to settings)
HEROKU_APP_NAME
value: mirrordc117 (create app name to any name whatever you want, it must be unique)
CONFIG_FILE_URL
(go to gist github then fill this with your convig.env gist)
- open gist.github.com
- copy config from repo github.com/anasty17/mirror-leech-telegram-bot/blob/master/config_sample.env named it to config.env
- fill Required Config and some optional config
- Remove commit id from raw link
- the rest config is optional, you don't need to fill all, some features may useful for you or not at all, just suit it with your needs.
you can ask me in youtube comment section for the rest configs, or you can learn directly from repo readme,
## Github Workflow Deployment
- Clone Repo to your github account with "use template" made it PRIVATE
- upload all credentials to Root of HEROKU Branch (credentials.json + token.pickle + token_sa.pickle)
- add file > create new file , write down accounts/file.txt
- upload all json files from "Bot credentials>accounts" folder
- don't forget Delete file.txt after that.. DON'T include anything in accounts folder instead json files
# FINAL DEPLOYMENT
- in Github action tab
- choose Manually Deploy to Heroku
- click Run Workflow , Use workflow from choose Branch: heroku -- (not master)
- Run workflow (green button)
- deploying ..
# Testing BOT perfomance (RANDOM)
- Give /Restart first after bot on
- /help to check all command available (explore it and read one by one)
- /speedtest
- backup with /clone command (try search public gdrive files to test clone command)
- mirror torrent file with /qbmirror [magnet link]
- test download video from youtube by /watch or /leechwatch command