Crawl Space Encapsulation + Foundation Repair: 3 Must-Know Tips Before Hiring
Most calls I get from homeowners start the same way. The floor feels soft. A door sticks when it rains. The crawl space smells musty. Sometimes all three. What lives beneath a house rarely gets attention until it starts sending signals upstairs, but by then moisture and soil movement may already be working together in ways that shorten the life of wood framing and concrete. That is exactly why crawl space encapsulation and foundation repair belong in the same conversation. Handle one without the other, and you often chase symptoms.
I have spent years inspecting subfloors, clay soils, loose piers, and plastic vapor barriers that did nothing because the real problem was outside at the downspouts. The fixes are not mysterious once you look at the whole system. They do, however, demand the right sequence and a contractor who will diagnose, not just sell. If you are searching for foundation repair near me or basement crawl space encapsulation because something feels off at home, start with these three must-know tips.
Why moisture and movement are joined at the hipFoundations do not fail in a vacuum. Soil changes volume as it wets and dries. Wood expands and contracts with relative humidity. Concrete wicks water and carries salts that undermine its surface over time. A vented crawl space exposes framing to outside air, which across much of the country is humid through the warm months. Bring 85 degree coastal air at 70 percent relative humidity into a 72 degree crawl, and you will hit the dew point on cold ducts and joists. That leads to condensation, then fungal growth, then softened fibers. At the same time, a clogged footing drain or badly sloped grade keeps water against the foundation. If you also have plastic clay below, it can swell when saturated and shrink when parched, flexing piers and pulling at grade beams.
Encapsulation makes sense in that context. The goal is to uncouple the crawl from outside air and soil moisture, then manage the interior with a sealed liner, taped seams, insulated walls, and a properly sized dehumidifier. Foundation repair addresses settlement, bowing, or cracked elements with piers, wall anchors, or helical piles, along with drainage and basement waterproofing where needed. What matters is the order: you stop the water and stabilize the structure before you lock it up.
Tip 1: Insist on a real diagnosis before anyone prescribes workGood contractors gather data. They do not point at a hairline crack and sell piers. They measure the crawl space and read the room, literally.
Here is what a thorough assessment looks like from my notebook. Start with a laser level or water level to map interior floor elevations, both to the nearest eighth inch and in context with exterior grades. Uneven floors can stem from a failing beam, but sometimes the top of the foundation wall has dropped. I once mapped a 1.25 inch drop over 24 feet, only to discover a broken downspout had been dumping at that corner for years. Without the grade map and a look outside, you would never know.
Moisture is next. I bring a pin-type moisture meter for subfloor and joists, and a quality hygrometer. Healthy wood in a crawl usually sits between 9 and 14 percent moisture content in a temperate climate. When I see readings in the high teens, I start looking for standing water, wet insulation, or unsealed earth. Relative humidity should be kept below 60 percent year-round after encapsulation. If it is already above 70 percent in spring, expect fungal growth. Smell confirms it before you see it.
Soil and water movement need their share of attention. In clay belts, a plasticity index test from a geotech lab tells you how reactive the soil is. You may not need a formal test for every home, but you should at least ask the contractor how they judge soil conditions. Helical piles behave differently in sand than in fat clay. Perimeter drains, sump basins, and discharge lines need to be part of the site plan in either case. I look for daylighting options for drains, then consider a sump only if gravity will not cooperate. Sumps are fine when correctly installed, sized, and backed up, but relying on one because nobody wanted to trench an outlet is a mistake.
Finally, I log the cracks. A simple crack gauge or a scribed line and dated photo can tell you whether a foundation crack is active. I have tracked cracks a sixteenth of an inch wide for a year with no change, then found the real culprit upstairs - wet, over-spanned joists. That house did not need piers. It needed to remove the soggy fiberglass, add a midspan beam, and encapsulate with proper dehumidification.

When a contractor leads with “You need to encapsulate crawlspace and it will solve your settlement,” hit pause. Encapsulation will manage humidity. It will not lift a sinking footing. Similarly, someone pushing piers without asking where the water goes is selling you half a plan.
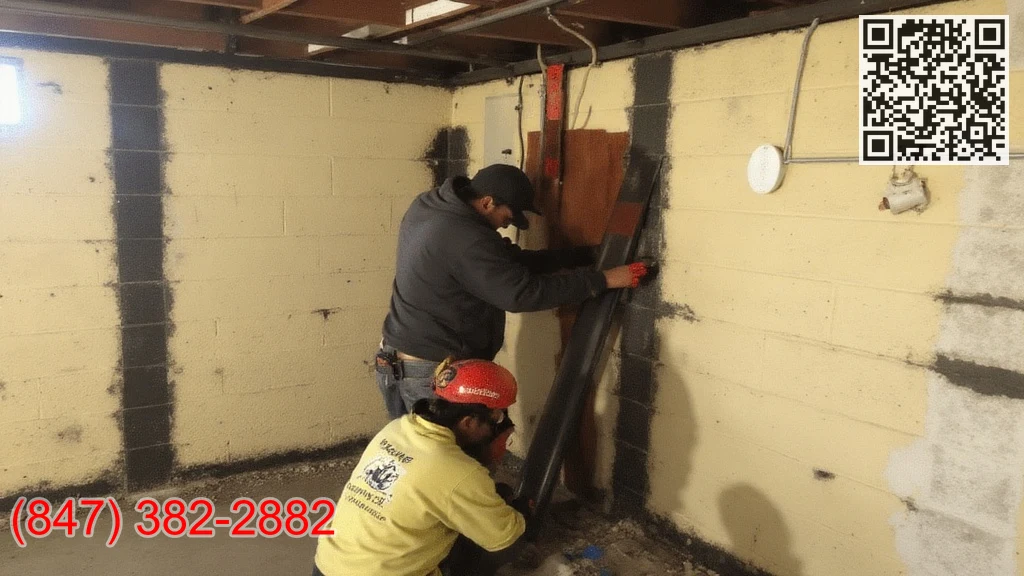
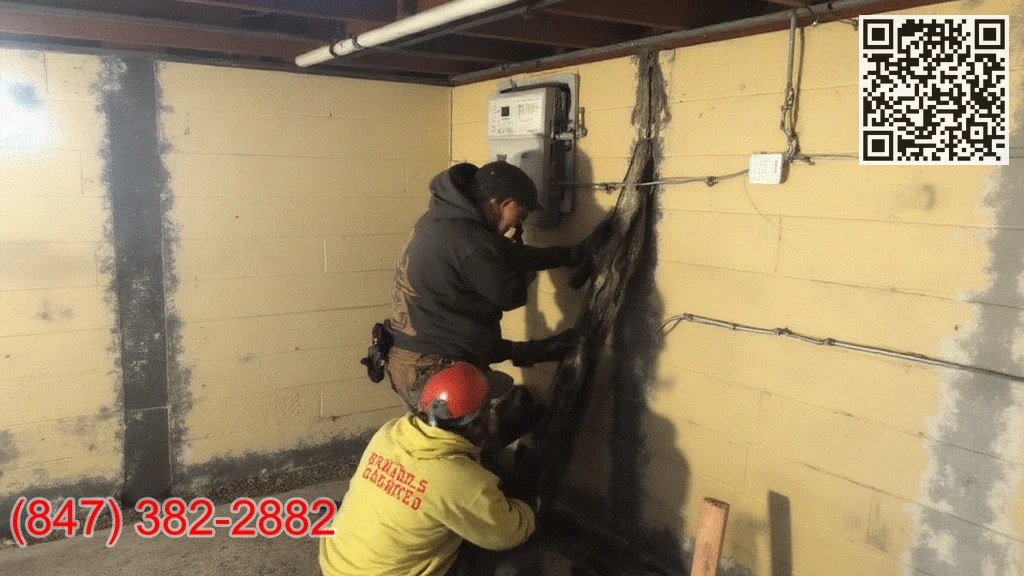
Tip 2: Vet materials, methods, and warranties more than priceTwo crawl spaces can look similar in photos and perform very differently in real life. I have crawled through 6 mil polyethylene that tore around every pier, and I have stood on a 12 mil reinforced liner taped to the walls with double-sided butyl tape that still looked tight eight years later. Materials and methods matter. So do the numbers behind a warranty.
The encapsulation kit should include a reinforced liner that is thick enough to deal with foot traffic and boxes of HVAC service techs. Many crews use 12 to 20 mil liners. I prefer a true 12 or 15 mil with fiber reinforcement that lays flat and resists tearing around supports. Seams should be overlapped at least 6 to 12 inches and taped with a compatible acrylic or butyl tape. The wall seal is where many jobs fail. A mechanical attachment with termination bar and a continuous bead of sealant along the top prevents peel-off in damp conditions.
Wall insulation can be a rigid foam board rated for below grade use, sealed at seams with foam or tape, or closed-cell spray foam installed to code. Floor joist bays are not the place for fluffy fiberglass in a sealed crawl. If local codes require a thermal barrier or ignition barrier over foam, the contractor should handle that permit and inspection. Watch for vent-block details and termite inspection considerations, which vary by state. In many termite zones, you need a viewing strip at the top of the foundation wall where no foam is installed so inspectors can see mud tubes.
Dehumidifiers are sized in pints per day and should be ductable in tight crawls. I rarely accept units under 70 pints per day for spaces over 1,200 square feet, particularly in humid regions. The drain for that unit needs a positive slope to a condensate pump or gravity drain line, with an overflow safety. A built-in RH display is a plus, but I still add a remote sensor so the homeowner can glance at levels from a utility room.
For foundation repairs, ask exactly which pier system is proposed, at what spacing, and what load each pier is rated to carry in your soil. Push piers rely on the weight of the structure to seat themselves, while helicals are literally screwed into soil until they reach a torque that correlates with capacity. Neither is universally better. On a light framed house, helical piles often make more sense. On a heavier masonry structure, push piers can reach deeper strata efficiently. The spacing - often every 4 to 8 feet along a distressed wall - should be justified with load calculations, not just a rule of thumb.
As for warranties, read the fine print. Many foundation repairs advertise lifetime warranties, but they are limited to the pier location and are transferable only once. Some cover adjustment labor for a set period, then charge for future lifts. Encapsulation warranties can be even trickier. What is covered, the liner or the humidity level? If the liner is intact but the RH creeps up because the dehumidifier failed, is that covered? Who services the dehumidifier at year five? These questions sort the serious operators from the rest.
Here is a compact checklist I give homeowners after a site visit.
Proof of diagnosis: written elevation map, wood moisture content, RH readings, and photos Materials spec sheet: liner thickness and reinforcement, tape and sealant types, insulation details Method statement: sequencing, pier or anchor layout with capacities, drainage plan with outlet Warranty terms in writing: what is covered, for how long, transfer rules, and service responsibilities Permits and code notes: termite inspection strips, ignition barriers, and electrical for dehumidifierIf the contractor balks at any of that, keep looking. You will find better results by searching foundation repairs near me and then filtering by companies that share real documentation, not just glossy before-and-after pictures. Pay attention to how they talk about basement waterproofing too. Drainage to daylight with washed stone and a filter fabric-wrapped pipe behaves differently than a bare perforated pipe laid in mud.
Homeowners often want to start with what they can see and smell, the damp crawl. That instinct makes sense, but it can waste money if outside water is still pushing in or the structure is still moving. Encapsulate crawl space over wet soil without a drain path, and the liner will float or sweat beneath. Lift a sagging beam after you have sealed the space, and you risk tearing your shiny new barrier. Sequencing is the thread that ties good work together.
The smart sequence of work usually follows this path.
Redirect water away from the house: gutters sized to 5 or 6 inches depending on roof area, downspouts extended 8 to 10 feet, regrade soil to slope 5 percent away for the first 10 feet Control subsurface water: perimeter drains at footing level or a reliable interior French drain if exterior access is blocked, with a gravity outlet or a sump with battery backup Stabilize structure: add or adjust piers, helical piles, or wall anchors to stop movement and, where appropriate, gently lift floors within tolerance Seal and insulate: install a reinforced liner, seal to walls and piers, add wall insulation as code and termite rules allow, and close vents properly Condition the space: set a dehumidifier to maintain 45 to 55 percent RH, verify airflow if tied into HVAC, and add a dedicated circuit if the unit requires itThere are exceptions, but I can count on one hand the jobs that benefited from a different order. In a very dry high-desert climate, encapsulation might be a lower priority if the https://louisvyse564.trexgame.net/foundation-repair-near-me-3-facts-to-check-before-you-call main issue is settlement. In flood-prone areas, you may need to plan for flood vents that open under hydrostatic pressure while still controlling day-to-day humidity, a balancing act that takes careful design and might alter the materials choice.
Costs worth knowing, and where the money goesNumbers vary by region and access. A clean, open crawl with 3 feet of clearance costs less to work in than a 14 inch belly crawl. As a rough guide from recent projects:
Crawl space encapsulation material and labor often range from 3 to 7 dollars per square foot. Add 1 to 3 dollars per square foot for wall insulation, and 1,200 to 2,500 dollars for a dehumidifier and electrical work. Tight spaces can push the labor higher. Foundation repair with piers or helical piles frequently runs 1,200 to 3,000 dollars per pier, depending on depth, bracket type, and local market. A typical run along one wall might use 6 to 10 piers. Interior drainage systems for basement waterproofing commonly fall between 35 to 60 dollars per linear foot, including sump and discharge. Exterior excavation costs more but can be the right call if you have accessible perimeter and want to keep water entirely outside.If you receive a quote that seems too low, ask what was left out. Many bids exclude debris removal, mold treatment if needed, or electrical work, then add change orders later. Conversely, a sky-high price does not prove quality. I have seen proposals to encapsulate a crawl and “treat” the air for more than the cost of fixing the yard grading that caused the problem. Always ask for options and a line-by-line scope.
What you, the homeowner, can do before anyone arrivesA lot of value sits in the boring tasks outside. Walk the perimeter during a steady rain. Do you see water sheeting off the roof in places without gutters? Are splash blocks sending water right back to the foundation? Look for high mulch piled against siding, a common invitation to termites and rot. Confirm that soil falls away from the house, not toward it.
Inside the crawl, use a decent flashlight and a mask. If you can access safely, check for standing water, torn ground cover, and dark staining or fuzz on joists. Bring a screwdriver. Gently press it into joist bottoms in a few places. Sound wood resists and feels springy. Spongy, easy penetration calls for attention. Note insulation condition. Fiberglass that hangs down like a hammock usually signals moisture and rodent traffic.
I also encourage a simple data habit. Buy a 30 to 60 dollar Bluetooth hygrometer and set it in the crawl for a week. The graph will show daily highs and lows and give your contractor something concrete to work with. If the space is vented and open, try closing vents on a muggy day and see if RH rises. Observation informs better design.
Regional realities that shape the planIn the Southeast with high humidity and often clay-rich soils, encapsulation pairs nicely with helical piles or push piers where settlement shows. Dehumidification is non-negotiable, and termites drive the detail at the top of the wall. Battery-backed sump pumps are common because afternoon thunderstorms can knock out power when you most need the pump.
In the Upper Midwest with deep frost, footing depth matters. I see frost heave masquerading as settlement near shallow porches and additions. Drainage and insulation at edges can prevent seasonal movement. If you are adding piers during winter, be mindful of frozen soil assumptions in torque readings for helicals.
Along coastal zones with high water tables, exterior waterproofing may be less feasible due to tides and neighbor constraints. That is where a well-designed interior drain and encapsulation system shines, provided you have redundancy on pumps and discharge routing that avoids sending water right onto a sidewalk or into a neighbor’s yard. I have also had clients type encapsulated crawl.space into their search bar and land on good studies of how salt air eats cheap fasteners. Stainless steel or hot-dipped galvanized hardware is not a luxury there.
Arid regions can lull you into thinking encapsulation is unnecessary. But even in deserts, night cooling can push RH up in shaded, vented crawls. If ducts run through the space, sealing and a small dehumidifier often pay for themselves in energy savings and indoor comfort.
Red flags during sales and installationI look for how a company behaves before and after the sale. If someone will not crawl the full perimeter or measure humidity, they are guessing. If the salesperson uses only stock phrases like foundations repair near me without asking how your house was built, they are marketing, not diagnosing. During installation, watch for rough cuts around piers, sloppy overlaps, and quick caulk patches where a termination bar should be. An encapsulation that looks good on day one but lifts at the edges by day 30 sends humid air behind the liner, which is worse than doing nothing because it hides the problem.
With foundation repairs, beware of a one-size-fits-all kit. Good crews sometimes change pier spacing once they expose the footer and see its condition. That change should be explained, not hidden. Ask the foreman where the pier torque readings or push pressures are recorded. Those numbers should land in your job file.
The maintenance no one talks aboutEncapsulation is not a set-and-forget project. Expect to replace or service a crawl space dehumidifier every 5 to 10 years, like any appliance. Filters need cleaning. Drains need checking. I recommend homeowners note RH levels monthly for the first year, then quarterly. If RH stays above 60 percent for weeks, call the installer. The liner should be walked at least annually to check for tears, especially near access doors and equipment pads. If you store items in the crawl, use plastic shelving, not cardboard boxes on the liner, and leave space for air to move.
For foundation repairs, pay attention to doors and drywall seasons later. Minor nail pops or a hairline crack reappearing near a door head may be normal as the house finds a new equilibrium. Significant changes - a half-inch of gap opening under baseboards or a door that suddenly rubs after a heavy rain - deserve a call. That is where a warranty with real service behind it pays off.
A short case from the fieldA two-story 1960s house in a piedmont clay belt developed uneven floors and a persistent musty odor each summer. The first company proposed 12 piers and a full encapsulation at a price that made the owner blanch. No drainage changes were mentioned. I mapped the floors and found a 0.75 inch sag centered in a long beam with undersized piers, worse near the back corner where a downspout dumped. Wood moisture content measured 18 to 20 percent in mid-June. The crawl had old 6 mil poly, loose and torn.
We changed the downspout layout to a buried solid pipe terminating 12 feet downslope. Grading added a 5 percent fall over the first 8 feet. Inside, we added three helical piles to stabilize the worst corner and a midspan steel beam with adjustable posts to pick up the long run. Then we encapsulated with a 12 mil reinforced liner sealed to insulated walls, taped seams, and a 90 pint dehumidifier set to 50 percent RH. I returned four weeks later. Wood moisture content dropped to 13 percent, and the kitchen door stopped rubbing. The owner spent roughly 60 percent of the original quote and got a plan that matched causes, not just symptoms.
Where and how to search for helpSearch terms like foundation repair near me and basement waterproofing will bring you a mix of national firms and local outfits. That is fine. What matters is who shows you a plan supported by measurements and who talks about both water and structure. If you are specifically focused on crawl spaces, mix in crawl space encapsulation and encapsulate crawlspace when you search. You will spot trends quickly. The better teams reference local soil behavior, show real job photos with materials identified, and offer service plans for the dehumidifier. The ones to avoid lean on scripts like foundations repair near me and pressure you to sign the same day for a discount.
If you have a basement with seepage along cold joints, the contractor should be fluent in interior drains, sump sizing, and exterior waterproofing trade-offs. They should be ready to discuss wall bowing limits in inches per 8 feet and when carbon fiber straps make sense versus anchors or excavation. The details matter far more than the brand stickers on a pier bracket.
Final thoughts from the crawlEncapsulation and foundation repairs succeed when they work as parts of one system. Water is disciplined outside, structure is put back in line, then the crawl becomes a conditioned space that quietly protects the house. That sequence delivers the best return on your time and money. Push for data during diagnosis, clarity in materials and methods, and honesty about what a warranty really covers. If you do that, the smell fades, the floors firm up, and the crawl space becomes what it should have been from day one - out of sight, out of mind, and doing its job.