Contouring Mature Woman

💣 👉🏻👉🏻👉🏻 ALL INFORMATION CLICK HERE 👈🏻👈🏻👈🏻
Style, Beauty, and Health for Women in their Hot-Flash Years
You are here: Home › Make-Up Tutorials › How To Contour the Mature Face | Contouring & Highlighting Tutorial
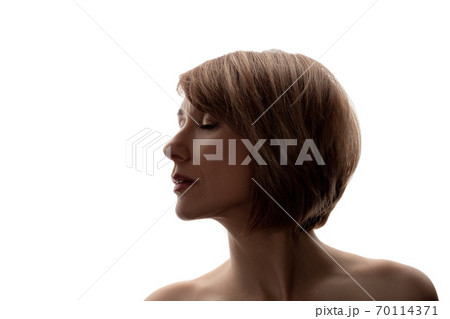
Contouring is a huge trend this year and everyone seems to be doing it. It’s hard to miss the YouTube videos or Instagram pics of people with painted faces (like mine above). It’s a technique that has it’s roots in theatrical makeup but now with video tutorials and contouring kits everywhere I’ve been asked if mature people can do it and if so, how.
If you read my blog at all you know that I don’t like rules or limits on what older people can do so I say “Yes We Can”! We just need to do it a little differently to accommodate the differences in our skin and what needs help on our faces.
It basically works by creating areas of light and shadow that fool the eye. Adding light brings things forward while adding shadow (or darkness) pushes things back. In this tutorial I’ll use the cream contour method in which I’ll use cream products underneath my foundation for a subtle, natural look.
I’ll be using the NYX Cream Highlight & Contour Palette in Light. If you don’t have a contour palette you can use 3 shades of foundation to achieve the same effect. If you’re just starting out the NYX palette is an inexpensive way to experiment (but I do find the creams a little stiff and not as easily blended as I’d like). If you’re going to contour frequently, I’d choose the Anastasia Cream Contour & Highlight Palette instead.
I’ll also be using the new Beauty Junkees Pro Highlight & Contour Brush Set. It has everything I need to highlight & contour like a pro.
Here’s a step by step tutorial on how to contour & highlight the mature face:
I recommend using a primer and letting it set up for a few minutes before starting (this is a lot of work and you want it to last)! Also if you have under eye discoloration, go ahead and apply your usual under eye concealer now. Each face is different, but the basic shape to create is a highlighted heart shape from above the eyes to the point of the chin.
We’ll start with the highlighting so these steps will all use the pale (matte) shade on the right side of the palette and the Beauty Junkees Pro Detailer brush.
To diminish eye bags: Paint a line from the inner corner of the eye along the dark side of the tear trough stopping when you reach the cheek. It’s best to avoid putting heavy makeup directly below the eyes where we have fine lines because makeup settles into them and makes us look older.
To thin/straighten nose: Paint a line down the center of the nose and along the edge where the nose meets the cheek leaving a space in between.
To lift cheekbones: Paint an outer V from the top of cheekbone starting below the pupil out beyond the corner of the eyebrow and up into the temple. Again, it’s best to avoid putting heavy makeup directly on the crow’s feet where we have fine lines because heavier makeup can make them look larger. Adding highlight to the temples helps to reduce the sunken appearance that comes with age.
To diminish naso-labial folds: Paint along the deepest part of the fold following contour from nose to corner of mouth.
To reduce frown lines: Paint palest shade into deepest part of frown line from corner of mouth down to chin.
Additional highlights to create heart shape (wider around the eyes, narrower at chin): Chin, above eyebrows, center of forehead.
Next, we’ll darken areas to make them visually recede using the darkest shade in the palette and the same brush (wipe it on a tissue to remove excess highlight color).
To shorten/narrow a tall/wide forehead: Paint along hairline to shorten, paint from hairline to eyebrow highlight to narrow. Avoid putting dark contour color into the temple at the outer corner of the brow, most older people become sunken in the temples so we need to highlight the temples to give them volume (this is the opposite of how younger people do it).
To thin/straighten nose: Paint vertical lines on either side of white line keeping color on the top of the nose, not down the sides.
To lift cheekbones: Paint a line from top where ear meets hairline angled toward the corner of the mouth and stopping half way.
To lift jawline: Paint a line along the jawline from ear to ear. Where jaw is firm place line under jaw in shadow, where jaw is sagging place line higher up so the line remains straight and doesn’t follow the contour of the curve.
At this point it looks scary, but we’re going to blend it and cover it with foundation for a natural effect:
The Pro Sculpting brush from the kit is perfect for blending these cream pigments seamlessly.
I blend the paler highlighted areas first using small circular motions around the edges. Then I wipe off the brush and blend the darker contour areas being careful to leave some color showing. For those who want to carve out more of a rounded cheek, use this brush to pull some of the cheekbone contour forward and curve it up toward the nose but not bringing it all the way to the nostril.
I recommend using a lightweight sheer to medium coverage foundation and applying with a blending sponge to avoid disturbing or moving the highlights and contours. Today I’m using Chanel Perfection Lumiere Velvet and the blending sponge from the Beauty Junkees Kit.
The foundation covers just enough of the highlight and contour to look natural but it still shows through so the foundation doesn’t look flat and mask-like.
The last steps are to set with powder and make it pop with blush, bronzer and illuminator (the bronzer and illuminator are optional)!
Using the Beauty Junkees Pro Highlighter brush from the kit and IT Cosmetics Bye Bye Pores HD Powder, I’m applying a light dusting of translucent setting powder under my eyes, along naso-labial folds, to center of chin and between eyebrows.
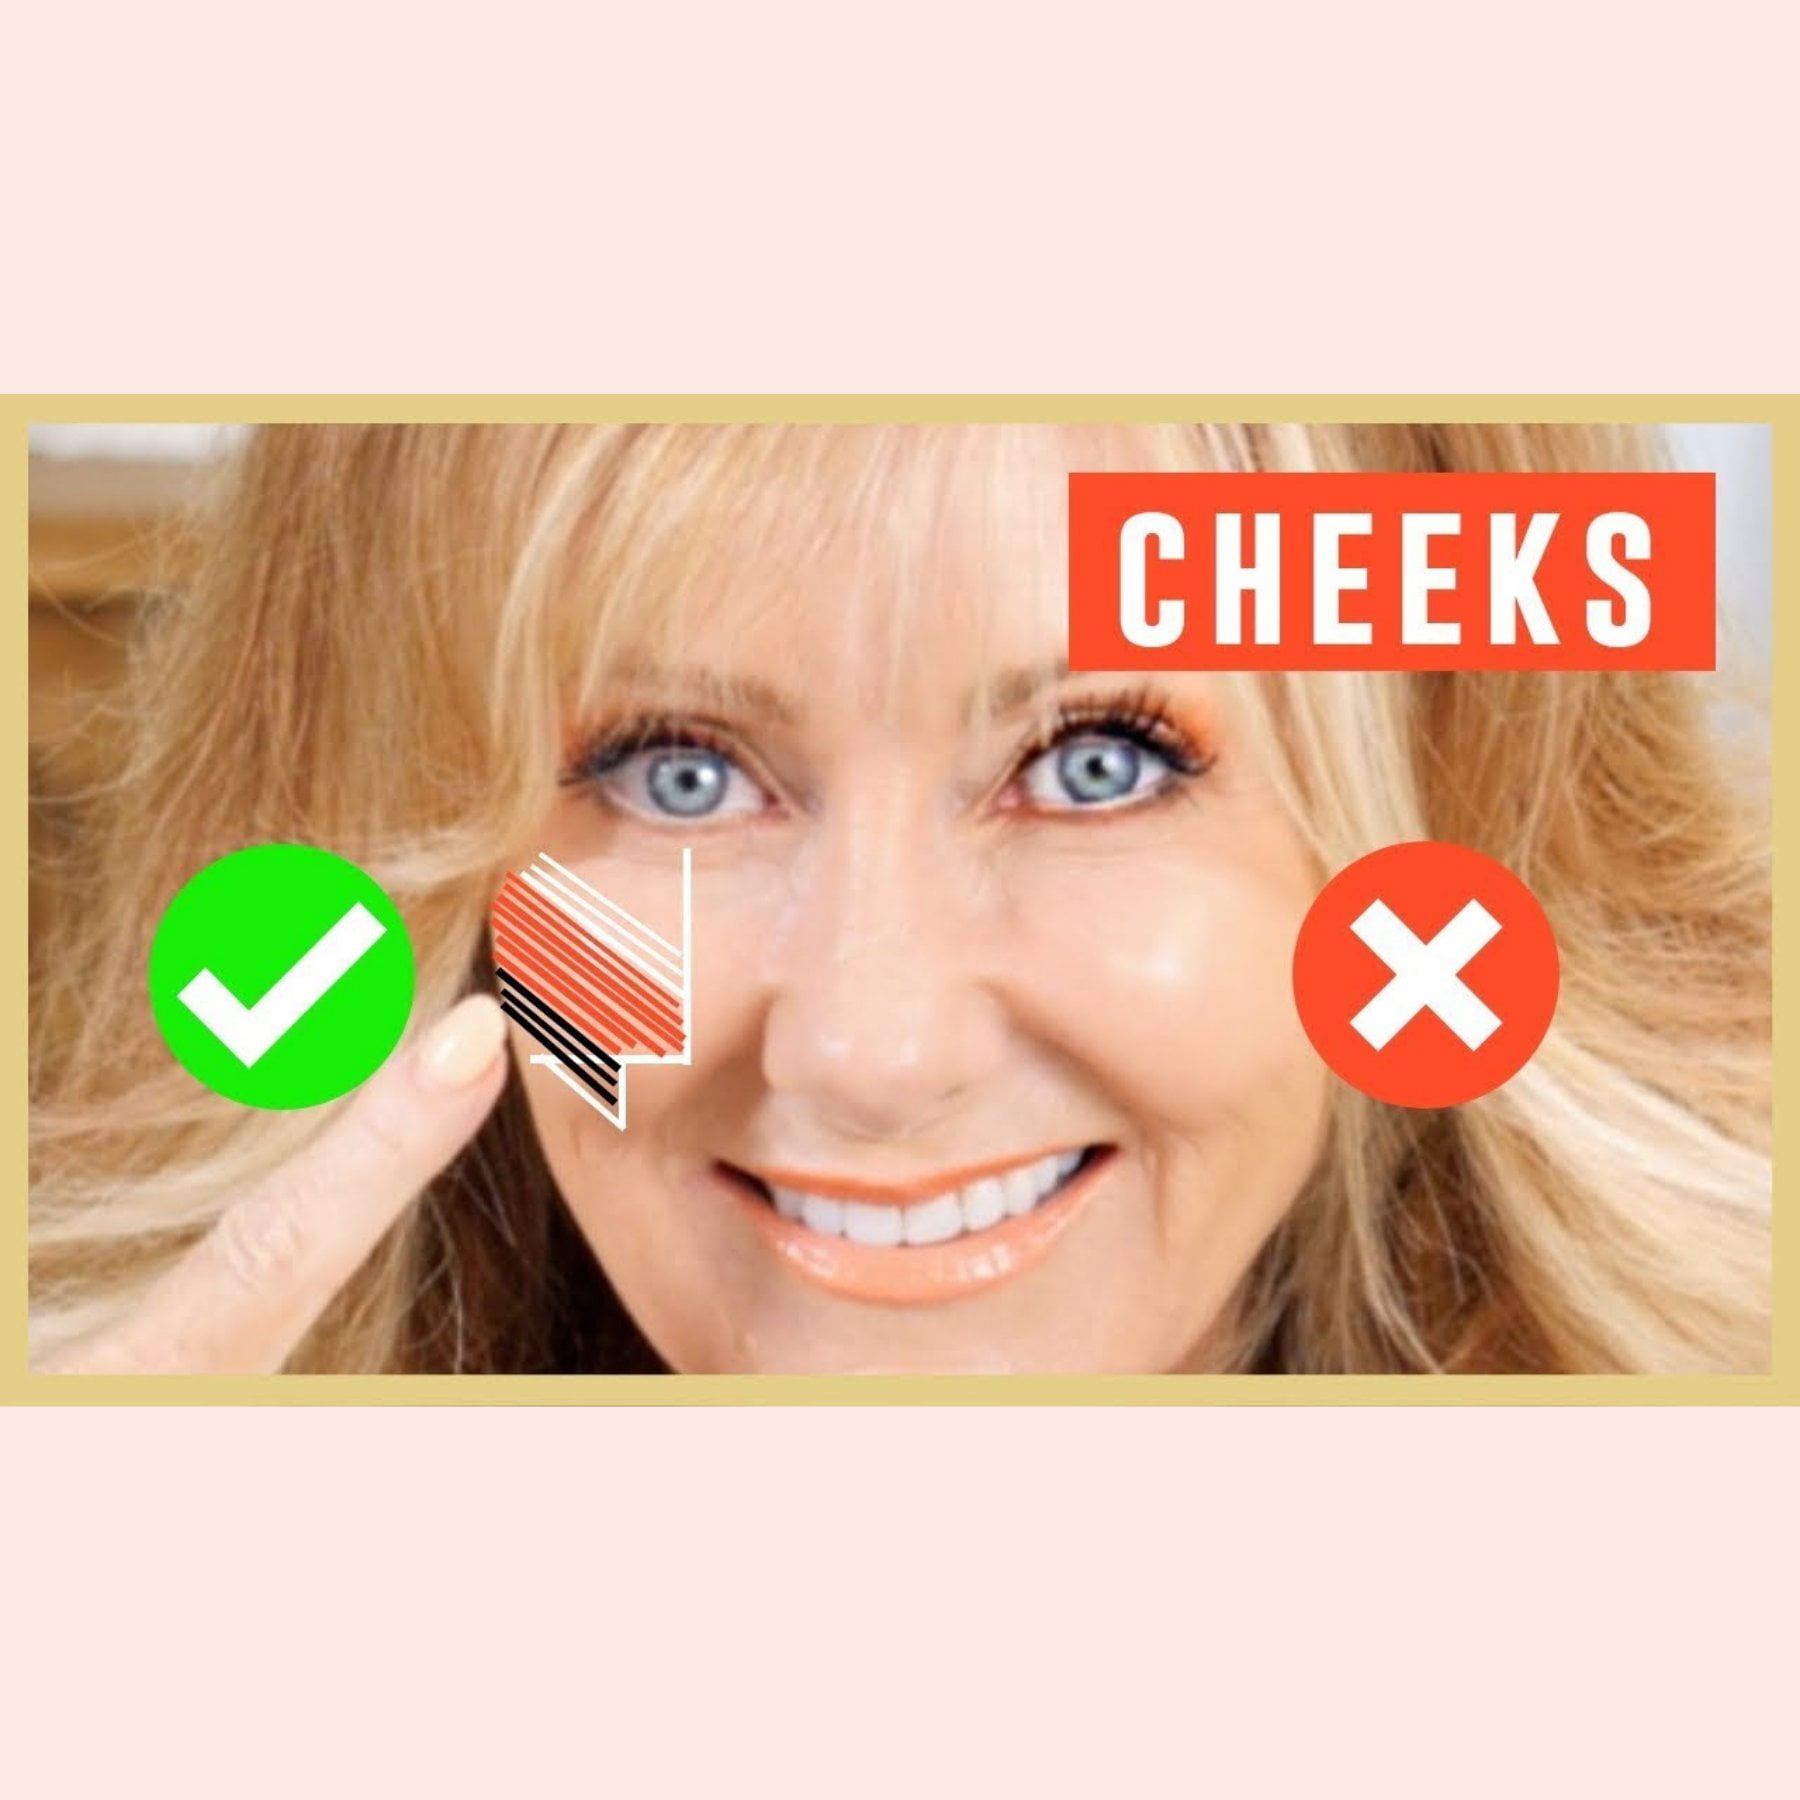
For blush today, I’m using NYX Baked Blush in Wanderlust and applying with my Crown Kabuki Fan Brush.
I start my blush high on the cheekbone back by the hairline and draw it forward to the center of my eye and then blend it down into my contour. The front of my cheek (the apple) can be a problem area. . . between the tear trough, naso-labial fold, and loss of cheek volume my “apple” is more of a “cumquat” that I don’t want to accentuate!
Adding powder illuminator will reflect light and optically “blur” wherever you put it so I like to add some right on those cheek “apples” to help them look fuller and continue it up along the tops of my cheekbones. You can also add some above each eyebrow, down the center of the nose, and in the cupids bow of the lips as well.
I’m using the Beauty Junkees Duo Fiber brush from the kit to apply Makeup Revolution Vivid Baked Highlighter in “Radiant Lights”
Optional last step is to darken the contours with powder by running over the contoured areas lightly with bronzer.
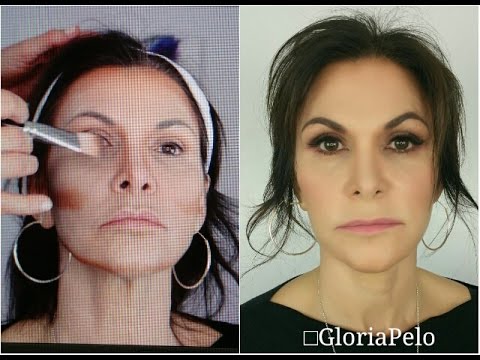
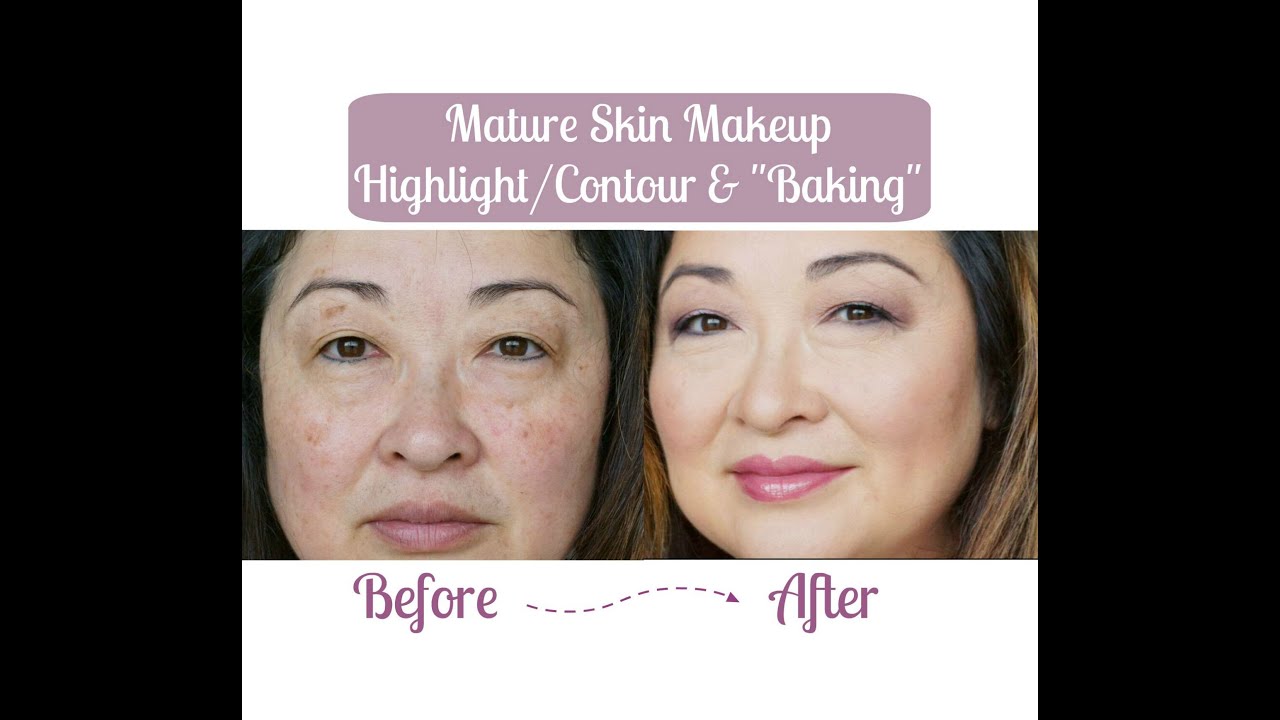
And the face is now finished! Check out the difference it made:
Links are affiliate links. If you click the link and buy something, I receive a commission for the sale. It doesn’t cost you anything extra and you are free to use the link or not as you choose. If you do use my links, I appreciate your support.
Did you like this article? Share it with your friends!
I suffer from allergies so the makeup looks great until I have to blow my nose or pat dry my eyes then all the hard work in these areas disappears. Any suggestions of how or what to use to help with the nose area.
Some foundations wear better on my nose than others. I recently found that Beauty Blender Bounce stays put on my nose all day and while I hate to recommend buying a separate foundation for your nose, you could give it a try… maybe get a sample first to test it out. You could also try a waterproof undereye concealer like Lancome Effecernes for your nose too.
I’m 54 never used makeup and really want too but even after watching tutorials I’m just no good and look terrible:-( anyone have any suggestions or tips?
Start with a tinted moisturizer and get comfortable with using that. Get an eyelash curler. It’s not adding make up to your face but it is something that can open up your eyes and take years off.
After you get comfortable with those two things, see if can find an eyebrow pencil and just fill in any bare spots in your eyebrows. Just a touch, you don’t have to change everything all at once.
Get one thing you like and learn how to use it well and then go to another thing. Make it fun and learn as you go.
Angie, does the NYX cream not settle in your pores and lines? I’m very interested in this if it doesn’t. I love NYX. I think they make great products for a drugstore brand.
The NYX cream actually wore pretty nicely… the white cream was pretty stiff to apply and more difficult to blend. I think it’s a good kit if you’re going to try contouring, but if you want to do it a lot, I’d splurge for the Anastasia cream kit… much easier to apply and blend. Also, start with a good primer to decrease any settling.
Thank you for this tutorial I have been working with IT Cosmetics My Sculpted Face Contour Kit and was interest in a cream application for this just turned 60 face of mine. I look forward to purchasing this weekend and play with these products. Currently, I use Tarte face primer have you tried these methods of application using this primer? Curious if you are receiving the same results.
Amazing! I was just looking at a contouring kit thinking I would have no idea how to fix this face of mine :). How do you make the makeup look so natural? No matter what I use, aside from Bare Minerals loose powder, I can see the makeup sitting on my face and or piles up in my pores. The problem with just using Bare Minerals powder alone is just not enough coverage for that complete photo finish. Any advise?
Hi Tina~ You might benefit from a primer. I used 2 for this tutorial… a mattifying pore minimizing primer for those pesky pores (Becca Ever-Matte Primer) on my cheeks, chin, & nose, and Laura Mercier Foundation Primer on the rest of my face. Also with mineral makeup if it looks powdery or cakey you can do a spritz of setting spray like e.l.f. Mist & Set, or simply lay a slightly damp washcloth over your face and gently press (don’t rub or pull) and remove. It’ll remove the powder from the fine hairs and help it look more natural. Hope that helps! xo ~angie
Thank you so much, Angie. I will try it out.
Wow, that’s a great tutorial, thank you! I think even I can follow this one. BTW, about how long did it take you from start to finish?
If I wasn’t talking through the whole thing, it would probably take about 10 minutes.
WOW! You’re good! Thanks again for a great tutorial!
Your email address will not be published. Required fields are marked *
Style, Beauty, and Health for Women in their Hot-Flash Years
You are here: Home › Make-Up Tutorials › How To Contour the Mature Face | Contouring & Highlighting Tutorial
Contouring is a huge trend this year and everyone seems to be doing it. It’s hard to miss the YouTube videos or Instagram pics of people with painted faces (like mine above). It’s a technique that has it’s roots in theatrical makeup but now with video tutorials and contouring kits everywhere I’ve been asked if mature people can do it and if so, how.
If you read my blog at all you know that I don’t like rules or limits on what older people can do so I say “Yes We Can”! We just need to do it a little differently to accommodate the differences in our skin and what needs help on our faces.
It basically works by creating areas of light and shadow that fool the eye. Adding light brings things forward while adding shadow (or darkness) pushes things back. In this tutorial I’ll use the cream contour method in which I’ll use cream products underneath my foundation for a subtle, natural look.
I’ll be using the NYX Cream Highlight & Contour Palette in Light. If you don’t have a contour palette you can use 3 shades of foundation to achieve the same effect. If you’re just starting out the NYX palette is an inexpensive way to experiment (but I do find the creams a little stiff and not as easily blended as I’d like). If you’re going to contour frequently, I’d choose the Anastasia Cream Contour & Highlight Palette instead.
I’ll also be using the new Beauty Junkees Pro Highlight & Contour Brush Set. It has everything I need to highlight & contour like a pro.
Here’s a step by step tutorial on how to contour & highlight the mature face:
I recommend using a primer and letting it set up for a few minutes before starting (this is a lot of work and you want it to last)! Also if you have under eye discoloration, go ahead and apply your usual under eye concealer now. Each face is different, but the basic shape to create is a highlighted heart shape from above the eyes to the point of the chin.
We’ll start with the highlighting so these steps will all use the pale (matte) shade on the right side of the palette and the Beauty Junkees Pro Detailer brush.
To diminish eye bags: Paint a line from the inner corner of the eye along the dark side of the tear trough stopping when you reach the cheek. It’s best to avoid putting heavy makeup directly below the eyes where we have fine lines because makeup settles into them and makes us look older.
To thin/straighten nose: Paint a line down the center of the nose and along the edge where the nose meets the cheek leaving a space in between.
To lift cheekbones: Paint an outer V from the top of cheekbone starting below the pupil out beyond the corner of the eyebrow and up into the temple. Again, it’s best to avoid putting heavy makeup directly on the crow’s feet where we have fine lines because heavier makeup can make them look larger. Adding highlight to the temples helps to reduce the sunken appearance that comes with age.
To diminish naso-labial folds: Paint along the deepest part of the fold following contour from nose to corner of mouth.
To reduce frown lines: Paint palest shade into deepest part of frown line from corner of mouth down to chin.
Additional highlights to create heart shape (wider around the eyes, narrower at chin): Chin, above eyebrows, center of forehead.
Next, we’ll darken areas to make them visually recede using the darkest shade in the palette and the same brush (wipe it on a tissue to remove excess highlight color).
To shorten/narrow a tall/wide forehead: Paint along hairline to shorten, paint from hairline to eyebrow highlight to narrow. Avoid putting dark contour color into the temple at the outer corner of the brow, most older people become sunken in the temples so we need to highlight the temples to give them volume (this is the opposite of how younger people do it).
To thin/straighten nose: Paint vertical lines on either side of white line keeping color on the top of the nose, not down the sides.
To lift cheekbones: Paint a line from top where ear meets hairline angled toward the corner of the mouth and stopping half way.
To lift jawline: Paint a line along the jawline from ear to ear. Where jaw is firm place line under jaw in shadow, where jaw is sagging place line higher up so the line remains straight and doesn’t follow the contour of the curve.
At this point it looks scary, but we’re going to blend it and cover it with foundation for a natural effect:
The Pro Sculpting brush from the kit is perfect for blending these cream pigments seamlessly.
I blend the paler highlighted areas first using small circular motions around the edges. Then I wipe off the brush and blend the darker contour areas being careful to leave some color showing. For those who want to carve out more of a rounded cheek, use this brush to pull some of the cheekbone contour forward and curve it up toward the nose but not bringing it all the way to the nostril.
I recommend using a lightweight sheer to medium coverage foundation and applying with a blending sponge to avoid disturbing or moving the highlights and contours. Today I’m using Chanel Perfection Lumiere Velvet and the blending sponge from the Beauty Junkees Kit.
The foundation covers just enough of the highlight and contour to look natural but it still shows through so the foundation doesn’t look flat and mask-like.
The last steps are to set with powder and make it pop with blush, bronzer and illuminator (the bronzer and illuminator are optional)!
Using the Beauty Junkees Pro Highlighter brush from the kit and IT Cosmetics Bye Bye Pores HD Powder, I’m applying a light dusting of translucent setting powder under my eyes, along naso-labial folds, to center of chin and between eyebrows.
For blush today, I’m using NYX Baked Blush in Wanderlust and applying with my Crown Kabuki Fan Brush.
I start my blush high on the cheekbone back by the hairline and draw it forward to the center of my eye and then blend it down into my contour. The front of my cheek (the apple) can be a problem area. . . between the tear trough, naso-labial fold, and loss of cheek volume my “apple” is more of a “cumquat” that I don’t want to accentuate!
Adding powder illuminator will reflect light and optically “blur” wherever you put it so I like to add some right on those cheek “apples” to help them look fuller and continue it up along the tops of my cheekbones. You can also add some above each eyebrow, down the center of the nose, and in the cupids bow of the lips as well.
I’m using the Beauty Junkees Duo Fiber brush from the kit to apply Makeup Revolution Vivid Baked Highlighter in “Radiant Lights”
Optional last step is to darken the contours with powder by running over the contoured areas lightly with bronzer.
And the face is now finished! Check out the difference it made:
Links are affiliate links. If you click the link and buy something, I receive a commission for the sale. It doesn’t cost you anything extra and you are free to use the link or not as you choose. If you do use my links, I appreciate your support.
Did you like this article? Share it with your friends!
I suffer from allergies so the makeup looks great until I have to blow my nose or pat dry my eyes then all the hard work in these areas disappears. Any suggestions of how or what to use to help with the nose area.
Some foundations wear better on my nose than others. I recently found that Beauty Blender Bounce stays put on my nose all day and while I hate to recommend buying a separate foundation for your nose, you could give it a try… maybe get a sample first to test it out. You could also try a waterproof undereye concealer like Lancome Effecernes for your nose too.
I’m 54 never used makeup and really want too but even after watching tutorials I’m just no good and look terrible:-( anyone have any suggestions or tips?
Start with a tinted moisturizer and get comfortable with using that. Get an eyelash curler. It’s not adding make up to your face but it is something that can open up your eyes and take years off.
After you get comfortable with those two things, see if can find an eyeb
German Bbw Big Tits
Porno Model Xxx
Boy Sucking Pussy
Ferro Network Mom Anal
Pure Teen Xxx
How To Contour the Mature Face | Contouring & Highlighting ...
199 Contour Mature Woman Photos - Free & Royalty-Free ...
Makeup After 50: How to Contour for a More ... - Prime …
SHOULD WOMEN IN THEIR 60'S CONTOUR??? SEINT BEAUTY …
Contouring for the Mature Woman!!! WARNING – I have n…
Contouring Mature Woman


/lip-56a088d05f9b58eba4b155d9.jpg)