Consul-Terraform-Sync: How to Build Your Own Module - HashiCorp Solutions Engineering Blog - Medium
HashiCorp Solutions Engineering Blog - MediumI have written over a dozen posts on Terraform in the past few years and I always find it interesting to hear more use cases for it. A new one I discovered since I joined HashiCorp is a really nice integration with another HashiCorp tool (Consul): Consul-Terraform-Sync (CTS). In this article I’ll explain why it’s so useful and show you how to build, run, and test a custom CTS module that works with Fortinet middleware (but this method could be used to build integrations for most networking middleware solutions).
Consul + Terraform: Modernized Network Automation
What’s cool about CTS is that it complements Terraform really well, filling in gaps in its networking automation story. You see, while Terraform gives you lots of benefits, there’s actually often a fair bit of human interactions required. The most common examples are around networking and security.
Take a firewall rule. It’s got source IPs, destination IPs, and ports. Adding or removing IPs to a security rule should be something that takes minutes, not days. While Terraform by itself will push a config in seconds, you usually need somebody to create the Terraform configuration, somebody to approve that change, and somebody to run Terraform.
Imagine you have a load-balancer pool. If an app developer needs to scale and add more servers to a pool, they shouldn’t have to go through multiple hoops and tickets to get that changethrough.
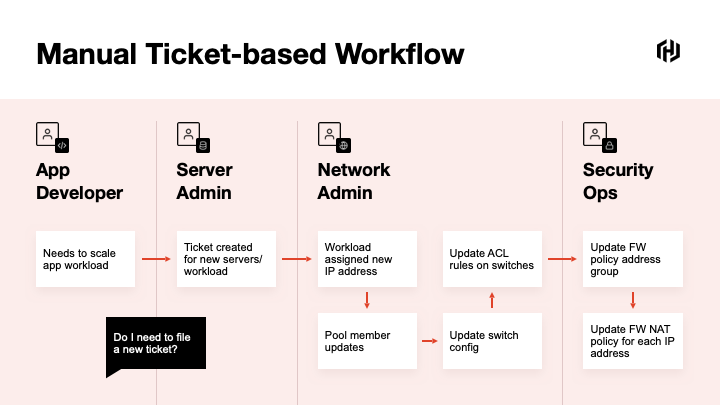
When I was a network engineer—and admittedly, things have changed since it was strictly my role—we would get a spreadsheet from an application team about the app flows and ports that we would need to open up on a firewall. Essentially, the service was registered in an Excel file and we had to manually provision this change on the network devices—after going through the standard painful change management process.
When the app needed updating or scaling up, we would get another request by email (note that the original Excel file would never be updated) and we would have to manually add servers to the server pool or to the firewallrules.
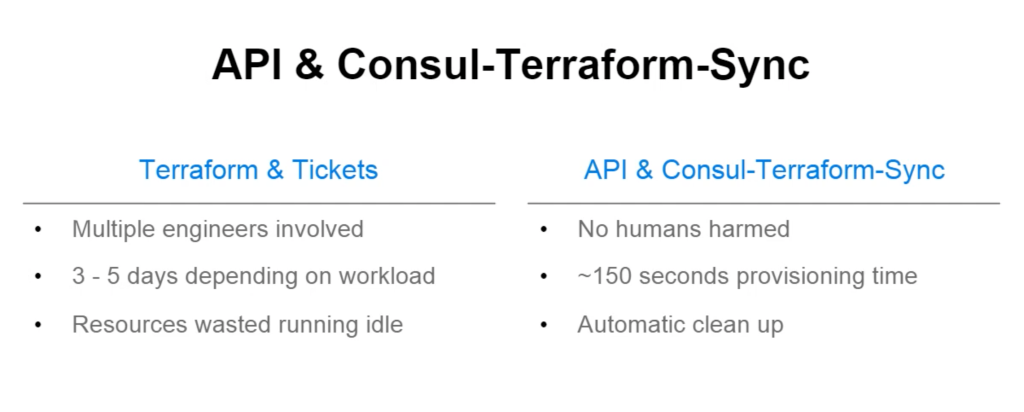
The premise of Consul-Terraform-Sync is that, once users register their services in a service register (Consul), CTS will listen for service changes and when one occurs, it will automatically trigger the execution of Terraform to deploy these services. Every time the services are updated in the register, it will automatically sync the changes on the firewalls or load balancers. No need for humans to get involved in theprocess.
How Does itWork?
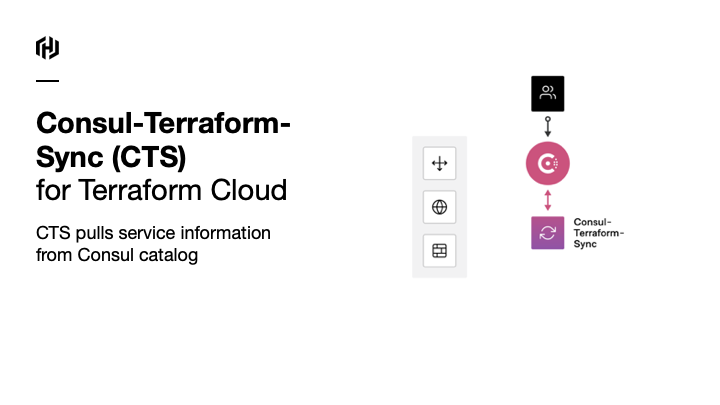
CTS is a lightweight application that watches for changes in Consul. In the CTS config, you need to tell CTS which Consul server tomonitor.

CTS looks out for changes to services and pulls information from the Consulcatalog…
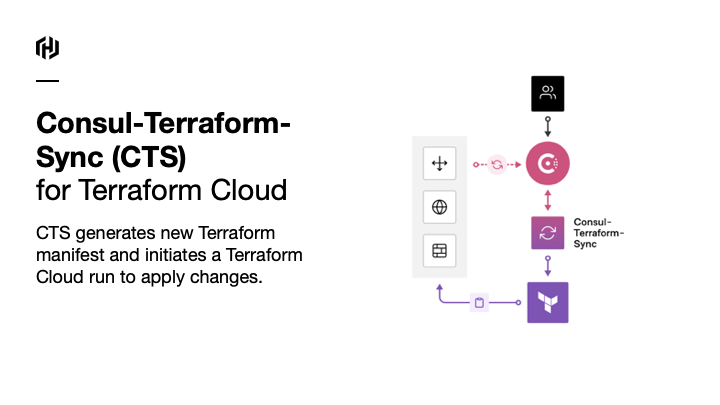
…and based on this info, CTS will generate a new Terraform configuration and apply it to the network devices it needs to configure.
As Workday explained in their use case of CTS, there was no human harmed in theprocess.
Workday’s discussion around their use case is in thisvideo.
Which Network Vendors are Supported?
Well, in principle, this could work with anything that has a Terraform provider. That’s the only requirement. Now, to make this work, we need a module to extract the information from the Consul Service and provide the relevant details (IP addresses, service names, port details, etc…) as inputs and variables to build up the Terraform files.
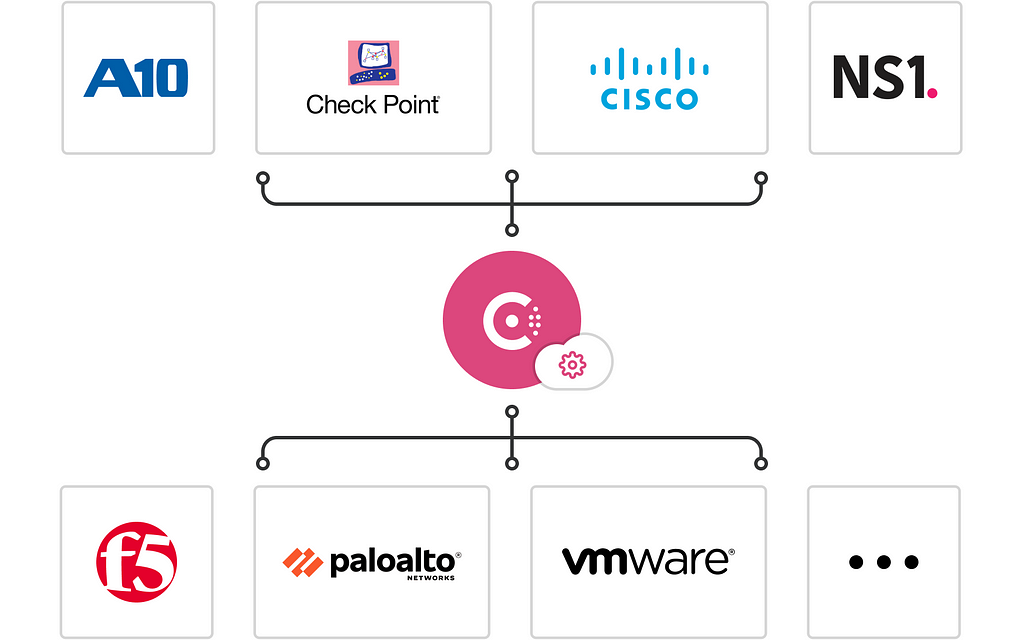
You might notice that Fortinet is not on the list—that’s OK. What we’ll do in the remainder of this post is write a module that supportsit!
Building, Running, and Testing a CTSModule
Now that we’ve established the concept and the use case of Consul-Terraform-Sync, let’s work out how to actually build amodule.
If you check out the Terraform Registry and search for NIA, you will see all the modules that have been built for this Network-Infrastructure-Automation framework and the supported vendors.
What the modules do is essentially take the values from the services created in Consul and map them to Terraform Configuration. The CTS daemon will execute Terraform and create the network and security configurations accordingly.
All modules follow a similar logic but are different enough that it warrants an explanation on how they work and how to build a new one. The module to build an AWS ELB Pool will differ from a module to build a securityrule.
One of my customers wanted to update objects in his Fortinet firewall ruleset. As there was no CTS Fortinet module available yet, I took a shot at building a simpleone.
The good thing is that the docs are pretty good and there’s a template repo for you to use. This tutorial on learn.hashicorp.com is also a great startingpoint.
Anatomy of a CTSModule
What we want CTS to do is automatically go and create a network entity from a service configured inConsul.
As you can see in the sample repo, the only files you need (outside of the module documentation) are twofiles.
First, you will find a standard Terraform file called variables.tf with the following field:
variable "services" {
  description = "Consul services monitored by Consul-Terraform-Sync"
  type = map(
    object({
      id        = string
      name      = string
      kind      = string
      address   = string
      port      = number
      meta      = map(string)
      tags      = list(string)
      namespace = string
      status    = string
      node                  = string
      node_id               = string
      node_address          = string
      node_datacenter       = string
      node_tagged_addresses = map(string)
      node_meta             = map(string)
cts_user_defined_meta = map(string)
})
)
}
This is used to essentially pull out the service data created in Consul. This might look confusing at first but this file simply describes what a service defined in Consul might looklike.
The type = map ( object ({} )field is just another way of saying that a service is a collection of key/value pairs (with the value can be of any type—more often than not, a string or a map(string)—another collection of k/v pairs with v being astring).
Look at what a very simple service might look likethis.
{
  "service": {
    "name": "fortinet-service",
    "id": "fortinet-service-s1",
    "address": "32.32.0.0",
    "meta": {
      "subnet_mask" : "255.255.0.0"
    }
  }
}
The other file we will need for the CTS module is a template— like the main.tf below—that CTS will use to generate the Terraform configuration.
Remember that our use case is to speed up the creation of security rules on your edge firewall. We want to update the source IPs or the destination IPs in the rule automatically.
In essence, your Consul service represents the IP address or range of an application that needs access to another service orsite.
CTS will automatically update the security rule based on the IP address/prefix defined in theservice.
On a Fortinet appliance, the source is either an “address” or an “address group” (unsurprisingly, a group of addresses).
terraform {
  required_providers {
    # Provider source is used for Terraform discovery and installation of
    # providers. Declare source for all providers required by the module.
    fortios = {
      source  = "fortinetdev/fortios"
    }
  }
}
resource "fortios_firewall_address" "consul_service" {
for_each = var.services
name = each.value.id
subnet = "${each.value.address} ${lookup(each.value.meta, "subnet_mask", "255.255.255.255")}"
type = "ipmask"
visibility = "enable"
}
resource "fortios_firewall_addrgrp" "ctsAddrGroup" {
allow_routing = "disable"
color = 0
exclude = "disable"
name = "groupCts"
visibility = "enable"
dynamic "member" {
for_each = fortios_firewall_address.consul_service
content {
name = member.value["name"]
}
}
}Let’s drill down into thiscode.
resource "fortios_firewall_address" "consul_service" {
  for_each = var.services
  name = each.value.id
  subnet     = "${each.value.address} ${lookup(each.value.meta, "subnet_mask", "255.255.255.255")}"
  type       = "ipmask"
  visibility = "enable"
}This above will look at all the services created (for_each will iterate through all the services) and will create a "fortios_firewall_address" (Fortinet IP address object), based on the name and the IP address defined inConsul.
We need to include the subnet mask when we create an address object in Fortinet. It’s not a field present in a Consul Service definition (unlike the address one) so we need to provide a way for the user to optionally provide this information.
The lookup is therefore here to check whether the service was created with a meta object with a subnet mask. If the subnet mask was not provided, we will just use create a host object(/32).
Once we have created these address objects, we will add them to an address group as members. Because it’s a nested module, we need to use the dynamic function (I covered this in a previous blogpost).
resource "fortios_firewall_addrgrp" "ctsAddrGroup" {
  allow_routing = "disable"
  color         = 0
  exclude       = "disable"
  name          = "groupCts"
  visibility    = "enable"
  dynamic "member" {
    for_each = fortios_firewall_address.consul_service
    content {
      name = member.value["name"]
    }
  }}
In summary, these two files are all you actually need. main.tf provides the template and variables.tf provides the input data for the Terraform files automatically generated and executed byCTS.
Let’s go and run themodule.
CTS Configuration
CTS is a light-weight application that will monitor Consul for any changes to the service (which is why CTS is often referred to as a “daemon”). To start up CTS, you need to give it a HCL-based configuration and run thecommand:
consul-terraform-sync -config-file cts-config.hcl
Let’s have a look at the cts-config.hcl file:
consul {
  address = "localhost:8500"
}
driver "terraform" {
# version = "0.14.0"
# path = ""
log = false
persist_log = false
working_dir = ""
backend "consul" {
gzip = true
} required_providers {
fortios = {
source = "fortinetdev/fortios"
}
}
}terraform_provider "fortios" {
hostname = ""
insecure = ""
token = ""
}
task {
name = "fortinet"
description = "fortinet"
providers = ["fortios"]
source = "nvibert/module-nia/fortios"
# version = "1.2.0"
services = ["fortinet-service"]
#variable_files = ["../"]
}Let’s go through these one by one but the doc is excellent if you want all thedetails.
This config line specifies the Consul settings. I use Consul locally but you will probably run hosted Consul or an enterprise version so you will need to specify TLS settings, username/password etc…
consul {
address = "localhost:8500"
}Next, you might want to specify the version of Terraform you want to run. I just use the default settingshere.
driver "terraform" {
  # version = "0.14.0"
  # path = ""
  log = false
  persist_log = false
  working_dir = ""
}You also have to specify the backend configuration settings for Terraform. The Terraform state could be saved locally, in the Cloud (S3, Google Storage, Terraform Cloud) or…. in Consul (yeah, that’s a bit confusing as Consul in this context is not only used for Service Discovery but for Key/Value Store).
  backend "consul" {
    gzip = true
}Then, you need the provider configuration—where to find it, which version and the essential variables, like the IP address of your Firewall and its username/password. Follow this if you want moredetails.
required_providers {
    fortios = {
      source = "fortinetdev/fortios"
      #version = "3.33.0"
    }
  }
}
terraform_provider "fortios" {
}Finally, you have to specify thetask:
task {
 name        = "fortinet-test"
 description = "fortinet"
 providers   = ["fortios"]
 source      = "nvibert/module-nia/fortios"
 # version     = "0.1.0"
 services    = ["fortinet-service"]
 #variable_files = ["../"]
}
The configuration details are here but essentially, we tell CTS which module to use and to only apply the configuration task for services with an ID “fortinet-service”.
And that’s it. I am now ready to runCTS:
% consul-terraform-sync -config-file cts-config.hcl
Once I create the service—the one I had described earlier, with the id “fortinet-service” and the address “32.32.0.0”—the CTS daemon notices the new service being created and executes the task accordingly:
2021/09/30 16:16:38.197071 [INFO] (ctrl) executing task fortinet-test
2021/09/30 16:16:39.774441 [INFO] (ctrl) task completed fortinet-test
CTS creates a set of TFfiles:
% tree
.
├── main.tf
├── providers.tfvars
├── terraform.tfvars
├── terraform.tfvars.tmpl
└── variables.tf
The files are automatically populated by the data explicitly or implicitly set up in the CTS config file and by the services definition in Consul. For example, terraform.tfvars will look likethis:
services = {
  "fortinet-service-s1.nicovibert-C02G964YMD6R.dc1" = {
    id      = "fortinet-service-s1"
    name    = "fortinet-service"
    kind    = ""
    address = "32.32.0.0"
    port    = 0
    meta = {
      subnet_mask = "255.255.0.0"
    }
    tags            = []
    namespace       = ""
    status          = "passing"
    node            = "nicovibert-C02G964YMD6R"
    node_id         = "ca7b147a-08b0-e319-b04c-44e5b9a5ed22"
    node_address    = "127.0.0.1"
    node_datacenter = "dc1"
    node_tagged_addresses = {
      lan      = "127.0.0.1"
      lan_ipv4 = "127.0.0.1"
      wan      = "127.0.0.1"
      wan_ipv4 = "127.0.0.1"
    }
    node_meta = {
      consul-network-segment = ""
    }
    cts_user_defined_meta = {}
  },
  "fortinet-service-s2.nicovibert-C02G964YMD6R.dc1" = {
    id      = "fortinet-service-s2"
    name    = "fortinet-service"
    kind    = ""
    address = "34.34.0.0"
    port    = 0
    meta = {
      subnet_mask = "255.255.255.0"
    }
    tags            = []
    namespace       = ""
    status          = "passing"
    node            = "nicovibert-C02G964YMD6R"
    node_id         = "ca7b147a-08b0-e319-b04c-44e5b9a5ed22"
    node_address    = "127.0.0.1"
    node_datacenter = "dc1"
    node_tagged_addresses = {
      lan      = "127.0.0.1"
      lan_ipv4 = "127.0.0.1"
      wan      = "127.0.0.1"
      wan_ipv4 = "127.0.0.1"
    }
    node_meta = {
      consul-network-segment = ""
    }
    cts_user_defined_meta = {}
  },
}
I ran Consul locally on my Mac so my Consul node is my Mac user name and the other values like the datacenter are the defaultones.
And my main.tf configuration is exactly what I want it tobe:
terraform {
  required_version = ">= 0.13.0, < 1.1.0"
  required_providers {
    fortios = {
      source = "fortinetdev/fortios"
    }
  }
  backend "consul" {
    address = "localhost:8500"
    gzip    = true
    path    = "consul-terraform-sync/terraform"
  }
}
provider "fortios" {
hostname = var.fortios.hostname
insecure = var.fortios.insecure
token = var.fortios.token
}# fortinet
module "fortinet-test" {
source = "nvibert/module-nia/fortios"
services = var.services
}
Testing theModule
Unsurprisingly, I had to do a fair bit of trial-and-error to get the syntax of the moduleright.
While testing and building the module, you will probably doing it locally (before the module is actually published on the Terraform Registry). In that case, the source in your task in your cts-config.hcl config will point to a local directory and might look likethis:
task {
 name        = "fortinet-test"
 description = "fortinet"
 providers   = ["fortios"]
 source      = "../test-module-nia"
 services    = ["fortinet-service"]
}
When building the module, I recommend you build it without CTS pulling the data from Consul—fewer things to troubleshoot—so we recommend you input mock variables.
For me, it meant my mock variables.tf file looked likethis:
services = {
  "fortinet-service.nicovibert-C02G964YMD6R.dc1" = {
    id      = "fortinet-service"
    name    = "fortinet-service"
    kind    = ""
    address = "32.32.0.0"
    port    = 0
    meta = {
      subnet_mask = "255.255.0.0"
    }
    tags            = []
    namespace       = ""
    status          = "passing"
    node            = "nicovibert-C02G964YMD6R"
    node_id         = "ca7b147a-08b0-e319-b04c-44e5b9a5ed22"
    node_address    = "127.0.0.1"
    node_datacenter = "dc1"
    node_tagged_addresses = {
      lan      = "127.0.0.1"
      lan_ipv4 = "127.0.0.1"
      wan      = "127.0.0.1"
      wan_ipv4 = "127.0.0.1"
    }
    node_meta = {
      consul-network-segment = ""
    }
    cts_user_defined_meta = {}
  }
}
Once you have created the modules, you can use it locally, publish it privately, or publish on the official registry. Publishing a module on the Terraform Registry is really straight-forward. You just need to make sure the repo follows the right naming convention, has a tag, a release, and a READ.ME. Mine ishere.
Enough of the code—let’s have a look at the UIs foronce:
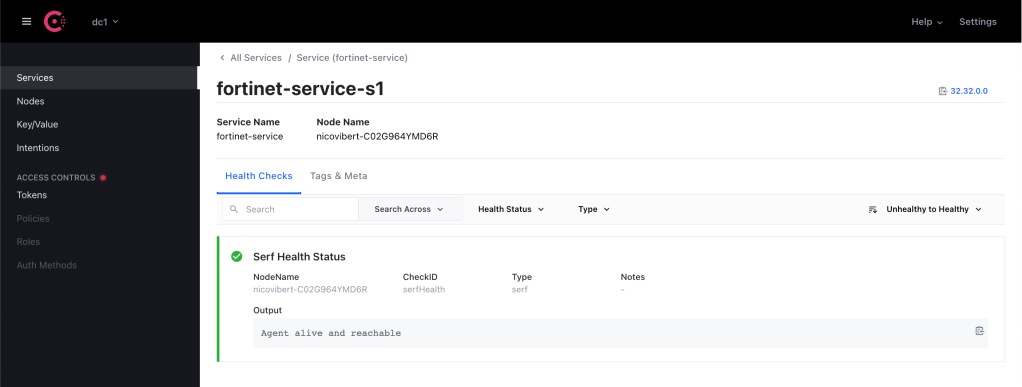
Once I create a service (which could just be by saving the service definition in a JSON file in the Consul configuration directory (consul.d)) and reloading Consul), the following service will showup.
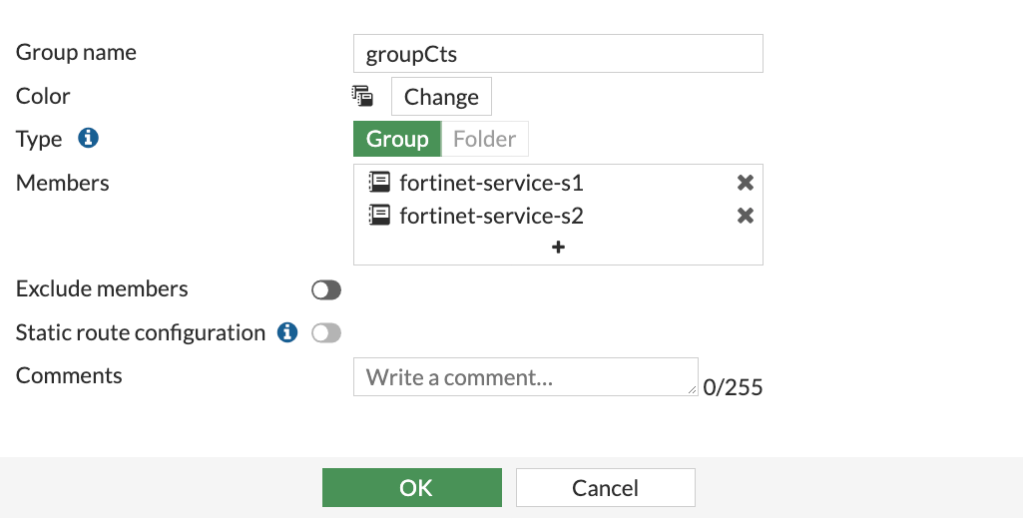
In a couple of seconds, my object appears on Fortinet:
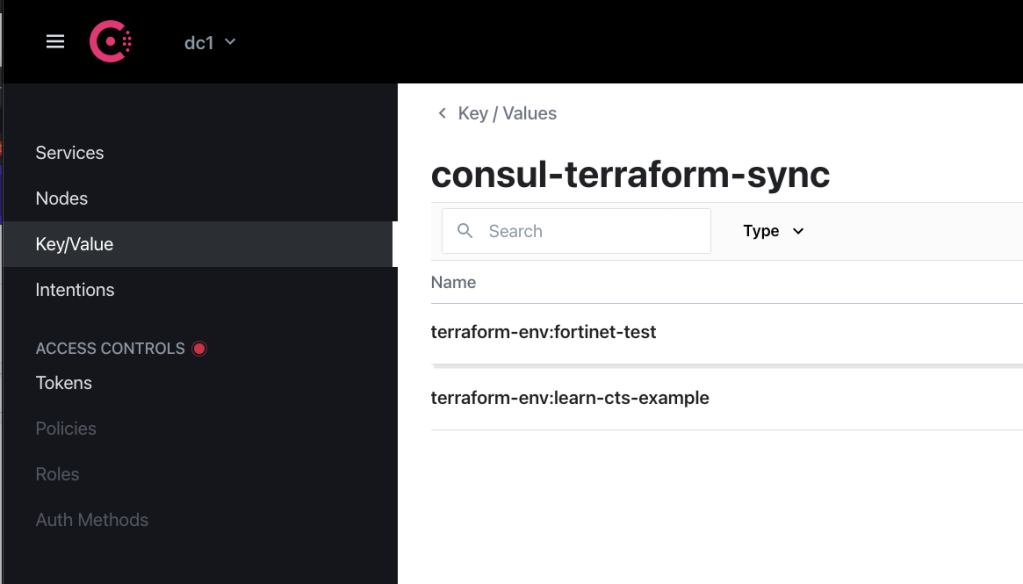
And the Terraform state is stored in the Key-Value store ofConsul.
And that’s it! My network config has been updated without me having to raise a ticket. My services are registered on a service register and not on a spreadsheet that nobody will ever locate or update. And Terraform was executed without my awareness.
Consul-Terraform-Sync: How to Build Your Own Module was originally published in HashiCorp Solutions Engineering Blog on Medium, where people are continuing the conversation by highlighting and responding to this story.
本文章由 flowerss 抓取自RSS,版权归源站点所有。
查看原文:Consul-Terraform-Sync: How to Build Your Own Module - HashiCorp Solutions Engineering Blog - Medium